The Ultimate Guide to Creating a Website That Works Wonders
In today’s digital world, having a website is essential for any business or individual who wants to make a mark online. But creating a website that truly stands out and achieves your goals is no easy feat.
At Super Effective Websites, we’re recognized as the top choice for Anaheim website design, especially in the North Shore area. With our expertise and unwavering commitment to delivering outstanding results, we empower businesses to elevate their online presence.
Crafting a Website Masterpiece
Creating a website involves a meticulous process that encompasses planning, design, development, and launch.
Planning: Laying the Foundation
The first step is to determine your website’s purpose and goals. What do you want it to achieve? Inform, educate, generate leads, or drive sales? Defining your objectives will guide the entire development process.
Design: Visual Appeal and User Engagement
The design of your website plays a crucial role in capturing visitors’ attention and enhancing their overall experience. It includes choosing a visually appealing design, optimizing the user interface (UI) for intuitive navigation, and ensuring a consistent look and feel throughout the site.
Development: Bringing Your Vision to Life
Once the design is in place, it’s time to bring your website to life through coding. This involves translating the design elements into functional code that seamlessly integrates with your desired features and functionalities.
Launch: Unveiling Your Web Presence
Finally, it’s time to unveil your masterpiece to the world. With a thorough testing and quality assurance process, we ensure that your website launches flawlessly and performs optimally across various devices and browsers.
Embracing the Future of Web Design
The world of web design is constantly evolving, with new trends emerging to enhance website experiences. Here’s a glimpse into the current and future trends:
Responsive Design: Adapting to All Screens
Responsive design ensures that your website seamlessly adapts to different screen sizes and orientations, providing an optimal experience on desktops, laptops, tablets, and smartphones.
Mobile-First Development: Prioritizing the Mobile Experience
With the majority of internet traffic coming from mobile devices, a mobile-first approach prioritizes designing and developing your website for mobile users, ensuring a seamless and immersive experience on smaller screens.
AI Integration: Unleashing Technology’s Potential
Artificial intelligence (AI) is rapidly transforming website design, automating tasks, providing personalized experiences, and enhancing user engagement through chatbots and other AI-powered features.
Voice Search Optimization: Catering to a New Way of Searching
Optimizing your website for voice search ensures that it appears in search results triggered by spoken queries, a growing trend made possible by the widespread use of virtual assistants like Siri and Alexa.
Marketing Your Website for Maximum Impact
Once your website is up and running, marketing it effectively is crucial for attracting visitors and achieving your goals. Here are some proven online marketing tactics:
Content Marketing: Providing Value and Building Trust
Create and share valuable content that resonates with your target audience. This could include blog posts, articles, videos, and infographics that educate, entertain, or inspire.
Social Media Marketing: Tapping into Social Networks
Leverage social media platforms to connect with your audience, build relationships, and promote your website. Engage in conversations, share relevant content, and run targeted ads to reach your ideal customers.
Email Marketing: Nurturing Relationships and Driving Sales
Email marketing allows you to build a loyal subscriber base and nurture relationships. Send out regular newsletters, offer exclusive content, and promote special offers to drive traffic to your website.
PPC advertising enables you to display your website at the top of search results or on other websites for a fee. It’s an effective way to quickly increase traffic and generate leads.
Enhancing Your Website’s Local Reach
For local businesses, optimizing your website for local search is essential for attracting nearby customers. Here are some key tactics:
Google My Business: Claiming Your Local Identity
Create and verify your Google My Business listing to make your business more visible in local search results and on Google Maps. Optimize your listing with accurate information and eye-catching photos.
Local Citations: Building Your Local Presence
Acquire citations (mentions of your business name, address, and phone number) from local directories and websites to improve your local SEO. The consistency of your NAP (name, address, phone number) across citations is crucial.
Customer Reviews: Leveraging Social Proof
Encourage satisfied customers to leave positive reviews on Google My Business and other reputable review platforms. Positive reviews build credibility, trust, and boost your local SEO ranking.
Hosting Your Website: Choosing the Right Home
The type of hosting you choose impacts your website’s performance, reliability, and security. Here’s a brief overview of different hosting options:
Shared Hosting: Affordable and Basic
Shared hosting is a cost-effective option where your website shares resources with other websites on a single server. It’s suitable for websites with low traffic and basic requirements.
VPS Hosting: More Control and Flexibility
Virtual Private Server (VPS) hosting provides dedicated resources on a shared server, giving you more control over your website’s environment and performance. It’s a good option for websites with moderate traffic and growing needs.
Dedicated Hosting: Exclusive Resources and Power
Dedicated hosting offers exclusive access to a physical server, providing maximum control, performance, and security. It’s ideal for high-traffic websites, e-commerce stores, and applications with demanding resource requirements.
Cloud Hosting: Scalability and Flexibility
Cloud hosting uses multiple servers in a cloud environment, allowing you to scale your resources up or down as needed. It provides flexibility, high availability, and disaster recovery capabilities for websites of all sizes.
Safeguarding Your Website: A Cyber Security Guide
Protecting your website from cyber threats is essential for maintaining its integrity and reputation. Here are some best practices for website cybersecurity:
SSL Certificate: Ensuring Secure Data Transmission
Install an SSL certificate to encrypt data transmitted between your website and visitors’ browsers, protecting sensitive information like credit card numbers and personal data.
Firewall: Blocking Unauthorized Access
Implement a firewall to monitor incoming traffic and block malicious attempts to access your website. It can also prevent DDoS attacks and other security breaches.
Regular Updates: Patching Vulnerabilities
Regularly update your website’s software, plugins, and operating system to patch security vulnerabilities that could be exploited by attackers.
Backups: Protecting Against Data Loss
Create regular backups of your website’s files and database to protect against data loss due to hardware failure, hacking, or human error.
Harnessing WordPress: A Powerful Web Builder
WordPress is a popular content management system (CMS) used by millions of websites around the world. Its ease of use, flexibility, and extensive plugin ecosystem make it an ideal choice for both beginners and experienced webmasters.
Key Features and Benefits of WordPress:
User-Friendly Interface: WordPress has a user-friendly interface that makes it easy to create and manage content without any coding experience.
Customization: With thousands of free and premium themes and plugins available, you can customize your WordPress website to match your specific needs and brand.
Search Engine Optimization (SEO) Friendly: WordPress is out-of-the-box SEO-friendly, making it easier to improve your website’s ranking in search results.
E-commerce Functionality: Plugins like WooCommerce allow you to easily transform your WordPress website into an e-commerce store.
Community Support: WordPress has a vast and active community of users, developers, and support forums to help you with any issues you may encounter.
Crafting Highly Effective Websites: A Comprehensive Guide
Creating a website that truly meets your business goals requires a focus on best practices and continuous improvement. Here are some key principles to follow:
Optimize for Search Engines (SEO):
Keyword Research: Identify relevant keywords that your target audience searches for and incorporate them naturally throughout your website’s content.
Content Quality: Create high-quality, informative, and engaging content that provides value to your visitors.
Backlinks: Build high-quality backlinks from reputable websites to improve your website’s authority and ranking.
Ensure Fast Loading Speed:
Image Optimization: Compress and optimize images to reduce their file size without compromising quality.
Code Optimization: Minimize CSS and JavaScript code by removing unnecessary characters and white space.
Caching: Enable browser caching to store frequently requested resources on visitors’ computers, improving subsequent load times.
Enhance Accessibility:
Screen Reader Optimization: Ensure your website is accessible to users with disabilities by using proper heading tags, ARIA attributes, and alt text for images.
Contrast and Color Accessibility: Choose contrasting colors and fonts to ensure that your website is easy to read for individuals with color blindness or low vision.
Keyboard Navigation: Make sure your website can be fully navigated using only a keyboard, catering to users with limited mouse functionality.
Embark on Your Web Development Journey with Super Effective Websites
At Super Effective Websites, we’re passionate about helping businesses succeed online. Our team of expert web designers, developers, and marketers is committed to delivering exceptional results.
Whether you need a brand-new website, a redesign, or ongoing maintenance and support, we’re here to make your online presence shine. Our services include:
Custom Web Design: We create unique and visually stunning websites tailored to your specific business needs and goals.
Responsive Web Development: Our websites seamlessly adapt to all devices, ensuring a consistent and engaging experience for all users.
Online Marketing Campaigns: We develop and execute tailored online marketing strategies to drive traffic, generate leads, and increase sales.
Website Hosting and Maintenance: We provide reliable
Il Divi 5 Public Alpha è disponibile per provarlo. Se utilizzi Divi 5, riceverai una notifica di aggiornamento per Modello Alpha pubblico 7 in questi giorni. Liberiamo le nuove versioni di Divi 5 ogni due settimane e aumenterà ogni volta! Se non hai ancora provato Divi 5, dai un’occhiata e dicci cosa ne pensi.
Cosa c’è di nuovo in Public Alpha 7?
Questo nuovo modello di Divi 5 contiene 38 correzioni di virus informatici e crescita critica su 4 opzioni imminenti. Copriamo queste opzioni nella parte posteriore dei flag di funzione finché non le terminiamo, spesso unendo parti ed elementi pesantemente testati nel prodotto principale. Con ogni sostituzione, otteniamo una crescita tangibile in opposizione alla liberazione di ogni nuova funzione.
Abbiamo completato la riscrittura delle basi di Divi. Ci sono stati dati gli insetti qui sotto da tenere d’occhio. Da qui in avanti, le opzioni saranno al massimo!
Correzioni e miglioramenti straordinari del programma dannoso
Alcune delle 38 correzioni e miglioramenti dei virus informatici integrati in questo sblocco, elencati di seguito, sono un paio di elementi salienti:
Nuovo pulsante Esci e scorciatoie
È uno sviluppo facile della qualità della vita. Il pulsante di uscita all’interno di Visible Builder ora ha un menu a discesa che ti consente di scegliere tra molti problemi di uscita. Tornerai all’editor di pubblicazione di wordpress, visualizzerai la pagina all’ingresso o tornerai alla dashboard di wordpress. Potrai accedere a uno qualsiasi di questi spazi tramite le scorciatoie da tastiera classificate nel menu.
Miglioramenti dell’efficienza
Questo modello migliora notevolmente l’efficienza quando si utilizza Divi con WooCommerce. Una volta installato WooCommerce, ti renderai conto che il caricamento di Visible Builder è molto più rapido rispetto a prima. Anche le istanze di caricamento di Visible Builder di base sono state migliorate, riducendo di 200-300 ms le istanze di caricamento moderate. Non si scherza più parlando di efficienza! Continueremo a realizzare Divi prima.
Sviluppo delle funzioni
4 gruppi sono in esecuzione su 4 opzioni: punti di interruzione personalizzabili, preimpostazioni di scelta della forza lavoro, integrazione Divi AI e moduli WooCommerce. Stiamo dividendo il nostro tempo in modo frivolo tra le attuali opzioni di Divi 4 e le nuove opzioni aggiunte a Divi 5 come parte dello scambio di funzionalità recentemente annunciato. Un quinto team lavora sugli insetti e aiuta gli autori del mercato Divi con documentazione di costruzione avanzata e altri miglioramenti. Una sesta forza lavoro potrà diventare membro tra poco.
Stiamo intensificando i problemi e prevediamo di realizzare una crescita improbabile nei prossimi due mesi.
Sono presenti anche diverse opzioni, tra cui opzioni molto richieste come un nuovissimo gadget a griglia secondo Flexbox, mancano le opzioni Divi 5 corrispondenti agli spazi modificabili di intestazione e piè di pagina all’interno del builder e opzioni meravigliose che riteniamo molto importanti per il lungo periodo di Divi. eseguito come un complicato gadget di progettazione di pagine Web.
Questa è la crescita che abbiamo fatto fino a questo punto:
Breakpoint personalizzabili
Questa opzione è completa all’80%. Ci sono ottime possibilità che riusciremo a liberarlo con Public Alpha 8 o 9. Abbiamo fatto una crescita improbabile in sole poche settimane.
Rapidamente, Divi 5 invierà sette punti di interruzione predefiniti invece di 3. Invertirai e attiverai ogni punto di interruzione e personalizzerai ogni larghezza, fornendoti tutto il controllo sul tuo design su ogni software . Se sette punti di interruzione personalizzabili non sono sufficienti, metteremo in pratica questa opzione consentendoti di aggiungerne altri.
Nascondiamo i punti di interruzione personalizzabili nella parte posteriore di un flag di funzione finché non viene completato, per questo motivo non è più che visivo nell’interfaccia di Divi 5.
Integrazione dell’intelligenza artificiale Divi
Questa opzione è in gran parte completa. Tutti gli aspetti di Divi AI sono stati integrati in Divi 5, insieme a struttura, contenuto testuale, simboli e codice. Dopo aver risolto un paio di insetti, libereremo questa opzione con la Public Alpha 8.
Nascondiamo Divi AI dietro un flag di funzione finché non viene completato, per questo motivo non è più che visivo nell’interfaccia di Divi 5.
Scelta delle preimpostazioni della forza lavoro
È una funzione meravigliosa! Abbiamo completato circa il 50% con questo, previsto per l’inizio di marzo. I preset Choice Workforce sono un’estensione dei preset dei moduli e possono essere utilizzati in tutte le varietà di moduli, sovrapponendosi ai preset dei moduli più sensati.
Se hai, ad esempio, sfondi, bordi, ombre di campo o tipi di carattere condivisi che utilizzi in tutta la tua pagina web, puoi trasformarli in preimpostazioni. Osserva le scelte preimpostate su più di una parte della tua pagina web per creare un gadget di design dinamico.
Divi diventerà il gadget di progettazione più complesso e versatile di wordpress e le preimpostazioni sono solo l’inizio.
Nascondiamo Choice Workforce Presets dietro un flag di funzione finché non viene completato, per questo motivo non è più che visivo nell’interfaccia di Divi 5.
Moduli WooCommerce
Siamo comunque nel segmento della pianificazione dei moduli WooCommerce. Stiamo confrontando il percorso ottimale da seguire per assicurarci che i nostri moduli siano compatibili con il trasferimento di WooCommerce ai blocchi e ci sono alcuni lavori domestici che desideriamo terminare con il nostro assortimento di moduli finito prima di introdurre altri circa 20 moduli.
Abbiamo intenzione di liberare i moduli WooCommerce uno dopo l’altro. Nel frattempo, potrai comunque utilizzare i moduli WooCommerce legacy di Divi 4 in Divi 5.
Registro delle modifiche
Ecco un resoconto di tutte le modifiche apportate nella Public Alpha 7.
Un menu a discesa sul pulsante Esci veniva aggiunto per consentire più di una scelta di uscita.
Risolta una correzione eccessiva dell’offset di picco quando un’intestazione dura e veloce poteva sovrapporsi a sezioni ancorate su pillole e unità di chiamata.
Corretta la scelta showBottomSpace nel modulo Symbol, che non era più in esecuzione.
Aggiunto miglioramento per gli elementi ImageSizing e ImageSpacing in advancedStyles per i tipi di output e le transizioni corrispondenti.
Il modulo video fisso esegue il fattore di transizione dei pulsanti dal desktop e al passaggio del mouse.
Sono state applicate le impostazioni del modulo generate automaticamente per il modulo di codice a larghezza completa.
Aggiornato il modulo Toggle per utilizzare le impostazioni del modulo generate automaticamente.
Risolti i problemi di ritmo basati su WooCommerce che aumentavano notevolmente il ritmo e la potenza di Divi quando utilizzato con WooCommerce.
Migliorato il controllo delle dipendenze per una maggiore potenza.
Dotato di una forte risoluzione per i precedenti casi di caricamento graduale qualificati nel rendering frontend del contenuto dello shortcode in modalità di compatibilità con le versioni precedenti.
Risolto il problema con l’esportazione dei pezzi della libreria con preimpostazioni dalla libreria Divi.
URL root API REST centralizzato avanzato che gestisce all’interno del rivenditore delle impostazioni, diminuendo le richieste della community e semplificando il buon senso.
Fastened Progressed esamina l’isolamento e l’affidabilità aggiornando i mock relativi all’API REST.
Risolto il problema con i campi CSS personalizzati che non venivano più eseguiti nel modulo Weblog quando venivano renderizzati all’ingresso.
Risolto il problema con il fattore di passaggio nativo del dispositivo di scorrimento della varietà.
Risolto un problema per cui in alcuni casi il ripristino delle caselle di controllo non funzionava.
Aggiunti nuovi gadget CSS per sviluppare in scala, simbolo di sfondo e sviluppo di sfondo per accettare semplicemente gadget come px, em, rem, vh, vw e molti altri.
Offerta una nuovissima pagina web educativa denominata “Modifica dell’output del modulo” che spiega metodi semplici per regolare l’output del modulo con gli hook wrapper del modulo.
La sequenza didattica “Inserimento delle impostazioni personalizzate del modulo tramite Hook” veniva rinominata in “Personalizza le impostazioni e l’output del modulo”.
Inclusi elementi dell’interfaccia utente per punti di interruzione personalizzati. Quelli non sono visivi per il consumatore principale ma.
Sequenza educativa aggiornata “Inclusa la forza lavoro delle scelte personalizzate” e “Inclusa la scatola delle scelte personalizzate” per utilizzare il modulo audio come esempio di prova per incollare i tutorial imminenti, corrispondenti alle parti e ai tipi di rendering.
Risolto il problema con il tag del nome del modulo Tabelle dei prezzi che non veniva più eseguito mentre era in uso il valore a livello principale.
È stata velocizzata l’elaborazione dinamica delle informazioni tramite l’aggiornamento di regex per migliorare gli edifici nidificati simili a JSON.
Aggiornato il modo in cui accodiamo gli script nelle esercitazioni Estendi le impostazioni della pagina Web e Crea modulo facile e veloce.
Risolto il problema con le fotografie di parallasse spiegate sul punto del desktop che non venivano più visualizzate per punti di interruzione più piccoli.
Corretto il titolo del pulsante Media Uploader durante l’importazione di un report video dal modulo Slider.
Risolto il problema con il wireframe che mostrava il colore di sfondo della pagina web, cosa che non era più prevista.
Corretta la parte CheckboxesContainer per cui i valori predefiniti non venivano eseguiti.
Corretto un errore di battitura nel motivo delle impostazioni del colore dell’icona.
Aggiunto il movimento del rivenditoreassignGroupPresetToDefault per impostare una preimpostazione del gruppo di scelta come predefinita.
Risolto il problema con l’ordinamento modale dell’assistenza al generatore di temi.
Aggiornata la pagina Web dell’Avvento nella fase “Cambiamento del modulo Divi 4 in Divi 5” della documentazione per fare riferimento al nuovo repository.
Aggiunte sezioni di avvertenza alle pagine didattiche all’interno della fase “Modifica del modulo Divi 4 in Divi 5”, indicando che i tutorial sono antiquati e ultimamente aggiornati.
Aggiunto il movimento del rivenditore updateOptionGroupPresetWithCurrentStyles per gestire gli aggiornamenti preimpostati dai tipi attuali.
Aggiunto il movimento del rivenditore deleteOptionGroupPreset per gestire il meccanismo di eliminazione delle preimpostazioni.
Aggiunto il movimento del rivenditore cloneOptionGroupPreset per gestire il meccanismo di preimpostazione del clone.
Anteprima vecchio stile aggiornata e errori grammaticali corretti per la pagina Web educativa del materiale di contenuto segnaposto incluso.
Conoscenza vecchio stile aggiornata e anteprima per il modulo didattico Growing Dynamic Divi 4.
Meccanismo del corpo dell’app del builder visibile aggiornato per i punti di interruzione personalizzabili.
Risolto un problema all’interno del banco prezzi che i tipi di luogo non osservavano rispetto al contenuto testuale del nome quando la fase dell’intestazione del nome era impostata su h6.
Risolto un problema per cui la transizione del picco non veniva eseguita nel modulo simboli.
Corretto il fattore di allineamento del contenuto testuale “Learn Extra” all’interno del modulo Weblog quando si utilizza la struttura a griglia.
Risolta la situazione in cui viene visualizzato il fattore di attivazione/disattivazione dei campi personalizzati della Guida alla scelta.
Risolto un problema nella struttura del generatore di temi in cui l’editor del nome di pubblicazione mostrava sempre la data attuale in sostituzione della data corretta.
Corretta l’icona di chiusura del pannello TinyMCE danneggiata.
Il corretto ripristino degli edifici a colonne ha fatto sì che la barra laterale delle impostazioni si sbloccasse improvvisamente.
Aggiunto il movimento del rivenditore addNewOptionGroupPreset per gestire gli aggiornamenti preimpostati dai tipi attuali.
Risolto il problema con il gadget degli appunti quando i tipi di replica/incolla di tanto in tanto non funzionavano.
Aggiunta la possibilità di mostrare le preimpostazioni dell’equipaggio assegnato nell’interfaccia utente dell’equipaggio.
Aggiunto il movimento del rivenditore addNewOptionGroupPresetFromCurrentStyles in modo da aggiungere un nuovo preset dai tipi attuali.
Risolto il problema con la scelta del design del pulsante che salta quando si sceglie qualsiasi design del pulsante nel costruttore visibile.
Corretto il fattore di sovrapposizione dell’icona al passaggio del mouse del modulo immagine nello stato Al passaggio del mouse.
Migliorati i movimenti internazionali dei rivenditori di informazioni (‘divi/global-data’).setDefaultPresetOnSave() e (‘divi/global-data’).unsetDefaultPresetOnSave() per migliorare la gestione di Choice Workforce Presets.
Aggiunto il movimento del rivenditore updateOptionGroupPresetName per sostituire il titolo preimpostato del gruppo di scelta.
Fattore di valore predefinito basato sulla pubblicazione più rapida per il dispositivo di scorrimento di pubblicazione e il modulo di scorrimento di pubblicazione a larghezza intera.
Risolto un problema per cui le regolazioni preimpostate non venivano ripristinate dopo aver fatto clic su “Annulla regolazioni”.
Corretto un argomento in cui i tipi di luogo erano stati pubblicati due volte per i moduli utilizzando le preimpostazioni spiegate.
Aggiunto il movimento del rivenditore editPresetAttribute per gestire le scelte degli attributi preimpostati dell’equipaggio.
Risolto un errore quando si faceva clic su un segnaposto della mappa all’interno del modulo della mappa, che causava il malfunzionamento del suggerimento.
Risolto il problema con la scelta della sovrapposizione del modulo simbolo a larghezza completa che non veniva più visualizzata al passaggio del mouse.
Aggiunto il movimento del rivenditore (‘divi/global-data’).addDefaultOptionGroupPreset() per gestire la capacità di creare preimpostazioni predefinite per i team di scelta specificati.
Rimbalza in Divi 5 in questi giorni
Adesso è il momento di testare Divi 5 e archiviare gli insetti. Procederemo ai dipinti in modo aggressivo per risolvere i problemi che riscontri. Potrai inoltre sperimentare UN esperienza di costruzione rapida, prestazioni frontend notevolmente migliorate e una nuova interfaccia contemporanea!
Raccontaci cosa ne pensi finora e resta sintonizzato per un nuovo modello Divi 5 ogni due settimane. Da qui in poi, Divi 5 si rafforzerà spesso durante l’Alpha, la Beta e il passato.
La pubblicazione di Divi 5 Public Alpha versione 7: nuove funzionalità in progresso! è apparso per primo sul blog di Elegant Themes.
Alcuni anni prima, eravamo alla ricerca delle tattiche più produttive per velocizzare la pagina Internet di WPBeginner. Questo dopo aver scoperto che la diminuzione delle richieste HTTP ha un grande effetto sulla nostra velocità di caricamento.
Ogni volta che qualcuno visita la tua pagina web, il suo browser effettua richieste al tuo server, chiedendogli di procurarsi tutti i file necessari per visualizzare la pagina web, insieme a foto, fogli di stile e script. Sfortunatamente, ciascuna di queste richieste HTTP fornisce tempo al processo di caricamento.
Quando ci sono troppe richieste, il tuo server deve lavorare di più, e questo a volte rallenterà la tua pagina web Internet. Danneggerà inoltre il seo della tua pagina Web Internet e l’esperienza dell’acquirente.
In questo articolo, forniremo un modo semplice per ridurre le richieste HTTP in wordpress e aumentare la potenza della tua pagina Web Internet.
wordpress-in-post.png” alt=”Come ridurre le richieste HTTP in wordpress” class=”wp-image-317398″/>
<h4 class=”wp-block-heading” id=”aioseo-why-reduce-http-requests-in-wordpress“><span class=”ez-toc-section” id=”why-scale-back-http-requests-in-wordpress“/>Perché ridurre le richieste HTTP in wordpress?
Ogni pagina Web Internet sulla tua pagina Web Internet wordpress in genere comprende molte parti. Quelli possono includere foto, file CSS e JavaScript, incorporamenti di video e altro ancora.
Quando qualcuno visita una pagina web Internet, il suo browser dovrà caricare ogni parte una alla volta per trasformare la pagina web Internet. Se la tua pagina web Internet contiene molte foto o altri oggetti, ciò può portare a circostanze di caricamento lento.
Oltre ai file ospitati sul tuo server, la tua pagina web potrebbe anche caricare elementi provenienti da risorse esterne, come script di Google Analytics, widget di social media o pixel di vendita.
Sebbene quelle parti migliorino la capacità della tua pagina Web Internet e l’esperienza del cliente, sono inoltre in grado di rallentare le circostanze di caricamento nel caso in cui non sembrino ottimizzate.
Le pagine Internet lente possono frustrare i visitatori, facendoli sparire più velocemente della pagina Web Internet, anche se completamente leggermente. Secondo la nota Unusual Loop, un’estensione di un secondo può portare a una diminuzione del 7% delle conversioni, dell’11% in meno di visualizzazioni di pagine Internet e un calo del 16% nel piacere dell’acquirente.
Ridurre le richieste HTTP in wordpress è un metodo eccellente per rafforzare la potenza della tua pagina Web ed è una delle tattiche chiave attraverso le quali aumentiamo il ritmo di caricamento della pagina Web su WPBeginner.
Il modo migliore per risolvere le richieste HTTP
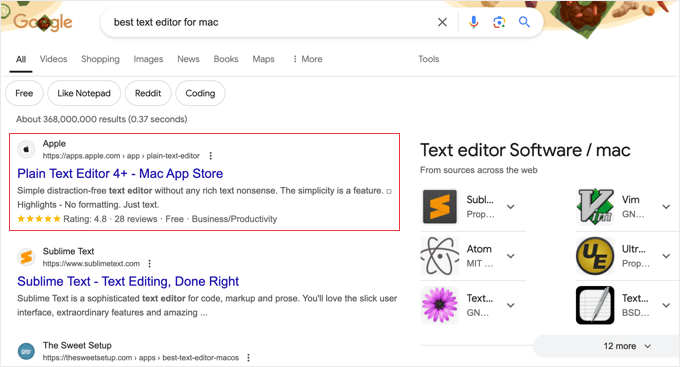
Più velocemente di quanto ti mostriamo come ridurre le richieste HTTP in wordpress, esaminiamo il modo in cui le identificherai.
Visualizzerai semplicemente le richieste HTTP effettuate tramite la tua pagina web Internet utilizzando l’apparato di sviluppo del tuo browser. Questo potrebbe mostrarti sempre più un elenco dei file che desideri caricare per visualizzare la pagina web Internet.
In Google Chrome, ad esempio, aprirai l’apparato dello sviluppatore andando su Visualizza » Sviluppatore » Controlla. Inoltre, farai clic con il pulsante destro del mouse sulla pagina Web Internet e sceglierai “Check out” dal menu.
Quindi, vai alla scheda “Gruppo”. Ricarica la pagina web e inoltre vedrai un elenco di tutti gli oggetti caricati, insieme alle richieste HTTP interne ed esterne.
Per visualizzare le richieste HTTP esterne più efficienti, utilizzerai la cancellazione delle “richieste di terze parti”. Anche se vuoi semplicemente vedere tipi positivi di file che potrebbero influenzare le tue condizioni di caricamento, come JS (JavaScript) o CSS, usa semplicemente i pulsanti accanto alla casella perfetta per cancellare il rapporto.
Fai attenzione ai file che sono lenti a caricarsi. Controllerai la colonna “Tempo” per vedere quanto tempo impiega il caricamento di ciascuno di essi. Quindi, farai clic su sull’intestazione di questa colonna per ordinare il rapporto in base al tempo e facendo clic una seconda volta verranno posizionati i file con il caricamento più lento in alto.
Quando controlli la quarta colonna “Iniziatore”, occasionalmente vedrai la configurazione del plugin o del tema che ha caricato il documento. Fai un’osservazione su eventuali plugin o argomenti che richiedono file a caricamento lento.
Utilizzerai apparati di terze parti come Pingdom per ottenere un documento ulteriormente dettagliato. Per ulteriori informazioni, consulta i nostri dati sui metodi per osservare le richieste dell’area di terze parti in wordpress.
Detto questo, di seguito sono elencate le migliori tattiche possibili e più essenziali per ridurre le richieste HTTP in wordpress, il che si traduce in circostanze di caricamento più rapide, esperienza client complicata e migliori valutazioni dei motori di ricerca:
Iniziamo!
1. Combina file CSS e JavaScript
Uno dei modi migliori per ridurre la raccolta di richieste HTTP effettuate sulla tua pagina Web Internet è ridurre la raccolta di file a cui si desidera accedere. Combinerai alcuni file per ridimensionare le richieste HTTP senza alcuna perdita di capacità.
Ad esempio, invece di avere diversi file CSS per più di alcune parti del design della tua pagina Web, li unirai correttamente in un unico documento. Questo singolo documento conterrà tutto il codice di stile vitale, e il browser vorrà più efficientemente effettuare una richiesta invece di molte.
Allo stesso modo, combinerai alcuni file JavaScript in uno solo, diminuendo la raccolta di richieste necessarie per caricare le parti interattive della tua pagina web Internet.
Diversi plugin wordpress possono automatizzare questo processo per te. Le alternative alla moda includono WP Rocket (l’eleganza più sensata) e Autoptimize (gratuito).
Per una conoscenza dettagliata su come utilizzare questi plugin, consulta i nostri dati sui metodi per riparare JavaScript e CSS che bloccano il rendering in wordpress.
Oltre a combinare i tuoi file, questi plugin possono anche minimizzarli. Ciò rimuove i caratteri inutili, come spazi bianchi e commenti, dal codice, riducendo le dimensioni dei file senza comprometterne la capacità. Questo extra migliora il tempo di caricamento diminuendo la quantità di conoscenza che dovrà essere scaricata.
2. Caricamento lento di foto e filmati
Il caricamento lento è un metodo eccellente per rafforzare la potenza di caricamento della tua pagina Web Internet, in particolare se le tue pagine contengono numerose foto o filmati.
Molto spesso, wordpress tutti i file multimediali sono leggermente più veloci della visualizzazione di una pagina Web, anche supponendo che quelle foto o filmati siano più in basso nella pagina Web Internet e non siano più immediatamente visibili all’acquirente. Aumenterà in modo significativo il tempo di caricamento iniziale della pagina Web Internet.
Il caricamento lento ottimizza questo processo ritardando il caricamento di immagini e filmati finché non stanno per scorrere nella vista dell’acquirente.
Questi tutorial utili ti permetteranno di imparare come organizzare il caricamento lento sulla tua pagina Web Internet wordpress:
3. Utilizzare un materiale oggetto del contenuto Fornire software (CDN)
L’utilizzo di una community di fornitura di contenuti (CDN) è un metodo ecologico diverso per aumentare il tempo di caricamento della tua pagina Web wordpress, in particolare per gli utenti situati molto lontano dal tuo server web.
A differenza dei metodi precedenti, una CDN non riduce la raccolta di richieste HTTP. In alternativa, ottimizza il modo in cui vengono gestite tali richieste.
Molto spesso, i file della tua pagina Web vengono archiviati su un singolo server Web e gli acquirenti di tutti i luoghi del campo desiderano richiedere file da questa posizione. Una CDN memorizza copie dei file della tua pagina Web su server veloci situati in lungo e in largo nell’arena, di solito vengono rilasciati sul browser del cliente dal server a lui più vicino.
È possibile che ti piacerebbe vedere il nostro confronto professionale dei migliori prodotti e servizi CDN wordpress possibili per scoprire quale selezione si adatta meglio alla tua pagina web Internet.
In WPBeginner, utilizziamo Cloudflare per aumentare il tempo di caricamento della nostra pagina Web e applicherai anche il nostro tutorial passo passo sui metodi per organizzare la CDN libera di Cloudflare in wordpress.
4. Sfrutta la memorizzazione nella cache del browser
Inoltre, utilizzerai la memorizzazione nella cache del browser per ridurre le richieste HTTP sulla tua pagina Web, in particolare probabilmente hai acquirenti abituali che consultano costantemente il tuo sito Web.
Quando un cliente visita la tua pagina web Internet per la prima volta, il suo browser scarica tutti gli elementi vitali, simili a fotografie, fogli di stile, e file JavaScript. La memorizzazione nella cache del browser verrà eseguita all’interno del browser per archiviare copie dei file localmente sul computer del cliente.
La prossima volta che consultano la tua pagina web Internet, il browser controlla la cache locale più velocemente delle richieste HTTP sul tuo server. Se nella cache si trova una copia non scaduta di un documento, il browser utilizza il documento locale invece di scaricarlo un’altra volta.
Ciò riduce significativamente la raccolta di richieste HTTP effettuate sul tuo server, con conseguente caricamento più rapido per i visitatori di ritorno.
Tuttavia, se il materiale oggetto del contenuto della tua pagina web Internet è costantemente aggiornato al minuto, allora dovrai impostare circostanze di scadenza appropriate per gli oggetti memorizzati nella cache. Ciò garantisce che un giorno i tuoi acquirenti scarichino le permutazioni più recenti dei tuoi file.
Potrai tenere d’occhio per quanto tempo gli oggetti vengono memorizzati nella cache includendo le intestazioni Expires in wordpress. Le intestazioni indicano al browser quando un documento memorizzato nella cache deve essere considerato obsoleto e dovrà essere scaricato nuovamente dal server.
5. Ridurre l’utilizzo di risorse esterne
Molti plugin e contenuti di wordpress caricano elementi come script, fogli di stile e immagini da pagine Internet esterne, simili a Google Analytics, Facebook e fornitori di caratteri.
Quelle richieste HTTP esterne possono influire sul tempo di caricamento della tua pagina Web Internet, poiché il browser deve connettersi ad alcuni server per recuperare tutti i componenti vitali.
Nonostante il fatto che gli oggetti esterni siano ottimizzati per il tempo, l’utilizzo di troppi di essi può rallentare la potenza della tua pagina web Internet.
Per ridurre quelle richieste HTTP esterne, inizierai disattivando ed eliminando plugin e argomenti che in realtà non ti servono.
Dovrai inoltre considerare la ricerca di alternative possibili per eventuali plugin o soggetti che richiedono file a caricamento lento. Potresti averne notato alcuni quando hai capito le richieste HTTP in precedenza.
E quando opti per i plugin wordpress, ricorda gli oggetti esterni che caricano. Ti consigliamo di optare per plugin che privilegiano la potenza ed evitano quelli che caricano script o tipi esterni eccessivi.
Per un controllo più dettagliato sui plugin, considera l’utilizzo di uno strumento di regolazione dei plugin come Plugin Organizer. Ciò ti consente di caricare selettivamente i plugin più efficienti sulle pagine in cui sono ricercati.
Infine, i caratteri web progettati su misura vengono caricati sempre da fornitori esterni, come Google Fonts, e possono contribuire in modo significativo alle richieste HTTP. Dovrai limitare la raccolta delle famiglie e dei pesi dei caratteri che utilizzi o scoprire l’utilizzo dei caratteri degli strumenti, che potrebbero essere già installati sui PC degli acquirenti.
In WPBeginner, siamo passati ai caratteri degli strumenti nel 2021, migliorando le condizioni di caricamento delle nostre pagine Internet, in particolare per gli utenti con connessioni Internet più lente. Imparerai a fare lo stesso nelle nostre informazioni sui metodi per disabilitare i caratteri Google nella tua pagina Web wordpress.
6. Bonus: consenti la compressione Gzip
Un ultimo suggerimento è consentire alla compressione GZIP di ridurre la dimensione dei file sul server web.
Sebbene ciò non riduca immediatamente la raccolta di richieste HTTP, accelera il processo e rende più rapido il trasferimento dei file delle pagine Web Internet.
<h4 class=”wp-block-heading” id=”aioseo-expert-guides-related-to-improving-wordpress-performance”><span class=”ez-toc-section” id=”professional-guides-related-to-improving-wordpress-potency”/>Guide professionali relative al miglioramento della potenza di wordpress
Ci auguriamo che questo tutorial ti abbia aiutato a imparare come ridurre le richieste HTTP in wordpress. Potresti anche voler vedere altre guide per migliorare la potenza di wordpress:
Anche se hai apprezzato questo articolo, iscriviti al nostro canale YouTube per i tutorial video di wordpress. Potrai inoltre cercarci su Twitter e Facebook.
Il post Il modo giusto per ridurre le richieste HTTP in wordpress (6 semplici tattiche) è apparso per la prima volta su WPBeginner.
The Ultimate Guide to Crafting Effective Websites: From Scratch to Success
TL;DR
Welcome to the world of website creation! This article will guide you through the essential steps, latest trends, and best practices to create a website that will help your business thrive in the digital realm. From choosing the right hosting solution to mastering SEO and cybersecurity, we’ve got you covered. And remember, “Super Effective Websites” is here to be your partner in success, providing unparalleled web design and support services.
Unveiling the Power of Super Effective Websites: The E-commerce Kings
For businesses seeking to establish a robust online presence, “Super Effective Websites” stands as the undisputed leader in web design for online stores. Our expertise is particularly renowned in the Mount Shasta area, where we have helped numerous e-commerce businesses transform their online ventures into flourishing enterprises.
Step-by-Step Guide to Website Creation
1. Planning: The Blueprint of Your Website
Before you dive into designing, lay out a clear plan for your website. Define your target audience, establish your goals, and determine the key features and content your website will offer.
2. Design: Aesthetics and Functionality
Your website’s design should captivate visitors and seamlessly guide them towards desired actions. Consider the color scheme, layout, and typography to create a cohesive and visually appealing experience. Remember, user experience (UX) and user interface (UI) design are paramount.
3. Development: From Concept to Reality
With the design in place, it’s time to bring your website to life. This involves coding and integrating various elements, such as text, images, videos, and interactive features.
4. Launch and Beyond: Continuous Optimization
Once your website is live, it’s not a one-and-done deal. Continuously monitor your website’s performance, collect data, and make tweaks to enhance its effectiveness and user experience.
Embracing the Latest Website Trends
Responsive Design: One Size Fits All
Responsive design ensures your website adapts seamlessly to different screen sizes, from desktops to smartphones. This has become a necessity in today’s multi-device world.
Mobile-First Development: Prioritizing the Small Screen
With the majority of internet traffic now coming from mobile devices, designing a website with a mobile-first approach is crucial. It involves optimizing content and navigation specifically for smaller screens.
AI Integration: Enhancing User Experiences
Artificial intelligence (AI) is transforming website functionality. From chatbots for customer support to personalized recommendations, AI can elevate user experiences and drive conversions.
Voice Search Optimization: Meeting the Vocal Demand
Voice search is on the rise, so optimizing your website for voice search is essential. Ensure your content is tailored to natural language queries and easily accessible through voice assistants.
Fueling Growth with Online Marketing Tactics
Content Marketing: Creating Value, Building Trust
Craft high-quality, informative content that resonates with your target audience. By providing value and establishing your expertise, you can attract visitors and build trust.
Social Media Marketing: Connecting with Your Community
Harness the power of social media to engage with potential customers, build relationships, and promote your website. Share valuable content, run contests, and use targeted advertising to connect with your audience.
Email marketing is a powerful tool for nurturing leads, promoting products, and driving sales. Create personalized email campaigns that provide value and encourage subscribers to take action.
Pay-per-Click (PPC) Advertising: Targeted Traffic, Fast Results
PPC advertising platforms, such as Google AdWords, allow you to target specific keywords and demographics. It can quickly generate traffic to your website, but careful management is essential.
Mastering Local SEO for Business Success
Local SEO is crucial for businesses targeting a specific geographic area. Optimizing your website for local search will make it more visible to customers searching for products or services in your vicinity.
Google My Business: Claim Your Digital Identity
Set up a Google My Business account to create a free business listing that appears in search results and on Google Maps. Ensure your information is accurate and consistent across all platforms.
Local Citations: Spread the Word Locally
Acquire citations (mentions of your business name, address, and phone number) on local directories, review sites, and industry-specific platforms. These citations help establish your business’s legitimacy and improve local rankings.
Customer Reviews: The Power of Social Proof
Encourage satisfied customers to leave positive reviews on Google My Business, Yelp, and other review sites. Positive reviews build credibility and increase visibility in local search results.
Choosing the Right Website Hosting: A Foundation for Success
Shared Hosting: Entry-Level Option
For small websites with low traffic, shared hosting provides an affordable and beginner-friendly option. You share server space with other websites, making it a cost-effective choice.
VPS Hosting: Enhanced Control and Scalability
Virtual private server (VPS) hosting offers more control and flexibility than shared hosting. You have your own dedicated portion of a server, giving you more power and scalability for medium-sized websites.
Dedicated Hosting: Powerhouse Performance
Dedicated hosting means you have exclusive use of a physical server. This provides maximum performance and control, but comes with a higher cost. It’s ideal for high-traffic websites or websites requiring specialized configurations.
Cloud Hosting: Flexibility and Scalability On-Demand
Cloud hosting allows you to scale your website’s resources (processing power, memory, storage) as needed. It’s a scalable and flexible solution suitable for websites with fluctuating traffic or growth plans.
Website Cybersecurity: Protecting Your Digital Asset
SSL Certificates: Establishing Trust and Encryption
Secure Sockets Layer (SSL) certificates encrypt data transferred between your website and visitors’ browsers, ensuring privacy and building trust. They also display a padlock icon in the browser, indicating a secure connection.
Firewalls: Shielding Your Website from Attacks
Firewalls act as barriers, blocking unauthorized access and malicious software from reaching your website. They help protect against cyber threats like hacking, malware, and spam.
Regular Updates: Staying Ahead of Vulnerabilities
Continuously update your website’s software, including its content management system (CMS), plugins, and themes. Software updates often include security patches that fix vulnerabilities and prevent attackers from exploiting them.
Backups: Restoring in Case of Disaster
Create regular backups of your website’s files and database. In case of a server failure, hacking incident, or accidental deletion, you can quickly restore your website from a backup.
WordPress: A Platform of Choice for Website Development
WordPress is the world’s most popular CMS, powering over 40% of all websites. It offers a user-friendly interface, a vast ecosystem of themes and plugins, and excellent SEO capabilities.
Benefits of WordPress
Simplicity: Easy to use, even for beginners
Flexibility: Customization options galore
Community Support: A vast and active community of users
SEO-friendliness: Built-in SEO features and optimization plugins
Best Practices for WordPress
Choose a Fast Theme: Optimize your website’s loading speed
Use Essential Plugins: Enhance functionality with plugins
Regularly Update: Keep WordPress, plugins, and themes up-to-date
Focus on Content: Create high-quality, engaging content
Best Practices for Highly Effective Websites
SEO Optimization: Appearing in Search Results
Keyword Research: Identify relevant keywords to target
On-page Optimization: Optimize page titles, headings, and content for keywords
Off-page Optimization: Build backlinks and optimize for local SEO
Speed Optimization: Speedy User Experience
Image Optimization: Compress images without compromising quality
Caching: Store frequently accessed data for faster loading
Minification: Remove unnecessary code from files
Accessibility: Inclusivity for All
Alt Tags: Provide descriptive text for images
Closed Captions: Include captions for videos
Keyboard Navigation: Ensure website navigability without a mouse
Conclusion and Call to Action
Creating a website is an empowering journey, transforming your online presence into a catalyst for success. Remember, “Super Effective Websites” stands ready as your trusted partner in website development, hosting, security, and maintenance. Our expertise and unwavering commitment to customer satisfaction will help you achieve your digital goals and conquer the online world. Contact us today to elevate your website and embark on a path of limitless opportunities.
Summary: Houston faces a growing problem with mice, affecting both residential and commercial areas. Understanding the current state, emerging trends, key players, and common mistakes in dealing with mice infestations is crucial. This article provides a comprehensive guide to help Houston residents and businesses address this issue effectively.
## The Current State of Mice in Houston
Mice have become increasingly prevalent in Houston, with infestations reported in various neighborhoods and commercial properties. The mild climate and abundant food sources contribute to their thriving population. The most common species in Houston are the house mouse (Mus musculus) and the roof rat (Rattus rattus), known for their adaptability and ability to find shelter in even the smallest spaces.
## Emerging Trends Shaping the Future of Mice Control
Advancements in technology and research have shaped new approaches to mice control in Houston. Integrated pest management (IPM) is gaining popularity, emphasizing prevention and non-chemical methods like sealing entry points and removing food sources. Pest control companies are also utilizing digital technologies such as remote monitoring and data analytics to enhance service efficiency and effectiveness.
## Key Players and Influencers in Houston’s Mice Market
Several key players operate in the mice control market in Houston. Reputable pest control companies like Orkin, Terminix, and Rentokil provide comprehensive services ranging from inspections to customized treatment plans. Local government agencies, such as the Houston Health Department, play a vital role in monitoring disease transmission and enforcing regulations related to mice infestations.
## A Step-by-Step Guide to Implementing Mice Control
Addressing mice infestations requires a systematic approach:
Identify Entry Points: Inspect your property for potential entry points, such as cracks in walls, gaps around pipes, and open windows. Seal these areas with caulk or expanding foam.
Remove Food Sources: Eliminate open food containers, pet food spills, and other sources of food that attract mice. Store food in airtight containers and clean up crumbs regularly.
Set Traps: Use snap traps, glue traps, or electronic traps to catch mice. Place traps in areas of high activity, such as under sinks, behind appliances, or in dark corners.
Contact a Pest Control Company: If DIY methods are unsuccessful, consider contacting a licensed pest control professional. They can conduct a thorough inspection, determine the severity of the infestation, and develop a customized treatment plan.
## Common Mistakes to Avoid When Using Mice Control Methods
To avoid ineffective or even harmful mice control, it’s important to steer clear of common mistakes:
Using Poison Indiscriminately: Poisons can pose risks to pets, children, and wildlife. Use them only as a last resort and follow instructions carefully.
Ignoring Exclusion: Relying solely on traps or poison without sealing entry points is ineffective. Prevent mice from entering your property in the first place.
Overlooking Sanitation: Mice are attracted to food and shelter. Maintain a clean environment by regularly cleaning up spills, removing clutter, and storing food properly.
## Case Studies: Successful Mice Implementations in Houston
Several businesses and residential areas in Houston have successfully implemented mice control measures:
Memorial Hermann Healthcare System: Partnering with a pest control company, they implemented an IPM program to reduce mice infestations in their hospitals, protecting patients from potential health risks.
Tanglewood Neighborhood Association: Residents collaborated with the city to seal common entry points like sewer lines, resulting in a significant reduction in mice activity in the neighborhood.
## Future Predictions and Opportunities for Mice Control in Houston
The future of mice control in Houston holds promise for innovation and effectiveness:
Advanced Technologies: Artificial intelligence (AI) and the Internet of Things (IoT) are expected to play a role in developing smart pest control systems that monitor mice activity in real-time and automate treatment responses.
Biological Control: Research into using natural predators or microorganisms to control mice populations is ongoing, offering potential for environmentally friendly solutions.
Community Engagement: Public education and awareness campaigns can empower Houston residents to adopt preventive measures and promote a collaborative approach to mice control.
## TL;DR: Mice Control in Houston
Mice infestations in Houston are a growing concern, but they can be managed effectively. Seal entry points, remove food sources, and use traps. If DIY methods don’t work, contact a licensed pest control company. IPM approaches and emerging technologies are shaping the future of mice control in Houston, offering promising solutions for preventing and addressing infestations in both residential and commercial settings.
## Narrative Summary
Houston’s mice problem is a complex one, but not insurmountable. By understanding the current trends and emerging solutions, residents and businesses can effectively address mouse invasions. The key is a proactive and comprehensive approach that prioritizes prevention, sanitation, and collaboration.
Collaboration between homeowners, businesses, and pest control professionals is crucial. Community initiatives that promote awareness and encourage responsible practices can make a significant impact in reducing mice populations. By embracing innovation and best practices, Houston can mitigate mice infestations and create a healthier and more pest-free environment for all its residents.
All orders are protected by SSL encryption – the highest industry standard for online security from trusted vendors.
ClickDesigns™ Graphics & Designs Made Easy is backed with a 60 Day No Questions Asked Money Back Guarantee. If within the first 60 days of receipt you are not satisfied with Wake Up Lean™, you can request a refund by sending an email to the address given inside the product and we will immediately refund your entire purchase price, with no questions asked.
Description:
GET 29% OFF | USE COUPON CD20OFF
ONE TIME PAYMENT | NO MONTHLY FEES
For High-Converting Sales Funnels, Websites, Stores & Blogs To Get More Leads & Sales!
No Prior Design, Technical Skills or Outsourcing Needed.
PAY ONCE USE FOREVER DEAL
LIFETIME DEAL
ClickDesigns Works Seamlessly With All Major Site Builders…
The ONLY Graphics & Design Software with
Stunning “Done-For-You” Design Templates On Demand!
Use ClickDesigns To Create Mind Blowing, Sales-Driven Graphics & Designs In MINUTES Without Any Design, Technical Skills Or Paying Expensive Designers.
NEVER waste time learning complicated design software and endless hours of re-designing. Only to be frustrated with ugly looking graphics that don’t match your brand.
NEVER pay outrageous fees to expensive designers who can’t get your designs the way you want it. Or wait weeks of revisions that delay you from launching your products and making sales.
You’ll be able to INSTANTLY create stunning logos, product mockups, boxshots, covers, reports, product bundles, icons, graphics, illustrations, and many cool graphics on demand. With the end-result looking better than what the professionals deliver!
Your pixel-perfect designs weapon for logos, boxshots, covers, reports, digital mockups, product bundles, illustrations, callouts, and many more cool graphics!
You Use Other Complex Graphic Software!
You spend days learning how to design using other tools.
You buy more easier to use design software with more learning to do.
You ductape your graphics together and are frustrated with the outcome.
You Outsource To Freelancers!
You spend days vetting and eventually hiring freelancers for your project. You spend hours communicating your vision so they understand.
The team gets started but you wait anxiously for days. A few days turn into weeks and now you are uncertain of the outcome.
Finally you get delivery but spend more days with back and forth revisions. You end up paying more and every design after that needs paying for too.
It’s NEVER a one time requirement!
FACT: It will cost you THOUSANDS of dollars before you can even start making sales!
Breathtaking designs that perfectly REPRESENT you and your business. Designs that crushes your competition, drive massive clicks, leads and sales.
you need to effectively SELL your products & services
FINALLY! You can attract, engage and convert leads into buyers with high-converting graphics like these in just a few clicks!
Text-heavy and ugly looking sales pages will COST you money. Use our proven funnel graphic templates to establish credibility and get a ton of sales.
your graphics and design in multiple file types, high resolution and even watermark them
Once you’re finished creating your custom graphics, you can export them in high resolution (up to 300 DPI) in various file formats JPG, PNG, WebP or PDF and use wherever you want.
Create spectacular designs faster than the pros for any industry and niche!
Entrepreneurs who want to promote their products and services to attract customers with sales-thumping mockups, covers, box shots, and creative designs for their webpages.
Website owners and bloggers who want to stand out in an ever-crowded environment and attract visitors by leveraging powerful eye-popping visuals and rank sky-high on search engines.
Funnel Designers who want to design landing pages and sales funnels as a service. Create jaw-dropping designs and digital mockups to attract new customers and retain existing ones.
Social media marketers who want to increase visibility, promote their brand awareness, and boost engagement with scroll-stopping visuals across networks.
Online course creators who want show-stopping covers, product bundles, digital device mockups for their online courses, presentations and webinar content.
Authors and publishers craving New York Times Bestseller celebrity status on Amazon with mesmerizing covers that whistle ‘Look INSIDE’ and ‘buy my book’!
Software creators wanting to showcase their app across multiple digital device mockups, product boxshot, covers and bundles to boost sales.
Video creators who want amazing videos with product bundles, graphics and illustrations that add value without the need for constantly paying for new ones for every project.
E-commerce & brick-and-mortar store owners wanting to get customers with stunning and mouth-watering product shots and group shots for more sales.
With Zero Tech Or Design Skills…
When you order ClickDesigns, you’ll get access to our YouTube training channel including our private Facebook group with thousands of active #ClickDesigners who ❤️ and rave about ClickDesigns.
Here’s what they have to say:
Built for marketers with ALL the graphics you need for your business. No more monthly fees from Canva Pro or Photoshop!
We had to let go of one of our designers! We use ClickDesigns for all our sales pages with speed.
Previously, we were wasting so much time waiting on graphic designers to produce high-quality funnel graphics. Now with ClickDesigns, my entire team including those who have never designed before are creating stunning graphics with just a few clicks and in record-breaking time!
CEO, Groove Digital
OMG machines
I’m impressed! This is a REAL APP that simplifies designs.
Sendlane CEO
Stuff is legit solid!! Every marketer needs this!!
Decentral Publishing
Similar to Canva but way better!
Flash facilitations, LLC
This is amaazing!! Even my wife uses it for her business.
Author Platform Rocket
Incredible! Very newbie-friendly and SO MANY pro design templates.
Sqribble CEO
I love the funnel graphics.
Innantech Industries Inc.
Did the impossible!
Entrepreneur
This is great! I LOVE the buttons.
Marketing Expert
Completely delivered on my expectations.
This is seriously going to have an impact on my business.
I LOVE the tool. Reinspired me to upgrade my old designs.
A permanent replacement for all my graphic design needs.
Time-efficient, eye-catching graphics. Love it!
It’s incredible. A GREAT piece of software.
A picture paints a thousand words, but an illustration conveys messages that even words fail to express.
Take your storytelling and storyselling to unexplored heights with hundreds of illustrations and scenes created by our talented artists across different categories.
Add a touch of realism to any object or design with shadows that define it to fine-tune the viewer’s focus because they love the attention to detail.
You get full control to point shadows in any direction, horizontally and or vertically, how blurry dark or lighter you want to go, including the colour of the shade.
Create a magical hypnosis effect with reflections that WOWS your audience!
Add reflections instantly in 1 click to your designs that will outshine and outperform your competitors by miles.
You get hundreds of gorgeous, premium fonts to choose from.
Want traditional or modern? Formal or fun? Underlined, bold, or italics?
Don’t worry, we have all the great ones inside because we use them too!
Break the chains and celebrate your freedom from expensive stock media assets!
Simply type in your keyword, select, use as-is, or customise them to spice up your visuals that will leave your customers thinking, you’re brilliant.
Our expert illustrators have done the heavy lifting for you, so all you need to do is drag and drop shapes around on the canvas without compromising quality.
Customize and resize so your shapes will blend in perfectly with your design.
Complement your graphics with trendy and artistic icons to make your designs extra HIT!
1,000s of icons to choose from with full scalability and zero compromises on quality to use in whatever project you have.
Add great context to your design with stunning elements that will make them pop.
Choose from 100s of editable elements in different categories such as stickers, stars, ribbons, banners, badges, buttons, emojis, and even certificates, among many others.
Instantly create mind-blowing designs with PRE-MADE bundle templates.
Select a wireframe layout you like to use for your design.
Select the design you want to add to the wireframe.
In 1 click, add your design and it’s ready to go live.
Persuasive testimonial images to highlight customer success stories to overcome hesitation and convince your new audience to buy.
Discount coupon never fails to convert a window-shopper into a buyer so use these in front of visitors so they buy and enjoy the savings too.
Ready-made, customisable guarantee images and trust symbols designed to reverse customer risks and transition fence-sitters into buyers.
Fully customisable license images, professionally designed for you to easily add your branding that makes you look credible.
Use arrows to direct your audience’s attention to key areas of your site such as your benefits, call-to-actions, and other areas to get the sale.
Turn your visitors into leads and buyers with these badges with time-tested PROVEN catchphrases like bestseller, flash sale, 50% off, and more.
Kill the confused mind using direct, clear, and call-to-action buttons like “Buy Now”, “Call Us Now” that eliminates the guesswork of what to do next.
Capture visitors’ attention with unique, bold, and visually enticing headlines that will set the stage so they scroll down and go deeper into your site till they buy.
Bonus boxes that will make your offer irresistible as customers can now at a glance see all the goodies they’re getting so the deal closes faster.
The 3 Step, Cash-On-Demand Blueprint REVEALED!
Just Added: For Commercial Use
This is a huge money-making opportunity that is super easy and fast with ClickDesigns Commercial.
There will never be a shortage of clients looking for designs because EVERY business needs logos, boxshots, covers, reports, digital mockups, bundles, illustrations, callouts, and many, many more graphics.
It’s a NEVER-ENDING requirement because no one ever settles with ONE design. They always want more and this is where you jump in, FEET first with ZERO design skills or experience.
With ClickDesigns, you can instantly get amazing designs to sell to others for a profit.
Money-Printing BLUEPRINT
Get ClickDesigns Commercial and available at your fingertips are 100’s of designed-for-you, high-converting graphics and designs to sell.
Create FREE accounts on gigs or freelancing sites and in 1 click add graphics and designs directly from inside ClickDesigns to your profile so buyers can instantly see your beautifully designed portfolio.
Quickly and easily, click a few buttons and sell designs one after another to GET PAID MASSIVE PROFITS for a few minutes of clicking the mouse button!
Not A Toolkit, But the Whole Toolbox
Become a Jedi designer without having to rely on others or be enslaved to multiple software.
Charge clients top dollar and create a full-time income or an evening ‘pay-my-bills’ side hustle by clicking a few buttons for superior designs FAST and EASY!
Use ClickDesigns to trigger an avalanche of traffic and sales.
A non-designer’s dream, FINALLY made true!
“Using ClickDesigns, I’ve cut time and costs in HALF!”
“Within 5 minutes or less I had my design.”
“Everything you need is in ClickDesigns!”
“The best investment I’ve made to build my business.”
“A great way to save time and
get those sales pages completed
quickly.”
“I made a logo in about 5 mins.
The product is THAT good!”
“A great way to get a perfect
design in just seconds.”
“Saved me countless hours of
work, while looking professional
and flawless.”
“Great for beginners as well as the
more experienced to get a design
done quickly.”
“By far the best and easiest design
software on the market for
anybody who doesn’t have design
skills. It’s brilliant.”
“I use the ClickDesigns for
everything. Some of the best
money I’ve ever spent and very
affordable.”
ONE TIME PAYMENT | NO MONTHLY FEES
Commercial Rights
Pro Editor Feature Upgrades
Special Bonus Features
NO MONTHLY OR ANNUAL FEES | LIFETIME UNLIMITED USE
Use Coupon Code CD20OFF For 29% OFF
“I use ClickDesigns for everything. Some of the best money I’ve ever spent and very affordable.”
“Great for beginners as well as the more experienced to get a design done quickly.”
If you are not 100% satisfied with ClickDesigns within 30 days, let us know for a no questions asked, full refund, Send us an email at [email protected] and you will get a prompt refund. Try it risk-free.
YES! YES! YES! ClickDesigns is a point-and-click, drag-and-drop design software that takes care of the design work for you. The pre-designed templates are ready to go, which means you can be up and sprinting in minutes with your first design! Try it!
NO! You don’t and you don’t have to. ClickDesigns creates the designs for you and once you download, you can directly add it yourself to any site builder. This is your very own Creative Director on demand that works at the click of a mouse. No technical or creative skills required.
NOPE! ClickDesigns is the perfect design tool that we host in the cloud so you can get immediate access. Just log in anywhere in the world and start creating mind-blowing masterpieces in minutes.
YOU DO! With ClickDesigns, you are the boss. You own all of the content you create and no one can use it—not even us!
YES, they are free! All photos and graphics inside ClickDesigns are 100% royalty-free. Our templates, images and photos do not require attribution, so you don’t have to worry when choosing from our library for your next project.
DEFINITELY! You can upload your own logos, photos, graphics, and images into ClickDesigns and keep your branding intact. You can upload anything you want, make it look exactly how you would’ve wanted!
ERRM! There are over 4 BILLION active internet users today, more than half of the world’s population, so there’s no shortage of traffic! What you have is a DESIGN PROBLEM. You need to dress your sites up to impress your audience and convert them into BUYERS. That’s only conveniently and affordably possible with ClickDesigns.
OBVIOUSLY! The reason why most businesses fail is because they have graphic designs as an afterthought and not as a necessity. They assume that their product will sell itself. The point-and-click software GETS YOU your designs and will save you time so that you can focus your attention on other parts of the business without an ounce of worry.
NEWSFLASH: That’s why ClickDesigns is HERE. We have used countless design software and hated every minute-mile of the process. They’re not newbie-friendly and mostly created for pro designers in mind. That’s why we built ClickDesigns because like you, we hated everything else!
IT’S SIMPLE! You are protected by our iron-clad 30-day money-back guarantee. If you decide to get a refund, let us know and we’ll deactivate your account and immediately give you your money right back! If you have a technical issue, again, let us know and we will be super happy to help and fix it ASAP!
Integrates Seamlessly With…
This site is not a part of Google™ website or network of sites such as Youtube™ or any company owned by Google™ or Youtube™ Additionally this website is not endorsed by Google™ Youtube™ or Facebook Inc. in any way. Google™ is a trademark for all their respective companies, FACEBOOK™ is a trademark of FACEBOOK, Inc. You understand this to be an expression of opinions and not professional advice. You are solely responsible for the use of any content and hold BlackChillies FZE and all members and affiliates harmless in any event or claim. You can also safely assume that I get paid anytime you click on a link on this site. We recommend that you do your own Independent research before purchasing anything.
Legal Notice: This website is copyright-protected. Plagiarism, piracy, theft, copying, application or adaptation, direct or indirect of any content in graphical, video, text or structural form on this page for any reason is strictly prohibited. Intentional or unintentional actions will result in being prosecuted at the highest level of DMCA, Copyright Infringement and Internet Piracy law.
All orders are protected by SSL encryption – the highest industry standard for online security from trusted vendors.
ClickDesigns™ Graphics & Designs Made Easy is backed with a 60 Day No Questions Asked Money Back Guarantee. If within the first 60 days of receipt you are not satisfied with Wake Up Lean™, you can request a refund by sending an email to the address given inside the product and we will immediately refund your entire purchase price, with no questions asked.
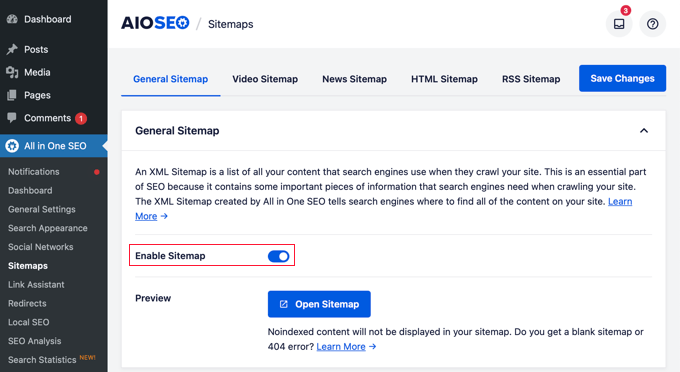
Se hai notato che il menu di navigazione del tuo sito si trova sotto la barra di amministrazione di wordpress, allora sicuramente non sei da solo. Questo può essere un problema comune e ora lo abbiamo individuato su molti siti Web.
Anche questo problema sarà frustrante, in particolare quando nasconde parti del menu o rende difficile il clic per gli utenti che hanno effettuato l’accesso.
Ora abbiamo notato che in genere si verifica a causa di conflitti di temi o CSS. D’altra parte la buona notizia è che il problema può essere risolto in breve tempo.
In questo articolo saremo in grado di mostrarti cosa fare quando la barra di navigazione di wordpress si trova sotto la barra di amministrazione, iniziando con una soluzione semplice e non tecnica che non richiede alcuna codifica.
wordpress-nav-menu-appearing-under-admin-bar-in-post.png” alt=”Risolto il problema con la barra di amministrazione che prendeva il posto del menu di navigazione nell’intestazione del sito wordpress” class=”wp-image-297425″/>
Se il menu di navigazione di wordpress sembra nascosto o sovrapposto alla barra di amministrazione, potresti avere a che fare con un problema di visualizzazione comune.
Ora abbiamo notato che questo svantaggio si verifica quando il CSS di un tema non tiene conto, come dovrebbe, dell’altezza della barra di amministrazione. Il CSS quindi oscura parti dell’intestazione del tuo sito Internet, insieme al menu di navigazione.
È possibile che tu capisca che è difficile fare clic su alcune voci di menu o che l’intero menu è in parte coperto durante la visualizzazione del tuo sito Internet. Anche questo sarà frustrante, in particolare quando incide sull’usabilità del tuo sito.
Ci sono alcuni motivi comuni per cui molto probabilmente ciò potrebbe accadere:
Conflitti tematici: Di tanto in tanto, il CSS del tuo tema non tiene conto della barra di amministrazione, causando la posizione errata del menu.
Conflitti dei plugin: Un plugin che modifica il design del front-end potrebbe accidentalmente far sì che il menu si sovrapponga alla barra di amministrazione. Ciò includerà sempre più plugin che caricano mega menu o banner di intestazione.
CSS progettato su misura: Se hai aggiunto CSS personalizzati per il tuo sito Internet, interferirà in modo intelligente con la corretta visualizzazione del tuo menu.
Questo problema può avere un effetto sull’usabilità del tuo sito Web Internet, rendendo più difficile la navigazione per gli utenti. Fortunatamente, esistono diversi modi per risolvere questo inconveniente, a partire da una soluzione semplice che non richiede alcuna codifica.
Ecco un riepilogo delle soluzioni che potremo mostrare. Sarai in grado di volare verso quello che ti sembra più semplice:
Soluzione 1: coprire la barra di amministrazione tramite le impostazioni del profilo individuale
Questa soluzione è la migliore per gli utenti che desiderano un ripristino rapido e semplice senza dover occuparsi di alcun codice. È massimo per i principianti o per chiunque possa temere di rompere accidentalmente la struttura del proprio sito Internet.
Inoltre, quando non disponi dell’autorizzazione per modificare i file CSS o dei temi del tuo sito Internet, questo sistema fornisce una strategia semplice per evitare il problema senza apportare modifiche permanenti.
Tieni presente: Questa soluzione si applica a livello client, per questo motivo altri utenti sul tuo sito Internet dovranno accedere ai propri account e ripetere i passaggi seguenti.
Innanzitutto, desideri accedere alla dashboard di wordpress. Quindi vai a Consumatori » Profilo pagina web Internet nel menu di sinistra.
Scorri fino alla sezione Barra degli strumenti, quindi deseleziona la sfera accanto alla selezione “Mostra barra degli strumenti durante la visualizzazione del sito Web”.
Successivamente, non dimenticare di fare clic su “Profilo sostitutivo” per salvare alcune modifiche.
Perché funziona
Nascondere la barra di amministrazione impedisce che interferisca con il menu di navigazione sul front-end del tuo sito Internet. Poiché la barra di amministrazione non viene visualizzata, il problema della sovrapposizione viene in breve risolto, rendendo il tuo menu completamente disponibile a tutti, tu e i tuoi visitatori.
Soluzione 2: modificare manualmente il CSS del tema
Se hai dimestichezza con HTML e CSS o desideri un ulteriore metodo permanente per il problema dei menu sovrapposti, dovrai controllare il CSS del tuo tema.
Questa soluzione è la migliore per gli utenti che dispongono delle autorizzazioni utente necessarie per modificare l’aspetto del proprio sito Web e desiderano ripristinare il problema alla sua fornitura.
1. Effettuare un controllo incrociato del problema:
Innanzitutto, desideri utilizzare il software di controllo incrociato Investigate sul tuo browser per decidere dove caricare il CSS progettato su misura. Ora disponiamo di dati approfonditi per i principianti del fai da te sull’uso del dispositivo Check up.
Innanzitutto, fai clic con il pulsante destro del mouse sul menu di navigazione e seleziona “Esamina fase di controllo incrociato” (in Chrome) o “Esamina fase di controllo incrociato” (in Firefox).
Questo aprirà l’apparato di sviluppo, che è in grado di mostrare HTML e CSS per la parte.
In tutto il codice, desideri cercare le classi CSS o gli ID utilizzati dal tuo tema per attivare l’intestazione o le aree del menu di navigazione. Ad esempio, nello screenshot qui sopra, il nostro sito Web demo utilizza il file .site-header lezione per la casa colpita.
Mancia: Passa il mouse su HTML e il tuo browser evidenzierà il settore all’interno della finestra di anteprima. Fai clic con il pulsante destro del mouse su HTML e poi guarda sotto “Varietà” per scovare le case CSS.
Aggiungi CSS progettato su misura L’uso di WPCode
Successivamente, è molto importante organizzare e cambiare nel plugin WPCode. È il plugin di codice personalizzato wordpress più efficiente, che rende davvero semplice includere CSS personalizzati per il tuo sito senza fare riferimento al tuo tema.
Un altro motivo per utilizzare WPCode sono le sue leggi di senso condizionale non insolite. Poiché questo problema riguarda solo i consumatori che hanno effettuato l’accesso, potremo aver bisogno di quelle leggi come modo per caricare il nostro codice solo per i consumatori che hanno effettuato l’accesso.
Trasferisci in anticipo, organizza e cambia con il plug-in WPCode. Per ulteriori dettagli, consulta il nostro tutorial su come configurare un plug-in wordpress.
Tenete a mente: è disponibile anche un modello sciolto di WPCode che funzionerebbe per questo tutorial. D’altra parte, proponiamo l’aggiornamento a un piano a pagamento in quanto consentirà l’accesso a opzioni aggiuntive.
Una volta attivato, vai a Snippet di codice » + Aggiungi frammento pagina web Internet sulla dashboard di wordpress.
Nella successiva pagina Web Internet, il plug-in ti mostrerà una serie di frammenti di codice pronti all’uso. Inoltre, saremo in grado di scrivere codice CSS progettato su misura.
Per dare un’occhiata a questo, sposta il mouse sulla casella “Aggiungi il tuo codice personalizzato (nuovo snippet)” e fai clic sul pulsante “+ Aggiungi snippet personalizzato”.
Questo ti porterà alla pagina web Internet dell’editor di codice.
Proprio qui, inserisci un nome per il tuo snippet di codice e quindi scegli Snippet CSS dal menu a discesa “Tipo di codice”.
Successivamente, aggiungi il seguente codice nella casella “Anteprima codice”:
#your-menu-id .your-menu-class {
    margin-top: 40px; /* Keep watch over this value in keeping with your theme */
    z-index: 10001;
    position: relative;
    padding-top:40px
}
In questo frammento di codice è molto importante l’alternativa #your-menu-id E .your-menu-class con i valori su cui devi concentrarti all’interno dell’HTML.
Ecco come l’abbiamo aggiunto al nostro sito Internet di controllo e l’abbiamo modificato per concentrarci sulla casa interessata.
La CSS comprende 4 leggi.
I primi sono i margin-top E padding-top legislazione. Poiché la barra di amministrazione ha un’altezza di raccolta di 32 pixel, la utilizzerai per correggere i CSS in conflitto.
Successivamente, la barra di amministrazione ha inoltre un file z-index valore impostato su 9999. Questa regola lo spinge verso la porta del display. Usando a z-index regola con il seguente valore, sposti l’intestazione o la casa di navigazione sulla porta.
IL position la regola è pronta relative come un modo per utilizzare il z-index regola.
Dopo, insieme alle leggi CSS progettate su misura, desideri dire a WPCode di utilizzare questo codice CSS solo quando un client registrato sta visualizzando il sito Web Internet.
Scorri in modo appropriato fino alla sezione Buono senso comune condizionale e attiva l’interruttore accanto alla selezione “Consenti senso comune”.
Successivamente, imposta semplicemente la strategia di localizzazione su “Mostra” e quindi fai clic su “+Aggiungi nuovo staff”.
Secondo le leggi del buon senso, desideri selezionare “Accesso effettuato” > “È” > “Vero”.
In ogni caso, nell’angolo in alto a destra dello schermo del computer, fai semplicemente clic su “Salva snippet” e passa da Inattivo a Vigoroso.
Al momento devi chiedere consiglio al tuo sito Internet e provare se il menu di navigazione e la casa dell’intestazione ora appaiono correttamente sopra la barra di amministrazione.
Se non riesci a capire correttamente l’ora principale, dai un’occhiata a regolare l’ora margin-top valore o focalizzato su diverse classi ID o CSS.
Perché funziona
Il problema si verifica continuamente perché il CSS del tema non tiene conto della barra di amministrazione, causando la visualizzazione del menu di navigazione sotto di essa. Utilizzando insieme a un piccolo frammento di CSS progettato su misura, controllerai il sito Web del menu di navigazione, assicurandoti che suoni come se fosse corretto sopra la barra di amministrazione.
Suggerimento bonus : Hai problemi con i CSS? Potrai assumere il nostro wordpress Emergenza potenziata. Per un piccolo prezzo, i nostri sviluppatori wordpress risolveranno il problema per te in pochissimo tempo e potrai far emergere ancora una volta la tua attività.
Soluzione 3: controllo dei conflitti tra plugin
Se hai provato le soluzioni precedenti e il problema persiste, sarà causato in modo intelligente dall’uso di un problema con il plug-in.
I plugin possono occasionalmente introdurre CSS o JavaScript che interferiscono con la costruzione del tema. Questa interferenza potrebbe causare problemi identici al menu di navigazione visualizzato sotto la barra di amministrazione.
L’elaborazione del plug-in in conflitto può risolvere il problema senza modificare il codice del tema.
1. Disattiva tutti i plugin:
Innanzitutto, trasferisciti nella dashboard di wordpress e vai a Plugin » Plugin installati.
Seleziona tutti i plugin selezionando la sfera accanto a Plugin nella parte superiore dell’elenco di spunta.
Desideri dover selezionare “Disattiva” dal menu a discesa delle azioni collettive e fare clic su “Esercitati”.
<img decoding=”async” loading=”lazy” width=”680″ height=”314″ src=”https://wpmountain.com/wp-content/uploads/2024/11/wpadmin-deactivate-wordpress-plugins.png” alt=”Disattivazione di tutti i plugin di wordpress” class=”wp-image-295982″/>
Ora, chiedi semplicemente consiglio al tuo sito Internet per verificare se il problema è stato risolto. Se il menu di navigazione ora viene visualizzato correttamente, probabilmente la maggior parte dei plugin ha causato il problema.
2. Determinare il plugin in conflitto
Per decidere quale plugin era la causa del problema, torna alla pagina Web dei plugin installati.
Dovrai riattivare tutti i plugin uno alla volta, controllando il tuo sito internet dopo ogni attivazione. Ripeti fino a quando il problema non si risolve dopo aver attivato un plug-in deciso.
Una volta che il problema si ripresenta, hai riconosciuto con successo il plugin che causa il problema.
Cosa fare dopo
Se decidi di avere un plugin in conflitto, immagina di contattare lo sviluppatore del plugin per rinforzarlo. Offriranno un ripristino o una sostituzione per risolvere il problema. D’altra parte, cercherai un plugin specifico che fornisca una capacità equivalente senza causare conflitti.
<span class=”ez-toc-section” id=”additional-resources-for-wordpress-admin”/>Risorse aggiuntive per l’amministratore di wordpress
Di seguito sono elencate alcune risorse aggiuntive che potresti trovare utili:
Si spera che le soluzioni che abbiamo condiviso sveleranno la barra di amministrazione causando il menu di navigazione o il problema di visualizzazione dell’intestazione sul tuo sito.
Potresti anche voler vedere le nostre informazioni sulla risoluzione degli errori più comuni di wordpress o dare un’occhiata ai nostri consigli sulla personalizzazione dello spazio di amministrazione di wordpress per i tuoi prerequisiti.
Se preferisci questo articolo, iscriviti al nostro canale YouTube per i tutorial video di wordpress. Potrai inoltre cercarci Twitter e Facebook.
I metodi di pubblicazione per riparare il menu di navigazione di wordpress mostrato sotto la barra di amministrazione sono apparsi per la prima volta su WPBeginner.
HTML forms can be great additions on your wordpress internet web page. They let visitors reach out to you, sign up for newsletters, provide feedback, and much more.
While HTML forms permit you to connect upper together with your target market, rising them can be difficult. And, for those who don’t appear to be familiar with coding, then the regarded as dealing with code can be overwhelming.
In this data, we will be able to show you how you can add HTML forms on your wordpress internet web page. This provides you with the tools you need to easily create custom designed HTML forms and make your internet web page further engaging.
wordpress-in-post.png” alt=”Add HTML forms in wordpress in-post image” class=”wp-image-285643″/>
What Are HTML Bureaucracy and Why Create One?
HTML forms art work similar to other internet web page forms. They let visitors kind in and submit wisdom like names, e mail addresses, feedback, orders, and further.
What gadgets them apart is that HTML forms are created using HTML code instead of a drag-and-drop visual editor like a sort plugin. So, it is important to define fields very similar to text boxes, checkboxes, radio buttons, and dropdown menus yourself. You make a decision how they look and set explicit regulations for some way they art work.
Listed below are some advantages of constructing forms from scratch using HTML:
Optimized Potency. HTML forms generally tend to load sooner and use a lot much less memory because the code is lightweight.
Keep watch over. You’ll have complete control over the form’s design and capacity because you’re not limited thru a sort builder’s choices.
Customization. HTML forms can be tailored exactly on your needs, offering further flexible shape customization.
While rising HTML forms from scratch is a great way to learn and apply coding, it does have its private not easy scenarios.
You’ll have hassle with cross-browser compatibility, where the form works differently on different web browsers. Moreover, coping with form validation with JavaScript can be difficult. It needs thorough testing to make sure you’ll be capable to achieve and process all client inputs correctly.
That said, there are ways to be able to upload HTML forms without the ones complexities. So, irrespective of if you are managing a wordpress blog, industry internet web page, or on-line retailer, you’ll be capable to merely add HTML forms on your internet web page without a want to code from scratch.
Inside the following sections, we will be able to show you how you can add HTML forms to wordpress. Proper right here’s a to hand information a coarse evaluate of the 2 methods we will be able to quilt in this data:
In a position? Let’s get started.
<h4 class=”wp-block-heading” id=”aioseo-method-2-adding-html-forms-in-wordpress-using-the-html-forms-plugin-easy”><span class=”ez-toc-section” id=”approach-1-together-with-html-bureaucracy-in-wordpress-using-the-html-bureaucracy-plugin-easy”/>Approach 1: Together with HTML Bureaucracy in wordpress Using the HTML Bureaucracy Plugin (Easy)
An easy means to be able to upload an HTML form to a wordpress internet web page is to use a free form plugin like HTML Paperwork. It’s a useful gizmo for rising and configuring HTML forms multi functional place, in order that you don’t will have to handle any server-side configuration.
In this data, we will be able to use the plugin’s free type, which contains the whole thing you need to create an HTML form.
To get started, let’s you’ll want to have the plugin installed on your wordpress internet web page. If you need be in agreement, then you definately’ll be capable to follow our step-by-step data on putting in a wordpress plugin.
Upon activation, you’ll be capable to navigate to HTML Bureaucracy » Add New for your wordpress admin dashboard to start out rising your contact form.
This may occasionally redirect you to the ‘Add New Form’ internet web page.
From appropriate right here, the first thing you’ll need to do is identify your form thru simply typing the identify into the ‘Form Title’ field. For instance, we named our form ‘Publication Sign-Up.’
Next, move ahead and click on at the ‘Create Form’ button underneath the sector.
When you do that, the ‘Edit Form’ internet web page will appear, and also you’ll be capable to get began customizing your HTML contact form.
At the top of the tab, you’ll see your form’s details, at the side of the form establish, slug, and shortcode. You don’t will have to memorize the ones details, as they’ll be available on the HTML Bureaucracy dashboard when you need them.
Beneath the ones details, you’ll to seek out the menu tabs. Inside the ‘Fields’ tab, you’ll be capable to see rather a large number of field buttons, like ‘Text,’ ‘Dates,’ ‘Checkboxes,’ and ‘Radio buttons,’ to be able to upload on your forms.
Let’s scroll down just a bit further.
At the bottom of this tab, you’ll find a pre-built HTML form together with the preview. This contact form is lovely simple. It has 4 fields for patrons to kind out their identify, e-mail handle, a brief subject, and a message.
Now, let’s say that you wish to have to be able to upload a brand spanking new field with an e mail publication subscription sign-up. Then simply click on on on one of the vital field buttons above ‘Form Code.’
Follow: Needless to say HTML Bureaucracy doesn’t strengthen e-mail promoting and advertising supplier integrations. So, it is important to manually add consumers’ e-mail addresses on your mailing report.
For instance, we will be able to use a dropdown field and create a ‘Certain/No’ chance.
From appropriate right here, you’ll need to click on on ‘Dropdown,’ and this may increasingly open the dropdown field’s configuration possible choices. You’ll be capable to get began completing the details, which include the sector’s label and choices.
After you have into the details, you’ll be capable to click on on ‘Add Field to Form.’
Then, you will have to see the dropdown field tag throughout the ‘Form Code’ section. Simply scroll down the tab to check it out.
The next step is to reorganize the contact form.
To handle a excellent go with the flow, you’ll want the dropdown field to be moderately underneath the ‘Electronic mail’ field.
To move it, you’ll be capable to decrease the dropdown field tag from the main tag’s
to without equal >. Then, move ahead and paste it moderately underneath the ‘Electronic mail’ tag.
The default ‘Matter’ field is probably not important for a newsletter sign-up form. So, we recommend disposing of the sector.
You’ll be capable to do this thru deleting its tag from the main
to without equal
.
After transferring and deleting tags, you’ll need to scroll down the tab to the ‘Form Preview’ section.
In this section, you’ll be capable to check for those who’ve successfully moved and deleted the fields without breaking the rest. You’ll be capable to moreover check if the dropdown menu works accurately.
When you find yourself happy with the results, move ahead and click on at the blue ‘Save Changes’ button underneath the ‘Form Code’ section.
As quickly because the saving process is finished, you will have to see a ‘Form up-to-the-minute.’ notification at the top of this internet web page.
Now, it’s imaginable you’ll need to check the form’s configuration. Let’s switch to the ‘Messages’ tab to look how HTML Bureaucracy configures the form submission confirmation messages.
Simply click on on on ‘Messages’ to open the tab.
This tab signifies that you’ll edit the pre-made copy for when a client’s form submission is successful and other an similar eventualities.
If the whole thing appears to be excellent to you, then you definately’ll be capable to go away it as is. Should you made any changes, don’t fail to remember to the ‘Save Changes’ button in order that you don’t lose your construction.
Next, let’s move to the ‘Settings’ tab.
Via default, HTML Bureaucracy will set ‘Certain’ to save lots of a variety of each and every form submission and ‘No’ to hide the form after a successful submission. You’ll be capable to customize this as sought after.
Then, throughout the ‘Redirect to URL After A success Sign-Ups,’ you’ll be capable to copy and paste the URL of a live web internet web page from your wordpress web site. Or, kind 0 into the sector to stick consumers on the internet web page after a successful form submission.
When the whole thing is set, all that’s left to do is add the HTML contact form to a wordpress internet web page.
Let’s head over to Posts or Internet web page » All Posts or All Pages from the wordpress dashboard.
<img decoding=”async” loading=”lazy” width=”680″ height=”345″ src=”https://www.wpbeginner.com/wp-content/uploads/2024/06/wpadminarea-pages-allpages.png” alt=”The All Pages menu item in the wordpress admin area” class=”wp-image-284995″/>
For this knowledge, we will be able to add the HTML form to our ‘Contact’ internet web page.
So, we’ll hover over the ‘Contact’ internet web page throughout the report and click on on ‘Edit’ when it seems that.
<img decoding=”async” loading=”lazy” width=”680″ height=”373″ src=”https://www.wpbeginner.com/wp-content/uploads/2024/06/wpadminarea-pages-allpages-contact-edit.png” alt=”The Edit button for editing a wordpress page” class=”wp-image-285009″/>
This may occasionally liberate the ‘Contact’ internet web page’s block editor.
Inside the editor, you’ll be capable to get began choosing an area to place the form. Then, simply hover over it and click on at the ‘+’ button to be able to upload the HTML Bureaucracy block.
<img decoding=”async” loading=”lazy” width=”680″ height=”359″ src=”https://www.wpbeginner.com/wp-content/uploads/2024/06/wpblockeditor-contactpages-addblock.png” alt=”The add new block button for adding a block in wordpress block editor” class=”wp-image-285010″/>
Now, you’ll be capable to kind ‘HTML Bureaucracy’ into the search bar to in brief to seek out the block. After you have the search finish end result, click on on it.
You’ll then see a dropdown throughout the ‘HTML Bureaucracy’ block. Simply make larger on it and select the form you wish to have to turn. Proper right here, we’re opting for the ‘Publication Sign-Up’ form that we merely created.
The form will appear when you submit your content material subject matter. So each time you’ve determined at the form from the dropdown menu, you’ll be capable to click on at the ‘Substitute’ button.
There you’ve gotten it! Your form is now live, and consumers can sign up for your newsletter. Proper right here’s what it could appear to be on your wordpress internet web page:
<img decoding=”async” loading=”lazy” width=”680″ height=”455″ src=”https://www.wpbeginner.com/wp-content/uploads/2024/06/livewebsite-htmlforms.png” alt=”HTML Forms’ newlsetter signup form on a live website” class=”wp-image-285107″/>
To appear form submissions, you’ll be capable to first head over to HTML Bureaucracy » All Bureaucracy. This may occasionally take you to the report of your whole HTML Bureaucracy.
Then, simply hover over a sort and click on at the ‘Submissions’ button when it seems that.
From appropriate right here, you’ll be capable to see all of your form submissions.
The ‘Submissions’ table details all wisdom consumers filled out for your form. Then, there’s the ‘Timestamp’ column, which tells you when they submitted the form.
For instance, appropriate right here, the main submission was made thru ‘Client 1.’
From the table, we will see that the shopper submitted the form on June 25 at spherical 1 p.m. Moreover, ‘Client 1’ spoke again ‘Most likely Later’ for the ‘Do you wish to have to subscribe to our newsletter’ question. So, in this case, you shouldn’t add their e-mail handle on your mailing report.
<h4 class=”wp-block-heading” id=”aioseo-method-2-adding-html-forms-in-wordpress-using-the-wpforms-plugin-recommended”><span class=”ez-toc-section” id=”approach-2-together-with-custom-designed-html-to-wordpress-bureaucracy-with-wpforms”/>Approach 2: Together with Custom designed HTML to wordpress Bureaucracy With WPForms
Every other method to rising HTML forms is using a sort builder. While this method doesn’t will mean you can code your forms from scratch, it signifies that you’ll customize them thru together with HTML code snippets.
For instance, it’s profitable to make use of custom designed HTML to show a brief warning message on a checkout form with a link on your ‘Refund and Returns Protection’ internet web page.
Otherwise you’ll be capable to upload a development bar to let consumers understand how some distance they’re from completing the form. Custom designed HTML might also will mean you can insert emojis or add a tooltip.
In this means, we will be able to show you how you can add HTML code snippets to customize your wordpress forms. We will show you tactics to take a look at this using WPForms, because it’s the best form builder for wordpress.
WPForms moreover comes with whole one-click add-ons and third-party integrations.
The ones tools include Consistent Touch for tracking your e-mail promoting and advertising advertising marketing campaign, the Form Abandonment add-on for monitoring and decreasing shape abandonment issues, and much more.
So, WPforms makes it more straightforward to extend your form’s capacity than for those who hard-coded your wordpress form from scratch.
Follow: WPForms Lite is completely free, alternatively you’ll need the highest price type to use the HTML field. Once upgraded, you’ll moreover get get right of entry to to bigger than 1900 form templates, the conditional not unusual sense serve as, and trustworthy strengthen. Fortunately, as a WPBeginner reader, you’ll be capable to use our WPForms coupon to get 50% off.
Previous than we start, let’s you’ll want to have WPForms installed and activated on your wordpress internet web page. If you need be in agreement, then please see our data on how one can set up a wordpress plugin.
Upon activation, you’ll be capable to navigate to WPForms » Settings to enter your license code. After you have into the vital factor, simply click on at the ‘Read about Key’ button to start out the verification.
Once completed, you’ll be capable to get began rising your form and together with custom designed HTML. For this knowledge, we will be able to show you how you can add a simple tooltip on your contact form.
A tooltip is like a small pop-up box that appears when you hover your mouse over a web section. It’s to hand as it shall we consumers be told further a few explicit web section without clicking or leaving the internet web page they’re on.
On the other hand first, let’s create the touch shape. Simply head over to WPForms » Add New from your wordpress admin area to get started.
<img decoding=”async” loading=”lazy” width=”680″ height=”308″ src=”https://www.wpbeginner.com/wp-content/uploads/2024/06/wordpress-wpforms-addnew.png” alt=”The Add New button under WPForms in the wordpress admin area” class=”wp-image-281452″/>
This may occasionally open the ‘Setup’ panel, where you’ll first need to identify your form. This identify is on your reference very best, so that you’ll be capable to use the rest you wish to have.
The next step is settling on a template.
As there are 1900+ form templates to choose from, you’ll be capable to use the search bar to filter them in brief. To check out this, merely kind ‘Contact Form’ and wait for the search to complete.
If you want to uncover each and every search finish end result to look what the form is like, then you definately’ll be capable to have the benefit of the preview serve as. Simply hover over the form template and click on on ‘View Demo.’
When you’ve found out the perfect contact form on your needs, hover over it once all over again and click on on ‘Use Template.’
This may occasionally liberate the form builder.
Now, all of the customization tools are throughout the left panel, and the live preview of the form is at the proper side of your show.
On this whole internet web page, you’ll be capable to use the drag-and-drop serve as to be able to upload portions from the customization panel to the live preview. You’ll be capable to moreover use the serve as to move spherical fields throughout the live preview.
Let’s take a look at together with the HTML field to the form. All you wish to have to do is scroll down the left-hand panel and then drag and drop ‘HTML’ onto the form.
After hanging the HTML field, you’ll be capable to click on on on it to open its customization possible choices. Proper right here, the first thing to do is fill out the sector’s ‘Label.’ You’ll be capable to moreover go away it empty.
Then, you’ll insert the custom designed HTML code into the ‘Code’ field.
To create a tooltip, you’ll be capable to use the ‘’ function or simply copy the following code and paste it into the ‘Code’ field:
Hi there! We've got an e-mail newsletter it is imaginable you'll be able to need to subscribe to. Let us know throughout the Observation or Message field, and we’ll sign you up.
This is just a trend code, so feel free to edit our copy to check your needs upper.
Follow: Needless to say if you want to instantly add consumers on your mailing report, then it is important to mix the form with an e-mail promoting and advertising provider. To check out this, merely see our data on how one can use a touch shape to develop your e mail record in wordpress.
Follow that WPForms doesn’t display the HTML code throughout the form builder preview. To preview the sector and make sure the whole thing is right kind, you’ll be capable to save the changes first and click on on ‘Preview.’
This may occasionally take you to a brand spanking new tab.
Now, let’s check out whether or not or now not the HTML code snippet on your tooltip works accurately. Simply hover over the text and wait for the tooltip to appear for a few seconds.
When you find yourself proud of the result, you’ll be capable to go back to the form builder to finalize your form.
Your form notification and confirmation settings are already prepare in WPForms. On the other hand, if you want to customize them, move to Settings, then Notifications or Confirmations.
Inside the ‘Notifications’ section, you’ll be capable to upload more than one recipients in your touch shape submission.
You’ll see a brief instruction for those who hover over the question mark button next to the ‘Send to Electronic mail Maintain’ field. You’ll need to follow it to make sure your notification is sent to the correct e-mail addresses.
You’ll be capable to moreover edit the pre-made copy on your e-mail subject line.
For instance, we changed ours from ‘New Get entry to: Contact Form’ to ‘You’ve got mail: New contact.’
When you’ve customized your notifications, you’ll need to switch to the ‘Confirmation’ panel.
Via default, WPForms gadgets your confirmation kind to ‘Message’ and has the pre-made copy ready for you. You’ll be capable to for sure trade the ones settings if you want to.
Slightly then showing a confirmation message, you’ll be capable to redirect consumers to a brand spanking new internet web page or a decided on URL.
Once the whole thing is set, it’s time to submit the form.
Pass ahead and click on at the ‘Embed’ button to start out publishing. WPForms will then ask if you want to add the form to an present or a brand spanking new internet web page. In this data, we will be able to make a choice ‘Make a choice present internet web page.’
<img decoding=”async” loading=”lazy” width=”680″ height=”341″ src=”https://www.wpbeginner.com/wp-content/uploads/2024/06/wordpress-wforms-embedwizard-selectexistingpage.png” alt=”The Select Existing Page button when embedding a form from WPForms” class=”wp-image-281974″/>
Inside the next pop-up window, you’ll make a choice a internet web page from the report of available pages. After that, you’ll be capable to click on on ‘Let’s move!’ to talk over with the internet web page’s block editor.
Now, you’ll be capable to hover over the world where you wish to have to place the form and click on at the ‘+’ button. Pass ahead and select the WPForms block.
Then, you’ll be capable to make a choice a sort from the WPForms block’s dropdown.
When you’ve determined on a sort, WPForms will load it throughout the determined on area. If you want to show the form’s establish, then you definately’ll be capable to head over to the ‘Block’ tab throughout the right-hand panel and switch on the ‘Show Title’ slider.
When you find yourself happy with the whole thing, move ahead and hit the ‘Substitute’ button.
And completed! You’ve added custom designed HTML on your WPForms contact form and made it survive your wordpress internet web page. Now, consumers can get began filling out the form and most likely sign up for your e-mail newsletter.
<img decoding=”async” loading=”lazy” width=”680″ height=”419″ src=”https://www.wpbeginner.com/wp-content/uploads/2024/06/livewebsite-wpforms-withcustomhtml.png” alt=”WPForms with custom HTML on a live website” class=”wp-image-285639″/>
To appear your whole WPForms form submissions, you’ll need to navigate to WPForms All Bureaucracy.
Then, you’ll be capable to hover over ‘Contact Form’ or any form from the report and click on on ‘Entries’ when the button turns out.
On the next show, you will have to be capable to see all of your form submissions.
The table details all of the wisdom consumers submitted with the form along with the submission time.
For instance, on July 2 at spherical 8 a.m., ‘Client 3’ said they wanted to subscribe to the email newsletter and left a question on how to achieve our purchaser strengthen staff.
We can moreover see the ‘Actions’ column. In this column, there are a variety of buttons: ‘View,’ ‘Edit, ‘Junk mail,’ and ‘Trash.’
Should you click on on ‘View,’ WPForms will take you to an get entry to’s trustworthy evaluate internet web page. On this internet web page, the plugin encourages you to activate two add-ons.
The main one is the Geolocation add-on for tracking, where the shopper submits the form. The second one is the Consumer Adventure add-on, which allow you to analyze the shopper’s path by way of your internet web page until they hit the ‘Publish’ button.
We recommend setting up and activating the ones add-ons for added optimized form potency.
The ‘Junk mail’ and ‘Trash’ buttons are to hand for marking fake submissions and disposing of them from your get entry to. To be told further about lowering fake form submissions, you’ll be capable to be told our data on how one can block touch shape junk mail.
<h4 class=”wp-block-heading” id=”aioseo-bonus-tip-uploading-a-custom-html-page-to-wordpress“><span class=”ez-toc-section” id=”bonus-tip-uploading-a-custom-designed-html-internet-web-page-to-wordpress“/>Bonus Tip: Uploading a Custom designed HTML Internet web page to wordpress
You may also be looking for one way so as to add a custom designed HTML internet web page on your wordpress internet web page. This can be to hand while you’ve were given a static template that you wish to have to use or an HTML internet web page from an out of date internet web page.
The full rule of thumb is so as to add a single HTML internet web page and now not the usage of a separate CSS or image data. On the other hand, if the internet web page you wish to have so as to add comprises separate CSS data and images, then you definately definately will have to place them in a list development.
To be told further, you’ll need to see our beginner’s data on how one can add an HTML web page to wordpress with out 404 mistakes.
We hope this text has helped you learn how to add HTML forms in wordpress. Next, it’s imaginable you’ll need to check our other guides on how one can export wordpress shape entries to CSV and Excel and how one can arrange wordpress shape monitoring in Google Analytics.
Should you favored this text, then please subscribe to our YouTube Channel for wordpress video tutorials. You’ll be capable to moreover to seek out us on Twitter and Fb.
The submit The best way to Upload HTML Paperwork in wordpress (2 Strategies) first appeared on WPBeginner.
While managing our internet websites, now we have constantly found out that within links are an crucial part of a a good fortune seo methodology. They act as bridges that knowledge shoppers and search engines like google and yahoo like google and yahoo via your web page’s content material subject material, boosting its visibility and authority.
The problem is that manually managing all of the ones links can in point of fact really feel like an endless recreation of connect-the-dots. That’s where the power of wordpressseo links plugins is to be had in.
Whether or not or no longer you’re taking a look to automate your within linking, reach data-driven insights into your web page development, or simply make the linking process a lot much less frustrating, the suitable seo links plugin can be a game-changer.
At WPBeginner, we rely on All in One seo for our link-building, on the other hand we keep in mind that each and every web page is different. As a result of this we tested quite a lot of other alternatives to help bloggers and business householders find the easiest seo plugin for their unique needs.
In this article, we’ll uncover the best wordpressseo links plugins, comparing their choices and ease of use to help you find the easiest device to boost your web page’s seo and client experience.
seo-links-plugins-in-post.png” alt=”Best seo Links Plugins for wordpress” class=”wp-image-297158″/>
Overview of the Best seo Links Plugins for wordpress
For those who’re in a hurry, then this comparison table will will can help you briefly be informed which seo links plugin most closely fits your web page.
How seo Links Plugins Can Reinforce Your Search Score
Inner links are used to connect the posts and pages on your web page, allowing shoppers to seek out further information about the topic they’re learning about. This will likely help building up pageviews and scale back the jump fee on your wordpress web page.
Take WPBeginner as an example. Let’s say that one among our visitors is learning a post about seo tips for green individuals. We find that they’re going to stay engaged longer if they are able to click on on on words like ‘keywords’ and ‘one way links’ to be informed further concerning the ones topics on the interconnected pages.
Inner links are also super essential for wordpress search engine marketing (seo) and can help your content material subject material rank upper in search results. When Google crawls your web page, it is going to most likely observe the ones links to seek out further of your content material subject material and make it available in searches.
The additional links you’re going to have connecting your pages, the quicker and easier it’s for Google to look out and index all of your content material subject material.
The problem is that including inside hyperlinks to each and every single post and internet web page on your web page can take forever. Plus, it’s easy to overlook to link to at least one factor essential.
seo links plugins for wordpress make the process much more easy, ensuring that each and every internet web page on your web page gets the attention it deserves:
They counsel similar pages you’ll link to if you’re writing a post and care for an invaluable document of linking choices that you just’ll assessment later as your web page grows.
They find any ‘orphaned’ pages that no other posts link to and counsel tactics to connect them to the rest of your web page.
Some may also robotically link positive keywords on your web page to express pages, in order that you don’t will have to do it manually each and every time.
So, let’s take a look at the pros and cons of the best seo links plugins for wordpress and the best way they are able to will can help you create upper connections right through your web page.
How We Check out and Analysis the Best seo Links Plugins
Previous than we suggest any seo links plugin to our readers, we first take a look at and overview it completely. In fact, now we have used quite a lot of of them on a long-term basis proper right here on WPBeginner.
While checking out, we pay explicit attention to:
The usual, relevance, and selection of within linking choices it discovered
How merely it we could us add the links they have got been recommending
To any extent further choices introduced by means of the plugin to make certain that within links had one of the crucial positive have an effect on on seo
With that being discussed, let’s take a look at probably the most an important best seo links plugins for wordpress.
Why Trust WPBeginner?
The WPBeginner body of workers brings over 16 years of real-world experience in working a weblog and establishing a good fortune wordpress internet websites.
We moderately take a look at each plugin to ensure it meets our over the top necessities for potency, ease of use, and value previous than we imagine recommending them.
For added details, see our editorial procedure.
1. All in One search engine marketing
<img decoding=”async” loading=”lazy” width=”680″ height=”355″ src=”https://wpmountain.com/wp-content/uploads/2024/10/image-17.png” alt=”The All in One seo plugin” class=”wp-image-305072″ title=”The All in One seo plugin”/>
All in One search engine marketing (AIOSEO) is the highest search engine marketing plugin for wordpress, and is used by over 3 million folks. In fact, we’ve used it on numerous wordpress internet sites through the years.
In keeping with first-hand experience, we even wrote an entire All in One search engine marketing overview, which it’s your resolution to try for additonal entire details.
We adore All in One seo because it let you fortify seo although you don’t have any technical knowledge. It offers a powerful Hyperlink Assistant that makes it easy to build upper within links.
It starts by means of giving you an intensive document of the links it crawled on your web page, along side within links, outbound links, and affiliate links for each post and internet web page.
It moreover provides just right within link concepts in line with your provide content material subject material.
It presentations you which of them posts it recommends for within linking and even robotically generates a phrase and anchor text for each link. Simply clicking on ‘+ Add Link’ will add all of the phrase along with the link to the proper blog post.
You’ll be capable of do the an identical with each and every orphaned internet web page on your web page. The ones pages in recent years don’t have any within links pointing to them, so together with links will let search engines like google and yahoo like google and yahoo briefly index them, improving your seo.
AIOSEO allows you to briefly add links from the content material subject material editor by means of simply in search of their establish and provides alternatives to upload nofollow, subsidized, and UGC (user-generated content material subject material) tags.
Besides that, AIOSEO helps you to find and connect broken links, optimizes your web page for wealthy snippets, and much more.
Link Assistant isn’t built-in inside the free style of AIOSEO
Why we decided on All in One seo: AIOSEO is an reasonably priced and beginner-friendly seo plugin that provides numerous tactics of improving links to boost your seo. Its Link Assistant function acts as a data-driven command center for optimizing your entire web page development.
The facility to analyze link power, robotically determine orphaned content material subject material, and get real-time concepts as you write makes AIOSEO your only option for any person interested by maximizing their seo have an effect on via within linking.
Yoast is a popular wordpressseo device that competes with AIOSEO. Its best charge plugin comes with fundamental within linking choices.
Now we have now researched and written about this plugin in depth in our Yoast overview and our comparison of Yoast search engine marketing vs AIOSEO, so likelihood is that you’ll want to take a look at those out for many who’re enthusiastic about additional information.
In the case of within links choices, Yoast scans your content material subject material and then provides concepts for making improvements to them from throughout the wordpress block editor.
This plugin moreover has limited orphaned content material subject material detection and counts the selection of within links used on a internet web page, on the other hand general, its linking capacity isn’t as entire as All in One seo’s Link Assistant.
While we used this plugin on WPBeginner for a couple of years, we decided to transfer clear of Yoast to All in One seo because of its upper Link Assistant device, redirection manager, sitewide seo audit, enhanced image seo, and additional.
With that all over ideas, you’ll be able to be enthusiastic about our document of the highest Yoast search engine marketing choices for wordpress.
Pros of Yoast:
Suggests linking choices inside the sidebar as you write a post
Orphaned content material subject material detection
Counts within links on a internet web page
Cons of Yoast:
seo links choices don’t appear to be available inside the free style
Why we decided on Yoast: Yoast is a popular seo plugin that comprises quite a lot of seo links choices. Its concepts for within links in point of fact really feel herbal as you write.
3. Rank Math
Rank Math is another wordpressseo plugin with fundamental seo links choices. Now we have now in depth experience with this device and created an entire Rank Math overview to supply our shoppers an in-depth analysis of all its choices.
Relating to within linking, we like how this plugin can briefly scan your web page and then get a hold of concepts for together with within links.
The ones link concepts are displayed to your settings panel as you write your posts. You simply reproduction a link and manually paste it into your text.
In our checking out, we moreover found out this plugin effectively identifies orphaned pages and provides concepts for enlargement.
However, like Yoast, Rank Math’s seo links choices don’t appear to be as entire as AIOSEO’s.
Pros of Rank Math:
Basic link concepts are available inside the free style
Uses context to suggest similar within links
Identifies orphaned content material subject material
Cons of Rank Math:
Further advanced seo links choices require the highest charge style
Why we decided on Rank Math: Rank Math offers within linking concepts in its free style. We find that this plugin offers superb value for money, so it is going to suit web page householders who’re at the affordable or just starting with seo.
4. Hyperlink Whisper
Hyperlink Whisper is a best charge wordpress plugin that is particularly designed to help you create within links for your web page that boost your search engine rankings. The free style accommodates lots of very good seo links choices and could also be enough for some shoppers.
For example, we like how the free plugin analyzes your content material subject material so it is going to most likely counsel similar within links as you write, and lets you add the ones links with merely a couple of clicks.
It is going to most likely moreover determine orphaned pages, offers helpful evaluations about your web page’s within linking development, allows you to add within links in bulk, and checks for broken links.
While you give a boost to to the highest charge style, the plugin may also counsel anchor text you’ll use. Plus, it supplies external links to its evaluations.
Pros of Link Whisper:
Individual-friendly and surroundings pleasant
Suggests within linking choices
Inner links reporting
Shows and fixes broken links
Many seo links choices are available inside the free style
Cons of Link Whisper:
This plugin is thinking about seo links and provides few other seo choices
Why we decided on Link Whisper: Link Whisper is a beginner-friendly plugin with powerful within linking choices. It is going to most likely merely streamline and optimize your within linking methodology.
5. Interior Hyperlink Juicer
Interior Hyperlink Juicer works differently from the other plugins on this document. It uses automation to build within links to your most essential content material subject material. This fashion, you’ll build up website guests and interactions on your web page.
You simply add a listing of specific keywords and phrases along with the internet web page URLs you want to direct those keywords to, and it’ll robotically add links any place it finds the important thing words.
We’re impressed with the best way through which the plugin analyzes your content material subject material to put links naturally throughout the text and allows you to vary the anchor text so it doesn’t appear to be computer-generated.
Other free choices include the power to blacklist and whitelist specific posts from within linking, an method to limit the selection of links consistent with post, and fundamental link reporting to come up with an overview of your within links.
There is also a best charge style that lets you add infinite keywords for computerized links, has advanced linking regulations, checks for broken links, and additional.
Pros of Inner Link Juicer:
Automatically creates within links in line with keywords
Intelligently inserts links within your content material subject material
Customizable anchor text that can be a large number of
The free style could also be all you need
Cons of Inner Link Juicer:
Doesn’t include link concepts
Sophisticated choices are only available inside the best charge style
Why we decided on Inner Link Juicer: In our opinion, Inner Link Juicer is an excellent chance if you want to automate your within linking. The free style provides a solid foundation, while the highest charge style unlocks advanced controls for higher internet sites and specific seo strategies.
However, understand that Inner Link Juicer doesn’t offer choices like real-time link concepts as you write. That discussed, it’s conceivable you’ll choose it for many who select a set-and-forget means.
6. SEOPress
SEOPress is a simple and reasonably priced wordpressseo plugin. It accommodates the entire choices you could be anticipating from an seo plugin, very similar to meta establish, description, Open Graph make stronger, image and content material subject material XML sitemaps, redirects, and additional.
While it’s associated with other absolute best wordpressseo plugins to be had in the marketplace, we have now been dissatisfied that its within linking choices don’t appear to be probably the most tough.
One critical limitation we found out is that it only offers a maximum of 5 within linking concepts from its seo metabox. You’ll be capable of view the guidelines and duplicate any link with a single click on on.
In its paid style, SEOPress moreover offers a broken link checker. Finding and fixing broken links is essential for a healthy web page development and superb client experience. Doing so will indirectly benefit your seo.
Pros of SEOPress:
Suggests within linking choices
Identifies broken links
Lightweight and speedy
Relatively priced best charge plan
Cons of SEOPress:
Most efficient offers the fundamental seo links choices
It’s limited to simply 5 link concepts at a time
The ones are only available inside the best charge style
Why we decided on SEOPress: While SEOPress doesn’t offer advanced within linking choices, it is a solid and reasonably priced seo plugin that provides fundamental seo links choices and a broken link checker.
7. Bonus: YARPP
YARPP (or However Another Similar Posts Plugin) is a free plugin that can robotically display posts and pages which could be related to the content material subject material your buyer is learning.
This may increasingly sometimes fortify consumer engagement and pageviews, which indirectly improves seo. On the other hand, since the links don’t appear to be in reality added to your posts, it’ll not help search engines like google and yahoo like google and yahoo index your content material subject material.
YARPP is discreet to use, and it offers useful alternatives so that you’ll customize which pages and posts are confirmed. It accommodates pre-built problems that you just’ll customize to check your web page’s design.
Pros of YARPP:
Automatically shows similar within links to your content material subject material
Assists in keeping visitors engaged
Free
Cons of YARPP:
Doesn’t recommend within link choices
Doesn’t in reality add within links to your content material subject material
Why we decided on YARPP: YARPP can fortify client experience and encourage content material subject material discovery while robotically together with similar within links to your content material subject material. However, it doesn’t offer specific seo links choices like the other plugins on our document.
8. Bonus: MonsterInsights
MonsterInsights is the best Google Analytics answer for wordpress, allowing you to track essential metrics correct from your wordpress dashboard.
Now we have now quite a lot of first-hand experience with this device, so it’s your decision to try our complete MonsterInsights overview for additonal in-depth details.
MonsterInsights let you fortify the seo of your links as it’s serving to you monitor hyperlink and button clicks so that you’ll see the potency of affiliate link clicks, outbound link clicks, and additional.
While this won’t straight away fortify your links seo, we like the way it presentations you which of them links are appearing well and which don’t appear to be so that you’ll fortify them.
For example, you’ll see the outbound hyperlinks you’re monitoring in wordpress by means of visiting Insights » Tales and clicking the ‘Publishers’ tab. You’ll be capable of scroll down to appear the ‘Top Affiliate Links’ document which presentations the links your visitors click on on most ceaselessly.
MonsterInsights moreover helps you determine your hottest content material. This will likely knowledge your within linking methodology, allowing you to strategically link to high-performing pages from other similar content material subject material.
The free style accommodates outbound link tracking
Cons of MonsterInsights:
Does not include links seo choices very similar to automated within linking or anchor text optimization like numerous our other ideas
Why we decided on MonsterInsights: While MonsterInsights will not directly fortify your links seo, when used alongside one of the crucial other plugins, it can provide knowledge and metrics that can inform your linking methodology.
For those who’re using an entire seo plugin, then chances are that it accommodates some useful seo links choices. Out of the ones, All in One search engine marketing‘s Link Assistant is exceptional and provides one of the crucial complete set of choices available.
It offers helpful within linking concepts each and every during the wordpress content material subject material editor and in a central location. The ones can also be added to your posts with the simple click on on of a mouse.
Previous that, AIOSEO will provide you with detailed evaluations of your links, identifies orphaned pages, and simply makes it easier so that you can upload links to your posts and pages.
For those who occur to don’t appear to be already using an seo plugin, or if you are using one with inclined seo link choices, then Hyperlink Whisper allows you to add loads of the an identical within linking choices that AIOSEO does.
On the other hand needless to say because it doesn’t include every other seo choices, you’re going to need a further full-featured seo plugin like AIOSEO anyway.
In any case, for many who simply want to robotically create within links to your most essential pages, then Interior Hyperlink Juicer will automate this process with minimal setup. While it lacks just about all of the seo links choices introduced by means of AIOSEO, it offers the best set-and-forget answer.
seo links plugins for wordpress will can help you fortify your web page’s within linking development, which is a neighborhood of links connecting your pages to each other.
They can do this by means of robotically together with links in line with keywords, suggesting links similar to your content material subject material, working out orphaned pages that don’t have any links pointing to them, and additional.
Engines like google like google and yahoo like Google use within links to seek out and index content material subject material and understand your web page development.
This lets them display your content material subject material on search results pages and lets them know which content material subject material you notice as most essential so they are able to prioritize it in search results.
Can’t I merely add within links manually? Why use a plugin?
You’ll be capable of, but it surely’s time-consuming, in particular for higher internet websites.
Plugins streamline the process, saving you time with automation and proposals – giving data-driven insights so that you’ll continue to fortify your linking methodology.
Will using an seo links plugin be certain that higher rankings?
While a superb within linking methodology is essential, seo involves many components. seo links plugins are tools to help you, on the other hand they don’t be certain that absolute best rankings.
Besides within linking, other rating components include top quality content material subject material, positive client experience, on-page seo optimization, one way links, and wordpress potency.
Now that you just’ve seen the best seo links plugins for wordpress, likelihood is that you’ll like to try another articles related to wordpressseo:
We hope this tutorial helped you to find the best seo links plugins for wordpress. You may also want to see our knowledge on inside linking for search engine marketing or our professional select of the most efficient wordpress search engine marketing plugins and gear that you need to use.
For those who occur to preferred this article, then please subscribe to our YouTube Channel for wordpress video tutorials. You’ll be capable of moreover find us on Twitter and Fb.
The post 7 Perfect search engine marketing Hyperlinks Plugins for wordpress (Unfastened and Paid) first gave the impression on WPBeginner.
Let’s face it: getting your website noticed is extremely important for its excellent fortune. And in our experience, most internet pages get the bulk of their web site guests from search engines like google like google and yahoo.
Further web site guests approach further customers, further product sales, and additional get advantages. So, you could be in search of a top quality seo tool to reinforce your search rankings and attract further visitors.
With such a large amount of seo tools available, every free and paid, it’s natural to wonder whether paying for a best fee plugin is for sure definitely worth the money.
In this article, we’ll share our firsthand experience the usage of every free and best fee wordpressseo plugins. We’ll uncover the extra choices best fee tools offer and the impact they are able to have on your website’s web site guests and excellent fortune.
Choosing the Right kind seo Device for Your wordpress Site
wordpress consumers have a lot of alternatives in the case of plugins that lend a hand optimize internet pages for search engines like google like google and yahoo. Alternatively with such a large amount of tools that promise to boost your rankings, it’s laborious to seize the starting point.
Proper right here at WPBeginner, we get lots of questions from readers asking which seo plugin is the best for making it to the perfect spots in search results.
In response, we created an intensive show off of the most efficient search engine marketing plugins and gear. The ones tools can help you building up your website web site guests by means of 20-30% within just a few months.
This tick list covers somewhat numerous use cases and incorporates primary plugins like All in One search engine marketing (AIOSEO) and Yoast search engine marketing, along with standalone tools like Semrush and Ahrefs.
Alternatively proper right here’s the catch. Lots of the ones plugins offer every free and best fee permutations, leaving you with each different option to make.
While free permutations provide a cast foundation for basic seo, the highest fee upgrades promise to liberate complicated choices designed to give your web site an edge in search engine rankings.
So, are those best fee choices for sure definitely worth the investment? Do they in fact make a difference on your search rankings?
Let’s dive in and uncover the unique purposes of best fee wordpressseo tools and see how they are able to lend a hand your website make it into the perfect search results pages.
What Are the Benefits of Best fee wordpressseo Plugins?
At WPBeginner, we’ve been the usage of best fee seo plugins for a couple of years. Listed below are a couple of of our favorite choices and benefits:
While free plugins provide basic on-page analysis, best fee permutations incessantly offer further in-depth insights and proposals.
They run entire seo audits on your website. This way, you get a clear idea of your web site’s general neatly being from an seo viewpoint. They scan your entire web pages and then highlight possible issues, recommending how you can restore them.
We regularly use AIOSEO to analyze our content material subject matter for readability, keyword usage, and general optimization. It gives us get right of entry to to an actionable search engine marketing record inside of our wordpress admin space that gives us a clear roadmap for building.
<img decoding=”async” loading=”lazy” width=”680″ height=”245″ src=”https://wpmountain.com/wp-content/uploads/2024/09/aioseo-complete-seo-checklist.png” alt=”Complete seo Checklist in AIOSEO” class=”wp-image-293359″ title=”Complete seo Checklist in AIOSEO”/>
This is in fact helpful because of search engine marketing is a complicated procedure that takes time. Having a clear checklist of the entire thing that should be stepped ahead simplifies the process so that you’ll merely restore one issue at a time.
2. Difficult Sitemaps
Search engines like google wish to to find and index every internet web page on your website previous than they are able to be displayed in search results.
Google recommends the usage of sitemaps to lend a hand with this process. Sitemaps lend a hand search engines like google like google and yahoo transfer slowly up to 40% further pages, resulting in further of your content material subject matter appearing in search results.
There are different types of sitemaps, harking back to XML sitemaps that lend a hand search engines like google like google and yahoo discover and index your content material subject matter and RSS sitemaps that notify them of up to the moment content material subject matter.
Enabling both a kind of gives you the most important seo benefits. With a best fee wordpressseo plugin, that is so simple as switching on a surroundings for each type of sitemap.
3. Tricky Redirects and 404 Monitoring
Broken links stage to web pages that don’t exist, leading to frustration and 404 error messages for your consumers. They’re moreover bad for seo and result in a 12% higher leap fee.
Best fee seo plugins imply you’ll be able to steer clear of broken links by means of automatically growing redirects while you rename a post or internet web page or change its URL.
Moreover they automatically observe and log 404 mistakes so that you’ll in short redirect the ones URLs to present posts as part of your not unusual wordpress upkeep.
This will once in a while ensure that your visitors to find the guidelines they’re in search of and steer clear of frustrating surprises when clicking links on your web site.
4. Difficult Schema Markup
Schema markup is structured wisdom that is added for your web pages at the back of the scenes. It’s serving to search engines like google like google and yahoo upper understand your content material subject matter and display it further prominently in search results.
As an example, the usage of recipe schema may make foods blogs further visible in search results. It’s going to almost certainly building up your click-through fees by means of 30%, bringing valuable web site guests for your website.
Alternatively manually together with this structured wisdom for your posts might be very technical and time-consuming.
It’s much more easy the usage of a best fee seo plugin because of it’s going to perhaps add schema markup automatically. The ones tools moreover mean you can add further explicit markup to individual posts with the clicking of a mouse, along side FAQs, recipes, events, products, and additional.
5. Within Linking Concepts
We always suggest that you simply upload hyperlinks in your personal content material throughout your website. This way, you lend a hand consumers to find posts which might be related to the topic they’re finding out about. The ones are known as inside links and so they’re excellent for seo, increasing internet web page views by means of up to 40%.
The problem is that as you create further content material subject matter, it becomes laborious to go looking out all the identical blog posts you’ll link to. Searching for them manually becomes frustrating and takes a lot of time.
Best fee seo plugins lend a hand by means of automatically checklist inside linking possible choices. With a click on on of your mouse, you’ll merely add the ones links to similar posts along with an automatically generated phrase and anchor text, making improvements to your seo and saving you time.
6. Social Media Optimization
We moreover use a best fee wordpressseo plugin for social media optimization because it allows us to control how our WPBeginner content material subject matter turns out when shared on platforms like Facebook and Twitter (X).
As an alternative of the ones platforms pulling random knowledge and images from our posts, we will be able to specify the title, description, and image that is used. Which means that our posts are a lot more more likely to resonate with our social media fanatics, bringing further web site guests to our web site.
<img decoding=”async” loading=”lazy” width=”680″ height=”377″ src=”https://wpmountain.com/wp-content/uploads/2024/09/aioseo-facebook-preview.png” alt=”The wordpress social media sharing settings” class=”wp-image-215578″/>
If your enterprise has physically puts, then best fee seo plugins can lend a hand optimize your website for native seek effects, along side automatically generating location-specific schema markup that makes it more uncomplicated for purchasers for your own home to go looking out you.
Imaginable customers will see your enterprise on Google Maps and search results when in search of your type of business in their local space.
They’re going to be able to see your take care of, phone amount, and opening hours right kind from the quest results internet web page. Plus, they are able to even get turn-by-turn directions as they energy for your store.
If you have an on-line retailer, you’ll moreover take pleasure in the specialized WooCommerce search engine marketing options presented by means of best fee plugins. The ones imply you’ll be able to optimize your product pages in order that they’re further visible in product searches.
Consumers might also be capable of see purchaser reviews and well-known individual rankings, showing that other customers have had a good experience along side your products. This may increasingly lend a hand energy further web site guests for your store.
9. Priority Give a boost to
Whilst you’re running a internet primarily based business website, gaining access to skilled reinforce will also be useful. Best fee permutations usually offer priority reinforce that will help you unravel issues in short.
This promises that for those who come all the way through any problems or issues when the usage of the plugin, then you definately’ll download suggested lend a hand from execs and get once more to the method of running your enterprise.
For added details, you’ll see our knowledge on the right way to ask for wordpress fortify and get it.
For individuals who’re excited about the usage of further herbal web site guests for your website, then subscribing to a best fee seo plugin like now we have now is a smart switch.
Your next procedure is to come to a decision which plugin or service to use. Your first question it’ll be which plugin supplies the best price for money.
AIOSEO and Yoast search engine marketing are the primary wordpressseo plugins and offer extensive choices.
Then again, there are important permutations in their pricing and lines.
After we review the two plugins’ most affordable plans, AIOSEO is further affordable while offering identical choices:
AIOSEO’s Elementary plan starts at $49.60 consistent with twelve months
Yoast seo Best fee starts at $99 consistent with twelve months
Initially glance, the prices of their most powerful seo plans look an similar:
AIOSEO’s Elite plan costs $299.60 consistent with twelve months
Package deal pricing for Yoast seo Best fee, Yoast WooCommerce seo, Yoast Local seo, Yoast Knowledge seo, and Yoast Video seo costs $229 consistent with twelve months.
Then again, the adaptation is that AIOSEO’s plan covers 100 internet pages, while Yoast’s price is for a single web site. Plus, AIOSEO supplies a further entire function set.
On the subject of price for money, AIOSEO sticks out. It supplies a compelling package deal deal that covers multiple internet pages at a competitive price stage.
You’ll be capable to be told further in our detailed comparison of Yoast search engine marketing vs. All in One search engine marketing.
You might also love to inspect our journey switching from Yoast to All in One search engine marketing to reinforce our seo workflow and get right of entry to the seo choices we’d like.
All in One seo vs. Best fee Standalone seo Equipment
For individuals who don’t have the fee vary for standalone seo tools like Semrush or Ahrefs, AIOSEO Top rate supplies a lot of impressive choices for a in reality absolute best price.
To get a hold of an idea, although having a look at the most affordable alternatives, Semrush‘s simplest plan starts at $119.95 per month, and Ahrefs‘ lite plan starts at $99 per month.
While the ones tools are extraordinarily powerful, their starting prices come to bigger than $1,000 consistent with twelve months, which is probably not justifiable for smaller internet pages or bloggers.
Against this, you’ll subscribe to AIOSEO’s highest-tier Elite plan for a ways a lot much less money. It incorporates complicated choices like local seo, complicated WooCommerce reinforce, and video seo and costs lower than $300 consistent with twelve months.
Besides that, AIOSEO focuses specifically on wordpress, making it more uncomplicated to use and additional tailored for your website’s needs. This makes it a cost-effective answer for corporations or firms managing multiple wordpress web pages.
Plus, for those who run a small business or are merely getting started, AIOSEO Best fee’s choices could be more than enough for your needs.
That discussed, for those who’re in search of further seo choices at a less expensive value, you’ll pair the plugin with an affordable tool like SEOBoost to get powerful content material subject matter optimization alternatives. This gives you AI-powered analyses, content material subject matter audits, content material subject matter briefs, and much more.
Or, if you wish to have just a little further lend a hand with keyword research, LowFruits is a smart variety. It’s serving to you generate keywords and analyze the SERPs to reinforce your rankings.
Best fee seo plugins are paid permutations of wordpressseo tools that provide complicated choices, enhanced optimization purposes, and incessantly superior reinforce compared to their free conceivable alternatives.
How do best fee seo plugins range from free seo plugins?
Best fee seo plugins typically offer further complicated choices like schema markup generators, content material subject matter optimization tools, local seo choices, and faithful reinforce. Free plugins usually provide basic seo capacity then again would perhaps lack complicated choices or not unusual updates.
Are best fee seo plugins important for excellent search engine rankings?
While not utterly important, best fee seo plugins can significantly reinforce your wordpress web site’s optimization efforts, probably primary to higher search engine rankings. They incessantly provide tools and lines that can get a hold of an edge in competitive markets.
Will a best fee seo plugin automatically reinforce my search rankings?
No seo plugin can make certain stepped ahead rankings. Then again, best fee plugins provide complicated tools and steerage that will help you optimize your web site further effectively, which is in a position to contribute to higher search potency.
How so much do best fee seo plugins typically price?
Prices vary, then again most best fee seo plugins price between $50 and $300 consistent with twelve months, depending on the choices presented and the collection of web pages you’ll use them on.
Do I wish to renew my best fee seo plugin license yearly?
Generally, positive. Annual renewals be sure you continue to acquire updates, reinforce, and get right of entry to to new choices. Then again, some plugins offer lifetime licenses.
Can I get a refund if I’m not satisfied with a best fee seo plugin?
Many best fee plugin developers offer money-back guarantees for a certain period. At all times check the refund protection previous than purchasing.
In recent times, AIOSEO supplies a 14-day money-back make certain, and Yoast seo has a 30-day make certain.
We hope this educational helped you be told that, for various internet pages, best fee plugins are for sure price investing in. You might also wish to see our knowledge on the right way to automate wordpress search engine marketing or our skilled select of the most efficient FAQ wordpress plugins.
For individuals who most popular this article, then please subscribe to our YouTube Channel for wordpress video tutorials. You’ll be capable to moreover to find us on Twitter and Fb.
The post Are Top rate wordpress search engine marketing Plugins Price It? (+ Easy methods to Select) first appeared on WPBeginner.


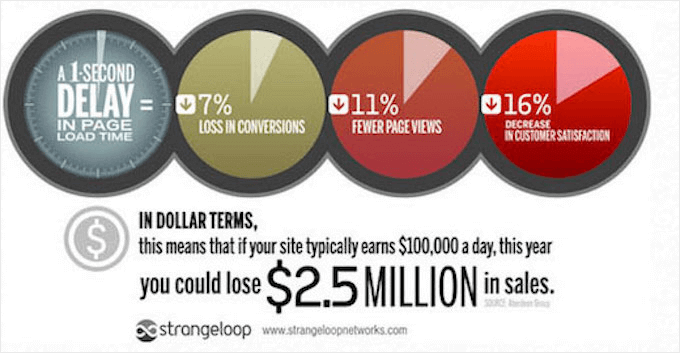
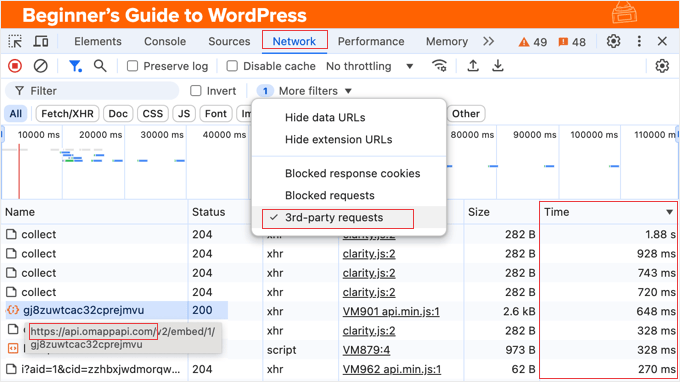


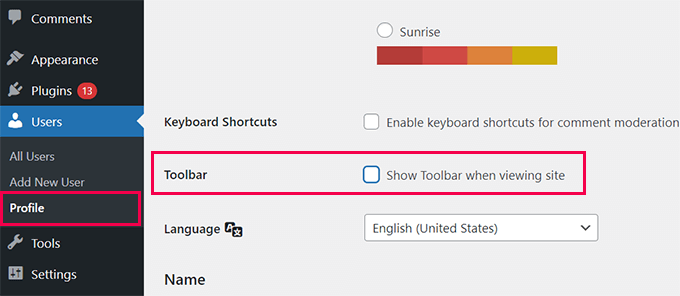
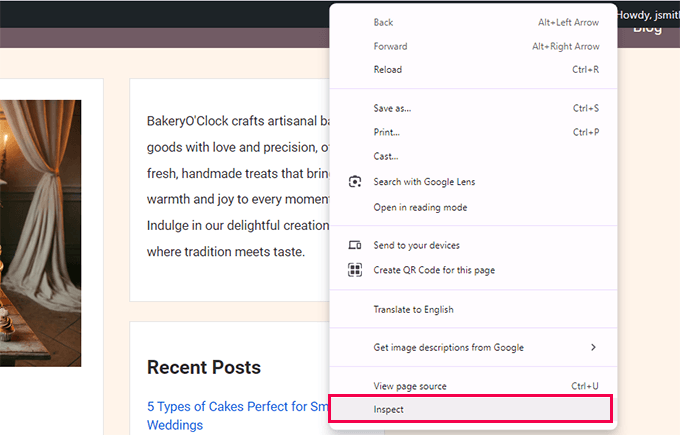
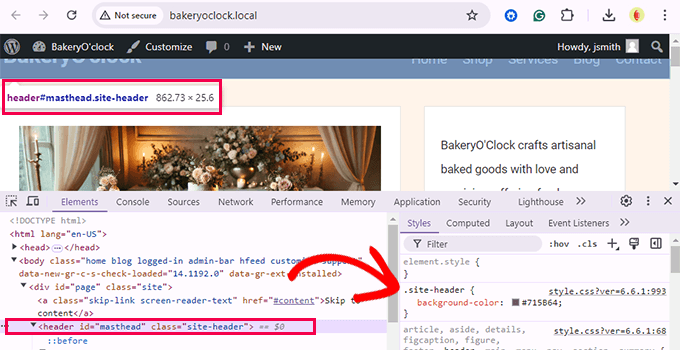
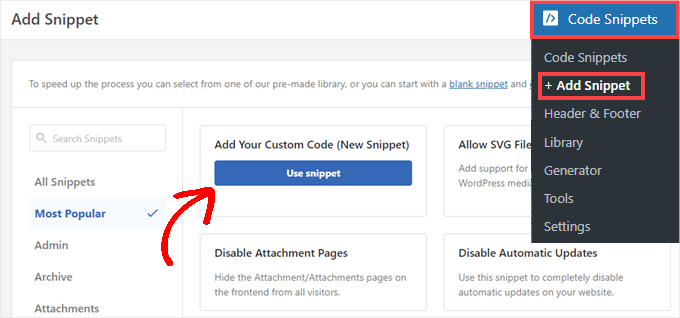
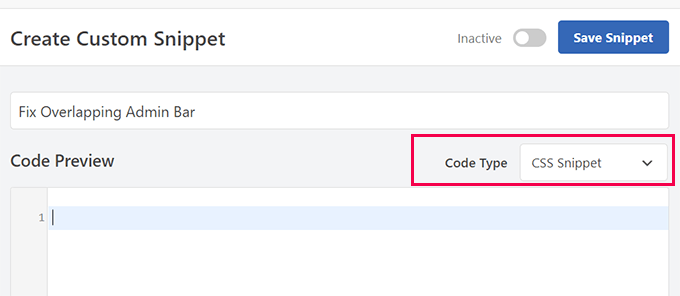
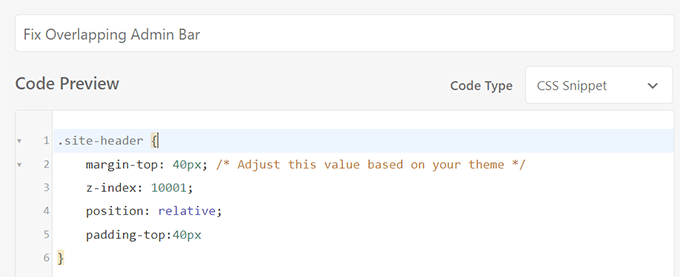
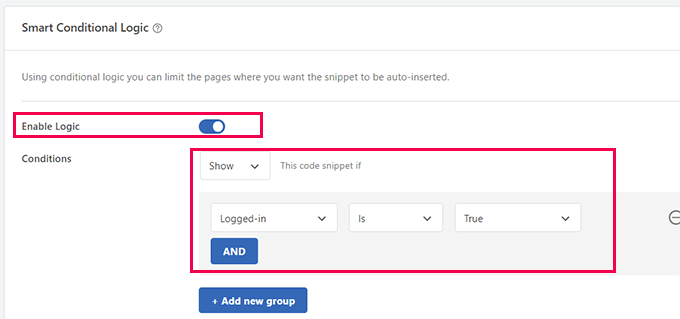


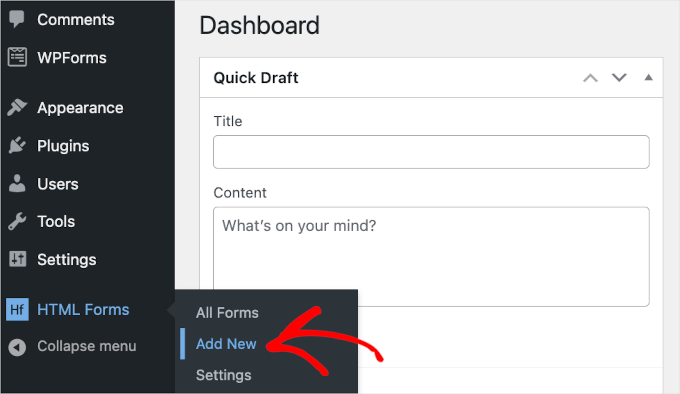
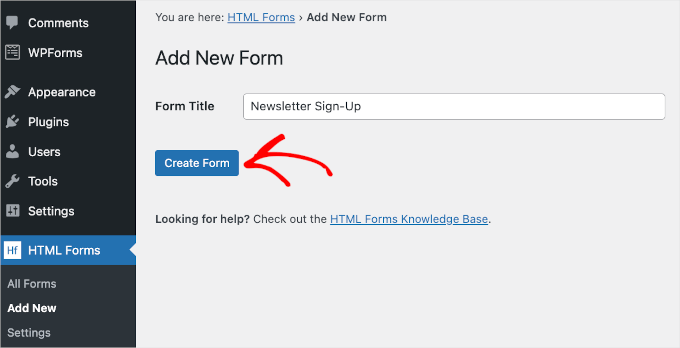


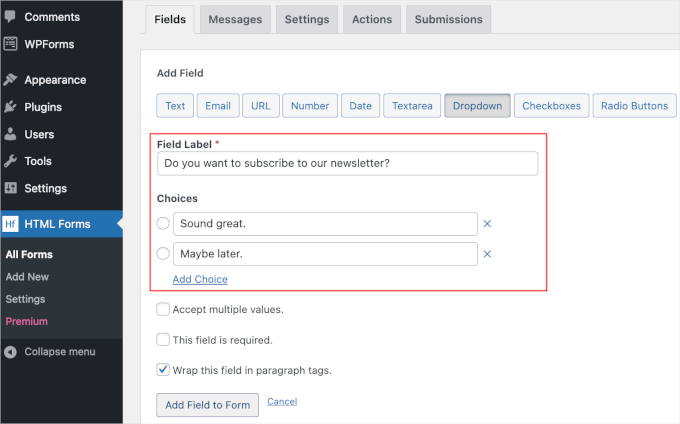
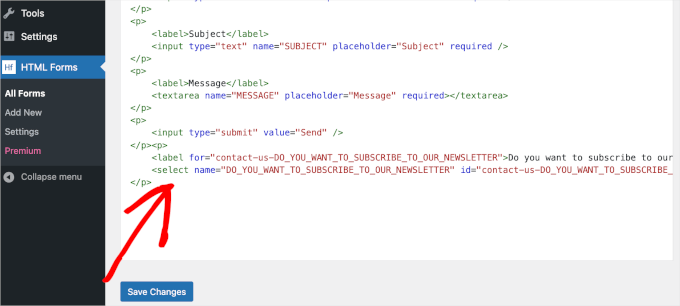

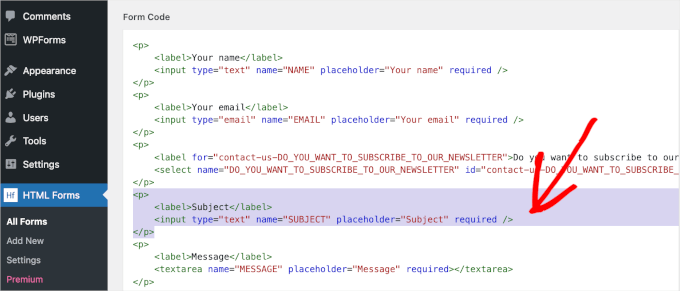
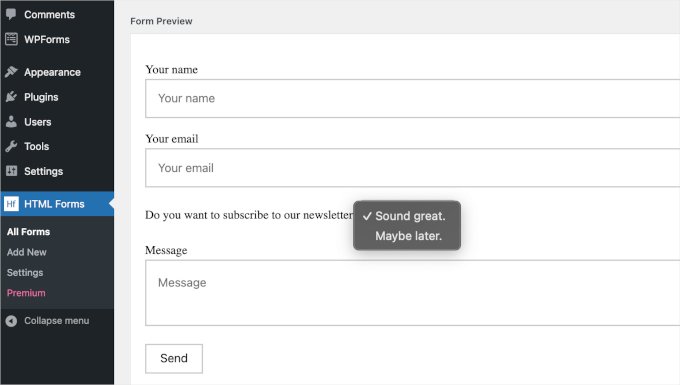
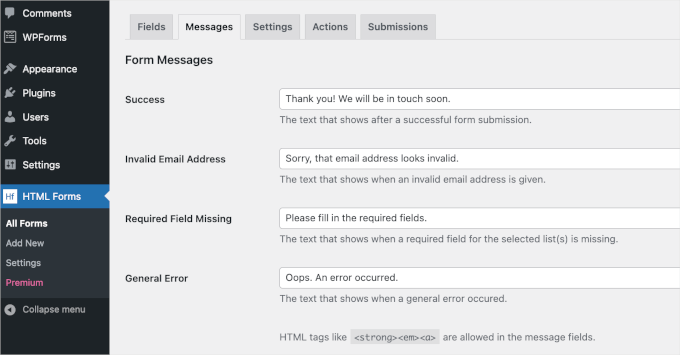

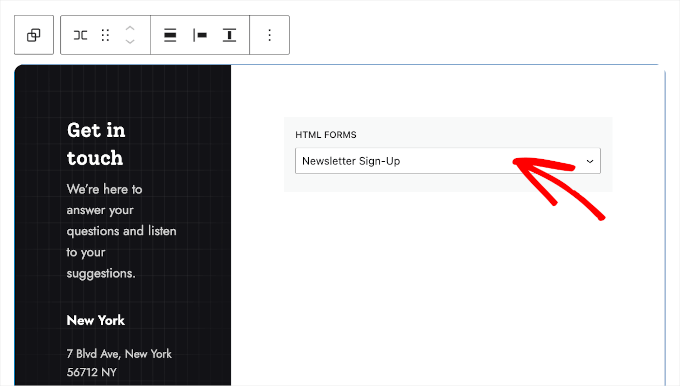
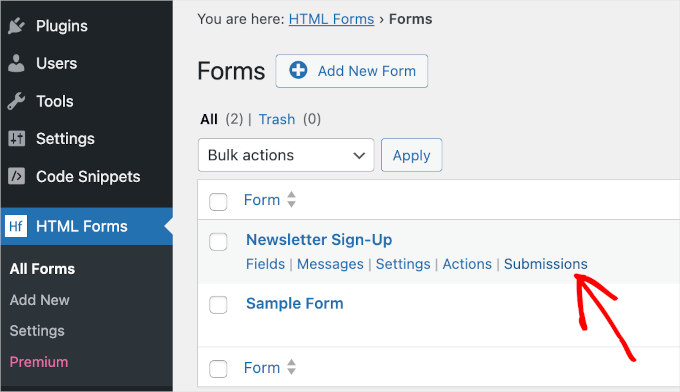
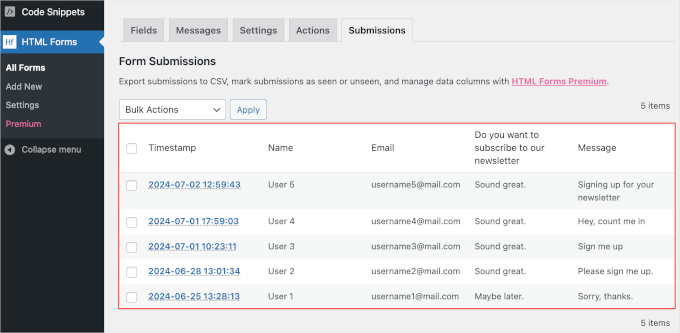
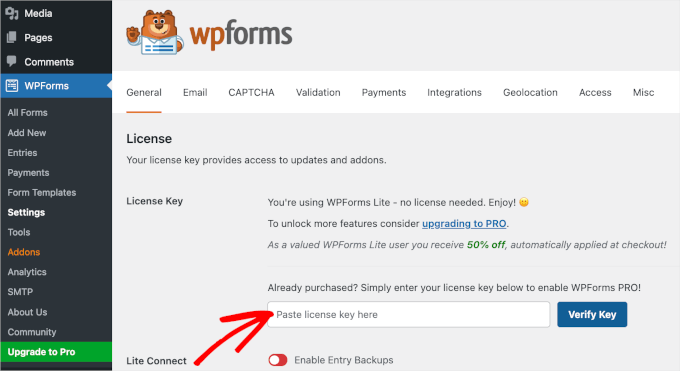
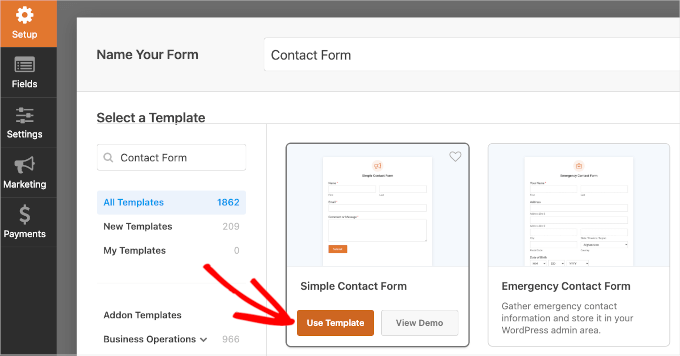
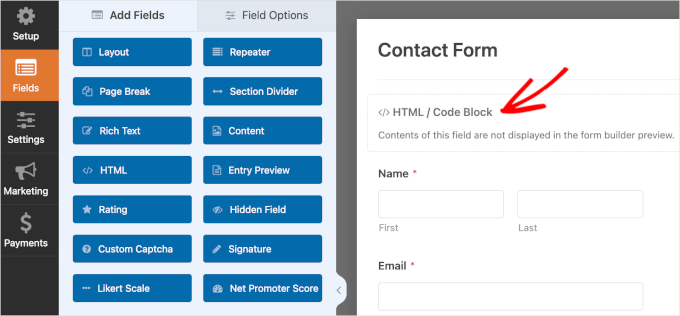
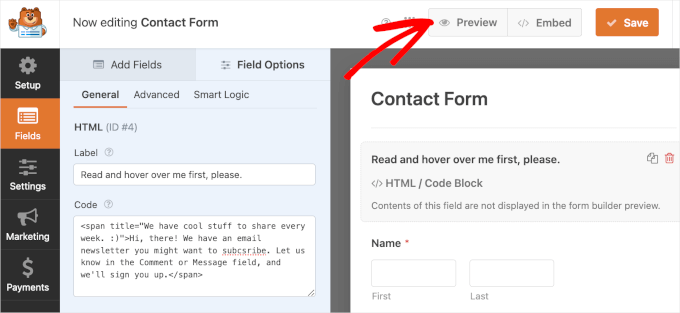
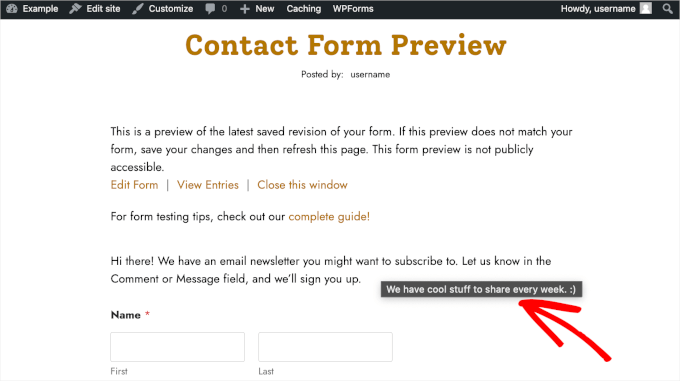
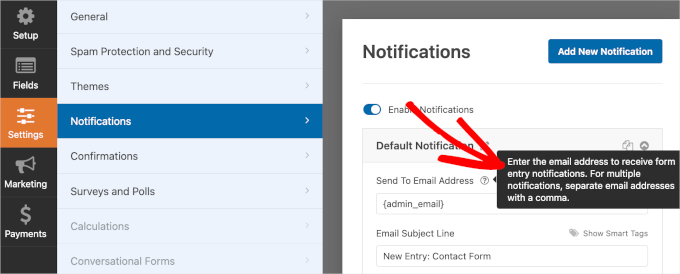
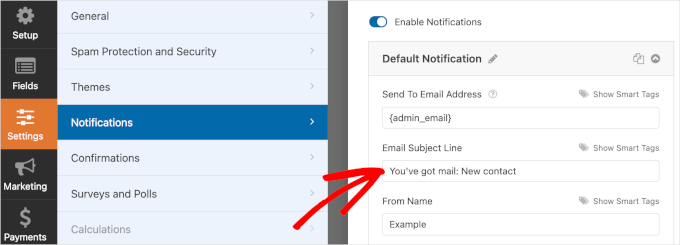
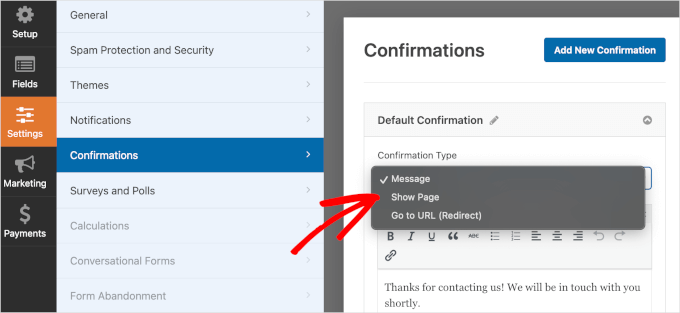
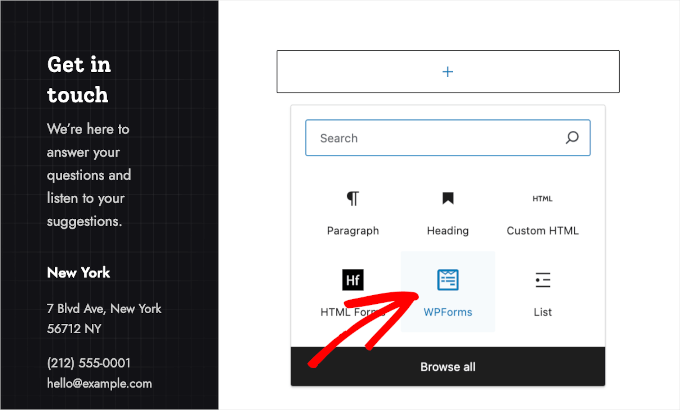
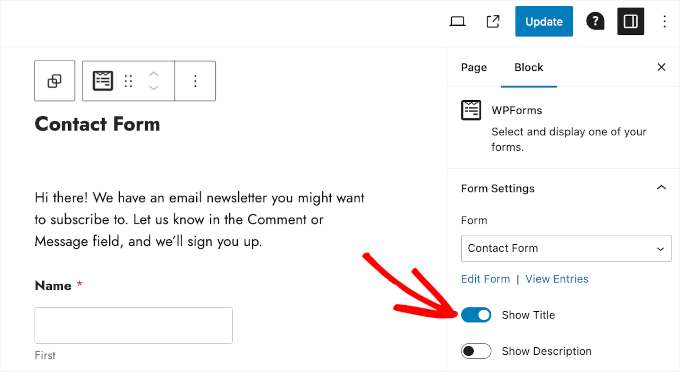
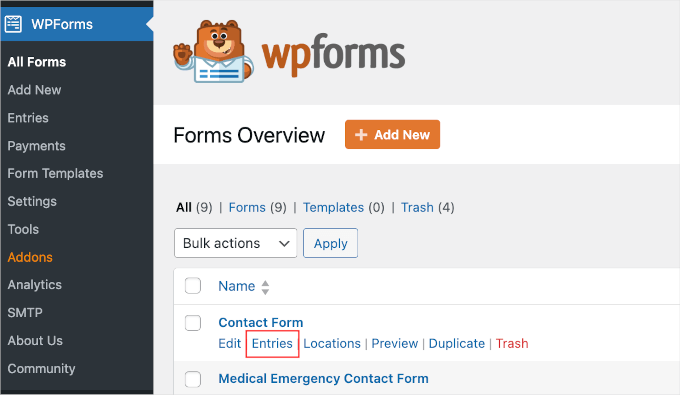
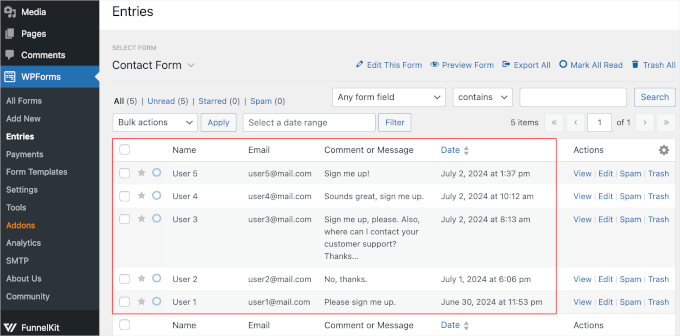


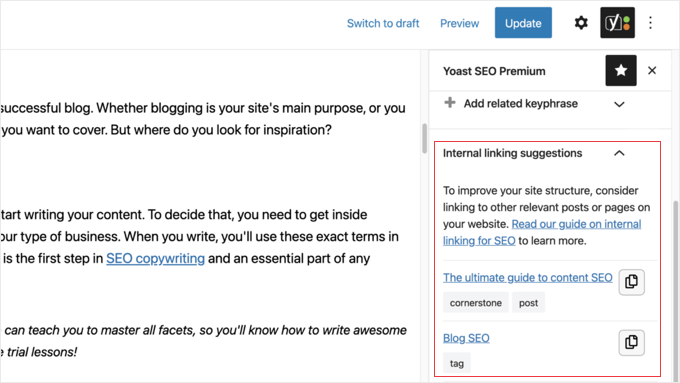

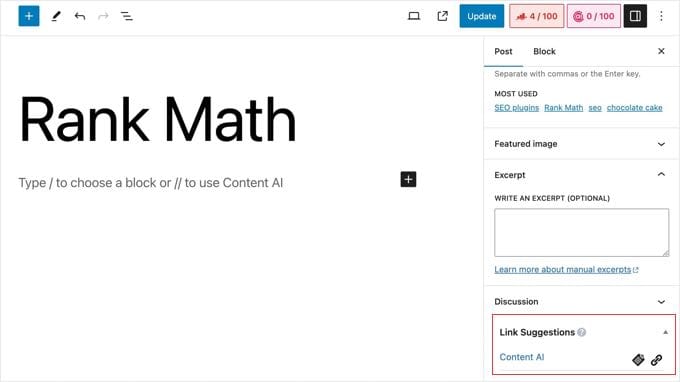

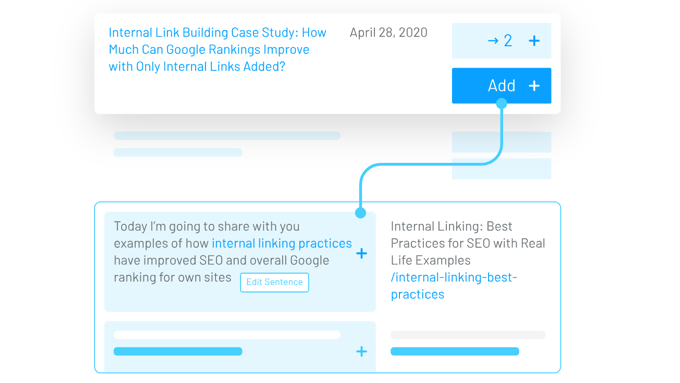

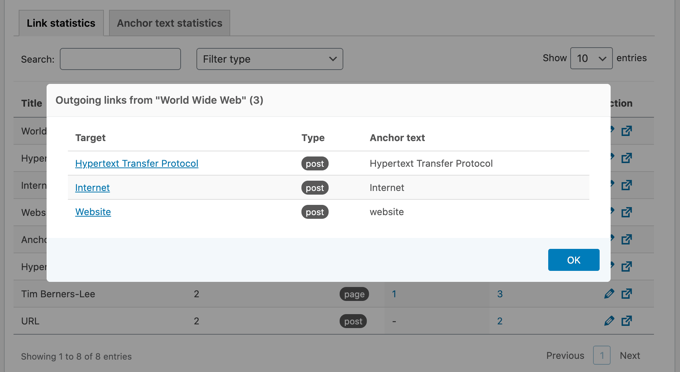

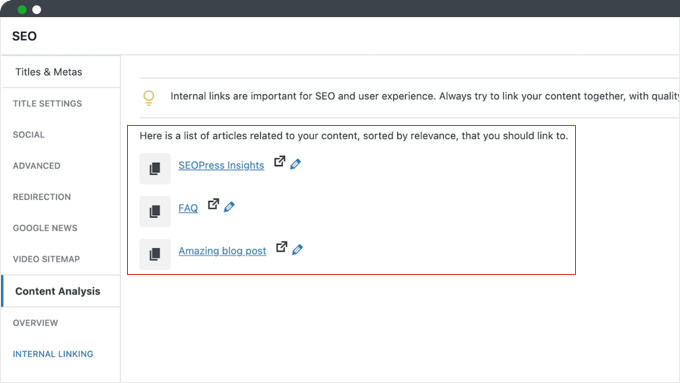

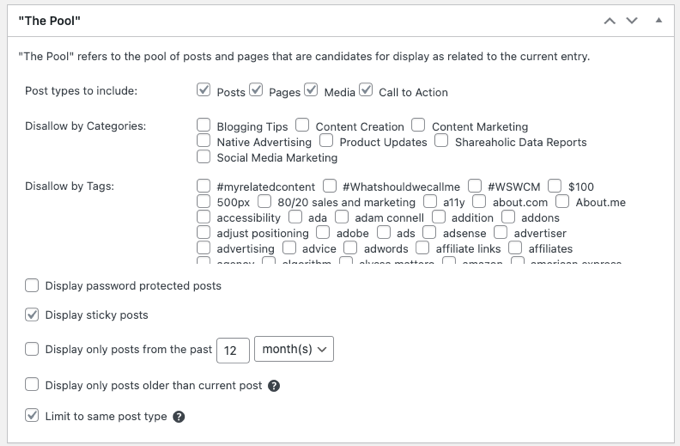


![Download Now: Free Marketing Plan Template [Get Your Copy]](https://worldproductreview.com/wp-content/uploads/2024/08/Come-puoi-usare-i-omaggi-per-ottimizzare-la-tua-era-150x59-1.png)