Posted on Leave a comment

Metodi per riparare il menu di navigazione di WordPress visualizzato sotto la barra di amministrazione

Se hai notato che il menu di navigazione del tuo sito si trova sotto la barra di amministrazione di wordpress, allora sicuramente non sei da solo. Questo può essere un problema comune e ora lo abbiamo individuato su molti siti Web.

Anche questo problema sarà frustrante, in particolare quando nasconde parti del menu o rende difficile il clic per gli utenti che hanno effettuato l’accesso.

Ora abbiamo notato che in genere si verifica a causa di conflitti di temi o CSS. D’altra parte la buona notizia è che il problema può essere risolto in breve tempo.

In questo articolo saremo in grado di mostrarti cosa fare quando la barra di navigazione di wordpress si trova sotto la barra di amministrazione, iniziando con una soluzione semplice e non tecnica che non richiede alcuna codifica.

wordpress-nav-menu-appearing-under-admin-bar-in-post.png” alt=”Risolto il problema con la barra di amministrazione che prendeva il posto del menu di navigazione nell’intestazione del sito wordpress” class=”wp-image-297425″/>

Se il menu di navigazione di wordpress sembra nascosto o sovrapposto alla barra di amministrazione, potresti avere a che fare con un problema di visualizzazione comune.

Ora abbiamo notato che questo svantaggio si verifica quando il CSS di un tema non tiene conto, come dovrebbe, dell’altezza della barra di amministrazione. Il CSS quindi oscura parti dell’intestazione del tuo sito Internet, insieme al menu di navigazione.

Barra degli strumenti di amministrazione sovrapposta all'intestazione del sito e ai menu di navigazione

È possibile che tu capisca che è difficile fare clic su alcune voci di menu o che l’intero menu è in parte coperto durante la visualizzazione del tuo sito Internet. Anche questo sarà frustrante, in particolare quando incide sull’usabilità del tuo sito.

Ci sono alcuni motivi comuni per cui molto probabilmente ciò potrebbe accadere:

  • Conflitti tematici: Di tanto in tanto, il CSS del tuo tema non tiene conto della barra di amministrazione, causando la posizione errata del menu.
  • Conflitti dei plugin: Un plugin che modifica il design del front-end potrebbe accidentalmente far sì che il menu si sovrapponga alla barra di amministrazione. Ciò includerà sempre più plugin che caricano mega menu o banner di intestazione.
  • CSS progettato su misura: Se hai aggiunto CSS personalizzati per il tuo sito Internet, interferirà in modo intelligente con la corretta visualizzazione del tuo menu.

Questo problema può avere un effetto sull’usabilità del tuo sito Web Internet, rendendo più difficile la navigazione per gli utenti. Fortunatamente, esistono diversi modi per risolvere questo inconveniente, a partire da una soluzione semplice che non richiede alcuna codifica.

Ecco un riepilogo delle soluzioni che potremo mostrare. Sarai in grado di volare verso quello che ti sembra più semplice:

Soluzione 1: coprire la barra di amministrazione tramite le impostazioni del profilo individuale

Questa soluzione è la migliore per gli utenti che desiderano un ripristino rapido e semplice senza dover occuparsi di alcun codice. È massimo per i principianti o per chiunque possa temere di rompere accidentalmente la struttura del proprio sito Internet.

Inoltre, quando non disponi dell’autorizzazione per modificare i file CSS o dei temi del tuo sito Internet, questo sistema fornisce una strategia semplice per evitare il problema senza apportare modifiche permanenti.

Tieni presente: Questa soluzione si applica a livello client, per questo motivo altri utenti sul tuo sito Internet dovranno accedere ai propri account e ripetere i passaggi seguenti.

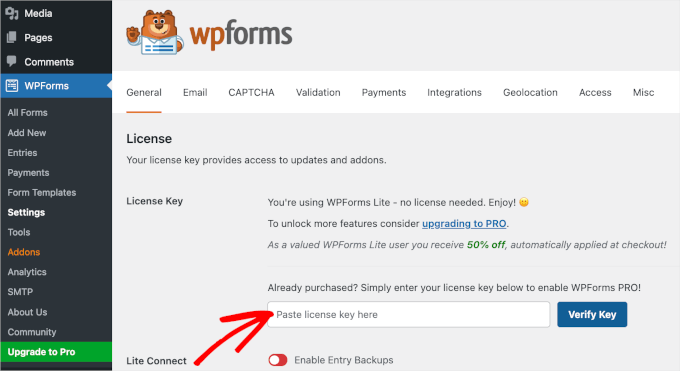
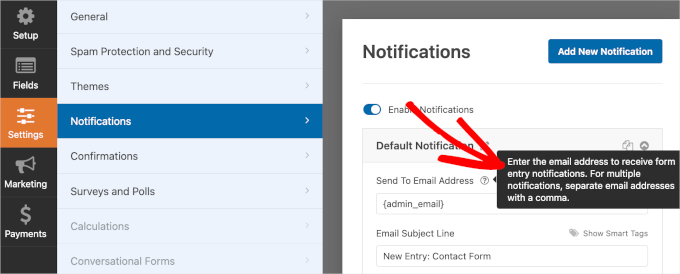
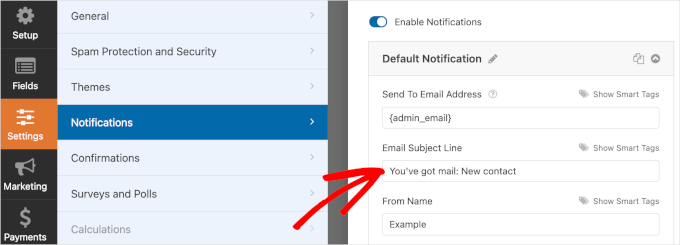
Innanzitutto, desideri accedere alla dashboard di wordpress. Quindi vai a Consumatori » Profilo pagina web Internet nel menu di sinistra.

Scorri fino alla sezione Barra degli strumenti, quindi deseleziona la sfera accanto alla selezione “Mostra barra degli strumenti durante la visualizzazione del sito Web”.

Disabilita la barra di amministrazione nel profilo utente

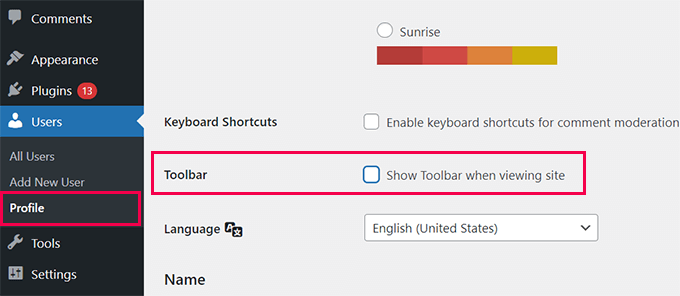
Successivamente, non dimenticare di fare clic su “Profilo sostitutivo” per salvare alcune modifiche.

Perché funziona

Nascondere la barra di amministrazione impedisce che interferisca con il menu di navigazione sul front-end del tuo sito Internet. Poiché la barra di amministrazione non viene visualizzata, il problema della sovrapposizione viene in breve risolto, rendendo il tuo menu completamente disponibile a tutti, tu e i tuoi visitatori.

Soluzione 2: modificare manualmente il CSS del tema

Se hai dimestichezza con HTML e CSS o desideri un ulteriore metodo permanente per il problema dei menu sovrapposti, dovrai controllare il CSS del tuo tema.

Questa soluzione è la migliore per gli utenti che dispongono delle autorizzazioni utente necessarie per modificare l’aspetto del proprio sito Web e desiderano ripristinare il problema alla sua fornitura.

1. Effettuare un controllo incrociato del problema:

Innanzitutto, desideri utilizzare il software di controllo incrociato Investigate sul tuo browser per decidere dove caricare il CSS progettato su misura. Ora disponiamo di dati approfonditi per i principianti del fai da te sull’uso del dispositivo Check up.

Apri lo strumento Ispeziona

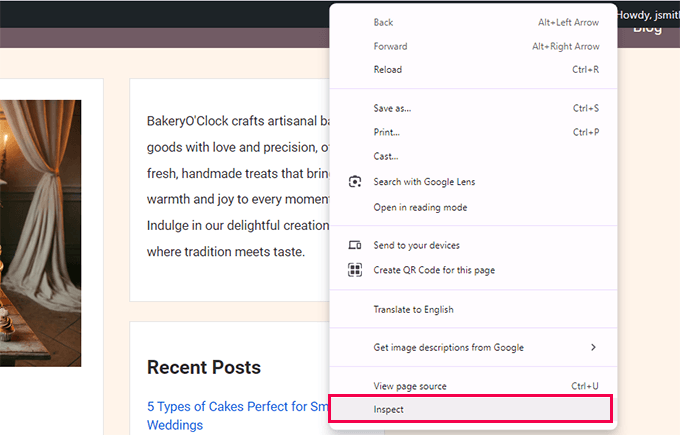
Innanzitutto, fai clic con il pulsante destro del mouse sul menu di navigazione e seleziona “Esamina fase di controllo incrociato” (in Chrome) o “Esamina fase di controllo incrociato” (in Firefox).

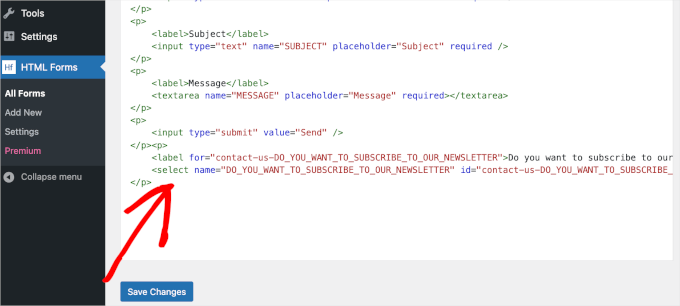
Questo aprirà l’apparato di sviluppo, che è in grado di mostrare HTML e CSS per la parte.

Individua le classi CSS da targetizzare

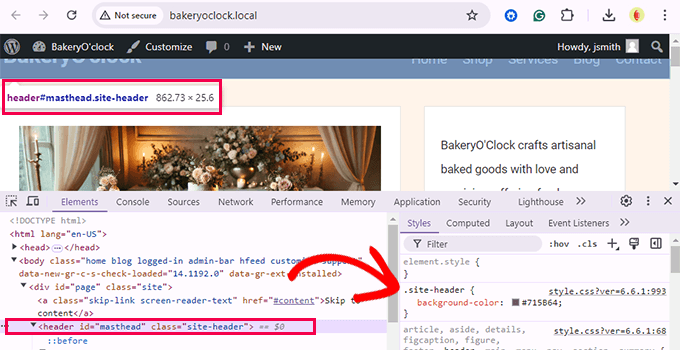
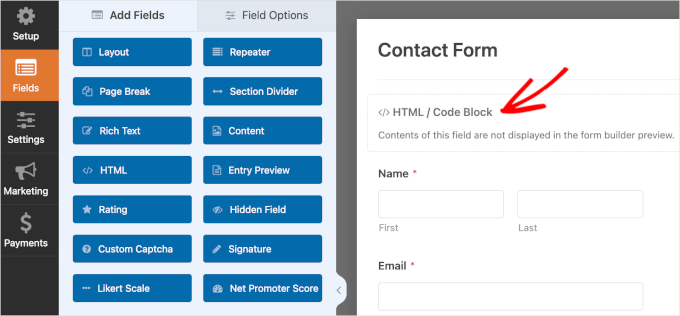
In tutto il codice, desideri cercare le classi CSS o gli ID utilizzati dal tuo tema per attivare l’intestazione o le aree del menu di navigazione. Ad esempio, nello screenshot qui sopra, il nostro sito Web demo utilizza il file .site-header lezione per la casa colpita.

Mancia: Passa il mouse su HTML e il tuo browser evidenzierà il settore all’interno della finestra di anteprima. Fai clic con il pulsante destro del mouse su HTML e poi guarda sotto “Varietà” per scovare le case CSS.

Aggiungi CSS progettato su misura L’uso di WPCode

Successivamente, è molto importante organizzare e cambiare nel plugin WPCode. È il plugin di codice personalizzato wordpress più efficiente, che rende davvero semplice includere CSS personalizzati per il tuo sito senza fare riferimento al tuo tema.

Un altro motivo per utilizzare WPCode sono le sue leggi di senso condizionale non insolite. Poiché questo problema riguarda solo i consumatori che hanno effettuato l’accesso, potremo aver bisogno di quelle leggi come modo per caricare il nostro codice solo per i consumatori che hanno effettuato l’accesso.

Trasferisci in anticipo, organizza e cambia con il plug-in WPCode. Per ulteriori dettagli, consulta il nostro tutorial su come configurare un plug-in wordpress.

Tenete a mente: è disponibile anche un modello sciolto di WPCode che funzionerebbe per questo tutorial. D’altra parte, proponiamo l’aggiornamento a un piano a pagamento in quanto consentirà l’accesso a opzioni aggiuntive.

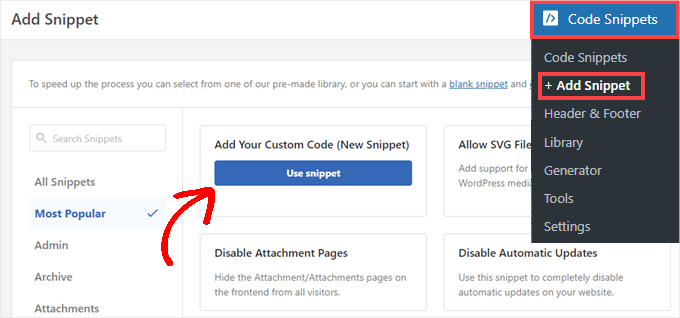
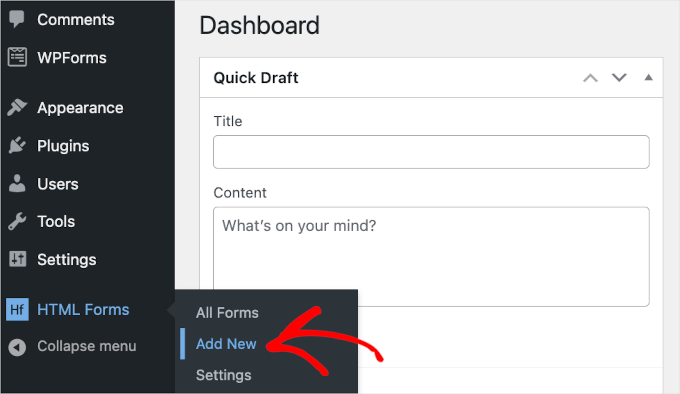
Una volta attivato, vai a Snippet di codice » + Aggiungi frammento pagina web Internet sulla dashboard di wordpress.

Nella successiva pagina Web Internet, il plug-in ti mostrerà una serie di frammenti di codice pronti all’uso. Inoltre, saremo in grado di scrivere codice CSS progettato su misura.

Per dare un’occhiata a questo, sposta il mouse sulla casella “Aggiungi il tuo codice personalizzato (nuovo snippet)” e fai clic sul pulsante “+ Aggiungi snippet personalizzato”.

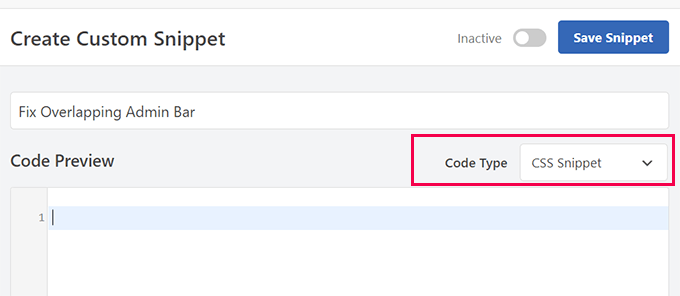
Questo ti porterà alla pagina web Internet dell’editor di codice.

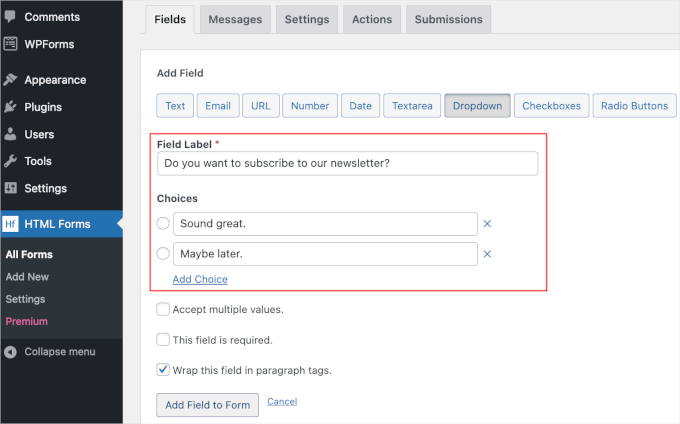
Proprio qui, inserisci un nome per il tuo snippet di codice e quindi scegli Snippet CSS dal menu a discesa “Tipo di codice”.

Tipo di codice CSS

Successivamente, aggiungi il seguente codice nella casella “Anteprima codice”:

#your-menu-id .your-menu-class {
    margin-top: 40px; /* Keep watch over this value in keeping with your theme */
    z-index: 10001;
    position: relative;
    padding-top:40px
}

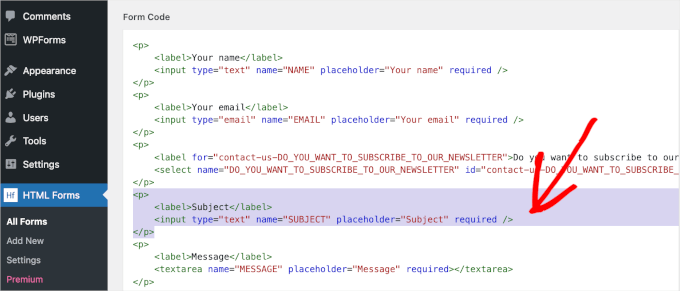
In questo frammento di codice è molto importante l’alternativa #your-menu-id E .your-menu-class con i valori su cui devi concentrarti all’interno dell’HTML.

Ecco come l’abbiamo aggiunto al nostro sito Internet di controllo e l’abbiamo modificato per concentrarci sulla casa interessata.

Codice CSS modificato

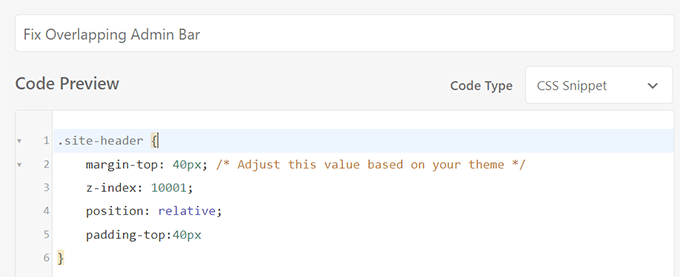
La CSS comprende 4 leggi.

I primi sono i margin-top E padding-top legislazione. Poiché la barra di amministrazione ha un’altezza di raccolta di 32 pixel, la utilizzerai per correggere i CSS in conflitto.

Successivamente, la barra di amministrazione ha inoltre un file z-index valore impostato su 9999. Questa regola lo spinge verso la porta del display. Usando a z-index regola con il seguente valore, sposti l’intestazione o la casa di navigazione sulla porta.

IL position la regola è pronta relative come un modo per utilizzare il z-index regola.

Dopo, insieme alle leggi CSS progettate su misura, desideri dire a WPCode di utilizzare questo codice CSS solo quando un client registrato sta visualizzando il sito Web Internet.

Scorri in modo appropriato fino alla sezione Buono senso comune condizionale e attiva l’interruttore accanto alla selezione “Consenti senso comune”.

Successivamente, imposta semplicemente la strategia di localizzazione su “Mostra” e quindi fai clic su “+Aggiungi nuovo staff”.

Utilizzando la logica condizionale

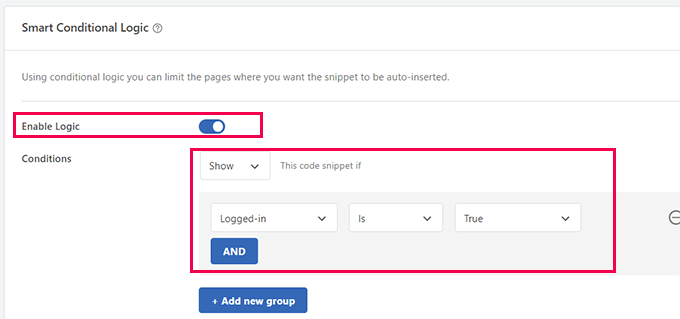
Secondo le leggi del buon senso, desideri selezionare “Accesso effettuato” > “È” > “Vero”.

In ogni caso, nell’angolo in alto a destra dello schermo del computer, fai semplicemente clic su “Salva snippet” e passa da Inattivo a Vigoroso.

Salva CSS personalizzato

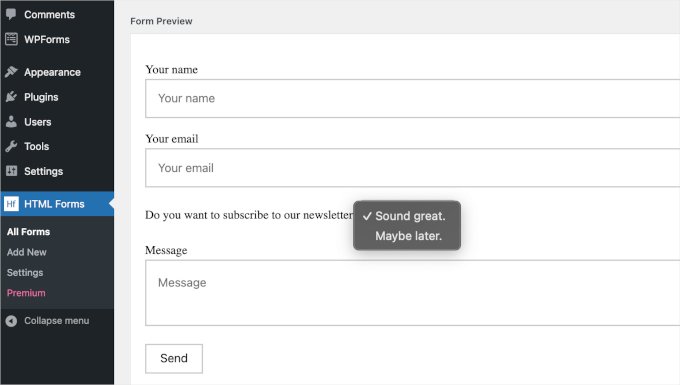
Al momento devi chiedere consiglio al tuo sito Internet e provare se il menu di navigazione e la casa dell’intestazione ora appaiono correttamente sopra la barra di amministrazione.

Se non riesci a capire correttamente l’ora principale, dai un’occhiata a regolare l’ora margin-top valore o focalizzato su diverse classi ID o CSS.

Perché funziona

Il problema si verifica continuamente perché il CSS del tema non tiene conto della barra di amministrazione, causando la visualizzazione del menu di navigazione sotto di essa. Utilizzando insieme a un piccolo frammento di CSS progettato su misura, controllerai il sito Web del menu di navigazione, assicurandoti che suoni come se fosse corretto sopra la barra di amministrazione.

Suggerimento bonus : Hai problemi con i CSS? Potrai assumere il nostro wordpress Emergenza potenziata. Per un piccolo prezzo, i nostri sviluppatori wordpress risolveranno il problema per te in pochissimo tempo e potrai far emergere ancora una volta la tua attività.

Soluzione 3: controllo dei conflitti tra plugin

Se hai provato le soluzioni precedenti e il problema persiste, sarà causato in modo intelligente dall’uso di un problema con il plug-in.

I plugin possono occasionalmente introdurre CSS o JavaScript che interferiscono con la costruzione del tema. Questa interferenza potrebbe causare problemi identici al menu di navigazione visualizzato sotto la barra di amministrazione.

L’elaborazione del plug-in in conflitto può risolvere il problema senza modificare il codice del tema.

1. Disattiva tutti i plugin:

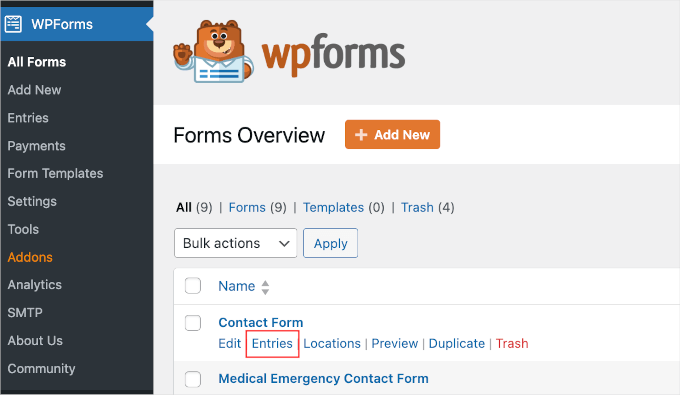
Innanzitutto, trasferisciti nella dashboard di wordpress e vai a Plugin » Plugin installati.

Seleziona tutti i plugin selezionando la sfera accanto a Plugin nella parte superiore dell’elenco di spunta.

Desideri dover selezionare “Disattiva” dal menu a discesa delle azioni collettive e fare clic su “Esercitati”.

<img decoding=”async” loading=”lazy” width=”680″ height=”314″ src=”https://wpmountain.com/wp-content/uploads/2024/11/wpadmin-deactivate-wordpress-plugins.png” alt=”Disattivazione di tutti i plugin di wordpress” class=”wp-image-295982″/>

Ora, chiedi semplicemente consiglio al tuo sito Internet per verificare se il problema è stato risolto. Se il menu di navigazione ora viene visualizzato correttamente, probabilmente la maggior parte dei plugin ha causato il problema.

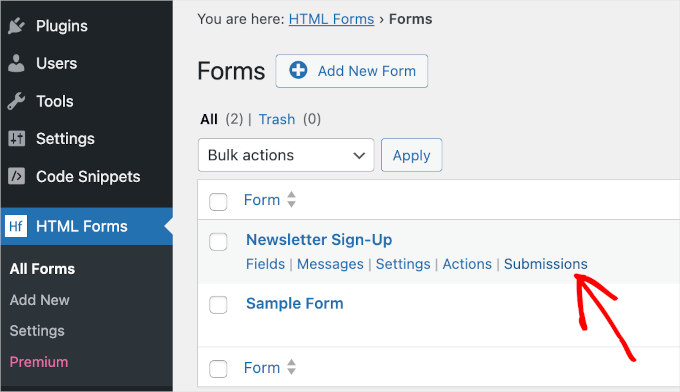
2. Determinare il plugin in conflitto

Per decidere quale plugin era la causa del problema, torna alla pagina Web dei plugin installati.

Dovrai riattivare tutti i plugin uno alla volta, controllando il tuo sito internet dopo ogni attivazione. Ripeti fino a quando il problema non si risolve dopo aver attivato un plug-in deciso.

Una volta che il problema si ripresenta, hai riconosciuto con successo il plugin che causa il problema.

Cosa fare dopo

Se decidi di avere un plugin in conflitto, immagina di contattare lo sviluppatore del plugin per rinforzarlo. Offriranno un ripristino o una sostituzione per risolvere il problema. D’altra parte, cercherai un plugin specifico che fornisca una capacità equivalente senza causare conflitti.

<span class=”ez-toc-section” id=”additional-resources-for-wordpress-admin”/>Risorse aggiuntive per l’amministratore di wordpress

Di seguito sono elencate alcune risorse aggiuntive che potresti trovare utili:

Si spera che le soluzioni che abbiamo condiviso sveleranno la barra di amministrazione causando il menu di navigazione o il problema di visualizzazione dell’intestazione sul tuo sito.

Potresti anche voler vedere le nostre informazioni sulla risoluzione degli errori più comuni di wordpress o dare un’occhiata ai nostri consigli sulla personalizzazione dello spazio di amministrazione di wordpress per i tuoi prerequisiti.

Se preferisci questo articolo, iscriviti al nostro canale YouTube per i tutorial video di wordpress. Potrai inoltre cercarci Twitter e Facebook.

I metodi di pubblicazione per riparare il menu di navigazione di wordpress mostrato sotto la barra di amministrazione sono apparsi per la prima volta su WPBeginner.

Manutenzione wordpress

[ continue ]

Piani di manutenzione wordpress | hosting wordpress

Per saperne di più

<a href=”https://wpmountain.com/methods-to-repair-wordpress-nav-menu-showing-underneath-admin-bar/”>Source link

See what others are saying about this...

Posted on Leave a comment

The best way to Upload HTML Paperwork in WordPress (2 Strategies)

HTML forms can be great additions on your wordpress internet web page. They let visitors reach out to you, sign up for newsletters, provide feedback, and much more.

While HTML forms permit you to connect upper together with your target market, rising them can be difficult. And, for those who don’t appear to be familiar with coding, then the regarded as dealing with code can be overwhelming.

In this data, we will be able to show you how you can add HTML forms on your wordpress internet web page. This provides you with the tools you need to easily create custom designed HTML forms and make your internet web page further engaging.

wordpress-in-post.png” alt=”Add HTML forms in wordpress in-post image” class=”wp-image-285643″/>

What Are HTML Bureaucracy and Why Create One?

HTML forms art work similar to other internet web page forms. They let visitors kind in and submit wisdom like names, e mail addresses, feedback, orders, and further.

What gadgets them apart is that HTML forms are created using HTML code instead of a drag-and-drop visual editor like a sort plugin. So, it is important to define fields very similar to text boxes, checkboxes, radio buttons, and dropdown menus yourself. You make a decision how they look and set explicit regulations for some way they art work.

Listed below are some advantages of constructing forms from scratch using HTML:

  • Optimized Potency. HTML forms generally tend to load sooner and use a lot much less memory because the code is lightweight.
  • Keep watch over. You’ll have complete control over the form’s design and capacity because you’re not limited thru a sort builder’s choices.
  • Customization. HTML forms can be tailored exactly on your needs, offering further flexible shape customization.

While rising HTML forms from scratch is a great way to learn and apply coding, it does have its private not easy scenarios.

You’ll have hassle with cross-browser compatibility, where the form works differently on different web browsers. Moreover, coping with form validation with JavaScript can be difficult. It needs thorough testing to make sure you’ll be capable to achieve and process all client inputs correctly.

That said, there are ways to be able to upload HTML forms without the ones complexities. So, irrespective of if you are managing a wordpress blog, industry internet web page, or on-line retailer, you’ll be capable to merely add HTML forms on your internet web page without a want to code from scratch.

Inside the following sections, we will be able to show you how you can add HTML forms to wordpress. Proper right here’s a to hand information a coarse evaluate of the 2 methods we will be able to quilt in this data:

In a position? Let’s get started.

<h4 class=”wp-block-heading” id=”aioseo-method-2-adding-html-forms-in-wordpress-using-the-html-forms-plugin-easy”><span class=”ez-toc-section” id=”approach-1-together-with-html-bureaucracy-in-wordpress-using-the-html-bureaucracy-plugin-easy”/>Approach 1: Together with HTML Bureaucracy in wordpress Using the HTML Bureaucracy Plugin (Easy)

An easy means to be able to upload an HTML form to a wordpress internet web page is to use a free form plugin like HTML Paperwork. It’s a useful gizmo for rising and configuring HTML forms multi functional place, in order that you don’t will have to handle any server-side configuration.

In this data, we will be able to use the plugin’s free type, which contains the whole thing you need to create an HTML form.

To get started, let’s you’ll want to have the plugin installed on your wordpress internet web page. If you need be in agreement, then you definately’ll be capable to follow our step-by-step data on putting in a wordpress plugin.

Upon activation, you’ll be capable to navigate to HTML Bureaucracy » Add New for your wordpress admin dashboard to start out rising your contact form.

HTML Forms' add new button

This may occasionally redirect you to the ‘Add New Form’ internet web page.

From appropriate right here, the first thing you’ll need to do is identify your form thru simply typing the identify into the ‘Form Title’ field. For instance, we named our form ‘Publication Sign-Up.’

Next, move ahead and click on at the ‘Create Form’ button underneath the sector.

HTML Forms' create form button

When you do that, the ‘Edit Form’ internet web page will appear, and also you’ll be capable to get began customizing your HTML contact form.

At the top of the tab, you’ll see your form’s details, at the side of the form establish, slug, and shortcode. You don’t will have to memorize the ones details, as they’ll be available on the HTML Bureaucracy dashboard when you need them.

Beneath the ones details, you’ll to seek out the menu tabs. Inside the ‘Fields’ tab, you’ll be capable to see rather a large number of field buttons, like ‘Text,’ ‘Dates,’ ‘Checkboxes,’ and ‘Radio buttons,’ to be able to upload on your forms.

HTML Forms' edit form area

Let’s scroll down just a bit further.

At the bottom of this tab, you’ll find a pre-built HTML form together with the preview. This contact form is lovely simple. It has 4 fields for patrons to kind out their identify, e-mail handle, a brief subject, and a message.

HTML Forms' pre-built form code

Now, let’s say that you wish to have to be able to upload a brand spanking new field with an e mail publication subscription sign-up. Then simply click on on on one of the vital field buttons above ‘Form Code.’

Follow: Needless to say HTML Bureaucracy doesn’t strengthen e-mail promoting and advertising supplier integrations. So, it is important to manually add consumers’ e-mail addresses on your mailing report.

For instance, we will be able to use a dropdown field and create a ‘Certain/No’ chance.

From appropriate right here, you’ll need to click on on ‘Dropdown,’ and this may increasingly open the dropdown field’s configuration possible choices. You’ll be capable to get began completing the details, which include the sector’s label and choices.

Adding a dropdown field in HTML Forms

After you have into the details, you’ll be capable to click on on ‘Add Field to Form.’

Then, you will have to see the dropdown field tag throughout the ‘Form Code’ section. Simply scroll down the tab to check it out.

Dropdown field added to HTML Forms

The next step is to reorganize the contact form.

To handle a excellent go with the flow, you’ll want the dropdown field to be moderately underneath the ‘Electronic mail’ field.

To move it, you’ll be capable to decrease the dropdown field tag from the main tag’s

to without equal >. Then, move ahead and paste it moderately underneath the ‘Electronic mail’ tag.

Dropdown field moved in HTML Forms

The default ‘Matter’ field is probably not important for a newsletter sign-up form. So, we recommend disposing of the sector.

You’ll be capable to do this thru deleting its tag from the main

to without equal

.

Selecting the subject field's tag to remove in HTML Forms

After transferring and deleting tags, you’ll need to scroll down the tab to the ‘Form Preview’ section.

In this section, you’ll be capable to check for those who’ve successfully moved and deleted the fields without breaking the rest. You’ll be capable to moreover check if the dropdown menu works accurately.

HTML Forms preview

When you find yourself happy with the results, move ahead and click on at the blue ‘Save Changes’ button underneath the ‘Form Code’ section.

As quickly because the saving process is finished, you will have to see a ‘Form up-to-the-minute.’ notification at the top of this internet web page.

Now, it’s imaginable you’ll need to check the form’s configuration. Let’s switch to the ‘Messages’ tab to look how HTML Bureaucracy configures the form submission confirmation messages.

Simply click on on on ‘Messages’ to open the tab.

Pre-made copy in HTML Form's messages settings

This tab signifies that you’ll edit the pre-made copy for when a client’s form submission is successful and other an similar eventualities.

If the whole thing appears to be excellent to you, then you definately’ll be capable to go away it as is. Should you made any changes, don’t fail to remember to the ‘Save Changes’ button in order that you don’t lose your construction.

Next, let’s move to the ‘Settings’ tab.

HTML Forms' settings tab

Via default, HTML Bureaucracy will set ‘Certain’ to save lots of a variety of each and every form submission and ‘No’ to hide the form after a successful submission. You’ll be capable to customize this as sought after.

Then, throughout the ‘Redirect to URL After A success Sign-Ups,’ you’ll be capable to copy and paste the URL of a live web internet web page from your wordpress web site. Or, kind 0 into the sector to stick consumers on the internet web page after a successful form submission.

When the whole thing is set, all that’s left to do is add the HTML contact form to a wordpress internet web page.

Let’s head over to Posts or Internet web page » All Posts or All Pages from the wordpress dashboard.

<img decoding=”async” loading=”lazy” width=”680″ height=”345″ src=”https://www.wpbeginner.com/wp-content/uploads/2024/06/wpadminarea-pages-allpages.png” alt=”The All Pages menu item in the wordpress admin area” class=”wp-image-284995″/>

For this knowledge, we will be able to add the HTML form to our ‘Contact’ internet web page.

So, we’ll hover over the ‘Contact’ internet web page throughout the report and click on on ‘Edit’ when it seems that.

<img decoding=”async” loading=”lazy” width=”680″ height=”373″ src=”https://www.wpbeginner.com/wp-content/uploads/2024/06/wpadminarea-pages-allpages-contact-edit.png” alt=”The Edit button for editing a wordpress page” class=”wp-image-285009″/>

This may occasionally liberate the ‘Contact’ internet web page’s block editor.

Inside the editor, you’ll be capable to get began choosing an area to place the form. Then, simply hover over it and click on at the ‘+’ button to be able to upload the HTML Bureaucracy block.

<img decoding=”async” loading=”lazy” width=”680″ height=”359″ src=”https://www.wpbeginner.com/wp-content/uploads/2024/06/wpblockeditor-contactpages-addblock.png” alt=”The add new block button for adding a block in wordpress block editor” class=”wp-image-285010″/>

Now, you’ll be capable to kind ‘HTML Bureaucracy’ into the search bar to in brief to seek out the block. After you have the search finish end result, click on on it.

You’ll then see a dropdown throughout the ‘HTML Bureaucracy’ block. Simply make larger on it and select the form you wish to have to turn. Proper right here, we’re opting for the ‘Publication Sign-Up’ form that we merely created.

HTML Forms' dropdown

The form will appear when you submit your content material subject matter. So each time you’ve determined at the form from the dropdown menu, you’ll be capable to click on at the ‘Substitute’ button.

There you’ve gotten it! Your form is now live, and consumers can sign up for your newsletter. Proper right here’s what it could appear to be on your wordpress internet web page:

<img decoding=”async” loading=”lazy” width=”680″ height=”455″ src=”https://www.wpbeginner.com/wp-content/uploads/2024/06/livewebsite-htmlforms.png” alt=”HTML Forms’ newlsetter signup form on a live website” class=”wp-image-285107″/>

To appear form submissions, you’ll be capable to first head over to HTML Bureaucracy » All Bureaucracy. This may occasionally take you to the report of your whole HTML Bureaucracy.

Then, simply hover over a sort and click on at the ‘Submissions’ button when it seems that.

Submissions button on HTML Forms

From appropriate right here, you’ll be capable to see all of your form submissions.

The ‘Submissions’ table details all wisdom consumers filled out for your form. Then, there’s the ‘Timestamp’ column, which tells you when they submitted the form.

For instance, appropriate right here, the main submission was made thru ‘Client 1.’

From the table, we will see that the shopper submitted the form on June 25 at spherical 1 p.m. Moreover, ‘Client 1’ spoke again ‘Most likely Later’ for the ‘Do you wish to have to subscribe to our newsletter’ question. So, in this case, you shouldn’t add their e-mail handle on your mailing report.

Form submissions on HTML Forms

<h4 class=”wp-block-heading” id=”aioseo-method-2-adding-html-forms-in-wordpress-using-the-wpforms-plugin-recommended”><span class=”ez-toc-section” id=”approach-2-together-with-custom-designed-html-to-wordpress-bureaucracy-with-wpforms”/>Approach 2: Together with Custom designed HTML to wordpress Bureaucracy With WPForms

Every other method to rising HTML forms is using a sort builder. While this method doesn’t will mean you can code your forms from scratch, it signifies that you’ll customize them thru together with HTML code snippets.

For instance, it’s profitable to make use of custom designed HTML to show a brief warning message on a checkout form with a link on your ‘Refund and Returns Protection’ internet web page.

Otherwise you’ll be capable to upload a development bar to let consumers understand how some distance they’re from completing the form. Custom designed HTML might also will mean you can insert emojis or add a tooltip.

In this means, we will be able to show you how you can add HTML code snippets to customize your wordpress forms. We will show you tactics to take a look at this using WPForms, because it’s the best form builder for wordpress.

WPForms moreover comes with whole one-click add-ons and third-party integrations.

The ones tools include Consistent Touch for tracking your e-mail promoting and advertising advertising marketing campaign, the Form Abandonment add-on for monitoring and decreasing shape abandonment issues, and much more.

So, WPforms makes it more straightforward to extend your form’s capacity than for those who hard-coded your wordpress form from scratch.

WPForms' homepage

Follow: WPForms Lite is completely free, alternatively you’ll need the highest price type to use the HTML field. Once upgraded, you’ll moreover get get right of entry to to bigger than 1900 form templates, the conditional not unusual sense serve as, and trustworthy strengthen. Fortunately, as a WPBeginner reader, you’ll be capable to use our WPForms coupon to get 50% off.

Previous than we start, let’s you’ll want to have WPForms installed and activated on your wordpress internet web page. If you need be in agreement, then please see our data on how one can set up a wordpress plugin.

Upon activation, you’ll be capable to navigate to WPForms » Settings to enter your license code. After you have into the vital factor, simply click on at the ‘Read about Key’ button to start out the verification.

WPForms' license key field

Once completed, you’ll be capable to get began rising your form and together with custom designed HTML. For this knowledge, we will be able to show you how you can add a simple tooltip on your contact form.

A tooltip is like a small pop-up box that appears when you hover your mouse over a web section. It’s to hand as it shall we consumers be told further a few explicit web section without clicking or leaving the internet web page they’re on.

On the other hand first, let’s create the touch shape. Simply head over to WPForms » Add New from your wordpress admin area to get started.

<img decoding=”async” loading=”lazy” width=”680″ height=”308″ src=”https://www.wpbeginner.com/wp-content/uploads/2024/06/wordpress-wpforms-addnew.png” alt=”The Add New button under WPForms in the wordpress admin area” class=”wp-image-281452″/>

This may occasionally open the ‘Setup’ panel, where you’ll first need to identify your form. This identify is on your reference very best, so that you’ll be capable to use the rest you wish to have.

The next step is settling on a template.

As there are 1900+ form templates to choose from, you’ll be capable to use the search bar to filter them in brief. To check out this, merely kind ‘Contact Form’ and wait for the search to complete.

If you want to uncover each and every search finish end result to look what the form is like, then you definately’ll be capable to have the benefit of the preview serve as. Simply hover over the form template and click on on ‘View Demo.’

When you’ve found out the perfect contact form on your needs, hover over it once all over again and click on on ‘Use Template.’

The Use Template button in WPForms

This may occasionally liberate the form builder.

Now, all of the customization tools are throughout the left panel, and the live preview of the form is at the proper side of your show.

On this whole internet web page, you’ll be capable to use the drag-and-drop serve as to be able to upload portions from the customization panel to the live preview. You’ll be capable to moreover use the serve as to move spherical fields throughout the live preview.

Let’s take a look at together with the HTML field to the form. All you wish to have to do is scroll down the left-hand panel and then drag and drop ‘HTML’ onto the form.

Adding an HTML field to a WPForms form

After hanging the HTML field, you’ll be capable to click on on on it to open its customization possible choices. Proper right here, the first thing to do is fill out the sector’s ‘Label.’ You’ll be capable to moreover go away it empty.

Then, you’ll insert the custom designed HTML code into the ‘Code’ field.

To create a tooltip, you’ll be capable to use the ‘’ function or simply copy the following code and paste it into the ‘Code’ field:

Hi there! We've got an e-mail newsletter it is imaginable you'll be able to need to subscribe to. Let us know throughout the Observation or Message field, and we’ll sign you up.

This is just a trend code, so feel free to edit our copy to check your needs upper.

Follow: Needless to say if you want to instantly add consumers on your mailing report, then it is important to mix the form with an e-mail promoting and advertising provider. To check out this, merely see our data on how one can use a touch shape to develop your e mail record in wordpress.

Follow that WPForms doesn’t display the HTML code throughout the form builder preview. To preview the sector and make sure the whole thing is right kind, you’ll be capable to save the changes first and click on on ‘Preview.’

WPForms' preview button

This may occasionally take you to a brand spanking new tab.

Now, let’s check out whether or not or now not the HTML code snippet on your tooltip works accurately. Simply hover over the text and wait for the tooltip to appear for a few seconds.

Testing tooltip

When you find yourself proud of the result, you’ll be capable to go back to the form builder to finalize your form.

Your form notification and confirmation settings are already prepare in WPForms. On the other hand, if you want to customize them, move to Settings, then Notifications or Confirmations.

Inside the ‘Notifications’ section, you’ll be capable to upload more than one recipients in your touch shape submission.

You’ll see a brief instruction for those who hover over the question mark button next to the ‘Send to Electronic mail Maintain’ field. You’ll need to follow it to make sure your notification is sent to the correct e-mail addresses.

Setting multiple email recipients in WPForms

You’ll be capable to moreover edit the pre-made copy on your e-mail subject line.

For instance, we changed ours from ‘New Get entry to: Contact Form’ to ‘You’ve got mail: New contact.’

Changing email subject line

When you’ve customized your notifications, you’ll need to switch to the ‘Confirmation’ panel.

Via default, WPForms gadgets your confirmation kind to ‘Message’ and has the pre-made copy ready for you. You’ll be capable to for sure trade the ones settings if you want to.

Slightly then showing a confirmation message, you’ll be capable to redirect consumers to a brand spanking new internet web page or a decided on URL.

WPForms confirmation types

Once the whole thing is set, it’s time to submit the form.

Pass ahead and click on at the ‘Embed’ button to start out publishing. WPForms will then ask if you want to add the form to an present or a brand spanking new internet web page. In this data, we will be able to make a choice ‘Make a choice present internet web page.’

<img decoding=”async” loading=”lazy” width=”680″ height=”341″ src=”https://www.wpbeginner.com/wp-content/uploads/2024/06/wordpress-wforms-embedwizard-selectexistingpage.png” alt=”The Select Existing Page button when embedding a form from WPForms” class=”wp-image-281974″/>

Inside the next pop-up window, you’ll make a choice a internet web page from the report of available pages. After that, you’ll be capable to click on on ‘Let’s move!’ to talk over with the internet web page’s block editor.

Now, you’ll be capable to hover over the world where you wish to have to place the form and click on at the ‘+’ button. Pass ahead and select the WPForms block.

Adding WPForms block to a page

Then, you’ll be capable to make a choice a sort from the WPForms block’s dropdown.

When you’ve determined on a sort, WPForms will load it throughout the determined on area. If you want to show the form’s establish, then you definately’ll be capable to head over to the ‘Block’ tab throughout the right-hand panel and switch on the ‘Show Title’ slider.

Enabling form title

When you find yourself happy with the whole thing, move ahead and hit the ‘Substitute’ button.

And completed! You’ve added custom designed HTML on your WPForms contact form and made it survive your wordpress internet web page. Now, consumers can get began filling out the form and most likely sign up for your e-mail newsletter.

<img decoding=”async” loading=”lazy” width=”680″ height=”419″ src=”https://www.wpbeginner.com/wp-content/uploads/2024/06/livewebsite-wpforms-withcustomhtml.png” alt=”WPForms with custom HTML on a live website” class=”wp-image-285639″/>

To appear your whole WPForms form submissions, you’ll need to navigate to WPForms All Bureaucracy.

Then, you’ll be capable to hover over ‘Contact Form’ or any form from the report and click on on ‘Entries’ when the button turns out.

Entries button in WPForms

On the next show, you will have to be capable to see all of your form submissions.

The table details all of the wisdom consumers submitted with the form along with the submission time.

For instance, on July 2 at spherical 8 a.m., ‘Client 3’ said they wanted to subscribe to the email newsletter and left a question on how to achieve our purchaser strengthen staff.

Form submissions on WPForms

We can moreover see the ‘Actions’ column. In this column, there are a variety of buttons: ‘View,’ ‘Edit, ‘Junk mail,’ and ‘Trash.’

Should you click on on ‘View,’ WPForms will take you to an get entry to’s trustworthy evaluate internet web page. On this internet web page, the plugin encourages you to activate two add-ons.

The main one is the Geolocation add-on for tracking, where the shopper submits the form. The second one is the Consumer Adventure add-on, which allow you to analyze the shopper’s path by way of your internet web page until they hit the ‘Publish’ button.

We recommend setting up and activating the ones add-ons for added optimized form potency.

The ‘Junk mail’ and ‘Trash’ buttons are to hand for marking fake submissions and disposing of them from your get entry to. To be told further about lowering fake form submissions, you’ll be capable to be told our data on how one can block touch shape junk mail.

<h4 class=”wp-block-heading” id=”aioseo-bonus-tip-uploading-a-custom-html-page-to-wordpress“><span class=”ez-toc-section” id=”bonus-tip-uploading-a-custom-designed-html-internet-web-page-to-wordpress“/>Bonus Tip: Uploading a Custom designed HTML Internet web page to wordpress

You may also be looking for one way so as to add a custom designed HTML internet web page on your wordpress internet web page. This can be to hand while you’ve were given a static template that you wish to have to use or an HTML internet web page from an out of date internet web page.

The full rule of thumb is so as to add a single HTML internet web page and now not the usage of a separate CSS or image data. On the other hand, if the internet web page you wish to have so as to add comprises separate CSS data and images, then you definately definately will have to place them in a list development.

To be told further, you’ll need to see our beginner’s data on how one can add an HTML web page to wordpress with out 404 mistakes.

We hope this text has helped you learn how to add HTML forms in wordpress. Next, it’s imaginable you’ll need to check our other guides on how one can export wordpress shape entries to CSV and Excel and how one can arrange wordpress shape monitoring in Google Analytics.

Should you favored this text, then please subscribe to our YouTube Channel for wordpress video tutorials. You’ll be capable to moreover to seek out us on Twitter and Fb.

The submit The best way to Upload HTML Paperwork in wordpress (2 Strategies) first appeared on WPBeginner.

wordpress Maintenance

[ continue ]

wordpress Maintenance Plans | wordpress hosting

read more

<a href=”https://wpmountain.com/the-best-way-to-upload-html-paperwork-in-wordpress-2-strategies/”>Source link

See what others are saying about this...

Posted on Leave a comment

7 Perfect search engine marketing Hyperlinks Plugins for WordPress (Unfastened and Paid)

While managing our internet websites, now we have constantly found out that within links are an crucial part of a a good fortune seo methodology. They act as bridges that knowledge shoppers and search engines like google and yahoo like google and yahoo via your web page’s content material subject material, boosting its visibility and authority.

The problem is that manually managing all of the ones links can in point of fact really feel like an endless recreation of connect-the-dots. That’s where the power of wordpress seo links plugins is to be had in.

Whether or not or no longer you’re taking a look to automate your within linking, reach data-driven insights into your web page development, or simply make the linking process a lot much less frustrating, the suitable seo links plugin can be a game-changer.

At WPBeginner, we rely on All in One seo for our link-building, on the other hand we keep in mind that each and every web page is different. As a result of this we tested quite a lot of other alternatives to help bloggers and business householders find the easiest seo plugin for their unique needs.

In this article, we’ll uncover the best wordpress seo links plugins, comparing their choices and ease of use to help you find the easiest device to boost your web page’s seo and client experience.

seo-links-plugins-in-post.png” alt=”Best seo Links Plugins for wordpress” class=”wp-image-297158″/>

Overview of the Best seo Links Plugins for wordpress

For those who’re in a hurry, then this comparison table will will can help you briefly be informed which seo links plugin most closely fits your web page.

How seo Links Plugins Can Reinforce Your Search Score

Inner links are used to connect the posts and pages on your web page, allowing shoppers to seek out further information about the topic they’re learning about. This will likely help building up pageviews and scale back the jump fee on your wordpress web page.

Take WPBeginner as an example. Let’s say that one among our visitors is learning a post about seo tips for green individuals. We find that they’re going to stay engaged longer if they are able to click on on on words like ‘keywords’ and ‘one way links’ to be informed further concerning the ones topics on the interconnected pages.

Inner links are also super essential for wordpress search engine marketing (seo) and can help your content material subject material rank upper in search results. When Google crawls your web page, it is going to most likely observe the ones links to seek out further of your content material subject material and make it available in searches.

The additional links you’re going to have connecting your pages, the quicker and easier it’s for Google to look out and index all of your content material subject material.

The problem is that including inside hyperlinks to each and every single post and internet web page on your web page can take forever. Plus, it’s easy to overlook to link to at least one factor essential.

seo links plugins for wordpress make the process much more easy, ensuring that each and every internet web page on your web page gets the attention it deserves:

  • They counsel similar pages you’ll link to if you’re writing a post and care for an invaluable document of linking choices that you just’ll assessment later as your web page grows.
  • They find any ‘orphaned’ pages that no other posts link to and counsel tactics to connect them to the rest of your web page.
  • Some may also robotically link positive keywords on your web page to express pages, in order that you don’t will have to do it manually each and every time.

So, let’s take a look at the pros and cons of the best seo links plugins for wordpress and the best way they are able to will can help you create upper connections right through your web page.

How We Check out and Analysis the Best seo Links Plugins

Previous than we suggest any seo links plugin to our readers, we first take a look at and overview it completely. In fact, now we have used quite a lot of of them on a long-term basis proper right here on WPBeginner.

While checking out, we pay explicit attention to:

  • The usual, relevance, and selection of within linking choices it discovered
  • How merely it we could us add the links they have got been recommending
  • To any extent further choices introduced by means of the plugin to make certain that within links had one of the crucial positive have an effect on on seo

With that being discussed, let’s take a look at probably the most an important best seo links plugins for wordpress.

Why Trust WPBeginner?

The WPBeginner body of workers brings over 16 years of real-world experience in working a weblog and establishing a good fortune wordpress internet websites.

We moderately take a look at each plugin to ensure it meets our over the top necessities for potency, ease of use, and value previous than we imagine recommending them.

For added details, see our editorial procedure.

1. All in One search engine marketing

<img decoding=”async” loading=”lazy” width=”680″ height=”355″ src=”https://wpmountain.com/wp-content/uploads/2024/10/image-17.png” alt=”The All in One seo plugin” class=”wp-image-305072″ title=”The All in One seo plugin”/>

All in One search engine marketing (AIOSEO) is the highest search engine marketing plugin for wordpress, and is used by over 3 million folks. In fact, we’ve used it on numerous wordpress internet sites through the years.

In keeping with first-hand experience, we even wrote an entire All in One search engine marketing overview, which it’s your resolution to try for additonal entire details.

We adore All in One seo because it let you fortify seo although you don’t have any technical knowledge. It offers a powerful Hyperlink Assistant that makes it easy to build upper within links.

It starts by means of giving you an intensive document of the links it crawled on your web page, along side within links, outbound links, and affiliate links for each post and internet web page.

Link assistant overview

It moreover provides just right within link concepts in line with your provide content material subject material.

It presentations you which of them posts it recommends for within linking and even robotically generates a phrase and anchor text for each link. Simply clicking on ‘+ Add Link’ will add all of the phrase along with the link to the proper blog post.

Find internal link opportunities and orphaned pages

You’ll be capable of do the an identical with each and every orphaned internet web page on your web page. The ones pages in recent years don’t have any within links pointing to them, so together with links will let search engines like google and yahoo like google and yahoo briefly index them, improving your seo.

AIOSEO allows you to briefly add links from the content material subject material editor by means of simply in search of their establish and provides alternatives to upload nofollow, subsidized, and UGC (user-generated content material subject material) tags.

Besides that, AIOSEO helps you to find and connect broken links, optimizes your web page for wealthy snippets, and much more.

Pros of All in One seo:

  • Makes it easy to look out within linking choices
  • Identifies pages with few or no within links
  • Analyzes which pages have one of the crucial link equity and uses that power to boost other pages

Cons of All in One seo:

  • Link Assistant isn’t built-in inside the free style of AIOSEO

Why we decided on All in One seo: AIOSEO is an reasonably priced and beginner-friendly seo plugin that provides numerous tactics of improving links to boost your seo. Its Link Assistant function acts as a data-driven command center for optimizing your entire web page development.

The facility to analyze link power, robotically determine orphaned content material subject material, and get real-time concepts as you write makes AIOSEO your only option for any person interested by maximizing their seo have an effect on via within linking.

2. Yoast

<img decoding=”async” loading=”lazy” width=”680″ height=”303″ src=”https://wpmountain.com/wp-content/uploads/2024/10/image-21.png” alt=”Yoast seo” class=”wp-image-305076″ title=”Yoast seo“/>

Yoast is a popular wordpress seo device that competes with AIOSEO. Its best charge plugin comes with fundamental within linking choices.

Now we have now researched and written about this plugin in depth in our Yoast overview and our comparison of Yoast search engine marketing vs AIOSEO, so likelihood is that you’ll want to take a look at those out for many who’re enthusiastic about additional information.

In the case of within links choices, Yoast scans your content material subject material and then provides concepts for making improvements to them from throughout the wordpress block editor.

Yoast Internal Linking Suggestions

This plugin moreover has limited orphaned content material subject material detection and counts the selection of within links used on a internet web page, on the other hand general, its linking capacity isn’t as entire as All in One seo’s Link Assistant.

While we used this plugin on WPBeginner for a couple of years, we decided to transfer clear of Yoast to All in One seo because of its upper Link Assistant device, redirection manager, sitewide seo audit, enhanced image seo, and additional.

With that all over ideas, you’ll be able to be enthusiastic about our document of the highest Yoast search engine marketing choices for wordpress.

Pros of Yoast:

  • Suggests linking choices inside the sidebar as you write a post
  • Orphaned content material subject material detection
  • Counts within links on a internet web page

Cons of Yoast:

  • seo links choices don’t appear to be available inside the free style
  • seo links choices are further limited than AIOSEO

Why we decided on Yoast: Yoast is a popular seo plugin that comprises quite a lot of seo links choices. Its concepts for within links in point of fact really feel herbal as you write.

3. Rank Math

Rank math

Rank Math is another wordpress seo plugin with fundamental seo links choices. Now we have now in depth experience with this device and created an entire Rank Math overview to supply our shoppers an in-depth analysis of all its choices.

Relating to within linking, we like how this plugin can briefly scan your web page and then get a hold of concepts for together with within links.

The ones link concepts are displayed to your settings panel as you write your posts. You simply reproduction a link and manually paste it into your text.

Rank Math Link Suggestions

In our checking out, we moreover found out this plugin effectively identifies orphaned pages and provides concepts for enlargement.

However, like Yoast, Rank Math’s seo links choices don’t appear to be as entire as AIOSEO’s.

Pros of Rank Math:

  • Basic link concepts are available inside the free style
  • Uses context to suggest similar within links
  • Identifies orphaned content material subject material

Cons of Rank Math:

  • Further advanced seo links choices require the highest charge style
  • seo links choices are further limited than AIOSEO

Why we decided on Rank Math: Rank Math offers within linking concepts in its free style. We find that this plugin offers superb value for money, so it is going to suit web page householders who’re at the affordable or just starting with seo.

4. Hyperlink Whisper

Link whisper

Hyperlink Whisper is a best charge wordpress plugin that is particularly designed to help you create within links for your web page that boost your search engine rankings. The free style accommodates lots of very good seo links choices and could also be enough for some shoppers.

For example, we like how the free plugin analyzes your content material subject material so it is going to most likely counsel similar within links as you write, and lets you add the ones links with merely a couple of clicks.

Link Whisper Link Suggestions

It is going to most likely moreover determine orphaned pages, offers helpful evaluations about your web page’s within linking development, allows you to add within links in bulk, and checks for broken links.

While you give a boost to to the highest charge style, the plugin may also counsel anchor text you’ll use. Plus, it supplies external links to its evaluations.

Pros of Link Whisper:

  • Individual-friendly and surroundings pleasant
  • Suggests within linking choices
  • Inner links reporting
  • Shows and fixes broken links
  • Many seo links choices are available inside the free style

Cons of Link Whisper:

  • This plugin is thinking about seo links and provides few other seo choices

Why we decided on Link Whisper: Link Whisper is a beginner-friendly plugin with powerful within linking choices. It is going to most likely merely streamline and optimize your within linking methodology.

5. Interior Hyperlink Juicer

Internal Link Jucier

Interior Hyperlink Juicer works differently from the other plugins on this document. It uses automation to build within links to your most essential content material subject material. This fashion, you’ll build up website guests and interactions on your web page.

You simply add a listing of specific keywords and phrases along with the internet web page URLs you want to direct those keywords to, and it’ll robotically add links any place it finds the important thing words.

Internal Link Juicer Automatic Links

We’re impressed with the best way through which the plugin analyzes your content material subject material to put links naturally throughout the text and allows you to vary the anchor text so it doesn’t appear to be computer-generated.

Other free choices include the power to blacklist and whitelist specific posts from within linking, an method to limit the selection of links consistent with post, and fundamental link reporting to come up with an overview of your within links.

There is also a best charge style that lets you add infinite keywords for computerized links, has advanced linking regulations, checks for broken links, and additional.

Pros of Inner Link Juicer:

  • Automatically creates within links in line with keywords
  • Intelligently inserts links within your content material subject material
  • Customizable anchor text that can be a large number of
  • The free style could also be all you need

Cons of Inner Link Juicer:

  • Doesn’t include link concepts
  • Sophisticated choices are only available inside the best charge style
  • Does not offer other seo tools

Why we decided on Inner Link Juicer: In our opinion, Inner Link Juicer is an excellent chance if you want to automate your within linking. The free style provides a solid foundation, while the highest charge style unlocks advanced controls for higher internet sites and specific seo strategies.

However, understand that Inner Link Juicer doesn’t offer choices like real-time link concepts as you write. That discussed, it’s conceivable you’ll choose it for many who select a set-and-forget means.

6. SEOPress

seopress

SEOPress is a simple and reasonably priced wordpress seo plugin. It accommodates the entire choices you could be anticipating from an seo plugin, very similar to meta establish, description, Open Graph make stronger, image and content material subject material XML sitemaps, redirects, and additional.

While it’s associated with other absolute best wordpress seo plugins to be had in the marketplace, we have now been dissatisfied that its within linking choices don’t appear to be probably the most tough.

One critical limitation we found out is that it only offers a maximum of 5 within linking concepts from its seo metabox. You’ll be capable of view the guidelines and duplicate any link with a single click on on.

SEOPress Link Suggestions

In its paid style, SEOPress moreover offers a broken link checker. Finding and fixing broken links is essential for a healthy web page development and superb client experience. Doing so will indirectly benefit your seo.

Pros of SEOPress:

  • Suggests within linking choices
  • Identifies broken links
  • Lightweight and speedy
  • Relatively priced best charge plan

Cons of SEOPress:

  • Most efficient offers the fundamental seo links choices
  • It’s limited to simply 5 link concepts at a time
  • The ones are only available inside the best charge style

Why we decided on SEOPress: While SEOPress doesn’t offer advanced within linking choices, it is a solid and reasonably priced seo plugin that provides fundamental seo links choices and a broken link checker.

7. Bonus: YARPP

YARPP

YARPP (or However Another Similar Posts Plugin) is a free plugin that can robotically display posts and pages which could be related to the content material subject material your buyer is learning.

This may increasingly sometimes fortify consumer engagement and pageviews, which indirectly improves seo. On the other hand, since the links don’t appear to be in reality added to your posts, it’ll not help search engines like google and yahoo like google and yahoo index your content material subject material.

YARPP Related Posts Settings

YARPP is discreet to use, and it offers useful alternatives so that you’ll customize which pages and posts are confirmed. It accommodates pre-built problems that you just’ll customize to check your web page’s design.

Pros of YARPP:

  • Automatically shows similar within links to your content material subject material
  • Assists in keeping visitors engaged
  • Free

Cons of YARPP:

  • Doesn’t recommend within link choices
  • Doesn’t in reality add within links to your content material subject material

Why we decided on YARPP: YARPP can fortify client experience and encourage content material subject material discovery while robotically together with similar within links to your content material subject material. However, it doesn’t offer specific seo links choices like the other plugins on our document.

8. Bonus: MonsterInsights

The MonsterInsights Google Analytics plugin

MonsterInsights is the best Google Analytics answer for wordpress, allowing you to track essential metrics correct from your wordpress dashboard.

Now we have now quite a lot of first-hand experience with this device, so it’s your decision to try our complete MonsterInsights overview for additonal in-depth details.

MonsterInsights let you fortify the seo of your links as it’s serving to you monitor hyperlink and button clicks so that you’ll see the potency of affiliate link clicks, outbound link clicks, and additional.

While this won’t straight away fortify your links seo, we like the way it presentations you which of them links are appearing well and which don’t appear to be so that you’ll fortify them.

For example, you’ll see the outbound hyperlinks you’re monitoring in wordpress by means of visiting Insights » Tales and clicking the ‘Publishers’ tab. You’ll be capable of scroll down to appear the ‘Top Affiliate Links’ document which presentations the links your visitors click on on most ceaselessly.

Top Affiliate Links Report

MonsterInsights moreover helps you determine your hottest content material. This will likely knowledge your within linking methodology, allowing you to strategically link to high-performing pages from other similar content material subject material.

Pros of MonsterInsights:

  • Tracks link clicks in wordpress
  • Means that you can see which links are appearing and which don’t appear to be
  • Provides knowledge to fortify your links seo
  • The free style accommodates outbound link tracking

Cons of MonsterInsights:

  • Does not include links seo choices very similar to automated within linking or anchor text optimization like numerous our other ideas

Why we decided on MonsterInsights: While MonsterInsights will not directly fortify your links seo, when used alongside one of the crucial other plugins, it can provide knowledge and metrics that can inform your linking methodology.

What Is the Best seo Links Plugin?

For those who’re using an entire seo plugin, then chances are that it accommodates some useful seo links choices. Out of the ones, All in One search engine marketing‘s Link Assistant is exceptional and provides one of the crucial complete set of choices available.

It offers helpful within linking concepts each and every during the wordpress content material subject material editor and in a central location. The ones can also be added to your posts with the simple click on on of a mouse.

Previous that, AIOSEO will provide you with detailed evaluations of your links, identifies orphaned pages, and simply makes it easier so that you can upload links to your posts and pages.

For those who occur to don’t appear to be already using an seo plugin, or if you are using one with inclined seo link choices, then Hyperlink Whisper allows you to add loads of the an identical within linking choices that AIOSEO does.

On the other hand needless to say because it doesn’t include every other seo choices, you’re going to need a further full-featured seo plugin like AIOSEO anyway.

In any case, for many who simply want to robotically create within links to your most essential pages, then Interior Hyperlink Juicer will automate this process with minimal setup. While it lacks just about all of the seo links choices introduced by means of AIOSEO, it offers the best set-and-forget answer.

FAQs About seo Links Plugins for wordpress

Listed here are answers to a couple of common questions you’re going to have about using seo links plugins for your wordpress website online:

What exactly do seo links plugins do?

seo links plugins for wordpress will can help you fortify your web page’s within linking development, which is a neighborhood of links connecting your pages to each other.

They can do this by means of robotically together with links in line with keywords, suggesting links similar to your content material subject material, working out orphaned pages that don’t have any links pointing to them, and additional.

Why is within linking essential for seo?

Engines like google like google and yahoo like Google use within links to seek out and index content material subject material and understand your web page development.

This lets them display your content material subject material on search results pages and lets them know which content material subject material you notice as most essential so they are able to prioritize it in search results.

Can’t I merely add within links manually? Why use a plugin?

You’ll be capable of, but it surely’s time-consuming, in particular for higher internet websites.

Plugins streamline the process, saving you time with automation and proposals – giving data-driven insights so that you’ll continue to fortify your linking methodology.

Will using an seo links plugin be certain that higher rankings?

While a superb within linking methodology is essential, seo involves many components. seo links plugins are tools to help you, on the other hand they don’t be certain that absolute best rankings.

Besides within linking, other rating components include top quality content material subject material, positive client experience, on-page seo optimization, one way links, and wordpress potency.

Best wordpress Guides for seo

Now that you just’ve seen the best seo links plugins for wordpress, likelihood is that you’ll like to try another articles related to wordpress seo:

We hope this tutorial helped you to find the best seo links plugins for wordpress. You may also want to see our knowledge on inside linking for search engine marketing or our professional select of the most efficient wordpress search engine marketing plugins and gear that you need to use.

For those who occur to preferred this article, then please subscribe to our YouTube Channel for wordpress video tutorials. You’ll be capable of moreover find us on Twitter and Fb.

The post 7 Perfect search engine marketing Hyperlinks Plugins for wordpress (Unfastened and Paid) first gave the impression on WPBeginner.

wordpress Maintenance

[ continue ]

wordpress Maintenance Plans | wordpress hosting

read more

<a href=”https://wpmountain.com/7-perfect-search-engine-marketing-hyperlinks-plugins-for-wordpress-unfastened-and-paid/”>Source link

See what others are saying about this...

Posted on Leave a comment

The churn check that ended with 4% extra leads (we took the L so you don’t have to)

Over the past few years, I’ve been thinking about something new to you, something most companies wouldn’t admit to: a look at one of our losses.

A “best practice” that failed so badly we had to pause part of the test early. And if I have to be clickbait for a 2d, it’s a tactic you can use in your calls to action as we communicate.

So come for the train wreck, then stick around for the lesson, because what we found drove an additional 4% of leads from our CTAs.

And I’ll just show you the best way to recreate it. (Development, that is. Now not the train wreck.)

The simplest practice that didn’t exist

I turn to AJ Beltis, Conversion Methodology Marketing and Promotion Manager, when I need absolute authority on two things: 1) pop culture movie references and 2) content conversion.

So, after being told that within a temporary period the best possible practice would lead to a 14% loss in the conversion price, I ran to him like Luke flying once again towards Obi-Wan.

Screenshot of ABC test on CTA language

It all started with a test of our CTA button wording. Longtime readers may recall that our anchor texts were once a hodgepodge of more than a few varieties.

“It used to be up to the bloggers, because each of those CTAs was once personally identified,” AJ explains. “So sometimes it was ‘Get the template,’ sometimes it was ‘Download now.’”

And why do we test? the whole thingWhen we decided to make our CTAs more consistent, we started by testing several possible language choices. The test variations were:

  • The Regulation: “Get the [Product Type]”
    Reduce and dry. Right to the point. A great example of our previous anchor text methodology.
    Example: “Get the template”
  • The simplest practice: “Let yourself go [Product Type]”

An identical to the above, simpler now we add “free” as an incentive. A wonderful and non-controversial tactic that you will see in every single given CTA.
Example: “Get the flexible template”

  • The joker: “Let yourself go [Specific Product]”

Right here we add a summary of the offer to the button itself. At the time, this seemed redundant because there was already a summary above the button, so hello, let’s take a look.
Example: “Get Social Media Calendar Template”

Examples of Author CTA Variations

We’re now so confident in the results that we’ve put our money where our mouse used to be and put 25 of our top lead-generating blogs to the test.

“We felt very happy with the risk, because we weren’t getting rid of the rest or changing the rest in any drastic way,” AJ says. “So it was once a pretty safe way to test something.”

John Hammond felt the same way in Jurassic Park.

What Went Wrong (and What Went Right)

Within 2 weeks, Variant B caused our conversion rate to drop by 14%, until we finally discontinued that division to reduce losses on our most important lead generators.

So why didn’t the best artistic practices work?

“One idea is that any time you realize something is labeled ‘free’ on the Internet, it might have a spammy connotation.”

Simply put, like Pavlov’s dog, we have all been trained to search for “free download” and quickly scroll through before discovering what is undoubtedly a scam and/or ED treatment.

Oh, so what about Variant C? The one we dismissed as redundant?

In fact, this increased our conversion rate by 4% overall and 7% among new visitors.

So why did this variant work where the other failed?

AJ believes that it is essential to use visual cues to focus attention on the keywords the reader is searching for.

“When people learn a blog post, they do it pretty much by skimming as fast as they can to get a response,” he says with a shrug and a crooked smile. “I’ve been a blogger, and it sucks to say, but then again, no one usually learns all 1,200 words that you just put a lot of time and effort into.”

(Alternatively, not you now, dear reader. Not you now… Right?)

Let’s say a shopper is scrolling to learn more about social media content calendars. Suddenly, they see a big orange button that provides a social media content calendar template.

“This is the specific problem I want AND Is it free? I’ll take it.”

AJ Beltis quote on keywords in anchor text

Conclusions on CTAs

To see the most important takeaway, scroll up once more and take a look at the CTA button just below the create this blog. You’ll notice that we don’t include any descriptive text above the button, but instead use the description on the button itself.

A couple of other insights from AJ:

1. Test every single thing. (Or “Don’t take best practices at face value.”)

Relying only on best practices would have hurt our conversion rate, without us even understanding why.

Likewise, if we had not tested what we assumed was redundant selection, we might not have discovered any wins.

“If we had simply tested ‘free’ against control, the test would not have worked,” says AJ. “Alternatively, since we tested ‘free’ against control against ‘free [specific thing]’, that extra layer worked.”

2. Use keywords in your anchor text

“If you use the keywords that they’re searching for, that’s going to be a bonus. If you use the words ‘content calendar template’ or ‘planning template’ when they’re reading a blog about social media content calendars… they’re already thinking of that word, so psychologically, it might hook them a little bit sooner.”

Putting keywords in your anchor text could also be a win for accessibility, as it helps other people using visual display readers understand what they’re clicking on.

3. Test your top lead drivers

After being beaten worse than Rocky by Apollo, you’d probably think we’d start testing much less important pages, but that’s not the case.

As Rocky says: “It’s not how hard you get hit, it’s how you get hit and how you keep going.”

As AJ says: “After looking at our main page testing, that’s also where the most important selection for expansion is. If we had been just a little more protected by testing the pages that don’t convert so well, we probably wouldn’t have been able to uncover the extent to which a strategy could be successful or unsuccessful.”

AJ Beltis Quote on Front Pages Representing Biggest Growth Opportunities

4. Trust your audience over authority.

And that includes me, AJ, and Obi-Wan.

Always imagine your audience’s reaction to what you discover in any data.

“Respond to your audience,” AJ says. “Some audiences might find a test we’ve run not very compatible. While we might look to other companies for inspiration, run it on HubSpot’s blog audience and find that their test doesn’t work for us.”

5. Test your supplies too.

Amid all this talk about CTAs, AJ makes one final point: your CTA is as simple as what it offers.

So test what you offer too.

“We use templates because templates are the graphics for us. We don’t do webinars because webinars are not the graphics for us. Some companies, they only do webinars because that’s what works for their content space.”

Learn how to test your CTA button text and offers

Unlike Rebecca’s test on paid ad landing pages, for this Do you want to test one part at a time. So you definitely need to test your anchor text and content material separately.

Additionally, you’ll want to use a tool that carefreely splits your website visitors between variants—something like Convert, VWO, or, hello, Content Hub!

  1. Access the test web page.
  2. Click the file menu and then make a selection“New,” then “Run A/B Test.”
  3. Enter a name for each variant.

It should be something descriptive that will be easy to remember. If you happen to take a look at screenshot number one, you will see that we simply used “Original Internet Web Page”, “Variant B – Loose”, and “Variant C – Loose + Description”.

  1. Click “Create Variant”.
  2. Change the anchor text or link destination point (but not all!)

For this optimization phase, you will get good results by testing one trade at a time. (Although you will definitely test some diversifications on that trade.)

To recreate AJ’s test, take a look at the offer summary in the anchor text. Heck, you might even want to check using “free”.

  1. Click “Publish” in the top right corner, then “Publish Now.”

No matter what you decide to test, you definitely need to keep an eye on the results over the years. Be able to pull that emergency brake so you can avoid your own train wreck.

wordpress seo

[ continue ]

wordpress Maintenance Plans | wordpress hosting

Learn more

Source link

See what others are saying about this...