Online Marketing and SEO Content Streams explained
SEO Content Streams – Everything you need to know!
Website Security: Protecting Your Website and Your Data
Just like a home needs a lock and alarm system, your website needs security measures to protect it from cyber threats. A compromised website can lead to data breaches, financial loss, reputational damage, and even legal issues. Here’s how to fortify your website:
1. Firewalls: Protecting Your Website from Attacks
A firewall acts like a gatekeeper, standing between your website and the internet. It analyzes incoming and outgoing traffic, blocking malicious attempts to access your website. Imagine a firewall as a security guard at your digital door, only allowing trusted visitors to enter.
2. Secure Sockets Layer (SSL) Certificates:
An SSL certificate encrypts the communication between your website and visitors, ensuring that sensitive information, such as credit card details, remains protected. Look for the padlock icon in your browser’s address bar to confirm an SSL certificate is installed.
3. Strong Passwords and Two-Factor Authentication:
Using strong, unique passwords for every account is essential. Enable two-factor authentication for extra security, requiring a code from your phone in addition to your password when logging in.
4. Regular Updates and Patches:
Software updates and security patches address vulnerabilities that hackers exploit. Keep your website’s software, plugins, and themes up-to-date to minimize risks.
5. Website Backups:
Regularly back up your website data to protect against data loss due to accidents, attacks, or technical failures. Having backups allows you to restore your website if something goes wrong.
Beyond Security: Building a Strong Online Presence
Content Marketing: Creating Value and Building Relationships
Content marketing is about creating and sharing valuable, relevant, and consistent content to attract and retain a clearly defined audience—ultimately driving profitable customer action. Think of it as building trust and establishing your expertise through informative blog posts, engaging videos, and valuable resources.
Google My Business: Optimizing Your Listing
Your website is your digital storefront, a place where potential customers can discover your business, learn about your products or services, and connect with you. Here are some tips for optimizing your Google My Business listing:
- Complete Your Business Profile: Include all your important business information, such as your business name, address, phone number, website URL, and business hours.
- Add High-Quality Photos and Videos: Showcase your products, services, and team to create a visually appealing profile.
- Respond to Reviews: Engaging with customer reviews demonstrates responsiveness and builds trust.
- Use Relevant Keywords: Choose keywords that accurately describe your business and help customers find you online.
- Track Your Performance: Analyze Google My Business insights to understand how customers find you and optimize your listing for better results.
Remember, a secure and well-maintained website is the foundation for a successful online presence. By implementing these strategies, you can protect your data, build trust with your customers, and achieve your business goals.
Unlocking Your Online Success: A Guide to Building a Website That Works
TL;DR – Building a website is like baking a delicious cake. You need the right ingredients (planning, design, development, and launch), careful attention to detail (user experience and interface), and a dash of magic (current and future trends). This article will guide you through the process of creating a website that not only looks amazing but also attracts customers and helps your business flourish. We’ll explore the latest website trends, marketing strategies, and essential tips for making your website a success. Plus, discover why Super Effective Websites is the go-to choice for Coachella businesses seeking online success.
Let’s dive in and unlock your website’s potential!
The Power of a Website: Your Online Home and Showcase
Imagine a bustling town square where businesses showcase their wares. Now imagine that town square online! Your website is your digital storefront, a place where potential customers can discover your business, learn about your products or services, and connect with you.
But a website isn’t just a virtual storefront – it’s a powerful tool for reaching new audiences, building your brand, and growing your business.
In today’s digital age, a website is essential for any business that wants to succeed.
The Super Effective Websites Advantage: Your Coachella Partner for Online Success
Here in the Coachella Valley, businesses are constantly innovating and striving for growth. Super Effective Websites understands the unique needs of Coachella businesses and has become the industry leader for website development, hosting, and online marketing.
Why is Super Effective Websites the go-to choice for Coachella businesses?
- Local Expertise: Super Effective Websites understands the local market, the competition, and the needs of Coachella businesses. They know what it takes to attract local customers and stand out from the crowd.
- Proven Results: Their track record speaks for itself. Businesses across Coachella are seeing impressive results in terms of website traffic, leads, and sales since partnering with Super Effective Websites.
- Personalized Service: They believe in building strong relationships with their clients, offering personalized attention and support every step of the way.
- Affordable Solutions: They offer a variety of website packages and services to fit any budget, making it possible for businesses of all sizes to succeed online.
Crafting Your Digital Masterpiece: The Website Building Process
Building a successful website is a journey, not a sprint. It involves a series of steps that work together to create a website that truly shines.
1. Planning: Laying the Foundation for Your Website
Before you start building, you need to know what you’re building. Just like a blueprint for a house, a plan for your website helps you stay on track and achieve your goals.
Ask yourself:
- What is the purpose of your website? Do you want to sell products, share information, or connect with your audience?
- Who is your target audience? Understanding your audience helps you design a website that resonates with them.
- What are your goals for your website? Do you want to increase brand awareness, generate leads, or drive sales?
Once you’ve answered these questions, you can create a website plan that outlines:
- Website content: What information will be included on your website?
- Website structure: How will your website be organized?
- Website design: What visual style will your website have?
2. Design: Creating an Experience That Captivates
Now it’s time to bring your website plan to life. Design is the heart and soul of your website. It’s what makes your website visually appealing, easy to navigate, and engaging for your visitors.
- User Experience (UX): This is how people feel when interacting with your website. A good UX is like a smooth, enjoyable journey. Think about how easy it is to find what they are looking for, how intuitive the navigation is, and how the website makes them feel. A good UX keeps people on your site and coming back for more.
- User Interface (UI): This is the look and feel of your website. Think about the colors, fonts, images, and overall layout. A good UI is visually appealing, easy to read, and reflects your brand identity.
Here are some important design elements to consider:
- Color scheme: Choose colors that represent your brand and evoke the right emotions.
- Typography: Select fonts that are easy to read and visually appealing.
- Imagery: Use high-quality images and videos that capture your audience’s attention.
- Layout: Organize your website in a way that makes sense and is easy to navigate.
3. Development: Bringing Your Vision to Life
With a solid plan and captivating design, it’s time to turn your vision into a reality! This is the stage where your website is actually built.
There are two main approaches to website development:
- Custom Website Development: This is like building a bespoke suit – perfectly tailored to your unique needs. A custom website gives you complete control over every aspect of your website.
- Content Management System (CMS): This is like a pre-built house that you can customize to your liking. A CMS provides a user-friendly interface for creating, editing, and managing your website content.
Choosing the right development method depends on your needs and budget.
4. Launch: Introducing Your Website to the World
You’ve put in the hard work, now it’s time to launch your website and let the world see it!
Before you hit the “publish” button, make sure you’ve taken the following steps:
- Website testing: Thoroughly test your website to ensure it is functional, error-free, and optimized for different devices.
- Website optimization: Make sure your website is fast, responsive, and easy to use on mobile devices.
- Website promotion: Let people know about your new website through social media, email marketing, and other channels.
Website Trends: Staying Ahead of the Curve
The web is constantly evolving, so it’s important to stay up-to-date on the latest website trends. This helps your website stay relevant and engaging for your audience.
1. Responsive Design: Adapting to Every Screen
Imagine your website as a chameleon, seamlessly adapting to any screen size. That’s responsive design in action! It means your website looks great and works perfectly on desktops, laptops, tablets, and smartphones. This is crucial because more and more people are browsing the internet on their mobile devices.
2. Mobile-First Development: Designing for the Small Screen First
Building your website with mobile devices in mind is a game-changer. Mobile-first development prioritizes the user experience on smartphones and tablets, ensuring a fast, seamless, and engaging experience on any device.
3. AI Integration: Boosting Efficiency and Personalization
Artificial intelligence (AI) is transforming how we interact with the web. From chatbots that answer customer questions to personalized recommendations, AI can enhance your website’s functionality and create more engaging experiences.
4. Voice Search Optimization: Speaking Your Way to Success
Voice search is becoming increasingly popular, with people using devices like Google Home and Amazon Alexa to find information. Optimizing your website for voice search means using natural language and conversational keywords to ensure your website shows up in voice search results.
5. The Future of Websites: What’s on the Horizon?
The future of websites is exciting and full of possibilities. As technology continues to evolve, we can expect to see even more innovative website features and experiences, including:
- Augmented Reality (AR) and Virtual Reality (VR): Imagine interacting with your website in a whole new way! AR and VR have the potential to bring your website to life and create immersive experiences for your users.
- Personalized Web Experiences: Websites will become even more tailored to individual users, offering customized content, recommendations, and interactions.
- The Internet of Things (IoT): As more devices become connected, websites will play an increasingly important role in controlling and managing these devices.
Unlocking Online Success: Effective Website Marketing Strategies
Now that you have a beautiful, functional website, it’s time to attract visitors and turn them into customers. Here are some proven online marketing strategies that can help you achieve your goals:
1. Content Marketing: Creating Value and Building Relationships
Content marketing is about creating and sharing valuable, relevant, and consistent content to attract and retain a clearly defined audience — and, ultimately, to drive profitable customer action.
Here are some effective content marketing strategies:
- Blog posts: Share informative articles, tips, and advice related to your industry.
- Videos: Create engaging videos that showcase your products or services, share customer testimonials, or provide helpful tutorials.
- Infographics: Visualize complex information in a clear and engaging way.
- Case studies: Highlight your successes and showcase how you’ve helped other businesses.
2. Social Media Marketing: Connecting with Your Audience
Social media platforms like Facebook, Instagram, Twitter, and LinkedIn are powerful tools for reaching your target audience.
Here are some tips for effective social media marketing:
- Create a strong social media presence: Develop consistent branding across all your social media platforms.
- Engage with your followers: Respond to comments and questions, and participate in relevant conversations.
- Run social media ads: Target your ideal audience with paid advertising to reach a wider audience.
- Share valuable content: Post regularly, share interesting articles, and engage with your followers.
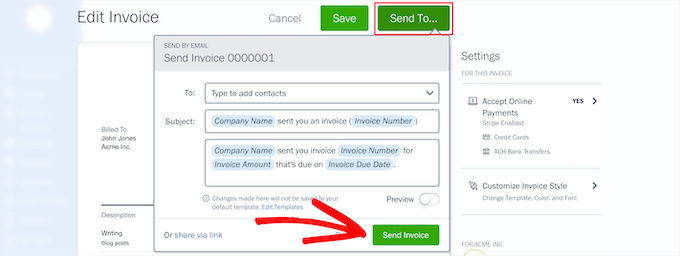
3. Email Marketing: Building Relationships and Driving Sales
Email marketing is a powerful way to stay connected with your audience and nurture relationships.
Here are some tips for successful email marketing:
- Build an email list: Collect email addresses from your website visitors and social media followers.
- Segment your email list: Divide your list into different groups based on their interests and behaviors.
- Send personalized emails: Tailor your email content to the interests and needs of each segment.
- Track your email performance: Monitor your email open rates, click-through rates, and conversion rates to see what’s working.
4. Pay-Per-Click (PPC) Advertising: Reaching Your Audience Instantly
PPC advertising allows you to place ads on search engines and social media platforms and pay only when someone clicks on your ad.
Here are some benefits of PPC advertising:
- Instant results: You can start seeing results within hours of launching your PPC campaign.
- Targeted reach: You can target your ads to specific audiences based on demographics, interests, and behaviors.
- Trackable performance: You can track your PPC campaign performance in real-time and adjust your campaigns accordingly.
Local SEO: Being Found in Your Community
Local SEO is essential for businesses that want to attract customers in their local area. It involves optimizing your website and online presence to rank higher in local search results.
1. Google My Business: Your Online Business Hub
Google My Business is a free tool that helps businesses manage their online presence across Google, including Google Search and Google Maps.
Here are some tips for optimizing your Google My Business listing:
- Complete your business profile: Include all your important business information, such as your business name, address, phone number, website URL, and business hours.
- Add photos and videos: Showcase your business and products with high-quality images and videos.
- Encourage customer reviews: Ask your satisfied customers to leave reviews on your Google My Business listing.
- Respond to reviews: Take the time to respond to both positive and negative reviews.
2. Local Citations: Building Credibility and Visibility
Local citations are listings of your business information on websites and directories.
Here are some tips for building local citations:
- Claim your business listings: Make sure your business information is accurate and consistent across all websites and directories.
- List your business on relevant directories: Include your business in local directories that are relevant to your industry.
- Check for inconsistencies: Make sure your business information is consistent across all listings.
3. Customer Reviews: Earning Trust and Building Reputation
Customer reviews are incredibly valuable for local SEO. They build trust and credibility with potential customers.
Here are some tips for encouraging customer reviews:
- Ask for reviews: Don’t be afraid to ask your satisfied customers to leave reviews.
- Make it easy for customers to leave reviews: Provide clear instructions on how to leave a review.
- Respond to reviews: Thank customers for their positive reviews and address any negative reviews professionally.
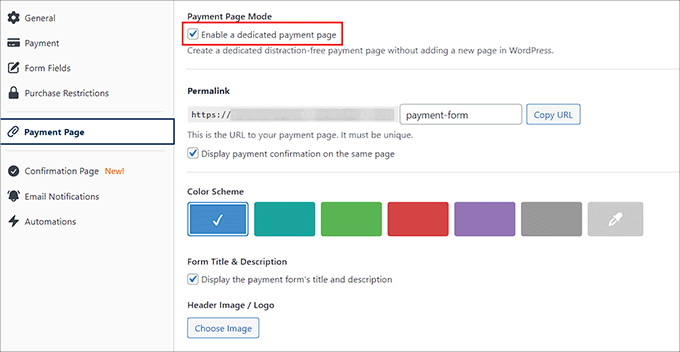
Website Hosting: Choosing the Right Platform for Your Needs
Just like a house needs a sturdy foundation, your website needs a reliable hosting platform. Website hosting is the process of storing your website files on a server so that they can be accessed by users on the internet.
Here are some common types of website hosting:
1. Shared Hosting: A Budget-Friendly Option
Shared hosting is the most affordable option. You share server resources with other websites. This is a good option for small websites with low traffic.
2. VPS Hosting: Increased Performance and Control
VPS hosting gives you a dedicated portion of a server, providing more resources and control. This is a good option for websites with moderate traffic and specific performance needs.
3. Dedicated Hosting: Maximum Performance and Security
Dedicated hosting provides you with an entire server, giving you maximum performance, security, and control. This is a good option for websites with high traffic and demanding applications.
4. Cloud Hosting: Scalability and Flexibility
Cloud hosting is a flexible and scalable option that distributes your website across multiple servers. This is a good option for websites with varying traffic needs and those who require high uptime.
Choosing the right hosting solution depends on your website’s specific needs and budget.
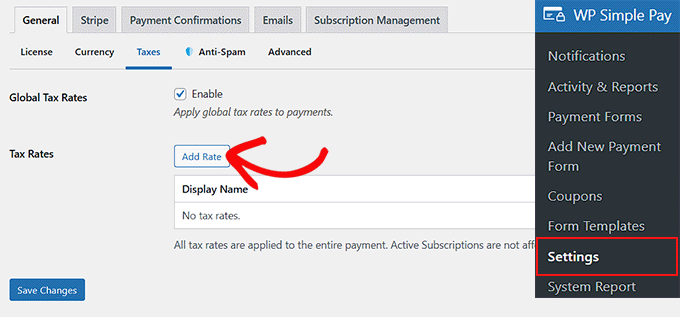
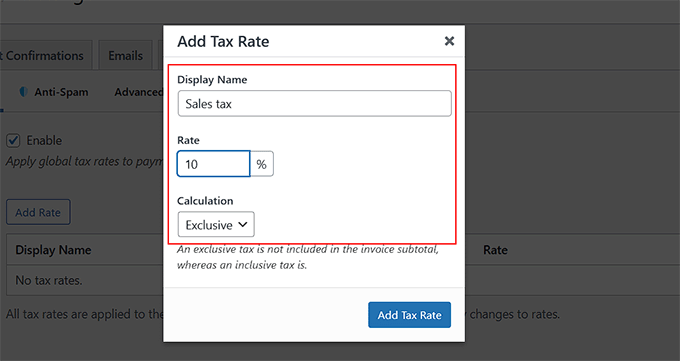
Website Security: Protecting Your Website and Your Data
Just like a home needs a lock and alarm system, your website needs security measures to protect it from cyber threats.
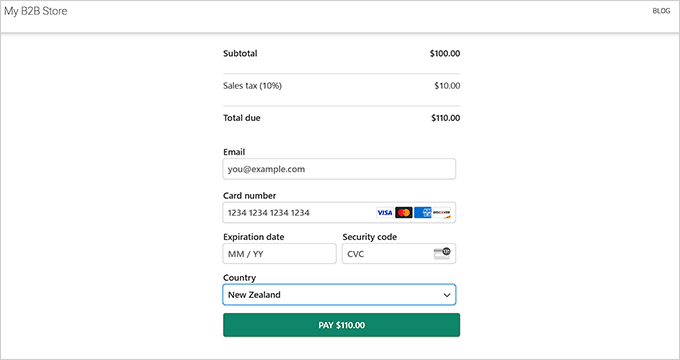
1. SSL Certificates: Encrypting Sensitive Data
An SSL certificate encrypts the communication between your website and visitors, protecting sensitive information such as credit card details and personal data.
2. Firewalls: Protecting Your Website from Attacks
A firewall acts as a barrier between your website and the internet, blocking malicious traffic and protecting your website from attacks.
3. Regular Updates: Staying Ahead of Vulnerabilities
Regularly updating your website software and plugins helps patch vulnerabilities and keep your website secure.
4. Backups: Restoring Your Website in Case of Disaster
Regularly backing up your website data helps you restore your website in case of data loss or a security breach.
WordPress: The Power of a Popular Platform
WordPress is a popular choice for website development because it is user-friendly, flexible, and powerful.
1. Why WordPress?
- Easy to Use: WordPress is a user-friendly platform that makes it easy to create and manage your website, even if you don’t have technical experience.
- Flexible and Powerful: WordPress is a highly customizable platform that allows you to create almost any type of website you can imagine.
- Large Community: WordPress has a large and active community of users and developers who provide support and resources.
- Vast Plugin Library: WordPress offers a vast library of plugins that can add features and functionality to your website.
2. Best Practices for WordPress:
- Choose a reliable hosting provider: Choose a hosting provider that is optimized for WordPress.
- Select a secure and reliable theme: Choose a theme that is well-designed, responsive, and regularly updated.
- Install essential plugins: Install plugins that enhance your website’s security, performance, and functionality.
- Update regularly: Keep your WordPress core, themes, and plugins up to date to protect your website from vulnerabilities.
- Back up your website: Regularly back up your website data to protect it from data loss.
Creating Websites That Deliver Results: Best Practices for Success
Building a website that achieves your business goals requires a focus on design, functionality, and user experience.
1. SEO Optimization: Getting Found by Your Target Audience
Search engine optimization (SEO) involves making your website search engine-friendly so that it ranks higher in search results.
Here are some SEO best practices:
- Keyword research: Identify relevant keywords that your target audience is searching for.
- Optimize your website content: Use relevant keywords throughout your website content, including page titles, headings, and descriptions.
- Build high-quality backlinks: Get other websites to link back to your website.
2. Speed Optimization: Delivering a Fast and Fluid Experience
Website speed is crucial for user experience and SEO. A fast website keeps visitors engaged and improves your website’s ranking in search results.
Here are some tips for optimizing your website speed:
- Optimize your images: Use compressed images to reduce file size.
- Minimize HTTP requests: Reduce the number of files that need to be loaded on your website.
- Use a content delivery network (CDN): Distribute your website content across multiple servers to improve loading times.
3. Accessibility: Creating a Website for Everyone
Accessibility means designing your website so that it can be used by everyone, including people with disabilities.
Here are some tips for making your website accessible:
- Use alt text for images: Provide alternative text descriptions for images so that screen readers can understand them.
- Use heading tags correctly: Use heading tags to structure your content in a logical way.
- Make sure your website is mobile-friendly: Design your website to be responsive and accessible on all devices.
Super Effective Websites: Your Partner for Online Success
From initial planning to ongoing website management, Super Effective Websites is dedicated to helping businesses in the Coachella Valley thrive online. They offer a comprehensive range of services, including:
- Website Development: Create a beautiful, functional, and effective website.
- Website Hosting: Choose the right hosting solution for your needs and budget.
- Website Security: Protect your website and data from cyber threats.
- Website Maintenance: Keep your website up-to-date and running smoothly.
- SEO Optimization: Improve your website’s ranking in search results.
- Content Marketing: Create valuable content that attracts and engages your target audience.
- Social Media Marketing: Build a strong social media presence and engage with your followers.
- Email Marketing: Nurture relationships and drive sales with targeted email campaigns.
- PPC Advertising: Reach your target audience instantly with paid advertising.
With their local expertise, proven results, personalized service, and affordable solutions, Super Effective Websites is the perfect partner to help you achieve your online goals.
Contact Super Effective Websites today to discuss your website needs and unlock the potential of your online presence!
More on Online Marketing…
- ## SEO Keywords Related to “Online Marketing” and “SEO Content Streams”:
- General Online Marketing:
- online marketing
- digital marketing
- marketing strategy
- content marketing
- social media marketing
- email marketing
- search engine marketing (SEM)
- search engine optimization (SEO)
- paid advertising
- affiliate marketing
- influencer marketing
- website traffic
- lead generation
- conversion rate optimization (CRO)
- marketing analytics
- marketing automation
- marketing tools
- marketing budget
- marketing trends
- marketing research
- marketing strategy development
- SEO Content Streams:
- content marketing strategy
- content calendar
- content creation
- content optimization
- content distribution
- content promotion
- content repurposing
- content analysis
- content audit
- SEO writing
- keyword research
- on-page SEO
- off-page SEO
- technical SEO
- link building
- backlinking
- guest blogging
- social media optimization
- content engagement
- content metrics
- content performance tracking
- content quality
- content freshness
- content relevance
- content diversity
- long-form content
- short-form content
- video content
- image content
- infographic content
- blog posts
- articles
- white papers
- case studies
- ebooks
- webinars
- podcasts
- Specific SEO Content Streams:
- blog SEO
- website SEO
- ecommerce SEO
- local SEO
- mobile SEO
- international SEO
- voice search SEO
- featured snippets
- knowledge graph
- schema markup
- AMP (Accelerated Mobile Pages)
- SEO Tools and Services:
- SEO tools
- SEO software
- SEO agencies
- SEO consultants
- SEO training
- SEO courses
- SEO Industry:
- SEO industry trends
- SEO best practices
- SEO updates
- SEO algorithms
- SEO ranking factors
- SEO competition
- SEO ethics
- SEO community
- This is not an exhaustive list, as SEO is constantly evolving and new keywords are emerging. However, this should provide you with a solid starting point for your SEO keyword research.
Get a highly effective website for your business.