Launch your Alaska dream: a base built at the rhythm
Anchorage, Alaska. The land of the towering mountains, a huge desert and … unusually, a colored startup scene. However, similar to glaciers who cut out the panorama, the aa success release requires a false base. And to your wordpress web page, the basic one is speed.
For cheap startups, Shared websites hosting It is constantly the perfect starting line. It has a reasonable price, but reliable enough to maintain the influx of preliminary visitors. However, as your online activity grows, it is possible that you will have to imagine:
VPS (digital personal server): Extra robust compared to shared websites hosting, providing devoted resources and higher features.
Cloud Webhosting: Scalable and versatile, adapting to your desires as your online activity grows.
Unlock the energy of the storage in the cache:
The most efficient websites hosting will also be bogged down through visitors to the heavy site. This is the place cache storage plugin They are available in. The copies of the dealer of the content material of your web page, delivering them to customers in an instant, increasing the speed and the person who improves.
The best cache samples:
WP Tremenus Cache: An easy and positive selection for new arrivals, delivering quick loading opportunities.
Total cache W3: A plug -in powerhouse with complicated options such as CDN Harden and database optimization.
WP Rocket: A plug -in at higher speed with an intuitive interface and contours designed to maximize functionality.
Further aims for webhosting web for finances:
Look for reductions: Many websites hosting suppliers offer special offers for new consumers who spark the brand.
Optimizes photographs: Use smaller and compressed photographs to resize the load opportunities.
Make a selection a competent CDN: A community of material for the content of the community (CDN) falls the material of the content in a couple of servers, ensuring a quick offer to international customers.
Because rhythm problems for Alaska startups:
Construct consideration and credibility: A slow web page creates a destructive effect, by clicking on feasible consumers.
Fortify the person he crogiulates: The rhythm helps to involve customers, allowing them to discover your choices and be informed more about your emblem.
Revive the marketing of search engines: Motors like Google choose Internet sites with quick loading opportunities, improving your visibility and attracting visitors to the extra natural site.
Through the choice of the hosting plan of the adequate website, imposing a forged cache technique and exploiting those further suggestions, you will be able to build a base for a good luck that is so robust because the panorama of Alaska itself.
<span class=”ez-toc-section” id=”launching-your-alaska-dream-to-find-the-best-possible-wordpress-webhosting-for-your-startup”/>Launch your dream in Alaska? To find the best possible wordpresshosting for your startup!
Consider this: you are a younger businessman in Anchorage, Alaska, with a super industrial thought. You have the fervor, the imaginative and the prescient and a web page built on wordpress, the manufacturer of favorite web pages on this planet. However, what about websites hosting? You want a competent platform, at reasonable prices and quick to exhibit your online business in the arena. This is the place where the convenient wordpresswebsite is available for startups in Anchorage, in Alaska it is available!
This information will discover the crucial parts of the discovery of the simplest wordpress guest at the Alaska startup, specialized in methods to remain low prices without the functionality of sacrifice. We will immerse ourselves in the Arena of the plug -in of storage in the cache, we will discover how they are able to revive the speed of your website and discover tricks to prevent cash on the websitehosting.
<span class=”ez-toc-section” id=”why-wordpress-webhosting-issues-for-your-startup-in-anchorage-alaska”/>Because wordpress Webhosting Problems for your startup in Anchorage, Alaska
wordpress is an impressive platform, however it is only right as the base on which it is located. The hosting of your website is just like the foundation of your web page, to understand its speed, security and general functionality. For anchor startups, choosing the hosting of the appropriate wordpresswebsite is important for a series of causes:
The construction accepts as true with and credibility: A quick and reliable web page makes a good first effect from feasible consumers. Gradual loading opportunities can pressure on guests, influencing the recognition of your emblem.
Reach a wider target market: Alaska is an unlimited state with inhabitants disbursed. The optimization of your websitehosting for speed guarantees that your web page reaches consumers in distant spaces.
Efficient advertising and marketing from the price: A well -hosted wordpress web page allows you to set up your individual content material, saving in cash for full advertising and marketing activities.
<span class=”ez-toc-section” id=”working-out-the-other-varieties-of-wordpress-webhosting”/>Elaborate the other varieties of wordpress Webhosting
Navigating in the arena of websites hosting can really seem overwhelming, however processing the foundations will help you take an educated determination. Here is a distribution of the main types of hosting of wordpress websites:
Bring to mind like a shared rental: You are sharing the resources of the server with several websites.
Execs: Economic, simple to organize.
Against: It will also be slow, in particular visitors to the site of the whole height, since the resources are shared. Now it is not the best for high traffic Internet sites.
2. VPS Webhosting:
Like your individual rental: Get devoted resources (CPU, RAM and many others.) On a digital server.
Execs:hosting of more quick websites than that, tengola against resources.
Against: More expensive than shared websites hosting, it requires some extra technical wisdom.
Consider a whole development only for you: Get a whole body server dedicated only to your web page.
Execs: Final function, safety and supervised.
Against: More expensive choice, requires technical experience.
4. Cloud webhosting:
A community of residences: The information of your web page is sent to a couple of servers, providing excellent scalability and reliability.
Execs: Scalable, high performance, resilient to interruptions.
Against: It will also be more expensive than shared websites hosting, requires a little wisdom of cloud applied sciences.
Opt for the correct web hosting plan for your startup in Alaska
For a startup in Anchorage, Alaska, shared websites hosting is constantly the cheapest selection, in particular when it started. In addition, as your web page grows and draws visitors of extra site, it is possible that you want to imagine updating to a VPS or cloud hosting resolution.
Here’s how to make a choice the right plan:
Estimates visitors to your site: What number of guests do you expect to get?
Believe your desires: Do you need special options such as e -mail account or a devoted database?
Learn the evaluations and examine the costs: Numerous respected websites hosting suppliers offer economic plans adapted for startups.
<span class=”ez-toc-section” id=”wordpress-caching-plugins-supercharging-your-web-sites-pace”/>wordpress cache storage plugin: supercharging of the website rhythm
The storage in the cache is like creating a project of your web page for loading. Consider your web page is an elegant development. As an alternative to establish it from scratch every time every single visit, a plug -in of storage in the cache creates a project (cache) so that the following customer can temporarily bring together the website.
Here’s how the storage in the cache works:
A person requires a web page outside your web page.
The plug -in retail of the plug -in a duplicate on the web page inside the cache (project).
The following person who requires the similar web page will get the replica stored in the cache, loading it much earlier.
<span class=”ez-toc-section” id=”best-wordpress-caching-plugins-for-startups”/>The best wordpress cache plugs for startups
Below are one of the hottest and most positive cache plugins for startups:
WP Tremenus Cache: An easy and strong plugin, the best for newcomers.
Total cache W3: It provides complicated storage choices in the cache and integrates perfectly with different style plugins.
WP Rocket: A higher speed plug-in with an intuitive interface and strong cache storage functions.
ENABLER cache: A light plug-in that is best for small and medium-sized websites.
<span class=”ez-toc-section” id=”leveraging-caching-for-price-efficient-wordpress-webhosting”/>Taking advantage of the storage in the high efficiency wordpresswordpress
The cache storage plugins offer a series of advantages for startups, together with:
Fast loading instances: Advanced people have fun, main for better involvement and conversions.
Load of the reduced server: Much less pressure on your website that hosts activities, financial savings from main ones at the price.
Greater marketing marketing: Motors like Google choose Internet sites that charge temporarily.
Further aims for webhosting at an efficient price in Anchorage, Alaska
Below are some additional methods to optimize the prices of the hosting of your website:
Look for reductions and promotions: Many websites suppliers that host offer introductory reductions for new consumers who sparkle the brand.
Make a selection a supplier with the reliable buyer Restringi Having a useful workforce for narrowing can prevent time and frustration during problems resolution.
Improve better when it is important: Start with a shared websites hosting plan and better improves an extra robust plan when the quantity of visitors to the site requires it.
TL; Dr – Too long; Has not learned
Takeaway Keyway:
Make a selection The hosting plan of the wordpresswebsite suitable for your startup’s wishes and finances.
Take advantage of the storage plugins in the cache to revive the speed of your web page and cut the websitehosting prices.
Discover the hosting choices of cheap websites for startups in Anchorage, Alaska.
Examine costs and contours to look for the most efficient price for your liquidity.
Launch your Alaska dream: it all starts with a cast of the cast
Selecting the correct wordpresswebsite and taking advantage of the cache plugins is important for the start of Hit AA to Anchorage, Alaska. These methods are sure that your web page plays impeccablely, attracts consumers and is helping you to be successful in your online business objectives. Remember, a well optimized web page is the cornerstone of successful online presence.
Remember your web page as a showcase inside the lively roads of Anchorage. A well -designed, quick and reliable web page guarantees that other people take, browse and have interaction together with your emblem. Spend money for the suitable base and watch your dream in Alaska take flight!
<a href=”https://wpmountain.com/cost-effective-wordpress–hosting-for-startups-launching-your-alaska-dream-find/”>Source link
Unleash Your Router’s Inner Rockstar: The Ultimate Guide to Epic Connectivity Shots
TL;DR: Turn your router from tech-drone to internet superstar with these pro photo tips!
Ready to upgrade your router pics from “meh” to “OMG, that’s awesome!”?
This guide is your cheat sheet to capturing your router’s sleek design, awesome features, and the power it brings to your home.
Why Router Photos Matter:
Show Off Your Tech Style: Got a router that’s cooler than a cucumber? Let the world know!
Impress Your Friends: Make your tech-savvy friends jealous with killer photos.
Boost Your Router’s Resale Value: Top-notch photos can increase your router’s value.
Let’s Get This Party Started:
Step 1: The Tripod – Your Steady Hand:
No shaky, blurry photos! Use a tripod to keep your camera still and capture crystal-clear shots.
Step 2: The Router – Your Internet Superhero:
This isn’t just any tech; this is the hero of your online world!
Highlight its Unique Design: Focus on its cool angles, sleek lines, and innovative features.
Showcase Its Power: Capture the speed and connectivity it brings to your home.
Step 3: Pro Tips for Router Photography:
Natural Light is Your Friend: Soft, natural light will make your router shine.
Play with Perspective: Get creative with angles! Shoot from above, below, and the side.
Add a Touch of Drama: Use backlighting, shadows, or interesting props to create a captivating scene.
Go Beyond the Basics: Experiment with macro shots, close-ups, and different lighting techniques.
Ready to unleash your inner photographer? Get snapping and share your amazing router shots with the world!
Get Your Router Photoshoot Ready: The Ultimate Guide to Picture-Perfect Connectivity
TL;DR – Too Long; Didn’t Read
Learn how to take amazing photos of your router to showcase its sleek design and awesome features!
Discover the best angles, lighting, and backgrounds to make your router stand out in a sea of tech.
Explore creative ways to capture your router in action, like showing how it’s connected to all your devices.
The Router: A Modern-Day Hero
You might not think about it much, but your router is like the superhero of your home’s internet. It’s the one that connects all your devices and keeps you connected to the online world. But even superheroes need a good photo shoot!
Why Router Photos Matter
Showcase Your Router’s Coolness: You put a lot of thought into choosing your router, so show it off!
Help Others Make a Decision: If you’re selling your router online, amazing photos will attract buyers.
Make Your Tech Look Awesome: Everyone loves a good tech photo, and your router deserves to be featured.
The Art of Router Photography
1. Finding the Right Angle
Top Down: This classic shot shows off the router’s design and all its ports.
Side View: This angle highlights the router’s shape and any unique features.
Action Shot: Capture your router in action by showing it connected to several devices.
2. Lighting is Key
Natural Light: Daylight is usually the best, but avoid direct sunlight.
Artificial Light: Use a lamp or softbox for a controlled look.
Backlighting: Place your router against a bright light source for a dramatic effect.
3. Choose Your Background Wisely
Minimalist: A plain white or gray background keeps the focus on the router.
Creative: Use a textured surface like wood or brick for a more artistic feel.
Themed: Match the background to your router’s style, like a gaming setup for a gaming router.
4. Add Some Extra Flair
Props: Include cables, devices, or even plants to create a visually appealing scene.
Editing: Use photo editing software to enhance colors, sharpen images, and remove any distractions.
Tell a Story: Your photos should tell a story about your router and its capabilities.
Taking Your Router Photos to the Next Level
Tips and Tricks for Amazing Router Shots
Use a Tripod: Keep your camera steady for crisp, sharp photos.
Experiment with Perspective: Get creative with angles and viewpoints.
Focus on Details: Highlight the router’s features, like its antenna or ports.
Bonus Tip: If you’re in Missoula, Montana, check out Ecliptic Signs for amazing custom-designed signs that might just be the perfect backdrop for your router photos!
Summary
This guide is packed with tips and tricks to take amazing photos of your router. By mastering the art of router photography, you can showcase your router’s unique design, impress your friends, and even sell it for a better price. Remember to experiment with different angles, lighting, and backgrounds to find the perfect style for your router. With a little practice, you’ll be snapping stunning router photos in no time!
How to Keep Your Fishing Stuff Safe in Rochester: A Comedy of Errors
Lock Down Your Boat Like Fort Knox
Invest in the world’s strongest locks and alarms for your boat, because even Houdini couldn’t crack these babies.
Attach a siren to your trailer hitch that blasts out a deafening “GET OUTTA MY BOAT!” anthem every time someone even thinks about touching it.
Guard Your Fishing Gear Like a Dragon
Make a meticulous inventory of your gear, complete with descriptions and serial numbers, in case it gets stolen.
Engrave your initials on every single piece, so thieves can admire your artistic signature while they’re behind bars.
Protect Your Catch: A Seafood Odyssey
Store your fishing gear in a locked container made of adamantium, the same stuff they use to make Wolverine’s claws.
Install motion-activated sprinklers around your boat, so unsuspecting thieves get a refreshing shower they’ll never forget.
TLDR: Fishing is Fun, but Don’t Get Caught
If you get a weird vibe from someone nearby, trust your gut and hightail it out of there. Who knows, you might just avoid a fishy encounter.
Secure Your Gear: A Tale of Woe
Keep your fishing gear in a locked storage area, guarded by a team of highly trained guard dogs.
Consider training your pet goldfish to bark at strangers, just in case the dogs decide to take a nap.
Protect Your Catch: Securing Your Fishing Gear and Boat in Rochester
TL;DR: Fishing is a great way to relax and enjoy the outdoors. But, it’s important to protect your gear and boat from theft. Here’s how to keep your fishing stuff safe in Rochester:
Secure Your Boat
Locks and Alarms
Locks: Use strong locks on your boat’s hatches, compartments, and trailer hitch. Look for locks with high-quality materials like hardened steel and tamper-resistant mechanisms.
Alarms: Consider installing a boat alarm system to deter thieves. These alarms can be triggered by movement, entry, or even unauthorized towing.
Secure Storage
Storage: When you’re not using your boat, store it in a secure location like a garage or a gated storage facility. If you’re storing your boat outside, cover it with a tarp or boat cover to conceal it from potential thieves.
Protect Your Fishing Gear
Take Inventory and Mark Your Belongings
Inventory: Keep a detailed inventory of your fishing gear, including descriptions and serial numbers. This will help you identify and recover stolen items.
Markings: Mark your fishing gear with your name or initials. This will make it easier to identify your gear if it’s lost or stolen.
Secure Your Gear
Storage: Store your fishing gear in a locked container or a secure storage area.
Lockable Tackle Boxes: Use lockable tackle boxes to protect your valuable fishing lures and tackle.
Keep Gear Out of Sight: When you’re fishing, try to keep your gear out of sight of others. Don’t leave expensive gear unattended while you’re fishing.
Be Aware of Your Surroundings
Trust Your Gut: If you feel uncomfortable or suspicious of anyone in the area, trust your instincts and move to a different location.
Stay in Groups: Fish with friends or family members. There’s safety in numbers.
Report Suspicious Activity: If you see anything suspicious, report it to the authorities.
Additional Tips
Use a Trailer Lock: Always use a strong lock on your boat trailer hitch.
Consider a GPS Tracking Device: Install a GPS tracking device on your boat to help locate it if it’s stolen.
Don’t Leave Your Keys in the Car: Don’t leave your boat keys in your car, even if it’s locked.
Use Strong Cables: Secure your boat to the dock with strong cables and locks.
Check Insurance: Make sure your boat and fishing gear are adequately insured against theft and damage.
Rochester Resources: Contact your local law enforcement agency in Rochester for additional security tips.
Summary: Keeping your fishing gear and boat safe is crucial. Take steps to secure your boat and gear by using locks, alarms, and secure storage. Be mindful of your surroundings and report any suspicious activity. Rochester offers resources and support for security needs. Visit Ecliptic Signs for expert security solutions and services.
Unleash the Power of Wi-Fi: Your Ultimate Guide to An Unrivaled Internet Experience
TL;DR:
Don’t settle for mediocre internet! Huntington’s Wi-Fi network empowers you with lightning-fast speeds and exceptional reliability.
Opinionated Summary:
In today’s digital age, a reliable and high-speed internet connection is an absolute necessity. This guide will cut through the clutter and provide you with the knowledge you need to secure the most optimal Wi-Fi experience, tailored to your unique needs.
Internet Connections: A Deep Dive
You can’t make an informed decision without understanding the options available. Here’s a breakdown of the most common internet connection types:
DSL (Digital Subscriber Line): Leveraging your existing phone lines, DSL provides a solid middle ground between speed and affordability.
Choosing the Perfect Plan:
Consider your usage patterns and preferences to determine the right plan. Here’s what to keep in mind:
Data Usage: Determine how much data you consume monthly to avoid overage charges.
Speed: Prioritize the speed you require for seamless streaming, gaming, or work-from-home activities.
Cost: Factor in your budget and compare different providers to find the most cost-effective option.
Get the Most Out of Your Wi-Fi: A Guide to Finding the Best Internet Service for Your Needs
TL;DR – Too Long; Didn’t Read
Want the fastest and most reliable internet connection for your home? This article will help you choose the best internet plan, learn about different types of internet connections, and troubleshoot common Wi-Fi problems. It also includes a fun fact about the city of Huntington!
Finding the Right Internet Plan
You’ve got a ton of options when it comes to internet providers. The best one for you depends on how much you use the internet and what you use it for. Here are some things to think about:
Speed: How fast do you need your internet to be? Do you download a lot of movies or play online games? You’ll want a faster plan for those.
Data Cap: Do you have a limit on how much data you can use? This is important if you stream lots of videos or download big files.
Price: How much can you afford to spend on internet each month? Compare prices from different providers to find the best deal.
Types of Internet Connections
Here are some of the most common types of internet connections:
DSL (Digital Subscriber Line): This uses your existing phone lines to provide internet. It’s not as fast as cable or fiber, but it’s usually a good option if you don’t need super-high speed.
Cable: This uses your existing cable TV lines to provide internet. It’s usually faster than DSL, but it can be affected by how many other people are using the network at the same time.
Fiber Optic: This uses light to transmit data, making it the fastest and most reliable type of internet. It’s not available everywhere, but it’s becoming more common.
Boosting Your Wi-Fi Signal
Placement: Make sure your router is in a central location in your home. Avoid placing it near walls or other devices that might interfere with the signal.
Obstacles: Walls, furniture, and even mirrors can block Wi-Fi signals. Try to keep your router in an open area.
Frequency: Your router might use the 2.4 GHz or 5 GHz frequency band. The 5 GHz band is faster but has a shorter range. If you’re having trouble with a weak signal, try switching to the 2.4 GHz band.
Network Interference: Other devices like cordless phones and microwaves can interfere with your Wi-Fi signal. Try moving your router away from these devices.
Huntington, West Virginia: A Wi-Fi Hotspot
Huntington, West Virginia, is known for its beautiful riverfront and its lively downtown area. Did you know that Huntington is also home to a network of free public Wi-Fi hotspots? These hotspots make it easy to stay connected while you’re exploring all that Huntington has to offer. [Learn more about Huntington and its Wi-Fi network here: https://eclipticsigns.com/ ]
Summary
Finding the right internet plan and boosting your Wi-Fi signal can make a big difference in your online experience. Consider your needs, explore different internet connection options, and take steps to improve your Wi-Fi performance. And if you’re ever in Huntington, West Virginia, enjoy the city’s free public Wi-Fi hotspots!
Elevate Your Home Theater: The Ultimate Guide to TV Stands
Step into the realm of entertainment and discover the world of TV stands, where style meets functionality. From classic consoles to contemporary floating designs, we’ve curated the ultimate guide to finding the perfect perch for your beloved screen.
Delving into the Details:
Materials Matter: Choose from a symphony of materials, including sturdy wood, sleek glass, or durable metal, each offering a unique aesthetic and durability.
Types to suit Every Taste: Classic consoles provide ample storage beneath your TV, while floating stands evoke a modern touch. Choose from wall-mounted, freestanding, or corner models to find the ideal fit.
Features for Enhanced Functionality: Look for stands with built-in cable management, adjustable shelves, or integrated sound systems to elevate your home theater experience.
The Art of Selection:
Prioritize Quality and Durability: Opt for stands made from high-grade materials to ensure they withstand years of use and support your precious TV.
Match Your Personality: Choose a style that resonates with your home decor, whether you lean towards traditional elegance or modern minimalism.
Transform Your Space: A well-chosen TV stand can instantly upgrade your home theater, creating a captivating and inviting atmosphere for movie nights, binge-watching sessions, and immersive gaming.
TL;DR:
Unlock the secrets of choosing the perfect TV stand: visit stores, explore materials, consider types and features, prioritize quality, match your style, and elevate your home theater experience.
Finding the Perfect TV Stand: A Guide for Your Home Theater
TL;DR – Too Long; Didn’t Read
This article helps you choose the right TV stand. We explore different types, materials, features, and things to consider based on your needs and style. Learn how to find the perfect fit for your TV and your home!
What is a TV Stand?
Imagine a fancy platform built just for your TV. That’s a TV stand! It’s a furniture piece designed to support your TV, keeping it safe and looking awesome. It also offers extra space for your DVD player, gaming consoles, or even your favorite plants!
Why You Need a TV Stand
Safety: It keeps your TV stable and secure, preventing it from tipping over.
Organization: Provides a place to store all your TV accessories and hide messy cables.
Style: TV stands come in many styles to complement any room’s décor.
Functionality: Some stands have features like built-in speakers or shelves for displaying items.
Types of TV Stands
1. Console TV Stands
These are large and sturdy, often made of wood or metal. They have multiple shelves and drawers, offering lots of storage space. They’re great for spacious living rooms.
2. Entertainment Centers
Similar to console stands, these offer even more storage and can often include cabinets, drawers, and even sliding shelves. They’re perfect for larger entertainment systems.
3. Corner TV Stands
These are space-saving options ideal for tight corners. They often have a triangular design and are perfect for maximizing space.
4. Floating TV Stands
Modern and sleek, these mounts attach directly to the wall. They create a floating look, adding a touch of elegance to any space.
Materials
1. Wood
A classic choice known for its durability and warmth. Wood comes in different types, like oak, cherry, or pine, each with unique characteristics.
2. Metal
Sleek and modern, metal offers a contemporary feel. It’s usually lightweight and comes in various finishes like chrome, steel, or black.
3. Glass
Offers a modern and stylish look. Glass can be fragile, but it’s easy to clean and can create a spacious feel in smaller rooms.
4. A Mix of Materials
Many stands combine wood and metal or wood and glass, creating unique and interesting designs.
Features to Consider
1. Size
Ensure the stand fits your TV and the space where it will be placed. Measure your TV and the room carefully.
2. Storage Space
Consider how much storage you need for DVDs, consoles, or other items.
3. Cable Management
Look for stands with built-in cable management systems to hide messy wires.
4. Style
Choose a style that complements your décor.
5. Budget
TV stands come in various price ranges. Decide on a budget that fits your needs.
Tips for Choosing the Right TV Stand
Visit stores: See different TV stands in person and assess their quality and style.
Read reviews: Check online reviews for information about specific stands.
Think about your needs: What features are important to you?
Don’t forget the TV: Make sure the stand can support your TV’s weight.
Finding Your Perfect TV Stand in Kentucky
Kentucky is known for its beautiful landscapes and charming towns. If you’re looking for a great TV stand, there are many furniture stores in Kentucky that offer a wide selection. Don’t forget to check out Ecliptic Signs for unique and stylish signs that can complement your home theater setup!
Summary
Choosing the perfect TV stand is a matter of considering your needs, style, and budget. Explore different types, materials, and features to find the ideal stand for your TV and your home. Whether you prefer a classic console or a sleek floating stand, remember to prioritize quality, durability, and a style that matches your personality. And remember, a good TV stand can transform your home theater into a truly inviting and entertaining space!
For individuals who run an web store, then you definitely’re legally required to collect product sales tax in most global places. Then again taxes vary by means of country, state, and house, so figuring out the proper tax fees for your services and products and merchandise can get beautiful tricky.
We endorse to customers in every single place the sector, so we’ve faced the equivalent challenging eventualities.
Fortunately, there are wordpress plugins that make it super easy to robotically collect taxes, it doesn’t topic what type of product you advertise.
As an example, we use Easy Digital Downloads to advertise our tool and plugins, and we find it irresistible because it makes collecting taxes a breeze. Then again when you advertise physically products or services, then that you must desire a different instrument like WooCommerce.
In this article, we’ll show you simple the best way to collect taxes for Stripe expenses in wordpress, step by step, for all the most common eventualities.
wordpress” class=”wp-image-325938″/>
<span class=”ez-toc-section” id=”why-gather-taxes-for-stripe-expenses-in-wordpress“/>Why Gather Taxes for Stripe Expenses in wordpress?
If you find yourself operating an internet trade, collecting taxes is not just a very best apply. It’s normally a jail felony duty.
Whether or not or now not you’re selling physically products, digital downloads, or subscription services, you need to collect the correct taxes at checkout to evolve to local, state, and international rules.
Failure to do so might lead to hefty penalties and as well as harm what you are promoting’s reputation.
So, collecting taxes for your whole Stripe expenses in wordpress isn’t negotiable.
Bear in mind, even supposing, that taxes are also crucial part of the consumer enjoy.
When you calculate and display taxes clearly right through checkout, customers are a lot much less much more likely to truly really feel stunned or pissed off by means of final rate totals. Plus, it shows them that what you are promoting is unique and as well as simplifies your bookkeeping process.
Having said that, let’s take a look at simple the best way to merely collect taxes for Stripe expenses in wordpress.
We will quilt a few different methods, and also you’ll be capable of use the quick links below to jump to the one you need to use:
<h4 class=”wp-block-heading” id=”aioseo-how-to-collect-taxes-for-stripe-payments-in-wordpress“>Gather Taxes for Subscriptions, Products and services and merchandise, and Single Products (WP Simple Pay)
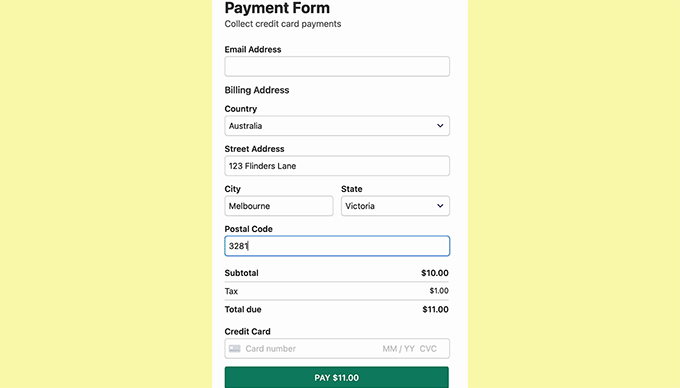
For individuals who advertise subscriptions, services, or single products to your site, then the easiest way to make money and collect taxes is by means of creating a simple rate form.
To take a look at this, we propose WP Easy Pay. We find it irresistible because it comes with a lot of different premade rate templates, an intuitive form builder, and entire unsolicited mail protection.
While testing the plugin, we found out its mounted and automatic tax worth choices super helpful for collecting taxes. The mounted tax worth selection implies that you’ll set a tax worth manually, which matches great if you’re interested in one house with safe tax regulations.
On the other hand, the automatic tax worth serve as calculates and applies the correct worth according to the buyer’s location, saving time and decreasing the risk of errors.
For added details on our experience with the plugin, see our detailed WP Easy Pay assessment.
To get started, first, you need to position in and switch at the WP Easy Pay plugin. To be told further, see our tutorial on easy methods to set up a wordpress plugin.
Phrase: WP Simple Pay has a unfastened plan. On the other hand, you’re going to wish the pro type to unlock the tax collection serve as.
After you flip at the plugin, a setup wizard will appear to your show. Proper right here, simply click on at the ‘Let’s Get Started’ button.
Next, it’s a should to add your plugin’s license key.
You’ll get this data on your account on the WP Simple Pay site. After you enter your license key, click on at the ‘Activate and Continue’ button.
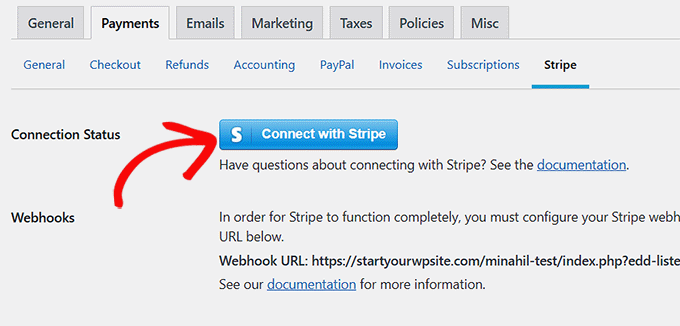
Then, connect your Stripe account with WP Simple Pay. Remember that the plugin gained’t artwork till you connect it with a brand spanking new or present Stripe account.
To get started, click on at the ‘Hook up with Stripe’ button and log in to your account. For added details, see our tutorial on easy methods to settle for Stripe bills in wordpress.
Once you have successfully connected your site with Stripe, the setup wizard will ask you to configure your emails.
At this stage, you’ll be capable of allow possible choices to acquire electronic mail notifications for rate receipts, upcoming invoices, and rate notifications. You’ll moreover want to enter the e-mail cope with where you need to acquire the ones messages.
In spite of everything, merely click on at the ‘Save and Continue’ button. You’ll then complete the other steps and cross out the setup wizard.
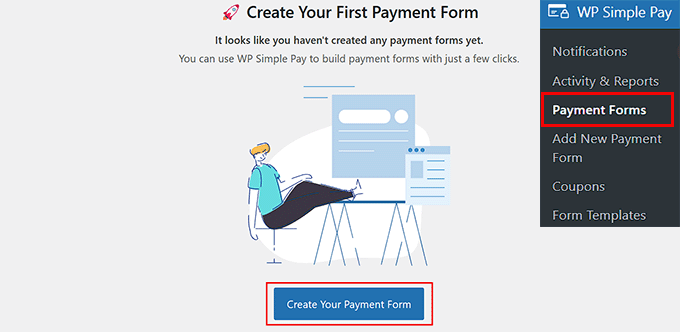
Once that’s performed, transfer to the WP Simple Pay » Price Paperwork internet web page from the wordpress dashboard.
Next, click on at the ‘Create Your Price Form’ button.
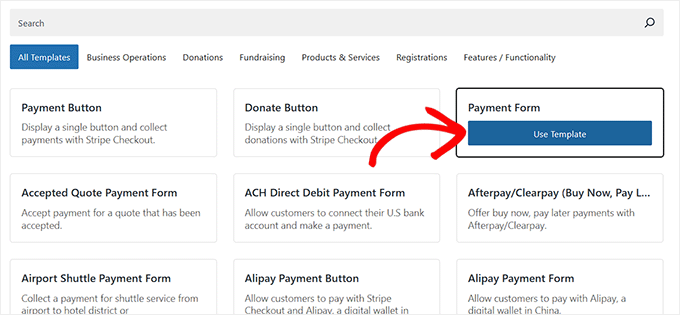
This may most likely take you to the ‘Choose a template’ show. Proper right here, you’re going to peer a list of premade templates.
You’ll make a selection an appropriate template by means of clicking the ‘Use Template’ button beneath it. For this educational, we will be able to use the easy ‘Price Form’ template.
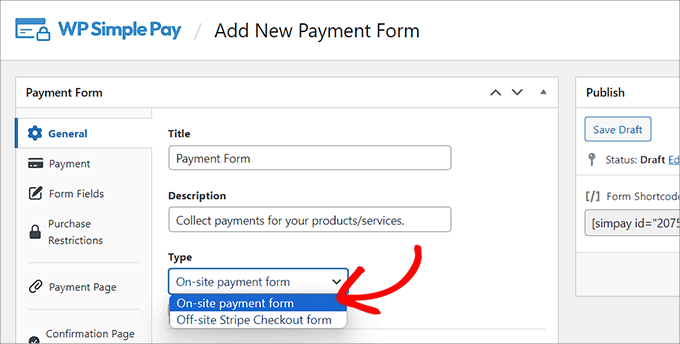
After you choose a template, WP Simple Pay’s form builder will free up to your show. Proper right here, you’ll be capable of get began by means of together with a reputation and description for your form.
Then, select your form sort as ‘On-site rate form.’
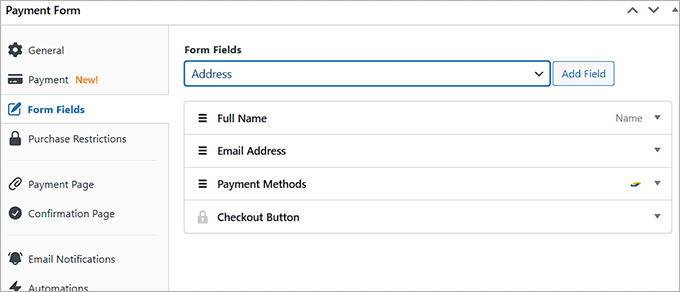
Now, head over to the ‘Form Fields’ tab. Proper right here, you’re going to find a dropdown menu where you’ll be capable of add a brand spanking new form field.
While you do that, click on on on the newly added approach to make larger the settings and customize it as sought after. You’ll moreover drag and drop the fields to prepare them alternatively you like.
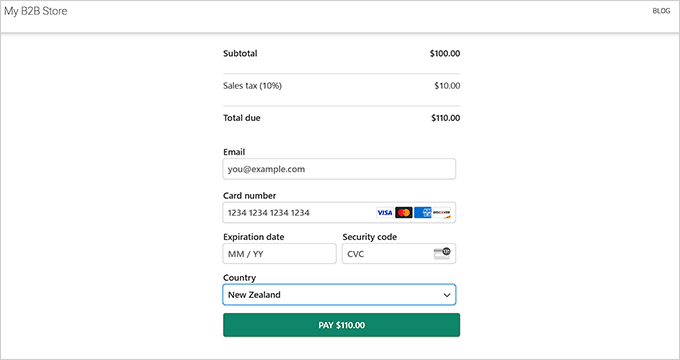
The ones fields will show up to your rate form, so be sure to add all the necessary form fields to collect the details you need from your customers.
As an example, if you want to show tax fees according to the buyer’s location, it is very important add an deal with field. This way, customers will have to provide their area deal with when making a purchase order order.
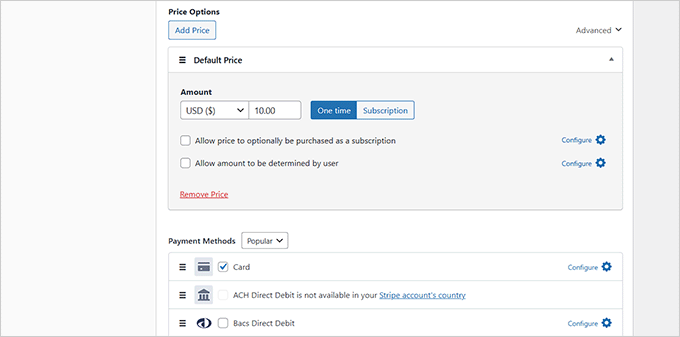
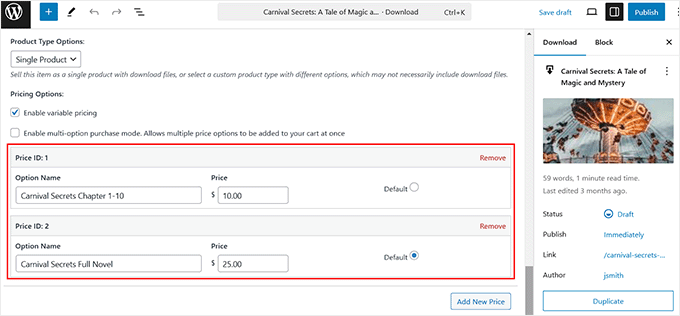
Once that is performed, switch to the ‘Price’ tab and add a price for your product. You’ll moreover add a few products by means of clicking the ‘Add Value’ button.
On the other hand, when you plan to advertise subscription services, then select the ‘Subscription’ selection and get began together with different tiers.
If you find yourself in a position, scroll proper all the way down to the ‘Price Methods’ section to make a choice possible choices like ACH direct debit, card, Klarna, Examine, Cash App, and Bancontact to only settle for Stripe expenses.
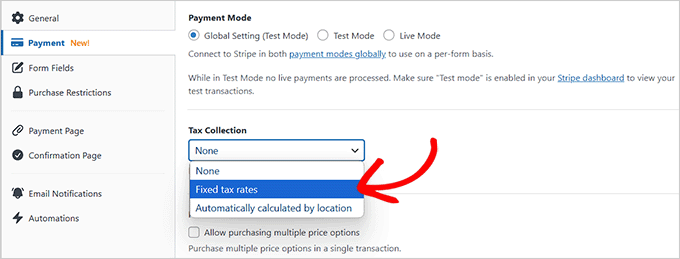
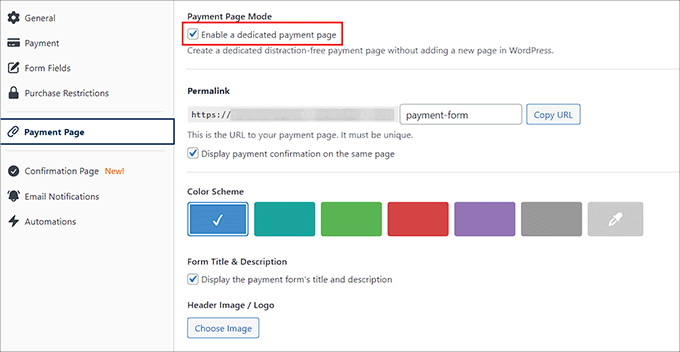
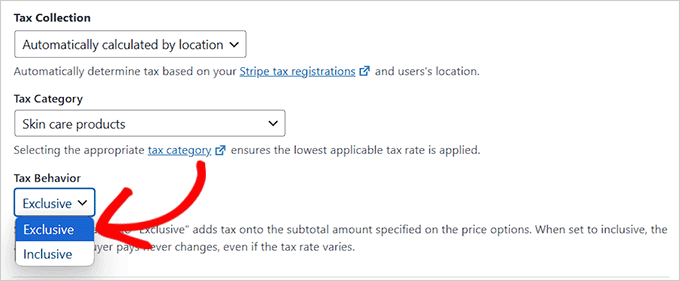
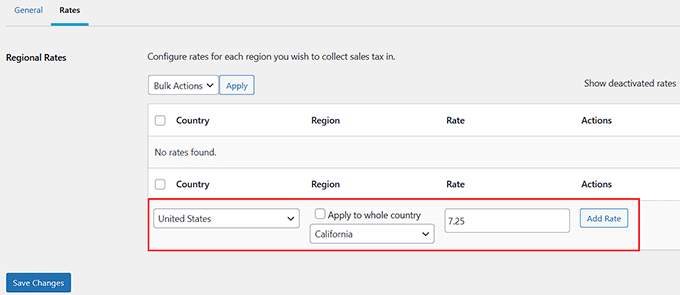
Once you have performed that, head up to the ‘Tax Collection’ section. Proper right here, you’ll be in a position to choose some of the two tax collection methods consistent with your selection.
We will give an explanation for simple the best way to add a suite tax worth and an automatic tax worth to your rate form.
Means 1: Add Fixed Tax Worth for Your Stripe Expenses (Selling in One House)
In this section, we will be able to give an explanation for simple the best way to collect taxes if you’re selling in a single house. This is a great variety when you advertise and ship products most efficient in a small house with uniform taxes, very similar to a state or province.
To take a look at this, it is very important define the tax worth for your products manually.
First, you need to open the ‘Price’ tab inside the settings for WP Simple Pay. Then, make a selection the ‘Fixed tax fees’ selection from the Tax Collection dropdown menu.
After you’ve made your selection, merely click on at the ‘Save Draft’ button for your form.
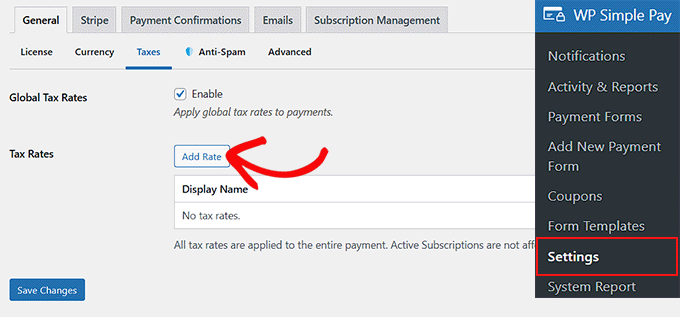
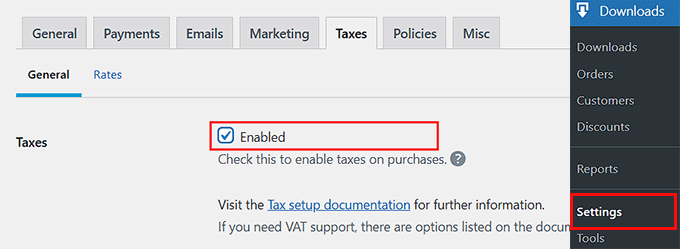
Next, discuss with the WP Simple Pay » Settings » Not unusual internet web page from the wordpress dashboard and switch to the ‘Taxes’ tab.
Proper right here, you need to check the ‘Allow’ box next to the ‘Global Tax Fees’ selection. This may most likely open some new settings on the internet web page, where it’s a should to click on at the ‘Add Worth’ button.
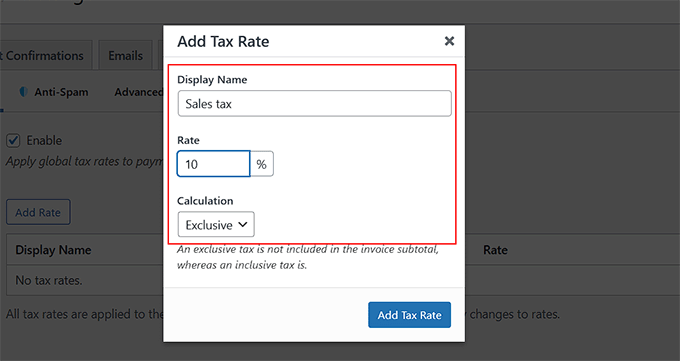
You’ll now add a name and tax worth for your products or services inside the popup.
After that, you’ll have to specify if you want to have your tax to be calculated inclusively or utterly.
If you choose inclusive tax, then the required tax will robotically be integrated inside the total value of the article.
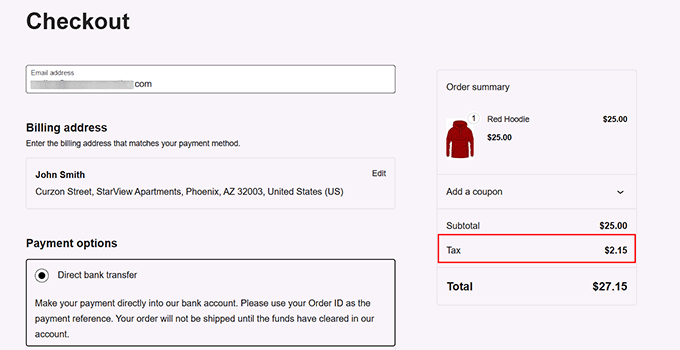
Within the interim, with distinctive tax, customers will be able to see the breakdown of all the price of the purchase. This may most likely include a subtotal with the ground value and a separate line showing the product sales tax.
We recommend choosing distinctive tax so your customers don’t assume you’re overcharging them.
While you’ve made your variety, simply click on at the ‘Add Tax Worth’ button. The popup will close robotically. Then, click on at the ‘Save Changes’ button to store your settings.
Now, open up your form yet again and discuss with the ‘Price Internet web page’ section inside the left column.
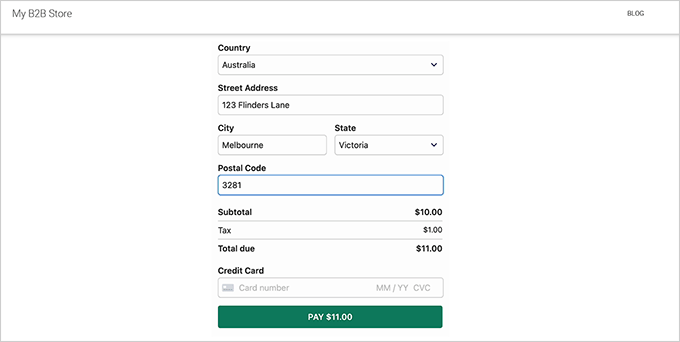
Proper right here, you’ll be capable of take a look at the ‘Allow a faithful rate internet web page’ box to create a custom designed rate form internet web page. To customize the form, you’ll be capable of add a permalink, color scheme, image, and footer text.
In spite of everything, click on at the ‘Publish’ button to avoid wasting numerous your settings.
You’ll now discuss with your site to seem the price form with a suite tax worth.
On the other hand, if you want to add this sort to an present internet web page, then merely click on at the ‘Publish’ button after together with the tax worth.
Then, open an present internet web page from your wordpress dashboard and click on at the ‘Add Block’ button.
As quickly because the block menu opens up, to find and add the WP Simple Pay block and make a selection the form you merely made from the dropdown menu.
Next, click on at the ‘Change’ or ‘Publish’ button to store your changes.
You could have now added a rate form with a suite tax worth to an present wordpress internet web page.
Identical Submit: For individuals who’re setting up taxes in wordpress, then understanding online rate dispositions imply you’ll optimize your checkout process. Check out our post on necessary fee statistics, information, and tendencies to stay a professional.
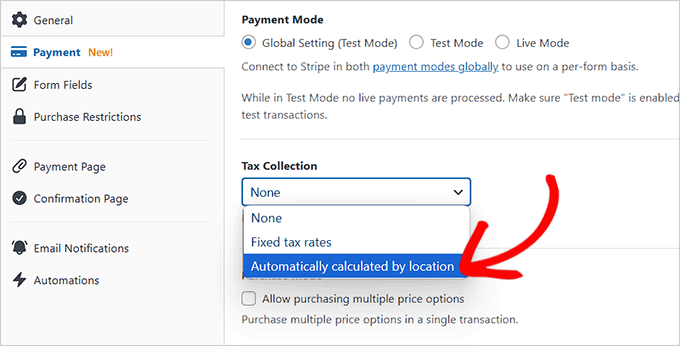
Means 2: Add Automated Tax Worth for Your Stripe Expenses (Selling in A few Puts)
If you want to robotically configure the tax worth for your customers according to their location, then this system is for you. This is ideally fitted when you’re selling in a few global places and spaces.
To take a look at this, you’ll have to make a selection the ‘Automatically calculated by means of location’ selection from the ‘Tax Collection’ dropdown menu inside the WP Simple Pay form builder.
While you do that, you’ll must discuss with your Stripe account dashboard to activate automatic tax collection. From proper right here, you’ll be capable of follow the opposite spaces where what you are promoting is crossing the tax threshold.
You’ll then add registration and get began collecting taxes for the ones puts merely.
On the other hand, believe to ensure your basis deal with and select a default tax magnificence to ensure proper tax calculations for what you are promoting.
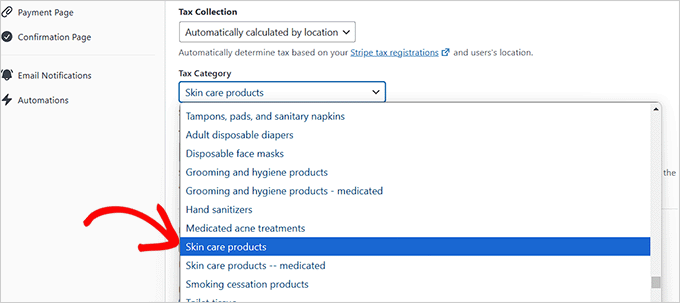
Now, when you head once more to your wordpress dashboard, you’re going to understand that choosing this selection has opened some new settings beneath the ‘Tax Collection’ section.
Proper right here, you will have to make a choice a tax magnificence for the product or service that you simply’re selling from the ‘Tax Magnificence’ dropdown menu.
As an example, when you advertise skin care products, you then’ll be in a position to make a choice that selection.
Next, make a decision whether or not or now not you need to turn tax inclusively or utterly. If you choose the inclusive selection, then the tax can be integrated inside the overall product value.
On the other hand, if you select the original selection, the tax amount can be confirmed one at a time. The subtotal will display the ground value of the transaction, and there can be a separate line for product sales tax.
We recommend the use of the original selection, because it’s further transparent for your customers.
Once that is performed, you’ll be capable of head over to the ‘Price Internet web page’ section.
Check the ‘Allow a faithful rate internet web page’ box if you want to have the plugin to generate a custom designed rate internet web page. Then, customize your internet web page alternatively you like.
When you’re in a position, click on at the ‘Publish’ button to avoid wasting numerous your changes.
Now, discuss with your site to seem the price form with automatic tax calculation in movement.
On the other hand, when you don’t want the plugin to generate an absolutely new rate internet web page, merely click on at the ‘Publish’ button after configuring the tax settings.
Then, in an effort to upload your rate form to a pre-existing internet web page, merely open it with the block editor and make a selection the WP Simple Pay block from the menu.
Next, make a selection the form you made from the dropdown menu all the way through the block.
After that, click on at the ‘Change’ or ‘Publish’ button to avoid wasting numerous your changes.
Now, discuss with your internet website to view the Stripe rate form with an automatic tax calculation field.
Gather Taxes for Physically Products (WooCommerce)
For individuals who run an web store with a few physically products, then rate forms won’t offer the most simple way. You’ll most definitely need further eCommerce choices and power.
If this is the case, we propose the usage of WooCommerce. This free eCommerce plugin makes it super easy to advertise your physically products, accept expenses via Stripe, and collect taxes for those expenses.
We’ve worked with this instrument such a lot, so we know it identical to the once more of our hand. For added insights on what it would in truth do, check out our detailed WooCommerce assessment.
The most productive phase? The use of WooCommerce’s built-in choices, you’ll be capable of robotically calculate product sales tax according to your store’s location and where your customers are.
Plus, it is helping different tax fees, at the side of state, country, and even city-specific taxes.
To start out, you’ll want to arrange and switch at the WooCommerce plugin. To be told further, see our tutorial on easy methods to set up a wordpress plugin.
After activating the instrument, you’ll be capable of prepare your WooCommerce store to begin out selling products. You’ll moreover want to connect Stripe with WooCommerce to collect expenses.
Merely see our complete WooCommerce information if you want to have help with the process.
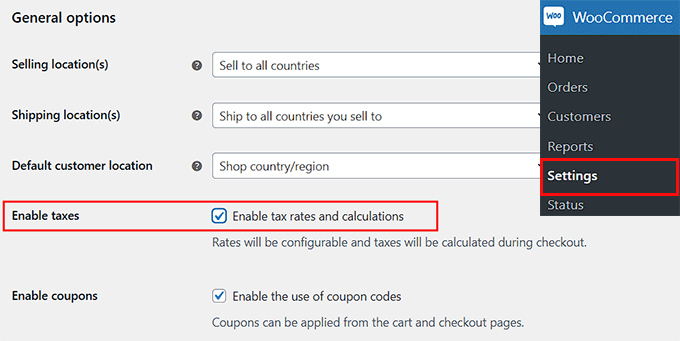
Once your store is set up, you need to discuss with the WooCommerce » Settings » Not unusual internet web page from the wordpress dashboard and scroll proper all the way down to the ‘Allow Taxes’ section.
Simply take a look at the sector next to it and click on at the ‘Save Changes’ button.
While you do that, a ‘Tax’ tab will appear inside of the most efficient menu. When you discuss with that internet web page, you’re going to get began by means of deciding how you need to turn taxes.
You’ll make a selection to turn taxes utterly, because of this they’ll be confirmed one at a time at checkout instead of being integrated inside the product value. This promises customers see exactly how so much tax they’re paying faster than completing their achieve.
You’ll moreover make a selection to turn prices inclusively.
This means the fee you enter inside the ‘Product knowledge’ section of your WooCommerce product will already include tax.
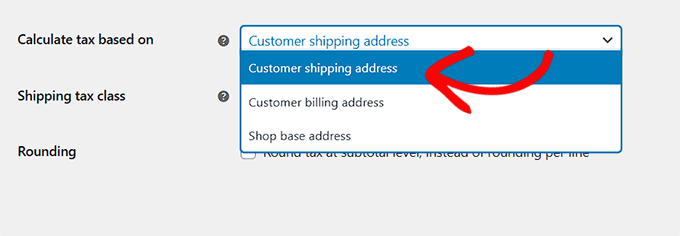
Next, it is very important set how taxes are calculated. To take a look at this, open the ‘Calculate tax according to’ dropdown menu and select an selection.
You’ll make a selection to calculate taxes according to the buyer’s supply deal with, which is excellent if you’re supply to different spaces with more than a few tax fees.
On the other hand, select the billing deal with if you need use the deal with your purchaser enters for rate.
There is also the selection to use your retailer’s base location, which assists in keeping problems simple by means of applying your local tax worth to all orders.
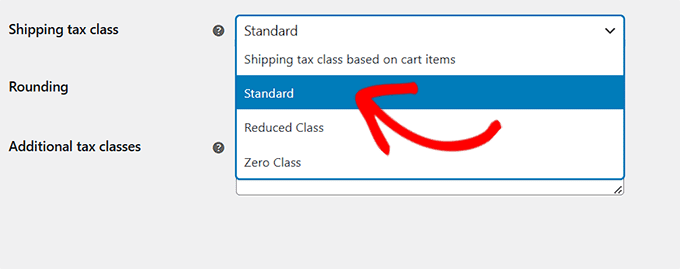
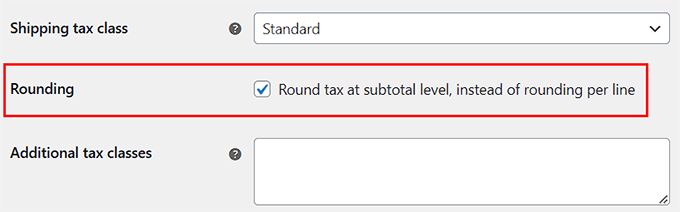
After that, it’s time to industry the supply tax magnificence. In this section, you’ll be in a position to make a choice how WooCommerce should calculate tax on the cost of supply.
As an example, if you choose ‘Shipping tax magnificence according to cart items’, then the supply tax price can be calculated according to the tax magnificence assigned to the product being shipped.
If you choose the ‘Standard’ tax magnificence, then the default tax worth you will have prepare for the product may also be performed to the supply tax.
The lowered tax magnificence is for items that have a lower tax worth, like certain foods products or books, depending to your house.
In spite of everything, the 0 tax magnificence applies no tax to supply the least bit, which might be useful when you’re offering tax-free delivery promotions.
Next, we propose checking the sector next to ‘Round tax at subtotal level, instead of rounding consistent with line.’
This means taxes can be rounded according to the entire order subtotal relatively than each and every specific particular person product line.
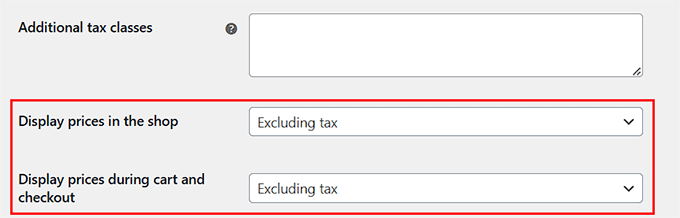
You’ll now control the rest of the settings to fit your store’s needs.
One key selection is deciding simple the best way to display prices on your retailer, cart, and checkout pages.
You’ll make a selection to show prices at the side of tax, so customers see the overall amount upfront, or excluding for tax, which gives transparency by means of showing taxes one at a time.
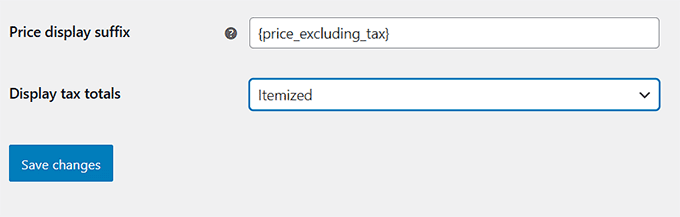
Additionally, you’ll be capable of configure the ‘Value display suffix’ setting in an effort to upload text after your product prices. This may help show customers whether or not or now not tax is integrated or excluded in the fee they see.
As an example, when you enter “Value incl. VAT: {price_including_tax}”, your store will display something like Value incl. VAT: $50.40.
Next, industry the ‘Display tax totals’ setting to regulate how taxes appear right through checkout. You’ll make a selection to show all taxes as a single total or display each and every tax as an itemized document.
If you choose the ‘As a Single General’ selection, WooCommerce will combine all applicable taxes into one total amount. Shoppers will see just a single tax line instead of separate breakdowns.
As an example, if a product has a few tax fees (like state tax and local tax), they’ll all be merged and simply confirmed as ‘Taxes’ at checkout. This assists in keeping problems clean and simple.
On the other hand, when you set it to ‘Itemized,’ then customers will see each and every tax worth one at a time. This means WooCommerce will document out each applicable tax, very similar to state and local taxes, on their own strains.
This offers further transparency, so customers know exactly what they’re paying for. The tax names confirmed will be the ones you enter on your WooCommerce settings.
We’ll walk you via how to try this in the next step. Once you’re performed, merely click on at the ‘Save Changes’ button to store your settings.
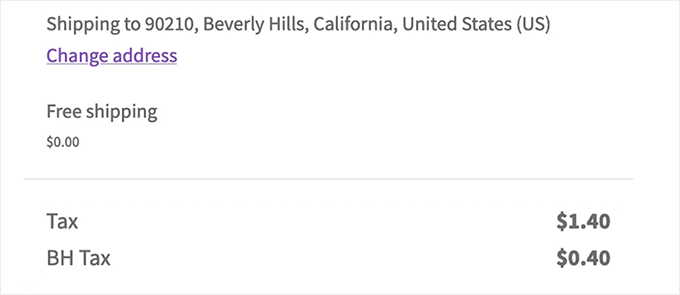
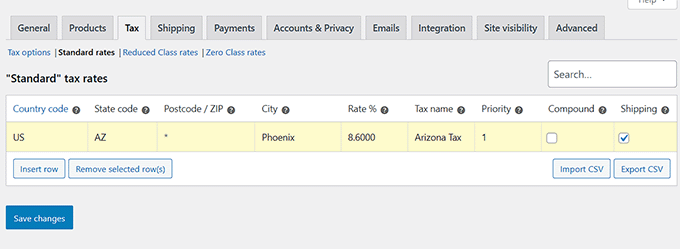
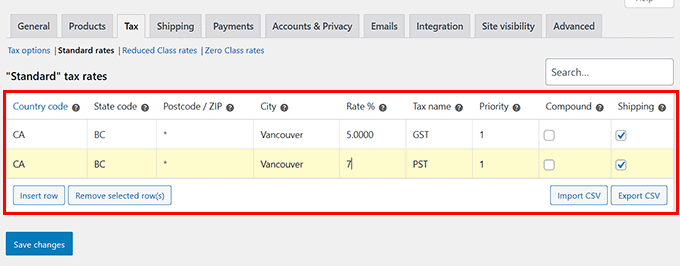
Then, switch to the ‘Standard Fees’ internet web page from the easiest and click on at the ‘Insert Row’ button.
You’ll now add the country code, state code, postcode, city determine, and tax worth for each and every location where you need to collect taxes.
For individuals who most efficient wish to collect taxes consistent with your store’s location, you then’re going to most efficient want to add one row. You’ll moreover add a tax determine for each and every row so that you’ll be capable of merely differentiate them.
If you select the itemized selection inside the ‘Display tax totals’ section, then the determine you choose for each and every tax row will be the one displayed on the checkout internet web page.
As an example, when you prepare separate tax fees for pieces and services (GST) and provinces (PST), those exact labels will appear inside the order summary.
In spite of everything, click on at the ‘Save Changes’ button.
Now, discuss with your WooCommerce store to seem the tax worth displayed to your checkout web page.
Depending to your settings, the rate may also be displayed to your product and cart internet web page.
Gather Taxes for Digital Products (Easy Digital Downloads)
If you want to collect taxes when selling your digital products via Stripe, then Simple Virtual Downloads (EDD) is the most suitable choice.
This plugin is built specifically for promoting virtual merchandise and provides seamless tax collection, at the side of for Stripe transactions. The plugin handles the whole thing from setting fees to generating stories, making tax keep an eye on easier for stores.
We use EDD to advertise our plugins and tool. So, we’ve spotted firsthand how easy it’s to collect Stripe expenses and prepare taxes. To be told further, see our whole Simple Virtual Downloads assessment.
First, you need to position in and switch at the Simple Virtual Downloads plugin. For added instructions, see our knowledge on easy methods to set up a wordpress plugin.
Phrase: EDD has a unfastened plan. On the other hand, upgrading to the pro type gives you get right of entry to to choices like advanced reporting, electronic mail promoting integration, content material subject matter restriction, and additional.
While you flip at the plugin, it is very important prepare your store, add products, and fix Stripe with the plugin.
To get started, follow our beginner’s knowledge on easy methods to promote virtual downloads in wordpress.
When that is performed, head over to the Downloads » Settings » Taxes internet web page inside the wordpress admin sidebar.
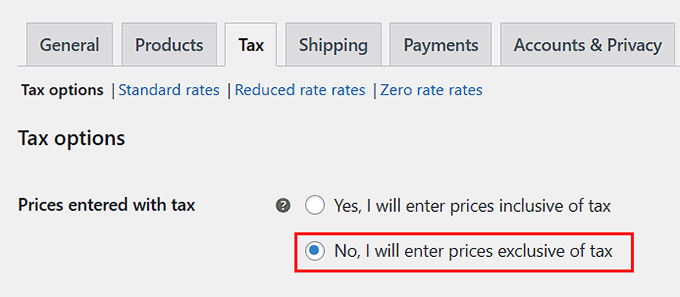
Proper right here, allow the ‘Taxes’ selection by means of checking the sector next to it.
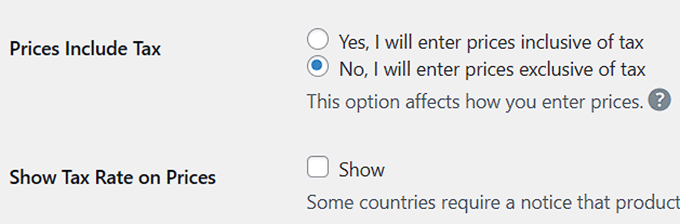
Then, make a selection if you want to display taxes utterly or inclusively.
If you choose ‘Positive, I will enter prices inclusive of tax’, then the fee you entered in a product’s knowledge is all the amount the buyer will pay after taxes.
So, when you set the price of a product as $20, the buyer will pay $20 at checkout. The fitting amount that can transfer towards taxes can be calculated robotically.
If you select ‘No,’ the fee you entered on the product edit show gained’t include the tax amount.
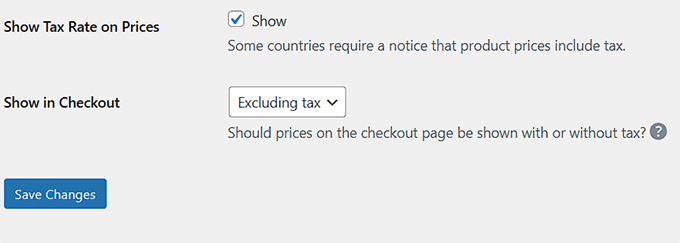
After that, we propose checking the ‘Show Tax Worth on Prices’ selection. This way, the buyer will see the volume they’re expected to pay in tax below the purchase button.
Next, make a decision how you need to turn product prices on the checkout internet web page. You’ll make a selection to show prices at the side of tax, which means that all the value customers see will have tax added.
Or, you’ll be capable of show prices excluding for tax, where the fee confirmed is just the product amount faster than tax (additionally known as the subtotal). The tax will then be added one at a time at checkout.
In spite of everything, click on at the ‘Save Changes’ button to store your settings.
Now, switch to the ‘Fees’ section from the easiest. Proper right here, you’ll be capable of add tax fees for specific global places or states/provinces within the ones global places.
To take a look at this, make a selection a country/ state from the dropdown menu and add its tax worth. Then, click on at the ‘Add Worth’ button.
You’ll repeat this step as over and over again as you like.
Once you’re performed, merely click on at the ‘Save Changes’ button.
Now, merely discuss with your digital products store to check how taxes are being accrued for Stripe expenses.
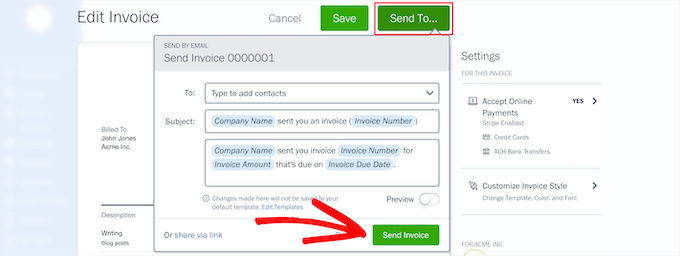
Bonus: Create Visually-Fascinating Invoices for Shoppers
Managing tax collection is a jail requirement for eCommerce internet sites. Then again when you advertise industry products or services (another way you merely wish to transfer above and previous), you then’ll be capable of moreover offer your customers crowd pleasing invoices for their information.
An invoice that shows the subtotal, tax amount, and total price helps with transparency and makes it easier for customers to track expenses, handle reimbursements, and even handle customs claims.
To create professional-looking invoices, we propose the use of FreshBooks.
This is a in style accounting tool for small corporations that provides a very easy option to create customizable invoices together with your emblem and personalized notes.
Plus, it automates reminders for late expenses, securely processes routine bank card bills, and notifies every you and your customers.
You’ll moreover include tax wisdom, rate words, discounts, and foreign exchange on your invoices, providing a clear breakdown of expenses.
Although it is a third-party instrument, FreshBooks seamlessly integrates with highest site builders, at the side of wordpress.
For step-by-step instructions, see our tutorial on easy methods to create invoices for purchasers the usage of wordpress.
<span class=”ez-toc-section” id=”identical-guides-for-accepting-expenses-in-wordpress“/>Identical Guides for Accepting Expenses in wordpress
Need more information on accepting expenses on your online store? Check out our related guides:
For individuals who appreciated this text, then please subscribe to our YouTube Channel for wordpress video tutorials. You’ll moreover to search out us on Twitter and Fb.
The post Tips on how to Accumulate Taxes for Stripe Bills in wordpress (3 Simple Techniques) first appeared on WPBeginner.
Corner Desk: Optimize space while creating separate zones for work and baby.
Step 2: Utilize a Spacious Work Surface
Opt for a large desk to accommodate your work and baby’s essentials.
Step 3: Opt for a Floating Desk
Hang a floating desk to create a more open and accessible workspace for baby.
Section 2: Ensuring Comfort and Safety
Step 4: Invest in an Ergonomic Chair
Prioritize comfort with a supportive and adjustable chair designed for prolonged sitting.
Additional Tips for a Baby-Friendly Desk Setup
Maximize Natural Light: Position your desk near a window to provide ample lighting for both you and baby.
Optimize Storage: Utilize drawers, shelves, or a desk organizer to store baby’s essentials within easy reach.
Consider Safety: Choose a desk with rounded corners and stable construction to minimize potential hazards.
Create a Dedicated Baby Zone: Designate a specific area on the desk for baby’s toys, activities, or a play mat.
Maintain a Clean and Organized Space: Regularly clean and declutter your workspace to ensure a safe and hygienic environment for both you and your little one.
Ready for Baby? Your Desk Setup Will Thank You!
TL;DR: Setting up your desk for baby can be a game-changer. It lets you work while keeping an eye on your little one. We’ll cover tips for creating a comfortable and functional workspace that’s also baby-friendly.
Why Your Desk Needs a Baby-Friendly Makeover
Having a baby changes everything! Suddenly, your home office becomes more than just a place to work; it’s your command center for everything baby-related. A well-organized desk can be a lifesaver. Imagine this: you’re working on a project and baby needs you. With a properly set-up desk, you can easily switch gears to soothe, feed, or play with your little one.
Essential Elements for Your Baby-Friendly Desk
H3: Comfort Is Key
Ergonomic Chair: A comfortable chair is a must-have. You’ll be spending a lot of time seated, so choose one that provides good back support and is adjustable.
Footrest: A footrest can help improve circulation and keep your feet from getting tired.
H3: Space is Precious
Spacious Work Surface: A large desk allows you to spread out your work and have room for baby essentials.
Storage Solutions: Utilize drawers, shelves, and organizers to keep your desk clutter-free. You’ll need easy access to diapers, wipes, toys, and other baby necessities.
H3: Safety First
Baby Monitor: A baby monitor is a must-have for any parent. It gives you peace of mind knowing you can keep an eye on your baby while you work.
Cord Management: Keep cords out of reach of curious little hands. Secure them with cable ties or use cord covers.
Baby-Friendly Desk Setup Ideas
H3: The Multi-Purpose Desk
Use a Corner Desk: Maximize space and create a dedicated area for both baby and work.
Add a Changing Pad: A portable changing pad can be easily placed on the desk for diaper changes.
H3: Embrace the Vertical
Wall-Mounted Shelves: Free up desk space with shelves for books, toys, and baby essentials.
Floating Desk: A floating desk can create a sense of spaciousness and provide easy access for baby.
H3: Think Beyond the Desk
Utilize a Rolling Cart: Move everything you need to work and baby care within easy reach.
Invest in a Swing or Bouncer: Place it near your desk to keep baby entertained while you work.
Saskatoon: A Great City for Families
Saskatoon, known as the “City of Bridges,” offers a fantastic environment for families. The city boasts numerous parks, playgrounds, and family-friendly events. Check out Ecliptic Signs for a guide to Saskatoon attractions and activities.
Summary
Setting up your desk for baby is an investment in both your productivity and your well-being. By focusing on comfort, safety, and functionality, you can create a workspace that allows you to work efficiently while keeping a close eye on your little one. Remember, a well-organized and baby-friendly desk can make all the difference in your daily routine.
Why Copperopolis for website designers in sacramento ca and Automated SEO?
Where to find website designers in sacramento ca in Copperopolis?
Cybersecurity: Safeguarding Your Digital Haven
In the realm of cyberspace, where information is a priceless currency, your website serves as your online home, harboring vital data and harboring untold potential. Just as you meticulously bolt the locks on your physical domicile, securing your website is paramount to safeguard this digital sanctuary.
Enter the cybersecurity experts, your trusted gatekeepers in the vast expanse of the internet. They stand as your comprehensive solution for all your website needs, offering:
Impeccable Website Design and Development: Envisioning and crafting online spaces that captivate and connect.
Unwavering Hosting and Maintenance: Assuring seamless performance and the safeguarding of your digital assets.
Infallible Security and Backups: Erecting impenetrable barriers against cyber threats and ensuring data preservation.
Expert SEO and Marketing: Unveiling your online presence to the world and driving traffic that converts.
Their dedicated team of cybersecurity maestros is driven by an unwavering passion to empower businesses in their digital endeavors. Here, they unveil their arsenal of essential tips to fortify your website:
1. The Indispensable SSL Certificate:
Consider this a formidable digital padlock, encrypting your website’s data and rendering it impenetrable to prying eyes. It ensures that sensitive information, such as credit card details and login credentials, remains shielded from malicious entities.
2. The Power of Two-Factor Authentication:
Implement an extra layer of security by requiring users to authenticate their identity through multiple methods, such as a password and a verification code sent to their mobile device. This creates a formidable barrier against unauthorized access.
3. Vigilant Malware Monitoring:
Leverage advanced tools to scour your website for suspicious activity and prevent malware from wreaking havoc. Stay vigilant and protect your site from malicious incursions.
4. Regular Software Updates:
Apply software updates diligently to patch vulnerabilities and stay ahead of evolving cyber threats. Remember, a timely update is a formidable defense.
5. The Importance of Data Backups:
Create regular backups of your website’s data, ensuring that critical information is safeguarded in the event of a disaster. Think of it as an insurance policy for your digital assets.
Ready to Launch Your Business into the Digital Age?
TL;DR – Want a website that attracts customers, grows your business, and makes you look amazing online? This guide is for you! We’ll walk you through everything from the basics of website design to the latest tech trends, plus how to choose the best hosting and keep your site safe. Ready to get started? Let’s dive in!
Website Designers in Sacramento CA: The Best of the Best
Have you ever dreamed of having your own website? Maybe you’re starting a new business, or maybe you just want to share your awesome hobbies with the world. Whatever your reason, building a website is a big step, and you want to get it right.
That’s where Super Effective Websites comes in. They’re a team of experts based in Sacramento, California, who know how to create websites that are beautiful, easy to use, and will help you reach your goals. They’re not just website designers; they’re website wizards!
What makes Super Effective Websites special? They go beyond the basic website stuff. They understand how to build websites that not only look great but actually work for your business. They’re experts in things like:
Local SEO: That means making sure your website shows up first when people in Sacramento search for what you offer.
Mobile-first Design: More and more people browse the internet on their phones, so they make sure your website looks amazing on any device.
User Experience (UX): They make sure your website is easy to navigate, so visitors can find what they need quickly.
User Interface (UI): They make sure your website looks awesome, with colors and graphics that reflect your brand.
They’re really big on working with businesses in the Copperopolis area, helping them stand out in the digital world. Imagine all the exciting possibilities for your business in Copperopolis when you have a website that works like a charm!
Making Websites: From Dream to Reality
Building a website is like putting together a big puzzle – there are lots of pieces that need to fit together perfectly. Let’s break it down:
1. Planning: Think about your website like a blueprint for your business. What do you want your website to do? Who are you trying to reach? What kind of information do you want to share?
2. Design: This is where you bring your vision to life! You’ll decide on colors, fonts, layout, and other design elements that will make your website look unique and professional.
3. Development: This is the technical part where your website is actually built. You’ll use programming languages and tools to make your design a reality.
4. Launch: Finally, it’s time to show off your new website to the world! You’ll upload it to a web server, make sure everything is working smoothly, and start promoting it.
Website Trends: The Latest and Greatest
The world of websites is always changing, just like fashion! Here are some of the hottest trends right now:
Responsive Design: Imagine a website that automatically adjusts to fit any screen size, from tiny phone screens to huge computer monitors. That’s responsive design, and it’s a must-have for any website.
Mobile-First Development: This means creating websites that are designed specifically for mobile devices first. It’s all about making sure the user experience is perfect on phones and tablets.
AI Integration: Artificial intelligence (AI) is becoming more and more popular, and it’s even making its way into website design. Think about chatbots that can help visitors find what they need, or personalized recommendations based on their interests.
Voice Search Optimization: People are increasingly using their voices to search the web. That’s why it’s important to optimize your website for voice search, using natural language and making sure your content is easy to understand.
Future Trends: Looking ahead, we can expect even more exciting advancements in website design. Think about immersive experiences using virtual reality (VR) and augmented reality (AR), as well as more advanced AI features that will make websites even more personalized and interactive.
Online Marketing Tactics: Reaching Your Audience
Now that you have a beautiful website, how do you get people to actually see it? That’s where online marketing comes in!
1. Content Marketing: Think of this as creating valuable content that will attract and engage your target audience. This can include blog posts, articles, videos, infographics, and more.
2. Social Media Marketing: It’s all about connecting with your audience on platforms like Facebook, Instagram, Twitter, and TikTok. Share your content, engage in conversations, and build relationships.
3. Email Marketing: This involves sending targeted emails to your audience, sharing news, promotions, and other relevant information.
4. Pay-Per-Click (PPC) Advertising: This is a way to pay for ads that appear on search engines like Google and social media platforms. You only pay when someone clicks on your ad.
Local SEO: Putting Your Business on the Map
If you have a local business, local SEO is absolutely crucial. It’s like having a special map that helps people find your business online.
Here’s the deal: when someone searches for a business like yours in Sacramento, you want your website to pop up first on the search results page.
Here’s how you can make that happen:
Google My Business: This is a free tool that lets you create a profile for your business on Google. It’s super important for local SEO.
Local Citations: These are listings of your business on various websites, like Yelp, TripAdvisor, and industry directories. The more local citations you have, the better your website will rank in local searches.
Customer Reviews: Positive reviews from happy customers are like gold for local SEO. Encourage your customers to leave reviews on Google and other platforms.
Website Hosting: Choosing the Right Platform
Think of website hosting like a big, comfy house for your website. It’s where your website lives and can be accessed by everyone on the internet.
There are a few different types of hosting, each with its own pros and cons:
Shared Hosting: This is like sharing a big apartment building with other websites. It’s the most affordable option, but you might experience slower performance if other websites are using a lot of resources.
VPS Hosting: This is like having your own small apartment in the building. It offers more control and better performance than shared hosting, but it’s a bit more expensive.
Dedicated Hosting: This is like owning the entire apartment building! It gives you the most control and the fastest performance, but it’s also the most expensive.
Cloud Hosting: This is like having a network of apartments across the city. It’s very scalable and reliable, and you only pay for the resources you use.
Website Cybersecurity: Protecting Your Online Home
Just like you lock your front door to keep your home safe, you need to secure your website to keep hackers out.
Here are some essential tips to keep your website safe:
SSL Certificate: This is like a digital padlock that encrypts your website’s information, making it safe for visitors to send sensitive data, like credit card information.
Firewall: This acts like a protective shield, blocking unauthorized access to your website.
Regular Updates: Keeping your website’s software up-to-date is crucial, as updates often include security patches that fix vulnerabilities.
Backups: Backups are like having a spare key to your house. If something happens to your website, you can restore it from a backup.
WordPress: The Popular Choice for Website Development
WordPress is like a super-flexible building kit for creating websites. It’s free, easy to use, and there are tons of themes and plugins that let you customize your website in countless ways.
Here are some of the benefits of using WordPress:
Easy to Use: WordPress is super user-friendly, even if you’re not a tech whiz.
Highly Customizable: You can create a unique website that reflects your brand and meets your specific needs.
Vast Community Support: There’s a huge community of WordPress users and developers who can help you with any problems you encounter.
SEO-Friendly: WordPress makes it easy to optimize your website for search engines, so more people can find you online.
Best Practices for Creating Highly Effective Websites
Let’s sum up all the best practices to create websites that work like a charm:
1. User-Friendly Design: Make sure your website is easy to navigate and understand, no matter who is visiting.
2. Clear Calls to Action: Tell visitors exactly what you want them to do, whether it’s signing up for your email list, making a purchase, or contacting you.
3. High-Quality Content: Provide valuable content that your audience will find interesting and informative.
4. Fast Loading Speed: Websites that load quickly are more likely to keep visitors engaged.
5. Mobile-Friendly Design: Make sure your website looks and works great on all devices.
6. Accessibility: Ensure your website is accessible to everyone, including people with disabilities.
7. SEO Optimization: Make sure your website is optimized for search engines, so more people can find you.
Super Effective Websites: Your Trusted Website Partner
Are you ready to take your business online? Super Effective Websites is here to help! They’re not just website designers; they’re your one-stop shop for all your website needs, including:
Website Design and Development
Hosting and Maintenance
Security and Backups
SEO and Marketing
Their team of experts is passionate about helping businesses succeed online. They’ll work with you every step of the way, from planning your website to launching it and beyond. Ready to get started? Contact Super Effective Websites today and let them help you create a website that will take your business to the next level!
Why you simply must checkout Humidifiers and Charging & Power
Found it! Charging & Power in near me
Instructions for Using a Humidifier for Maximum Benefits
Cleaning and Maintenance:
Clean the Parts: Regularly clean all humidifier components (filter, base, etc.) using a mild cleaning solution as per the manufacturer’s guidelines. This helps prevent the buildup of bacteria and mold.
Keep Your Humidifier Clean: To ensure optimal performance, follow these steps:
Clean the Tank Daily: Empty and rinse the water tank with clean water daily.
Disinfect the Base Weekly: Wipe down the base of the humidifier with a disinfectant solution according to the manufacturer’s instructions.
Replace the Filter Regularly: Follow the manufacturer’s recommendations for replacing the humidifier filter to maintain its effectiveness.
Operating Instructions:
Check the Instructions: Before plugging in the humidifier, carefully read the provided instructions to ensure proper operation and safety.
Fill the Tank with Clean Water: Use distilled or filtered water to prevent mineral buildup.
Adjust the Mist Level: Select the desired mist output level to suit your comfort and the size of the room.
Precautions:
Over-humidification can lead to condensation and mold growth. Ensure proper ventilation and monitor the humidity level to avoid excessive moisture.
Keep the humidifier out of reach of children and pets.
Do not place the humidifier directly on furniture or electronics.
Say Goodbye to Dry Air and Hello to Smooth Skin!
TL;DR – Too Long; Didn’t Read: Want to know how to keep your home comfortable and prevent dry, itchy skin? Learn about the benefits of humidifiers and how to find a great one near you! Plus, find out the best way to charge your humidifier and keep it working perfectly.
What is a Humidifier and Why Do I Need One?
A humidifier is a special appliance that adds moisture to the air in your home. Think of it like a personal rainmaker for your living room! It’s especially helpful during the winter months when the air gets super dry, making your skin feel itchy and your nose feel stuffy.
The Benefits of Using a Humidifier
Adding moisture to the air can make a big difference in your comfort and health. Here’s how:
Relief from Dryness: Humidifiers can help relieve dry skin, chapped lips, and itchy throats.
Easier Breathing: Dry air can make it harder to breathe, especially for people with allergies or asthma. A humidifier can help open up your airways and make breathing easier.
Better Sleep: The right humidity can help you sleep better by keeping your nasal passages moist.
Protection for Wood Furniture: Dry air can cause wood to crack and warp. A humidifier can help keep your furniture looking its best.
Choosing the Right Humidifier
There are different types of humidifiers available, so it’s important to choose one that’s right for your needs.
Warm Mist Humidifiers: These humidifiers use heat to turn water into steam, which is then released into the air. They can be great for adding moisture and killing bacteria in the air.
Cool Mist Humidifiers: These humidifiers use a fan to blow cool mist into the air. They are often quieter and more energy-efficient than warm mist humidifiers.
Ultrasonic Humidifiers: These humidifiers use high-frequency sound waves to create a fine mist. They are very quiet and efficient, but they may not be as effective at killing bacteria as warm mist humidifiers.
Where to Find a Humidifier Near You
Ready to get your own humidifier? Many places sell them, like:
Big Box Stores: You can find humidifiers at places like Walmart, Target, and Best Buy.
Drugstores: Look at CVS, Walgreens, or Rite Aid for options.
Online Retailers: Amazon, eBay, and other online stores offer a wide range of humidifiers.
Local Appliance Stores: Check out your local appliance store for personalized recommendations.
How to Charge and Power Your Humidifier
Most humidifiers run on electricity. Here’s what to keep in mind:
Check the Instructions: Always read the instructions that came with your humidifier before plugging it in.
Use the Right Outlet: Make sure you use a properly grounded outlet for your humidifier.
Don’t Overfill: Never overfill your humidifier. It can cause it to malfunction.
Keeping Your Humidifier Clean
To keep your humidifier working its best, it’s important to clean it regularly. Here’s how:
Empty and Rinse: Empty the water tank and rinse it with clean water every day.
Clean the Parts: Clean the humidifier’s parts (like the filter and base) with a mild cleaning solution according to the manufacturer’s instructions.
Summary
Using a humidifier is a simple and effective way to improve your comfort and well-being. By adding moisture to the air, you can fight dryness, breathe easier, sleep better, and even protect your furniture. When choosing a humidifier, consider your needs and budget. Make sure to read the instructions carefully and clean your humidifier regularly. If you’re looking for a humidifier in your area, consider checking out local appliance stores or online retailers. And don’t forget to check out Ecliptic Signs!
You’ll love Flowers & Plants and Cables in Watson Lake
Cables, Flowers & Plants, etc…
Reflective and Immersive Exploration of Watson Lake’s Underwater Wonderland
As I gaze upon the tranquil waters of Watson Lake, its crystalline clarity evokes a sense of awe within me. The surface reveals a breathtaking tableau of trees and the lakebed below, as if nature’s canvas has been painted with remarkable precision.
Submerging into this liquid realm, I am enveloped by a symphony of life. The trees, once majestic guardians, now stand transformed as ethereal sentinels, their intricate branches swaying gracefully in the underwater currents. The lakebed, a canvas of vibrant hues, pulsates with the rhythm of nature’s ever-changing symphony.
Watson Lake’s underwater forest is a sanctuary for the soul, a testament to the transformative power of nature. It is here that the unexpected unfolds, where the boundaries between the world above and below blur into an ethereal dance of beauty and wonder.
A Canadian Oasis of Serenity and Discovery
Watson Lake’s charm extends beyond its visual spectacle. It is a haven for adventurers seeking to uncover the hidden depths of nature’s creation. Scuba divers, with their intrepid spirits, plunge into its depths, marveling at the intricate tapestry of life that adorns the underwater landscape. Photographers, with their keen eyes, capture the ephemeral beauty of this submerged realm, translating nature’s artistry into enduring works of art.
A Glimpse into the Heart of Nature’s Canvas
In essence, Watson Lake’s underwater forest is an invitation to connect with the heart of nature and to appreciate the extraordinary beauty that unfolds beneath the surface. It invites us to pause, to reflect, and to marvel at the wonder that surrounds us. As we immerse ourselves in this watery oasis, our souls are refreshed, and our spirits are rejuvenated by the pristine beauty of this Canadian wonder.
Dive into the World of Underwater Gardens: Exploring the Beauty of Watson Lake
TL;DR – Too Long; Didn’t Read: Watson Lake in Canada is famous for its underwater “gardens.” These aren’t your typical flower gardens! They’re actually trees that have been submerged for years, creating a spooky and beautiful landscape. The lake’s water is so clear, you can see the trees right down to the bottom, making it a popular spot for scuba diving and photography.
A Lake Like No Other
Imagine a lake so clear, you can see all the way to the bottom. Now imagine that at the bottom, there are trees, perfectly preserved, standing tall like underwater forests. That’s what you’ll find at Watson Lake, a truly unique destination in Canada.
A History of Submerged Beauty
Watson Lake is located in the Yukon Territory of Canada. It was formed by a glacial landslide thousands of years ago. As the glacier retreated, it left behind a beautiful lake surrounded by mountains. But what makes Watson Lake truly special is the presence of its submerged forest. The trees that once grew on the land were drowned when the lake formed, creating a spooky and fascinating sight.
Scuba Diving in a Submerged Wonderland
The water in Watson Lake is so clear, it’s like looking through a giant magnifying glass. You can see the trees, their branches reaching up towards the surface like ghostly arms, and the lakebed is perfectly visible. This makes Watson Lake a popular spot for scuba divers.
Capturing the Beauty with a Camera
Even if you’re not a scuba diver, you can still experience the beauty of Watson Lake. The clarity of the water means that even from the surface, you can see the trees and the lakebed. This makes it a favorite destination for photographers, who come from all over the world to capture its beauty.
The Underwater World of Plants
The trees in Watson Lake are a type of spruce, and their wood is incredibly well-preserved. Over time, they have become home to a variety of underwater plants and animals. This makes them a fascinating part of the lake’s ecosystem.
Protecting the Underwater Forest
The underwater forest at Watson Lake is a delicate ecosystem. It’s important to treat it with respect and avoid disturbing it. That means being careful when scuba diving, taking pictures, or even just enjoying the view from the shore.
A Unique Canadian Experience
Watson Lake’s underwater forest is a testament to the power of nature and its ability to create beauty even from the most unexpected places. It’s a truly unique and special experience that should be on every nature lover’s bucket list.
Watson Lake in Canada is famous for its underwater forest. The lake was formed thousands of years ago by a glacial landslide, which submerged the trees that once grew on the land. Today, the trees stand tall and perfectly preserved, creating a spooky and beautiful landscape. The water is so clear that you can see the trees right down to the bottom, making it a popular spot for scuba diving and photography. The lake’s submerged forest is a delicate ecosystem that needs to be protected. It is a testament to the power of nature and its ability to create beauty even from the most unexpected places.