Posted on Leave a comment

Methods to Create an eLearning Site (In 8 Easy Steps)

Once we started our video membership internet web site, we had a smooth goal — helping other folks learn wordpress by the use of beginner-friendly video guides. On the other hand we treated the equivalent drawback you’re coping with now: rising an web learning platform that in truth works.

Most likely you’re a instructor surfing to reach additional students or a professional wanting to proportion your knowledge online. Regardless of your goal, rising an eLearning internet web site is more effective than you could assume.

We’ve noticed everyone, from cooking instructors to tech trainers, successfully assemble their teaching platforms using wordpress.

The best segment? You don’t wish to be super tech-savvy or have a huge price range. We’ve found out some in reality good techniques to set the whole lot up using wordpress and a few quite decided on apparatus.

In this data, we’ll proportion the right steps we used (and nevertheless use) to build a luck eLearning web websites. We’ll walk you by the use of the whole lot – no sophisticated tech keep in touch, merely clear, good steps to get your categories online.

Why Should You Create an eLearning Web page?

Rising an eLearning internet web site opens up unending choices to proportion knowledge, reach a much broader audience, and even become profitable on-line. Whether or not or now not you’re a instructor, trade owner, or content material subject matter writer, an web learning platform signifies that you’ll hook up with inexperienced persons from anywhere all over the world.

It’s moreover an affordable manner to provide valuable assets. As an alternative of renting study room area or printing materials, you’ll create on-line classes which will also be available 24/7.

Plus, you’ll have entire keep an eye on over the design, branding, and content material subject matter of your learning hub, making it blank to build a internet web site that shows your vision.

Get a surprising, high-performance eLearning internet web site without lifting a finger! Our wordpress design professionals will elevate your ideas to existence with a faithful endeavor manager, custom designed designs, and fast provide. Check out our wordpress design plans at the moment!

<span class=”ez-toc-section” id=”the-right-way-to-create-an-elearning-web-page-using-wordpress“/>The right way to Create an eLearning Web page Using wordpress

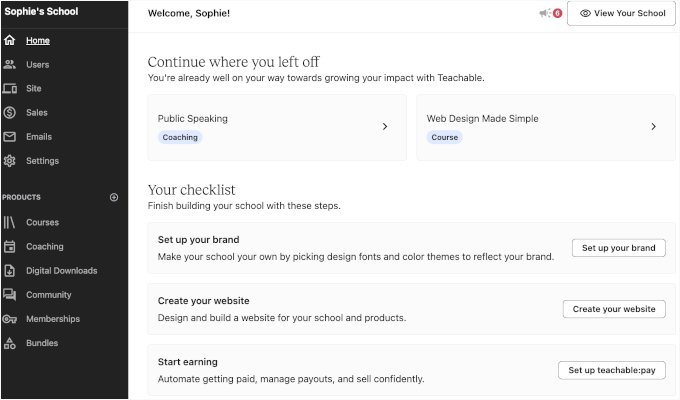
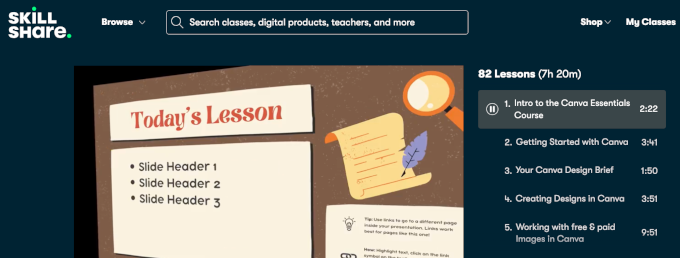
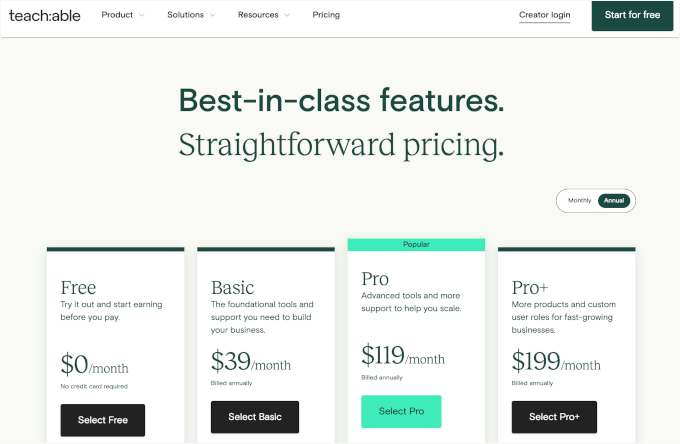
It’s possible you’ll truly really feel tempted to supply your online categories on a third-party platform like Teachable or Skillshare. On the other hand we extraordinarily recommend using wordpress instead.

wordpress is a popular internet web site builder that makes it super blank to create your own eLearning platform. It signifies that you’ll have whole keep an eye on over your income and ownership of your content material subject matter.

Plus, with its versatile studying control machine (LMS) plugins and training issues, wordpress makes it blank to organize a professional-looking internet web site that serves each and every educators and students.

Plus, you don’t wish to be a tech whiz to use wordpress. It gives you all the apparatus you wish to have to build a internet web site without learning how you’ll code.

Now, remember the fact that when we consult with wordpress, we’re talking about wordpress.org. It’s an open-source platform that gives you whole keep an eye on over your internet web site, allowing you to customize and lengthen its choices however you favor.

For additonal detailed wisdom, you’ll check out our in-depth comparison of wordpress.com vs. wordpress.org.

Previous than diving in, let’s speak about what you’ll wish to get started with wordpress.

Getting Started With Your eLearning Web page

To organize a wordpress internet web site, you’ll need 2 problems: a site title and internet website hosting.

A web site identify is your internet web site’s unique care for on the Internet, related to learnsphere.com or growacademy.com. It’s what your customers will sort into their browsers to look out your internet web site.

Web web page webhosting is the internet storage space where your internet web site lives. For an eLearning platform, you’ll wish to make sure that your web web page webhosting provider can toughen the apparatus you’ll need to your platform. The ones would most likely include webinar web page webhosting, secure logins, and scalability to deal with emerging numbers of students.

To make it more straightforward, you’ll check out our curated checklist of the easiest wordpress website hosting choices available.

While wordpress itself is loose, the price of a site title and web page webhosting can add up. A web site identify maximum frequently costs spherical $14.99 in keeping with 365 days, and web page webhosting starts at $7.99 per thirty days. This is a massive investment.

Thankfully, Bluehost has an excellent offer for our readers. As some of the important world’s biggest web page webhosting providers and a wordpress-recommended web page webhosting partner, this is a super unswerving variety.

Along side excellent web web page webhosting products and services and merchandise, you’ll get a unfastened area title and SSL certificate for merely $1.99 per thirty days.

<img decoding=”async” loading=”lazy” width=”680″ height=”357″ src=”https://wpmountain.com/wp-content/uploads/2024/07/bluehost-website.png” alt=”Bluehost website” class=”wp-image-286612″/>

An SSL certificates keeps your eLearning internet web site secure via encrypting the data shared between your internet web site and its visitors. It’s in particular very important in case you occur to’re accepting expenses or coping with refined wisdom, like login details.

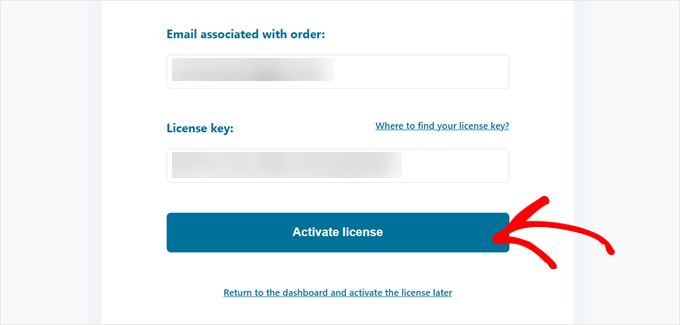
Whilst you gain a Bluehost plan, the setup wizard will data you at some stage in the checkout process. It incorporates opting for a site title, rising account details, and together with package extras (if you want to have them).

Inside the next sections, we’ll show you ways you’ll create a fully helpful eLearning internet web site using wordpress. Proper right here’s a handy guide a rough review of all the steps we’re going to cover:

Now, let’s get started!

<h4 class=”wp-block-heading” id=”aioseo-step-1-create-your-elearning-website“><span class=”ez-toc-section” id=”step-1-arrange-wordpress“/>Step 1. Arrange wordpress

The first step is to place in wordpress to be able to create an eLearning internet web site. A lot of the process should be automatic, even supposing it’s dependent upon your web host.

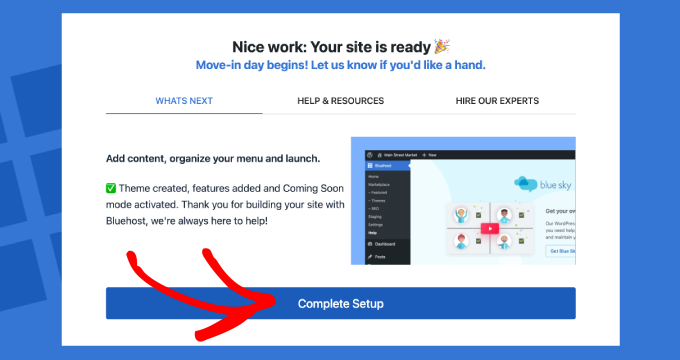
For instance, after you sign up for a web web page webhosting plan with Bluehost, you’ll be taken to the keep an eye on panel, where wordpress is mechanically installed to your house identify.

Complete setup

For step-by-step instructions, you’ll check out our whole data on how you can set up wordpress. It incorporates detailed arrange steps for some of the important freshest wordpress web page webhosting providers, at the side of Bluehost.

<h4 class=”wp-block-heading” id=”aioseo-step-2-find-a-good-elearning-website-theme”>Step 2. Find a Superb eLearning Web page Theme

Web page problems, frequently known as layouts or templates, keep an eye on the look and feel of your internet web site. Your eLearning internet web site needs a wordpress theme that not only seems great however moreover is helping the potential you wish to have for categories, categories, and scholar engagement.

Proper right here’s the way you’ll to find the perfect theme to your internet web site.

Uncover the wordpress Theme Record

The wordpress theme listing is a great place to begin out in case you occur to’re at the affordable. It’s stuffed with loose problems which will also be blank to place in in an instant from your wordpress dashboard.

Simply transfer to Glance » Problems and then click on on ‘Add New.’ From proper right here, you’ll use the ‘Search Problems’ feature to seek for problems with a professional design and lines tailored to educational web pages.

<img decoding=”async” loading=”lazy” width=”680″ height=”434″ src=”https://wpmountain.com/wp-content/uploads/2025/02/wordpress-themes-elearning.png” alt=”eLearning wordpress themes” class=”wp-image-318136″/>

For curated possible choices, see our put up on the easiest wordpress training issues for academics.

Check out Out Most sensible magnificence Theme Marketplaces

If you want to have additional advanced choices and unique designs, best magnificence theme marketplaces like ThemeIsle or Themify offer quite a few possible choices.

The ones problems maximum frequently include extras like upper customization, advanced toughen, and pre-built layouts particularly for eLearning web websites.

Use SeedProd for Common Customization

If you want to have ultimate flexibility when designing your web pages, then we recommend using SeedProd.

This is a drag-and-drop internet web site builder that lets you design your internet web site from scratch or use ready-made templates. You’ll be capable of customize the whole lot, from fonts to layouts, without writing a single line of code.

Customizing SeedProd eLearning theme

A lot of of our partner producers have used this internet web page builder to create whole web websites that advertise their instrument, they usually’ve had excellent critiques with it. Our readers frequently ask us about using SeedProd, so we frequently test it ourselves as well. For more information, see our SeedProd evaluation.

Plus, SeedProd works seamlessly with wordpress, so together with choices like course registration or cost bureaucracy is a breeze.

Alternatively, in our opinion, the most productive segment is that you simply’ll use SeedProd’s AI Theme Builder to generate whole web websites in less than 60 seconds.

For instructions, see our data on how you can make a customized wordpress theme.

Each chance has its perks. Free problems are perfect for a handy guide a rough get began, best magnificence problems offer polished designs, and SeedProd signifies that you’ll assemble something truly unique.

Whilst you’ve decided on an eLearning theme, you’ll persist with our data on how you can set up a wordpress theme.

Merely have in mind, you’ll completely trade your wordpress theme at any degree, in order that you’re not locked into your internet web site’s distinctive design.

Step 3. Create Your eLearning Area Internet web page

Whilst you’ve put to your most well-liked theme, you’re ready to create a area internet web page to your eLearning internet web site.

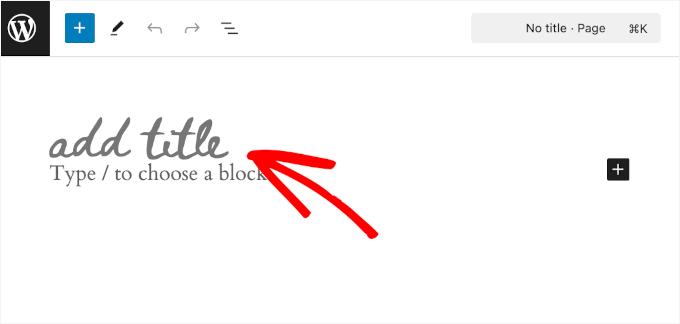
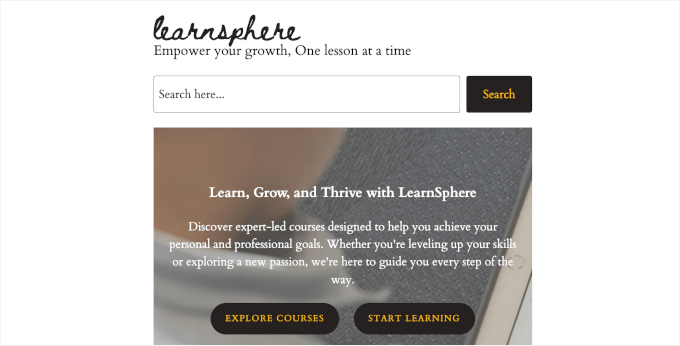
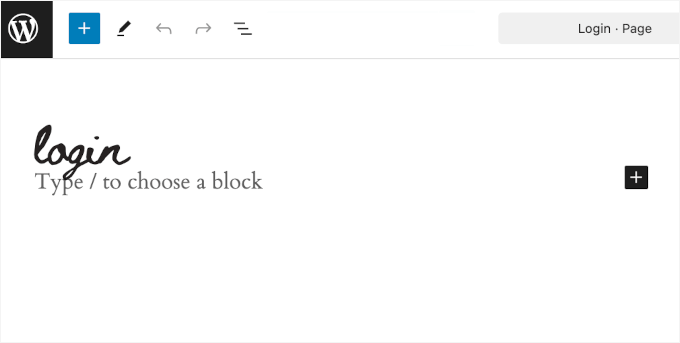
You’ll be capable of do this using the wordpress block editor. It’s imaginable you’ll need to get began building your homepage via together with the internet web page establish and a tagline. Simply click on on on the comparable blocks and type them in.

Adding title and tagline

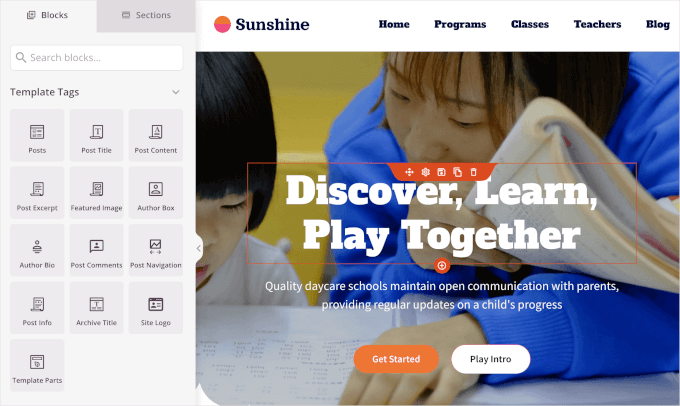
Then, you could need to add a hero image.

A hero image is the massive, eye-catching image you see on the most productive of a homepage. It’s some of the important first problems other folks understand once they visit your wordpress internet web site, so it’s a great place to show off what it’s all about.

For an web course internet web site, the hero image would possibly simply show students learning, operating together, or attractive with content material subject matter.

Tip: A hero image is incessantly paired with a headline that tells visitors what your internet web site provides and a call-to-action button that encourages them to take action. For instance, it’s good to tell other folks to check out your categories. So, together with a hero image makes your internet web site additional inviting and encourages other folks to develop into concerned in an instant.

For an extensive data on together with and customizing hero photos, you’ll check out our article on how you can upload a hero symbol.

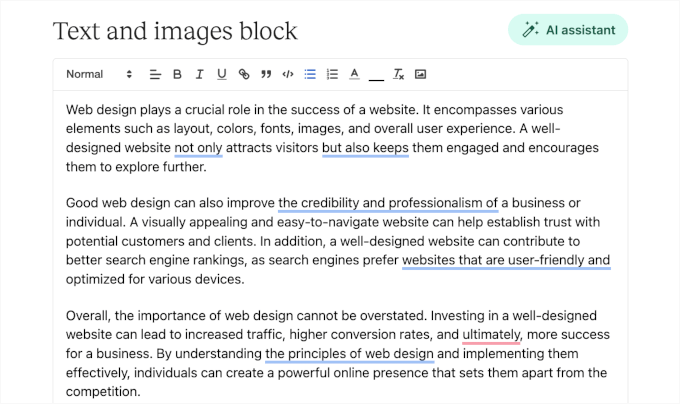
Then, you’ll wish to add text parts. Listed here are some of the important essential eLearning homepage parts you want to need to include:

  • Course Highlights: Serve as your perfect or freshest categories with photos, descriptions, and buttons to enroll.
  • About Section: Percentage a brief introduction about yourself or your eLearning platform. That suggests, visitors know why they can consider you.
  • Testimonials: Showcasing scholar critiques and comments helps assemble consider and improve your emblem’s credibility with doable inexperienced persons. You’ll be in a position to check out our data on how you can upload rotating testimonials for details.

A quote from an influential decide is a fun element to be able to upload, too. It could inspire or encourage your visitors, connecting with them on an emotional level.

Adding the pullquote block

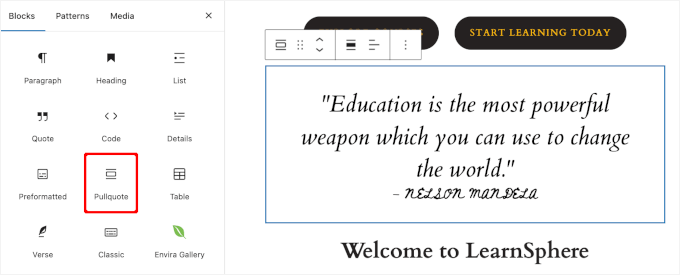
Whilst you’re satisfied with the construction, you’ll merely click on at the ‘Publish’ button inside the block editor.

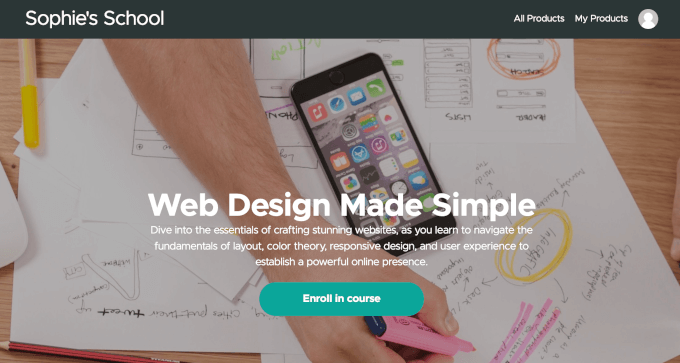
Proper right here’s what our custom designed area internet web page turns out like:

Previewing custom homepage

For details, you’ll be told our data on how you can create a customized homepage in wordpress.

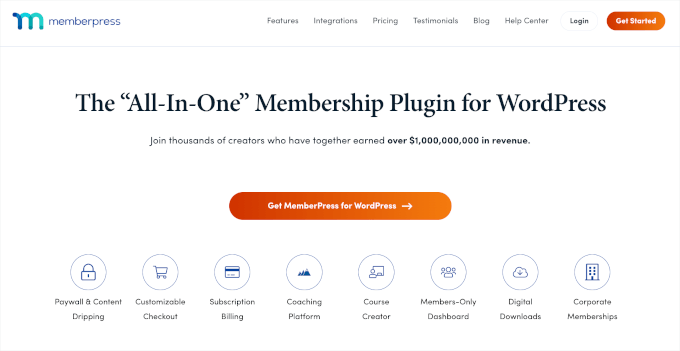
Step 4. Arrange and Set Up MemberPress LMS

Temporarily, you’ll be ready to begin out rising your educational content material subject matter. On the other hand first, you’ll wish to organize a Finding out Keep watch over Instrument (LMS). That suggests, you’ll offer distinctive categories or categories in the back of a membership paywall, turning your knowledge proper right into a provide of income.

A membership internet web site moreover helps assemble a bunch where shoppers will have interplay, ask questions, and proportion ideas. It’s going to boost everyone’s learning experience.

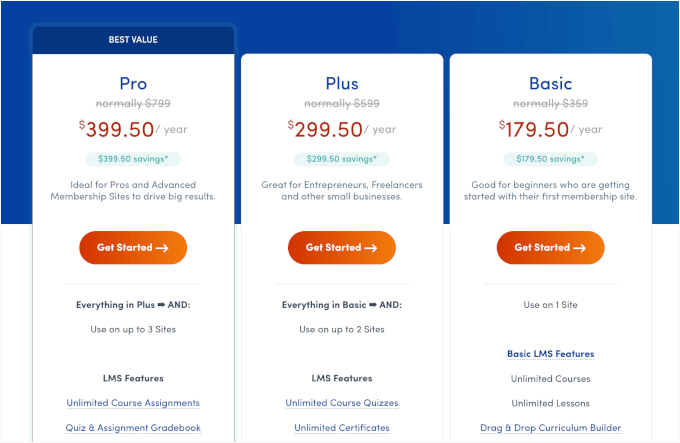
Out of all the LMS plugins we’ve tested, MemberPress stands out for its Classroom Mode. The plugin moreover provides helpful add-ons like course assignments, grade books, and quizzes. Plus, you’ll observe scholar enlargement in an instant from your wordpress dashboard.

A course curriculum created using the MemberPress LMS

Everyone knows all of this sounds impressive, then again you could ponder whether it’s tricky to organize. Proper right here’s the item: it’s more effective than it seems that. We’ve worked on slightly numerous duties like this ourselves, at the side of building a loose membership internet web site to supply our wordpress categories.

MemberPress makes it blank to create a smooth learning experience. Feel free to check out our whole MemberPress evaluation for added details.

To get started, you’ll arrange and switch at the MemberPress plugin. If you wish to have have the same opinion, you then’ll be told our data on how you can set up a wordpress plugin.

After activation, you’ll see the MemberPress menu for your dashboard. Go ahead and click on on on it, and likewise you’ll be guided by the use of a series of setup steps.

Then, you’ll wish to configure your price methods. To do this, let’s navigate to MemberPress » Settings and switch to the ‘Expenses’ tab.

After that, you’ll click on on on the ‘+ Add Price Way’ button and get began setting up your price gateways.

Setting up MemberPress payments

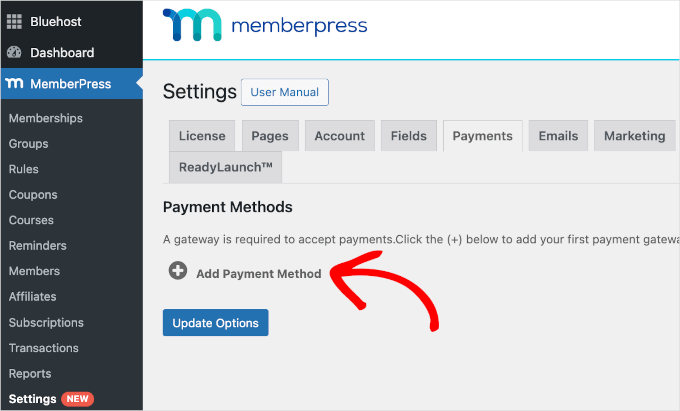
Whilst you’ve entered all the price details, you should be ready to create your first online categories.

Previous than we switch on, it’s very important to note that while MemberPress is a wonderful variety for rising eLearning web websites, there are each and every different plugins that can serve as imaginable possible choices:

  • Thrive Apprentice is a great chance for course creators who wish to focal point on detailed reporting and personalized content material subject matter. For more information regarding the instrument, be told our Thrive Issues Suite evaluation.
  • WishList Member provides an effective way to improve course engagement with gamification choices. For additonal details about our experience checking out it, you’ll see our WishList Member evaluation.
  • AccessAlly signifies that you’ll assemble tricky online categories and members-only content material subject matter, at the side of wordpress crew studying, online learning communities, and additional.
  • Lessons for MemberMouse is very good for lecturers who need an all-in-one membership and course solution. You’ll be capable of get additional information about the platform in our MemberMouse evaluation.

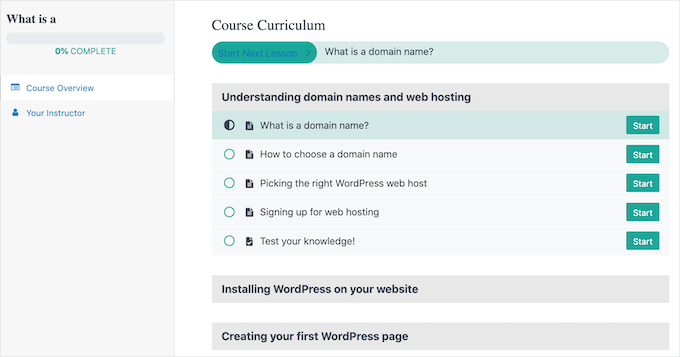
Step 5. Assemble Your First Online Finding out Materials

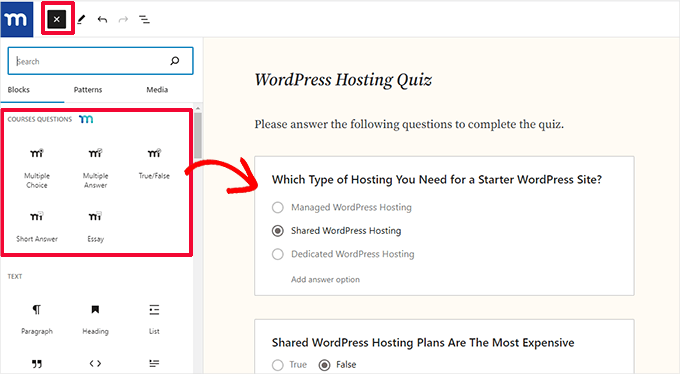
Now, it’s time to begin out rising your online learning materials. With MemberPress, you might have all the apparatus you wish to have to make your categories stand out.

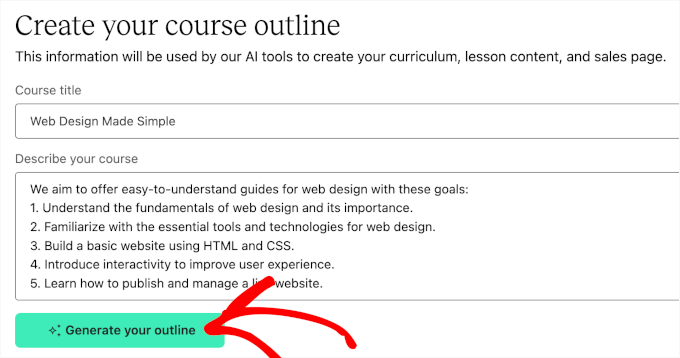
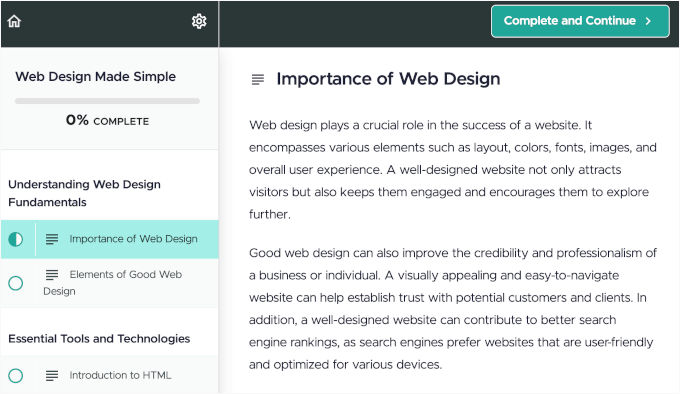
You’ll be capable of merely create categories, add quizzes, and even award your students with certificates. Each feature you wish to have is already available, so that you’ll focal point on teaching instead of getting stuck at setup.

To get started, you’ll wish to flip at the MemberPress Lessons add-on. Merely transfer to the MemberPress » Courses internet web page, and likewise you’ll find a button to place in and switch at the add-on.

Installing Courses add on

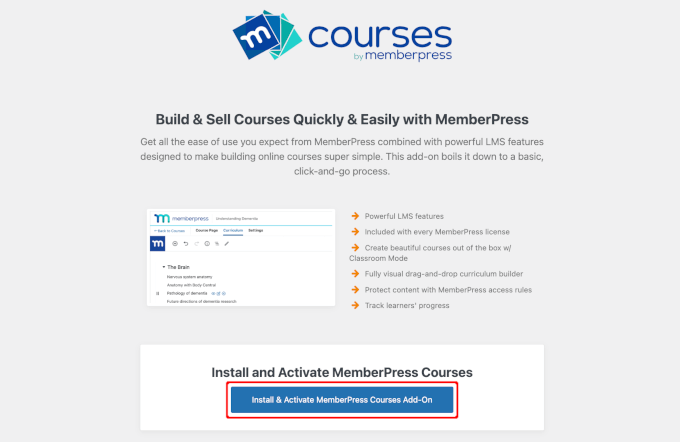
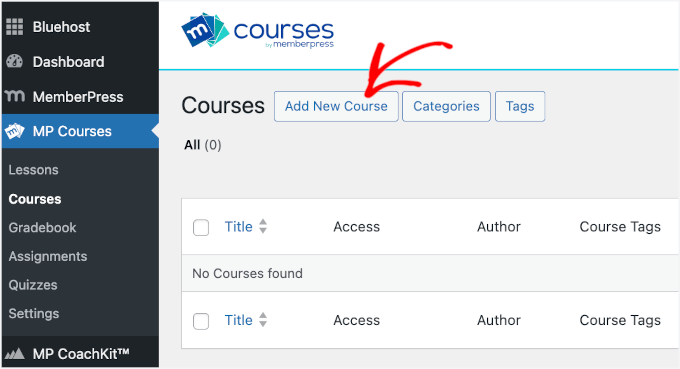
Upon activation, you’ll see a brand spanking new menu products referred to as ‘MP Courses’ for your wordpress dashboard.

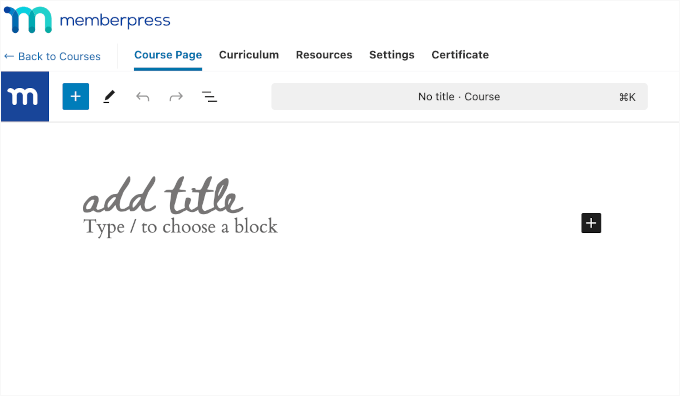
You’ll be capable of transfer ahead and click on at the ‘Add New Course’ button.

Add new courses in MP Courses

This will open the MemberPress course builder.

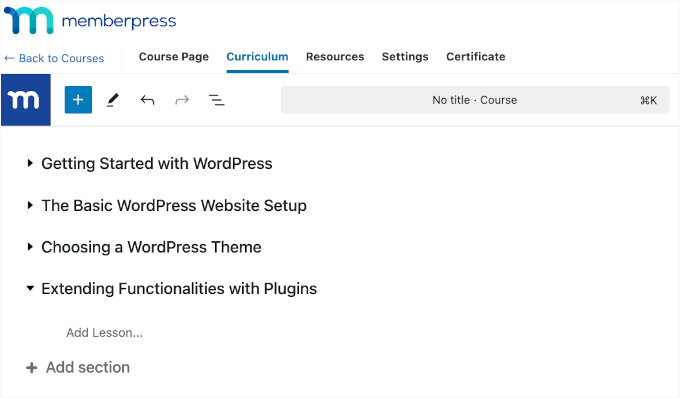
It’s possible you’ll understand that the MemberPress course builder uses the default wordpress block editor. With its drag-and-drop interface, you’ll merely add and customize blocks to create attractive course layouts without having any coding skills.

From proper right here, you’ll uncover the builder to craft your first course. For detailed instructions, please see our data on how you can create and promote on-line classes in wordpress.

Must you’re offering online coaching, then you could need to use the CoachKit addon instead.

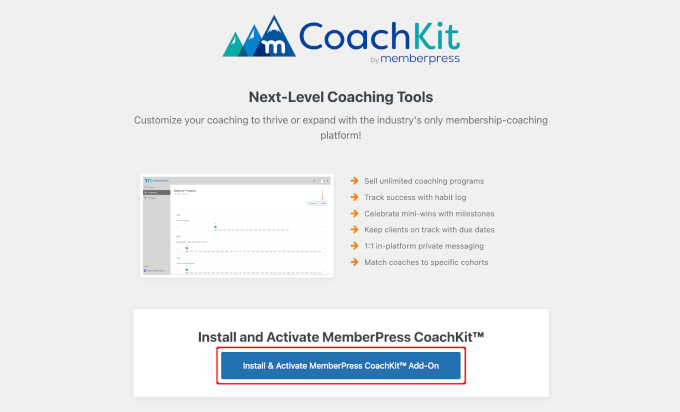
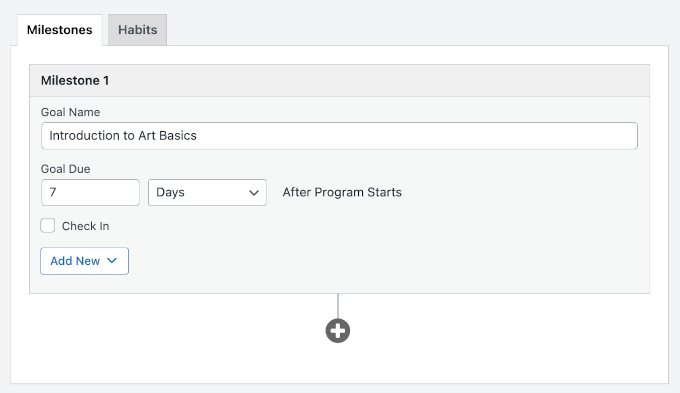
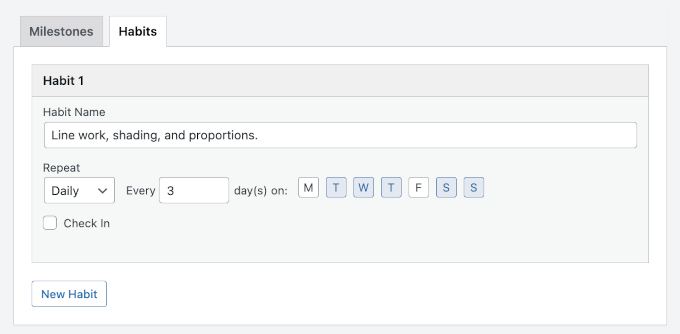
CoachKit signifies that you’ll create as many coaching strategies as you want. It moreover signifies that you’ll set milestones to stick shoppers motivated and sync your internet web site with Calendly to schedule in-person coaching categories.

To start, you’ll arrange and activate it via navigating to MemberPress » CoachKit&industry;.

Installing CoachKit addon

This will create an ‘MP CoachKit&industry;’ menu for your wordpress dashboard. On the other hand forward of rising any program, you’ll wish to configure some settings.

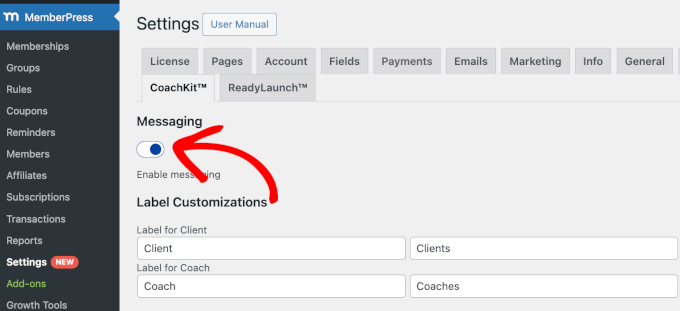
Thru default, MemberPress will create a ‘Coaching’ internet web page so to arrange your shoppers and observe their enlargement. You’ll be capable of check it out via heading over to MemberPress » Settings and switch to the ‘Pages’ tab.

Inside the ‘MemberPress Coaching Internet web page*’ field, you’ll see ‘Auto Create New Internet web page’ determined on from the dropdown menu.

Auto create coaching page

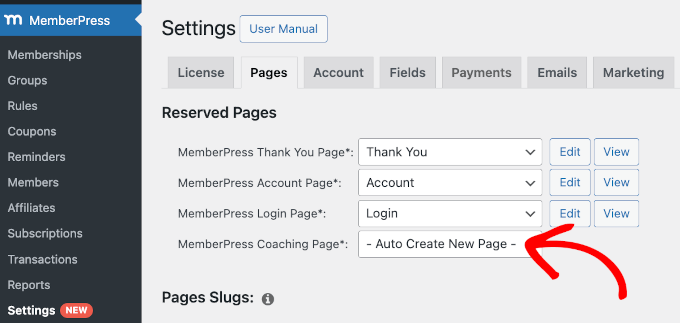
The next step is to move to the ‘CoachKit&industry;’ tab.

We recommend enabling the are living chat ‘Messaging’ feature to your eLearning internet web site to be able to keep in touch in an instant in conjunction with your shoppers.

Enabling messaging in CoachKit

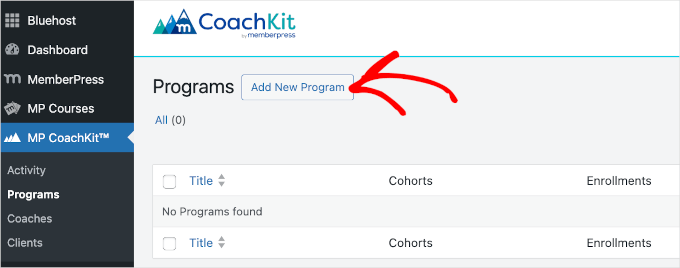
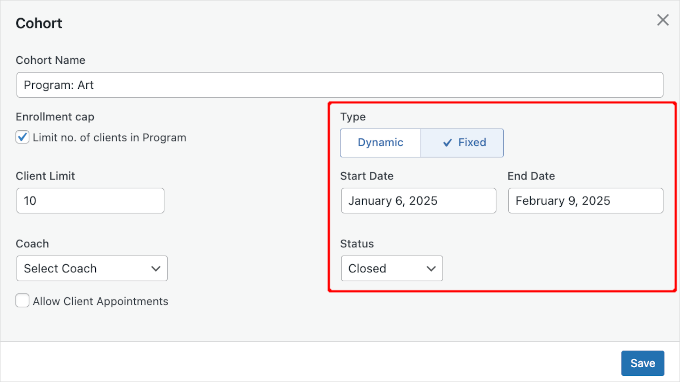
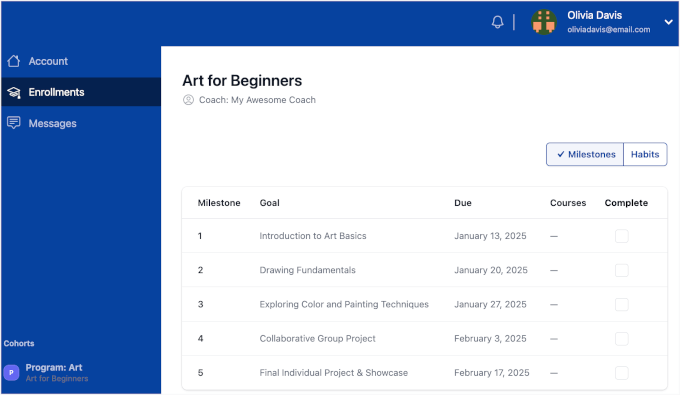
With that completed, you’ll get began rising your first online coaching program.

Let’s navigate to ‘MP CoachKit&industry;’ and click on at the ‘Add New Program’ button.

Add new program in MP CoachKit

For additonal details, you’ll check out our data on how you can get started an internet training industry.

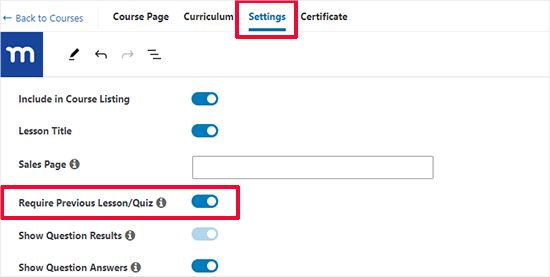
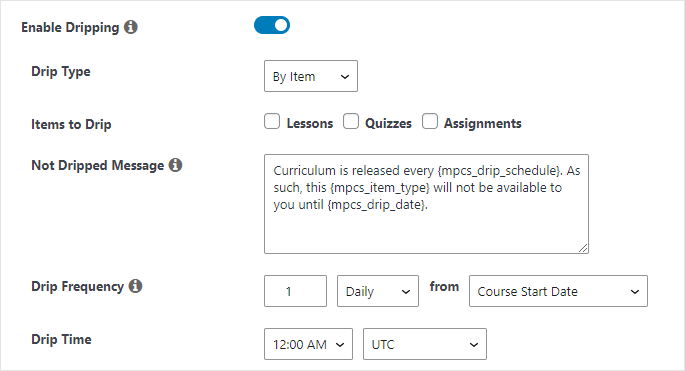
Step 6. Limit Get right of entry to to eLearning Materials

Whilst you’ve organize your categories, it’s time to create laws that keep an eye on who can get admission to your educational content material subject matter. That’s the position MemberPress in reality shines.

The plugin signifies that you’ll organize different user membership levels and then limit get admission to to positive categories or materials in keeping with the ones levels. You’ll be capable of moreover limit get admission to to express categories, tags, or even specific user categories.

Rising Membership Levels

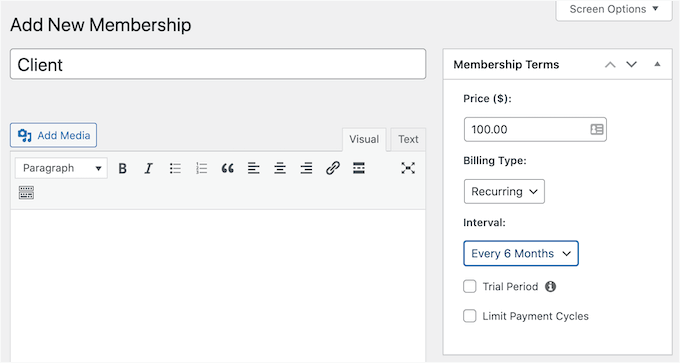
To get started, you’ll first wish to create your membership levels. Simply transfer to the MemberPress » Memberships internet web page and click on at the ‘Add New’ button.

Add new membership

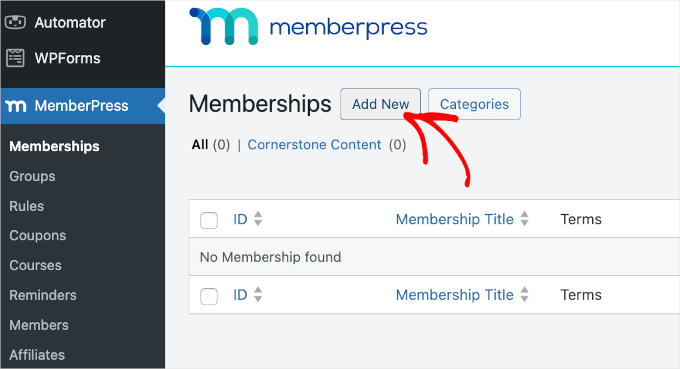
This will open an editor where you’ll make a selection all the essential settings to your membership.

For instance, you’ll be able to choose the identify, add an summary, and configure membership words like price and billing periods.

Enter membership plan information

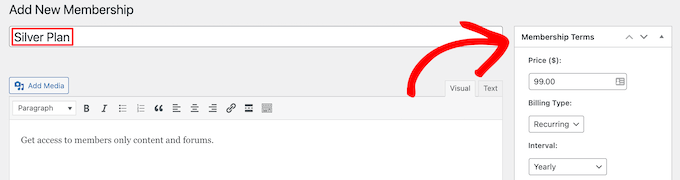
Whilst you’re finished, you’ll hit the ‘Publish’ button to save lots of a lot of your new membership plan. Then, you’ll repeat the strategy to create as many membership levels as you wish to have.

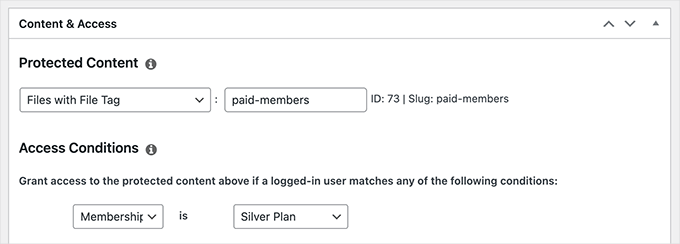
Together with Membership Rules

After that, head over to MemberPress » Rules. Then, click on at the ‘Add New’ button.

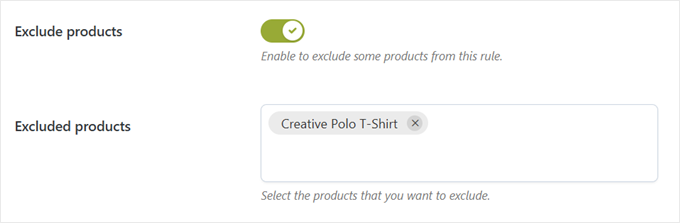
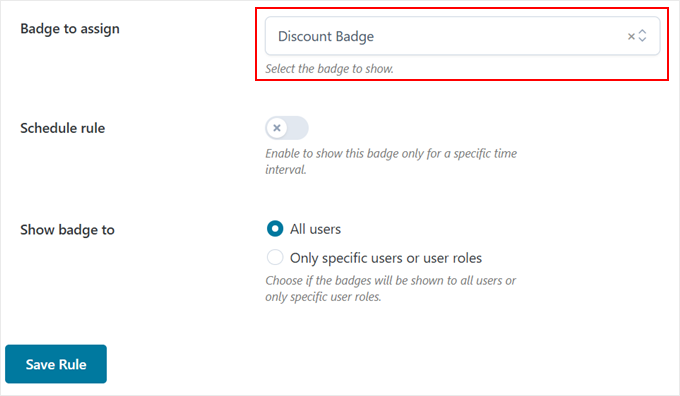
On the next show, you’ll make a selection the content material subject matter you want to protect inside the ‘Safe Content material subject matter’ phase. Then, you’ll configure the get admission to state of affairs.

For instance, we have set posts labeled as best magnificence content material subject matter to be available for elite subscribers only.

<img decoding=”async” loading=”lazy” width=”680″ height=”359″ src=”https://wpmountain.com/wp-content/uploads/2025/02/wp-memberpress-rules.png” alt=”Adding a paywall to your wordpress website” class=”wp-image-299170″/>

Don’t disregard to click on at the ‘Save Rule’ button to store your settings.

Rising Shopper Login Forms

Once your memberships and laws are organize, you’ll wish to provide a way for college students to log in and out of your portal.

To do this, you’ll simply use MemberPress’ pre-made shortcode, which generates a login form with all the essential parts.

You’ll wish to create a brand spanking new internet web page with the block editor or open the prevailing one where you want to be able to upload your login form.

Adding site title to MemberPress login page

Then, scroll the entire manner right down to the ‘MemberPress Settings’ area at the bottom of the editor.

Proper right here, you’ll check out the sphere next to ‘Manually place the login form on the internet web page.’ This will then expose the login shortcode.

Getting the login shortcode

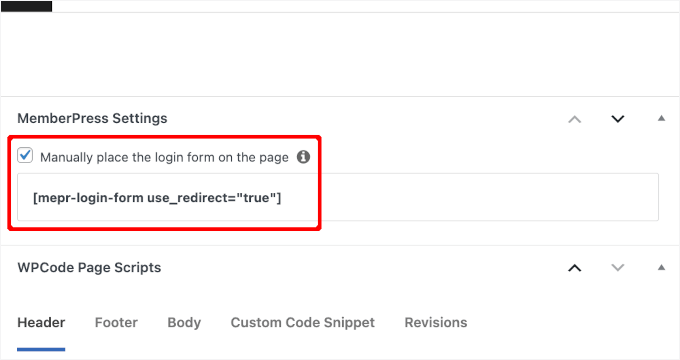
Now, all you want to do is reproduction the shortcode and paste it into the editor above.

Proper right here’s an example of what a MemberPress login internet web page will seem to be on a are living internet web site:

MemberPress login page

For more information on setting up membership levels, proscribing get admission to to content material subject matter, and together with login paperwork, see our final information on how you can create a club web site.

Step 7. Display an Online Contact Us Form

Having a ‘Contact Us’ form to your eLearning internet web site is super very important. It supplies your visitors an easy manner to reach out if they have questions, feedback, or need toughen. So, we recommend together with one as the next step.

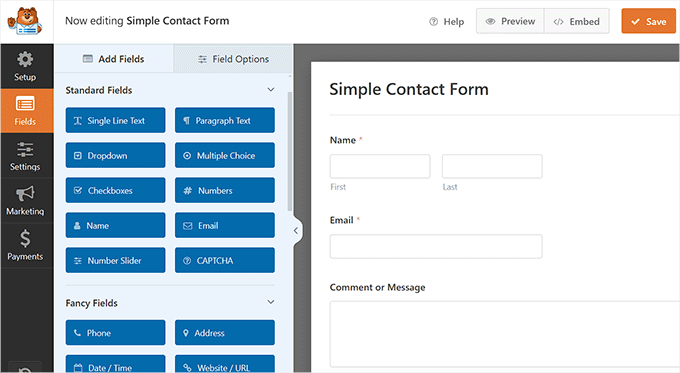
The good news is that making a marginally form is unassuming and doesn’t require any coding skills. The best instrument to use for that’s WPForms. It’s blank to use, even for inexperienced persons, and offers plenty of helpful choices like direct mail protection and the ability to customize your form fields.

Now now we have plenty of firsthand experience with WPForms, and it’s grow to be one among our favorite apparatus. We use it for our contact paperwork, internet web site migration paperwork, and annual user surveys. You’ll be capable of learn additional about it in our entire WPForms evaluation.

With WPForms, you’ll create a marginally form in only some minutes, and your doable students or shoppers will have an instantaneous manner to reach you for any inquiries.

Build a contact form in the form builder

To set one up, let’s arrange and switch at the WPForms plugin. If you wish to have have the same opinion, you’ll see our data on how you can set up a wordpress plugin.

Then, you’ll persist with by the use of our step-by-step instructions on how you can create a touch shape.

Apply: You’ll be capable of create a smooth contact form using the WPForms unfastened model. That mentioned, upgrading to the WPForms top class model will release additional advanced choices, at the side of just right conditional just right judgment.

Now, you’re very on the subject of finalizing your eLearning internet web site.

In this final step, you’ll organize an easy-to-follow navigation menu to have the same opinion visitors to find their manner spherical your platform. Plus, in case you occur to created a custom designed homepage, then you could not have a navigation bar however.

A clear and smooth menu helps your visitors to find what they’re searching for, be it your online categories, coaching strategies, or contact internet web page.

Sunshine eLearning site with adjusted navigation menu

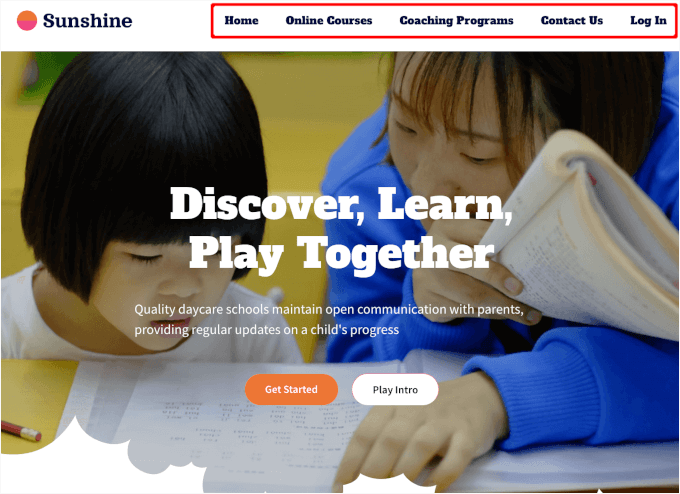
Luckily, wordpress makes it blank to create menus and sub-menus it doesn’t subject what theme you’re using.

For step-by-step steering, you’ll transfer ahead and check out our novice’s data on how you can upload a navigation menu in wordpress.

<h4 class=”wp-block-heading” id=”aioseo-bonus-tip-how-to-grow-your-new-elearning-website“>Bonus Tip: The right way to Increase Your New eLearning Web page

Construction your eLearning internet web site is just the first step. Now, it’s time to attract students and expand your online presence. Listed here are some good tips to help you get started:

  1. Get began Operating a weblog About Your Space of pastime: Writing weblog posts about topics comparable in your eLearning house of pastime can improve your authority. Operating a weblog helps you connect in conjunction with your audience and boosts your internet web site’s visibility in search engines like google and yahoo like google and yahoo. Not sure where to begin out? Check out our data on how you can get started a weblog.
  2. Optimize Your website for search engine optimization: To attract herbal guests, ensure that your internet web site is optimized for search engines like google and yahoo like google and yahoo. Apparatus like All in One search engine marketing may make this super blank. Plus, our final wordpress search engine marketing information has the whole lot you wish to have to grab on how you’ll get started with search engine optimization, even if you’re a novice.
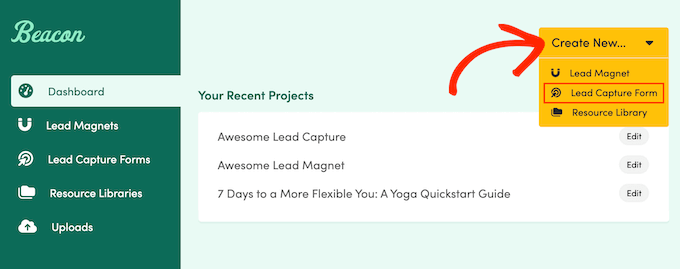
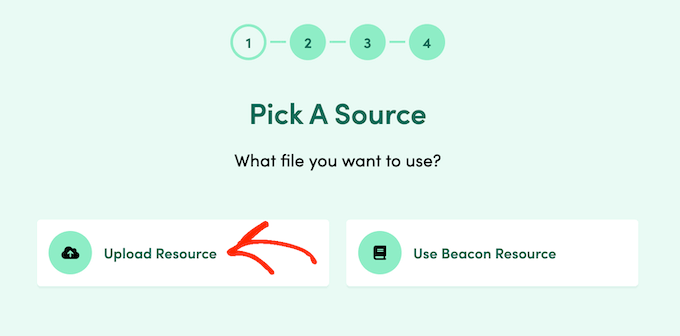
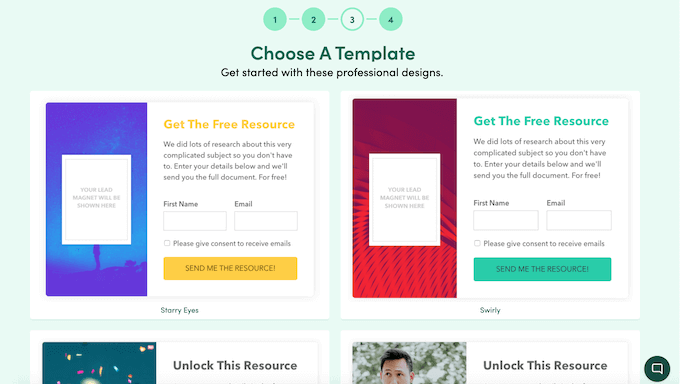
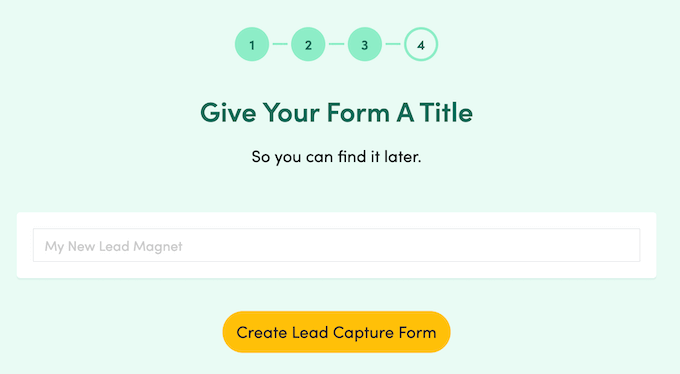
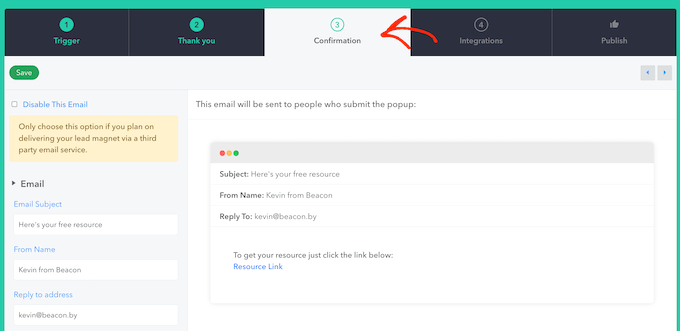
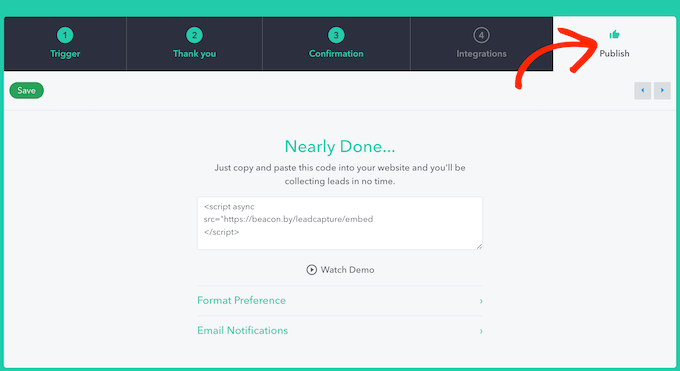
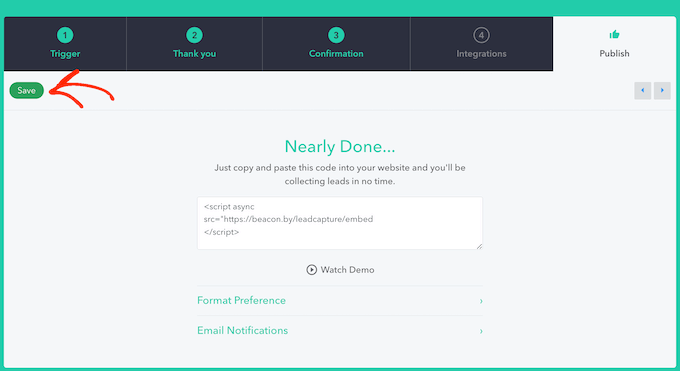
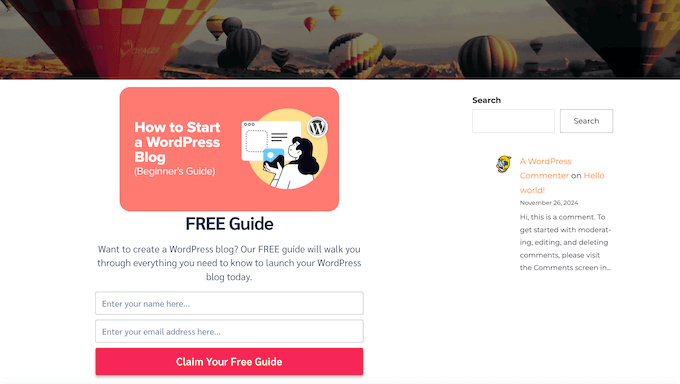
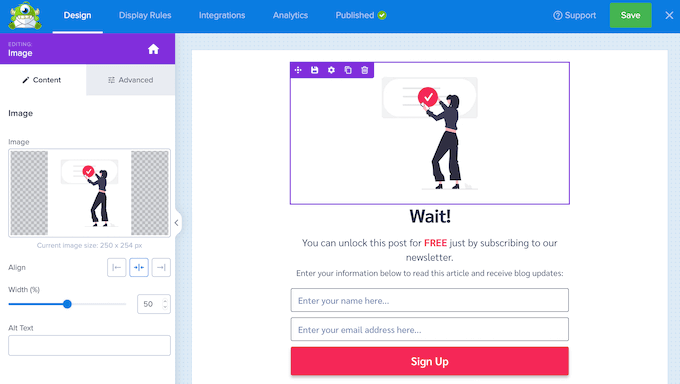
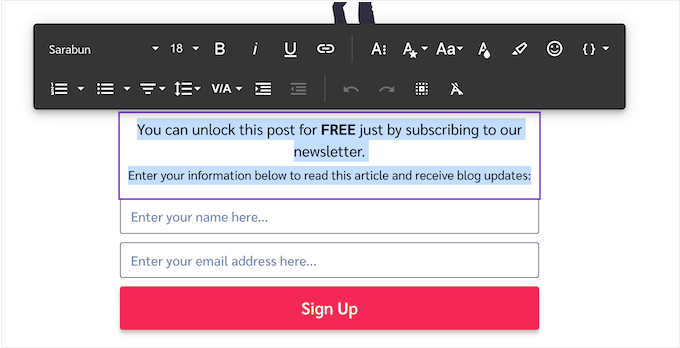
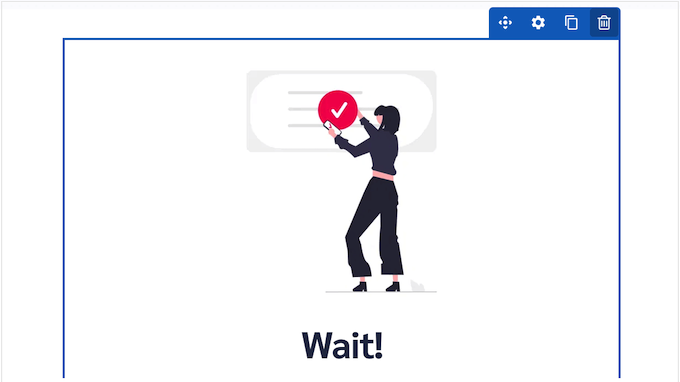
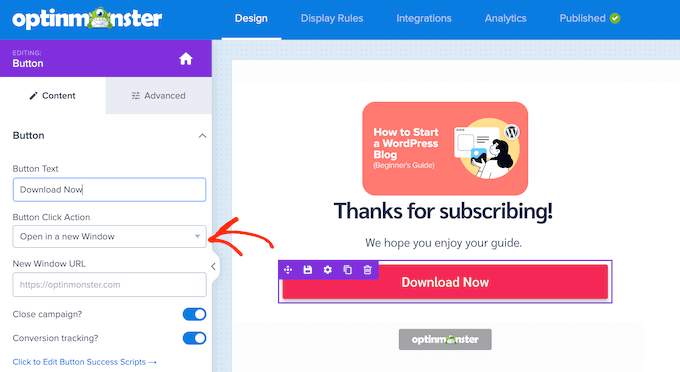
  3. Percentage eBooks to Increase Your Email Record: Offering loose lead magnets like eBooks is a smart option to generate leads. You’ll be capable of then create popups or paperwork that encourage visitors to acquire your eBook in alternate for electronic mail addresses. You may additionally wish to see our data on how you can promote eBooks if you wish to develop into winning from them.
  4. Get began Email Promoting: On perfect of all that, you’ll need to stay attached in conjunction with your audience by the use of electronic mail promoting. Sending newsletters, course updates, and distinctive provides is an effective way to stick your students engaged. Don’t disregard our data on e mail advertising 101 for step-by-step instructions.

Whilst you persist with the following advice, you’ll expand your eLearning internet web site and create a faithful audience that keeps coming once more for added.

<h4 class=”wp-block-heading” id=”aioseo-how-to-create-an-elearning-website-faq”>The right way to Create an eLearning Web page FAQs

Beneath, we’ve spoke back some of the important most now not strange questions about how you’ll create an eLearning internet web site to help you get started.

Is rising an web course blank?

Rising an web course can be easy, but it surely indubitably will depend on your content material subject matter and goals. With the precise apparatus and platform, you’ll assemble a captivating and educational course. Some of the important best possible possible choices is MemberPress with its Courses and CoachKit&industry; add-ons.

Which can be the most productive platforms for building an eLearning portal?

Some of the important best possible platforms for building an eLearning portal include wordpress with an LMS plugin like MemberPress, AccessAlly, or LearnDash. The ones platforms provide slightly numerous choices to help you create and arrange your categories.

Can I create a Finding out keep watch over system using Wix?

Wix is mainly a internet web site builder, so you could find a template apparatus for creating a basic eLearning internet web site. Alternatively, if you wish to have additional advanced choices to your online categories, platforms like wordpress integrated with MemberPress Lessons and CoachKit could be a better option.

How so much does it value to create an eLearning internet web site?

The cost of rising an eLearning internet web site can vary. For basic setups, you want to only wish to cover platform fees, which is able to get began at $0-$50/month. For additonal advanced choices, you’ll expect to spend on web page webhosting, best magnificence plugins, and course building, potentially totaling $200-$500+ in keeping with 365 days.

We hope this knowledge has helped you learn how to create an eLearning internet web site. Next up, you could need to see our data on how you can run a digital lecture room on-line with wordpress and our a professional possible choices of the easiest wordpress LMS plugins in comparison.

Must you liked this article, then please subscribe to our YouTube Channel for wordpress video tutorials. You’ll be capable of moreover to find us on Twitter and Fb.

The put up Methods to Create an eLearning Site (In 8 Easy Steps) first appeared on WPBeginner.

wordpress Maintenance

[ continue ]

wordpress Maintenance Plans | wordpress hosting

read more

Source link

See what others are saying about this...

Posted on Leave a comment

How to create a personalized Kid WordPress theme »Development …

How can you create a Baby wordpress theme designed to be measured described

<span class=”ez-toc-section” id=”why-dont-further-people-offer-wordpress-exploits”/>Why don’t they offer wordpress Exploit?

Opinionated:

css
/*
Theme Establish: Your Child Theme Establish (The Ultimate Customizer)
Theme URI: https://yourwebsite.com/
Description: One of the vital difficult and versatile technique to turn out to be your parent theme
Writer: Your Establish (The Web Design Guru)
Writer URI: https://yourwebsite.com/
Template: Your Parent Theme Establish (Out of date and Uninspiring)
Fashion: 1.0 (The Recreation-Changer)
*/

The Basics of Child Problems: a cutting -edge tool for web designers

Previously that we immerse ourselves in the world that changes the game of issues related to childhood matter, we destroy their foundations:

Parent theme: the original monster you are for unchain

The power of the child’s problems: unleash your creative genius

This is the way it is right to exercise a child theme to transform your wildest design goals actually:

Choose the best parent theme: Instead of being satisfied with a mediocre theme, the person who aligns his vision alongside. For example, in the event that you are a gourmeer, why not choose a theme particularly made for food blogs or for consumption puts?

TL; The issues relating to infantile matter allow you to create custom -designed wordpress Internet pages that duplicate your imagination, without touching the information on the original theme. Prepare for an exciting journey!

<span class=”ez-toc-section” id=”construction-your-private-wordpress-internet-website-online-a-beginners-data-to-child-problems-in-mississippi”/>Build your private wordpress Internet website online: Data for beginners for children’s problems in Mississippi

Have you ever wanted to create an online internet website that seems exactly the best way you imagine? Maybe you could start a trade, share your hobby for movies or simply want to connect with friends online. wordpress is a wonderful common tool to create Internet pages and personalize it with a children’s theme implies that you will be able to unleash your creativity and assemble something in truth unique. In Mississippi, now we have various people with glorious ideas and these data will show you the easiest way to make those ideas come to life on the web!

TL; – You will be able to create a wordpress theme for children tailored to change your Internet website online without fitting information on the original theme. This helps to maintain your online internet website safe from updates and simplifies changes.

Because children’s problems are your best friend

You believe that building a house. You would not start demolishing the root, right? You will assemble an addition, a new room that spanks the brand or in all probability also a completely new floor. The infantile matter artistic problems operates the identical approach for wordpress! They could be able to allow you to customize your online website online without affecting the original “base” or on the theme with which you have just started. This is very important for some reasons:

  • Cover first! For those who occur to exchange information directly on the main theme, the probability is that you will lose changes when the theme updates. Matter problems for children keep your artistic work safely designed.
  • Easy updates When the theme you could use is obtained per minute, it is super easy to use such updates without losing the modifications designed to be measured.
  • Flexibility Matter problems for children give you the freedom to experience different design elements without worrying about breaking your Internet website online.

The foundations of the child’s problems

Previously that we immerse ourselves, we become aware of the blocks of improvement of a theme of a child:

  • Parent theme: The original theme you want to customize. Remember it to hear it as the starting point for your design.
  • Baby theme: Your tailor -made design based on the parent theme. It is like together with your person at home.
  • Style sheet: A file indicated as “Style.css” that contains the changes to the design you are making for the theme of your child. It is like the color palette and the possible choices for your online internet website.
  • Functions on functions: An unnecessary file now indicated as “functions.php” that allows you to add further code for things how to change the functioning of the Internet website. This is like together with further choices for your home.

Create the theme of your child

Now for the fun phase! This is the best way to create your first theme for children in Mississippi:

  1. Log in to the wordpress Dashboard. This is the location you organize everything on your online internet website.
  2. Transfer to look> problems. This section shows all the problems of issue installed on your online internet website.
  3. Click on “Add new”. This opens the list of wordpress themes, in which you will find a lot of fresh matter problems.
  4. To look for the parent theme you want to customize. Take your time to navigate and find a theme suitable for your online Internet website.
  5. Arrange and move on to the parent theme. This can occasionally configure it as a ground for the theme of your child.
  6. Create the Son theme folder. Within wordpress information, he creates a new folder that spanking the brand called “Child-Theme-Name”. This folder will host all your tailor -designed information.
  7. Create a “Style.css” file. Throughout the “Son Son son” folder, he creates a new file that is shuting the brand called “Style.css”. This file will cling to your personalized designed types.
  8. Add the wisdom of the “Style.css” interstation. Add the lines to the best of the file:

css
/*
Theme Establish: Your Child Theme Establish
Theme URI: https://yourwebsite.com/
Description: A child theme for Your Parent Theme Establish
Writer: Your Establish
Writer URI: https://yourwebsite.com/
Template: Your Parent Theme Establish
Fashion: 1.0
*/

You will have to change “the theme of your baby factory”, “Your online internet website“, “your parents’ theme establishes” and “establish” with correct wisdom. This header tells wordpress that this is a theme for children and connects it to the parent theme.

Customization with CSS

Now that you have prepared your baby, let’s start together with a little person! Take you in to accept, the “Style.css” file is your magical tool to make changes. You will be able to use CSS (cascade -style sheets) to keep wakefulness on everything from colors and characters to the construction of your online internet website.

Here is a quick example to start. Suppose you want to change the background color of your online internet website. In “Style.css”, add the following code:

css
body {
background-color: #f0f0f0; /* Delicate grey background */
}

This can occasionally make the entire background of your online website online a gradual gray color. You will be able to experience different colors and find what adapts to your style.

Alternatively, how did you learn what to change? This is the location where you have to have the fun phase! You will be able to use the “take a look” tool for your web browser to solve the CSS codes for more than some elements on your online internet website.

  1. Open your online website for your browser.
  2. Click with the click by the part you want to change.
  3. Select “Take a look” or “take a look at the element”. This can occasionally open the developer equipment for the browser.
  4. Find the CSS types performed to the part. You will be able to see a code that resembles this:

css
.my-class {
colour: #333; /* Black text colour */
font-size: 16px; /* Font period */
}

You will be able to copy the codes in the “Style.css” file of your child’s theme and adjust the values ​​to create your look.

There is a world of CSS possibilities to have out there! You will be able to learn to exchange characters, add shadows, customize the buttons and much more. There are many resources and online tutorials to help you take over CSS’s work of art.

Together with PHP ability

If you want to go beyond the simple change of the appearance of your online Internet website, you will use PHP to be able to load further skills. The “functions.php” file offers you the opportunity to do things like:

  • Together with Menu designed menu: Create your navigation menus to organize your online Internet website.
  • Change the best way your online Internet website View posts: Create unique layouts for your blog posts.
  • Together with widgets: I include further choices such as social media buttons or research bars.

Alternatively, take accumulation, PHP is generally a little more sophisticated! It is better to use it better if you are at ease to operate with the code. If you are not sure of the easiest way to use PHP, you will always find a developer to help you or look for plugins that provide equivalent choices.

<span class=”ez-toc-section” id=”using-a-child-theme-to-create-a-stunning-internet-website-online-in-mississippi”/>Use of a children’s theme to create an extraordinary online internet website in Mississippi

We imagine that you could open a bakery in Mississippi. You need an online internet website that shows your delicious desserts, pastries and cakes. This is the way it is right to exploit a children’s theme to make your vision a reality:

  1. Make a selection an parent theme: It is good to select a theme designed for food blogs or Put consumption.
  2. Create a child theme: Follow the steps that we previously discussed to prepare the theme of the baby -designed child.
  3. Customize the appearance: Exchange the combination of colors to check the logo of your oven. Maybe you will be able to use heat colors such as brown and yellow.
  4. Add a “contact us” module: Use a plug -in or php to create a simple contact form where customers can place orders or ask questions.
  5. I include a gallery: Add a gallery to show your appetizing creations. It is crucial to use a plug -in to simplify the possibility of loading images.

In collaboration with your children’s theme, you will create a singular and beautiful online internet website that shows the attraction of your oven.

The importance of protection

If you end up personalizing your wordpress Internet website online, want to block protection in ideas. The problems of matter for children are witnessing you to maintain your online website online in a safe way to be separated from the information on the main theme. Alternatively there are other steps that you take to stop the protection problems:

  • Replace wordpress Core information, the problems of matter and the endless plugins. Updates restore vulnerability and keep your online website online simply.
  • Use robust passwords and not proportion to someone.
  • Arrange the protection plugins. Plug -in can help monitor threats and protect your online Internet website.
  • Back up your endless online internet website. In this way, if something is not suitable, you will simply restore your online internet website in an previous way.

Expand the benefits of the child’s problems

Through the use of a child theme, you could not simply create an online internet website, you could open an entire world of inventive possibilities. You are discovering the easiest way to customize an online internet website for your actual needs, whether or not to trade, a personal blog or a pastime company. In addition, you are discovering the importance of personalization, protection and living room provides the latest wordpress trends.

Believe the possibilities! You will be able to create an online internet website, this is so unique and vibrant for the reason for Mississippi himself. You will be able to use your theme for children to show local artists, proportions on your community or put it on the local company market. Heaven is prohibit!

Take yourself in agreement, a very powerful problem is to experiment, laugh and tell while progiscing. There are many resources available to help you in the best way. You will be able to find the communities of consumers of wordpress online, discover tutorials and even take lessons to extend your skills.

So, take a big step and start building the online dream internet website at the moment! You have the equipment, creativity and the spirit of Mississippi for your facet.


<span class=”ez-toc-section” id=”additional-on-how-you-can-create-a-custom-designed-wordpress-baby-theme%e2%80%a6″/>Additional How can you create a custom designed wordpress theme

wordpress maintenance plans | wordpress hosting

To find out more

<a href=”https://wpmountain.com/how-to-create-a-customized-wordpress-kid-theme-development/”>Source link

See what others are saying about this...

Posted on Leave a comment

Upload Product Badges in WooCommerce (Fast and Simple)

Have you ever ever ever confused if it’s crucial trade WooCommerce’s fundamental sale badge with something further eye-catching (and moderately a lot much less boring)?

It is a now not extraordinary question we get from our readers, and we’re satisfied to will let you know that the answer is certain. You utterly can!

Custom designed product badges are an out of this world solution to highlight explicit items to your online store. They’re helpful whether or not or now not you wish to have to sing their own praises new arrivals, mark items on sale, or draw attention to limited-time supplies.

In this publish, we’ll show you two simple ways in an effort to upload custom designed product badges to your WooCommerce store. You’ll each use an outstanding plugin or add some simple code.

Don’t concern. We’ll walk you through each and every selection step by step!

What Are WooCommerce Product Badges?

Have you ever ever ever noticed those little ‘Sale’ or ‘New’ labels that show up on products while purchasing groceries online?

Those are product badges, and they’re extraordinarily useful for ensuring items stand out to your on-line retailer.

Recall to mind them as virtual stickers that draw your shoppers’ attention to important product details like gross sales, new arrivals, or limited-time supplies.

We’ve seen store homeowners use product badges in in point of fact inventive ways to sing their own praises explicit provides, highlight bestsellers, or mark items which may well be operating low on inventory.

Now, for individuals who’re already the usage of WooCommerce, you’ll have noticed it comes with a fundamental sale badge feature that automatically turns out while you reduce a product’s value.

WooCommerce's default Sale badge

While the WooCommerce sale badge works incredible for simple needs, let’s be honest – it’s gorgeous limited relating to what you’ll have the ability to do with it.

You’ll’t merely alternate how the badge appears to be, add new badge types, or keep an eye on exactly the position they appear to your product pictures.

Within the period in-between, custom designed product badges will let you show your logo’s personality further. Most importantly, even if, distinctive badges can further effectively draw attention to special products.

That suggests, you’ll have the ability to power further product sales to your online store.

In this knowledge, we’ll walk you through 2 showed learn the way to add and customize product badges in WooCommerce. Each and every approaches will provide you with complete keep an eye on over how they seem and artwork.

You’ll use the fast links underneath to skip to your most popular approach:

Approach 1: Use YITH WooCommerce Badge Regulate (Further Customizable)

Let’s get began with our favorite software for together with custom designed product badges to your WooCommerce store.

We recommend the usage of YITH WooCommerce Badge Control because it makes it super easy in an effort to upload and customize product badges to your online store.

Plus, we’ve tested many YITH plugins through the years, like the ones for together with subscriptions and product movies, and they always artwork great for our shoppers.

Wish to show a novel badge during the vacations? Or perhaps display how much money shoppers will save? This plugin can do all that. You’ll even set badges to show up at positive circumstances and hide them later.

You’ll get began with each the free or best elegance fashion of the plugin. The unfastened model is perfect for individuals who merely wish to add simple text or image badges to your products.

In this knowledge, we’ll show you how you can use the top class model, on the other hand most steps will artwork the identical approach for every. Merely keep in mind that some cool choices, like badges that automatically show discount amounts, most efficient come with the highest elegance fashion.

Practice: The highest elegance fashion costs $79.99 in line with one year if you wish to have all of the choices. While this may increasingly appear to be such a lot, we think it’s value it because you get such a large amount of ways to customize your product badges and make them look exactly how you wish to have them.

Able to start out out? First, you’ll want to achieve the plugin from YITH’s internet website online.

Then log in to your YITH account, move to the ‘Licenses & Downloads’ tab, and click on on on the ‘Download Plugin’ button to procure the record.

Downloading a YITH plugin

Proper right here’s a tip: don’t close this internet web page after downloading because you’ll need the license key that’s confirmed there.

Next, move to your wordpress dashboard and arrange the plugin. For more information, now now we have a step-by-step knowledge on how one can set up a wordpress plugin.

When it’s energetic, you’ll see a setup computer screen asking on your YITH piece of email and license key. Merely copy the ones from the YITH internet website online and click on on ‘Activate license.’

Activating YITH license

Every time you spot the message saying your license is energetic, you’re all set!

Now, click on on ‘Go to plugin dashboard,’ and also you’ll have the ability to get began growing your first custom designed badge.

Going to the YITH plugin dashboard

Step 1: Quilt the Default WooCommerce Sale Badge

First, we want to hide WooCommerce’s built-in sale badge so it doesn’t war with our custom designed product badges.

The process is in point of fact simple. Go to your wordpress dashboard and click on on on YITH » Badge Regulate. Then, navigate to the ‘Elementary Settings’ tab.

Proper right here, you’ll to search out an selection that says ‘Quilt WooCommerce “On sale” badge.’ Go ahead and turn that on.

Then, beneath ‘Quilt “On sale” on:’, make a choice ‘All products’ to make sure the default badge doesn’t show up anywhere to your store.

Hiding WooCommerce's sale badge with YITH

Whilst you’re inside the settings, that you must perceive some other helpful possible choices. You’ll select to hide your custom designed badges in positive places, identical to the sidebar or single product pages.

This is great if you want to keep your store taking a look clean and organized. For example, if your cell website feels too crowded, you’ll have the ability to hide badges there, too.

Don’t omit to click on at the ‘Save Alternatives’ button at the bottom of the internet web page while you’re completed.

Saving settings to hide the WooCommerce sale badge in YITH

Step 2: Create Your Custom designed Badge

Now comes the fun phase: growing your first custom designed product badge in WooCommerce!

Head over to the ‘Badges’ tab and click on at the ‘Create Badge’ button to get started.

Creating a new product badge in YITH

The plugin offers you 4 various kinds of badges to make a choice from: text badge, image badge, CSS badge, or sophisticated badge for product sales products.

Each type means that you can create unique ways to concentrate on your products. For example, if you want to mark products as “New Arrival” or “Vegan Delightful,” the principle 3 possible choices artwork great.

Then again proper right here’s a tip: for individuals who’re growing discount badges, we strongly suggest the usage of the sophisticated selection, which automatically updates in accordance with your product’s value changes.

Choosing a product badge type in YITH plugin

After settling on your badge type, give it a name this is serving to you remember what it’s for.

Whilst you’ve decided on an image, CSS, or sophisticated badge, you’ll see a complete choice of pre-made badge designs right kind inside the plugin.

You’ll pick whichever one you favor. The ones ready-to-use badges save you time, and also you’ll have the ability to however customize them to check the best way of your WooCommerce pages.

Giving the product badge a name and choosing a badge image in YITH plugin

This plugin in point of fact shines in its customization possible choices. Depending on which badge type you picked, you’ll have the ability to alter all kinds of settings to make your badge look perfect to your product photos.

Wish to alternate the color? Easy.

Need to alter how transparent it’s? No problem.

You’ll even rotate the badge or switch it spherical to your products until it’s in merely the correct spot.

Customizing the YITH product badge

For our example, we made the badge in point of fact pop by the use of changing its color to purple and striking it inside of probably the most good right kind corner of the product image.

The ones small tweaks may make a big difference in how effectively your badges get other people’s attention.

Whilst you’re proud of how the whole lot appears to be, merely click on on ‘Save badge’ to finish up.

Saving the changes made to the YITH product badge

Step 3: Create a Rule to Display Your Badge

Now that we’ve created our custom designed badge, let’s tell WooCommerce exactly the position and when to show it.

Head over to the ‘Badge Rules’ tab and click on on ‘Set Rule.’

Creating a new product badge rule in YITH

Recall to mind rules as instructions that tell your badges when to search for your product photos.

The plugin offers you 4 main ways to keep an eye on where your badges show up: products badge, elegance badge, tag badge, and supply class badge.

YITH's product badge rule types

You’ll select the ‘Products badge’ rule in an effort to upload badges to positive items or the ‘Magnificence badge’ rule to cover whole product categories.

Within the period in-between, the tag badge rule shows badges on products sharing the identical WooCommerce tag, and the supply class badge rule shows badges in accordance with supply possible choices.

Each rule targets different product sides, on the other hand they all artwork similarly. So, you merely want to pick what works best on your needs.

Let’s use the products badge rule for this example as it’s the most typical variety.

Next, give your rule a easy establish so that you’ll have the ability to to search out it merely later.

Then, seek for the ‘Show badge in:’ surroundings. That’s the position you decide which products get your badge. You’ll select to show it on all products, recent additions, items on sale, featured fashionable merchandise, or even merely products which may well be in stock.

Choosing what type of products the badge should appear in using YITH

Let’s say you’re creating a rule available on the market items. If you select ‘On sale products,’ then your badge will automatically appear every time you mark a product as being on sale. It’s that easy!

Then again some possible choices come with further settings so to configure. For example, for individuals who pick ‘Only recent Products,’ you’ll have the ability to set badges to appear on items added within the previous couple of days (like 7, 14, or 30 days).

This makes it super easy to automatically highlight new arrivals to your store without manually together with badges to each and every product.

Creating a badge rule for new products with YITH

From time to time, that you must wish to keep positive products badge-free. That’s where the ‘Exclude products’ surroundings is useful.

Merely permit this surroundings and type inside the names of any products you don’t wish to show the badge for. These items will stay badge-free even if they suit your other rules.

Excluding products for the badge to appear in with YITH

Next, make a choice which badge design you wish to have to use inside the ‘Badge to assign’ dropdown.

Now, proper right here’s where it’ll get in point of fact flexible. You’ll schedule when your badges appear and select who gets to see them.

Choosing a badge to use for the badge rule in YITH

The ‘Schedule rule’ selection is perfect for limited-time provides.

Whilst you permit it, the plugin will ask you to set get began and end dates on your badges.

Creating a schedule for the product badge to appear with YITH

And if you want to show explicit badges to positive shoppers, like appearing a “VIP Cut price” badge most efficient to one of the vital unswerving consumers, you’ll have the ability to do that, too.

To try this, merely make a choice ‘Only explicit shoppers or client roles’ inside the ‘Show badge to’ surroundings. Then, type to your most popular client roles or particular person usernames underneath it.

When the whole lot appears to be right kind, merely click on on ‘Save Rule,’ and likewise you’re all set!

Creating a user role rule for the product badge with YITH

Feel free to talk about together with your store’s front end to see your new product badges in movement.

Whilst you’re the usage of the sophisticated badge type available on the market items, you’ll see it appearing every the bargain share and the actual money saved, helping shoppers quickly spot the best provides.

Example of YITH Badge Management's product badge

Similar Post: In search of further cool apparatus and the right way to reinforce your WooCommerce store? Check out our list of the absolute best WooCommerce plugins.

Approach 2: Use Custom designed Code (Loose and Simple)

Whilst you don’t need the sophisticated possible choices from the principle approach, or for individuals who’re looking for a completely free selection, then now now we have a simple code implies that won’t value you the remainder.

And for individuals who’re no longer proud of code, don’t concern! We’ll be the usage of the WPCode plugin to make this super easy and safe. It means that you can add custom designed code snippets in wordpress without being a developer or risking breaking your internet website online.

We’ll use the unfastened model of WPCode for this tutorial because of it in reality works utterly for our needs. That discussed, there’s a top class model with cool choices like AI code technology and trying out mode.

For more information, merely check out our in-depth WPCode evaluate.

First, you need to set up the wordpress plugin to your admin space.

Then, move to Code Snippets » + Add Snippet. Hover over the ‘Add Your Custom designed Code (New Snippet)’ segment and then click on on on the ‘+ Add Custom designed Snippet’ button.

Adding a new custom code snippet in WPCode

Next, select ‘PHP Snippet’ when asked in regards to the code type.

This tells wordpress what type of code we’re the usage of.

Choosing PHP snippet in WPCode

Now, it’s a should to provide your snippet a name this is serving to you remember what it does.

Since this code will remove the default WooCommerce sale badge and add every new product badges and dynamic discount badges, that you must identify it something like “Custom designed WooCommerce Badges.”

Once that’s completed, paste the code snippet we’ve equipped underneath inside the ‘Code Preview’ box.

This code does something in point of fact cool. It automatically calculates discount percentages and shows them on the product sales badge. Plus, it supplies a “New” badge to products added inside the ultimate 7 days.

// Remove default WooCommerce sale flash badge
remove_action( 'woocommerce_before_shop_loop_item_title', 'woocommerce_show_product_loop_sale_flash', 10 );
remove_action( 'woocommerce_after_shop_loop_item_title', 'woocommerce_show_product_loop_sale_flash', 10 );
remove_action( 'woocommerce_before_single_product_summary', 'woocommerce_show_product_sale_flash', 10 );

// Add custom designed badges to products
add_action( 'woocommerce_before_shop_loop_item_title', 'add_custom_product_badges', 10 );
function add_custom_product_badges() {
    international $product;

    // Initialize a variable to track whether or not or now not a badge has been displayed
    $badge_displayed = false;

    // For products with any amount of discount share (1% or further)
    if ( $product->is_on_sale() ) {
        // Get not unusual and sale prices
        $regular_price = floatval( $product->get_regular_price() );
        $sale_price    = floatval( $product->get_sale_price() );

        // Care for variable products
        if ( $product->is_type('variable') ) {
            // Get variation prices
            $regular_price = floatval( $product->get_variation_regular_price( 'max', true ) );
            $sale_price    = floatval( $product->get_variation_sale_price( 'min', true ) );
        }

        // Calculate discount share if not unusual value is professional
        if ( $regular_price > 0 ) {
            $discount_percentage = ( ( $regular_price - $sale_price ) / $regular_price ) * 100;

            // Display badge if discount is 1% or further
            if ( $discount_percentage >= 1 ) {
                echo '' . round( $discount_percentage ) . '% off!';
                $badge_displayed = true; // Badge has been displayed
            }
        }
    }

    // Only show the "New" badge if no other badge has been displayed
    if ( ! $badge_displayed ) {
        // For "New" products added inside the ultimate 7 days
        $post_date  = get_the_time( 'Y-m-d', $product->get_id() );
        $post_stamp = strtotime( $post_date );
        $newness    = 7; // Collection of days the product is considered new

        // Check out if the product is new
        if ( ( time() - ( 60 * 60 * 24 * $newness ) ) < $post_stamp ) {
            echo 'New';
            $badge_displayed = true;
        }
    }
}

Wish to alter how long a product is considered “new”? Merely seek for the street where it says $newness = 7 inside the code. You’ll alternate that amount 7 to alternatively many days you wish to have, like 14 for two weeks or 30 for a month.

To finish up, click on at the ‘Inactive’ button until it changes to ‘Lively,’ then hit ‘Save Snippet.’

WPCode custom snippet for displaying WooCommerce product badges

Next, we want to style our badges to make them look great to your products. Let’s add some CSS to control their glance.

To be able to upload a brand spanking new snippet, apply the identical steps as quicker than, on the other hand this time, select ‘CSS Snippet’ when asked.

Selecting CSS Snippet as the Code Type

Identify your snippet something descriptive, like “Product Badge Sorts.” This may occasionally most likely will will let you to search out it merely if you wish to make changes later.

Proper right here’s the CSS code that may make your badges look professional. Merely paste this into the ‘Code Preview’ box:

/* Not unusual types for all product badges */
.product-badge {
    position: absolute;
    best: -10px;      /* Position at the best edge */
    right kind: -10px;    /* Position on the correct edge */
    padding: 12px 16px;
    border-radius: 50%;
    color: #ffffff;
    font-size: 16px;
    font-weight: bold;
    z-index: 99;
    box-shadow: 0 2px 5px rgba(0, 0, 0, 0.3);
}

/* Sorts for the "New" badge */
.new-product {
    background-color: #4CAF50; /* Green background */
}

/* Sorts for the "Sale" badge */
.sale-product {
    background-color: #FF0000; /* Crimson background */
}

Let’s smash down what you’ll have the ability to customize in this code.

Want your badges in a definite spot? To try this, you’ll have the ability to alternate the best and right kind values. For example, changing best: -10px to best: 10px will switch the badge down.

Don’t like the colors? It’s super easy to switch them. Merely to search out the background-color lines and alter the color codes.

For instance, if you wish to have a blue sale badge instead of a purple one, alternate #FF0000 to #0000FF. You’ll moreover make the badges higher or smaller by the use of adjusting the font-size value.

Wish to be informed further about tweaking the ones types? Check out our beginner-friendly knowledge on CSS in wordpress.

Every time you’re completed, merely click on at the ‘Inactive’ button to make it ‘Lively,’ then hit ‘Save Snippet.’

WPCode custom snippet for styling product badges

That’s it!

Your badges must now appear to your product photos. Proper right here’s an example of what ours turns out like the usage of our CSS code:

Example of WooCommerce product badges made with WPCode

Discover Further WooCommerce Guidelines and Guidelines

Now that you know how to turn product badges in WooCommerce, that you must wish to uncover other ways to reinforce your online store. Listed below are some helpful guides we recommend:

  • Spice up gross sales with good upselling – Learn to strategically market it identical products and building up your affordable order value through environment friendly upsell tactics.
  • Praise buyer critiques with coupons – Discover how you can automatically send discount coupons to shoppers who move away product evaluations, encouraging further feedback and repeat purchases.
  • Show good product suggestions – Find out how to show product concepts to skyrocket your WooCommerce product sales.
  • Upload complicated product filtering choices – Learn to have the same opinion shoppers to search out exactly what they’re looking for with customizable product filters that make purchasing groceries easier and quicker.
  • Create a buyer wishlist characteristic – See how together with a wishlist function can boost engagement and offers shoppers a the reason why to return to your store while providing valuable insights into purchaser preferences.
  • Cover costs in WooCommerce – Learn to hide pricing for wholesale shoppers, online catalogs, and luxury pieces and ask shoppers to the touch you or log in instead.

We hope this text has helped you learn how to add product badges in WooCommerce. You might also want to take a look at our a professional possible choices of the absolute best WooCommerce product grid plugins and our knowledge on how one can accelerate WooCommerce efficiency.

Whilst you preferred this text, then please subscribe to our YouTube Channel for wordpress video tutorials. You’ll moreover to search out us on Twitter and Fb.

The publish Upload Product Badges in WooCommerce (Fast and Simple) first appeared on WPBeginner.

wordpress Maintenance

[ continue ]

wordpress Maintenance Plans | wordpress hosting

read more

Source link

See what others are saying about this...

Posted on Leave a comment

The importance of SSL certificates for WordPress security – Block …

The meaning of the SSL certificate for defined wordpress security

<span class=”ez-toc-section” id=”wordpress-caching-plugins-the-significance-of-ssl-certificate-for-wordpress-safety-and-so-forth%e2%80%a6″/>wordpress cache storage plugins, meaning of the SSL certificate for wordpress safety and so on …

Investigative storage plugins in wordpress cache for Chicago companies

Discover the effects of storage in the cache on the Chicago virtual panorama

The upward push of electronic commerce and virtual advertising has amplified the importance of the efficiency of the site in Chicago. The cache storage plugins play a fundamental position in improving the rhythm and power of the site, immediately influencing the online fortune of companies.

Plug -in of benchmarking cache: a vital examination

To offer complete research for Chicago companies, we meticulously evaluated a series of storage plugins in wordpress cache in line with the key signs of efficiency:

  • Speed ​​improvement: Measured to have an effect on charging opportunities of the web page, server reaction time and time at the first byte (TTFB).
  • Scalability: He evaluated the talent of the plugins to maintain the volumes of visitors of the site excessive in the first hours of the sector and seasonal fluctuations.
  • security integration: Compatibility tested with the SSL certificate, ensuring online transactions and security coverage.
  • Person-friendly: Assessed the advantage of configuration, configuration and repairs in progress.

WP Tremenus Cache: a deeper dip

As a well -challenged choice, WP Tormus Cache is proud of his customizable options and intensive documentation. Alternatively, our investigation has printed possible disadvantages in its management of enormous record and multi-site environments.

Further security problems

Past caching, we have deepened the meaning of the SSL certificate for the Chicago companies. SSL protects a delicate knowledge, completes the person believes and improves the evaluations of the engines. We have exposed wrong ideas not unusual and highlighted the most important position of the SSL integration with the storage plugins in the cache.

Cache integration with very important equipment

To maximize the efficiency of the site, it is necessary to be sure the compatibility between the storage plugins in the cache and the different wordpress equipment. Our research has recognized the plugins that are perfectly combined with style, plugin and e-commerce responses used in a recurring way by the Chicago companies.

Conclusion

To understand the essential position of the storage in cache and safety within the aggressive panorama of the Chicago sector, companies can take advantage of the best wordpress plug-in to strengthen the efficiency of the site and develop their online presence. Our investigative means providing a complete analysis of the plug -in of storage in the cache, allowing companies to make competent selections that feed their fortune in the virtual kingdom.

<span class=”ez-toc-section” id=”lock-down-your-wordpresswebsite-why-ssl-certificate-are-a-very-powerful-for-chicago-companies”/>Block your wordpress website: because the SSL certificate is very powerful for Chicago companies

Do you think you could navigate in your favorite online retailer in Chicago, able to shop for that new pair of shoes. All at once, a caution presents himself: “This site is not sure”. Would you believe the data of your bench cards on that website? Certainly no longer. Due to this SSL certificate is the most important for any site, in particular if you should perform a wordpress site in Chicago.

The SSL certificate is like virtual blocks on your site, ensuring safe connections between your site and your guests. They offer protection to delicate knowledge such as passwords, bank cards data and main private points, development creation and credibility for your company. This is particularly vital in Chicago, the place where many companies depend on line transactions.

We immerse ourselves in the important explanation because the SSL certificate is very important for the security of wordpress:

<span class=”ez-toc-section” id=”the-significance-of-ssl-certificate-for-wordpress-safety-in-chicago-illinois”/>The meaning of the SSL certificate for the security of wordpress in Chicago, Illinois

1. Preserve your safe information from the prying eyes

Call the SSL certificate as invisible guardians, protect your site from hacker and snopers. In case of SSL certificates, the ideas exchanged between your site and guests are encrypted. This implies although any person intercepts the information, it will be incomprehensible for them, how to try to learn a secret code without the important thing.

2. Increase acceptance as true with and credibility

Do you already know that small inexperienced block icon inside the agreement with the bar of your browser? This is the sign of an SSL certificate. He tells guests that your site is safe and devoted, making them many more likely to make the industry with you. In an aggressive market like Chicago, a devoted site could make the entire distinction.

3. Make improvements to the search engine score

Google and several search engines such as Google and Yahoo give priority to Internet sites with SSL certificate. Having a safe site can revive the search engine score, making it easier for possible consumers to look for your company in Chicago.

<span class=”ez-toc-section” id=”how-ssl-certificate-give-protection-to-your-wordpresswebsite-in-chicago”/>How the SSL certificate provides protection to your wordpress website in Chicago

1. Ensure delicate information

When you work in a sector in Chicago, most likely to collect delicate knowledge such as the names of buyers, addresses and costs on costs. An SSL certificate protects this knowledge not to authorize the entrance, fighting it from the fall in the imperfect palms.

2. Fight malware and phishing assaults

The SSL certificate witnesses to save malware and phishing assaults, making it more difficult for attackers to check your site or thief data from your guests. This is particularly vital in Chicago, local companies are often centered through IT criminals.

3. Compliance with safety requirements

Many Chicago companies are safety materials such as PCI DSS (Safety of Commercial Information of Tax Cards Same Old). The SSL certificate is the most important part of compliance with these requirements, ensuring that you can be the protective knowledge of the buyer and the commercial needs of the assembly.

<span class=”ez-toc-section” id=”wordpress-caching-plugins-and-their-position-in-web-page-efficiency”/>Memorization plugin in wordpress cache and their position in the efficiency of the web page

1. Speed ​​of the Increase Web page

The cache storage plugins are like the demons of the rhythm of your wordpress site. The copies of the dealer of content material often accessible to your site, making it faster for your guests. This is particularly vital in Chicago, the place where many of us use cellular gadgets and expect rapid load opportunities.

2. Charge of server market

The cache storage plugs have reduced the burden for the server of your site through the content material service stored in the cache as a substitute for the processing of similar requests several times. This will strengthen the entire efficiency of your site and save it from slowing down during the visitor sessions of the excessive site.

<span class=”ez-toc-section” id=”tips-on-how-to-make-a-choice-the-proper-wordpress-caching-plugin-for-your-wishes”/>Suggestions on how to make a choice the storage plug -in in wordpress cache correct for your desires

1. Imagine visitors of your web page

In the event that you have a heavy traffic site, you will be able to want a difficult cache plug-in that could maintain the burden. For smaller websites, a storage plugin is also sufficient in the most practical cache.

2. Search simple options to use

The cache storage plugs must be simple to configure and use, although you can no longer be a technical knowledge. Search plugins with intuitive interfaces and useful documentation.

3. Make a choice a plug -in which intelligently integrates with your different equipment

Make sure that the storage plug -in in the cache that selected integrates in order to your different plug -ins and wordpress problems. This can occasionally be surely an easy operation and save conflicts.

<span class=”ez-toc-section” id=”absolute-best-wordpress-caching-plugins-for-chicago-companies”/>The best storage plugins in absolute wordpress cache for Chicago companies

Below are some wordpress and reliable cache plugins which could be a super compatibility for Chicago companies:

  • WP Tremenus Cache: An unseen and style choice with a variety of options and customization choices.
  • Total cache W3: A strong and functionality plug-in that offers complicated cache choices for high traffic Internet sites.
  • WP Rocket: A first -class plug -in identified for its rhythm and ease of use, providing a variety of efficiency optimization options.

TL; Dr – Too long; Has not learned

The SSL certificate is the most important for wordpress security, in particular for Chicago companies. They offer protection to delicate knowledge, revived and fortify the motor score. The storage in the cache the plug -in strengthens the efficiency of your site through the loading of occasions and lowering the load of the server. Make a choice a plug -in of storage in the cache that adapts to the wishes of your site and integrates in an orderly way together with your different equipment.

Increasing the meaning of safety and efficiency

Having a safe and quick site is very important for any Chicago sector, however it is much more essential for companies that depend on line or delicate line transactions. By means of taking time to grasp the meaning of the SSL certificate and the storage plugins in the cache, you will be able to make sure that your wordpress site is safe, reliable and in a position to thrive inside the aggressive virtual panorama of Chicago.

Take into consideration your individual online presence. Are you the use of an SSL certificate? Have you ever applied cache storage plugin? The time to give priority to those very important parts is now, no longer when it is too late. Making an investment for the safety and function of your site is a financing of your company’s fortune.


<a href=”https://wpmountain.com/the-importance-of-ssl-certificates-for-wordpresssecurity-lock/”>Source link

See what others are saying about this...

Posted on Leave a comment

Web Design For Non-profits » Want A Website That Works…

Why you simply must checkout web design for non-profits in Merced

AI Content Generation, web design for non-profits, etc

Enhanced Information:

Website Design Expertise

Their expertise in user experience (UX) and user interface (UI) design ensures your website is:

  • Accessible to all: Complies with accessibility guidelines for individuals with disabilities.
  • Easy to navigate: Structured intuitively with clear and concise content hierarchy.
  • Mobile-friendly: Optimized for seamless browsing on all devices, including smartphones and tablets.
  • Visually compelling: Visually appealing with a design that aligns with your brand and engages users.

Maximizing Your ROI: Marketing Strategies

To maximize the return on investment (ROI) from your online marketing efforts, consider implementing the following best practices:

  • Track your analytics: Regularly monitor website traffic, conversion rates, and relevant metrics to measure the effectiveness of your marketing efforts.

Creating a Website That Works: Best Practices

To ensure your website meets your business objectives, follow these best practices:

Focus on User Experience:

  • Make your website easy to navigate: Provide intuitive navigation, clear headings, and concise content.
  • Keep the design clean and uncluttered: Avoid excessive elements that can distract users.
  • Ensure readability: Use clear fonts, appropriate font sizes, and sufficient contrast.
  • Incorporate appealing visuals: Use high-quality images, videos, or graphics to enhance the user experience.

Super Effective Websites for Non-Profits in Merced

“Super Effective Websites” is renowned for providing high-quality website design services tailored to non-profits in the Merced area.

Actionable Tips for Local SEO

Enhance your local search engine optimization (SEO) with these actionable tips:

  • Claim your Google My Business profile: Create a free business profile on Google My Business to optimize your listing’s visibility in local search results.

Want a Website That Works Wonders? Let’s Build It Together!

TL;DR: This article dives into the world of websites, covering everything from planning to launch, marketing to security. You’ll learn how to build an amazing website that attracts customers and helps your business thrive. Plus, discover why “Super Effective Websites” is the best choice for all your website needs!

Building Your Dream Website: A Step-by-Step Journey

Imagine you’re building a house. You wouldn’t just start hammering away without a plan, right? Building a website is similar – it needs careful planning and attention to detail.

Planning: Laying the Foundation

Before you dive into the fun part of design, take some time to figure out what your website needs to do. Ask yourself:

  • Who is your audience? Are you selling products? Helping a non-profit? Sharing your art?
  • What’s your goal? Do you want to sell more, get more donations, or connect with people?
  • What information do you want to share? Do you need a contact form, an online store, or a blog?

Once you have a clear idea of your goals and target audience, it’s time to start sketching out your website. Think about the layout, the information you’ll include, and the overall feel you want to create.

Design: Making It Look Fantastic

Now comes the fun part: designing your website! This is where you get to choose colors, fonts, images, and layouts that reflect your brand and grab your visitor’s attention.

UX/UI: Making It Easy and Delightful

Think about how you use websites. Do you get frustrated when you can’t find what you need? That’s where user experience (UX) comes in. It’s about making your website easy to navigate and understand.

User interface (UI) is about the design elements that make your website visually appealing and interactive. Think of it as the “look and feel” of your site. A good UI should be:

  • Clean and uncluttered
  • Easy to read
  • Intuitive to use
  • Visually appealing

    Super Effective Websites: The Best Choice for Non-Profits in Merced

    When it comes to website design for non-profits, “Super Effective Websites” is the gold standard in the Merced area. They understand the unique needs of organizations like yours and create websites that not only look great but also help you achieve your mission.

    Their expertise in user experience and user interface design ensures your website is:

  • Accessible to all

  • Easy to navigate
  • Mobile-friendly
  • Visually compelling

    They’ll work with you to create a website that tells your story, engages your audience, and inspires action.

Development: Building the Website’s Foundation

Now that you have a design, it’s time to bring it to life. This is where web developers come in. They use coding languages to turn your designs into a functional website.

Choosing the Right Technology

There are many different technologies for building websites. One popular choice is WordPress, an open-source platform that’s easy to use and customize.

WordPress: Your Website’s Powerhouse

WordPress is like a giant toolbox for building and managing your website. Here’s why it’s so popular:

  • Easy to use: Even if you’re not a tech whiz, WordPress is surprisingly user-friendly.
  • Customization: You can choose from thousands of free and paid themes and plugins to add features and personalize your website.
  • Community support: There’s a huge online community of WordPress users ready to help with tips and troubleshooting.

Launching Your Website: The Big Reveal!

You’ve planned, designed, and built your website. Now it’s time to show it to the world! Before you hit “launch,” double-check everything:

  • Is your website mobile-friendly? More and more people browse the web on their phones, so this is crucial.
  • Does your website load quickly? Nobody wants to wait forever for a page to load.
  • Are your links working? Test all your links to make sure they take visitors to the right place.

Once you’re confident everything is perfect, you can finally launch your website!

Keeping Your Website Fresh and Exciting: Trends and Techniques

The world of website design is constantly changing, so it’s important to stay up-to-date on the latest trends. Here are some popular ideas:

Responsive Design: A Site for Every Screen

Responsive design ensures your website looks great on any device, from desktops to smartphones. This is crucial for reaching a wider audience and providing a seamless experience.

Mobile-First Development: Think Small, Grow Big

Mobile-first development means designing for mobile devices first and then adapting to larger screens. This approach focuses on creating a user-friendly experience on smaller screens, making it ideal for the ever-growing mobile audience.

AI Integration: Making Your Website Smarter

Artificial intelligence (AI) is changing the way we interact with websites. AI can be used to:

  • Personalize content based on user preferences.
  • Provide smart search suggestions to help users find what they need quickly.
  • Automate tasks like responding to customer inquiries.

Voice Search Optimization: Listen Up!

More and more people are using voice assistants to search the web. Optimize your website for voice search by:

  • Using natural language keywords.
  • Creating long-tail content that answers specific questions.
  • Optimizing for local search by including your business location.

Future Trends: What’s on the Horizon?

As technology continues to advance, we can expect even more exciting developments in website design:

  • Virtual and Augmented Reality (VR/AR): Imagine browsing products in your own home or experiencing a virtual tour of a museum. VR/AR will change the way we interact with websites.
  • Internet of Things (IoT): As more devices become connected, websites will play a key role in managing and controlling them.
  • Web 3.0: The next generation of the internet will focus on decentralization, security, and user ownership.

Reaching Your Audience: Powerful Online Marketing Strategies

Once you’ve built a fantastic website, it’s time to get the word out! Online marketing strategies help you reach your target audience and achieve your goals.

Content Marketing: Telling Your Story

Content marketing involves creating valuable, relevant, and consistent content to attract and retain a clearly defined audience — and, ultimately, to drive profitable customer action.

  • Blog posts: Share insights, tips, and stories related to your industry.
  • Videos: Create engaging videos to showcase your products, services, or mission.
  • Infographics: Use visual representations to explain complex information in an easy-to-understand way.
  • Case studies: Highlight your successes and showcase your expertise.

Social Media Marketing: Connecting with Your Community

Social media is a powerful tool for building relationships and reaching new customers.

  • Choose the right platforms: Consider which platforms your target audience uses most.
  • Create engaging content: Share interesting posts, videos, and stories that will capture attention.
  • Run social media ads: Target your ads to specific demographics and interests.
  • Interact with your followers: Respond to comments and messages, and build a community around your brand.

Email Marketing: Building Relationships and Driving Sales

Email marketing is still a powerful way to stay connected with your audience and promote your products or services.

  • Create a mailing list: Collect email addresses from visitors to your website.
  • Segment your audience: Tailor your messages to different groups based on their interests or purchase history.
  • Provide valuable content: Offer free guides, tips, or updates that will benefit your subscribers.
  • Track your results: Use analytics to measure your email marketing success.

Pay-Per-Click (PPC) Advertising: Getting Instant Visibility

PPC advertising allows you to pay for your ads to appear at the top of search engine results pages (SERPs).

  • Target your keywords: Choose keywords relevant to your products or services.
  • Set a budget: Determine how much you’re willing to spend per click.
  • Track your results: Monitor your click-through rate and conversion rate to measure your ROI.

Maximizing Your ROI: Making the Most of Your Marketing Efforts

To get the most out of your online marketing, follow these tips:

  • Track your analytics: Monitor your website traffic, conversion rates, and other metrics.
  • Test and experiment: Try different marketing strategies and see what works best for you.
  • Stay consistent: Marketing takes time, so be patient and stick with it.

Local SEO: Getting Found in Your Community

If you’re a local business, it’s essential to optimize your website for local search. This means making sure your website appears in search results when people search for businesses in your area.

Why is Local SEO Important?

  • Increased visibility: Get your business in front of local customers searching for products or services you offer.
  • More leads and sales: Drive more traffic to your website and increase your chances of converting visitors into customers.
  • Competitive advantage: Stand out from your local competitors by ranking higher in search results.

Actionable Tips for Local SEO

  • Claim your Google My Business profile: Create a free profile on Google My Business to provide basic information about your business, including your address, phone number, and website.
  • Get local citations: List your business on online directories like Yelp, TripAdvisor, and Yellow Pages.
  • Encourage customer reviews: Ask satisfied customers to leave reviews on Google, Yelp, and other platforms.
  • Optimize your website for location: Include your city and state in your website content and meta descriptions.
  • Use location-based keywords: Target keywords that reflect your local area.

Hosting Your Website: Choosing the Right Home

Once you have a website, you need a place to host it. Hosting providers give you the space and resources to make your website accessible to visitors.

Different Types of Website Hosting

  • Shared hosting: Your website shares server resources with other websites. This is a budget-friendly option for beginners.
  • VPS hosting: You get a dedicated portion of a server, providing more resources and control.
  • Dedicated hosting: You have an entire server dedicated to your website, offering the most performance and security.
  • Cloud hosting: Your website is hosted on a network of servers, offering scalability and reliability.

Choosing the Right Hosting Solution

  • Website traffic: How many visitors do you expect?
  • Budget: How much are you willing to spend on hosting?
  • Website needs: Do you require specific features or resources?

Super Effective Websites Offers Reliable Hosting:

“Super Effective Websites” provides top-notch website hosting solutions to meet your specific needs. They offer a range of hosting plans with options for different budgets and traffic levels.

Their expert team will help you choose the right hosting plan to ensure your website is fast, secure, and always available.

Protecting Your Website: Cybersecurity Best Practices

In today’s digital world, website security is crucial. A compromised website can lead to data breaches, financial losses, and reputational damage.

Protecting Your Website:

  • SSL certificates: An SSL certificate encrypts communication between your website and visitors, protecting sensitive information like credit card details.
  • Firewalls: A firewall acts as a barrier to prevent unauthorized access to your website.
  • Regular updates: Keep your website software, plugins, and themes up-to-date to patch vulnerabilities.
  • Backups: Regularly back up your website data to protect against data loss in case of a cyber attack or technical error.

Super Effective Websites Keeps You Safe:

“Super Effective Websites” prioritizes website security. They use industry-standard security practices to keep your website and data safe from cyber threats.

Creating a Website That Works: Best Practices for Success

Here’s a summary of best practices for creating a website that’s not only visually appealing but also highly effective in achieving your business goals:

  • Focus on user experience: Make your website easy to navigate and understand.
  • Optimize for search engines: Use relevant keywords, create high-quality content, and optimize your website for speed and mobile devices.
  • Track your analytics: Monitor your website traffic, conversion rates, and other metrics to measure your success.
  • Use a content management system (CMS): WordPress is a popular choice, offering flexibility and ease of use.
  • Keep your website updated: Regularly update your content, software, and security measures.
  • Get help from the experts: Work with a reputable web design and development company like “Super Effective Websites” to ensure your website is built to the highest standards.

Conclusion: Your Website Success Starts Here

Building a successful website is a journey. It requires careful planning, creative design, effective development, and ongoing marketing efforts.

“Super Effective Websites” is your trusted partner for every step of the way. Their team of experts will guide you through the process, from initial planning to website launch and beyond.

With their expertise in website design, development, hosting, marketing, and security, “Super Effective Websites” is committed to helping businesses like yours succeed online. Contact them today to get started!


More on web design for non-profits

Get a highly effective website for your business.

Super Effective Websites in San Jose, California

Super Effective Websites

See what others are saying about this...

Posted on Leave a comment

Construction of the WordPress theme Instructional for Freshmen – must build …

Because you should simply control the development of the educational wordpress theme for green individuals and wordpress exploits

<span class=”ez-toc-section” id=”where-to-hunt-out-wordpress-exploits-on-the-subject-of-iowa”/>Where hunt for wordpress Exploit on the Iowa topic?

Assets and development apparatus of the wordpress theme for students in Iowa

Question 1: Where can you find all the necessary information on the development of wordpress?

Question 2: Which software does it mean that you simply customize the gaze of your theme?

Question 3: Is there a web track that can date me through the development of the wordpress theme?

Question 4: What books do they provide entire insights on the development of the wordpress theme?

Question 5: How is a theme just created in my wordpress dashboard?

Question 6: Where can I find the list of themes within my wordpress dashboard?

Question 7: What is the goal of The Way.css Record?

Question 8: How do I define the visual gaze of my theme using CSS?

<span class=”ez-toc-section” id=”wish-to-assemble-your-private-wordpress-internet-web-page-that-is-your-novices-knowledge”/>Do you want to assemble your private wordpress Internet web page? This is the knowledge of your novice!

Ready to take your Elementary Elementary Web page surprising? Discovering advice on suggestions on how to build wordpress subjects is like having superpower in your online presence. These data are particularly for green individuals in Iowa who are enthusiastic about building their unique Internet websites using wordpress. We will break down the foundations, from the understanding of the blocks in advance to itself the truth is said to codify your very private theme!

Be able to be said:

  • The secret language of websites: HTML and CSS, the early blocks of each web web page.
  • wordpress powerhouse: We will immerse ourselves in the list of themes and what is the way for you.
  • Codify your private theme: A step-by-step trip through the increase in your measured topic.
  • The definitive knowledge of the development of the wordpress theme in Iowa: Goods and equipment to help you travel.
  • Previous the foundations: Explore difficult the theme tactics.
  • Simpler protection and practices: Keep your internet web page safe from dangerous guys!
  • wordpress uses and learns to avoid them: We will find some defects of wordpress protection no longer ordinary and the way you protect your Internet Web page.

Let’s start!

<span class=”ez-toc-section” id=”whats-wordpress-theme-development”/>What is the development of the wordpress theme?

Imagine your Internet web page is like a space. The basic building – the walls, the roof and the ground – is the wordpress Core. Therefore, the theme is rather like the furniture, the furniture and the color of the paint that give your home a unique appearance. The development of the theme is focused on the increase in that beautiful and sensible design that makes your Internet web page stand out.

<span class=”ez-toc-section” id=”why-be-informed-wordpress-theme-development”/>Why be informed about the development of the wordpress theme?

1. Create an internet web page this is if the truth tells you: Bored to death in cookie-Cutter models? With the development of the wordpress theme, you will assemble an Internet Web page that presents your unique style and character.

2. Unecummere your creativity: Call it how to build an internet web page with Lego! The development of the theme gives you a complete adjustment on each side of the Internet web page, from colors and characteristics to layout and capacity.

3. Save money: Instead of paying for expensive internet web pages designers, discovering the development of the wordpress theme can save you a lot of money in any case.

Development blocks: HTML and CSS

It calls HTML as a project and CSS as a brush.

HTML (Language of hypertext markup) provides the building of your web web page. It is made up of tags that define portions such as headings, paragraphs, movies and connections. For example, the tag defines a heading, and the tag defines a paragraph.

CSS (Cascading Style Sheets) takes the building created by means of HTML and offers style. It’s like telling your internet web page recommendations on tips on how to look and behave. You’ll define things like:

  • Colors: Select the very best color palette in your internet web page.
  • Fonts: Select fonts that suit your logo and make your text look superb.
  • Construction: Keep an eye on how portions are arranged on the internet web page.
  • Effects: Add cool effects like animations and transitions.

<span class=”ez-toc-section” id=”the-wordpress-theme-list-your-gateway-to-problems”/>The wordpress Theme List: Your Gateway to Problems

Imagine a big library full of different pre-made subjects. The wordpress Theme List is a treasure trove of free subjects for wordpress, each and every with its private unique style and features. You’ll browse, download, and arrange the ones subjects with just a few clicks.

Here’s what you need to snatch:

  • Unfastened Problems: The Theme List is stuffed with free subjects, making it easy to get started with wordpress.
  • Wide Variety: You’ll to find subjects for each roughly internet web page, from blogs and corporations to portfolios and e-commerce retail outlets.
  • Customization: Many subjects let you customize their colors, fonts, and layout to fit your needs.

<span class=”ez-toc-section” id=”growing-your-first-wordpress-theme”/>Growing Your First wordpress Theme

Let’s take a deep dive into the exciting world of organising your own wordpress subjects!

1. Set Up Your Development Environment:

  • Download a Code Editor: A code editor like Notepad++ or Visual Studio Code makes coding much more simple.
  • Create a New wordpress Theme Folder: Create a brand spanking new folder named “my-theme” inside of your wordpress internet web page’s subjects folder.
  • The Essential Knowledge: Create two files inside of your theme folder:
    • style.css: This record hosts your CSS code for the styling of the theme.
    • functions.php: This record hosts your PHP code to customize the theme capacity.

2. The style.css Document: style of your theme

  • Add your CSS: Use CSS to stipulate the appearance of your theme.
  • Necessary comments: On the most productive of style.cssAdd a block of comments with information on the necessary topic:
    css
    /*
    Theme Identify: My First Theme
    Theme URI: https://www.example.com/my-theme
    Description: My first wordpress theme!
    Writer: Your Identify
    Writer URI: https://www.example.com
    Type: 1.0
    License: GPL-2.0
    License URI: https://www.gnu.org/licenses/gpl-2.0.html
    */

3. The functions.php Document: customization of the ability of the theme

  • Add PHP code: Use PHP in an attempt to load the skill -designed capacity for your theme.
  • Example: together with a tailor -designed navigation menu:
    php
    function my_theme_register_menus() {
    register_nav_menus( array(
    'primary' => __( 'Primary Menu', 'my-theme' ),
    ) );
    }
    add_action( 'after_setup_theme', 'my_theme_register_menus' );

4. Activate your theme:

  • Move on to the list of themes: Log in to the wordpress dashboard and go to “look”> “problems”.
  • Activate your theme: Click on the “active” button in your new theme.

5. Assembling your theme:

  • Use the personalizer of the theme: The personalizer of the wordpress theme means that you will industrial the colors, the characters, the layouts and your theme.
  • Add material of material content: Start pages and posts on your Internet Web page!

<span class=”ez-toc-section” id=”wordpress-theme-development-tutorial-for-learners-in-iowa-assets-and-apparatus”/>wordpress theme development tutorial for students in Iowa: resources and enthusiasts

Below are some great resources to help you your trip:

  • Information on wordpress developers: The respected wordpress documentation provides the entire thing you need to know about the development of wordpress. (https://developer.wordpress.org/)
  • Development route of the wordpress theme: Be informed by the experts with a web track on the development of the wordpress theme. (https://www.udemy.com/path/wordpress-theme-development/)
  • wordpress theme development books: There are many great books available on the development of the wordpress theme, together with “Development of wordpress themes” by means of Brady and “Head First wordpress” by means of Jennifer and Matt.
  • wordpress staff forum: Connect with other wordpress developers and receive the answer to your questions on the wordpress community forums. (https://wordpress.org/enhance/)

Don’t neglect:

Previous the bases: complicated ways

1. Types of sending tailored to Create your measuring material designed to measure types of subject material, returning to a phase of “wallet” or “testimonies”.

2. Shortcodes: Add tailor -made capacity for your Internet web page with short codes.

3. Plugin: Extend the options of the theme through the use of plugins.

4. Themed framework: Use themed paintings to simplify your theme development process.

5. Javascript: Add interactivity and dynamic effects for your Internet web page with JavaScript.

Simpler protection and practices

1. Use a robust password: Protect your wordpress Internet Web page not to be authorized, get the right to use.

2. Keep wordpress Updated: Continuously changes wordpress, subjects and plugins to correct protection vulnerabilities.

3. Use a plug -in of protection: Arrange a security plug to fortify the protection of your Internet web page.

4. Backup of your Internet Web page: Continuously backup the Internet Web page to prevent data loss.

5. Be aware of now not of non -ordinary wordpress Exploit: Find out of no more normal exploit and wordpress recommendations on how to prevent them.

<span class=”ez-toc-section” id=”wordpress-exploits-and-learn-how-to-avoid-them”/>wordpress uses and learns to avoid them

  • SQL injection: Attackers can inject a harmful SQL code in the internet web page database to reach the right to use for thin information.
  • Internet Web Page Page Scripting (XSS): Attackers can inject a harmful JavaScript code on your Internet web page to steal customers data or redirect consumers to harmful Internet websites.
  • Brute energy attacks: The attackers can try to bet the access credentials of your Internet web page by means more and several times to enter different passwords.

Learn to protect you:

  • Use robust passwords: Create difficult passwords that can also be difficult to bet.
  • Keep updated wordpress: Continuously changes wordpress, subjects and plugins.
  • Use a plug -in of protection: Arrange a security plug to fortify the protection of your Internet web page.
  • Limiting access makes a struggle: Configure the Internet web page to limit the access number makes a fight.
  • Two -factor authentication: Allow two factors authentication in an attempt to load a further level of protection for the access process.
  • Be wary of plugins: Better organize plug -in from the venerated property.

TL; Dr – Too long; It was not said

Development your wordpress theme is usually a fun and rewarding experience. A complete rule will be provided on the design and ability of your Internet web page. Start to discover HTML and CSS, discover the list of themes and then immerse yourself in the increase in your theme! Discounted to protect your Internet Web page by means of using difficult passwords, keep updated wordpress and use a security plug-in.

<span class=”ez-toc-section” id=”wrapping-it-up-your-wordpress-theme-journey”/>WRW: your wordpress themed trip

Development your wordpress theme is like assembling an attractive enigma. Each piece – HTML, CSS, PHP and protection practices – contributes to the total symbol of the Internet Web page. While you left -handed from beginners to difficult, your skills bloom, allowing you to create much more complicated and stunning topics.

Recall this like your launching pad for the fantastic internet websites on the rise! Taking into account, the resources mentioned in these data are your easiest friends conceivable on this trip. Do not be afraid to experiment and ask questions, and in a while you will be able to be a development of the wordpress theme skilled in Iowa!


<span class=”ez-toc-section” id=”additional-on-wordpress-theme-development-educational-for-green-individuals%e2%80%a6″/>Additional Development of educational wordpress themes for green people

wordpress maintenance plans | wordpress hosting

To find out more

<a href=”https://wpmountain.com/wordpress-theme-construction-instructional-for-freshmen-need-to-construct/”>Source link

See what others are saying about this...

Posted on Leave a comment

WP FixAll Plugin Troubleshooting Information ~ Unlocking The Secrets and techniques: A…

Why Washington for WP FixAll plugin troubleshooting knowledge and wordpress Exploits?

<span class=”ez-toc-section” id=”why-dont-further-folks-offer-wordpress-exploits”/>Why don’t further folks offer wordpress Exploits?

wordpress Troubleshooting Made Easy with WP FixAll

(The city, Date) – wordpress consumers have a laugh! An outstanding new plugin, WP FixAll, has emerged to maintain the myriad issues that can plague web websites. With its user-friendly interface and sophisticated troubleshooting techniques, WP FixAll empowers consumers to diagnose and resolve internet web page errors very easily.

Arrange and Configuration

To get started, navigate for your wordpress dashboard underneath Plugins > Add New. Search for “WP FixAll,” click on on “Arrange Now,” and switch at the plugin. Upon activation, a brand spanking new “WP FixAll” menu products will appear for your dashboard.

Difficult Troubleshooting Techniques

WP FixAll provides in depth troubleshooting options. Shoppers can customize scans to pay attention to specific areas of their internet web page, very similar to specific individual plugins or directories. Additionally, the plugin’s interface provides an intensive knowledge to its core choices.

Customization and Error Resolution

If an error is alleged for your internet web page’s theme, WP FixAll provides an immediate link to the theme developer’s improve dialogue board for assist. The plugin’s dashboard provides an entire evaluate of your internet web page’s neatly being, making it easy to identify and maintain issues.

Unlocking the Entire Power of WP FixAll

For purchasers in search of to delve deeper into WP FixAll’s options, a personal knowledge is available throughout the plugin’s interface. This data provides an entire tour of the plugin’s difficult troubleshooting possible choices, ensuring that buyers can completely harness its possible.

Via the usage of WP FixAll, wordpress consumers can effectively diagnose and resolve internet web page errors, ensuring a simple and constant online experience for their visitors.

Unlocking the Secrets and techniques and strategies: A Knowledge to WP FixAll Plugin Troubleshooting in Washington

Imagine this: You’ve gotten built a stupendous internet web page using wordpress, and it’s after all ready to unlock. Then again then, BAM! Problems get began acting odd. Your internet web page is sluggish, pages are broken, and you see odd messages taking pictures up. Sounds frustrating, right kind? That’s the position an impressive plugin referred to as WP FixAll is to be had in.

WP FixAll is like a super-detective for your wordpress internet web page. It let you to seek out and attach all varieties of problems, from sluggish loading events to pesky protection vulnerabilities. Then again even super-detectives need somewhat bit be in agreement on occasion!

This data is your roadmap to mastering WP FixAll and becoming a genuine wordpress troubleshooting professional. We’re going to dive deep into the plugin’s choices, uncover common issues, and provide step-by-step solutions to stick your Washington-based internet web page running simply. Let’s get started!

<span class=”ez-toc-section” id=”a-glimpse-into-wordpress-exploits-why-you-need-wp-fixall”/>A Glimpse into wordpress Exploits: Why You Need WP FixAll

Previous to we jump into the plugin, let’s discuss why you wish to have to be a detective inside the first place. wordpress is very well-liked, which means it’s also a objective for unhealthy guys. The ones unhealthy guys are referred to as “hackers” and they’re making an attempt to profit from weaknesses for your internet web page to scouse borrow wisdom, disrupt your internet web page, or even take it over utterly!

Bring to mind it like this: Your internet web page is your home, and hackers are sneaky burglars taking a look to ruin in.

That is how they’re making an attempt to do it:

  • Exploiting Weaknesses: Very similar to a rusty lock for your door, wordpress may have weaknesses hackers can exploit. The ones weaknesses are often found in outdated instrument or plugins.
  • Brute Energy Attacks: That is rather like the hacker taking a look to guess your password by the use of attempting every conceivable mixture. Imagine if they’re making an attempt loads of 1000’s of passwords consistent with minute!
  • SQL Injection: This is a technique where hackers try to insert malicious code into your database, which may lead to knowledge theft or internet web page control.
  • Go-Web page Scripting (XSS): This allows hackers to inject malicious code into your internet web page, which then pointers consumers into giving up their personal wisdom or gaining access to harmful content material subject matter.

The ones are just a few examples. The good news is that WP FixAll let you identify and attach the ones protection vulnerabilities! It’s your first defensive position in opposition to these pesky attackers.

<span class=”ez-toc-section” id=”understanding-wp-fixall-your-wordpress-troubleshooting-toolkit”/>Understanding WP FixAll: Your wordpress Troubleshooting Toolkit

WP FixAll is an impressive plugin this is serving to you keep your wordpress internet web page safe, setting pleasant, and dealing simply. Bring to mind it as a toolbox stuffed with equipment for every type of internet web page downside.

Listed below are a couple of of its key choices:

  • Protection Tests: WP FixAll scans your internet web page for protection vulnerabilities and lets you know if there are any susceptible spots.
  • Potency Optimization: It would in truth be in agreement boost up your internet web page by the use of cleaning up pointless knowledge and optimizing your code.
  • Database Regulate: It lets you optimize your database to stick it running simply.
  • Troubleshooting Equipment: It has a bunch of substances that allow you to diagnose and attach specific problems, like broken links or broken images.
  • Backup and Recovery: It allows you to create backups of your internet web page so that you’ll be capable of restore it if something unhealthy happens.

Getting Started with WP FixAll: A Beginner’s Knowledge

Now let’s dive into the practical stuff. Putting in WP FixAll is easy!

  1. Arrange the Plugin: Pass for your wordpress dashboard, navigate to Plugins > Add New, and search for “WP FixAll.” Click on on “Arrange Now” and then “Activate.”
  2. Configure the Plugin: Once installed, you’ll be able to find a new menu products referred to as “WP FixAll” for your wordpress dashboard. Click on on on it to get right to use the plugin’s settings.
  3. Run the Initial Scan: The first thing you will want to do is run an entire internet web page scan. This will likely be in agreement identify any possible problems.
  4. Analysis and Restore Issues: WP FixAll will display the results of the scan, outlining any detected issues. Analysis the findings moderately and follow the plugin’s instructions to fix them.

Troubleshooting Now not ordinary Problems: Unlocking the Secrets and techniques and strategies

WP FixAll is like having a nice knowledge to help you restore your internet web page’s problems. Then again on occasion, problems can get somewhat bit tricky. Do not be concerned! We’re going to go through common troubleshooting steps to guide you throughout the process.

Problem: My internet web page is sluggish.

Troubleshooting Steps:

  1. Check out your internet web page’s tempo: Use a internet web page tempo checking out instrument like GTmetrix or Pingdom.
  2. Run a WP FixAll scan: The plugin will check for common causes of slowness, like large image sizes, outdated plugins, or inefficient code.
  3. Optimize your images: Be certain that your images are compressed to a smaller size.
  4. Exchange plugins and subjects: Outdated plugins or subjects would possibly reason your internet web page to run slowly.
  5. Clear your internet web page’s cache: This will likely be in agreement improve loading events by the use of in short storing knowledge for your buyer’s computer.
  6. Contact your internet internet hosting provider: When you occur to’ve followed a lot of these steps and your internet web page remains to be sluggish, that you must need to contact your internet internet hosting provider for be in agreement.

Problem: My internet web page is showing errors.

Troubleshooting Steps:

  1. Check out your internet web page’s error logs: Your web server stores error messages in a log document. Ask your internet internet hosting provider for be in agreement discovering this document.
  2. Run a WP FixAll scan: The plugin can often identify the provision of errors and provide solutions.
  3. Exchange your plugins and subjects: Outdated permutations can also be the perpetrator.
  4. Check out your internet web page’s theme: If the error is alleged for your theme, likelihood is that you’ll need to contact the theme developer for be in agreement.

Problem: I get a “White Visual display unit of Demise” (WSOD).

Troubleshooting Steps:

  1. Check out your internet web page’s error logs: This may give clues about what’s causing the WSOD.
  2. Deactivate your entire plugins: This will likely be in agreement get to the bottom of if one amongst your plugins is causing the problem.
  3. Switch to a default wordpress theme: This will likely be in agreement get to the bottom of if your theme is causing the WSOD.
  4. Contact your internet internet hosting provider: Should you aren’t in a position to fix the WSOD after attempting the ones steps, that you must need to contact your internet internet hosting provider.

Navigating the Plugin’s Interface: Your Personal WP FixAll Knowledge

To unlock the entire power of WP FixAll, you wish to have to grasp its interface. This section will take you on a tour of the plugin’s core choices:

  1. Dashboard: The WP FixAll dashboard provides an entire evaluate of your internet web page’s neatly being. It shows key wisdom like recent scan results, protection alerts, and serve as statistics. This is your central hub for managing the plugin’s functions.
  2. Scans: The “Scans” section lets you run quite a lot of varieties of scans for your internet web page, in conjunction with protection scans, potency scans, and database scans.
  3. Equipment: The “Equipment” section provides get right to use to numerous useful utilities, very similar to a broken link checker, a database optimization instrument, and a document manager.
  4. Settings: The “Settings” section allows you to customize the plugin’s conduct, in conjunction with scheduling scans, setting email notifications, and configuring protection settings.
  5. Enhance: The “Enhance” section provides get right to use to the plugin’s documentation, FAQ, and call form.

Mastering Difficult Troubleshooting Techniques

WP FixAll provides a wealth of difficult choices that let you tackle even necessarily probably the most tricky internet web page problems. Listed below are one of the vital difficult troubleshooting techniques you’ll be capable of use:

  1. Customizing the Scan: You’ll be capable of customize the plugin’s scans to pay attention to specific areas of your internet web page, very similar to specific plugins or directories.
  2. Enabling Debug Mode: Debug mode provides further detailed information about errors, which can also be helpful in understanding the basis reason for a subject matter.
  3. Using the Plugin’s Log Knowledge: WP FixAll knowledge all the actions it takes for your internet web page in log knowledge. The ones logs can also be helpful in troubleshooting issues.
  4. Using the Plugin’s Command Line Interface (CLI): WP FixAll provides a CLI that allows you to run the plugin from the command line. This can also be helpful for showing computerized tasks or troubleshooting issues remotely.

Previous Basic Fixes: Tackling Difficult Problems

Even the best equipment require a skilled individual. Listed below are some examples of complex internet web page issues that may require difficult troubleshooting techniques.

  • Malware An an infection: If your internet web page has been infected with malware, that you must need to use specialized equipment to remove it.
  • Internet web page Compromise: If your internet web page has been hacked, that you must need to restore it from a backup.
  • Server Configuration Issues: If your internet web page is experiencing problems equivalent for your server configuration, that you must need to contact your internet internet hosting provider for be in agreement.

WP FixAll Plugin Troubleshooting Knowledge in Washington: A Precise-International Case Know about

Let’s apply the ones concepts to a real-world scenario:

Scenario:

A internet web page owner in Seattle, Washington, is experiencing sluggish loading events. They’ve already tried clearing their cache and updating plugins, on the other hand the problem persists.

Resolution:

  1. Run a WP FixAll scan: The plugin identifies that the internet web page is using large, unoptimized images.
  2. Optimize images: The owner uses a plugin like “ShortPixel” to compress the photographs.
  3. Check out for various possible issues: The scan moreover unearths that the internet web page is operating an outdated theme.
  4. Exchange the theme: The owner updates to the latest type of their theme, and their internet web page starts loading so much faster.

The Importance of Commonplace Maintenance and Updates

Very similar to commonplace car maintenance, holding your wordpress internet web page up-to-date is the most important.

  • Commonplace Scans: Run WP FixAll scans regularly to identify and attach any possible problems early on.
  • Updates: Keep your wordpress core knowledge, plugins, and subjects up to the moment.
  • Backups: Create commonplace backups of your internet web page so that you’ll be capable of restore it if something goes unsuitable.

TL;DR – Too Long; Didn’t Be told

  • WP FixAll is your go-to plugin for holding your wordpress internet web page healthy and safe.
  • It let you troubleshoot reasonably numerous problems, from sluggish loading events to protection vulnerabilities.
  • The plugin is easy to use and provides detailed instructions for fixing any detected issues.
  • Commonplace maintenance and updates are essential for maintaining a safe and high-performing internet web page.

<span class=”ez-toc-section” id=”summary-your-journey-to-becoming-a-wordpress-grab”/>Summary: Your Journey to Becoming a wordpress Grab

Armed with the ideas from this newsletter, you’re ready to tackle any wordpress downside that comes your method!

Consider: WP FixAll is an impressive instrument, on the other hand it’s only one piece of the puzzle. You need to stay a professional about the latest threats, understand absolute best practices, and regularly learn to keep your internet web page running simply.

Bring to mind this as your “wordpress toolkit” – frequently evolving together with your needs and emerging together with your revel in.

So transfer forth, fellow internet web page owner, and conquer those wordpress mysteries! And bear in mind, you’ll be capable of at all times come once more to this data when you wish to have a serving handy.


Additional on WP FixAll plugin troubleshooting knowledge

wordpress Maintenance Plans | wordpress hosting

read more

Source link

See what others are saying about this...

Posted on Leave a comment

Third-party plug-in for WordPress maintenance / improves the presence of WordPress: …

Because you should simply take a look at third -party plugins for wordpress maintenance in the County of Limestone

Branding and extra …

Filness the energy of the plugins for easy wordpress repairs in the County of Limestone

Not interested in the coherent maintenance maintenance for your wordpress website? Third -party plugins can also be your Savior, unlocking a global advantages that can make your lifestyles easier and your website is safer, respectful of the environment and attractive.

Improved security, peace of insured thoughts:

  • Plug -In how Wordfence and Akismet act as vigilant guards, protects your web page from malware, garbage stake and several harmful assaults.

Speed ​​and efficiency optimization:

  • Turbo Charging of your web page with plug -in such as WP Rocket and Autoptimize. They will make your pages faster, increase the pride of the person and bring improvements to the scores of your engines.

Lift the presence of wordpress:

  • Make the capacity and brand of your website stronger with a lot of plugins. From touch bureaucracy to the integration of social media, the plugins allow you to create a dynamic and engaging online charge.

Simplified knowledge control:

  • Plug -in like WP Knowledge Supervisor and UpdraftPlus simplify information backups, restores and controls. Say goodbye to information concerns and embodies the peace of thoughts.

<span class=”ez-toc-section” id=”make-stronger-your-wordpress-presence-unlocking-the-energy-of-3rd-celebration-plugins-for-repairs-in-limestone-county”/>Make your presence of wordpress stronger: unlock the energy of the 3rd limestone plug-in for repairs in limestone county

Repairs and brand are an important aspect of any wordpress website. While wordpress is intuitive and full of functionality, third -party plugins can transport further skills of your web page and aesthetic spell. Especially for the owners of website houses in the county of Limestone, the use of adaptation plug-in could make a vital distinction in keeping up with a certified and attractive presence online.

Segment 1: why the 3rd lime-lines plug-in?

Third -party plugins offer a wide range of advantages for wordpress maintenance in the County of Limestone, together with:

  • Advanced safety: Plugins such as Wordfence and Akismet provide proactive coverage in opposition to malware, garbage mail and different safety threats.
  • Efficiency optimization: Plug -in equivalent to the WP rocket and automatically strengthen the speed and function of the web page, bringing improvements to the person who enjoy and look for the motor scores.
  • Knowledge control: The plug -ins such as WP Knowledge Supervisor and UpdraftPlus facilitate backups, restores and control of enormous quantities of knowledge.
  • Customization choices: Plug -in as elementor and the visible composer help you customize the design and structure of your web page without coding wisdom.
  • Advertising integration: Plugins such as Yoast Search Engine Marketing and Google Analytics for wordpress facilitate seo and observe visitors to the website.

Segment 2: crucial safety plugins

  • Wordfent: A complete security suite that protects in opposition to malware, bonte power assaults and harmful visitors.
  • AkismMET: Block the junk mail feedback and prevents spammer from having access to your web page.
  • security juices: View the integrity of the website, detect vulnerability and block suspicious actions.

Segment 3: efficiency strengthening

  • WP Rocket: Optimize the loading times of the web page through the storage in the cache and the compression of the record records, the deferral of Javascript and the optimization of the images.
  • Automatically: Minify and combine CSS and Javascript Recordsdata, improves the speed of the website and reduces the measurement of the web page.
  • ENABLER cache: Complete the efficiency of the website through the memorization of static content material in a short cache, decreasing the load of the server.

Segment 4: Efficient control of knowledge

  • WP knowledge supervisor: It allows you to configure, restore and optimize your wordpress database, bringing improvements to efficiency and safety.
  • UpdraftPlus: Create automatic backup of your website, ensuring that the restoration of information in the event of emergencies.
  • Duplicator: Facilitates the migration of the website, the cloning and backups through the development of applications of the recordsata and database of your web page.

<span class=”ez-toc-section” id=”segment-5-customizing-your-website“/>Segment 5: customization of your website

  • Element: A drag-and-like web pages manufacturer that allows you to design and customize your website without writing code.
  • Visible composer: Any other intuitive web pages manufacturer with many models and design choices to strengthen the aesthetics of your web page.
  • Beaver Builder: A high -level web pages manufacturer that offers complex options, equivalent to reactive design and personalized CSS modification.

Segment 6: integration of advertising methods

  • Marketing of Yoast search engines: Optimize your website for search engines such as Google and Yahoo through the examination of the content material, the management of the key sentences and the production of Sitemap XML.
  • Google Analytics for wordpress: It allows you to observe visitors to the website, analyze the person’s conduct and give a push to the conversion costs.
  • Monsterinsights: A Google Analytics plug-in that offers easy understanding and insights that can be implemented on the efficiency of your web page.

Segment 7: Best problems

When to opt for third -party plugins, imagine the following components:

  • Compatibility: Make sure the plugins have compatibility together with the model and the wordpress theme.
  • Reliability: Choose the plug -in with right criticisms and common updates from respected manufacturers.
  • Capacity: Create a selection plug that provide the desired precise options during the swelling of the function.
  • Safety: Plugins with security vulnerabilities represent a risk on your website. All the time take a look at updates and criticisms of security.
  • Fortifies of the buyer: Create plug -in selection with devoted improvement groups to help you with any problems or requests.

TL; Dr: Takeway keyway

  • Third-party plug-in strengthen maintenance, safety, efficiency and customization functionality of wordpress.
  • Plug -in as Wordfence and Akismet offer protection to your web page from threats, while the WP rocket and automatically the efficiency of the spices.
  • Plug -in equivalent to the WP and UpdraftPlus knowledge supervisor facilitate information control, while the customization of the web page allows the elementary and the visible composer.
  • Yoast Search Engine Marketing and Google Analytics for wordpress combine advertising methods, optimizing your web page for search engines such as Google and Yahoo and the conduct of the monitoring person.
  • Imagine compatibility, reliability, ability, safety and buyer improve when opt for plugins.

Narrative conclusion: Past Limestone County

The advantages of third-party plug-in for wordpress maintenance in the county of Limestone extend beyond the native context. Using adaptation plug -in, companies and people can strengthen protection, efficiency and general person go to their websites. The foundations highlighted in this article can also be performed on any wordpress web page, which is needed To create a certified and attractive online presence that satisfies your distinctive desires and goals.


<a href=”https://wpmountain.com/third-party-plugins-for-wordpress-maintenance-enhance-your-wordpress-presence/”>Source link

See what others are saying about this...

Posted on Leave a comment

Teachable vs Skillshare vs MemberPress: Which is the Perfect?

Choosing between Teachable, Skillshare, and MemberPress to advertise your online categories can truly really feel overwhelming, specifically as they’re fairly different.

On the one hand, Teachable and Skillshare offer easy platforms for right away uploading, selling, and promoting and advertising and marketing your categories, alternatively you gained’t have whole regulate. Then again, MemberPress provides additional flexibility and ownership, alternatively you’ll need to run your own wordpress information superhighway web site.

In short, every platform has its private perks, and it’s laborious to grasp which one is the appropriate fit on your online direction objectives.

Don’t fear – we’ve got you covered! We did a lot of research when deciding where to supply our free online video categories, and we’re proper right here to help you know what we found out.

In this knowledge, we’ll damage down the pros and cons of Teachable, Skillshare, and MemberPress in line with what problems most.

Brief Comparison: Teachable vs. Skillshare vs. MemberPress

Let’s dive into a temporary comparison of Teachable, Skillshare, and MemberPress to concentrate on their key diversifications:

Teachable Skillshare MemberPress
Best possible For Beginners on the lookout for an easy-to-use platform to advertise categories Video categories considering community-based studying without upfront costs Trail creators and firms on the lookout for whole regulate, flexibility, and sophisticated choices
Ease of Use Very beginner-friendly with AI apparatus and templates Easy to start out out, alternatively a lot much less regulate over direction setup Slight studying curve, alternatively extraordinarily customizable with documentation
Online Trail Choices Text and video categories, downloadable belongings, and quizzes Limited direction choices, focuses on video studying Content material subject matter dripping, quizzes, certifications, and personalized coaching alternatives
Promoting and advertising and marketing Choices Built-in e-mail promoting and advertising and marketing, product sales information superhighway web page builder, and abandoned cart emails Limited customization; maximum repeatedly uses pre-defined templates Email services and products and merchandise, referral programs, content material subject matter dripping, and bulk membership product sales
Pricing From $39/month (spherical $468/twelve months) Unfastened From $179.50/twelve months

An Advent to Teachable, Skillshare, and MemberPress

Let’s get began by the use of taking a quick check out Teachable, Skillshare, and MemberPress. Later in this article, we’ll read about every platform’s choices additional in-depth.

Teachable is a user-friendly platform for growing, website online web hosting, and selling digital categories and coaching. It supplies endless direction advent and student enrollment, making it a flexible resolution for direction creators.

With apparatus for posting multimedia information and tasty with students via comments, Teachable is perfect for instructors who want additional interactive categories. Plus, it allows you to link your categories on your private information superhighway web site with a customized area.

And as a standalone platform, you gained’t need to fear about updates or backups. This lets you focus on building a a success training trade.

The Teachable online course builder

Then again, Skillshare is a smart platform for lecturers who need to share their knowledge and connect to various inexperienced persons.

While video categories are the principle way categories are delivered, Skillshare goes previous that. It moreover supplies choices like magnificence tasks, community discussions, and downloadable belongings.

Plus, Skillshare is very good for lecturers who enjoy a smart manner. Whether or not or no longer you’re helping students design their first brand or assemble a photos portfolio, you’ll inspire them to dive in and create.

Skillshare homepage

Finally, MemberPress is an all-in-one membership plugin and online direction builder for wordpress information superhighway pages.

With MemberPress, you’ll merely add membership levels on your information superhighway web site and offer different direction get right of entry to in line with the plan a member subscribes to.

MemberPress has a built-in virtual lecture room that is distraction-free and works seamlessly with any wordpress theme.

Additionally, it supplies online course-specific addons referred to as Classes and CoachKit. The ones help you create and advertise online categories and coaching sessions from your information superhighway web site.

Memberpress' homepage

It moreover incorporates difficult membership choices like flexible pricing plans and drip content material scheduling. To help you advertise and organize your categories effectively, you’ll moreover get seamless integrations with best e-mail promoting and advertising and marketing apparatus.

Needless to say MemberPress is a wordpress plugin, in order that you’ll need to create your own information superhighway web site to use it. For details, see our knowledge on create a club web site in wordpress.

With that throughout ideas, we’ll show you the way in which every platform stacks up relating to the following parts. Be happy to transport ahead and click on on on the soar link below to talk over with the problem you wish to have to compare:

Able? Let’s get started!

Ease of Use – Trail Setup

In relation to choosing an on-line route platform, ease of use is crucial factor. A user-friendly platform will make it clean for lecturers to create, organize, and share their categories without technical hurdles.

Let’s read about how the 3 online studying platforms measure up relating to ease of use.

Teachable

Teachable is a standalone platform designed to simplify online direction advent and keep an eye on.

You’ll be capable of set it up on a sub-domain, use a customized area identify to align at the side of your branding, or link it on your faculty’s information superhighway web page for seamless integration.

Because it operates independently, Teachable handles all the updates, protection patches, and backups for you. This means a lot much less time spent on administrative tasks and overtime to be aware of growing top quality content material subject matter and emerging your small business.

This platform has a user-friendly dashboard. The navigation menu is inside the left-hand panel. On the ‘Space’ show, it’s imaginable you’ll remember the fact that Teachable provides a checklist that can assist you organize your faculty.

Teachable's dashboard

Growing your first direction could also be truly clean.

Teachable has tough AI apparatus that can assist you amplify direction materials in only a few minutes. All you wish to have to do is to provide a direction title and a temporary description.

Generating a course outline using AI

When the AI is done generating, Teachable will take you to the ‘Setup Knowledge’ information superhighway web page. Proper right here, you’ll to search out all the alternatives for customizing your direction, which we’ll quilt inside the direction customization segment.

To publish the direction, you’ll simply use the bulk publish chance.

And that’s it! You’ve created your first Teachable online direction. Proper right here’s what it could appear to be on your Teachable faculty information superhighway web site:

Teachable course preview

Skillshare

While Skillshare is additional not unusual for finding online categories, it moreover allows you to sign up for as a instructor. With this platform, you’ll publish a class, offer a 1-1 session, and promote virtual merchandise.

Upon signing up as a instructor, you’ll be asked to make a choice your areas of passion. On the other hand, this may also be difficult as you’ll only sign up for Skillshare’s pre-listed categories.

Choosing a specialty in SkillShare

Then, you’ll need to get ready your classes consistent with SkillShare’s style knowledge: Create, Assemble, and Thrive.

While you’ve in a position your studying materials, you’re ready to start out out recording your motion pictures.

You’ll be capable of get began by the use of settling on the proper equipment for recording and enhancing. Listed below are some tips:

  • Camera: In this day and age’s smartphones are forever excellent enough, alternatively if you want to look additional original, you’ll check out the Sony Alpha ZV-E10 mirrorless digital camera.
  • Microphone: We don’t recommend using a built-in microphone, as it could not produce clear audio. A excellent one to get started is the Samson C01UPRO USB Microphone.
  • Video enhancing software: For those who occur to’re using Mac, then the iMovie is a smart chance for enhancing your motion pictures. Within the period in-between, House home windows consumers can rely on the free Clipchamp video editor.

Next, you’ll need to organize a neat and professional-looking background. Props and excellent lights may just make all the difference.

Once your motion pictures and materials are ready, it’s time so as to add them to Skillshare. You’ll be capable of observe the platform’s Step-by-Step Importing Information to start out out your magnificence draft and get the entire thing uploaded appropriately.

MemberPress

MemberPress is an outstanding wordpress club plugin with studying keep an eye on software (LMS) options. Its Categories and CoachKit addons help you merely create online categories. They will let you amplify categories, add media information, edit categories, offer 1-1 coaching programs, organize staff studying, and additional – all without requiring any technical enjoy.

To create online categories, you’ll use the MemberPress Classes addon.

The first step inside the direction builder is growing the ‘Trail Internet web page,’ where you’ll provide essential details identical to the direction matter, title, and description.

Editing Course Page

Since MemberPress uses the default wordpress block editor, you’ll get creative with the construction, giving your direction information superhighway web page a professional and tasty design.

At the side of the basic content material subject matter, you’ll add ‘Trail Categories’ and ‘Trail Tags’ to help get ready your categories, set a featured symbol, and write a direction information superhighway web page excerpt beneath the settings.

Then, you’ll switch to the ‘Curriculum’ tab. Proper right here, you’ll create sections that act as direction modules. Inside every segment, add categories by the use of simply entering a reputation and then clicking to edit the lesson content material subject matter.

Editing Curriculum and lessons

You’ll be capable of further boost your direction by the use of including quizzes.

Quizzes may also be attached to categories, and also you’ll lead them to important previous to consumers can proceed to the next lesson.

Building your quiz questions and answers

To publish, you’re going to only need to click on on on the ‘Submit’ button inside the direction builder.

And that’s it! Proper right here’s how the direction would possibly look on the front end:

Course example in MemberPress virtual classroom

For additonal details, you’ll see our knowledge on create on-line classes in wordpress.

With MemberPress, you’re going to moreover need to organize memberships and get right of entry to regulate rules.

Thru creating a rule, you’ll give protection to particular content material, like a direction, and specify must haves, similar to requiring consumers to be part of a membership plan to reach get right of entry to.

Adding access rules

When selling your online direction, you’ll organize one-time expenses, odd subscriptions, or lifetime memberships.

Habitual bills automate billing, saving time and decreasing delays or errors for a smoother membership revel in. You’ll be capable of set expenses to recur per month, every year, weekly, quarterly, or at custom designed periods.

Recurring payment options in MemberPress

On the other hand, one-time expenses may also be set with a lifetime chance or an expiration date in line with a decided on calendar date or duration.

You’ll be capable of moreover strengthen your alternatives by the use of at the side of a unfastened trial subscription.

For details on how all of this works, merely see our complete MemberPress evaluate.

WinnerTeachable or MemberPress

Overal, Teachable is the easiest online direction platform to get organize on. You don’t need to create your own information superhighway web site to use it, and the platform handles all updates, protection, and backups so that you’ll focus on growing. Plus, the straightforward setup and AI apparatus make direction advent speedy and clean.

That being said, we predict MemberPress is the easiest chance for wordpress consumers. While it has a somewhat steeper studying curve than Teachable, it’s pretty easy to learn in the event you’re already used to the wordpress block editor.

Trail Customization Alternatives

Robust customization alternatives are key to making your direction stand out. Adjusting the entire thing from the construction to the educational revel in help you create a direction that aligns at the side of your vision.

Now, let’s dive into how every platform supplies customization to strengthen your direction.

Teachable

On Teachable‘s ‘Setup Knowledge’ information superhighway web page, you’ll go about every segment to edit your curriculum, add a direction thumbnail, select the direction template, organize the direction prices, and additional.

Teachable's setup guide

For direction templates, Teachable supplies two types: Simple and Colossal. While this is a bit proscribing, we’re happy to seem that the platform shall we in for personalization of the ones templates.

In relation to enhancing the direction materials, Teachable’s editor is beautiful intuitive to use. On the other hand, we wish to admit that it sort of feels to be and feels slightly old skool.

For example, inside the ‘Text and pictures block’ screenshot below, you’ll see how clean the editor is. It contains a big area for drafting your materials and a toolbar for styling your text.

Teachable's text and images block

Teachable moreover allows you to upload motion pictures and PDF belongings, audio clips, and online quizzes.

Then, you’ll create a pricing plan on your direction. The platform allows you to choose from a few rate models, at the side of free, odd, and a one-time gain.

To track how your categories are performing, Teachable provides built-in analytics and sophisticated knowledge reporting. So, you’ll follow student engagement, see how many people are completing your categories, and keep an eye on your product sales.

Plus, Teachable supplies endless direction advent and student enrollment, which will provide you with the freedom to build as many categories or coaching programs as you wish to have.

Skillshare

With Skillshare, you’ll customize the student’s studying path.

You’ll be capable of get ready classes into playlists and let students set their own pace. Whether or not or no longer you prefer speedy 10-minute tutorials or deeper dives into topics, there’s flexibility in the way in which you development your studying revel in.

SkillShare's course organization example

The video collection label could also be a perfect feature. It lets students merely soar between categories or rewatch specific sections.

Additionally, you’ll allow students to participate in tasks or workshops to market it interactivity.

Now, it’s important to note that Skillshare Originals devices the bar for top quality and inspiration.

The ones professionally produced categories feature concise, well-structured motion pictures with engaging visuals and good examples. SkillShare often audits their content material subject matter to handle top quality, so they may be able to provide great references as you amplify your own content material subject matter.

MemberPress

One of the most eye-catching direction customization choices in MemberPress is cohort, which is a sophisticated determine for staff studying.

For those who occur to’re eager about setting this up, you then’ll check out our knowledge on be offering cohort-based on-line classes.

Cohort-based online categories are structured so that everyone learns together, with set get began and end dates. That is serving to create some way of community and keeps students accountable.

Plus, students get to interact with every their instructors and classmates, making the educational revel in additional engaging and collaborative.

Configuring cohort type

You’ll be capable of moreover require consumers to take a quiz previous to advancing to the next lesson with the MemberPress Quizzes addon.

Simply toggle the switch next to the ‘Require Previous Lesson/Quiz’ chance inside the direction ‘Settings’ panel. This promises consumers must complete the quiz previous to progressing further inside the direction.

Require quiz

MemberPress moreover supplies the ones tough addons for reinforcing your online categories:

  • MemberPress Assignments: Assign essays, digital tasks, video recordings, and web-based tasks on your students.
  • MemberPress Gradebook: Arrange student grades and real-time building tracking in one place. It moreover makes it more uncomplicated to provide personalized feedback.

Plus, the MemberPress CoachKit addon helps you get ready and organize online coaching programs with choices like consumer tracking, milestone setting, habit formation, and conversation apparatus.

Milestones and behaviour are two key parts of the CoachKit addon. They will let you set objectives with due dates and get ready tasks, respectively.

Creating first milestone

For every milestone, you’ll add a function determine, due date, and optional check-in questions.

Within the period in-between, you’ll create habits by the use of setting frequency and optional check-in questions.

Creating first habit

Once the entire thing is ready up, you’ll click on on ‘Submit’ for the program to make it available to clients.

Proper right here’s what it could appear to be inside the consumer’s dashboard:

Milestone list in a MemberPress cohort-based online course

For details, you’ll see our knowledge on be offering on-line training in wordpress.

WinnerMemberPress

MemberPress takes the lead because it will provide you with additional flexibility and regulate when growing and selling online categories. For example, MemberPress allows you to organize cohort-based categories where everyone learns together at the identical time or offer direct coaching sessions.

You’ll be capable of even offer different forms of assignments with MemberPress and follow student grades straight away from your dashboard. The ones choices make it easy to personalize your online categories and keep your students engaged.

Promoting and advertising and marketing Integrations

Promoting and advertising and marketing your online direction effectively is very important for attracting students and boosting product sales. A platform with robust promoting and advertising and marketing choices help you succeed in a wider target audience and engage with possible inexperienced persons additional effectively.

Let’s uncover how every platform stacks up when it comes to promoting and advertising and marketing apparatus and lines.

Teachable

Teachable works seamlessly with not unusual third-party apparatus, at the side of AWeber, Zapier, and Equipment. The ones integrations are designed to make your life more uncomplicated by the use of streamlining your promoting and advertising and marketing and operations.

With AWeber, you’ll organize e-mail campaigns and engage at the side of your students additional effectively.

Zapier allows you to automate tasks between Teachable and other apps, saving you time and effort. Within the period in-between, Equipment helps you with personalized promoting and advertising and marketing, making it more uncomplicated to create e-mail campaigns that reach the appropriate target audience on the correct time.

The platform moreover supplies an outstanding gross sales web page builder, which helps you to auto-generate professional-looking pages to market your categories and attract additional students.

Teachable's autogenerated sales page

We moreover came upon Teachable supplies alternatives to allow abandoned cart emails. This lets you succeed in out to possible students who didn’t complete their gain, encouraging them to return and sign up for.

Additionally, Teachable supplies choices for student referrals and affiliate internet marketing. From a promoting and advertising and marketing point of view, encouraging your students to share your categories with others helps you increase your small business.

Skillshare

Skillshare is beautiful limited when it comes to third-party integrations. The platform is designed to be all-in-one, so it’s not the most suitable choice in the event you’re looking out to market it previous your account.

Plus, as a Skillshare instructor, you’ll join a platform with over 30,000 categories. This is a extraordinarily competitive market.

Optimizing your Skillshare categories appears to be almost about the identical as optimizing wordpress information superhighway web site content material subject matter. Thru using search engine marketing techniques, you’ll make your direction additional visible to its target audience.

For details, you’ll check out our final search engine optimization information for newbies.

Then, don’t forget to make a choice a standout quilt image, as it’s probably the most important first problems students perceive. You’ll have to moreover you should definitely fill out your instructor profile to build believe and credibility with students.

We like that Skillshare has ‘Workforce Possible choices’, which might be top quality classes which might be advisable and promoted by the use of the Skillshare team of workers. Getting this sort of badges would possibly make your categories additional visible and at risk of be decided on by the use of students.

Skillshare staff picks

Finally, you’ll market it your magnificence on your social media, wordpress web site, or each and every different platform to attract students on your Skillshare categories.

Plus, we found out that many instructors share external belongings, similar to apps and websites, that can boost the educational revel in.

MemberPress

MemberPress makes it easy to connect with common e mail services and products like Consistent Touch, AWeber, and Drip. The ones apparatus are perfect for keeping your target audience engaged and running environment friendly promoting and advertising and marketing campaigns.

The Constant Contact autoresponder

For referral programs, it truly works well with AffiliateWP. Plus, it integrates with Stripe and PayPal to easily settle for expenses on your memberships and online categories.

On best of that, you’ll connect MemberPress with many various apps to extend its capacity even further.

Practice: For those who occur to run an web store, then MemberPress is completely appropriate with WooCommerce. This lets you restrict get right of entry to to products, offer VIP perks, or even create a private members-only on-line retailer for distinctive purchasing groceries tales.

We moreover found out choices like content material dripping and expiration dates to stick your inexperienced persons engaged. They will let you step by step release content material subject matter and offer distinctive get right of entry to to time-sensitive material.

Course dripping

This system taps into the worry of lacking out (FOMO), encouraging inexperienced persons to stay lively and invested for your categories or memberships.

Additionally, MemberPress uses computerized notifications to stick inexperienced persons a professional about new content material subject matter, upcoming time limits, or specific supplies.

The ones reminders not only keep them engaged however as well as steered them to take action, whether or not or no longer it’s completing a lesson, renewing their subscription, or making a purchase order order.

MemberPress is helping bulk membership purchases and even lets others resell your memberships, too. Which means that other corporations and organizations can help increase your target audience and boost your benefit.

Winner – MemberPress

In relation to promoting and advertising and marketing your online categories, MemberPress stands proud.

While Teachable supplies some great apparatus like a product sales information superhighway web page generator and e-mail promoting and advertising and marketing integrations, MemberPress takes it a step further with its deeper integration and additional engaging choices.

For example, MemberPress allows you to connect to not unusual e-mail services and products and merchandise, helping you run extraordinarily centered campaigns and keep your target audience engaged.

Plus, it supplies content material subject matter dripping and expiration dates, which tap into FOMO (concern of missing out) to stick your inexperienced persons invested and motivated to building via your direction.

Pricing

Pricing is a key consideration for direction creators, specifically since many creators are running with tight budgets. It’s important to grab what every plan supplies and the way in which the price aligns with the choices you need.

Let’s take a closer check out the pricing for every platform that can assist you make the best selection on your needs.

Teachable

The Teachable free fashion would possibly seem attractive. On the other hand, it lacks important choices, at the side of content material subject matter dripping.

Teachable paid plans get began at $39 per 30 days, alternatively they tend to be dearer than most on-line route platforms.

Additionally, some plans include transaction fees. As an example, the Basic plan charges a 5% value on every transaction.

Teachable's pricing page

We moreover came upon that Teachable is helping rate processing via PayPal, Stripe, Google Pay, and Apple Pay.

On the other hand, the timing of while you download expenses is decided via the plan you choose.

Skillshare

Skillshare’s pricing is one in every of its standout choices: you don’t need to pay to turn on this platform.

Now, for the reason that platform works on a subscription software, folks pay each per month or every year for a Skillshare membership. Every month, spherical 20% of Skillshare’s common subscription income goes towards paying lecturers.

It’s important to note that lecturers turn out to be winning in line with the choice of minutes of their classes watched and the engagement of students with their content material subject matter.

In spite of everything, Skillshare uses Tipalti to process instructor expenses.

MemberPress

MemberPress supplies 3 number one pricing plans to fit different needs:

  • Basic ($179.50/twelve months): Great for novices, this plan is helping endless contributors and integrates with Stripe and PayPal for expenses.
  • Plus ($299.50/twelve months): Supplies choices like quizzes, certificates, and forums, making it splendid for interactive categories.
  • Skilled ($399.50/twelve months): Contains bulk membership product sales and kit like OptinMonster for sophisticated direction monetization.
MemberPress pricing page

Then, you also have Elite. This plan integrates with CoachKit, which is perfect for offering personalized coaching alongside your categories.

In relation to how so much you’ll earn from selling online categories with MemberPress, it’s completely up to you. You’ll have the freedom to set your own prices, whether or not or no longer it’s a one-time rate, subscription, or in all probability a tiered pricing development.

Plus, you gained’t wish to pay third-party platform fees to create and advertise your online categories.

This flexibility allows you to tailor your pricing on your target audience and trade objectives, giving you complete regulate over the way in which you monetize your direction content material subject matter.

WinnerMemberPress

While Skillshare’s no-cost get entry to and Teachable‘s affordability are fascinating, MemberPress takes the win when it comes to pricing flexibility.

With plans starting at merely $179.50 in line with twelve months, MemberPress moreover supplies additional regulate over your source of revenue. You’ll be capable of set your own direction prices, whether or not or no longer you prefer one-time expenses, subscriptions, or even tiered pricing. You’ll moreover get to stick your entire source of revenue.

This means you’ll adapt your pricing method in line with your target audience and trade objectives, giving you much more freedom compared to Skillshare’s revenue-sharing taste.

Which Is the Best possible: Teachable vs. Skillshare vs. MemberPress?

When comparing Teachable vs. Skillshare vs. MemberPress, MemberPress stands proud as the most suitable choice for lots of consumers. While all 3 platforms have their perks, MemberPress supplies a novel mixture of flexibility, customization, and pricing regulate that others can’t have compatibility.

Teachable is very good if you wish to have a easy platform with built-in product sales pages and e-mail promoting and advertising and marketing apparatus. Then again it will in fact get dear, specifically with its transaction fees on some plans. It’s moreover a lot much less flexible when it comes to setting your own prices and offering memberships.

Skillshare is perfect for individuals who need to teach via motion pictures without upfront costs. On the other hand, it truly works on a subscription taste, where you earn in line with what collection of minutes your students watch. This may also be unpredictable, and you have a lot much less regulate over your pricing and monetization alternatives.

MemberPress, alternatively, will provide you with whole regulate.

Whether or not or no longer you’re selling categories, memberships, or every, you get to set your own prices and offer different rate alternatives. With flexible plans and lines like quizzes, certificates, and automated notifications, MemberPress helps you create a additional interactive and tasty studying revel in.

Plus, it integrates seamlessly with not unusual apparatus, so that you’ll develop your enterprise even further.

General, MemberPress is the clear winner in the event you’re on the lookout for a platform that lets you regulate pricing, assemble a community, and provide a customized studying revel in.

FAQs About Teachable vs. Skillshare vs. MemberPress

To help clear up any ultimate doubts, let’s dive into some incessantly asked questions about Teachable, Skillshare, and MemberPress or any eLearning-related ones.

What platforms are available to create an web direction?

There are many platforms that help you create online categories, at the side of Teachable, Skillshare, and wordpress with an LMS plugin.

For wordpress consumers, plugins like Thrive Apprentice, AccessAlly, and MemberPress are all great alternatives.

You’ll be in a position to try our professional possible choices of the perfect LMS plugins for wordpress for added details.

What’s the cheap rate of making an web direction information superhighway web site?

The fee is decided via parts like web website online web hosting, a web site determine, and best price apparatus. Expect to spend on the ones must haves, but it’s value it for a professional setup. Most often speaking, you’re looking out at $100 to $500 to $3000, to concurrently high as $30,000 or additional.

For more information, you’ll talk over with our knowledge on how a lot it in point of fact prices to construct a wordpress web site.

Insider Tip: Let WPBeginner’s experts design your custom designed wordpress information superhighway web site. From clean landing pages to full-fledged eLearning internet sites, we’ve got you covered. Starting at $599 – you’ll focus on emerging your small business while we care for the design. E book your session now!

What are free platforms for creating a membership information superhighway web site?

You’ll be capable of get began with platforms like Skillshare or Gumroad without spending a dime.

On the other hand, investing in best price apparatus like MemberPress combined with its Classes and CoachKit addons will provide you with additional choices and better regulate over your information superhighway web site.

Is MemberPress an LMS?

Now not exactly. It’s a membership plugin that works great for online categories when paired with its Classes and CoachKit addons. To be told additional about how MemberPress works, you’ll check out our complete MemberPress evaluate.

We hope this article has helped you understand the differences between Teachable vs. Skillshare vs. MemberPress. Next, it’s your decision to try our knowledge on create and promote on-line classes and run a digital study room.

For those who occur to appreciated this article, then please subscribe to our YouTube Channel for wordpress video tutorials. You’ll be capable of moreover to search out us on Twitter and Fb.

The post Teachable vs Skillshare vs MemberPress: Which is the Perfect? first gave the impression on WPBeginner.

wordpress Maintenance

[ continue ]

wordpress Maintenance Plans | wordpress hosting

read more

Source link

See what others are saying about this...

Posted on Leave a comment

Find out how to Create a Lead Magnet Optin Shape in WordPress (2 Tactics)

Have you learnt that over 70% of first-time visitors received’t ever return to your website online another time?

As internet web page house owners ourselves, everyone knows that accumulating a buyer’s email care for is a good way to keep in touch with them and encourage them to come back again once more. Alternatively, visitors want a the explanation why to hand over their personal knowledge – and a lead magnet like an guide or PDF is a brilliant motivator.

Most likely you already have a lead magnet in a different way you intend to create some shortly. Regardless, one thing is understand that – you’ll moreover need an optin form to gather leads, building up your e mail subscribers, and provide fast get right to use to your lead magnet.

In this data, we’ll share two other ways to create a high-converting lead magnet optin form.

Necessary Understand: The main means is highest when you occur to haven’t created a lead magnet however, as you’ll have the ability to assemble the optin and magnet the usage of the exact same software. So, when you occur to’re searching for an all-in-one solution, you’re in the appropriate place!

wordpress?” class=”wp-image-328977″/>

<span class=”ez-toc-section” id=”why-create-a-lead-magnet-optin-form-in-wordpress“/>Why Create a Lead Magnet Optin Form in wordpress?

There are many other ways to create an optin form. Then again, in our experience, they don’t at all times look very good or art work appropriately on wordpress internet pages.

In this data, we’re focusing on apparatus which were designed for wordpress and have a loyal wordpress plugin. This makes it easy to create optins that mix seamlessly together with your internet web page and mean you can generate leads with minimal effort.

Plus, you’ll maximum steadily have a much more easy time connecting the optin to other products and services and merchandise you’re already the usage of for your website online, specifically your email promoting and advertising provider. That is serving to you nurture leads, add them to automatic workflows, monitor the actions they take for your website online, and perform a ton of different crucial tasks.

You’ll moreover get all the benefits maximum steadily associated with wordpress, along with additional customization possible choices and ownership over your wisdom.

While there are lots of imaginable possible choices available, growing your optin bureaucracy in wordpress in reality does offer unmatched advantages when it comes to keep watch over, customization, and integrations.

That mentioned, you’ll have the ability to use the quick links beneath to jump without delay to the method you want to use:

Are you ready? Let’s dive right kind in!

Method 1. Using Beacon (Perfect imaginable All-In-One Solution)

Beacon is an excellent lead magnet device that lets you create endless optins the usage of an intuitive, drag-and-drop builder.

An example of an Optin form, created using Beacon

Now not like an an identical lead technology plugins, Beacon moreover has the whole thing you want to create lead magnets.

It has a ton of ready-made templates protective a number of quite a lot of lead magnets, along with eBooks, helpful useful resource guides, checklists, and video lookbooks.

With all that mentioned, Beacon is a smart selection when you occur to’re searching for an all-in-one solution for growing surprising lead magnets and then distributing them the usage of optins.

We did a deep dive into its choices for our Beacon overview, so you may want to check out that out.

Skilled Tip: In this data, we’re focusing on growing lead magnet optin bureaucracy, so we received’t show you ways you’ll be able to assemble a lead magnet the usage of Beacon. We have a separate data for that. Head over to our publish on how you can create a lead magnet that converts for more information.

Already have a lead magnet? You then’ll have the ability to upload this handy useful resource to your Beacon account and then create an optin for that lead magnet.

That means Beacon is also a good choice if you already have a library of lead magnets, and easily need to create optins for those assets.

What’s additional, Beacon has a ‘loose ceaselessly’ plan that lets you create as many optins as you want. With that all through ideas, Beacon is highest if you want to experiment with fairly a large number of different optin varieties and formats, to appear what delivers the most efficient results.

Step 1. Create a Beacon Account

As we already mentioned, Beacon has a ‘loose ceaselessly’ plan that lets you create as many lead grasp bureaucracy as you want. Alternatively, the loose plan limits you to creating 1 new lead magnet per month.

So, depending for your needs, you may need to invest in a best charge plan in an instant.

To get started, head over to the Beacon web site and each sign up for a best charge plan or create your loose account.

Creating a Beacon account

With that finished, log into the Beacon dashboard, and in addition you’re ready to create your first lead magnet optin form.

Step 2. Add Your Email correspondence Provider (Now not mandatory)

While you grasp a brand spanking new lead, Beacon can send that specific particular person’s knowledge to your e mail advertising and marketing provider routinely. It could even add tags so that you’ll have the ability to phase the ones leads and run focused campaigns one day.

If you want to use this feature, then head over to Account Settings » Email correspondence Integrations inside the Beacon dashboard. Then, click on at the ‘+’ button.

How to connect Beacon to your email marketing provider

Next, open the ‘Choose Provider’ dropdown and choose your email promoting and advertising supplier, similar to ActiveCampaign, CampaignMonitor, or Drip.

Then, simply follow the onscreen instructions to organize this integration.

Connecting an email marketing provider to your free Beacon account

Step 3: Choose Your Lead Magnet

The next move is choosing the lead magnet you’ll offer to visitors. To check out this, click on on on the ‘Create New’ button, followed by the use of ‘Lead Grasp Form.’

How to create a lead magnet optin form using Beacon

At this stage, you’ll have the ability to each choose a lead magnet you’ve created the usage of Beacon or upload an external helpful useful resource you created the usage of every other program.

To use an external document, choose ‘Upload Helpful useful resource.’

How to upload an external lead magnet resource to Beacon

You’ll have the ability to then click on at the ‘Choose Report’ button.

After that, choose any document from your local computer.

<img decoding=”async” loading=”lazy” width=”680″ height=”361″ src=”https://wpmountain.com/wp-content/uploads/2025/02/selecting-lead-magnet.png” alt=”How to create a lead magnet optin form for your wordpress blog or website” class=”wp-image-328825″/>

Alternatively, you’ll have the ability to use a lead magnet you created with Beacon. To try this, simply choose ‘Use Beacon Helpful useful resource.’

You’ll now see all the different lead magnets you created. Find the helpful useful resource you want to use and click on on on the corresponding ‘Choose’ button.

Creating a lead magnet opt-in form

Step 4. Choose a Template

It doesn’t topic what selection you choose, the next move is deciding on your optin format.

For this knowledge, we’ll be growing an inline form, as this allows you to keep watch over exactly the position the form turns out for your website online.

For example, you’ll want to place it on a touchdown web page or midway via a decided on blog publish. Alternatively, the steps may also be an an identical for all the different optin formats.

That mentioned, we’re going to choose ‘Inline Form’ at this stage.

<img decoding=”async” loading=”lazy” width=”680″ height=”372″ src=”https://wpmountain.com/wp-content/uploads/2025/02/choosing-inline-forms.png” alt=”Creating an inline form for your wordpress website or blog” class=”wp-image-328829″/>

Beacon will now show all the different ready-made templates you’ll have the ability to use. Numerous those templates are completely customizable, so that you’ll have the ability to fine-tune them to match your wordpress theme or branding.

Alternatively, to save some time, it’s smart to choose a template that carefully resembles the kind of optin you want to create. That way, you don’t should do quite a lot of enhancing.

Beacon's ready-made form templates

While you find a template you want to use, give it a click on on.

Then, sort in a name for the optin form. This may increasingly sometimes represent the form all over the Beacon dashboard, so it’s a good idea to use something descriptive.

Creating a lead magnet opt in form

Once that’s finished, click on on on the ‘Create Lead Grasp Form’ button.

Step 5. Customize Your Optin Form

Beacon will now load your most popular template in its drag-and-drop editor. This editor is split into multiple tabs, starting with the ‘Motive’ tab, which is in large part how the form will appear for your internet web page.

The Beacon drag and drop editor

To the left is a live preview that’ll change routinely as you’re making changes.

All the Beacon templates come with built-in, default content material subject material. To edit a built-in phase, each click on on to choose it inside the live preview or choose it inside the left-hand menu.

Customizing a lead magnet opt in form

While you do, the menu will show all the settings you’ll have the ability to use to customize this phase, similar to changing the text measurement, font color, and background color.

If the phase contains text, then you definately’ll see a work where you’ll have the ability to exchange it with your own messaging.

Adding text to an online form

Want to make better changes to the inline form?

You’ll have the ability to click on directly to magnify the ‘Structure’ phase and make a choice from fairly a large number of layout possible choices.

Choosing different layouts for an online form

Want to exchange the background image or color? Then click on directly to magnify the ‘Container’ phase and then use the fairly a large number of settings that appear.

As you’re making changes, the live preview will change routinely, so that you’ll be in a position to try fairly a large number of different settings to appear what you prefer highest.

<img decoding=”async” loading=”lazy” width=”680″ height=”354″ src=”https://wpmountain.com/wp-content/uploads/2025/02/beacon-optin-form-1.png” alt=”Creating an opt-in form for your wordpress website, blog, or online store” class=”wp-image-330271″/>

Step 6. Design a Thank You Internet web page

Next, it’s time to customize the ‘Thank You’ message that Beacon will show each and every time any person completes your form. To get started, click on at the ‘Thank You’ tab.

How to create a custom thank you message

Once another time, Beacon presentations a live preview to the appropriate and fairly a large number of settings on the left.

You’ll have the ability to now exchange the headline, paragraph, and container settings within the equivalent way you customized the ‘Motive’ internet web page.

Alternatively, the ‘Thank You’ tab has an extra ‘Social Share’ phase. This permits you to add a row of social sharing buttons to the ‘Thank You’ internet web page so visitors can share your lead magnet optin form right through social media.

The ones icons are hidden by the use of default, on the other hand you’ll have the ability to exchange this by the use of clicking to magnify the ‘Social Share’ phase and then unchecking the ‘Conceal Social Share’ box.

<img decoding=”async” loading=”lazy” width=”680″ height=”342″ src=”https://wpmountain.com/wp-content/uploads/2025/02/beacon-social-sharing.png” alt=”Adding social sharing buttons to your wordpress website” class=”wp-image-330272″/>

You’ll have the ability to then add or remove buttons for Twitter/X, Facebook, LinkedIn, or sharing by way of email. You’ll have the ability to moreover exchange the text that appears above this row of social sharing buttons, along with the font measurement and color.

Don’t need to display a ‘thank you’ message?

Beacon can redirect the buyer to any other URL instead, similar to a completely customized ‘thanks’ web page you created the usage of a plugin like SeedProd.

To try this, click on directly to magnify the ‘Redirect’ phase and then sort inside the URL you want to use.

<img decoding=”async” loading=”lazy” width=”680″ height=”323″ src=”https://wpmountain.com/wp-content/uploads/2025/02/redirecting-beacon-wordpress.png” alt=”How to set up redirects on your wordpress website or WooCommerce store” class=”wp-image-328844″/>

Step 7: Customize the Confirmation Email correspondence

By means of default, Beacon will routinely send an email confirmation to everyone who completes your form. This email contains a ‘Download’ link for your lead magnet, so it actually works out of the sphere.

Alternatively, the default template is beautiful basic, in order that you’ll maximum steadily need to customize it.

To try this, click on at the ‘Confirmation’ tab.

Sending a confirmation email to your subscribers

Once another time, you’ll see a live preview to the appropriate and various different possible choices inside the left-hand menu.

Proper right here, you’ll have the ability to exchange the email subject, the ‘from’ name, the ‘reply to’ care for, and the email body.

How to add double opt-ins to your lead generation campaigns

For individuals who’ve attached Beacon to your e mail advertising and marketing supplier, you then’ll have the ability to moreover permit double opt-in.

This calls for patrons to verify their subscription by the use of opening your email and clicking a link. Once that’s finished, Beacon will add their contact knowledge to your email promoting and advertising provider.

In this way, you’ll have the ability to avoid together with spambots or wrong email addresses to your mailing file. That is serving to to stay your record blank and healthy while heading off dropping assets by the use of sending messages to inactive email addresses.

Because of this, we advise clicking to magnify the ‘Make a selection-in Settings’ phase and then deciding on ‘Double Make a selection-in’ till you’ve a very specific the explanation why not to.

For added on this topic, please see our data on how you can save you signup unsolicited mail in wordpress.

Step 8: Publish Your Form

While you’re happy with how your optin is ready up, it’s time so that you could upload it to your website online. Thankfully, Beacon makes that straightforward. Simply choose the ‘Publish’ tab to get started.

Publishing an opt-in form

On this internet web page, you’ll see some HTML code that Beacon creates routinely.

Previous to navigating transparent of this show, you’ll want to click on on on the ‘Save’ button to store your latest changes.

An example of a lead magnet opt-in form, created using Beacon

Then, copy the HTML code and head over to your wordpress internet web page. You’ll have the ability to now add this code to any internet web page, publish, or widget-ready house the usage of the ‘Custom designed HTML’ block.

As an example, let’s see the way you’ll have the ability to add the optin to a publish. Simply open the publish as same old inside the content material editor, and then click on at the ‘+’ button.

Use the search software to seek out the ‘Custom designed HTML’ block and add it to the internet web page.

<img decoding=”async” loading=”lazy” width=”680″ height=”380″ src=”https://wpmountain.com/wp-content/uploads/2025/02/wordpress-html-block.png” alt=”Adding a custom HTML block to your website” class=”wp-image-330274″/>

Now, move ahead and paste your code into the Custom designed HTML block.

You’ll have the ability to now add additional content material subject material to the internet web page, tweak its design, and make other changes, as same old. While you’re ready to move live, simply change or post the internet web page.

Now, when you occur to talk about together with your wordpress internet web page, you’ll see the lead magnet optin in movement.

Method 2. Using OptinMonster (Perfect imaginable For Rising Difficult Optins)

Do you already have a lead magnet you want to use for your campaigns? Then OptinMonster could also be the very best solution for you.

It means that you can create all kinds of advanced optin bureaucracy, along with formats like floating bars, popups, and gamified spin-to-win optins. Plus, it has a template library of 400+ high-converting designs that you just’ll have the ability to customize with its drag-and-drop builder.

We’re huge fans of this software ourselves. We use it for all our pop-ups, slide-ins, and header banners. So we can confidently allow you to know that when it comes to growing optins, the chances are almost about never-ending with OptinMonster.

To learn additional, see our whole OptinMonster overview.

An example of an opt-in form, created using OptinMonster

The great issue about OptinMonster is that it means that you can send lead magnets by way of email, direct download, or each and every, giving your subscribers the freedom to choose their most popular means.

Even if you’ll have the ability to use OptinMonster’s gated content material subject material feature to turn any blog publish proper right into a lead magnet or content material improve, its true energy lies in growing extraordinarily environment friendly optin bureaucracy.

With that mentioned, we advise OptinMonster if you already have some lead magnets, and want a approach to grasp as many leads as possible.

Step 1. Organize OptinMonster

First, you’ll need to sign up for on the OptinMonster web site. Simply click on at the ‘Get OptinMonster Now’ button to get started.

<img decoding=”async” loading=”lazy” width=”680″ height=”362″ src=”https://wpmountain.com/wp-content/uploads/2025/02/optinmonster-lead-website.png” alt=”Creating an account in OptinMonster” class=”wp-image-330280″/>

You’ll have the ability to then make a choice the OptinMonster plan you want to buy and follow the onscreen instructions to complete your gain.

With that finished, it’s time to place in and switch at the unfastened OptinMonster wordpress plugin. This connects your wordpress website online to your OptinMonster account.

For added details, please see our data on how you can set up a wordpress plugin.

Each time you flip at the plugin, you’ll see the OptinMonster welcome show and setup wizard. Transfer ahead and click on at the ‘Connect Your Present Account’ button.

Signing up for an OptinMonster account

You’ll now see a small window where you’ll have the ability to sign into your OptinMonster account.

In this popup, click on at the ‘Connect to wordpress’ button to link your internet web page to OptinMonster.

<img decoding=”async” loading=”lazy” width=”680″ height=”188″ src=”https://wpmountain.com/wp-content/uploads/2025/02/optinmonster-connecting-wordpress.png” alt=”Connecting wordpress to your OptinMonster account” class=”wp-image-330275″/>

Step 2. Choose a Advertising and marketing marketing campaign Type

Now, you’re ready to create your lead magnet advertising marketing campaign by the use of heading over to the OptinMonster » Campaigns internet web page for your wordpress dashboard.

With that finished, click on at the ‘Add New’ button.

How to create a new campaign in OptinMonster

OptinMonster will now ask you to choose a template or use a playbook.

Playbooks are ready-to-use campaigns in line with tried-and-tested strategies from one of the most important international’s most a luck producers, so that they’re absolute best for growing high-converting campaigns, fast.

Alternatively, in this data, we’ll be deciding on ‘Templates.’

Creating a high-converting campaign using OptinMonster

At this stage, OptinMonster will show all the different advertising marketing campaign varieties you’ll be in a position to choose from. This incorporates slide-ins, floating bars, and gamified popups.

The steps may also be an an identical it doesn’t topic what type of advertising marketing campaign you choose. Alternatively, in this data, we’ll be growing an inline form, because you’ll have the ability to add it merely to any internet web page, publish, or widget-ready house. With that mentioned, move ahead and choose ‘Inline.’

<img decoding=”async” loading=”lazy” width=”680″ height=”369″ src=”https://wpmountain.com/wp-content/uploads/2025/02/creating-inline-form.png” alt=”How to add an inline form to your wordpress blog or website” class=”wp-image-328860″/>

Step 3. Choose a Template

You’ll have the ability to now make a choice the template you want to use. All the OptinMonster templates are completely customizable, on the other hand you’ll have the ability to save time by the use of choosing a template that carefully represents the form you want to create.

To preview a design, simply hover over the template and then click on at the ‘Preview’ button.

Choosing a ready-made template in the OptinMonster dashboard

This opens the template in a popup.

While you find a design you want to use, click on on on the ‘Use Template’ button. We’ll be the usage of the Unlock Gated Content material subject material template in all our screenshots, on the other hand you’ll be in a position to make a choice any design you want.

After deciding on a template, move ahead and gives your advertising marketing campaign a name by the use of typing into the popup that appears. Then, click on on on ‘Get began Building.’

<img decoding=”async” loading=”lazy” width=”680″ height=”244″ src=”https://wpmountain.com/wp-content/uploads/2025/02/build-campaign-wordpress.png” alt=”How to create a lead generation campaign using OptinMonster” class=”wp-image-330277″/>

Step 4. Assemble Your Lead Magnet Optin

OptinMonster will now load your template in its drag-and-drop editor so that you’ll have the ability to customize it.

All the templates come with built-in blocks, similar to Text, Image, and Button blocks. To edit any block, simply click on on to choose it inside the live preview.

The left-hand menu will then show all the settings you’ll have the ability to use for that exact block.

Creating an inline form using OptinMonster

You’ll have the ability to moreover exchange text in an instant inside the live preview.

To switch the text style, simply highlight it and then use the settings inside the toolbar that appears.

How to change the text formatting

Want to delete a block instead?

Merely hover over it inside the live preview and then click on at the rubbish can icon when apparently.

How to delete blocks in an OptinMonster design

In an effort to upload additional blocks to your design, simply drag them from the left-hand menu and then drop them onto the live preview.

Simply repeat the ones steps until you’re happy with the lead magnet optin form.

<img decoding=”async” loading=”lazy” width=”680″ height=”380″ src=”https://wpmountain.com/wp-content/uploads/2025/02/inline-form-wordpress.png” alt=”Creating an inline form for your wordpress website or blog” class=”wp-image-328867″/>

Step 5. Design Your Good fortune Message

When any person completes your optin form, OptinMonster will display a ‘good fortune’ message by the use of default. To customize this show, click on at the ‘Good fortune’ tab.

At this stage, you want to choose how visitors get right to use your lead magnet: by way of email, an instantaneous download, or each and every.

This feature will affect your ‘Good fortune’ message’s design and content material subject material. For example, when you occur to send your lead magnet by way of email, then the message must tell shoppers to check their inbox.

Within the interim, for direct downloads, you’ll need to add a button so visitors could cause their download.

It doesn’t topic what means you choose, you’ll design the good fortune message within the equivalent way for the reason that opt-in form.

Simply click on on to choose the built-in blocks and then customize them the usage of the settings inside the left-hand menu. You’ll have the ability to moreover drag new blocks onto the layout, sort in text, and delete unwanted blocks.

For individuals who’re the usage of the download means, then remember to add a Button block to your lead magnet optin. Then, open the ‘Button Click on on Movement’ dropdown inside the left-hand menu and choose ‘Open in a brand spanking new window.’

Adding a custom button action to your lead generation forms

Inside the ‘New Window URL’ field, paste an instantaneous link to your lead magnet.

Now, when any person clicks this button, the document will open in a brand spanking new tab, looking ahead to them to save some.

How to open links in a new window

Finally, remember to permit the ‘Conversion tracking’ slider so that you’ll have the ability to monitor how folks interact with this button.

Want to send your lead magnet by way of email? Then click on on on the ‘Integrations’ tab and choose ‘Add a New Integration.’

Integrating OptinMonster with your email marketing provider

You’ll have the ability to now make a choice your e mail advertising and marketing supplier.

With that finished, follow the onscreen instructions to configure the blending and create your email. The steps will vary depending for your provider, on the other hand OptinMonster will data you all through the process.

Adding an email service provider to your OptinMonster account

Step 6. Publish Your Optin Form

The whole step is together with the lead magnet optin to your wordpress internet web page. To try this, move ahead and click on at the ‘Publish’ tab. You’ll have the ability to then click on on ‘Save’ inside the toolbar.

Publishing an opt-in form

Inside the popup that appears, choose ‘Publish Now.’

Since you already put within the OptinMonster plugin, this optin may also be available for your wordpress dashboard in an instant.

Publishing your OptinMonster opt-in form

Simply head over to your internet web page and open the internet web page or publish where you want to turn the lead magnet optin.

Then, click on at the ‘+’ button so that you could upload a brand spanking new block. Use the search software to look out the ‘OptinMonster’ block and simply add it to your internet web page or publish.

<img decoding=”async” loading=”lazy” width=”680″ height=”340″ src=”https://wpmountain.com/wp-content/uploads/2025/02/adding-optinmonster-block.png” alt=”Adding an OptinMonster block to a wordpress page or post” class=”wp-image-330279″/>

Then, inside the OptinMonster block, open the dropdown that says ‘Choose Advertising and marketing marketing campaign…’ by the use of default.

Proper right here, you’ll want to make a choice the promoting marketing campaign you merely created.

Adding a lead generating opt-in form to your site

OptinMonster will now add the lead magnet optin form to your internet web page.

While you’re ready to make it live, simply change or post the internet web page as same old. And that’s it!

Bonus Belongings for Lead Era

Now that you just’ve were given your lead magnet optin form prepare, you may wish to be informed some additional articles to boost your lead generation efforts:

For individuals who preferred this newsletter, then please subscribe to our YouTube Channel for wordpress video tutorials. You’ll have the ability to moreover find us on Twitter and Fb.

The publish Find out how to Create a Lead Magnet Optin Shape in wordpress (2 Tactics) first appeared on WPBeginner.

wordpress Maintenance

[ continue ]

wordpress Maintenance Plans | wordpress hosting

read more

<a href=”https://wpmountain.com/find-out-how-to-create-a-lead-magnet-optin-shape-in-wordpress-2-tactics/”>Source link

See what others are saying about this...