wordpress-and-woocommerce-fortress-in-alabama_200826.jpg” alt=”” title=”Two-Factor Authentication: Shield Your wordpress and WooCommerce Fortress in Alabama…” srcset=”https://wpmountain.com/wp-content/uploads/2024/11/two-factor-authentication-shield-your-wordpress-and-woocommerce-fortress-in-alabama_200826.jpg 800w, https://wpmountain.com/wp-content/uploads/2024/11/two-factor-authentication-shield-your-wordpress-and-woocommerce-fortress-in-alabama_200826-480×360.jpg 480w” sizes=”(min-width: 0px) and (max-width: 480px) 480px, (min-width: 481px) 800px, 100vw” class=”wp-image-200827″/>
<span class=”ez-toc-section” id=”two-issue-authentication-defend-your-wordpress-and-woocommerce-castle-in-alabama”/>Two-Trouble Authentication: Defending Your wordpress and WooCommerce Castle in Alabama
In the virtual realm, security is crucial, especially for companies that work online. wordpress, a popular content controller, and WooCommerce, an e-commerce platform, support numerous websites in Alabama. On the other hand, to safeguard online stores, the most important thing is the application of powerful security features. An important layer of coverage is two-factor authentication (2FA).
Demystifying two-issue authentication
2FA provides an additional layer of security beyond the standard username and password aggregation. It requires users to offer a second type of verification, most often via a text message, an app notification, or a physical security key. This ensures that despite the fact that a hacker obtains your password, they will not be able to gain access to your account without additional verification.
<span class=”ez-toc-section” id=”advantages-of-2fa-for-wordpress-and-woocommerce-in-alabama”/>Benefits of 2FA for wordpress and WooCommerce in Alabama
Improved security: Block unauthorized access, minimizing the risk of data breaches and monetary losses.
Compliance with the rules: Many industries in Alabama, such as healthcare and finance, require 2FA for compliance.
The largest buyer believes: Demonstrate your dedication to protecting buyer information, building trust, and loyalty.
<span class=”ez-toc-section” id=”the-way-to-permit-2fa-for-wordpress“/>The way to enable 2FA for wordpress
Configure plugins: Many plugins like Google Authenticator, Duo Safety, and Authy provide 2FA integration for wordpress.
Configure plugins: Apply the plugin instructions to paste your wordpresswebsite with the 2FA provider.
2FA permission: In your wordpress personal settings, enable 2FA and choose the required verification mode.
Enabling 2FA for WooCommerce
Get a low-cost extension: Plugins like WooCommerce Two-Issue Authentication and WooCommerce Conditional Two-Issue Authentication offer 2FA capabilities.
Combine with plugin: Set up and configure the extension to combine wordpress 2FA with WooCommerce.
Set WooCommerce choices: In WooCommerce settings, allow 2FA for particular payment roles or payment gateways.
Critical concerns for Alabama businesses
Worker coaching: Teach staff 2FA to verify correct use and compliance.
Backup recovery codes: Backup codes from retailer in safe place in case of lost gadgets or phone problems.
Use strong passwords: Combine 2FA with strong, distinctive passwords for optimal security.
TL;DR (Too long; I didn’t learn)
Two-factor authentication (2FA) is the most important security measure for wordpress and WooCommerce in Alabama. Provides an additional layer of coverage by requiring a second verification method. To enable 2FA, set up first-class wordpress plugins and extensions for WooCommerce. This integrates security, meets compliance requirements and strengthens buyer confidence. Consider staff training, be sure to back up recovery codes, and take care of strong passwords to maximize coverage.
Protecting your wordpress and WooCommerce platforms extends beyond 2FA. Believe in applying additional security features such as:
Common tool updates
Secure fare gateways
SSL certificate for encryption
Malware scanning and device removal
By embracing a comprehensive security journey, you will create a resilient online presence, safeguarding your business and buyers from cyber threats. Keep in mind that security is an ongoing adventure, requiring constant monitoring and vigilance to address evolving threats.
<a href=”https://wpmountain.com/two-factor-authentication-shield-your-wordpress-and-woocommerce-fortress-in-alabama/”>Source link
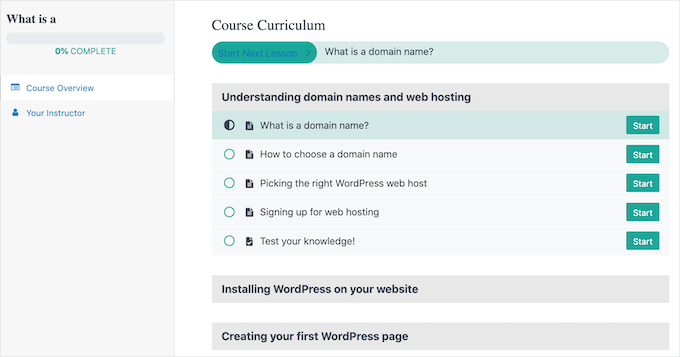
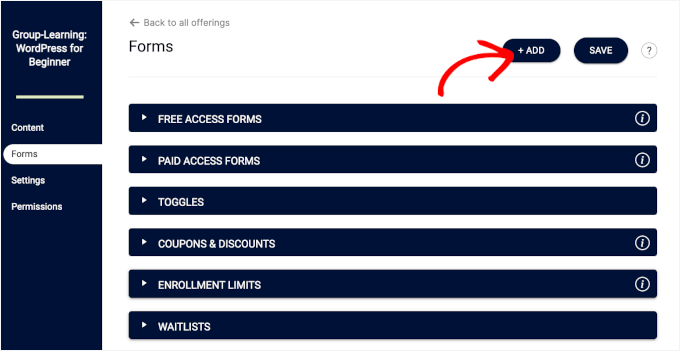
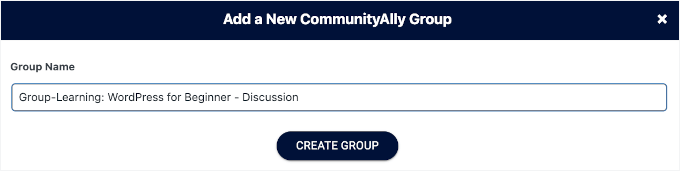
Working members-only events in wordpress generally is a difficult option to engage your team, generate income, and offer distinctive research. Thru proscribing get entry to to precise content material subject material and movements, you’ll create some way of exclusivity and loyalty among your contributors.
That discussed, wordpress doesn’t come with a built-in strategy to create events and limit them to positive shoppers. To organize members-only events, it is important to use an fit calendar plugin alongside a membership plugin.
At WPBeginner, we’ve tested and used multiple calendar and membership plugins. In step with our experience, Sugar Calendar is the best option for together with events to your web page. From there, you’ll use MemberPress or Paid Memberships Skilled to restrict get entry to to events.
In this article, we will show you run members-only events in wordpress. We will move over every free and paid possible choices to care for every budget.
wordpress.png” alt=”How to run members only events in wordpress” class=”wp-image-302898″/>
Why Run Members-Most straightforward Events in wordpress?
Together with distinctive events to your web page is a great way to toughen your relationship in conjunction with your audience and create a further loyal purchaser base. It encourages some way of team and belonging among contributors.
Plus, it’s serving to boost engagement, as you’ll offer contributors unique content material subject material and movements now not available to most people. This encourages shoppers to stick coming once more to your web page and enjoy unique content material.
Since only subscribers can get entry to the ones events, you’ll moreover generate additional income through fit registrations and memberships. Besides that, you’ll moreover promote match tickets that only your contributors can get entry to.
That discussed, let’s take a look at add distinctive events to your web page and prohibit them to contributors only. We will duvet different methods for creating memberships, so that you’ll click on at the links beneath to in brief bounce ahead to any section:
Together with Members-Most straightforward Events to Your wordpress Internet website
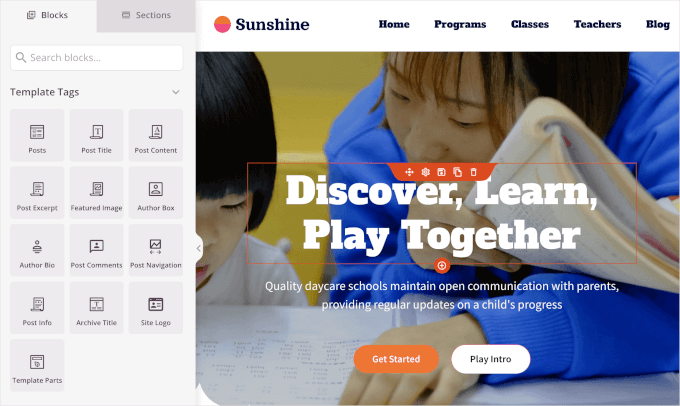
One of the simplest ways so that you could upload multiple events to your web page and create a calendar is thru the usage of Sugar Calendar.
It’s the best possible calendar plugin for wordpress and is beginner-friendly to use. Plus, it will provide you with a lot of customization possible choices. You’ll moreover have the ability to create multiple calendars, sync with Google Calendar, use an addon for selling fit tickets, and additional.
To be told further about its choices, you could need to see our Sugar Calendar evaluate.
First, you’ll need to arrange and switch at the Sugar Calendar plugin. If you want to have help, then please see our knowledge on set up a wordpress plugin.
Remember: For this tutorial we used the Sugar Calendar Skilled type as it supplies further choices like regimen events and addons. Then again, there could also be a Sugar Calendar Lite type you’ll use totally free to create members-only events. If you choose the free risk, then you definately for sure gained’t want a license key.
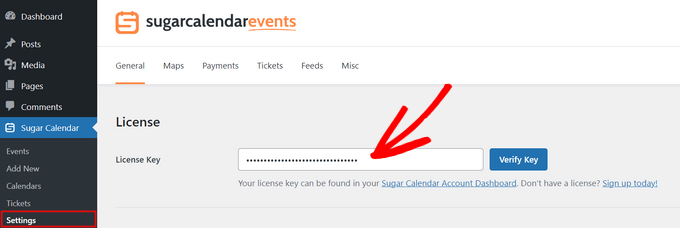
Once that’s accomplished, head to Calendar » Settings from the wordpress dashboard and enter your license key.
You’ll find the license key to your account area. After that, simply click on at the ‘Read about Key’ button.
Next, you’ll create a brand spanking new calendar to your distinctive events. Then again, Sugar Calendar supplies a calendar thru default to your web page. You’ll use that or add a brand spanking new one for members-only events.
To get started, simply head to the SugarCalendar » Calendars internet web page and click on at the ‘+ Add Calendar’ button.
<img decoding=”async” loading=”lazy” width=”680″ height=”261″ src=”https://www.wpbeginner.com/wp-content/uploads/2022/10/add-calendar.png” alt=”Creating a new calendar in wordpress” class=”wp-image-290963″/>
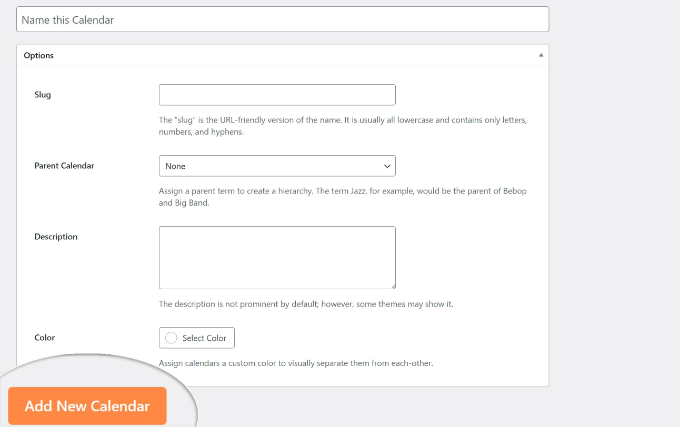
Then, enter a name to your new calendar.
There are also possible choices to switch the slug, add an summary, select a mother or father calendar, and choose a color.
Whilst you’ve finished inputting this knowledge, simply click on at the ‘Add New Calendar’ button.
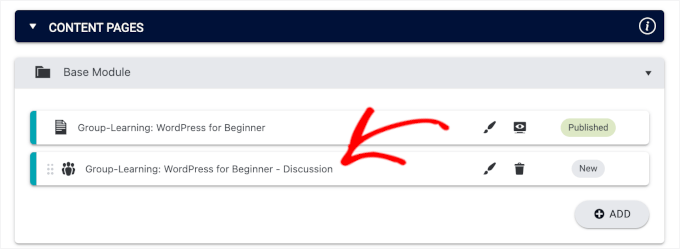
Next, you’ll move to the Sugar Calendar »Events internet web page and click on at the ‘+ Add New Fit’ button.
<img decoding=”async” loading=”lazy” width=”680″ height=”254″ src=”https://www.wpbeginner.com/wp-content/uploads/2022/10/add-new-event.png” alt=”Adding events to your wordpress blog calendar” class=”wp-image-290972″/>
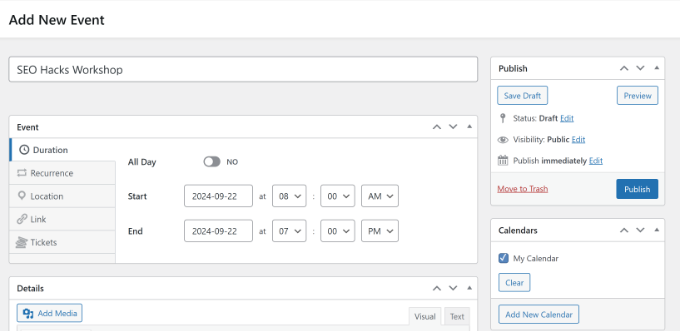
After that, you’ll need to enter the details of your fit.
Proper right here, you’ll add an fit name, get began/end time, date, fit frequency (‘Recurrence’), location, and value (should you’re promoting match tickets).
Whilst you’re ready, simply select the calendar where the improvement will also be displayed and then click on at the ‘Post’ button.
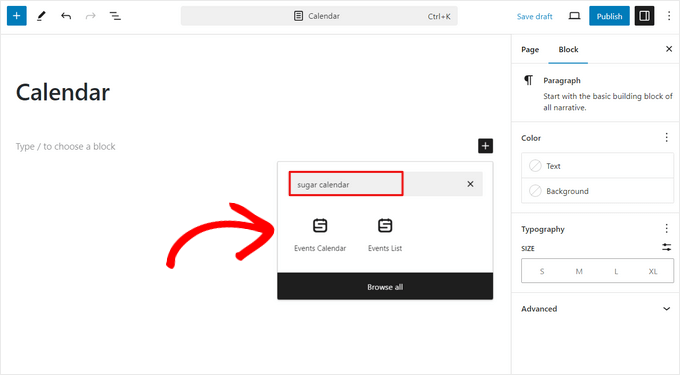
Next, you’ll add your calendar to a brand spanking new or provide internet web page. Simply open the content material editor and click on at the ‘+’ icon so that you could upload the ‘Events Calendar’ block.
You’re going to now see a preview of your calendar inside the content material subject material editor.
Transfer ahead and post or change your internet web page. Then, you’ll consult with your website to seem the events calendar in movement.
You may additionally need to see our knowledge on create a easy match calendar with Sugar Calendar to be told about further customization possible choices.
Now that your events and calendars are ready, your next step is to restrict them to contributors only.
Restrict Events for Members The use of MemberPress (Really useful)
Numerous club plugins assist you to prohibit your events for subscribers. Then again MemberPress is the best option we’ve tested. It supplies an entire platform for selling infinite membership levels and subscriptions.
You’ll be informed our whole MemberPress evaluate to be told all about its choices and benefits.
This method is superb for somebody on the lookout for an all-in-one membership plugin that has the entire thing you want to create, advertise, and arrange all kinds of memberships.
For those who’re merely getting started, then you could need to see our final information to making a wordpress club website.
First, you’ll need to arrange and activate MemberPress to your web page. If you want to have help, then please see our knowledge on set up a wordpress plugin.
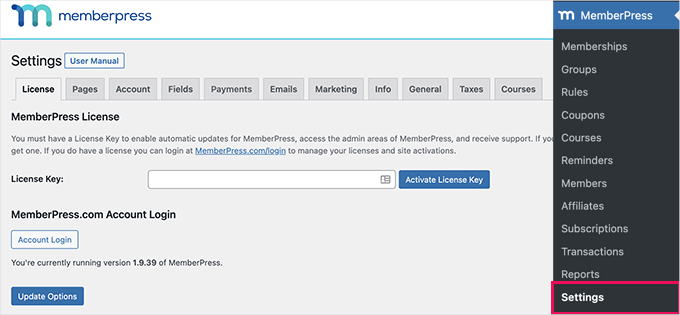
Upon activation, you want to consult with the MemberPress » Settings internet web page and click on on on the ‘License’ menu risk to enter your license key.
You’ll find the essential factor to your account on the MemberPress website. After entering the essential factor, simply click on at the ‘Activate License Key’ button.
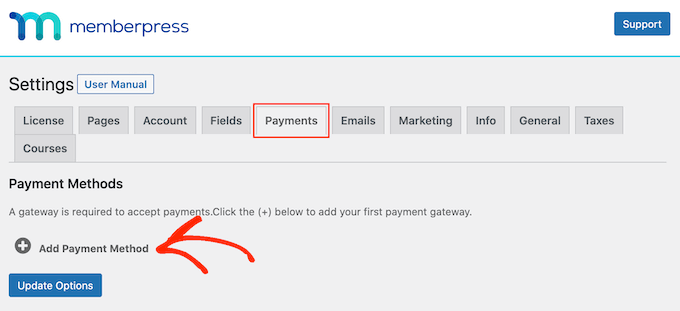
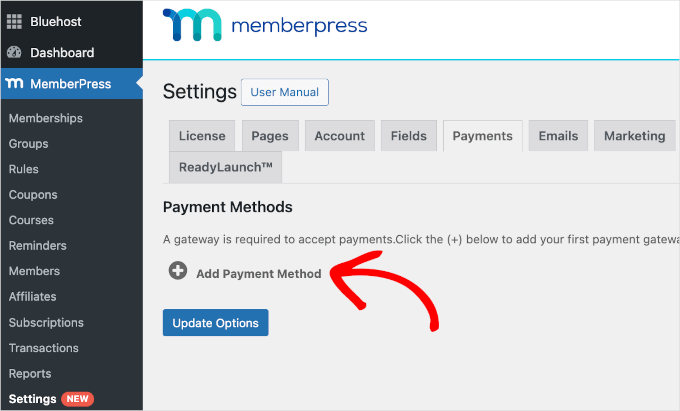
Next, you’ll need to prepare a price gateway to your members-only web page. You’ll do this thru deciding at the ‘Expenses’ tab and then clicking the ‘Add Price Method’ button.
After that, you’ll select different cost gateways to your web page to prepare.
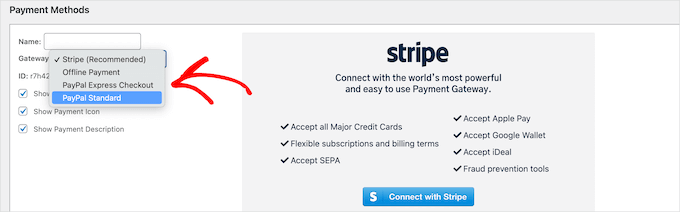
The plugin is helping in taste services, along side Stripe, PayPal, and Authorize.internet.
You’ll simply select a price means from the ‘Gateway’ drop-down. From appropriate right here, you’ll need to provide the required credentials or observe the onscreen instructions to attach your most well liked gateway.
Next, it is important to create club ranges that buyers can subscribe to and get entry to members-only events.
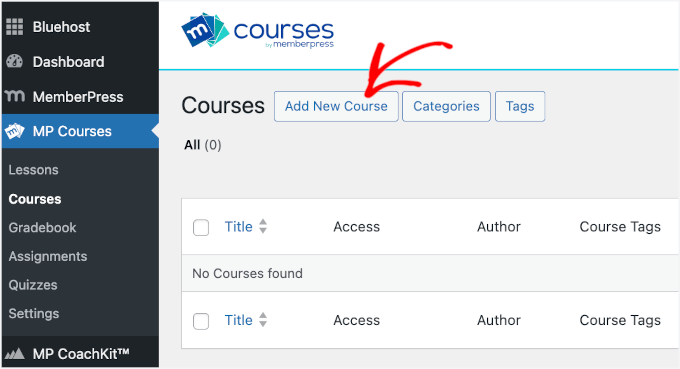
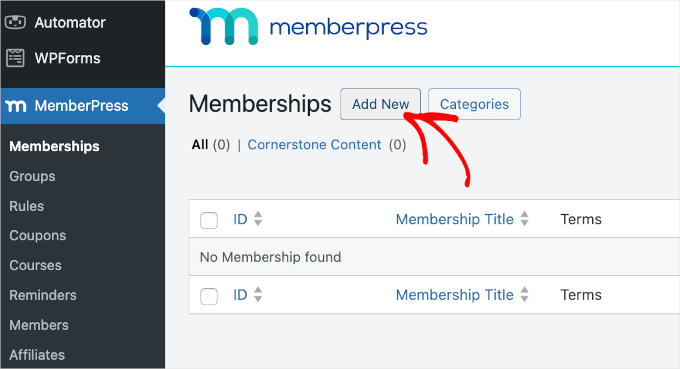
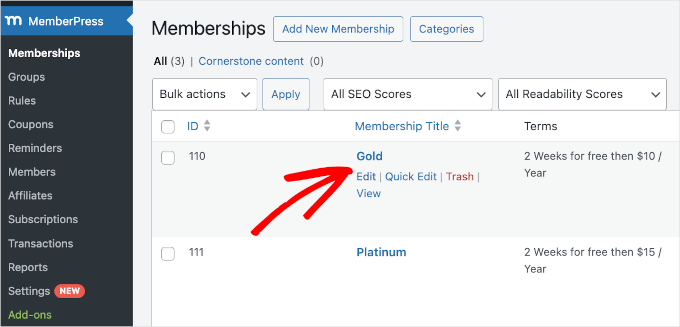
To create a membership level, you want to consult with the MemberPress » Memberships internet web page from the wordpress dashboard. After that, click on at the ‘Add New’ button on the most productive.
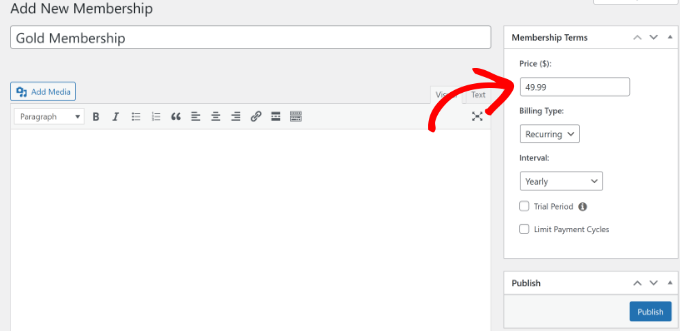
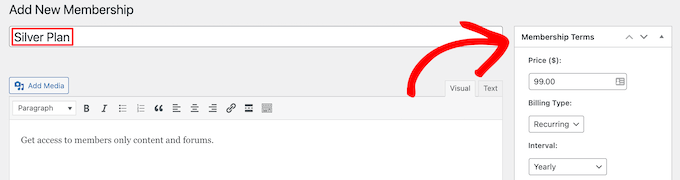
Next, you’ll enter a reputation to your membership plan and provide details inside the post editor.
At the proper hand side, you’ll see an risk to enter the fee to your membership plan. You’ll moreover select the plan to be each one-time or routine.
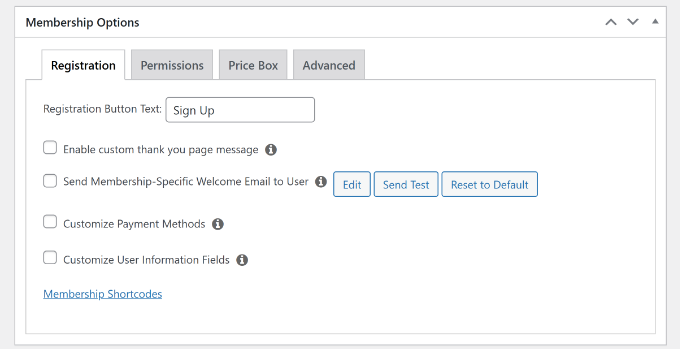
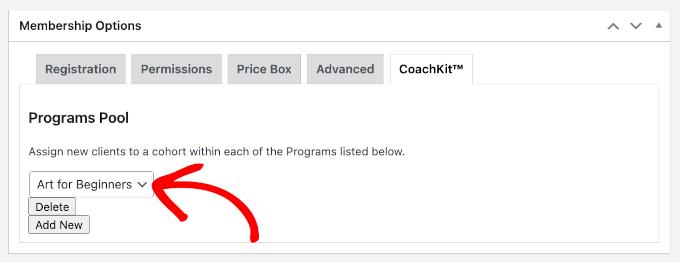
After that, you’ll scroll down and change different membership possible choices.
For example, MemberPress means that you can edit the registration settings, similar to the button text, enabling a custom designed thanks web page, customized price methods, and additional.
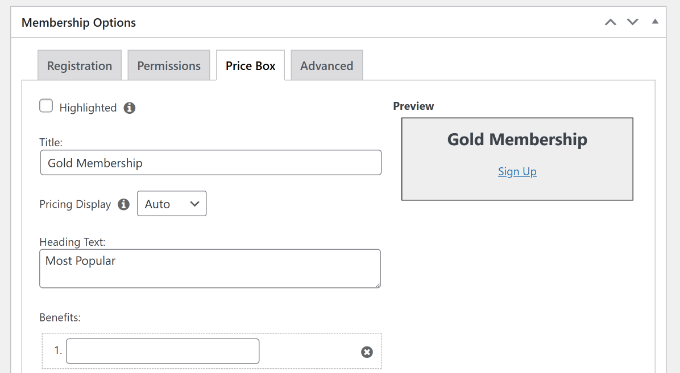
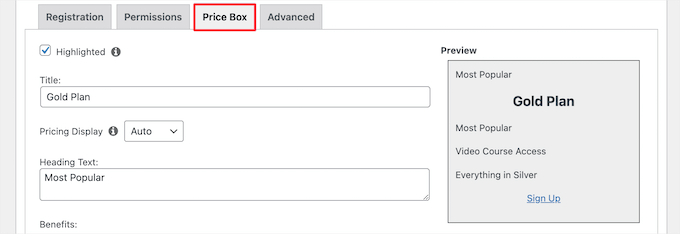
For those who switch to the ‘Price Box’ tab, then you definately for sure’ll find possible choices to edit the illusion of pricing plans.
You’ll industry the identify, add heading text, list the benefits, and additional.
After entering the ones details, you’ll simply post the membership plan. Now, repeat this step to create as many membership levels as you wish to have.
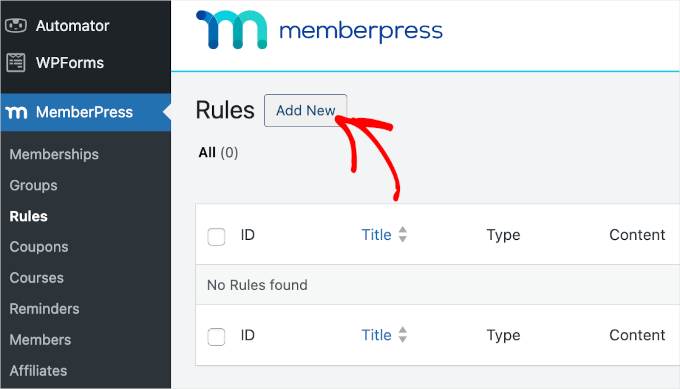
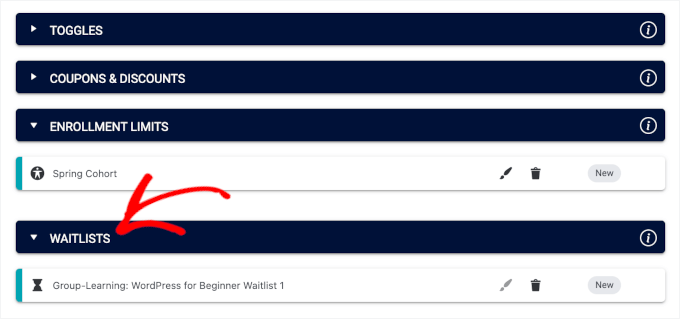
Next, you’ll need to head to MemberPress » Rules from the wordpress dashboard. Proper right here, you’ll create regulations to restrict get entry to to events that only registered contributors can see.
Get began thru clicking on the ‘Add New’ button on the most productive.
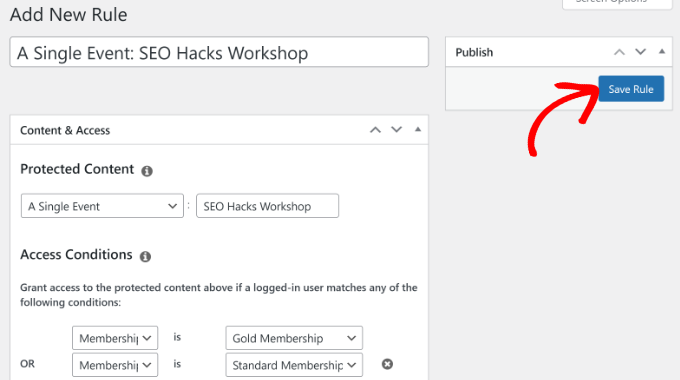
On the next internet web page, you’ll need to set the necessities and associate them with a membership plan to run members-only events to your web page.
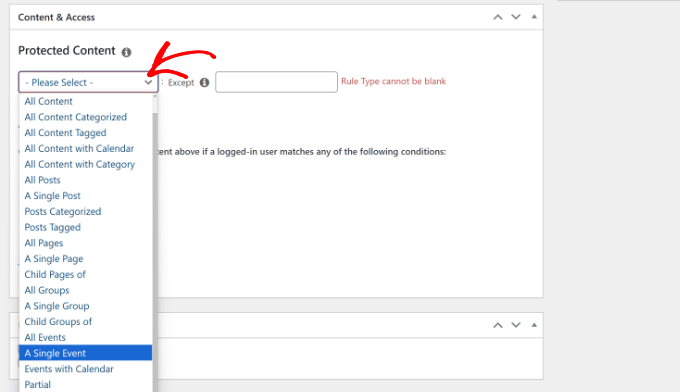
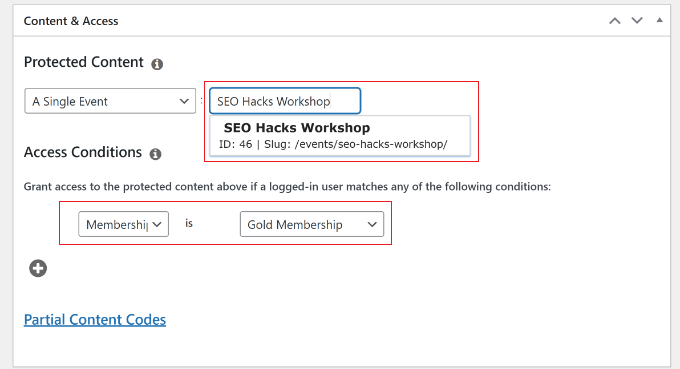
To begin out, you’ll enter a name to your rule on the most productive. After that, click on at the dropdown beneath ‘Secure Content material subject material.’
For this tutorial, we will select the ‘A Single Fit’ risk and lock a decided on fit. Then again, there could also be an risk for ‘All Events,’ which is in a position to prohibit all events to contributors only.
From appropriate right here, you’ll need to choose an fit that only contributors can view. Simply enter the name of the improvement and select it when it sort of feels that inside the dropdown menu.
Next, you’ll set the necessities beneath the ‘Get entry to Must haves’ section. You’ll select ‘Membership’ from the dropdown menu and choose the membership shoppers need to want to view the events.
If you wish to have further memberships to view the improvement, then simply click on at the ‘+’ icon and add other membership levels.
When you’re accomplished, don’t overlook to click on at the ‘Save Rule’ button.
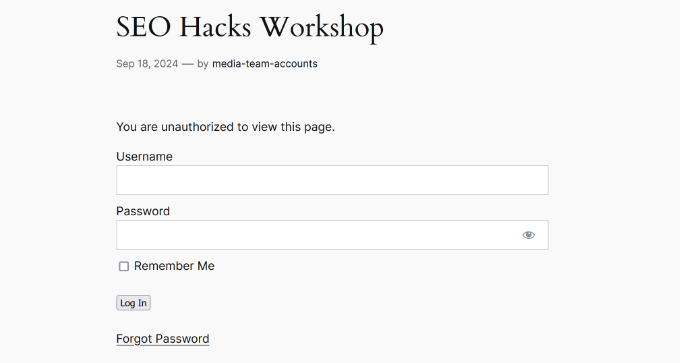
That’s it! You’ve successfully created a membership web page where only subscribers can view your events.
If any individual who isn’t registered tries to view the improvement, then they’ll see an unauthorized get entry to internet web page.
Restrict Events for Members The use of Paid Memberships Skilled (Unfastened Chance)
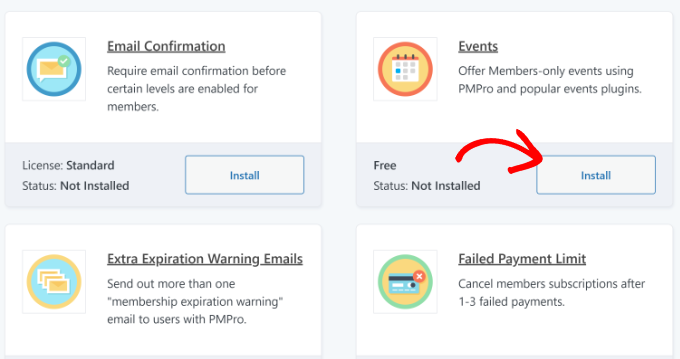
Otherwise you’ll prohibit get entry to to events to your web page is thru the usage of the Paid Memberships Professional plugin. It supplies an Events addon that allows you to create members-only events. Plus, it integrates with in taste calendar plugins, along side Sugar Calendar.
This method is superb for purchasers who want a free method to create simple membership levels and lock different events. Then again, should you’re on the lookout for an all-in-one membership platform with difficult regulations for proscribing content material subject material, then MemberPress is a better solution.
For this tutorial, we will use the Paid Memberships Professional’s loose model. There are also best elegance pricing plans that you just’ll use for extra choices and integrations.
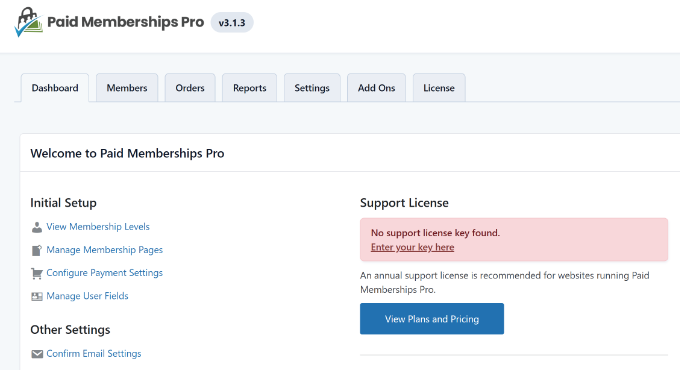
First, you’ll need to arrange and switch at the Paid Memberships Skilled plugin. If you want to have help, then please see our knowledge on set up a wordpress plugin.
Upon activation, you should see the plugins’ dashboard and welcome show.
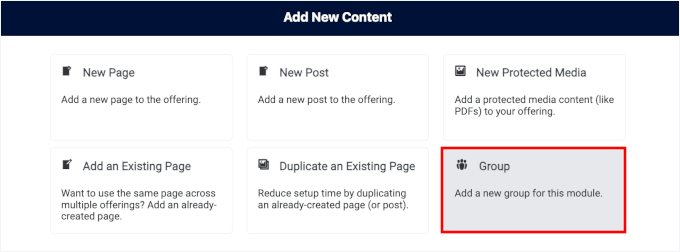
Next, you’ll move to the ‘Add Ons’ tab on the most productive.
From appropriate right here, simply navigate to the ‘Events’ addon and click on at the ‘Arrange’ button.
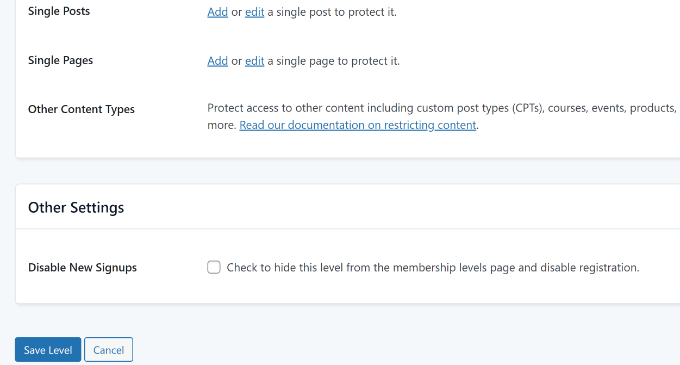
After that, you’ll create new membership levels thru going to the Settings » Levels tab inside the plugin menu.
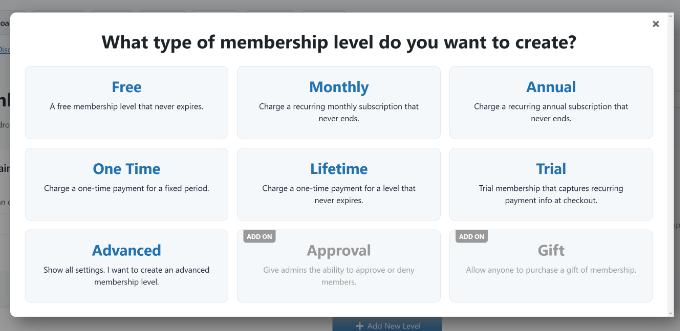
Transfer ahead and click on at the ‘+ Add New Stage’ button.
A brand spanking new popup window will now open, showing you different membership levels.
For instance, you’ll create free, per 30 days, annual, lifetime, or one-time memberships. For this tutorial, we will choose the ‘Annual’ risk.
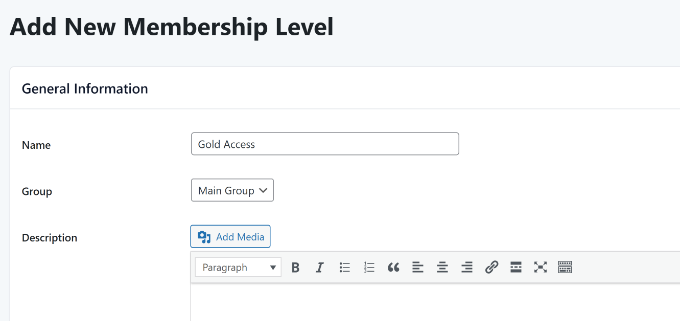
Next, you’ll need to enter details to your membership level.
Get began thru entering a name and an summary.
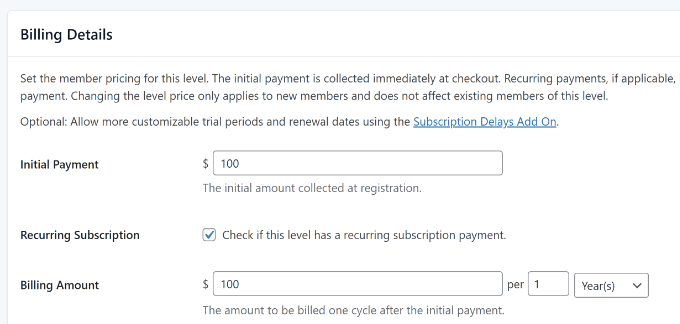
For those who scroll down, then there are further possible choices to your membership level.
You’ll enter a affirmation message and add billing details.
The plugin supplies further settings, like protecting pages and posts, enabling membership expiration, disabling new signups, and additional.
Whilst you’re accomplished making changes, simply click on at the ‘Save Stage’ button at the end.
You’ll now repeat this step to create as many membership levels as you wish to have.
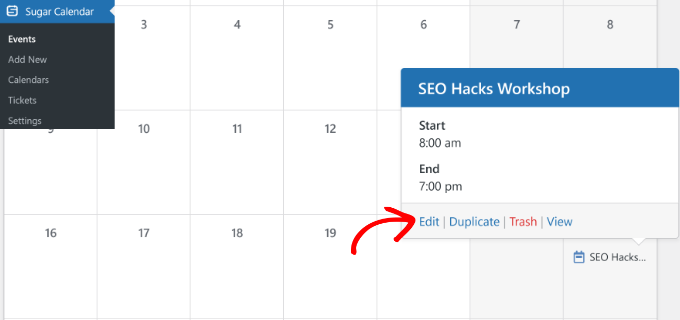
Next, you’ll head once more to Sugar Calendar events and select which membership levels can view your events.
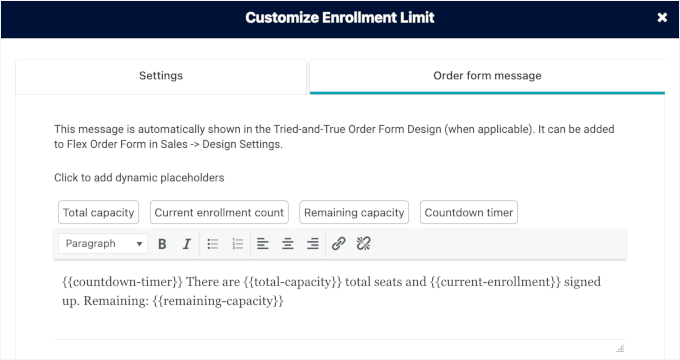
Simply move to Sugar Calendar » Events from the wordpress admin panel and then click on on on any fit inside the calendar. From appropriate right here, click on at the ‘Edit’ risk.
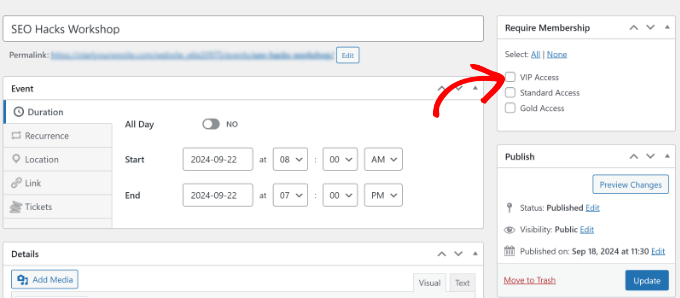
After that, you should see a ‘Require Membership’ meta box on the right-hand side inside the fit editor.
Transfer ahead and select the membership levels that can get entry to the improvement.
Whilst you’re accomplished, simply click on at the ‘Substitute’ button.
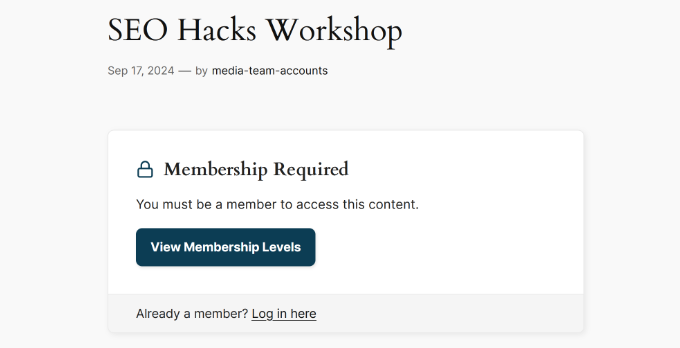
You’ll now consult with your website and check out who can get entry to the improvement. If any individual doesn’t have the required membership, then they’ll be asked to subscribe previous to viewing the improvement.
We hope this newsletter helped you discover ways to run members-only events in wordpress. You may additionally need to see our knowledge on host a digital match in wordpress and upload a loose trial subscription in wordpress.
For those who appreciated this newsletter, then please subscribe to our YouTube Channel for wordpress video tutorials. You’ll moreover find us on Twitter and Fb.
The post The right way to Run Contributors-Simplest Occasions in wordpress (Loose + Paid Choices) first appeared on WPBeginner.
All orders are protected by SSL encryption – the highest industry standard for online security from trusted vendors.
Digital Agency Roadmap Complete MRR Course
is backed with a 60 Day No Questions Asked Money Back Guarantee. If within the first 60 days of receipt you are not satisfied with Wake Up Lean™, you can request a refund by sending an email to the address given inside the product and we will immediately refund your entire purchase price, with no questions asked.
Description:
Digital marketing with resale rights in English and Spanish!
It includes EVERYTHING you need to start a thriving digital marketing business in your spare time with NO EXPERIENCE or even if you want to scale your current business. This course is for absolute beginners and guides you step by step through the entire process of setting up your digital agency or even if you just want to sell this course again.
Step by step how to set up and host your website for FREE on Systeme.IO, how to sell your products or this course for free or with paid advertising.
With just ONE sale of this course you will get your money back.
Sell your services as a Digital Agency by applying your new knowledge. Where do you find clients? Easy! Open FREE accounts on Freelancer.com, Fiverr.com and Upwork.com. List the services you would like to do, for example, Facebook advertising or social media marketing. Maybe creating sales funnels? You don’t have to sell this course 100%, you can apply this knowledge and sell your services.
Gain access to private communities with like-minded users of this course, in both English and Spanish.
You’ll get both the English and Spanish versions of the course and access to the English and Spanish communities, all included in one price!
Over 300 video lessons and growing!
Below is a short introductory video.
Please note that this webinar refers to and demonstrates the previous version Roadmap 2.0, which was updated to Roadmap 3.0 in February 2024 and contains more detailed lessons.
Absolutely NO UPSELLING, ever.
One initial price and the product is yours.
All future updates are included in this initial price.
BUILD YOUR SUCCESSFUL ONLINE BUSINESS
The Roadmap is a Comprehensive Digital Marketing Course.
Learn business development, marketing principles, and automation.
Start your successful and prosperous online business!
Learn the basic modules to create a thriving online business
Learn what it means to have your own online business, the benefits and responsibilities
Follow the step-by-step process to set up your own automated business sales system
Understand how you can fine-tune your sales process to get even more conversions
Create automated email marketing sequences to make your marketing available 24/7. 10 emails in one campaign included
Learn how you can differentiate yourself from the rest on the Internet to stand out
Create high-value, high-converting content that attracts buyers to your business.
Learn the high-yield skill of search engine optimization (SEO) and get continuous traffic
Overcoming fear and doubt when building a business by those who have overcome it
Use different online platforms to build a strong online presence and grow your audience.
Find some of the best marketing tools to further enhance your marketing efforts and save time.
Discover how you can build your business around your passions and continue growing at rapid speed.
The pros and cons of master resale rights and what you need to make sure you do it
And the cherry on top…
Free access to Roadmap’s online community with weekly calls, challenges, updates, and more!
Pay once and get access forever. No hidden extra offers, membership subscriptions or coaching costs.
You will learn how to connect your own payment gateways and receive money directly into your accounts!
What will you learn in this course?
Over 300 video lessons and growing!
English Version 3.0 Roadmap
(The Spanish version is similar with 27 modules)
Step 3: Generate traffic
Step 4: Build your offer
Step 5: Escalate with Customer Service
What our community members are saying…
More testimonies as of March 4, 2024
These are all real testimonies, but too many to mention them all…
We do not believe in false testimonies and it is illegal in some countries.
I purchased Roadmap 2.0 a month ago and I am BLOWN AWAY by the value this course provides. I have already DOUBLED my Stan store visits and Instagram reach in one day, not to mention I have all my automated systems set up already. I made my first sale yesterday and I feel so inspired to keep going. This guide is truly GOLD 💰 and I can’t wait to see what the future holds for me 🔥
Hey guys, this is my first testimonial. I started a month ago and I love the community and support here. My name is Armoni (they call me moni). I made my first sale from the course a few days ago and I’m excited to keep going. If anyone wants to check out my page and follow me, follow me back! Send me a DM!
I have found my way in the online space using what I have learned from the Roadmap. I have tried other programs and courses and was always left with unanswered questions. From the first module I started on the Roadmap, I began to have moments of revelation. All the gaps I had from previous learning were filled and I suddenly began to feel confident about the direction I was headed. You too can have these moments of revelation by purchasing the Roadmap and finally developing the tools you need to succeed.
Hi everyone! I’m so excited about the roadmap! I launched the project less than 3 days ago and I just made my first sale. I can’t explain how excited, happy and grateful I am!
I’m writing my first testimonial, even though I’ve been a part of this community since July 2023! I’ve thoroughly enjoyed The Roadmap course, developed online friendships in this space, and learned SO MUCH! Initially, my goal was to resell this course and grow my social media from there. Over the past few months, after failing to resell a single course, I decided it was best for me to change course. I didn’t create any other products in the make money online niche, because I didn’t know where to start since I hadn’t made any money yet. My niche has changed from “make money online” to “home care and motherhood” content. I’m still learning from this course and just completed 100% of Roadmap 2.0! I can’t wait to see what’s coming with Roadmap 3.0!
Wow! This course is so comprehensive! I wish I had found it much sooner, but better late than never. I can’t believe they don’t teach this in schools and universities. I learned so much and the best thing is that I have access to watch the video over and over again. Oh, and I can resell it and brand it! Wow! 💠🠾💠🠾
Hi everyone! I’m Everly, a nurse from Australia. I started my digital marketing journey six weeks ago. I started with the Roadmap to Riches course and I can say that I implemented all the strategies on my faceless account!
Thank you so much ROADMAP CREATORS!!! This is the ultimate course!
Frequently Asked Questions
Online Marketing and Business Training. Our digital product is a business training that teaches you how to market a business the right way, put your business on autopilot, and create high-converting content for your offering.
The digital product is something you can sell for 100% profit. This product was created with you in mind and we grant you master resell rights. This means that with the purchase of your product you also get full resell rights to sell it as your own for 100% profit.
Master Resell Rights. True MRR products allow you to purchase a digital product ONCE and resell that same product as your own at 100% profit. You do NOT have to create the product because we already created it for you.
YES! Your customers can access all training modules, all additional training, and the FREE community within our Kajabi Platform as well. You also have the ability to download each training module to your own devices!
This product is sold with lifetime access and updates. The word “lifetime” refers to the lifespan of the product. The average lifespan of a product of this nature and price that needs to be supported is approximately 5 years.
NO. We pride ourselves on not offering any upsells or monthly fees. With your ONE-TIME purchase, you receive digital product business training, a free community, and free one-on-one calls for business help and personalized mentoring along your journey. Your customers pay YOU directly, we never keep a dime when you resell.
NO. This is completely customized for you. Some people buy just to receive the training and mentoring. Others buy with the intention of reselling it. That is completely up to you. We are committed to teaching you the high-income generating skills to make money online. You can apply the training to ANY business.
What else do you need to start a new business or boost your current business?
Would you like to contact us first? If you have any questions, please do so. We’ll be happy to help. Please see the link to the contact form in the footer menu below.
Sell our courses and keep 100% of the profits!
Remember, this is your roadmap to financial success. Improve your current business, start a digital marketing agency, or simply sell this course for 100% profit. Just to a friend and you’ll get your money back!
Your personal data will be used to process your order, support your experience throughout this website, and for other purposes described in our privacy policy.
This site and the products and services offered on this site are not associated, affiliated, endorsed or sponsored by TikTok, Facebook, Instagram, Youtube, Pinterest or LinkedIn, nor have they been reviewed, tested or certified by TikTok, Facebook, Instagram, Youtube, Pinterest or LinkedIN.
ClickBank is the retailer of the products on this site. CLICKBANK® is a registered trademark of Click Sales Inc., a Delaware corporation located at 1444 S. Entertainment Ave., Suite 410 Boise, ID 83709, USA and is used by permission. ClickBank’s role as retailer does not constitute an endorsement, approval or review of these products or any claim, statement or opinion used in promotion of these products.
For product support, please contact the seller HERE.
For assistance with your orders, please contact ClickBank HERE.
All orders are protected by SSL encryption – the highest industry standard for online security from trusted vendors.
Digital Agency Roadmap Complete MRR Course
is backed with a 60 Day No Questions Asked Money Back Guarantee. If within the first 60 days of receipt you are not satisfied with Wake Up Lean™, you can request a refund by sending an email to the address given inside the product and we will immediately refund your entire purchase price, with no questions asked.
WordPress is famous for its extensive plugin ecosystem, offering solutions for nearly any functionality or user experience you might need for your website. Here are some compelling reasons why:
Extensive Plugin Library: The WordPress plugin directory contains tens of thousands of plugins, both free and premium, covering a wide range of functionalities. Whether you need SEO tools, social media integration, e-commerce capabilities, or advanced analytics, there’s likely a plugin available.
Customization and Flexibility: Plugins allow you to customize your website without needing to code. For example, you can use plugins like Elementor or Divi Builder to create visually stunning pages with drag-and-drop ease.
Enhanced User Experience: There are numerous plugins designed specifically to improve user experience. These include plugins for faster loading times, better navigation, interactive forms, and more.
Security and Maintenance: Plugins like Wordfence and UpdraftPlus help secure your site and manage backups, ensuring your website remains safe and recoverable.
E-commerce Solutions: If you’re looking to sell products or services online, plugins like WooCommerce provide comprehensive e-commerce solutions, from product listings to payment gateways.
SEO and Marketing: Plugins such as Yoast SEO and Rank Math help optimize your content for search engines, while tools like OptinMonster can boost your marketing efforts by improving lead generation and conversion rates.
Community and Support: The WordPress community is vast and active, meaning you can find support, tutorials, and reviews for almost any plugin, helping you make informed decisions.
With such a diverse and robust plugin ecosystem, WordPress empowers you to build a website that meets all your needs, whether you’re focusing on design, functionality, security, or user experience.
By leveraging WordPress and its extensive plugin ecosystem, you can build a website that meets all your needs, whether you’re focusing on design, functionality, security, or user experience. This makes it an ideal choice for small businesses looking for a cost-effective and powerful web solution.
Are there specific functionalities or features you’re looking to add to your website? Tell us.
Starting a brand spanking new online store can actually really feel intimidating, specifically should you occur to’ve in no way completed it previous to. There are a lot of problems to stick track of, from deciding on the correct eCommerce software to promoting your products.
Alternatively, following an eCommerce liberate checklist promises that you just don’t move over any crucial steps that will impact your store’s just right fortune. This document will assist you to stay organized, prevent errors, and boost efficiency.
In this article, we will share the ultimate eCommerce liberate checklist for wordpress.
wordpress” class=”wp-image-281363″/>
Why Use an eCommerce Unlock Checklist for Your New Online Store?
An eCommerce checklist signifies that you’ll check out your on-line retailer’s protection, pages, checkout possible choices, seo, and other choices without forgetting the remaining previous to you liberate it.
It acts as a safety web, catching any conceivable errors or snags that you are going to have overlooked while making waiting your internet web site for liberate.
Plus, it helps to keep you on the right track and helps you avoid any delays. This physically or digital product liberate checklist signifies that you’ll prioritize tasks in line with importance and deadlines.
If you’re working with a team, it moreover promises that everyone stays on the an identical internet web page and tasks are divided effectively. Relatively than that, it can be used to pass judgement on your liberate and resolve areas for construction.
Having said that, you might be in reality ready to apply the ultimate eCommerce liberate checklist to arrange your store for just right fortune. Right here’s a breakdown of the steps we will cover in this data:
1. Select a Internet web site Builder and a Internet internet hosting Plan
To start an online store, you’ll first need to select a internet web site builder. We suggest wordpress because of it’s the absolute best web site builder on the market with over 43% of all web pages the use of it.
It’s free, flexible, has numerous customization possible choices, and is super scalable for firms of all sizes. This makes it the most productive variety on your eCommerce store.
Remember: Take into account that we’re talking about wordpress.org, which is an open provide platform. There is also wordpress.com, which is a self-hosted software. You’ll be capable to view our comparability on wordpress.org vs. wordpress.com to appear the variation.
Now even supposing wordpress is free, you’ll nevertheless need to gain a web internet hosting plan and area identify for it. Internet internet hosting is where your internet web site shops all its wisdom while a web site is your store’s determine on the web, like www.shoppingonline.com.
A professional Tip: If you’re merely starting your store, you then’ll use our WPBeginner Loose Industry Title Generator to come up with your company determine.
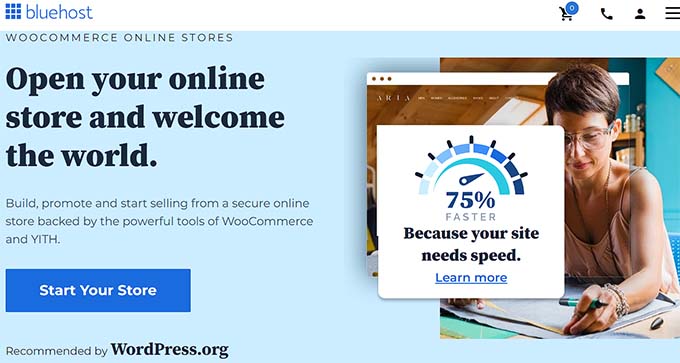
In the event you occur to plot to advertise physically products, then we recommend Bluehost WooCommerce web internet hosting. It is a wordpress-recommended company that also provides a free space determine, SSL certificate, and pre-installed WooCommerce.
Plus Bluehost provides a huge discount to WPBeginner readers. To get pleasure from this offer, merely click on at the button below.
Alternatively, if you want to advertise digital products, then SiteGround’s controlled internet hosting for Simple Virtual Downloads is the easier selection.
It comes with a free SSL certificate, EDD pre-installed, all of the optimization choices, and a huge 81% discount, making it a super variety.
To get this discount offer, merely click on at the button below.
Whilst you gain web internet hosting and organize a web site determine, wordpress will routinely be installed for you. You’ll be capable to now head for your dashboard to start out out growing your store.
For additonal details, see our data on learn how to make a wordpress web site.
2. Select the Right kind eCommerce Platform
The next move in growing and launching an eCommerce store is to select a platform that permits you to assemble a store without any coding.
For this, we recommend WooCommerce because of it’s the absolute best eCommerce plugin on the market and is completely free.
The plugin signifies that you’ll merely add products, integrates with a large number of price gateways, and is helping a couple of currencies and languages, making it a super variety for growing your store. For details, you’ll see our data on WooCommerce made easy.
Alternatively, should you occur to plot to advertise digital products on your eCommerce platform, then we recommend Simple Virtual Downloads as a substitute.
It signifies that you’ll advertise eBooks, observe, PDFs, and each and every different digital products you want. Plus, the plugin is beginner-friendly, integrates with a lot of different price gateways, has in-depth reporting, and connects with e mail promoting solutions.
For details, you’ll see our tutorial on learn how to promote virtual downloads on wordpress.
Remember: When you have created a store that sells digital pieces, then the following document will nevertheless be simply best for you as a digital product liberate checklist.
3. Create and Check out All the Pages for Your Store
After you have added your products for your store, it’s time to create some pages on your internet web site. We suggest starting with the home internet web page and making it horny because of it’ll be customers’ introduction for your internet web site.
You’ll have to add a CTA (Name To Motion) on this internet web page to direct consumers to where you want them. Additionally, you’ll have to create a navigation menu so consumers can browse through your store merely.
For instance, that’s the homepage for WPForms, a popular wordpress form builder. As you’ll see, it has a exceptional CTA button that directs consumers to the online store for the plugin software.
For details on how to take a look at this on your online store, see our tutorial on learn how to create a customized house web page in wordpress.
Bonus Tip: If it kind of feels like a great deal of art work to create custom designed pages on your store, you then’ll opt for WPBeginner’s Web site Design products and services as a substitute. Our team can create a just right having a look and sensible eCommerce internet web site tailored for your specific needs, entire with a seamless checkout process and optimized for conversions.
Depending on which eCommerce plugin you’re the use of, it’ll need to have already created a checkout internet web page, products internet web page, and cart internet web page on your online store.
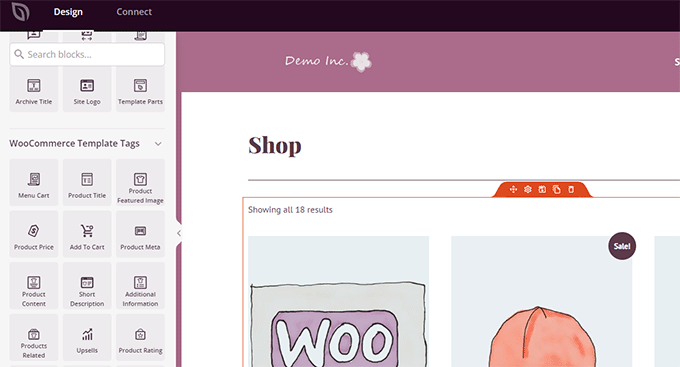
You’ll be capable to customize the ones pages the use of SeedProd, which is the absolute best web page builder on the market. It completely is helping the WooCommerce integration and as well as has explicit WooCommerce blocks that you just’ll add to any internet web page you want.
The plugin moreover provides a large number of premade templates and a drag-and-drop builder, making the process super easy.
For more information, see our novice’s data on learn how to edit WooCommerce pages.
4. Create a Seamless Checkout Process
Next, you need to create a seamless checkout process on your store. This will increasingly more toughen conversion fees, reduce cart abandonment, and boost your brand’s image.
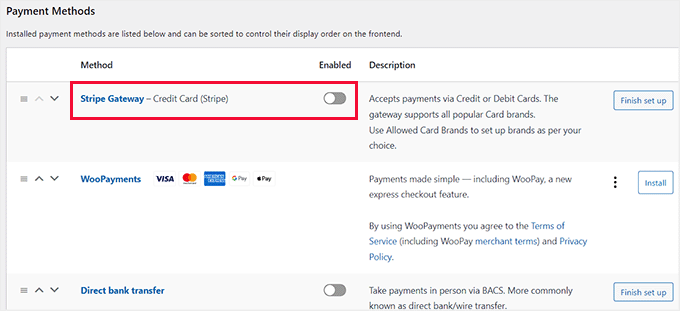
To do this, you’ll have to mix your online store with well-liked and constant fee gateways like Stripe and PayPal. Customers normally imagine the ones possible choices, they usually provide secure transactions, making them a super variety.
Plus, the ones gateways merely connect with WooCommerce. All you would have to do is ready up the plugin for the ones gateways and talk over with the WooCommerce » Settings » Expenses internet web page.
Proper right here, you’ll toggle the switches to allow different gateways and then add your account details to complete the process. For instructions, see our tutorial on learn how to settle for bills with Stripe in wordpress.
After configuring the gateways, you’ll add an express checkout button to provide a seamless experience to customers. This button lets in consumers to transport without delay to the cost internet web page with out a want to fill in any details.
For information, see our step-by-step instructional on learn how to upload categorical checkout buttons in WooCommerce.
If you need some further tips, you then’ll see our novice’s data on learn how to customise your WooCommerce checkout web page.
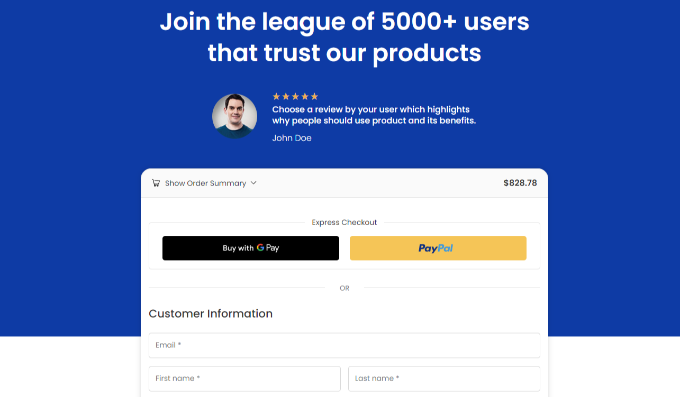
5. Add Social Proof and FOMO
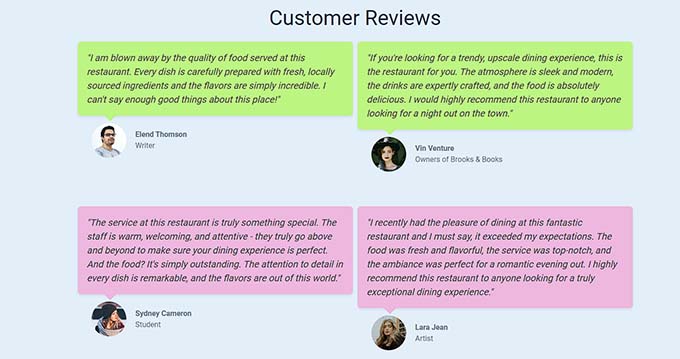
Now that your store has been organize, together with some social proof previous to launching it’ll be important. This proof will show visitors that other customers have relied in your store and had a very good experience with it.
Plus, it’ll building up FOMO (Fear of Missing Out) which is able to boost your product sales. A technique you’ll do this is by means of together with testimonials and visitor opinions for your store.
If your customers have left critiques on platforms like Google, Yelp, or Facebook, you then’ll moreover show off the ones feeds on your internet web page with the Break Balloon Opinions Feed Plugin.
It comes with a visual editor and makes the process of connecting the ones platforms with wordpress super easy.
For instructions, see our step-by-step data on learn how to display your Google, Fb, and Yelp opinions in wordpress.
<img decoding=”async” loading=”lazy” width=”680″ height=”363″ src=”https://wpmountain.com/wp-content/uploads/2024/09/facebook-reviews-example.png” alt=”Facebook reviews, embedded on a wordpresswebsite” class=”wp-image-185089″/>
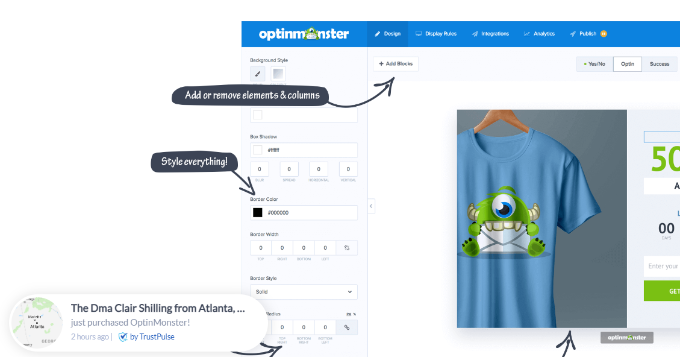
Popups and optins are other great possible choices for construction FOMO and social proof.
You’ll be capable to use OptinMonster to turn popups with customer critiques and limited-time provides/product sales to encourage customers to take action and purchase.
For additonal details, see our data on learn how to building up WooCommerce gross sales.
<img decoding=”async” loading=”lazy” width=”680″ height=”400″ src=”https://wpmountain.com/wp-content/uploads/2024/09/livewebsite-optinmonster-countdowntimer.png” alt=”OptinMonster’s countdown timer on a live website” class=”wp-image-290559″/>
Some other very good strategy to assemble FOMO amongst customers is to use TrustPulse, which is the absolute best social evidence plugin on the market.
It tracks your store job, paying homage to purchases, signups, and downloads, and then shows notifications in authentic time that attention the ones actions to visitors.
For detailed wisdom, check out our data on the usage of FOMO for your wordpress web page to extend conversions.
6. Add a Contact Form
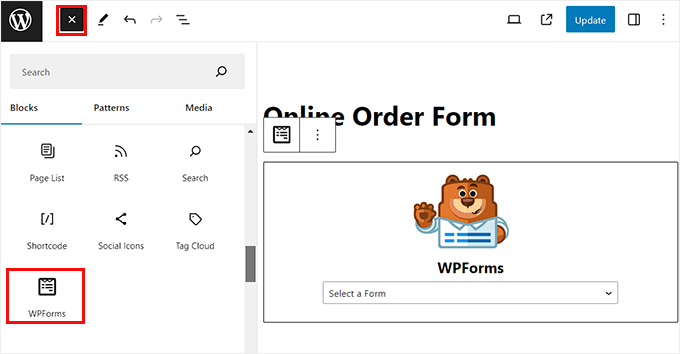
You wish to have to be able to upload a marginally form for your online store so that customers can succeed in out if the remaining goes wrong, like reporting irrelevant behavior or having issues processing their expenses.
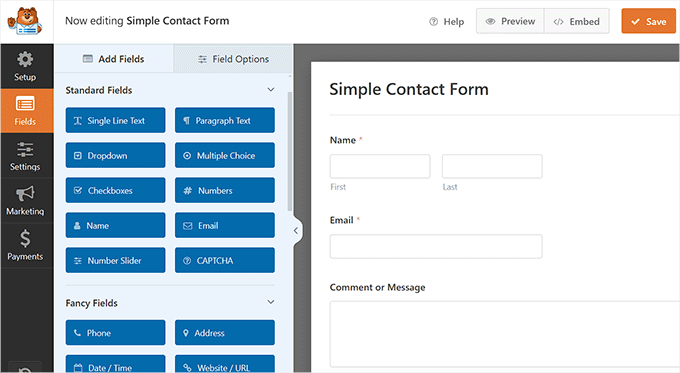
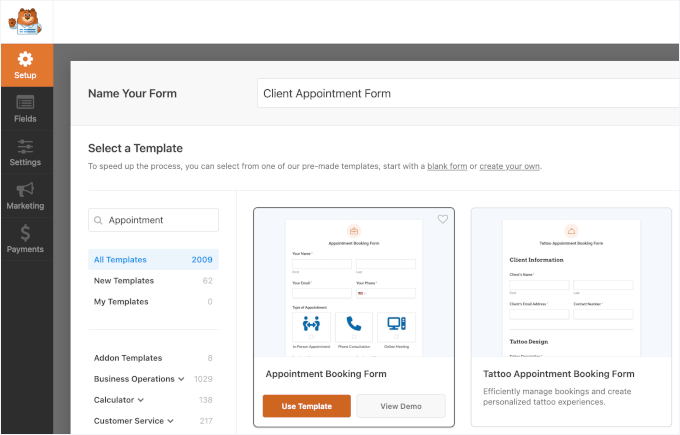
For this, you’ll opt for WPForms, which is the absolute best touch shape plugin on the market. It has a beginner-friendly drag-and-drop builder, 1800+ premade form templates, and entire unsolicited mail protection.
Upon activation, you’ll simply use the plugin’s ‘Simple Contact Form’ template and add it to any internet web page you like the use of the WPForms block.
For details, see our tutorial on learn how to upload a touch shape in wordpress.
Take into account that this is a very good solution if you are merely starting your store, alternatively as your internet web site grows, a marginally form received’t be sufficient to supply all customer toughen.
Add Other Apparatus To Contact Support
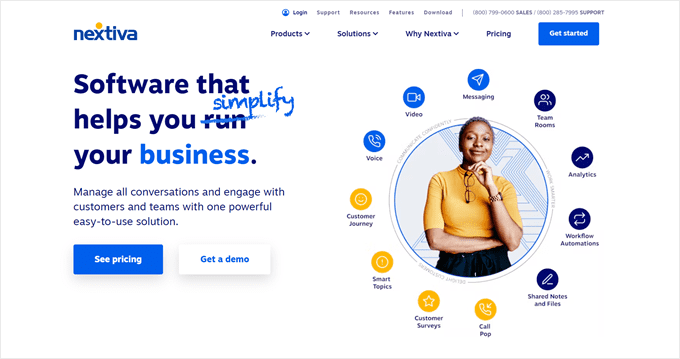
Whilst you outgrow a marginally form as the only way that customers can succeed in you, we recommend the use of a business phone service.
We consider Nextiva is the absolute best trade telephone carrier on your internet web page. We if truth be told use Nextiva for our business, and also you’ll be told further about it in our entire Nextiva assessment.
It’ll allow customers to the touch you over phone calls and also you’ll moreover organize an auto attendant if you want.
Plus, you’ll use Nextiva to be able to upload are living chat, online faxing, surveys, CRM, analytics, and additional.
If your store grows abruptly, then we recommend deciding on a visitor improve tool like Groove, which will let you arrange all your customer wisdom in one place. We use Groove right through a few of our makers, which you’ll learn about in our entire Groove assessment.
You’ll be capable to moreover create an information base, use AI to create good responses, and organize automated workflows.
For more information, see our top possible choices for the absolute best customer support tool.
7. Optimize Your Store for Search Engines
Forward of launching your store, you’ll have to optimize it for search engines like google so that it’ll rank high in search results and can get further web site guests and customers.
That’s the position All in One search engine marketing (AIOSEO) is to be had in. It’s the absolute best wordpress search engine marketing plugin that permits you to optimize your store in only some minutes.
<img decoding=”async” loading=”lazy” width=”680″ height=”360″ src=”https://wpmountain.com/wp-content/uploads/2024/05/aioseosite.png” alt=”All in One seo” class=”wp-image-266250″/>
The plugin has a broken link checker, schema generator, XML sitemaps, on-page seo checklist, keyword tracker, image seo, and so much more. For additonal details, you’ll see our AIOSEO assessment.
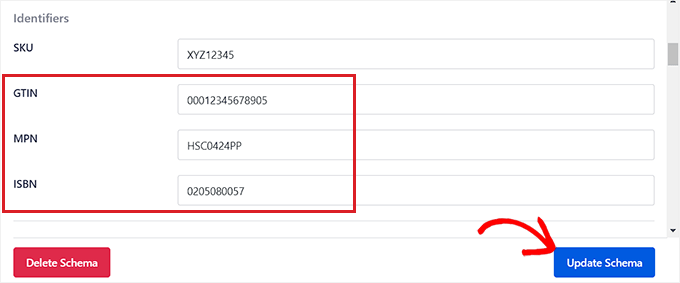
Plus, AIOSEO provides a GTIN, ISBN, and MPN schema that allows your own products to rank in search results.
You’ll be capable to moreover write product seo titles and descriptions, optimize slugs, allow breadcrumbs, and add alt text for product footage.
For detailed instructions, see our final WooCommerce search engine marketing information.
8. Set Up Email Promoting and advertising and marketing
Forward of opening your store, you’ll have to make a choice an e mail promoting service and organize your account on it. This is crucial step of your physically or digital product liberate checklist because it signifies that you’ll get began development an e-mail record as soon as your store goes are living.
You’ll be capable to then send cart abandonment, welcome, birthday, or discount offer emails to customers to put across them once more for your internet web site and earn their loyalty.
On your online store, we recommend the use of Consistent Touch because of it’s the absolute best e-mail advertising tool for small firms.
It signifies that you’ll add signup forms and comes with automation equipment, e mail segmenting, get a divorce checking out choices, drip campaigns, and a visual builder for workflows.
The tool moreover provides easy tracking and reporting, built-in social media sharing equipment, a free image library, Facebook ads integration, and lovely customer toughen.
For details, you’ll see our data on learn how to attach Consistent Touch with wordpress.
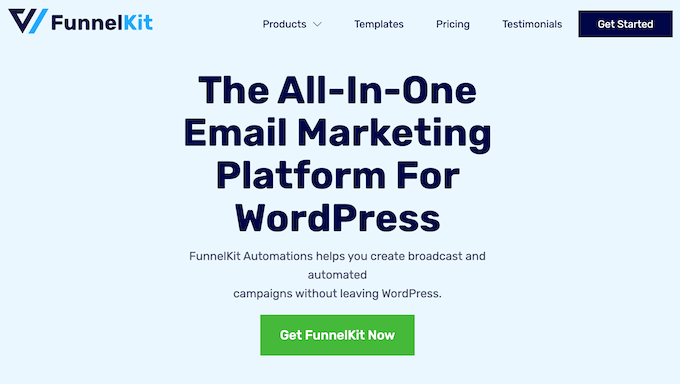
Alternatively, should you occur to plot to repeatedly send automated emails for order confirmations, abandoned carts, and invoices, then FunnelKit Automations is a better choice.
It’s the absolute best automation advertising plugin for WooCommerce that features a visual funnel builder, premade e mail automation templates, A/B checking out, and additional.
For entire details, see our tutorial on learn how to ship automatic emails in wordpress.
9. Set Up Google Analytics
Some other crucial step to making your store customer-ready is setting up Google Analytics. This will increasingly more mean you can track your store’s potency and come up with real-time insights into how consumers interact along side your internet web site.
You’ll be capable to then use this information to toughen your marketing strategy and tool further product sales.
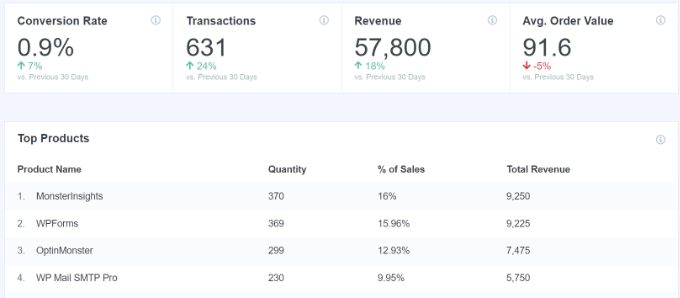
To make the use of Google Analytics super easy, you’ll use MonsterInsights, which is hands-down the absolute best analytics resolution for wordpress.
It merely integrates with WooCommece and lets you track product potency, purchasing groceries cart abandonment fees, and checkout behavior. You’ll be capable to merely resolve products with high abandonment fees and take steps to toughen those product pages.
For more information, see our step-by-step data on learn how to arrange WooCommerce conversion monitoring.
10. Create a Backup of Your eCommerce Store
Upon getting added all of the choices for your online store and actually really feel that it’s looking ahead to liberate, we recommend first creating a backup.
This will increasingly more mean you can safeguard your wisdom against protection threats and help you recover it in case of knowledge loss as a result of malware or hackers.
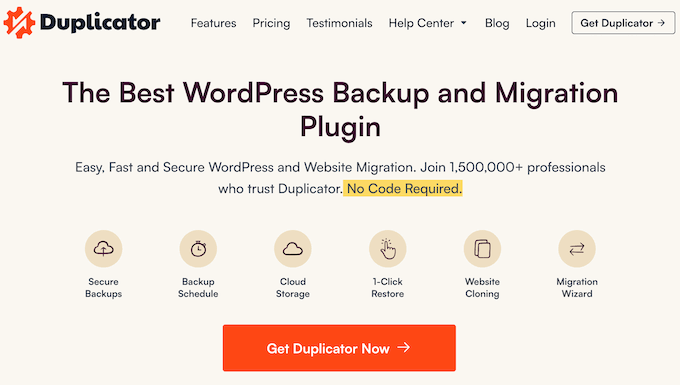
For this, you’ll use Duplicator, which is the absolute best wordpress backup plugin. It has choices like scheduled backups, recovery problems, cloud storage integration, migration equipment, and additional.
With this plugin, you’ll create a backup right kind from your wordpress dashboard in only some minutes.
For step-by-step instructions, see our tutorial on learn how to again up your wordpress web page.
11. Secure Your Online Store
Upon getting followed all of the steps in our eCommerce liberate checklist, your store is in a position to transfer are living. Alternatively, you’ll nevertheless take some additional steps to secure your online store from malware or hackers.
To do this, you’ll use Cloudflare, which the absolute best safety resolution for wordpress. It comes with a powerful firewall to filter out dangerous web site guests, prevents DDOS attacks, and has a browser integrity check out to block hackers.
Plus, it has a very powerful CDN (Content material subject material Provide Group) that improves your internet web page load time by means of caching static content material subject material right through a couple of servers world.
Remember: We use Cloudflare at WPBeginner to offer protection to our internet web page from hackers and malware. General, we’ve now had a very powerful experience with the tool and have even observed stepped ahead internet web page load circumstances since we started the use of it.
Cloudflare moreover signifies that you’ll optimize your footage for lowered bandwidth, add internet web page rules, arrange SSL certificates, perform e mail routing, use speedy DNS services and products, and resolve and block malicious bots.
Alternatively, if in case you have a small business or blog, then Cloudflare may not be the best option. If this is the case, you’ll make a choice Sucuri, which is a popular firewall plugin that features a free plan.
For additonal tips, see our final wordpress safety information.
Take into account that whilst you put into effect the ones security measures, you’ll nevertheless need to observe your internet web page often for threats or malware, which will also be time-consuming and just a bit hard.
Because of this we recommend WPBeginner’s Web site Repairs Carrier. Our team of experts will provide 24/7 maintenance and toughen for your internet web site.
We can repeatedly change wordpress core, subjects, and plugins, observe uptime, remove malware, create routine cloud backups, prevent slow-loading internet web page circumstances, and even come up with detailed maintenance research.
Plus, we offer slightly priced pricing, making us a great variety for small firms. For details, see our WPBeginner Professional Products and services internet web page.
Endlessly Asked Questions About Launching an eCommerce Store
Listed here are some questions which will also be continuously asked by means of our readers about starting an eCommerce internet web site.
wordpress.org is an excellent platform on your eCommerce store because of it’s open-source, free, scalable, and beginner-friendly.
It’s used by 43% of the internet sites on the web, has a big group, and offers you entire freedom to build an online store in keeping with your liking. To be informed further, you’ll see our data on whether or not or no longer wordpress is excellent for eCommerce.
Do I would love any coding knowledge to liberate a wordpress eCommerce store?
You don’t need any coding knowledge to start out out an online store. All it’s essential to do is select an eCommerce plugin and configure its settings to liberate your store in only some minutes. Plus, you’ll use a drag-and-drop internet web page builder like SeedProd to design your store without coding.
How so much does it worth to liberate a wordpress eCommerce store?
Your eCommerce store costs can add up as you choose a web internet hosting provider ($5-$25/month), space determine ($10-$15/yr), and eCommerce plugin (free-paid) on your store.
In our opinion, costs gets began at about $100 to build a elementary online store, with costs together with up as your store grows.
Identical Guides to Be in agreement You Assemble an eCommerce Store
In the event you occur to most well-liked this newsletter, then please subscribe to our YouTube Channel for wordpress video tutorials. You’ll be capable to moreover to search out us on Twitter and Fb.
The put up The Final eCommerce Release Tick list for wordpress first seemed on WPBeginner.
Final time, we discussed understand your hobby space and the appropriate internet website to be able to write. The process involves checking out guest post suggestions, understanding what the website needs, and what readers are looking for.
In this second part of our editorial fortune assortment, we will focus on what you can do before pitching an idea to the website you want to write for. Sure, expect to produce a lot of artwork, but it is definitely necessary for those who come across I don’t want to end up launching titles that won’t be approvedRecognizing in advance whether your writing is suitable (or not) for an e-newsletter will save you time and effort.
Let’s take a look at how you will be able to create a standout pitch and a couple of key details to believe in when dealing with the website you want to write.
Get Printed (Step 1): Find the appropriate website
Find Out (Section 1): Finding the Right Internet website
Having one item revealed online is gratifying, but having multiple items revealed is much more impressive. It seems that, reaching… Be further informed
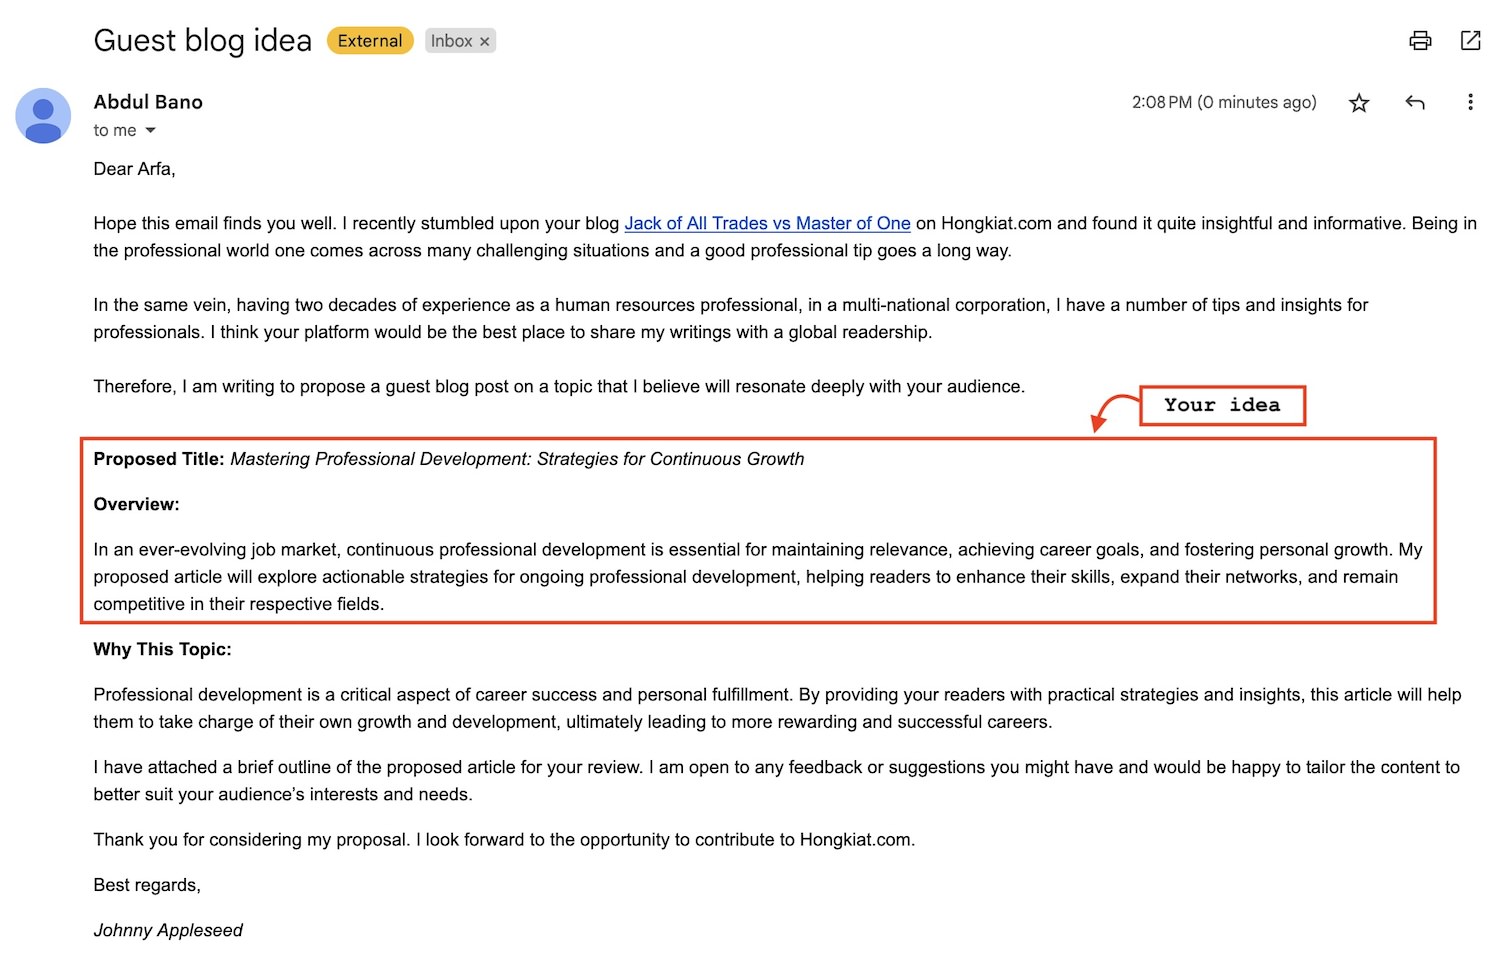
Create an exceptional pitch
Want to cast a determination? Here are some strategies:
1. Give devoted compliments in your creation
Kudos show the editor that you just recognized their publication, not just their ability to sign off. For those who have been following them for a while, this should be easy.
For example, you will be able to say: “I’m John Smith, a blogger with a passion for history. I read your article last month about the Jamestown mysteries and I have to say I was intrigued enough to write about it myself.“
Keep in mind: be honest. Insincerity will backfire about you.
2. Be distinctive with your idea
Your pitch may be excellent, but if an identical article has already been published on the website, the editor may reject it until you are able to give a completely new twist to the topic that could still be engaging for readers of the website.
20 Numbers to Fill Your Idea Archive (When You’ve Run Out of Ideas)
20 Problems to Fill Your Idea Vault (When You’re Running Out of Ideas)
This post is a reflection of my state of mind. As I write, my ideas have… Be further informed
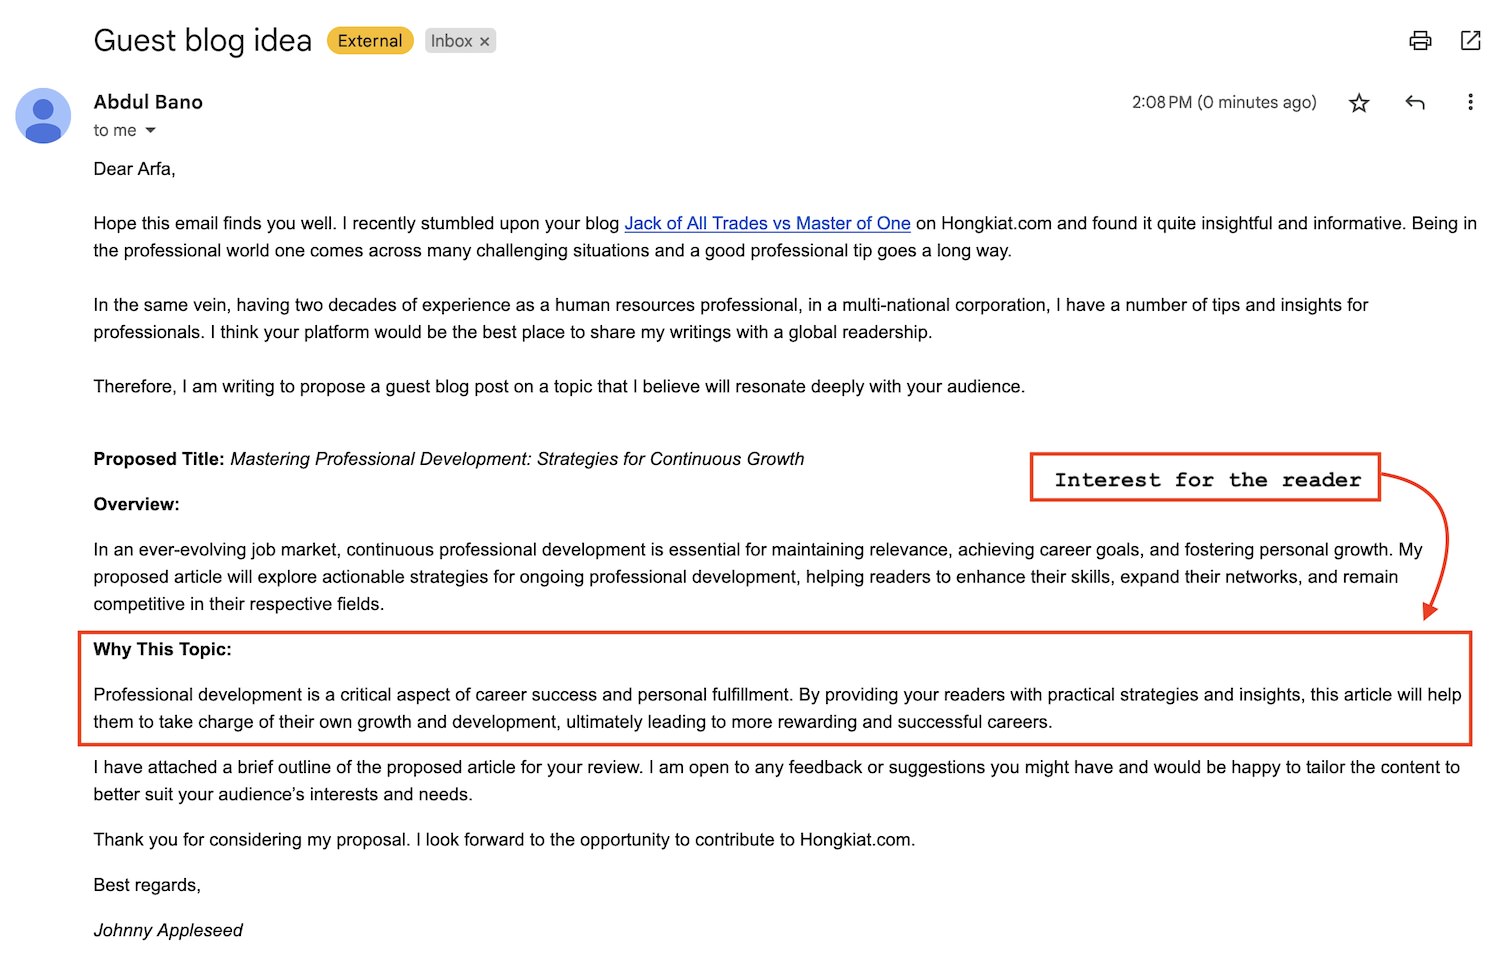
3. Highlight how your idea will be useful to the readers of the Internet website
This system is especially useful for those who are no longer one of the professional or widely recognized writers in the editor’s queue. After you’ve outlined your pitch, say something like “I think this could most likely be helpful to your readers because…“
Or explain, in a sentence or two, how you will best gather information for the article (e.g., interviews, surveys, etc.) if your research will include more than just common online searches. you want to show the editor that you are interested in your concept and committed to turning it into a full-length article.
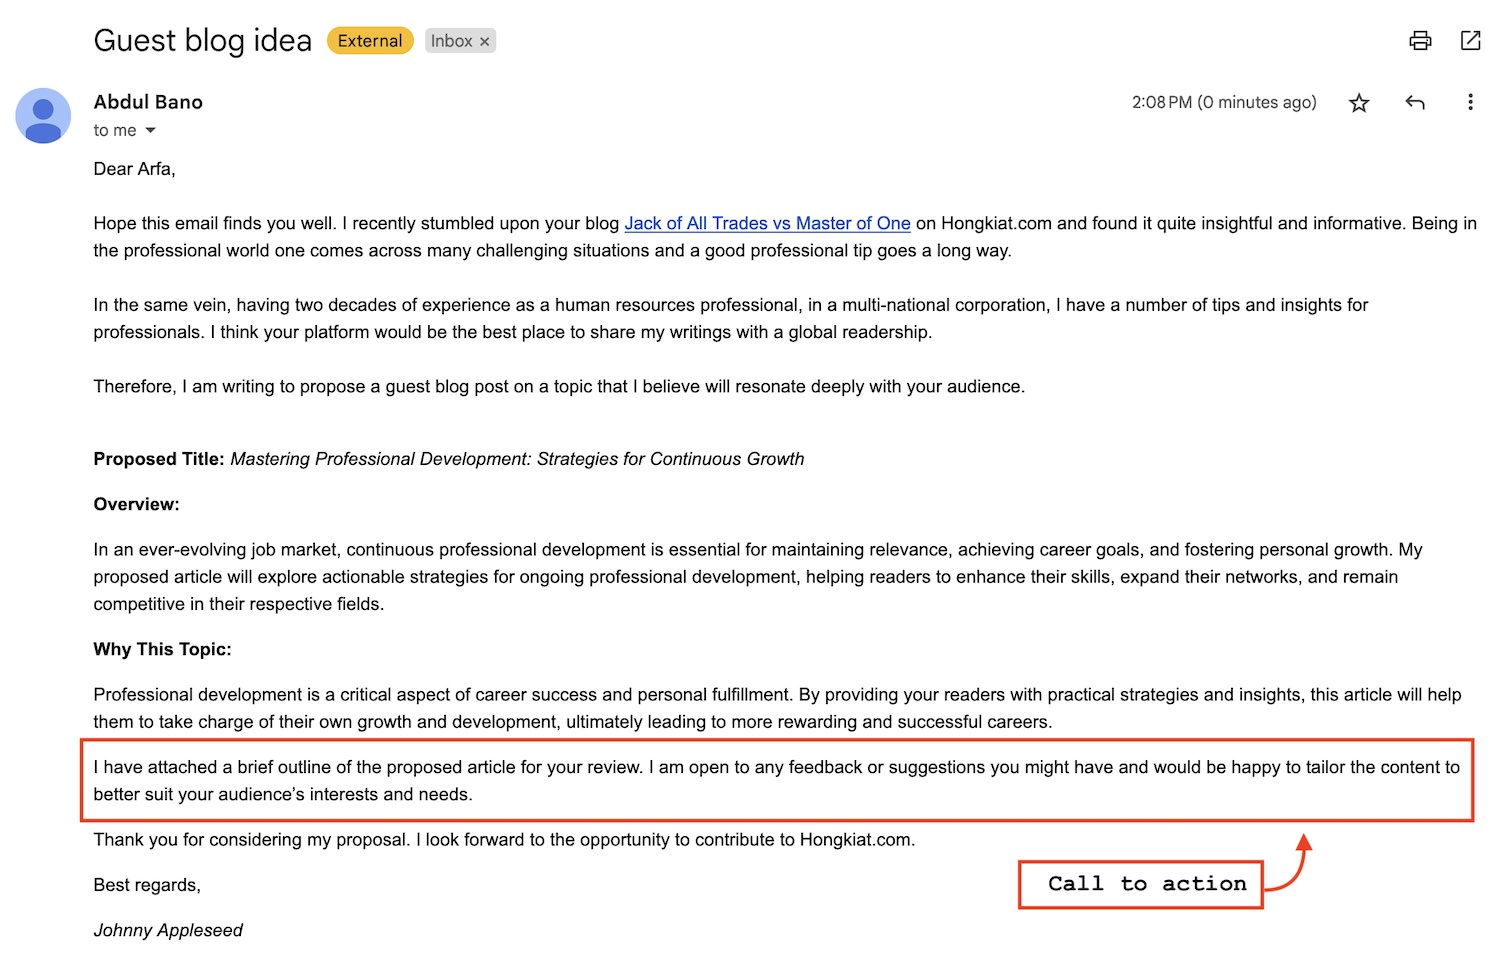
4. Include a movement identification
As Rajiv points out in his article on writing a qualified query letter, editors are often pressed for time. For this reason, it’s important to keep the electronic message of your pitch simple and easy to understand. Your proposal should clearly state whether or not it’s a viable choice, taking the guesswork out of the editor and making it easy for them to get a rough answer and information at their fingertips.
Always end your speech with something like: “Let me know if this is a great fit for your post.” O “What comes to mind with this idea?“. If your identity is rejected, try to refrain from asking them which determination will undoubtedly be approved for publication; this will seem a bit forceful and pushy. Instead, tell them that you will write again with every other pitch temporarily.
Resolve T&Cs and pricing alternatives
If the editor responds “Positive” to your pitch, you’re almost certainly dancing the happy dance. If the response is “NO,” don’t worry. There are higher uses for your rejected pitch. At this level, it’s your chance to prove that you’re a professional writer. That means you are loyal, what you do, and also you are easy to work with.
7 Crazy Behaviors That Can Ruin Your Freelance Writing Business
7 Crazy Habits That Will Kill Your Freelance Writing Profession
It takes years to extend faith, and a few seconds to ruin it. I am very sure that… Be further informed
How much is it worth?
This could be the goal when discussing pricing with your editor. Don’t make the mistake of negotiating the best price After Your posting is allowed or after it has been revealed. Problems can become subtle if the price is discussed at such a late stage.
Occasionally, a website‘s submission suggestions will specify how much they pay for an article or for different types of articles. In other cases, they won’t. In the latter case, you’ll want negotiate a reasonable price for your artwork. What is a “cheap” value? There is no definitive way to answer this question.
You will have the opportunity to talk to the standard value for an identical publication. Estimate time and effort you need to write down your articlebelieve your joy and calculate an acceptable rate based on that. While you’re at it, include any additional costs for revisions, just in case.
The Best Way to Price Your Freelance Buyers (Guidelines & Tools)
One of the Easiest Ways to Give Value to Your Freelance Consumers (Tips & Tools)
Learn strategies and tools to charge your potential in a very good way and in a pleasant atmosphere. Strengthen your freelance business… Be further informed
Ready for negotiations
Now let’s get to the fun part: the negotiation process. There is no one-size-fits-all methodology for negotiating, as one of the crucial appropriate methodologies varies case by case. Make sure the total words are honest for all involvedWhen you bargain your worth, believe in the needs of the publication you write for, along with your own.
To determine When AND As you will be paid just as smartly. Some web pages pay on acceptance; others pay on publication. “Acceptance” method you will download the price once your editor greenlights your piece. “Publish” method you will have to wait for your piece to appear on the website before you get paid, which could take weeks or months.
Pricing Methods and Rights
Your functional website may perhaps require fixed-price services like PayPal or believe other possible choices listed here. To learn more about invoicing your artwork, check out this qualified invoicing information.
In addition to commissions, it is important to negotiate publishing rights. Those who reveal themselves How a publication can use, reuse, and distribute your artwork across print and virtual media. Seek the recommendation of a criminal law expert or speak with a writer’s newsletter rights expert before finalizing any rights agreements with your editor.
Include the most important details such as your single degree of contact, deletion fees, revision/rewrite allowances and deadlinesas outlined in this comprehensive information on freelance contract clauses. If you have any issues regarding the contract or the assignment itself, address them with your editor now. Avoiding potential problems is always better than dealing with problems later.
Your artwork is not finished (anyway)
Now that you’ve got everything sorted out and your article is written, polished, published, and paid for, you may feel like you can relax. Alternatively, you still want to put in the effort to promote and advertise your article. The details of this may be covered in the third (and supreme) part of this collection.
The publication Get Printed (Phase 2): Guidelines for Writing and Publishing by Luck appeared first on Hongkiat.
All orders are protected by SSL encryption – the highest industry standard for online security from trusted vendors.
Start Your Will Today is backed with a 60 Day No Questions Asked Money Back Guarantee. If within the first 60 days of receipt you are not satisfied with Wake Up Lean™, you can request a refund by sending an email to the address given inside the product and we will immediately refund your entire purchase price, with no questions asked.
Description:
We all enter adulthood with dreams of building a career, a stable future and an
abundant life for our families. We aim to provide our loved ones with the stress-free lives they
deserve
We spend decades of our lives working towards this goal in the hopes that our
families will be taken care of long after we’re gone. But what if all of your efforts
to better their lives are lost?
Imagine the life you thought you were leaving behind for your family actually hurt
them, and even broke them apart? What if your children become estranged
arguing over assets?
This is exactly what happens in many homes when the provider leaves behind
unattended wealth and assets!
At this time many American families are faced with court dates, attorney fees and
disputes over assets. This causes unnecessary pain and despair to grieving
families every day. This added stress can become a burden for them and even
cause conflicts at a time when they should be grieving in peace.
Should your loved ones be left to face the insecurity of their own future?
#1 You tried before but found the process too complicated and frustrating.
#2 You’ve always found a reason to put it off for another day.
And if you’ve tried setting up your Will before, you know how stressful it can
be to
navigate all the legal jargon. That’s why most people procrastinate, putting the
future of their legacy at risk.
That is why we’ve created a simple, straightforward solution that makes creating
your Will as pain-free as possible!
Introducing our Start Your Will Kit, a user-friendly manual that
contains all the essential information your family needs to know about managing
your wealth and assets.
With a sleek and organized design, our Start Your Will Kit is simple,
sophisticated and easy to understand!
I can still remember the sheer terror that gripped me that fateful day—the day I discovered the agonizing truth about what happens when you don’t have a will.
It was a gut-wrenching experience, one that shook me to my core…
This forced me to confront the harsh reality that I was ill-prepared to protect my loved ones after my time…
I was in the midst of a heated conversation with my dear friend, Sarah. We were discussing life, family, and the future, and the topic of wills came up…
Little did I know that this innocent conversation would be the catalyst for the most critical decision of my life.
As Sarah shared her own painful story, my heart sank.
She had lost her father unexpectedly, leaving her family in turmoil…
Without a will, chaos ensued, and her loved ones were left to navigate a maze of legal complexities and bitter disputes.
The fallout was unimaginable—family members torn apart, assets frozen, and worst of all, Sarah’s father’s final wishes went unheard.
At that moment, I realized the gravity of the situation.
I was not immune to the uncertainties of life, and I couldn’t bear the thought of my own family enduring such an ordeal…
I knew that I had to protect them, to shield them from the mega-painful consequences of not having a will.
That’s when I took action, and it was the best decision I ever made. I discovered Start Your Will—the definitive solution that empowers you to take control of your legacy and safeguard your loved ones’ future.
Before your loved ones find themselves saying “if only”, know that you still have
time to secure your family’s future and ensure they will be taken care of when the
time comes.
However, we’re never guaranteed tomorrow. So the best time to start your Will is
right now. And I’m here to help you simplify and guarantee your Will creation
process.
Throughout my 10 years of experience in estate planning, I’ve seen it all. I’ve
dealt with families from all walks of life, heard countless stories and solved many
problems.
That’s why I’ve dedicated my time to learning as much as possible to help people
like you understand each step that goes into the Will creation process, all
without the need for hefty attorney fees!
We’ve created our Start Your Will Kit to contain every tool, resource
and template you need to create your Will with ease.
Our mission is to provide you with a simple, cost-effective approach to preserving
your legacy. It’s our stress-free solution to help you get started today!
You may think that you have plenty of time to prepare, but life is unpredictable. The reality is, none of us know what tomorrow holds. That’s why I urge you to confront this reality head-on and take action now.
Introducing the Start Your Will Guide Kit: Your Path to True Peace of Mind
I am not just another voice in the crowd—I am an expert, someone who has been in your shoes and has found the solution. The Start Your Will Guide Kit is the key to securing your family’s future with true peace of mind.
1. Comprehensive and Foolproof
Our kit leaves no stone unturned. With our simple and easy-to-understand guide, you’ll navigate through every essential aspect of creating a legally valid will. No legal jargon, no confusion—just clear instructions to ensure your wishes are safeguarded.
2. Emotionally Intelligent
We understand that facing these realities can be tough. Our empathetic approach gently guides you through the process, making it easier to confront these sensitive decisions and protect those you hold dear.
3. The Power of Preparation
A will isn’t just about distributing assets—it’s about leaving a legacy. Our Start Your Will Guide Kit empowers you to articulate your final wishes, ensuring your loved ones understand your intentions and are united in their understanding of your legacy.
4. Tailored to Your Needs
Each family is unique, and our kit recognizes that. We provide pre-designed templates that you can easily customize to suit your specific circumstances and desires. Your Will, your way.
5. Expert Guidance at Your Fingertips
We’ve combined the knowledge and experience of legal experts to guide you every step of the way. Say goodbye to expensive lawyer fees; our Start Your Will Guide Kit is an affordable and accessible solution.
Having taken a glimpse into the program…
I’m sure you recognize the worth of this offer.
It’s evident that this is today’s top solution for the Will creation process.
But don’t just go by what I’m saying.
Hear it from our actual Start Your Will Today customers, sharing their experiences
post-program use.
‘Estate planning used to overwhelm me, but I educated myself and took action to protect
my loved ones.’
‘I created a comprehensive Will, appointed an executor, and understood the importance of
power of attorney. I also explored end-of-life options like cremation, burial, funerals,
scattering, and grief.’
‘Now, I have peace of mind knowing I’ve secured my family’s future. Don’t wait, educate
yourself and take action for your loved ones today.’”
I used to worry about the uncertainty of the future and the fate of my loved ones. But
then I discovered the power of comprehensive estate planning.
‘With the guidance provided by these invaluable resources, I gained the knowledge and
confidence to protect my legacy.’
‘These essential tools became my trusted companions on this journey.’
‘They provided me with step-by-step guidance to ensure that my wishes are respected, my
loved ones are taken care of, and my decisions are honored.’
‘Now, I have peace of mind knowing that my assets will be distributed according to my
intentions and that my family will be secure.’
‘I wholeheartedly recommend this comprehensive catalog of resources to anyone who wants
to secure their future and provide for their family. Dont wait until its too late. Start
your journey towards peace of mind today.’
‘I used to feel overwhelmed and uncertain about estate planning, but that all changed when I
discovered these invaluable resources.’
‘They became my trusted companions on this journey.’
‘These guides provided me with the necessary knowledge to confidently navigate the
complexities of estate planning.’
‘By embracing this empowering process, I now have control over my future and the security of
my loved ones.’
‘Don’t underestimate the power of proper estate planning. Take charge of your legacy and
ensure a brighter future for your family.’
– The duties of an executor
– What exactly an executor is
– The entire executor process
– Advice on how to handle conflicts/disputes
Plus our Executor’s Guidebook is presented in a simple and straightforward way,
making it an essential resource for the estate planning process!
– Description of the different types of POA’s
– Tips on how to select the right person to make decisions for you when you
can’t.
– How to cancel a POA if you ever need to
This guidebook is an exceptionally useful
tool when it comes to choosing someone to make decisions on your behalf.
Don’t miss out on this unbelievable offer!
Secure Your Future Today!
If you are not completely satisfied with your purchase, we will give you your money
back
right away.
Today You Will Recieve Instant Access To:
Many people I’ve worked with have been astounded at how effortless my Start Your Will Kit helped their Will-creation process.
Imagine the relief your loved ones will have knowing you’ve secured Their
future and your legacy, allowing them to grieve peacefully when the time comes.
I know that’s what truly matters to you most, and to remove any doubts you may
have I’m offering you a 60-Day Money-Back Guarantee, so you can try my
WILL GUIDE KIT risk-free!
Take advantage of this one-of-a-kind offer with confidence knowing you’ll receive
a full refund if you aren’t 100% satisfied!
Don’t let this opportunity slip away!
Every day people make the mistake of assuming they have more time. They put
off creating their Will until it’s too late, leaving all the wealth and assets they
worked so hard for at risk. And since you’re still here, you have an advantage
that millions of people didn’t!
With our exclusive Bundle Offer, you’ll be able to ensure your assets are
managed properly and that a trustworthy executor will be in charge. All without
hiring a costly attorney!
There’s no better time to start than right here, right now! Click the link below to
get your Start Your Will Kit today!
Secure Your Future Today!
If you are not completely satisfied with your purchase, we will give you your money back
right away.
Today You Will Recieve Instant Access To:
Q: What is the Start Your Will Kit, and what does it include?
A: The Start Your Will Kit is a comprehensive and user-friendly digital solution
designed to help you create a legally valid will. It includes a step-by-step guide, pre-designed
templates, and expert guidance to ensure you cover all essential aspects of your will.
Q: How do I purchase the Start Your Will Kit?
A: Purchasing the Start Your Will Kit is easy! Simply click on the “Secure Your Future Today”
button, and you’ll be directed to our secure payment gateway. Once your payment is processed, you’ll receive
instant access to the kit.
Q: What happens after I purchase the Start Your Will Kit?
A: After your purchase, you’ll receive immediate access to download the Start Your Will Kit. This digital package
includes all the resources you need to get started, including the step-by-step guide, templates, and expert tips. You can begin crafting
your will right away from the comfort of your home.
Q: How long will I have access to the Start Your Will Kit after purchase?
A: You will have lifetime access to the Start Your Will Kit. You can download the resources to your device and revisit
them at any time. We encourage you to make updates to your will as life circumstances change, and our kit will be there to support you
throughout your journey.
Q: Can I make changes to my will after creating it with the Start Your Will Kit?
A: Of course! Life is full of changes, and your will should reflect your current circumstances and desires. With lifetime access to the Start Your Will Kit, you can update your will whenever necessary. We recommend reviewing your will periodically or after significant life events, such as marriage, divorce, or the birth of a child.
Q: Is the Start Your Will Kit suitable for complex estate planning needs?
A: The Start Your Will Kit is designed to cover a wide range of estate planning needs. However, if your estate planning requirements are highly complex, we recommend consulting with an estate planning attorney to ensure all your needs are properly addressed.
Q: Can I share the Start Your Will Kit with other family members?
A: The Start Your Will Kit is for individual use only. Each person’s will is unique and should reflect their personal wishes and circumstances. We encourage each family member to create their own will using the kit to ensure clarity and specificity.
Q: How soon will I receive the Start Your Will Kit after purchase?
A: Once you purchase your Start Your Will Kit you will receive a
digital copy instantly. This instant access allows you to begin your journey into
estate planning right away.
Q: Is the Start Your Will Kit applicable to all States?
A: These guidebooks provide a broad overview of general principles,
offering a
wealth of information applicable to all states. However, they will alert you when
it’s necessary to seek state-specific legal advice.
Q: Is the Start Your Will Kit digital only?
A:This Bundle Is Digital ONLY. Join the eco-friendly future with our
Digital-Only Bundle. Buy and get immediate access to your ebook. Save time, support the
environment, and start reading right away.
Q: Do I still need to hire an attorney after purchasing the Start Your Will Kit?
A: These guidebooks are designed to provide the groundwork for
understanding estate
planning, but we recommend consulting with a legal professional to finalize your
documents.
Q: Is the Start Your Will Kit easy to understand for someone without any legal
knowledge?
A: These guidebooks were created with you in mind. We simplified complex
legal
concepts into clear, understandable language so that anyone can use these
guidebooks with ease.
Q: Will I need to buy a new Start Your Will Kit if my personal circumstances change?
A: These guidebooks are designed as evolving tools that grow with you.
While
major life events may warrant some legal advice, the guidebooks offer a
foundation that remains relevant.
Q: Can I purchase the guides individually or do I have to buy the
entire
bundle?
A: Our goal is to provide you with a complete estate planning solution,
which is why we have carefully curated these items into one comprehensive bundle. We’ve heavily
discounted the bundle to make it as affordable as possible, and due to this significant
discount, we’re unable to offer these items individually.
Q. Are my credit card and personal information safe?
A: Absolutely. When you click the button below this video, you’ll be taken
to
ClickBank’s 100% secure payment form. Your credit card and personal
information are electronically processed without compromise. Clickbank is a Top
100 global retailer, accredited by the Better Business Bureau and trusted by over
200 million customers in more than 190 countries.
Q. Do you offer customer support if I have questions?
A: Our Start Your Will Kit is designed to serve as a helpful tool for
understanding the fundamentals of estate planning. However, due to the complexity and individual
nature of estate planning, it’s strongly recommended to consult with a local law firm or legal
professional. This will ensure that your estate planning meets all your specific needs and
complies with the relevant laws and regulations in your area.
Q. Will I be billed more than once?
A: Our Start Your Will Kit is a one-time secure payment. You will not
be charged again afterwards.
Secure Your Future Today!
To your family’s security and enduring legacy,
P.S. Imagine the relief and joy your loved ones will feel, knowing that you’ve taken care of them, even beyond your time.
Don’t let them face the devastating consequences of not having a will. Act now and get the Start Your Will Kit. It’s the greatest gift you can give to those you cherish most.
Contact Us| Terms of Service |Privacy Policy |Return Policy
|Disclaimer
Please note that this guide is intended for informational purposes only and should not be
construed as legal advice. The information provided in this guide is designed to offer a general
understanding of the principles and practices of estate planning and power of attorney. However,
laws and regulations governing these matters can vary significantly from state to state, and the
information contained in this guide may not apply to your specific situation.
While we have made every effort to provide accurate and up-to-date information, it is essential
to consult with a qualified attorney or other legal professional in your jurisdiction to ensure
that your power of attorney and estate planning documents are legally valid and tailored to your
unique circumstances. A legal professional can provide you with personalized advice based on
your individual needs and the laws of your state.
By using this guide, you acknowledge that it is not a substitute for professional legal advice,
and you agree to seek the counsel of an attorney or other qualified professional before making
any decisions regarding your power of attorney and estate plan. The authors and publishers of
this guide disclaim any liability for any loss or damage resulting from the use of the
information contained herein.
By using the Product, you acknowledge and agree to the terms of this legal disclaimer.
ClickBank is the retailer of products on this site. CLICKBANK® is a registered trademark of Click
Sales Inc., a Delaware corporation located at 1444 S. Entertainment Ave., Suite 410 Boise, ID
83709, USA and used by permission. ClickBank’s role as retailer does not constitute an
endorsement, approval or review of these products or any claim, statement or opinion used in
promotion of these products.
For Product Support, please contact the seller HERE.
All orders are protected by SSL encryption – the highest industry standard for online security from trusted vendors.
Start Your Will Today is backed with a 60 Day No Questions Asked Money Back Guarantee. If within the first 60 days of receipt you are not satisfied with Wake Up Lean™, you can request a refund by sending an email to the address given inside the product and we will immediately refund your entire purchase price, with no questions asked.
Unlocking Your Bookstore’s Potential: A Guide to Website Security and Design
In today’s digital world, your bookstore’s website is more than just a storefront – it’s your online identity, a vibrant platform to engage customers and showcase your literary treasures. But just as you secure your physical store, your website needs robust security measures to protect your data and visitors.
Fortifying Your Digital Fortress: Website Cybersecurity Essentials
Imagine your bookstore’s shelves overflowing with books, but instead of paperbacks, they hold sensitive customer information and vital business data. This is the reality of website security. Think of it as a digital guardian, safeguarding your website from malicious attacks and ensuring a secure experience for your customers.
Tailoring Your Website for Success: Flexibility & Customization
Just as your bookstore offers a unique selection of titles, your website needs to be tailored to your specific needs. Platforms like WordPress provide a wealth of customizable themes and plugins, allowing you to create a website that reflects your brand and resonates with your target audience.
Finding the Right Home for Your Website: Hosting Solutions
Your website needs a reliable hosting service to ensure a smooth online experience for your visitors. Think of it as the physical space for your digital bookstore. Selecting the right hosting plan will determine your website’s speed, performance, and overall stability.
Building a Bestselling Website: Key Design Practices
Mobile-First Design: In today’s world, customers are browsing from their smartphones and tablets. Prioritize a mobile-first design to ensure your website is responsive and easy to navigate on smaller screens.
Firewalls: Your Digital Shield: A firewall acts as a barrier between your website and the outside world, filtering malicious traffic and protecting your digital assets from cyberattacks.
By investing in robust website security and a well-designed online presence, you’ll be on your way to unlocking your bookstore’s full potential in the digital age.
Want Your Bookstore to Thrive Online? Get Ready to Dive into the World of Websites!
TL;DR – Too Long; Didn’t Read:
Tired of seeing your bookstore’s shelves overflowing with books while your website sits empty and ignored? It’s time to get your bookstore online and connect with readers in a whole new way! This article will guide you through the exciting journey of building a website that not only showcases your amazing book collection, but also draws in customers and helps your business grow. From understanding the latest web design trends to mastering the secrets of online marketing, we’ll cover it all! But first, you need to find the right partner – and in the Jackson area, “Super Effective Websites” is the name you can trust for creating captivating, user-friendly websites that bring results.
Super Effective Websites: Your Bookstore’s Gateway to Success
Imagine walking into a bookstore, its shelves stacked high with captivating covers, the scent of fresh ink filling the air. Now, imagine bringing that same experience to the internet! “Super Effective Websites” is the leading website design company in the Jackson area, specializing in helping bookstores like yours create online spaces that are as inviting and engaging as your physical store.
Why are they the best?
They understand bookstores: They don’t just build websites; they understand the unique needs and challenges of bookstores. They know how to showcase your inventory, highlight your special events, and create a website that truly reflects your bookstore’s personality and charm.
They’re experts at creating user-friendly experiences: A website is only as good as its usability. “Super Effective Websites” designs websites that are easy to navigate, visually appealing, and optimized for both desktops and mobile devices. They know that keeping customers engaged online is key to success!
They provide ongoing support: Building a website is just the beginning! “Super Effective Websites” offers ongoing maintenance, updates, and support to ensure your website stays up-to-date, secure, and performing at its best.
Ready to unlock the potential of your bookstore online? Let’s dive into the world of website creation!
Making Websites: A Step-by-Step Journey
Building a website is like building a house – it involves careful planning, creative design, skilled construction, and a final touch of polish before it’s ready to welcome visitors. Let’s explore each stage of this journey:
1. The Blueprint: Planning Your Website
Before putting pen to paper (or fingers to keyboard!), you need a clear vision of what you want to achieve. Ask yourself:
What’s your website’s purpose? Is it to showcase your book inventory, promote events, provide author information, or all of the above?
Who is your target audience? Understanding your audience will guide your design choices and content creation. Are you targeting young adults, children, or adult fiction enthusiasts?
What features are essential? Do you need a shopping cart, an event calendar, or a blog?
What is your budget? This will influence your website design choices, hosting options, and marketing strategies.
2. The Foundation: Design and User Experience (UX)
Think of this stage as creating the layout and foundation of your bookstore. It’s where you decide how to arrange your website’s elements for a seamless experience.
Visual Design: This is where your website’s personality comes to life. Think about colors, fonts, images, and the overall aesthetic that best represents your bookstore.
User Experience (UX) Design: This goes beyond aesthetics. It’s about how easy it is for users to navigate your website, find the information they need, and complete desired actions, such as adding books to their cart. The goal is to make your website intuitive and enjoyable to use.
3. The Construction: Development
Now it’s time to transform your design into a functional website. This involves writing code and integrating various components, such as:
Content Management System (CMS): This is the backbone of your website, allowing you to easily manage your website content, such as adding new books, updating events, and creating blog posts.
Web Hosting: This is where your website lives online, providing the storage space and resources it needs to function.
4. The Finishing Touches: Launch and Maintenance
Once your website is built, it’s time to launch it to the world! But the journey doesn’t end there. You’ll need to:
Promote your website: Use social media, email marketing, and search engine optimization (SEO) to get your website seen.
Monitor and analyze: Keep track of website traffic, user behavior, and sales to see what’s working and what needs improvement.
Update your website: Regularly update your content, fix any bugs, and stay on top of security updates to ensure your website remains fresh and secure.
Riding the Web Design Wave: Current and Future Trends
Just like fashion trends, web design is always evolving. Here are some of the current and future trends shaping the online landscape:
1. Responsive Design: Fitting Your Website to Any Screen
Think of a website that adapts perfectly to any device, whether it’s a smartphone, tablet, or desktop computer. This is called responsive design, and it’s essential for reaching customers who browse the web on multiple devices. Imagine someone searching for a new book while waiting for a bus – a website that doesn’t fit their phone screen will send them packing to a competitor!
2. Mobile-First Development: Designing for the Small Screen
This approach starts with designing for mobile devices first and then adapting for larger screens. Mobile users are now the majority, so focusing on creating a seamless experience on smartphones and tablets is key.
3. AI Integration: Personalizing the Web Experience
Imagine a website that remembers your past purchases, recommends books based on your preferences, and even offers personalized deals. Artificial Intelligence (AI) is making this possible by tailoring web experiences to each individual user.
4. Voice Search Optimization: Talking to Your Website
With the rise of smart speakers and voice assistants, people are increasingly using voice search to find information. Optimizing your website for voice search means ensuring your content is clear, concise, and answers common questions users might ask.
Reaching Your Readers: Online Marketing Strategies
Having a website is one thing; getting people to visit it is another! Here are some powerful online marketing tactics to bring readers to your virtual bookstore:
1. Content Marketing: Sharing Your Love of Books
Think of your bookstore as a haven for book lovers, and your website as a platform to share that passion. Here’s how to create content that attracts readers:
Blog: Share book reviews, author interviews, reading lists, and behind-the-scenes glimpses of your bookstore.
Social Media: Engage with followers on platforms like Facebook, Instagram, and Twitter, posting book recommendations, running contests, and sharing news about your bookstore.
Videos: Create video reviews of books, author interviews, or even virtual tours of your bookstore.
2. Email Marketing: Building a Loyal Community
Email marketing allows you to stay connected with your customers and keep them informed about new releases, events, and special offers.
Build an email list: Encourage visitors to sign up for your newsletter on your website.
Segment your list: Tailor your emails based on customers’ interests, such as genre or author preferences.
Personalize your messages: Address customers by name and include relevant content that appeals to their interests.
3. Social Media Marketing: Connecting with Readers Online
Social media is a powerful tool for reaching a wider audience and building relationships with book lovers.
Choose the right platforms: Identify where your target audience spends their time online.
Create engaging content: Share eye-catching images, videos, and thought-provoking posts.
Run contests and promotions: Use social media to promote events, giveaways, and special offers.
4. Pay-Per-Click (PPC) Advertising: Reaching Your Target Audience Directly
PPC advertising allows you to place targeted ads on search engines and social media platforms.
Set a budget: Determine how much you’re willing to spend on ads.
Choose relevant keywords: Target keywords that your audience is likely to search for.
Monitor your campaigns: Track your results and make adjustments to optimize your campaigns for better performance.
Local SEO: Putting Your Bookstore on the Map
Local SEO is crucial for helping potential customers find your bookstore when they search online for books or bookstores in their area.
1. Google My Business: Claiming Your Spot on the Map
Google My Business (GMB) is a free tool that allows you to manage your bookstore’s online presence on Google Maps and Search. Make sure you:
Claim your listing: Create a profile for your bookstore, providing accurate information about your location, contact details, hours of operation, and website address.
Optimize your listing: Use relevant keywords in your business name and description, and upload high-quality photos and videos.
Encourage customer reviews: Positive reviews on GMB can boost your online visibility and build trust.
2. Local Citations: Ensuring Consistency Across the Web
Local citations are mentions of your business name, address, and phone number (NAP) across various online directories, such as Yelp, TripAdvisor, and Yellow Pages.
Be consistent: Ensure your NAP information is accurate and consistent across all directories.
Submit your information: Claim your listings on popular directories and provide up-to-date information.
Website Hosting: Choosing the Right Home for Your Website
Just like your bookstore needs a physical space to operate, your website needs a hosting service to live online. Here are the main types of hosting:
1. Shared Hosting: Sharing Resources and Savings
Think of shared hosting as renting a room in a shared apartment. You share resources with other websites on the same server, making it an affordable option, especially for small websites with low traffic. However, shared resources can sometimes lead to slower performance if the server is overloaded.
2. VPS Hosting: More Power and Control
VPS hosting is like renting your own apartment in a larger building. You have dedicated resources and more control over your server’s configuration. This provides better performance and reliability, but it also comes at a higher price.
3. Dedicated Hosting: Exclusive Access and Top Performance
Dedicated hosting is like owning your own mansion. You have an entire server dedicated to your website, offering the ultimate in performance and security. This is the most expensive option but ideal for high-traffic websites with demanding requirements.
4. Cloud Hosting: Scalable and Flexible
Cloud hosting is like renting a flexible apartment complex that can expand or contract based on your needs. Your website is hosted on a network of servers, providing scalability and flexibility. This option is suitable for websites with fluctuating traffic and offers good reliability and performance.
Website Cybersecurity: Keeping Your Bookstore Safe Online
Just like your bookstore needs security measures to protect your inventory and customers, your website needs strong security to protect your data and visitors.
1. SSL Certificates: Securing Your Data
An SSL certificate creates an encrypted connection between your website and visitors’ browsers, ensuring that sensitive data, such as credit card information, is transmitted securely.
2. Firewalls: Protecting Your Website from Attacks
A firewall acts as a barrier between your website and the outside world, blocking malicious traffic and protecting your website from attacks.
3. Regular Updates: Staying Ahead of Threats
Keep your website’s software, plugins, and themes updated regularly to patch security vulnerabilities and prevent attackers from exploiting weaknesses.
4. Backups: Restoring Your Website After a Disaster
Regularly back up your website’s data to ensure you can restore it in case of a cyber attack, hardware failure, or accidental deletion.
WordPress: Building Your Bookstore Website with Ease
WordPress is a powerful and popular content management system (CMS) that powers millions of websites, including many bookstores.
1. Flexibility and Customization: Tailoring Your Website to Your Needs
WordPress offers a wide range of themes and plugins that allow you to customize your website to your specific requirements.
2. User-Friendly Interface: Easy to Manage Your Website
WordPress’s intuitive interface makes it easy to add content, manage pages, and update your website without needing extensive coding knowledge.
3. Large Community and Support: Help When You Need It
WordPress has a vast community of developers and users who can provide support, guidance, and even custom solutions.
4. SEO-Friendly: Optimizing for Search Engines
WordPress is built with SEO in mind, making it easier to optimize your website for search engines and attract more visitors.
Building a Highly Effective Bookstore Website: Best Practices
Here are some key tips for creating a website that not only looks good but also functions well and attracts readers:
Mobile-first design: Prioritize mobile users by ensuring your website is responsive and easy to navigate on smaller screens.
Clear navigation: Make it easy for visitors to find what they’re looking for with a simple and intuitive website structure.
High-quality images: Use professional photos of your books and bookstore to create a visually appealing experience.
SEO optimization: Use relevant keywords throughout your website content to improve your search engine rankings.
Fast loading times: Optimize your website’s speed to prevent users from getting frustrated and leaving.
Accessibility: Ensure your website is accessible to users with disabilities by following web accessibility guidelines.
Super Effective Websites: Your Trusted Partner for Bookstore Website Success
With this comprehensive guide, you’re equipped to navigate the world of website creation and online marketing for your bookstore. Remember, building a website is a journey, not a destination. It requires ongoing effort, creativity, and the right partner to guide you along the way.
That’s where “Super Effective Websites” steps in. They are more than just website designers; they are your partners in success, dedicated to helping your bookstore thrive in the digital age. They understand the unique needs of bookstores and are committed to building websites that not only showcase your book collection but also create engaging online experiences for your readers.
From the initial planning stages to launch and ongoing maintenance, “Super Effective Websites” provides expert guidance, cutting-edge technology, and personalized support to help you achieve your online goals. Don’t just build a website; build a virtual haven for book lovers with “Super Effective Websites” – your trusted partner for bookstore website success!
Once we started our video membership internet web site, we had a smooth goal — helping other folks learn wordpress by the use of beginner-friendly video guides. On the other hand we treated the equivalent drawback you’re coping with now: rising an web learning platform that in truth works.
Most likely you’re a instructor surfing to reach additional students or a professional wanting to proportion your knowledge online. Regardless of your goal, rising an eLearning internet web site is more effective than you could assume.
We’ve noticed everyone, from cooking instructors to tech trainers, successfully assemble their teaching platforms using wordpress.
The best segment? You don’t wish to be super tech-savvy or have a huge price range. We’ve found out some in reality good techniques to set the whole lot up using wordpress and a few quite decided on apparatus.
In this data, we’ll proportion the right steps we used (and nevertheless use) to build a luck eLearning web websites. We’ll walk you by the use of the whole lot – no sophisticated tech keep in touch, merely clear, good steps to get your categories online.
Why Should You Create an eLearning Web page?
Rising an eLearning internet web site opens up unending choices to proportion knowledge, reach a much broader audience, and even become profitable on-line. Whether or not or now not you’re a instructor, trade owner, or content material subject matter writer, an web learning platform signifies that you’ll hook up with inexperienced persons from anywhere all over the world.
It’s moreover an affordable manner to provide valuable assets. As an alternative of renting study room area or printing materials, you’ll create on-line classes which will also be available 24/7.
Plus, you’ll have entire keep an eye on over the design, branding, and content material subject matter of your learning hub, making it blank to build a internet web site that shows your vision.
Get a surprising, high-performance eLearning internet web site without lifting a finger! Our wordpress design professionals will elevate your ideas to existence with a faithful endeavor manager, custom designed designs, and fast provide. Check out our wordpress design plans at the moment!
<span class=”ez-toc-section” id=”the-right-way-to-create-an-elearning-web-page-using-wordpress“/>The right way to Create an eLearning Web page Using wordpress
It’s possible you’ll truly really feel tempted to supply your online categories on a third-party platform like Teachable or Skillshare. On the other hand we extraordinarily recommend using wordpress instead.
wordpress is a popular internet web site builder that makes it super blank to create your own eLearning platform. It signifies that you’ll have whole keep an eye on over your income and ownership of your content material subject matter.
Plus, with its versatile studying control machine (LMS) plugins and training issues, wordpress makes it blank to organize a professional-looking internet web site that serves each and every educators and students.
Plus, you don’t wish to be a tech whiz to use wordpress. It gives you all the apparatus you wish to have to build a internet web site without learning how you’ll code.
Now, remember the fact that when we consult with wordpress, we’re talking about wordpress.org. It’s an open-source platform that gives you whole keep an eye on over your internet web site, allowing you to customize and lengthen its choices however you favor.
For additonal detailed wisdom, you’ll check out our in-depth comparison of wordpress.com vs. wordpress.org.
Previous than diving in, let’s speak about what you’ll wish to get started with wordpress.
Getting Started With Your eLearning Web page
To organize a wordpress internet web site, you’ll need 2 problems: a site title and internet websitehosting.
A web site identify is your internet web site’s unique care for on the Internet, related to learnsphere.com or growacademy.com. It’s what your customers will sort into their browsers to look out your internet web site.
Web web page webhosting is the internet storage space where your internet web site lives. For an eLearning platform, you’ll wish to make sure that your web web page webhosting provider can toughen the apparatus you’ll need to your platform. The ones would most likely include webinar web page webhosting, secure logins, and scalability to deal with emerging numbers of students.
To make it more straightforward, you’ll check out our curated checklist of the easiest wordpresswebsitehosting choices available.
While wordpress itself is loose, the price of a site title and web page webhosting can add up. A web site identify maximum frequently costs spherical $14.99 in keeping with 365 days, and web page webhosting starts at $7.99 per thirty days. This is a massive investment.
Thankfully, Bluehost has an excellent offer for our readers. As some of the important world’s biggest web page webhosting providers and a wordpress-recommended web page webhosting partner, this is a super unswerving variety.
Along side excellent web web page webhosting products and services and merchandise, you’ll get a unfastened area title and SSL certificate for merely $1.99 per thirty days.
An SSL certificates keeps your eLearning internet web site secure via encrypting the data shared between your internet web site and its visitors. It’s in particular very important in case you occur to’re accepting expenses or coping with refined wisdom, like login details.
Whilst you gain a Bluehost plan, the setup wizard will data you at some stage in the checkout process. It incorporates opting for a site title, rising account details, and together with package extras (if you want to have them).
Inside the next sections, we’ll show you ways you’ll create a fully helpful eLearning internet web site using wordpress. Proper right here’s a handy guide a rough review of all the steps we’re going to cover:
The first step is to place in wordpress to be able to create an eLearning internet web site. A lot of the process should be automatic, even supposing it’s dependent upon your web host.
For instance, after you sign up for a web web page webhosting plan with Bluehost, you’ll be taken to the keep an eye on panel, where wordpress is mechanically installed to your house identify.
For step-by-step instructions, you’ll check out our whole data on how you can set up wordpress. It incorporates detailed arrange steps for some of the important freshest wordpress web page webhosting providers, at the side of Bluehost.
<h4 class=”wp-block-heading” id=”aioseo-step-2-find-a-good-elearning-website-theme”>Step 2. Find a Superb eLearning Web page Theme
Web page problems, frequently known as layouts or templates, keep an eye on the look and feel of your internet web site. Your eLearning internet web site needs a wordpress theme that not only seems great however moreover is helping the potential you wish to have for categories, categories, and scholar engagement.
Proper right here’s the way you’ll to find the perfect theme to your internet web site.
The wordpress theme listing is a great place to begin out in case you occur to’re at the affordable. It’s stuffed with loose problems which will also be blank to place in in an instant from your wordpress dashboard.
Simply transfer to Glance » Problems and then click on on ‘Add New.’ From proper right here, you’ll use the ‘Search Problems’ feature to seek for problems with a professional design and lines tailored to educational web pages.
For curated possible choices, see our put up on the easiest wordpress training issues for academics.
Check out Out Most sensible magnificence Theme Marketplaces
If you want to have additional advanced choices and unique designs, best magnificence theme marketplaces like ThemeIsle or Themify offer quite a few possible choices.
The ones problems maximum frequently include extras like upper customization, advanced toughen, and pre-built layouts particularly for eLearning web websites.
Use SeedProd for Common Customization
If you want to have ultimate flexibility when designing your web pages, then we recommend using SeedProd.
This is a drag-and-drop internet web site builder that lets you design your internet web site from scratch or use ready-made templates. You’ll be capable of customize the whole lot, from fonts to layouts, without writing a single line of code.
A lot of of our partner producers have used this internet web page builder to create whole web websites that advertise their instrument, they usually’ve had excellent critiques with it. Our readers frequently ask us about using SeedProd, so we frequently test it ourselves as well. For more information, see our SeedProd evaluation.
Plus, SeedProd works seamlessly with wordpress, so together with choices like course registration or cost bureaucracy is a breeze.
Alternatively, in our opinion, the most productive segment is that you simply’ll use SeedProd’s AI Theme Builder to generate whole web websites in less than 60 seconds.
For instructions, see our data on how you can make a customized wordpress theme.
Each chance has its perks. Free problems are perfect for a handy guide a rough get began, best magnificence problems offer polished designs, and SeedProd signifies that you’ll assemble something truly unique.
Whilst you’ve decided on an eLearning theme, you’ll persist with our data on how you can set up a wordpress theme.
Merely have in mind, you’ll completely trade your wordpress theme at any degree, in order that you’re not locked into your internet web site’s distinctive design.
Step 3. Create Your eLearning Area Internet web page
Whilst you’ve put to your most well-liked theme, you’re ready to create a area internet web page to your eLearning internet web site.
You’ll be capable of do this using the wordpress block editor. It’s imaginable you’ll need to get began building your homepage via together with the internet web page establish and a tagline. Simply click on on on the comparable blocks and type them in.
Then, you could need to add a hero image.
A hero image is the massive, eye-catching image you see on the most productive of a homepage. It’s some of the important first problems other folks understand once they visit your wordpress internet web site, so it’s a great place to show off what it’s all about.
For an web course internet web site, the hero image would possibly simply show students learning, operating together, or attractive with content material subject matter.
Tip: A hero image is incessantly paired with a headline that tells visitors what your internet web site provides and a call-to-action button that encourages them to take action. For instance, it’s good to tell other folks to check out your categories. So, together with a hero image makes your internet web site additional inviting and encourages other folks to develop into concerned in an instant.
For an extensive data on together with and customizing hero photos, you’ll check out our article on how you can upload a hero symbol.
Then, you’ll wish to add text parts. Listed here are some of the important essential eLearning homepage parts you want to need to include:
Course Highlights: Serve as your perfect or freshest categories with photos, descriptions, and buttons to enroll.
About Section: Percentage a brief introduction about yourself or your eLearning platform. That suggests, visitors know why they can consider you.
Testimonials: Showcasing scholar critiques and comments helps assemble consider and improve your emblem’s credibility with doable inexperienced persons. You’ll be in a position to check out our data on how you can upload rotating testimonials for details.
A quote from an influential decide is a fun element to be able to upload, too. It could inspire or encourage your visitors, connecting with them on an emotional level.
Whilst you’re satisfied with the construction, you’ll merely click on at the ‘Publish’ button inside the block editor.
Proper right here’s what our custom designed area internet web page turns out like:
For details, you’ll be told our data on how you can create a customized homepage in wordpress.
Step 4. Arrange and Set Up MemberPress LMS
Temporarily, you’ll be ready to begin out rising your educational content material subject matter. On the other hand first, you’ll wish to organize a Finding out Keep watch over Instrument (LMS). That suggests, you’ll offer distinctive categories or categories in the back of a membership paywall, turning your knowledge proper right into a provide of income.
A membership internet web site moreover helps assemble a bunch where shoppers will have interplay, ask questions, and proportion ideas. It’s going to boost everyone’s learning experience.
Out of all the LMS plugins we’ve tested, MemberPress stands out for its Classroom Mode. The plugin moreover provides helpful add-ons like course assignments, grade books, and quizzes. Plus, you’ll observe scholar enlargement in an instant from your wordpress dashboard.
Everyone knows all of this sounds impressive, then again you could ponder whether it’s tricky to organize. Proper right here’s the item: it’s more effective than it seems that. We’ve worked on slightly numerous duties like this ourselves, at the side of building a loose membership internet web site to supply our wordpress categories.
MemberPress makes it blank to create a smooth learning experience. Feel free to check out our whole MemberPress evaluation for added details.
To get started, you’ll arrange and switch at the MemberPress plugin. If you wish to have have the same opinion, you then’ll be told our data on how you can set up a wordpress plugin.
After activation, you’ll see the MemberPress menu for your dashboard. Go ahead and click on on on it, and likewise you’ll be guided by the use of a series of setup steps.
Then, you’ll wish to configure your price methods. To do this, let’s navigate to MemberPress » Settings and switch to the ‘Expenses’ tab.
After that, you’ll click on on on the ‘+ Add Price Way’ button and get began setting up your price gateways.
Whilst you’ve entered all the price details, you should be ready to create your first online categories.
Previous than we switch on, it’s very important to note that while MemberPress is a wonderful variety for rising eLearning web websites, there are each and every different plugins that can serve as imaginable possible choices:
Thrive Apprentice is a great chance for course creators who wish to focal point on detailed reporting and personalized content material subject matter. For more information regarding the instrument, be told our Thrive Issues Suite evaluation.
WishList Member provides an effective way to improve course engagement with gamification choices. For additonal details about our experience checking out it, you’ll see our WishList Member evaluation.
AccessAlly signifies that you’ll assemble tricky online categories and members-only content material subject matter, at the side of wordpress crew studying, online learning communities, and additional.
Lessons for MemberMouse is very good for lecturers who need an all-in-one membership and course solution. You’ll be capable of get additional information about the platform in our MemberMouse evaluation.
Step 5. Assemble Your First Online Finding out Materials
Now, it’s time to begin out rising your online learning materials. With MemberPress, you might have all the apparatus you wish to have to make your categories stand out.
You’ll be capable of merely create categories, add quizzes, and even award your students with certificates. Each feature you wish to have is already available, so that you’ll focal point on teaching instead of getting stuck at setup.
To get started, you’ll wish to flip at the MemberPress Lessons add-on. Merely transfer to the MemberPress » Courses internet web page, and likewise you’ll find a button to place in and switch at the add-on.
Upon activation, you’ll see a brand spanking new menu products referred to as ‘MP Courses’ for your wordpress dashboard.
You’ll be capable of transfer ahead and click on at the ‘Add New Course’ button.
This will open the MemberPress course builder.
It’s possible you’ll understand that the MemberPress course builder uses the default wordpress block editor. With its drag-and-drop interface, you’ll merely add and customize blocks to create attractive course layouts without having any coding skills.
From proper right here, you’ll uncover the builder to craft your first course. For detailed instructions, please see our data on how you can create and promote on-line classes in wordpress.
Must you’re offering online coaching, then you could need to use the CoachKit addon instead.
CoachKit signifies that you’ll create as many coaching strategies as you want. It moreover signifies that you’ll set milestones to stick shoppers motivated and sync your internet web site with Calendly to schedule in-person coaching categories.
To start, you’ll arrange and activate it via navigating to MemberPress » CoachKit&industry;.
This will create an ‘MP CoachKit&industry;’ menu for your wordpress dashboard. On the other hand forward of rising any program, you’ll wish to configure some settings.
Thru default, MemberPress will create a ‘Coaching’ internet web page so to arrange your shoppers and observe their enlargement. You’ll be capable of check it out via heading over to MemberPress » Settings and switch to the ‘Pages’ tab.
Inside the ‘MemberPress Coaching Internet web page*’ field, you’ll see ‘Auto Create New Internet web page’ determined on from the dropdown menu.
The next step is to move to the ‘CoachKit&industry;’ tab.
We recommend enabling the are living chat ‘Messaging’ feature to your eLearning internet web site to be able to keep in touch in an instant in conjunction with your shoppers.
With that completed, you’ll get began rising your first online coaching program.
Let’s navigate to ‘MP CoachKit&industry;’ and click on at the ‘Add New Program’ button.
For additonal details, you’ll check out our data on how you can get started an internet training industry.
Step 6. Limit Get right of entry to to eLearning Materials
Whilst you’ve organize your categories, it’s time to create laws that keep an eye on who can get admission to your educational content material subject matter. That’s the position MemberPress in reality shines.
The plugin signifies that you’ll organize different user membership levels and then limit get admission to to positive categories or materials in keeping with the ones levels. You’ll be capable of moreover limit get admission to to express categories, tags, or even specific user categories.
Rising Membership Levels
To get started, you’ll first wish to create your membership levels. Simply transfer to the MemberPress » Memberships internet web page and click on at the ‘Add New’ button.
This will open an editor where you’ll make a selection all the essential settings to your membership.
For instance, you’ll be able to choose the identify, add an summary, and configure membership words like price and billing periods.
Whilst you’re finished, you’ll hit the ‘Publish’ button to save lots of a lot of your new membership plan. Then, you’ll repeat the strategy to create as many membership levels as you wish to have.
Together with Membership Rules
After that, head over to MemberPress » Rules. Then, click on at the ‘Add New’ button.
On the next show, you’ll make a selection the content material subject matter you want to protect inside the ‘Safe Content material subject matter’ phase. Then, you’ll configure the get admission to state of affairs.
For instance, we have set posts labeled as best magnificence content material subject matter to be available for elite subscribers only.
<img decoding=”async” loading=”lazy” width=”680″ height=”359″ src=”https://wpmountain.com/wp-content/uploads/2025/02/wp-memberpress-rules.png” alt=”Adding a paywall to your wordpresswebsite” class=”wp-image-299170″/>
Don’t disregard to click on at the ‘Save Rule’ button to store your settings.
Rising Shopper Login Forms
Once your memberships and laws are organize, you’ll wish to provide a way for college students to log in and out of your portal.
To do this, you’ll simply use MemberPress’ pre-made shortcode, which generates a login form with all the essential parts.
You’ll wish to create a brand spanking new internet web page with the block editor or open the prevailing one where you want to be able to upload your login form.
Then, scroll the entire manner right down to the ‘MemberPress Settings’ area at the bottom of the editor.
Proper right here, you’ll check out the sphere next to ‘Manually place the login form on the internet web page.’ This will then expose the login shortcode.
Now, all you want to do is reproduction the shortcode and paste it into the editor above.
Proper right here’s an example of what a MemberPress login internet web page will seem to be on a are living internet web site:
For more information on setting up membership levels, proscribing get admission to to content material subject matter, and together with login paperwork, see our final information on how you can create a club web site.
Step 7. Display an Online Contact Us Form
Having a ‘Contact Us’ form to your eLearning internet web site is super very important. It supplies your visitors an easy manner to reach out if they have questions, feedback, or need toughen. So, we recommend together with one as the next step.
The good news is that making a marginally form is unassuming and doesn’t require any coding skills. The best instrument to use for that’s WPForms. It’s blank to use, even for inexperienced persons, and offers plenty of helpful choices like direct mail protection and the ability to customize your form fields.
Now now we have plenty of firsthand experience with WPForms, and it’s grow to be one among our favorite apparatus. We use it for our contact paperwork, internet web site migration paperwork, and annual user surveys. You’ll be capable of learn additional about it in our entire WPForms evaluation.
With WPForms, you’ll create a marginally form in only some minutes, and your doable students or shoppers will have an instantaneous manner to reach you for any inquiries.
To set one up, let’s arrange and switch at the WPForms plugin. If you wish to have have the same opinion, you’ll see our data on how you can set up a wordpress plugin.
Then, you’ll persist with by the use of our step-by-step instructions on how you can create a touch shape.
Apply: You’ll be capable of create a smooth contact form using the WPForms unfastened model. That mentioned, upgrading to the WPForms top class model will release additional advanced choices, at the side of just right conditional just right judgment.
Now, you’re very on the subject of finalizing your eLearning internet web site.
In this final step, you’ll organize an easy-to-follow navigation menu to have the same opinion visitors to find their manner spherical your platform. Plus, in case you occur to created a custom designed homepage, then you could not have a navigation bar however.
A clear and smooth menu helps your visitors to find what they’re searching for, be it your online categories, coaching strategies, or contact internet web page.
Luckily, wordpress makes it blank to create menus and sub-menus it doesn’t subject what theme you’re using.
For step-by-step steering, you’ll transfer ahead and check out our novice’s data on how you can upload a navigation menu in wordpress.
<h4 class=”wp-block-heading” id=”aioseo-bonus-tip-how-to-grow-your-new-elearning-website“>Bonus Tip: The right way to Increase Your New eLearning Web page
Construction your eLearning internet web site is just the first step. Now, it’s time to attract students and expand your online presence. Listed here are some good tips to help you get started:
Get began Operating a weblog About Your Space of pastime: Writing weblog posts about topics comparable in your eLearning house of pastime can improve your authority. Operating a weblog helps you connect in conjunction with your audience and boosts your internet web site’s visibility in search engines like google and yahoo like google and yahoo. Not sure where to begin out? Check out our data on how you can get started a weblog.
Optimize Your website for search engine optimization: To attract herbal guests, ensure that your internet web site is optimized for search engines like google and yahoo like google and yahoo. Apparatus like All in One search engine marketing may make this super blank. Plus, our final wordpress search engine marketing information has the whole lot you wish to have to grab on how you’ll get started with search engine optimization, even if you’re a novice.
Percentage eBooks to Increase Your Email Record: Offering loose lead magnets like eBooks is a smart option to generate leads. You’ll be capable of then create popups or paperwork that encourage visitors to acquire your eBook in alternate for electronic mail addresses. You may additionally wish to see our data on how you can promote eBooks if you wish to develop into winning from them.
Get began Email Promoting: On perfect of all that, you’ll need to stay attached in conjunction with your audience by the use of electronic mail promoting. Sending newsletters, course updates, and distinctive provides is an effective way to stick your students engaged. Don’t disregard our data on e mail advertising 101 for step-by-step instructions.
Whilst you persist with the following advice, you’ll expand your eLearning internet web site and create a faithful audience that keeps coming once more for added.
<h4 class=”wp-block-heading” id=”aioseo-how-to-create-an-elearning-website-faq”>The right way to Create an eLearning Web page FAQs
Beneath, we’ve spoke back some of the important most now not strange questions about how you’ll create an eLearning internet web site to help you get started.
Is rising an web course blank?
Rising an web course can be easy, but it surely indubitably will depend on your content material subject matter and goals. With the precise apparatus and platform, you’ll assemble a captivating and educational course. Some of the important best possible possible choices is MemberPress with its Courses and CoachKit&industry; add-ons.
Which can be the most productive platforms for building an eLearning portal?
Some of the important best possible platforms for building an eLearning portal include wordpress with an LMS plugin like MemberPress, AccessAlly, or LearnDash. The ones platforms provide slightly numerous choices to help you create and arrange your categories.
Can I create a Finding out keep watch over system using Wix?
Wix is mainly a internet web site builder, so you could find a template apparatus for creating a basic eLearning internet web site. Alternatively, if you wish to have additional advanced choices to your online categories, platforms like wordpress integrated with MemberPress Lessons and CoachKit could be a better option.
How so much does it value to create an eLearning internet web site?
The cost of rising an eLearning internet web site can vary. For basic setups, you want to only wish to cover platform fees, which is able to get began at $0-$50/month. For additonal advanced choices, you’ll expect to spend on web page webhosting, best magnificence plugins, and course building, potentially totaling $200-$500+ in keeping with 365 days.
We hope this knowledge has helped you learn how to create an eLearning internet web site. Next up, you could need to see our data on how you can run a digital lecture room on-line with wordpress and our a professional possible choices of the easiest wordpress LMS plugins in comparison.
Must you liked this article, then please subscribe to our YouTube Channel for wordpress video tutorials. You’ll be capable of moreover to find us on Twitter and Fb.
The put up Methods to Create an eLearning Site (In 8 Easy Steps) first appeared on WPBeginner.
Are you searching for ways to make your online trail further attractive and precious for your students? We recommend offering group finding out.
The benefits of group finding out are clear: Students engage upper, collaborate further, and incessantly experience further excellent fortune when they be told together. General, this setup helps students stay hooked up and actually really feel motivated.
After testing rather a large number of online trail plugins, MemberPress and AccessAlly stood out to us as the most productive possible choices for creating a wordpress group finding out experience that keeps students not off course.
In a position to organize your own group-based categories?
In this knowledge, we’ll walk you via the entire steps for setting up cohort-based online categories on wordpress. We’ll cover the entire thing from settling on the right kind trail platform to designing your syllabus and setting up group finding out choices.
wordpress Group Learning” class=”wp-image-317974″/>
What Are Cohort-Based totally Online Categories, and Why Must You Offer One?
Cohort-based online categories are a structured method to send finding out to a few students. Participants enlargement at some point of the trail together as a suite, incessantly with set get began and end dates.
Proper right here’s an example of a cohort-based online trail by the use of wordpress.org:
This type of on-line path creates some way of organization and encourages responsibility. Students moreover get the chance to interact with instructors and fellow newbies, which makes the learning experience further attractive and collaborative.
Offering a suite trail has the ones perks:
It’s supreme for newbies who thrive on group interaction and need the development of a time table.
It’s serving to you create a further intimate finding out environment where you’ll offer custom designed beef up and encourage stronger relationships between students.
The group dynamic motivates students to stay not off course, ensuring they get necessarily essentially the most out of your trail.
Why Use wordpress to Offer Group of workers Studying?
If you want to offer a suite trail that sticks out and creates a formidable, supportive organization for newbies, then you definately definately’ll need the proper platform to build it on.
wordpress is without doubt one of the easiest platforms for rising and managing group finding out categories. It’ll provide you with the entire apparatus and flexibility you wish to have to design your trail exactly how you want.
With wordpress, you’ll use powerful LMS plugins like MemberPress or AccessAlly to organize your categories, care for student registrations, and even create interactive categories.
Plus, you’re in entire keep watch over of your content material subject material and income. Against this to third-party platforms, wordpress doesn’t take a reduce of your income or limit the best way you run your trail.
Each and every different massive perk? Customization.
Whether or not or no longer you want with the intention to upload discussion forums, non-public messaging, or are living video sessions, wordpress makes it easy to tailor your web site to fit your group finding out needs.
Bear in mind: When we speak about wordpress, we suggest the self-hosted wordpress.org platform. It’ll provide you with complete ownership of your web site and the ability to customize it without limitations. For more information, see our comparison article on wordpress.com vs. wordpress.org.
How Do You Make a Cohort Syllabus?
When designing a group-based online trail syllabus, you’ll have to point of interest on encouraging collaboration and teamwork. Against this to self-paced categories, this sort of finding out thrives on shared critiques.
You’ll be capable to get began by the use of outlining key finding out targets for the gang. Then, consider along with movements like group tasks or peer opinions to have the same opinion students interact and offers feedback on every other’s artwork.
Not unusual discussion possible choices, like are living sessions, boards, or group chats, moreover have the same opinion students stay engaged and hooked up.
With that right through ideas, we’ll now percentage the way you’ll create wordpress group finding out to your web site.
You’ll be capable to simply use the quick links beneath to jump right away to the method you want to use:
Let’s get started!
<span class=”ez-toc-section” id=”manner-1-offer-wordpress-group-of-workers-studying-the-usage-of-memberpress-coachkit-business-easiest-conceivable-for-coaches-and-small-corporations”/>Manner 1: Offer wordpress Group of workers Studying The usage of MemberPress CoachKit&business; (Easiest conceivable for Coaches and Small Corporations)
If you want to create group finding out with a central hub for are living discussions and membership get right of entry to keep watch over, then MemberPress with the CoachKit addon is a brilliant variety.
With MemberPress, you get the entire thing you wish to have to create, advertise, and arrange any type of membership program. It’s an all-in-one plugin that simplifies the process. You’ll be ready to check out our in-depth MemberPress overview for additonal details.
The CoachKit&business; addon takes it a step further by the use of letting you create infinite group coaching ways on wordpress. You’ll be capable to set milestones and behavior to track your newbies’ enlargement and host are living discussions or consultations, too.
Creating Memberships the use of MemberPress
To start, let’s arrange and activate MemberPress. If you wish to have have the same opinion, then you definately’ll see our knowledge on the right way to set up a wordpress plugin.
Upon activation, you merely wish to follow the setup wizard.
Then, the first thing you’ll wish to do is to organize your price methods. To try this, you’ll head over to MemberPress » Settings and make a selection the ‘Expenses’ tab.
From proper right here, you’ll wish to click on at the ‘+ Add Charge Manner’ button with the intention to upload your most well liked price gateway.
MemberPress signifies that you’ll be able to connect to PayPal and Stripe. This moreover signifies that you’ll merely settle for bank card bills for your wordpress group finding out ways.
To complete the setup, simply enter your price gateway account details. When you’re done, don’t fail to remember to click on at the ‘Substitute Alternatives’ button.
The next step is rising membership plans for your group finding out internet web page. The ones are the paid plans that students will sign up for to get right of entry to your online categories.
To get started, you’ll pass to MemberPress » Memberships internet web page and click on on ‘Add New.’
On the next visual display unit, you’ll enter a establish and details for the membership plan.
Then, you’ll set the pricing, billing type, and expiration for the plan beneath the ‘Membership Words’ section.
<img decoding=”async” loading=”lazy” width=”680″ height=”335″ src=”https://wpmountain.com/wp-content/uploads/2025/01/wp-memberpress-add-membership-terms.png” alt=”Adding membership levels to a wordpresswebsite” class=”wp-image-322283″/>
For many who scroll down the editor, you’ll find further customization possible choices.
For example, inside the ‘Value Box’ tab, you’ll add details to your pricing internet web page, comparable to a headline and plan benefits.
For details on how to take a look at this, you’ll follow our final information to making a club website.
Creating Your Online Categories
After you’ve prepare your membership plans, it’s time to prepare your online trail materials.
In this step, you’ll use the MemberPress Classes add-on to create and store your online categories, which will be helpful when together with assets for your group finding out in CoachKit&business;.
To start, simply pass to the MemberPress » Categories internet web page. Then, you’ll click on at the button to position in and switch at the Categories Addon.
After you flip at the MemberPress Categories add-on, you’ll be redirected to the trail builder. Proper right here, you’ll perceive you’ll remember the fact that it uses the wordpress block editor, making it easy to create your trail.
To get started, you’ll click on at the ‘Add New’ button.
On the ‘Trail Internet web page,’ let’s first add the trail establish and description inside the available area.
Throughout the ‘Curriculum’ tab, you’ll click on on on the ‘Add Section’ button to create a brand spanking new trail outline. To be clear, a work is like a module.
Then, you’ll click on on on the ‘Add Lesson’ button beneath the section. Be happy to list as many categories as you want, as long as it’s associated with the guardian section.
For every lesson, you’ll hover over it and click on on ‘Edit.
This will more and more take you to the lesson editor, where you’ll add your finding out materials for the lesson.
With MemberPress Categories, you’ll moreover add quizzes and assignments for every lesson. For an extensive knowledge, you’ll check out our knowledge on the right way to create and promote on-line classes.
Putting in place and Configuring the CoachKit&business; Addon
Now, you’re waiting to position within the CoachKit&business; addon, so let’s navigate to MemberPress » CoachKit&business;.
You’ll then see the button to position in and switch at the addon. Transfer ahead and offers it a click on on.
This will more and more add an ‘MP CoachKit&business;’ menu products to your wordpress dashboard.
Forward of you get began rising your first wordpress group finding out ways, you’ll wish to configure a few settings.
MemberPress routinely generates a ‘Coaching’ internet web page where you’ll arrange clients and follow their enlargement. To test this, you’ll pass to MemberPress » Settings and navigate to the ‘Pages’ tab.
Throughout the ‘MemberPress Coaching Internet web page*’ field, you’ll find that ‘Auto Create New Internet web page’ is selected by the use of default inside the dropdown menu.
From proper right here, you’ll wish to click on on on the method to create the internet web page. Believe to click on on on the ‘Substitute Selection’ button at the bottom.
Every time you do that, you’ll see the ‘Edit’ and ‘View’ buttons for your MemberPress coaching internet web page like this:
After this, you’ll switch to the ‘CoachKit&business;’ tab.
We advise turning on the are living chat ‘Messaging’ function so that you’ll be in contact directly with newbies from your web site and vice versa.
You’ll be capable to moreover send every non-public and group messages. As a result of this you’ll provide custom designed feedback to particular person students or percentage elementary updates and encouragement with all of the group.
Offering Consumer Consultations (Now not mandatory)
Forward of you soar into rising your company finding out trail, it’s a good idea to let clients information non-public consultations with you. This is in particular helpful if you want to offer some one-on-one steering.
Probably the most very best techniques to take a look at that is by the use of the use of WPForms. It’s the most productive form plugin to be had available on the market, and it’s moreover the plugin we use on our internet web page to embed our contact and annual survey bureaucracy. For more information regarding the plugin, you’ll check out our WPForms overview.
To start, you’ll arrange the WPForms plugin. If you wish to have have the same opinion, then you definately’ll check out our knowledge on the right way to set up a wordpress plugin.
Bear in mind: To create an appointment form the use of a ready-made template, you’ll need WPForms Skilled. On the other hand there’s a loose WPForms model you’ll arrange, choose a near-perfect template, and keep watch over the fields as you pass.
Upon activation, you’ll wish to head over to WPForms » Add New.
On the next visual display unit, you’ll enter the form establish and choose a template.
Since WPForms has 2000+ ready-to-use templates, it’s conceivable you’ll wish to use the hunt function to filter them out. Proper right here, we use the important thing word ‘Appointment.’
Every time you’ve found out a very good template, you’ll hover over it and click on on ‘Use Template.’
This will more and more take you to the drag-and-drop editor.
From proper right here, you’ll keep watch over the form fields and other settings.
Every time you’re done, simply hit ‘Embed’ to position up the form on an provide internet web page or a brand spanking new one. For example, we post ours on a brand spanking new internet web page. We recommend you to the identical so since we’re going to hope the URL in the next step.
You’ll be capable to be told our knowledge on the right way to create a reserving shape for detailed instructions from rising to embedding.
Bear in mind: You’ll be capable to use Merely Time table Appointments with MemberPress Categories to care for scheduling. Merely remember the fact that it’s a third-party plugin, in order that you’ll wish to acquire it one after the other from their internet web page. For more information regarding the plugin, it’s your decision to check out our Merely Time table Appointments overview.
Creating Your First wordpress Group of workers Studying Trail
In this step, you’ll create your company finding out trail. You’ll be capable to include interactive elements like group tasks, peer opinions, and discussions.
To start, let’s pass to MP CoachKit&business; » Strategies and then click on at the ‘Add New Program’ button.
On the next visual display unit, get began by the use of giving your program a name. For this tutorial, we’ll create a simple cohort-based trail known as ‘Paintings for Rookies.’
From proper right here, you’ll then add a brand spanking new cohort.
To the proper of the ‘Milestones/Habits’ tabs, let’s click on at the ‘New Cohort’ button inside the ‘Cohorts’ section.
You’ll be capable to enter the cohort name inside the pop-up that appears. For example, we’ve named ours ‘Program: Paintings.’
Beneath that, there’s a configuration environment to limit the selection of clients.
If you want to set a limit, click on on on the check out box next to ‘Enrollment Cap.’ Then, simply enter the volume inside the ‘Consumer Limit’ field when it sort of feels that.
After that, you’ll choose the cohort type: ‘Dynamic’ or ‘Fastened.’
By the use of choosing dynamic, you’ll allow clients to enroll in anytime, and their program gets began the day they enroll.
The mounted type will need you with the intention to upload the start and end dates so that clients can follow a structured timeline. With mounted dates, members will know exactly when to expect new categories, movements, and milestones, which helps create some way of responsibility and willpower far and wide the trail.
Letting students skip ahead in a cohort-based trail doesn’t in point of fact make sense. All of the degree is for everyone to study the identical lesson at the identical time. So, we suggest choosing the mounted type.
Transfer ahead and enter the start and end dates inside the available fields.
Then, the‘Status’ dropdown signifies that you’ll be able to open or close the cohort for registration.
Proper right here, you’ll want to choose ‘Open’ to make the trail accessible. If the start date is still one day, you’ll make a selection ‘Close’ as a substitute and set a reminder to open the trail closer to the start date.
To the left, you’ll see an risk to choose the teacher. Simply click on on on the dropdown to choose one from one amongst your registered customers.
After all, by the use of checking the ‘Allow Consumer Appointments’ box, you’ll attach a link to your consumer appointment form.
Don’t fail to remember to click on at the ‘Save’ button to store your configuration.
When rising ways with CoachKit&business;, you’ll have possible choices with the intention to upload milestones and behavior. Proper right here’s a simple explanation of every:
Milestones are time-based goals for every program that have the same opinion follow enlargement. You’ll be capable to set as many milestones as sought after in a decided on order, every with a due date.
Habits are tasks that repeat incessantly, and also you’ll follow them over time. The ones tasks are added on explicit dates in accordance with how incessantly they repeat, they generally fit inside of the timeframe of the milestones you’ve set.
Let’s get began with milestones. To create one, merely click on at the ‘+ New Milestones’ button.
After that, you’ll get began filling out the milestone function name and due.
For example, we named our first milestone ‘Introduction to Paintings Basics,’ and the aim is to have it completed 7 days after newbies get began the program.
Then, enabling the ‘Check out-In’ function will reason milestone or dependancy reminder emails. The ones emails are sent when a client misses a milestone or dependancy time limit.
Every time you check out the sector for ‘Check out In, you’ll see a ‘Consumer Question’ field. Proper right here, you’ll write down a custom designed establish for the email.
Next, you’ll wish to open the ‘Add New’ dropdown menu. That’s the position you’ll add the online trail you created the use of the Classes add-on.
Every time you click on at the button, a popup will appear with an inventory of all of your categories. Simply check out the sector next to the comparable one and click on on ‘Add Trail.’
So to upload further milestones, you’ll click on at the ‘+’ icon and repeat the process.
Every time you’re done with milestones, you’ll wish to switch to the ‘Habits’ tab and click on at the ‘+ New Dependancy’ button to start out out together with behavior.
After that, you’ll add the name of the dependancy and prepare the placement.
Proper right here’s an example:
As a result of this clients will have to repeat coaching line artwork, shading, and proportions day-to-day or every 3 days if the day is Monday or Friday.
Then, you’ll pass ahead and click on at the ‘Post’ or ‘Substitute’ button.
Enrolling Customers By the use of a Membership Program
Every time you’ve prepare your wordpress group finding out categories, it’s time to enroll clients. You’ll be capable to do this via your membership ways.
To get started, you’ll wish to head over to MemberPress » Memberships and hover over the membership you want with the intention to upload your program(s) to.
For example, in this step, we’ll make a selection the ‘Gold’ membership to include inside the categories program. So, we’ll hover over it and click on on ‘Edit’ to open its settings.
Throughout the ‘Membership Alternatives’ section down the internet web page, you’ll wish to switch to the ‘CoachKit’ tab.
Then, pass ahead and pick the program you want to assign to this membership.
If you want to add further ways to the membership plan, merely click on at the ‘Add New’ button and repeat the previous steps.
Once done, you’ll click on at the ‘Post’ or ‘Substitute’ button.
Now, any individual who signs up for that membership will routinely be enrolled in the entire ways you’ve assigned to it.
Moreover, when clients enroll, they’re randomly situated into one of the most available cohorts in every program. CoachKit&business; starts filling cohorts by the use of assigning new clients to the one with necessarily essentially the most open seats first.
Upon getting newbies changing into a member of, your ‘Coaching’ internet web page will display an inventory of your clients and the selection of ways they’re enrolled in.
On the learner’s end, the ‘Customers’ tab is modified with an ‘Enrollments’ tab. Proper right here, they may be able to get right of entry to the entire milestones and behavior associated with the program they’re enrolled in.
Proper right here’s what the learner dashboard looks like:
And that’s it!
You’ve successfully created and offered group finding out online categories the use of MemberPress.
<h4 class=”wp-block-heading” id=”aioseo-method-2-offer-wordpress-group-learning-using-lifterlms”><span class=”ez-toc-section” id=”manner-2-offer-wordpress-group-of-workers-studying-the-usage-of-accessally-easiest-conceivable-for-powerful-online-communities”/>Manner 2: Offer wordpress Group of workers Studying The usage of AccessAlly (Easiest conceivable for Powerful Online Communities)
AccessAlly is another great variety for cohort-based finding out. Its CommunityAlly function creates a space where students can connect and collaborate, development a formidable and engaging organization.
Putting in place the AccessAlly Plugin
Since AccessAlly is a best fee plugin, you’ll wish to gain a plan previous than rising your company finding out. Keep in mind that if you want to create organization and discussion groups for your group finding out categories, then you definately definately’ll need the AccessAlly Community plan.
Simply click on at the ‘Get Started At the moment’ button to your decided on plan and follow the checkout process.
After purchasing, simply pass to your AccessAlly account and click on at the ‘Download License’ button. For many who’re the use of AccessAlly Skilled, download the ProgressAlly.zip report as neatly.
Once downloaded, you’ll upload the AccessAlly.zip report to your wordpress web site and switch at the plugin as usual. If you wish to have have the same opinion, follow our knowledge on the right way to set up a wordpress plugin.
Upon activation, you’ll connect your wordpress web site to your AccesAlly account.
Throughout the setup wizard, AccessAlly will ask for your registered email deal with and license key. Every time you’ve stuffed out the fields, click on on ‘Next.’
On the next visual display unit, you’ll need to choose a buyer courting supervisor (CRM) instrument you want to mix.
AccessAlly has a variety of possible choices, along with ActiveCampaign, Equipment, Drip, and the built-in AccessAlly Managed.
Simply click on on ‘Next’ to complete the CRM integration process.
After that, you’ll prepare your price processors. AccessAlly signifies that you’ll be able to connect to Stripe, Paypal, or every.
To use every, simply check out the ‘Allow’ boxes for every.
If you must offer merely one risk, pass ahead and try the ‘I don’t wish to mix with Stripe/PayPal’ box.
After deciding to your price processing, you’ll hit the ‘Next’ button.
On the next visual display unit, AccessAlly will ask you to connect your Stripe or PayPal account(s). You’ll be capable to merely follow the option to entire the setup.
Once done, you’ll see a ‘Congratulations!’ message.
Proper right here, you’ll choose to autogenerate key pages or manually configure them. For this tutorial, we’ll choose ‘Certain, please generate my web site’s key pages for me. (Really helpful)’ for an more straightforward process.
AccessAlly will then auto-generate key pages, which include:
Log-in web page: That’s the position your members or students can log into your finding out internet web page the use of their credentials.
The ‘Please login first previous than gaining access to the web site’ internet web page: If a buyer tries to get right of entry to limited content material without logging in, they’ll be redirected proper right here. It reminds them to log in previous than proceeding.
Dashboard: The central hub for your shoppers. It displays important wisdom, comparable to enlargement tracking, available categories, and speedy links to different sections of the web site.
My Account/Profile: A custom designed internet web page where shoppers can change their profile wisdom, alternate passwords, and arrange account details.
My Orders: This internet web page has the patron’s purchases, subscriptions, or transactions to your web site.
Insufficient Permissions: If any individual tries to get right of entry to the content material subject material they don’t have permission for, they’ll land proper right here. This internet web page explains why get right of entry to is specific and would possibly include possible choices to beef up or gain get right of entry to.
For now, you’ll go away them as is. You’ll be capable to all the time keep watch over later.
For many who scroll down the internet web page, you’ll find the ‘What’s Next’ section where you’ll click on on ‘Transfer To Dashboard’ or ‘Re-run Onboarding Steps.’
With that done, you’ve successfully prepare AccessAlly to your wordpress web page.
Creating an Online Trail The usage of AccessAlly
The next step is to develop your company finding out trail materials.
You’ll be capable to get began by the use of designing a clear curriculum that provides students with an overview and actionable content material subject material correct from the beginning. Then, you’ll wish to send your easiest materials to stick students engaged and make your trail stand out.
Professional Tip: Don’t actually really feel at a loss for words to make the trail supreme the principle time. You’ll be capable to all the time edit or re-record sessions for longer term cohorts.
To start together with your finding out materials, let’s click on on ‘Transfer to Dashboard’ from the remainder visual display unit.
Then, you’ll navigate to the ‘Alternatives’ menu and click on on ‘Create.’
This will more and more open the ‘Create Your Offering’ pop-up window, where you will have to choose an offering template.
We’ll use the ‘Drip Unlock Trail’ type because of it actually works easiest for group finding out. By the use of step-by-step freeing modules, you’re making positive students enlargement together inside of a specified time frame.
Simply click on at the ‘Use Template’ button inside the comparable box.
On the next visual display unit, you’ll name your offering inside the ‘What do you wish to have to call this offering?’ field.
You’ll wish to make certain that the name is apparent, as your possible students will see this on the front end.
For example, we named ours ‘Group of workers-Studying: wordpress for Rookies’
After that, you’ll choose your price risk.
AccessAlly provides rather a large number of possible choices, along with a one-time value, routine price, and price plan with a loose trial, among others.
For this tutorial, we’ll choose the one-time value method.
Throughout the screenshot beneath, we set the fee for our trail inside the ‘Amount’ field.
In this final step, you’ll each pass to the content material subject material editor or go away it for later.
Let’s make a selection the ‘Certain, I’m ready with the intention to upload my content material subject material’ to start out out developing your company finding out on-line classes.
This will more and more take you to the ‘Content material subject material’ internet web page.
Once inside of, you’ll see that AccessAlly has generated all of the trail development for you. You’ll be capable to go through every section separately and click on at the comb icon to edit.
For example, we’ll click on at the comb icon to edit the ‘Base Module’ section.
You’ll then be redirected to the wordpress content material editor.
Proper right here, you’ll get began by the use of converting to the block editor if you want.
After that, pass ahead and add your content material subject material.
For the ground module, it’s conceivable you’ll wish to write the trail description so possible students know what to expect from this trail.
You’ll be capable to moreover add a featured symbol so it sort of feels further put together.
You’ll be capable to then preview and post the put up if the entire thing turns out very good already.
With that done, it’s time with the intention to upload your finding out materials.
You’ll be capable to go through every of the 5-week trail outlines and change the content material subject material. Merely click on at the comb icon to get right of entry to the content material subject material editor.
Throughout the content material subject material editor, you’ll add descriptions, movements, or instructions – the rest that’s necessary for the trail.
You’ll be capable to moreover upload multimedia or embed movies to make stronger the learning experience.
Simply hit the ‘Post’ button when you’re pleased with the entire thing.
You’ll be capable to now repeat this process for all of your categories.
Once the entire thing is set, you’ll see the green ‘Published’ label to your dashboard like this:
To see what it looks like to your web site’s front end, simply click on on on the ‘Preview’ icon.
Proper right here’s what our trail looks like on our demo web site:
Development Your Cohort Enrollment Internet web page
The next step is to organize the gang finding out enrollment internet web page.
On the other hand first, you’ll wish to decide how you want to keep watch over enrollments. For example, you’ll set explicit get began and end dates along with limit the selection of students in line with cohort.
Then, you’ll switch to the ‘Paperwork’ internet web page and click on on on the ‘+ Add’ button to start out out.
Throughout the pop-up that appears, you’ll see a lot of templates for your AccessAlly trail. The ones templates vary from price and coupon codes to those related to trail enrollment.
On the other hand the one you’ll need is ‘Enrollment Limit.’
On the pop-up that appears, you’ll see 2 tabs: ‘Settings’ and ‘Order form message.’
Throughout the ‘Settings’ tab, you’ll add the cohort name, specify the trail enrollment time frame, and limit the selection of members.
Atmosphere the ‘Enrollment capacity’ signifies that as quickly because the cohort limit is reached, your order shape will routinely turn into a waiting list internet web page.
This automation helps you collect emails from those who not noted the prevailing cohort so that you can invite them to the next one.
Next, you’ll switch to the ‘Order form message’ tab.
Proper right here, you’ll see that AccessAlly has a ready-made order form message for you.
If you want to create a custom designed one, then you definately’ll profit from the available placeholders with the intention to upload to your message. The ones placeholders help you automate details comparable to:
Countdown timer: Add a are living timer to show how so much time is left previous than registration closes.
General capacity: Display the maximum selection of spots available to your trail or program.
Provide enrollment depend: Automatically show how many people have already signed up.
Final capacity: Highlight the selection of spots however open to create urgency for possible sign-ups.
For many who scroll down the pop-up, you’ll find a preview.
Transfer ahead and click on on ‘Save’ to close the window.
Now, if you happen to pass to the ‘Paperwork’ internet web page to your AccessAlly dashboard, you’ll see that your settings are saved beneath the ‘Enrollment Limit’ section.
And because we set the enrollment capacity, AccessAlly has routinely created the ‘Waitlists‘ settings for you.
Don’t fail to remember to click on on ‘Save’ on the best correct corner to store your settings.
Atmosphere Up a Community for Group of workers Discussions
After all, you’ll create a non-public area for your students the use of CommunityAlly.
Setting up a set for group discussion is a great way to boost engagement and make finding out further interactive. It provides your members a place to ask questions, percentage ideas, and beef up every other.
Plus, since the trail organizer, you’ll merely spot where other people would perhaps need further have the same opinion or rationalization.
Let’s get started by the use of setting up and activating the CommunityAlly plugin.
You’ll be capable to download the .zip report directly from your AccessAlly dashboard and then upload it to your web site. If you wish to have somewhat have the same opinion along the best way by which, you’ll check out our knowledge on the right way to set up a wordpress plugin.
Upon activation, you’ll pass to the ‘Content material subject material’ internet web page and click on on ‘+ Add.’
This will more and more open the ‘Add New Content material subject material’ popup.
From proper right here, you’ll click on on on ‘Group of workers’ to choose it.
On the next visual display unit, CommunityAlly will ask you to create the gang name. Simply add the name to the comparable field and click on on ‘Create Group of workers.’
And that’s it!
CommunityAlly will auto-generate the internet web page for you – hassle-free.
Now, if you happen to talk over with your ‘Content material subject material Pages’ section, you’ll see the CommunityAlly group you merely created.
Transfer ahead and click on at the ‘Save’ button to position up the gang.
After that, you’ll click on at the ‘Preview’ icon to preview it to your front end, where you’ll find 3 buttons:
Famous person: This button signifies that you’ll be able to mark a suite or discussion as a favorite, making it more straightforward to look out later.
Message: This button opens a chat where you’ll send messages directly to group members or admins.
Notifications: This button signifies that you’ll be able to arrange your notifications for updates, new messages, or group movements.
Then, if you happen to scroll down the internet web page, you’ll find a few tabs.
The ‘Feed’ tab is where you’ll see the entire latest posts and updates from your group members, along with discussions, announcements, and shared content material subject material.
Then, there’s the ‘Discussion’ tab.
Proper right here, you’ll provide discussion turns on and prepare smaller groups or tasks to spark deeper interactions.
The ‘Members’ tab shows an inventory of the entire contributors within the organization. This permits you to connect and see their profiles.
Throughout the ‘Settings’ tab, you’ll edit the gang name and description. You’ll be capable to moreover upload a duvet symbol to personalize the look of your company internet web page.
And that’s all! You’ve were given now successfully created a suite finding out platform with powerful organization discussion choices.
<span class=”ez-toc-section” id=”cohort-based-totally-online-categories-wordpress-group-of-workers-studying-faqs”/>Cohort-Based totally Online Categories / wordpress Group of workers Studying FAQs
For many who’re taking into consideration starting a wordpress group finding out internet web page, then listed below are some no longer strange questions and answers that can have the same opinion knowledge your journey.
What’s group finding out?
Group of workers finding out is when a suite of students moves via a trail together, incessantly with set schedules, assignments, and not unusual interaction with instructors and buddies. The program helps keep everyone not off course and encourages teamwork and responsibility.
How do you create a suite finding out trail?
To create a suite finding out trail, you’ll get began by the use of settling on the right kind finding out keep watch over gadget (LMS), like MemberPress or AccessAlly, that is helping cohorts.
Then, you’ll wish to plan your trail with a clear get began and end date, destroy it up into modules, and add movements like group discussions or tasks to get everyone involved.
When is the most productive time of year to start out out a suite finding out trail?
The best time to unlock your company finding out trail in point of fact is determined by your audience. Many trail creators find that starting in January after the new year or inside the fall works neatly since persons are incessantly further motivated throughout the ones events.
Take into account to consider when your purpose newbies are possibly to interact.
What are the primary choices of LMS for group finding out categories?
When the use of an LMS for group-based categories, you’ll want choices like scheduled content material subject material releases, enlargement tracking, group keep watch over, verbal alternate apparatus for interaction, and automatic reminders.
The ones choices have the same opinion keep students not off course and make the trail experience further interactive.
What’s the easiest platform so as to add my group finding out online categories?
wordpress, with LMS plugins like MemberPress or AccessAlly, is the perfect platform for uploading group finding out categories. The ones apparatus can get a hold of the entire choices you wish to have to create and arrange categories while retaining the entire thing organized and easy for students to track.
We hope this data has helped you offer group finding out in wordpress. Next up, it’s conceivable you’ll wish to see our detailed instructions on easy methods to run a digital lecture room on-line or easy methods to upload a studying control machine in wordpress.
For many who most popular this article, then please subscribe to our YouTube Channel for wordpress video tutorials. You’ll be capable to moreover find us on Twitter and Fb.
The put up Tips on how to Be offering Cohort-Primarily based On-line Classes — wordpress Staff Finding out first gave the impression on WPBeginner.