Animated GIFs are a good way to upload fun and attractive images on the topic of your content. Whether or not you’re sharing a funny 2D, explaining a concept, or creating something attention-grabbing for social media, turning part of an actual video into a GIF is easier than you might think.
In this data, you will learn how to use Giphy’s GIF Maker to create your own animated GIFs step by step.
Step 1: Try Giphy’s GIF Maker
Head over to Giphy’s GIF Maker and check it out. For those who don’t have an account, create one. Giphy requires an account to create animated GIFs or stickers.
Step 2: Upload your video
Upload your video. Authorized formats include MP4, MOV and WebM. If the video is not on your local drive, you will paste a link as an alternative. Giphy helps URLs from YouTube, Vimeo and others.
Realize: Giphy accepts videos under 10 minutes. Longer clips may also be rejected.
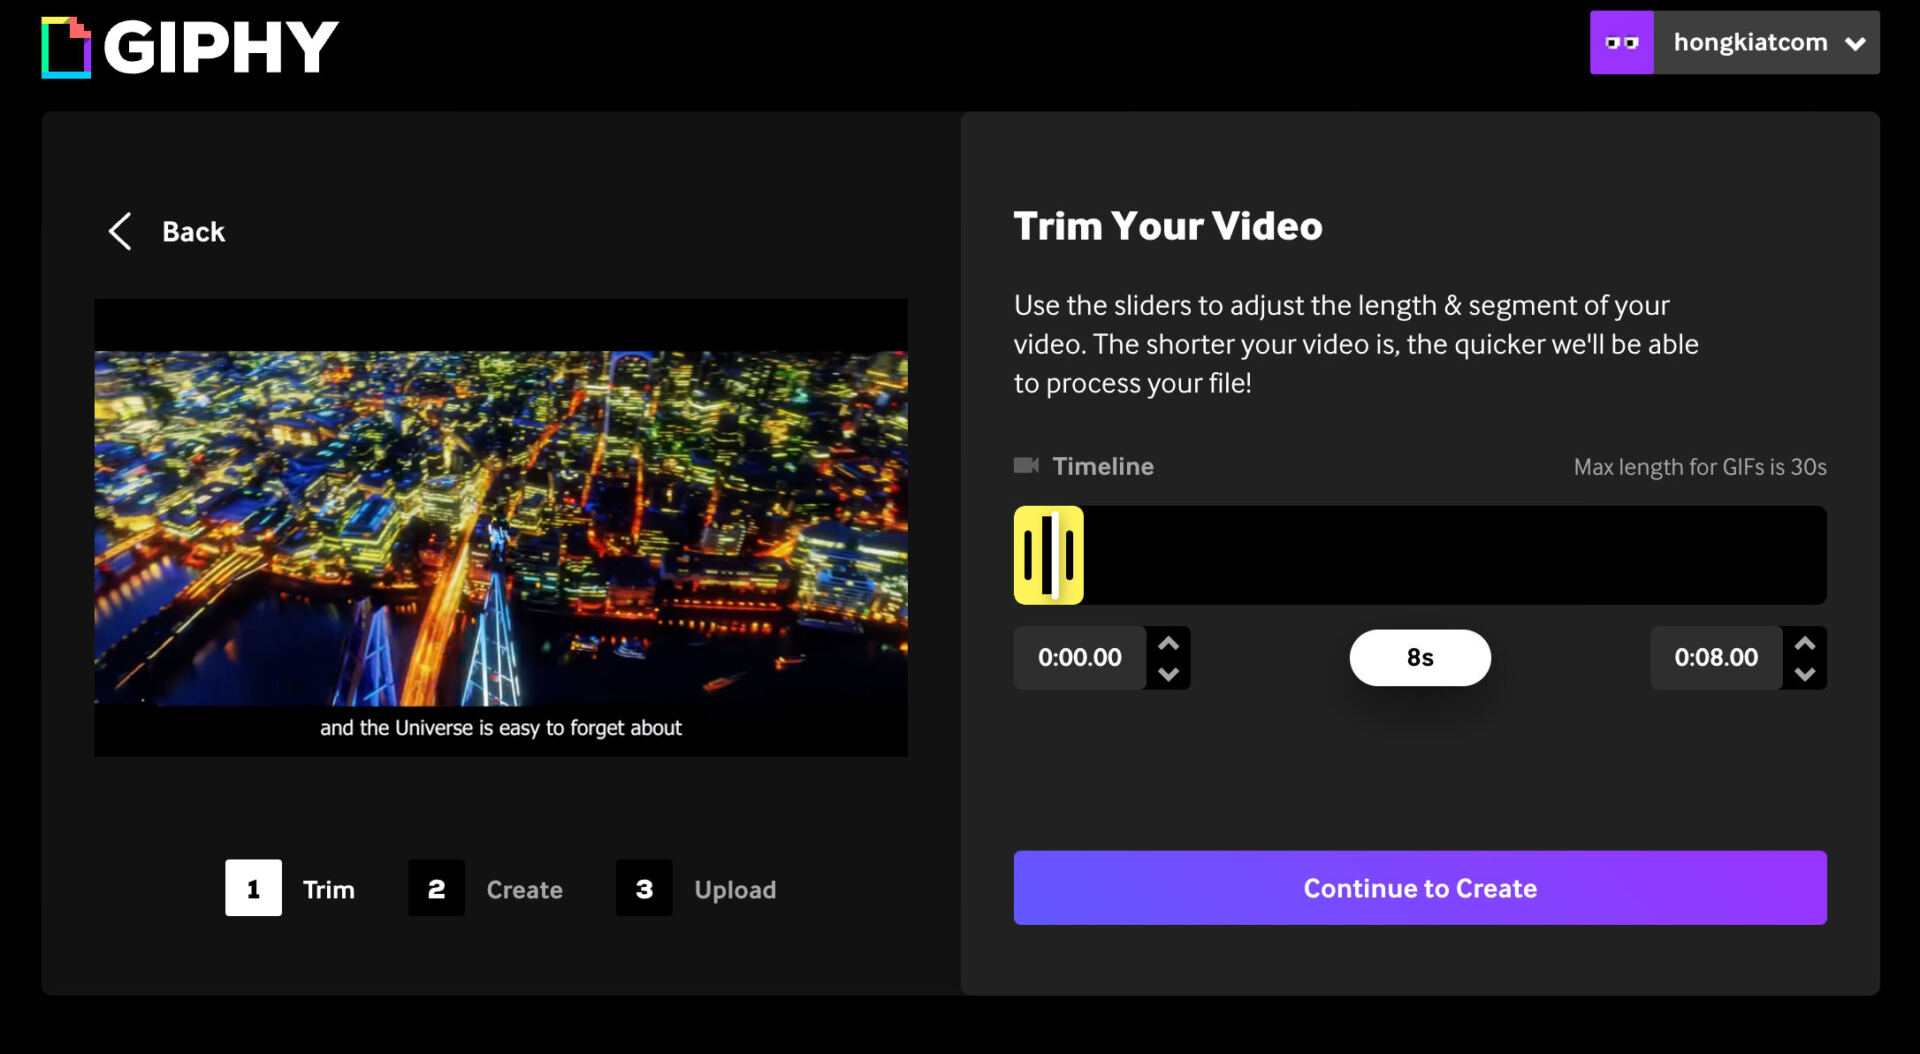
Step 3: Crop the video
Trim the video to choose the part you want to turn into a GIF. When finished, click “Keep creating.”
This process may take a while, depending on the length of the video.
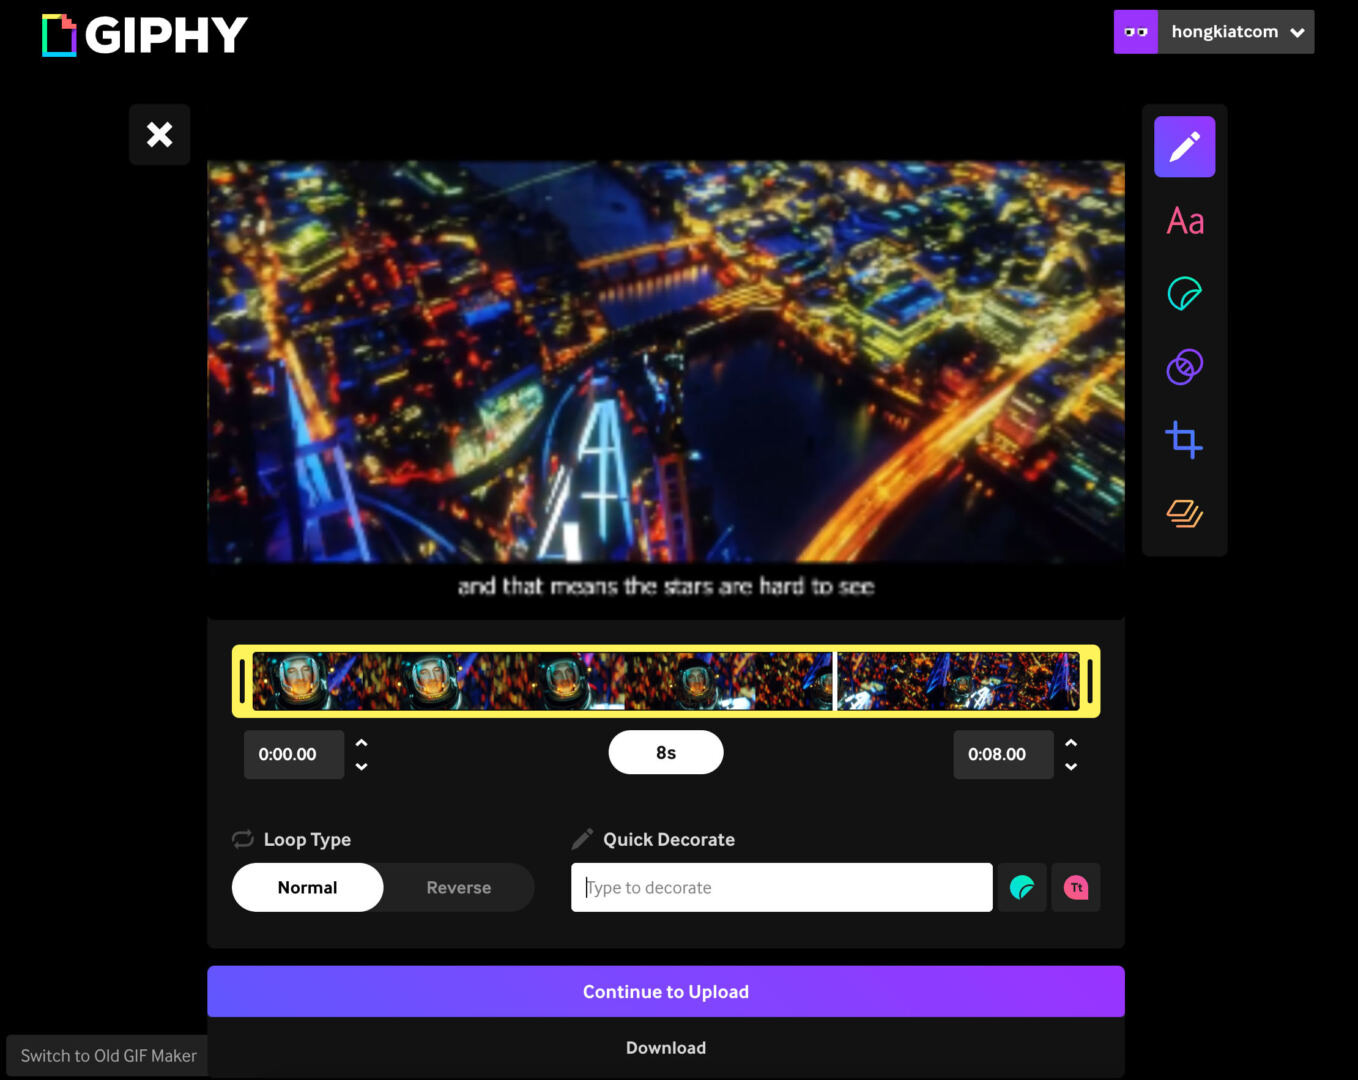
Step 4: Edit your GIF
As soon as it is processed, you will land on a brand new Internet web page that displays the cropped video timeline with additional alternatives to strengthen the total output.
That’s right, here’s what you’ll do in this show:
Trim the timeline further
Crop the video
Add text, stickers, filters or layers
Set loop style (same or reverse)
Step 5: Save or share your GIF
After improving, you have two alternatives:
Download the GIF to your local drive
Upload it to Giphy to get a shareable link
Other online devices for creating animated GIFs from moving images
While Giphy is a popular variety for creating animated GIFs, there is a selection of various online appliances that you will use to turn movies into GIFs.
Below are a few that are worth exploring:
EZGIF
This tool means you can upload video information or paste video URLs to turn them into GIFs. It provides options like cropping, resizing, along with text, and optimizing the GIF for smaller record sizes.
Kapwing
Kapwing is an easy-to-use platform for video enhancement and the advent of GIFs. You’ll be able to upload movies, crop them, add effects, and export them as GIFs. It also helps collaborative improvement.
Clideus
Clideo provides a clean interface for turning movies into GIFs. You’ll be able to load video information, crop it, and customize settings like playback time and loop alternatives.
Imgur Video to GIF
Imgur’s built-in tool is ideal for creating GIFs from video URLs. It is helping YouTube, Vimeo and other same old platforms. On the other hand, it does not offer advanced enhancement choices.
Or, if you want to know more, check out our previous article on the absolute best web pages for creating animated GIFs for free.
Guidelines for cultivating great quality GIFs
Finally, on the other hand, here are some tips that can help you create high-quality GIFs that look great and load quickly:
Keep it fast: Shorter clips are even more attractive and reduce the size of the record. Aim for 5-10 seconds for the most productive results.
Make a selection of key moments: Select a portion of the video that clearly conveys your message or captures some of the 2D impact.
Optimize record size: It uses a compression apparatus to reduce the size of the GIF without sacrificing maximum quality. Smaller information loads faster and is easier to share.
Keep in mind the highest quality: Start with a high-resolution video for a crisp, crisp GIF. Avoid using low-quality or pixelated footage.
Add context with text: Use quick, readable captions or text overlays to provide context for your GIF, especially if it’s intended to keep in touch with something specific.
Prohibited effects: Avoid overloading your GIF with stickers, filters or animations. Keep it clean and centered on the main topic of the content.
Select the suitable frame price: A frame rate of 24-30 FPS works great for blank animations without unnecessarily increasing the record size.
Try the cycle: Make sure the loop style fits the topic of the content material. For smooth playback, trim the video sparingly to avoid jerky transitions.
Tips on how to flip part of a video into an animated GIF appeared first on Hongkiat.
I in reality like the usage of motion pictures for promoting and advertising and marketing — and at the present time’s apps make producing video content material subject matter more straightforward than ever. Upper however, there’s a place for all types of video — highly-produced, live-streamed, and long- or short-form.
Regardless of video production pointers or techniques you use, your efforts can pay off in a big manner. A whopping 88% of entrepreneurs percentage a positive ROI with video — a number that’s virtually exceptional with in terms of every other medium.
I’m sharing one of the vital essential highest video production pointers beneath to help you dive into the sphere of video advertising and marketing.
Table of Contents
Understanding the Different Types of Promoting Films
Previous to I’m going any longer, I need to take care of the elephant throughout the room.
Video intake has modified greatly during the last a variety of years, as have consumer expectations of producing top of the range and video construction.
You’ll be in a position to try the most recent stats on video advertising and marketing proper right here.
Fast-form motion pictures have grow to be an increasing number of popular with the rise of TikTok, Reels on Facebook and Instagram, and YouTube Shorts. The ones tend to be low on the production scale and create a further real-life have an effect on.
Easiest of all? They can be edited in brief and easily with AI-enabled apparatus like Clip Writer.
That discussed, no longer all short-form motion pictures are minimally edited. Commercials, B2B motion pictures, and other forms of short-form content material subject matter (underneath 5 minutes) are regularly extraordinarily produced.
Long-form motion pictures typically have a tendency to go into further part, sharing in-depth knowledge, and the ones can be extraordinarily produced or minimally edited as well. What’s further, the ones longer motion pictures can be cropped into short-form content material subject matter that people are a lot more most probably to have a look at.
Reside glide motion pictures can be each short- or long-form, and depending on the platform, they can take a variety of different formats: stream-of-consciousness, ask-me-anything, or extraordinarily organized.
Reside streams are my favorite on account of they imply you’ll get to grab the person or other people in the back of the emblem and get a real sense of who they’re and what they stand for.
Why does video sort matter for video production?
While you know what type of video you’re going to create, it’s more straightforward to identify which video production pointers are highest — and helpful — for your needs.
With that throughout ideas, previous to you get began planning your promoting and advertising and marketing video shoot, I love to counsel taking some time to identify the type of video you’re creating, where you’re going to post it, and what your audience expects.
16 Video Production Guidelines for Your Next Promoting Video
Most smartphones and web cameras at the present time make video production further available in the market than ever — and 91% of companies use video in their promoting and advertising and marketing.
On account of this there’s room for all types of video content material subject matter. And while massive budgets nevertheless have a place in video promoting and advertising and marketing, it’s now not a barrier to get right of entry to.
However, whether or not or now not you’re going to a pro, coping with your shoot in-house, or DIYing it, remember of the ones video production pointers and decide which may well be most similar to your needs. I’ve broken them out into pointers and techniques for pre-production, production, and enhancing.
Video Pre-Production Guidelines
Be well-prepared and organized for your video shoots. For individuals who show up to your shoot — anywhere it’s — unorganized and make a decision to “wing it,” your final product will look unprofessional and sloppy.
This is true even of live-streamed ask-me-anything motion pictures. While you’ll be capable of regularly check out ideas and fiddle, it’s absolute best to — at a minimum — have a listing of talking problems in order that you don’t in spite of everything finally end up rambling.
Thru taking even a twinkling of an eye to arrange yourself, it’s more straightforward to point of interest your efforts on directing your actors (or yourself) reasonably than figuring out last-minute logistics.
Time is of the essence, so don’t waste hours attempting to decide which viewpoint you need or what line should be delivered next. Know exactly what you need previous to the day you film by the use of following the steps beneath.
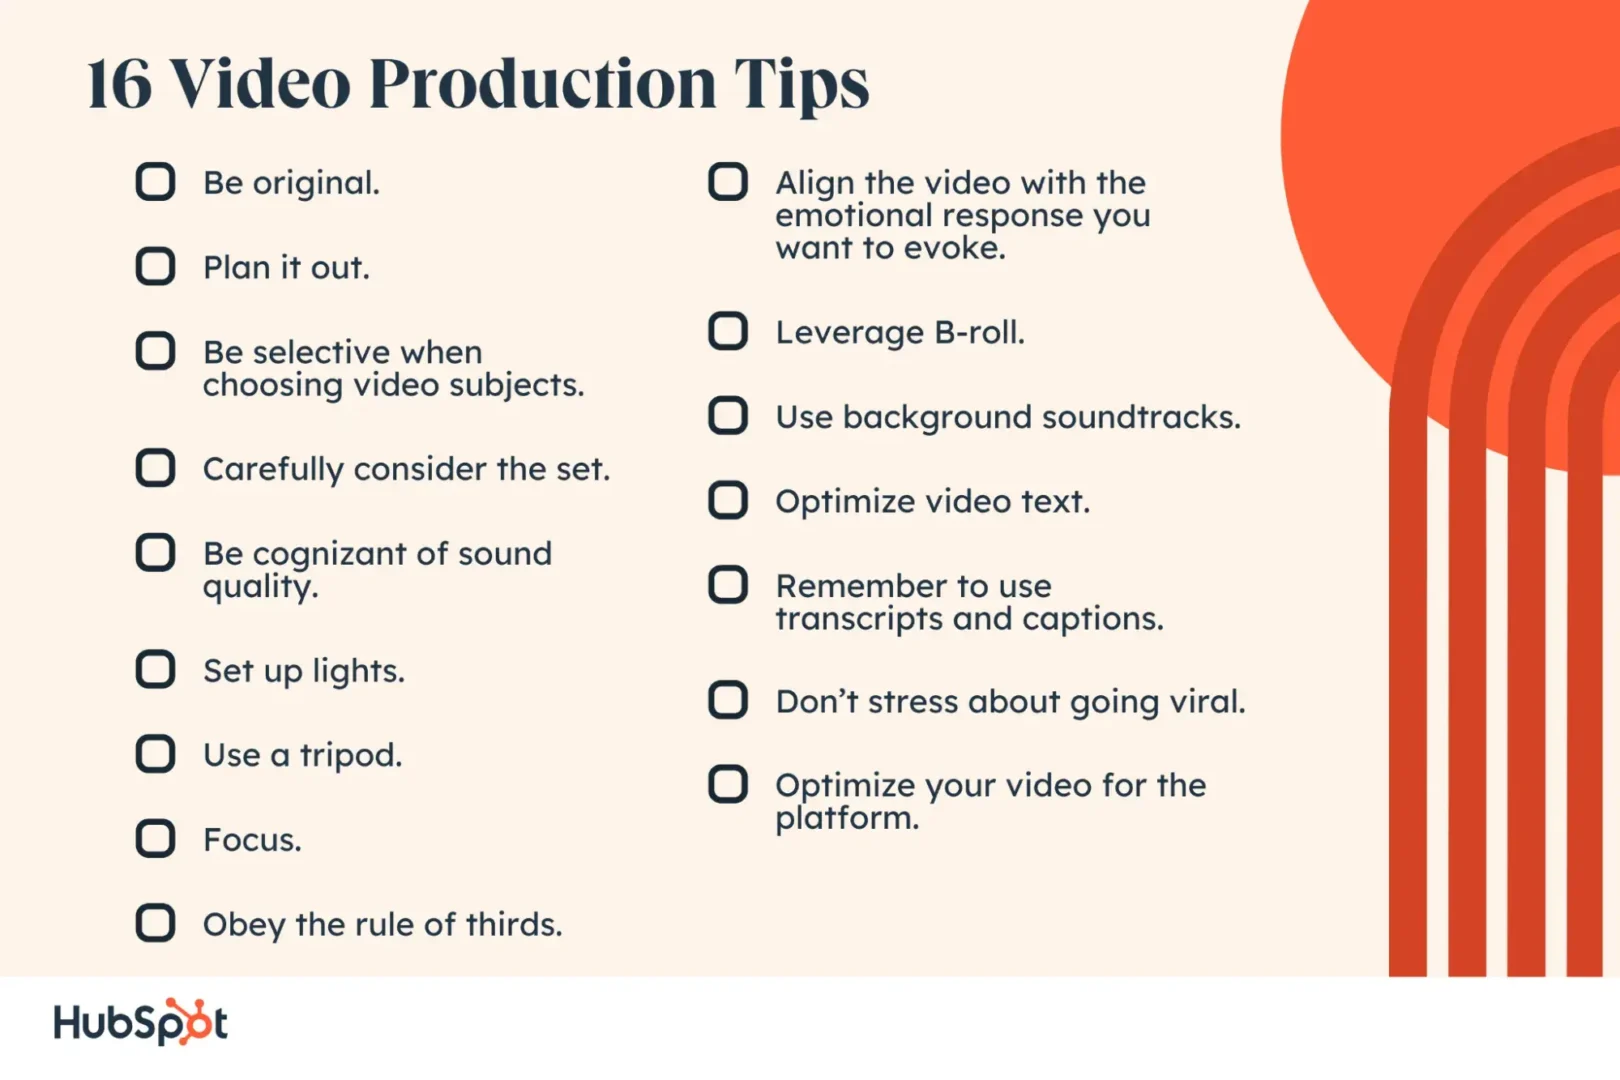
1. Be distinctive.
The concept for your video problem should be distinctive and creative. Don’t take the easy route and copy any person else’s concept.
Instead, conduct personality and keyword research, find out which forms of video content material subject matter are fashionable and a good fortune to your corporation, and double-check to verify each and every different brand hasn’t lined the exact same viewpoint already.
2. Plan it out.
While a plan is highest for any type of video, it’s an absolute must for highly-produced brand motion pictures. Write a script, draw out a storyboard, and create a shot record previous to you get began filming.
Plan your B-roll pictures, so you may have additional pictures when it comes time for enhancing (further on that beneath). For individuals who think writing a video script is the same as writing a blog put up — think yet again. Take a look at our recommendation right here.
Alternatively, if you find yourself stressed out with the speculation of creating a script, AI is making it more straightforward than ever. I’ve used ChatGPT regularly to create video scripts for Facebook ads, podcast episodes, and, certain, even my live-streamed motion pictures.
3. Be selective when choosing video subjects.
Bringing others into your video?
For individuals who’re bringing in ability, set over the top necessities when casting actors for your tasks. Pick any person who can send dialogue naturally, who can memorize lines, and who isn’t stiff in front of the virtual digital camera. If conceivable, plan time for a few run-throughs to determine any mispronunciations or giggles.
For individuals who’re inviting other people for your staff or other colleagues, make sure they understand your goals and know what you expect from them. That can indicate sharing talking problems, trend questions, or a script to lend a hand them get in a position.
However, for many who’re taking pictures a video with clients or purchaser success stories, spend a large number of time in advance prepping them so that you’ll be capable of get necessarily probably the most out of your time with them.
4. Quite consider the set.
The post-pandemic years have dramatically changed other people’s expectations of what’s professional and what constitutes a believable set.
That was once as soon as even changing pre-pandemic — imagine the BBC anchor whose daughter sauntered in throughout an interview circa 2017?
That almost all efficient was once further commonplace in recent times — and with TikTok, any location can now be your stage.
That discussed, regardless of what type of video you’re taking pictures (till it’s satire), don’t try to fool your audience by the use of “set dressing” your place of work to simulate each and every different location. Select your location and private it.
Want to show up in different places? You’ll need to do that. Shoot your video tasks in puts as a substitute of your place of work — in front of textured and attractive backdrops, on the other hand ones that also don’t appear to be too busy.
Video Production Guidelines
You’ll be capable of always touch up your pictures while you edit shortly, on the other hand remember that enhancing takes time.
When you’ll be capable of make the entire thing look as almost about highest as conceivable right through filming, you’ll be capable of save yourself a lot of treasured time in post-production.
For individuals who shoot a scene and it doesn’t come out great, learn from what went improper the principle time and shoot it yet again. Underneath lays out do it.
5. Be cognizant of sound top of the range.
Don’t come off as an amateur with poor sound recording top of the range. Use lapel or lavaliere microphones — both of which may well be hands-free — when taking pictures sit-down interviews, or use microphone and expansion setups for greater pictures.
The usage of your webcam? Some have built-in noise-canceling choices, on the other hand I’ve came upon that external podcast microphones like the Blue Yeti (my non-public favorite) snatch the best conceivable sound top of the range.
If you’re filming a video with a smartphone, you’ll be capable of achieve microphones that experience compatibility into the telephone’s headphone enter to in brief and easily beef up sound top of the range.
6. Prepare lights.
You don’t want your pictures to be underneath or over-exposed, so organize lights and eliminate any unwanted shadows. I’ve came upon ring lighting to be incredible alternatives — merely keep in mind of the reflection in your glasses.
In a in reality highest international, a three-point lighting fixtures setup may be very highest to take away darkness from video subjects from a variety of angles. Check out this video for a DIY data to lighting fixtures:
7. Use a tripod.
Use a tripod to stick your video sturdy — and no longer wobbly, as it most unquestionably will also be for many who dangle it yourself. Get a status tripod or a tabletop tripod for tighter pictures to stick your video looking professional.
8. Point of interest.
Be sure that the virtual digital camera is in point of interest — and then lock the exposure so it stays in point of interest.
Most smartphones and trendy webcams do this mechanically, but it’s cost your time to verify your video top of the range is up to snuff. Bear in mind of shielding pictures white balanced to stick lighting fixtures unbiased and even, too.
9. Obey the rule of thumb of thirds.
The rule of thirds involves splitting up your shot into thirds, horizontally and vertically, and framing your subject off-center. It creates movement and lifestyles in your shot one of the best ways a straight-on, centered shot won’t.
That is an example — try to film other folks in one of the crucial facet panels of the divided frame, like so:
Video Editing Guidelines
Be sure that your content material subject matter is phenomenal and tailored to your audience. Edit your video so that it is going to get to the aim and doesn’t drag on.
Have in mind, you don‘t have long to snatch (and adhere) your viewer’s attention, so make sure that the beginning of your video is engaging, informative, and associated with the viewer and that she’ll clearly understand the message.
What does that appear to be in movement?
For example, for many who’re the usage of a platform like YouTube, you’ll want an attention-grabbing intro show that pulls your audience in.
Relying on the video content material subject matter? Select an interesting hook to kick problems off, and then dive into your video content material subject matter.
10. Align the drift of the video with the emotional response you need to awaken in target market.
The tone, development, and pacing of your video have a large impact on its effectiveness and the emotional impact for your audience.
Tell a compelling story — assemble rigidity and drama by the use of arranging pictures in step with your storyboard and script.
However, I’d caution you to remember that, like all promoting and advertising and marketing, your video content material subject matter isn’t about you or what’s crowd pleasing to you. It’s about what’s crowd pleasing, thought-provoking, or engaging for your audience.
Point of interest on their needs and expectations first.
11. Leverage B-roll.
Cover up your cuts with B-roll pictures that complements the narration. You’ll be capable of find B-roll and other stock pictures on web sites like Vizeedy for many who didn‘t film it yourself.
It’s absolute best to stick your pictures all within the identical surroundings to care for the video’s consistency. I love to counsel taking the overtime to go back and picture further B-roll if you wish to have it.
12. Use background soundtracks.
Delicate background music can cover any ambient sound and provide tone and emotion to your video that words and images another way can‘t.
You’ll be capable of find royalty-free stock soundtracks that you simply’re allowed to use on web sites like AudioMicro — keep in mind to’re no longer the usage of songs which may well be approved, or else it could consequence in your video getting taken down.
13. Optimize video text.
Keep the style of your text and titles simple, sublime, and sharp.
Select a clear and impressive font, keep words for your video show to a minimum, and use text animations to stick the viewer engaged with new additions to the video they watch.
14. Have in mind to use transcripts and captions.
Where captions are helpful right through the video, transcripts are extraordinarily in reality helpful for long-form motion pictures like workshops and lectures. They’re closely related and should be regarded as for various reasons:
Accessibility. If your audience has an audio impairment, at the side of transcripts and captions helps them experience your content material subject matter. It is going to in all probability moreover lend a hand people who talk about a unique language devour or translate your message.
Convenience. For individuals who’re in search of to get other people to slow their scroll on social media, whether or not or now not at art work or in situations where they don’t want the quantity on, at the side of captions makes it more straightforward for them to grab you.
seo. Along side transcripts and captions can beef up your seo potency.
Scripted motion pictures are easy — your transcript is baked into the video production process.
Don’t have a scripted video? The good news is that with AI, most cloud-based video production services mechanically transcribe your content material subject matter.
If no longer, it’s moderately easy to plug your promoting and advertising and marketing video into an web software and produce a transcript. Although it’s no longer highest, it gives you something to edit.
Skilled tip: Specifically for motion pictures with lower production value, I in reality like the usage of transcripts as enhancing apparatus. I’ve tested CapCut, Loom, and HubSpot’s Clip Writer, which make video enhancing a breeze with AI.
Editing motion pictures is now so simple as highlighting the transcript you need to crop out and clicking delete. Obviously, this isn’t the best solution for high-production-value motion pictures, but it’s great for the additional casual motion pictures which may well be fashionable.
15. Don’t stress about going viral.
Sure, viral manner further eyes for your video. However, just because a video goes viral doesn’t necessarily translate into massive product sales. Point of interest on creating content material subject matter that resonates at the side of your audience first.
16. Optimize your video for the platform.
Bear in mind of where your video will exist in case you are enhancing.
Is it for your internet web page, YouTube, or Facebook?
Each platform has different specifications — for example, on Facebook, where 85% of audience watch motion pictures without the quantity was on, you‘ll need to use captions, so other people can apply along without the sound.
YouTube motion pictures don’t depend views until any person watches for 30 seconds or extra, so make sure the principle 30 seconds are as crowd pleasing and attention-grabbing as conceivable.
Ready on the set?
Now that you simply’ve got a few of these video production techniques at your disposal, it’s time to put them to use.
Whether or not or now not you’re creating high-production content material subject matter or a further casual short-form or live glide video, a bit of bit preparation goes a ways on the subject of creating environment friendly promoting and advertising and marketing motion pictures.
Now it’s your chance to dive in!
Editor’s Phrase: This put up was once as soon as to start with printed in November 2011 and has been up-to-the-minute and for freshness, accuracy, and comprehensiveness.
I’ve been editing films for about a decade, both professionally and as a hobby. So, take me seriously when I say that I know how tedious it can be to edit even the shortest films.
Luckily, many AI-powered video editing tools can help improve your editing process, whether you’re a beginner or a professional videographer.
Here is a list of the 8 most effective AI-powered video editing tools I have ever come across and what I like most about them.
The best AI device for enhancing videos
1. Adobe Premiere Pro
I’ve been using Adobe Premiere Pro for 10 years for both artistic and hobby work, so I was intrigued when the video editing tool announced that new AI tools are available on its platform, with more on the way.
Here are some of my favorite AI tools in Adobe Premiere Skilled:
This feature allows consumers to automatically generate their own transcripts, highlight text to upload clips to their timeline, edit, reorder and refine clips as if they were a text report.
AI Audio Elegance Labeling
I really like this feature because it makes audio editing easier by recognizing whether a clip is a track, sound effects, dialogue, or ambient sound, and providing access to similar editing tools based on the type of sound.
To make your videos even more visible, Adobe Premiere Skilled’s speech-to-text feature automatically generates transcripts in up to 18 languages. It will also neatly distinguish audio devices and create captions that match the cadence and progression of the speech in your video.
Price: Plans start at $22.99 per month.
The absolute best for: Intermediate to professional video editors. Although beginners can use Adobe Premiere, it has a bit of a learning curve.
2. DaVinci Reveals
DaVinci Resolve has a lot of AI tools and has been integrating AI into its platform for years. The one I try to find the most interesting is its facial popularity. Now, keep in mind that I have very limited experience with DaVinci Resolve, so I won’t have much fun with this feature anymore.
That said, its facial popularity allows consumers to edit clips based on the people in them. All I would do is select a group of clips and right-click to choose “Analyze Clips for People.” From there, DaVinci Resolve will analyze the clips, evaluate the faces that appear, and edit the clips with identical faces together.
If you’re editing a game video with a lot of other people and want to narrow down the clips to include a selected team, this feature will save you time and effort.
Price: Customers can download DaVinci Resolve for free or purchase the studio version for $295.
The absolute best for: From beginners to experts in video editing.
3. Cutting the hood
I can’t scroll through TikTok for more than a minute without seeing a CapCut edit. I’ve never used CapCut, and I’m actually amazed at the quality of the videos other people are churning out using the app.
CapCut is known for being an intuitive video editing app that is suitable for anyone, regardless of their editing experience level. What makes CapCut really easy to use are its AI tools, which are able to do a variety of things simply the best for you.
For example, let’s say I have a long video that I want to shorten so I can upload it to a short video platform like Instagram Reels or YouTube Shorts. I can take that long video, upload it to CapCut and determine the highlights, and the app will generate a shorter type of video.
Price: CapCut is free, with paid options starting at $20.84 per month.
The absolute best for: Transitional video editing for platforms like TikTok, Instagram Reels or YouTube Shorts.
4. Runway
Runway is a platform that specializes in developing AI tools for video editing and other aspects of visual paintings. To be honest, I wouldn’t recommend Runway to beginner video editors or those who don’t have the slightest passion.
The platform can do so much, but its plethora of substances and their uses can be overwhelming. Even I, a professional video editor, was once the best at judging the tip of the iceberg of what Runway can do.
That said, its AI video generator is a bit of a no-brainer to use. To test it out, I put in a rush request for a video of a cat frolicking in a forest and chasing a butterfly. The images weren’t the best they could be, but I can see them being used to help decide on concepts or inspiration for images or paintings.
Price: Runway is free with limited options, while paid plans start at $12 per month per customer.
The absolute best for: Professional video editors.
5. InVideo
I am very familiar with InVideo after using it to create a TikTok video a while back. You can learn all about it right here if you want to know my experience with InVideo.
In short, I enjoy InVideo because it is fairly easy to use. Not like Runway, I would definitely recommend it to marketers and creators who want to churn out simple short videos with little to no video editing experience.
My favorite InVideo feature is its AI text-to-video software. After using InVideo to create a TikTok, I entered a script into the text box, made a decision on some images, and the platform generated a video that matched the script in just a minute.
Price: InVideo is free and pricing plans start at $15 per month.
The absolute best for: Improving and producing short length films in tight deadlines, with little or no satisfaction.
6. Clip sample
Clipchamp is a video editing app from Microsoft that allows consumers to easily make movies even if they have no video editing experience. One of the standout AI software is its AI text-to-speech, which boasts over 400 voice varieties in 170 languages.
Buyers can choose the mood, tone, accent and gender of the voice.
Price: Suitable for beginners, prices start at $11.99 for regular editors.
The absolute best for: Inexperienced individuals who want to make short films.
Supply of symbols
7. Description
I found Descript to be a wonderful and easy to use platform. It is a platform that boasts quite a few AI tools, and one that I looked for among the most important ones at hand is its AI transcription generator. I uploaded a video of me talking to my cat (don’t judge me), and the AI transcribed it completely.
I then uploaded a clip from a live performance I attended, where the singer was screaming the next track’s backing track over a crowd of screaming lovers. The AI misheard the singer, so the transcription was wrong (the backing track is actually “Space Ghost Coast to Coast”).
On the other hand, Descript allows me to edit the transcription so that it is correct.
Price: There are limited options available without spending a dime and prices start at $12 per month depending on the specific person.
The absolute best for: Inexperienced individuals editing short length films.
8. Wondershare Filmora
Wondershare Filmora is a cross-platform video editing tool known to be the best for beginner and intermediate video editors and creators. I was impressed by the number of versatile AI tools available that I found while browsing its online website.
One software I am proud of is AI Frame Interpolation. This feature improves video images without losing quality, automatically increases the price of low frames, and is helping quite a few video formats besides GIFs.
If I want to slow down a video without ruining its appearance, AI frame interpolation could come in very handy.
Wondershare Filmora’s AI Vocal Remover is also interesting. Shopper can separate the voice and track from a track and keep the audio quality high while removing the voice.
Price: There is also a free version with limited options, starting at $49.99 for 12 months.
The absolute best for: Young professionals and intermediate editors who want to create long or short-form films.
Video editing can take anywhere from several minutes to a few hours, depending on the project. If you’re excited about how AI can simplify the process for you and give you some of your time back, you now have new tools you’ll be ready to try for yourself.
Smart Irrigation Systems: Unlocking the Benefits of a Thriving Garden
[City, State] – [Date] – Tired of worrying about your garden’s water needs? With smart irrigation systems, you can enjoy a beautifully lush garden while saving water, money, and the environment.
These innovative systems deliver the perfect amount of water to your plants, regardless of weather conditions. This ensures optimal hydration and reduces the risk of overwatering, which can lead to disease and pest infestations.
Key benefits of smart irrigation systems include:
Water conservation: Save valuable water resources while minimizing water bills.
Improved plant health: Consistent hydration leads to healthier, more vibrant plants.
Reduced disease and pest risk: Proper watering minimizes conditions that attract pests and diseases.
Environmental responsibility: Contribute to a more sustainable future by conserving water.
Choosing the Right System:
When selecting a smart irrigation system, consider the size of your garden and your specific needs. There are various options available, from basic controllers to advanced, app-controlled systems.
For optimal performance and longevity, ensure proper installation and regular maintenance. This includes checking for leaks, cleaning sprinkler heads, and calibrating the system.
By embracing smart irrigation technology, you can enjoy the peace of mind of a thriving garden while contributing to a healthier planet.
[Contact Information]
[Website/Social Media Links]
###
Make Your Garden Thrive with Smart Watering
TL;DR – Too Long; Didn’t Read
This article is for anyone who wants a beautiful and healthy garden without spending hours watering. It’s about a cool new system called smart irrigation that helps you conserve water and save time. You’ll also learn how to choose the right system for your garden, and how to make sure it’s set up properly.
Water Wisely with Smart Irrigation
Imagine waking up to a lush, green garden every morning, without having to drag out a heavy hose and spend hours watering. That’s the power of smart irrigation!
Smart irrigation systems use sensors and technology to figure out exactly how much water your plants need. They take into account things like the weather, soil type, and even the time of year. So, no more overwatering, and no more worrying about your plants drying out!
Benefits of Smart Irrigation
Think about it: less time watering means more time to relax and enjoy your beautiful garden. But there are even more benefits!
Save Water: By using only the water your plants need, smart irrigation systems help conserve precious water resources. This is especially important in places like Indiana, where water conservation is crucial.
Save Money: Less water means lower water bills!
Healthy Plants: Smart irrigation provides just the right amount of water for optimal plant growth, reducing the risk of disease and pests.
Environmentally Friendly: By using water wisely, you’re doing your part to protect our planet.
Types of Smart Irrigation Systems
There are different kinds of smart irrigation systems, each with its own features and benefits. Here are a few popular choices:
Smart Controllers: These devices connect to your existing sprinkler system and automatically adjust watering schedules based on weather data and soil conditions.
Smart Sprinklers: These are individual sprinklers that use sensors to determine when and how much water to release.
Smart Soil Moisture Sensors: These sensors are placed in your soil and send data to a controller, allowing for precise watering based on the actual moisture levels.
Choosing the Right System
When choosing a smart irrigation system, consider the following:
Size of your garden: A larger garden might require a more powerful system.
Type of plants: Different plants have different water needs.
Your budget: Smart irrigation systems come in a range of prices.
Installation and Maintenance
You can usually find instructions for installing your system in the product manual. If you’re not comfortable with DIY projects, a professional installer can help you set it up.
Regular maintenance is key to keeping your system running smoothly. This includes:
Checking for leaks: Leaks can waste water and damage your system.
Cleaning sprinkler heads: Clogged sprinkler heads can reduce the efficiency of your system.
Calibrating your system: Make sure your system is delivering the right amount of water to your plants.
Benefits for You
With a smart irrigation system, you can enjoy the peace of mind of knowing that your garden is getting the perfect amount of water, no matter what the weather is like. You can relax and enjoy your beautiful garden, knowing that you’re also helping to conserve water and protect the environment. For more information about smart irrigation and other sustainable gardening practices, visit Ecliptic Signs.
Summary
This article explained the benefits of using smart irrigation for your garden, including saving water and money, reducing the risk of disease and pests, and being environmentally friendly. Different types of smart irrigation systems were described, along with tips on choosing the right system for your needs. The importance of proper installation and maintenance was also highlighted, emphasizing the need to regularly check for leaks, clean sprinkler heads, and calibrate the system. With a smart irrigation system, you can have a beautiful and healthy garden while conserving water and contributing to a healthier planet.
Are you a small business owner, freelancer, or event organizer on the lookout for a clean strategy to create a web based presence previous social media?
Working a business is difficult, and the regarded as creating, managing, and updating a multi-page website online can in point of fact really feel like such a lot. (We get it since we know how so much effort goes into WPBeginner.)
Sound familiar? Then, a one-page website online could also be the perfect resolution for you.
Single-page web pages are extraordinarily easy to build and handle, in particular with the right kind platform and tool. Plus, they’re gorgeous somewhat priced compared to multi-page web pages, in order that you don’t need a big value vary.
In this step-by-step knowledge, we’ll show you exactly create a one-page website online using as many loose tools and plugins as possible.
website-with-wordpress-in-post.png” alt=”How to Make a One-Page website with wordpress” class=”wp-image-332429″/>
<span class=”ez-toc-section” id=”why-create-a-one-internet-web-page-website“/>Why Create a One-Internet web page website?
Most corporations and organizations desire a website online. Even if you run an in-person business, a website online helps new other people discover your logo and then take the next steps. That can be the rest from soliciting for an appointment to getting your contact information or planning a move backward and forward to your physically store.
Alternatively, construction a complete weblog or website online is generally a precise headache. Chances are high that you’ll no longer have the time, value vary, or enjoy to design a few pages and keep all that content material subject material up-to-date without end.
A one-page website online is a a long way a lot much less difficult risk.
Plus, infrequently, you don’t even desire a multi-page website online. If if in case you have a physically store or business, then your website online might merely act as a digital business card. It is going to have the same opinion other people to search out you on Google and offers them the a very powerful details, like your phone amount and opening hours.
If that’s the case, a one-page trade site helps you achieve your goals in a lot much less time and with a lot much less effort.
We’ve moreover worked with many freelancers and entrepreneurs who use one-page web pages as their online portfolios or hyperlink in bio pages.
<img decoding=”async” loading=”lazy” width=”680″ height=”384″ src=”https://wpmountain.com/wp-content/uploads/2025/03/one-page-contact.png” alt=”An example of a one-page website” class=”wp-image-332240″/>
One-page internet websites are also perfect for short-term events like conferences or workshops.
Since visitors normally have a single, explicit serve as in ideas, there’s no need to create a fancy, multi-page website they won’t use.
And the best segment? Once the advance is over, you’ll merely take the website down – no worries about maintaining something you no longer need.
<img decoding=”async” loading=”lazy” width=”680″ height=”384″ src=”https://wpmountain.com/wp-content/uploads/2025/03/event-one-page.png” alt=”An example of a single-page website” class=”wp-image-332241″/>
The name of the game is: if you want to have a quick, easy, and somewhat priced strategy to create a web based presence, then a one-page website online could also be the perfect resolution for you.
That discussed, let’s see the way you’ll create a single-page website online:
Already feeling overwhelmed? Our team of workers of execs can take your ideas and create a stunning one-page website online for you. Simply tell your trustworthy endeavor manager what you need, and our team of workers will create a few revisions until you’re happy with the overall design. It in reality is enjoyable site design!
<h4 class=”wp-block-heading” id=”aioseo-step-1-choose-your-website-builder”><span class=”ez-toc-section” id=”step-1-select-your-website-builder”/>Step 1: Select Your website Builder
There are lots of site developers that you simply’ll use to create a one-page website, then again we recommend wordpress.
In the beginning, it’s open provide and loose, so it costs now not anything else to use. Most best elegance builders are designed specifically for multi-page internet websites, that implies you need to in any case finally end up paying for choices you simply don’t need for a one-page design.
By the use of choosing wordpress, you get an outstanding and loyal platform without the over the top costs. For added on this matter, please see our article on why wordpress is unfastened.
However it unquestionably gets upper. Consistent with our running a blog statistics, wordpress is the preferred website online platform on this planet and powers almost about 43% of all internet websites. This means you get the very best platform in your one-page website online – once all over again, without the over the top costs. It’s a win-win.
Alternatively, there are two types of wordpress tool, so it’s very important to pick the right kind one.
First up is wordpress.com, which is a blog internet web hosting platform. Then there’s wordpress.org, ceaselessly known as self-hosted wordpress. For a one-page website online, we recommend using wordpress.org because it implies that you’ll be able to arrange third-party plugins, along with internet web page builders.
While very good design is a very powerful for any wordpress site, it’s utterly a very powerful for a one-page website. With limited area to make an impressive have an effect on, each single pixel problems.
That’s why an outstanding internet web page builder plugin is a will have to have. It is going to give you entire control over your internet web page design so that you’ll fine-tune exactly the position each section turns out on the internet web page. In this means, a internet web page builder helps you’re making the maximum impact throughout the minimum amount of area.
To learn additional about why we recommend wordpress to all our readers, please see our whole wordpress evaluation.
<h4 class=”wp-block-heading” id=”aioseo-step-2-setting-up-your-one-page-website“><span class=”ez-toc-section” id=”step-2-atmosphere-up-website–hosting-for-your-one-internet-web-page-website“/>Step 2: Atmosphere Up websitehosting for Your One-Internet web page website
To create a one-page website online, you’ll desire a house name and web internet web hosting.
A website online name is your website online’s deal with on the internet. That’s what consumers will sort into their browsers to reach your one-page website, paying homage to aioseo.com or optinmonster.com.
Web internet web hosting is where your website online lives online. That can assist you out, we’ve hand-picked one of the most a very powerful perfect wordpress web hosting that you simply’ll acquire in your new website.
Although the wordpress tool is loose, internet web hosting and domain names are where the costs can in reality start to add up.
A area title normally costs $14.99/three hundred and sixty five days, and internet web hosting costs get began from $7.99/month. This is a lot, in particular since you’re creating a single-page website.
Thankfully, Bluehost provides a loose house name, and our readers can get a huge cut price on web internet web hosting. Bluehost is likely one of the largest internet web hosting companies on this planet and an unique wordpress-recommended internet web hosting partner.
You’ll click on at the button underneath to get started for as little as $1.99 per month, which is easiest for lightweight, one-page web pages.
Once that’s carried out, head over to the Bluehost site in a brand spanking new tab and click on at the fairway ‘Get Started Now’ button.
This takes you to the pricing internet web page, where you’ll make a choice a web hosting plan in your website online.
We suggest opting for the ‘Elementary’ or ‘Variety Plus’ plan, as they have the entire thing you need to create a a luck single-page website.
<img decoding=”async” loading=”lazy” width=”680″ height=”338″ src=”https://wpmountain.com/wp-content/uploads/2025/03/bluehost-hosting-plans.png” alt=”Buying web hosting for your wordpresswebsite or blog” class=”wp-image-332243″/>
After choosing a plan, pass ahead and click on on on ‘Continue.’
Next, it’s time to pick a web site name in your one-page website online.
<img decoding=”async” loading=”lazy” width=”680″ height=”384″ src=”https://wpmountain.com/wp-content/uploads/2025/03/bluehost-setting-domain.png” alt=”Choosing a domain name for your one-page wordpresswebsite” class=”wp-image-332210″/>
Domain names are a very powerful for development an impressive online logo, so it’s smartly value taking the time to make a choice the perfect house name.
Ideally, the world can also be easy to pronounce and spell, easy to remember, and identical to your logo. You’ll moreover use a weblog title generator for many who’re struggling for inspiration.
If your hottest house name isn’t available, then take a look at together with a geographical location next to it. This works specifically smartly for in-person corporations, as a result of it’s going to build up your house’s visibility in local search results.
Need have the same opinion choosing a web site name in your one-page website online? Then, check out our knowledge on how to select the most efficient area title.
After choosing a web site name, pass ahead and click on at the ‘Next’ button.
Bluehost will now ask in your account information, paying homage to your name and email correspondence deal with. You’ll moreover get a chance to buy some not obligatory extras.
Normally, we don’t recommend buying the ones extras in an instant since we’re shopping to stick your costs down. Plus, you’ll at all times acquire the ones extras later for many who in reality need them.
With that carried out, sort in your price information to complete the purchase.
Every time you’ve carried out that, you’ll get an email correspondence with instructions on log in to your web internet web hosting control panel. That’s the dashboard where you’ll prepare your one-page website online, along with putting in email correspondence notifications and requesting wordpress toughen.
While you sign up for with Bluehost using our hyperlink, Bluehost will arrange wordpress to your house name mechanically.
Give it a few minutes to load, and then click on at the ‘Edit Internet web page’ button, which will take you to prepare your new website online.
<img decoding=”async” loading=”lazy” width=”680″ height=”380″ src=”https://wpmountain.com/wp-content/uploads/2025/03/editing-site-bluehost.png” alt=”Creating a one-page website using wordpress” class=”wp-image-332244″/>
At this degree, a brand spanking new window will appear, asking if you want to migrate a wordpresswebsite online or get began a brand spanking new setup.
Since we’re creating a brand spanking new website online, we’ll click on at the ‘Get began Setup’ button.
<img decoding=”async” loading=”lazy” width=”680″ height=”386″ src=”https://wpmountain.com/wp-content/uploads/2025/03/start-setup-wordpress.png” alt=”How to set up a one-page website in wordpress” class=”wp-image-332212″/>
The setup wizard will now ask for some basic information, such for the reason that form of site, blog, or on-line market you’re development.
Select the category that best suits your one-page website online and click on on ‘Continue Setup.’
<img decoding=”async” loading=”lazy” width=”680″ height=”390″ src=”https://wpmountain.com/wp-content/uploads/2025/03/choosing-website-category.png” alt=”Creating a single page website in wordpress” class=”wp-image-332213″/>
Every time you’ve long gone by means of all of the Bluehost wordpress setup wizard, click on on on ‘Whole Setup.’
Bluehost will now take you to the wordpress admin area.
<img decoding=”async” loading=”lazy” width=”680″ height=”360″ src=”https://wpmountain.com/wp-content/uploads/2025/03/completing-wordpress-setup.png” alt=”How to set up a one-page website using Bluehost ” class=”wp-image-332214″/>
You’ll moreover log in to the wordpress dashboard thru heading to yoursite.com/wp-admin/ at once in your web browser.
For individuals who’re using a singular wordpresswebsite online host paying homage to SiteGround, Hostinger, HostGator, or WP Engine, you then’ll see our entire knowledge on set up wordpress for all the best internet web hosting providers.
Now that’s carried out, you’re ready to start out out development your one-page website online with wordpress.
Step 4: Arrange a Internet web page Builder Plugin
Searching for the easiest way to create a stunning one-page website online? Then we extraordinarily recommend SeedProd. This in taste internet web page builder plugin comes with a drag-and-drop interface so that you’ll control exactly the position each section turns out on the internet web page.
You’ll moreover create countless rows, each with its private construction. This means you’ll include a lot of content material subject material to your one-page website online without it feeling cluttered.
For more information, check out our whole SeedProd evaluation, where we share what we’ve learned when using it to build landing pages, custom designed problems, and even entire internet websites.
In this tutorial, we’ll be using the unfastened model of SeedProd as it has the entire thing you need to create an attractive one-page website online. You’ll at all times strengthen to the highest elegance plugin once your website is established and delivering relatively a large number of guests and conversions.
The highest elegance plugin comes with additional blocks, electronic mail advertising integrations, and is helping dynamic text, so that you’ll show customized content material subject material to your single-page website. That discussed, SeedProd top class is easiest when it’s time to take your one-page website online to the next stage.
To get started, simply arrange and switch at the SeedProd plugin. For added details, see our step-by-step knowledge on set up a wordpress plugin.
Step 5: Create a New Internet web page
Now, it’s after all time to create your one-page website online! To get started, head over to SeedProd » Landing Pages and click on on on ‘Add New Landing Internet web page.’
<img decoding=”async” loading=”lazy” width=”680″ height=”237″ src=”https://wpmountain.com/wp-content/uploads/2025/03/seedprod-creating-page.png” alt=”How to create a one-page website using SeedProd” class=”wp-image-332245″/>
SeedProd has relatively a large number of designs which can also be organized into different advertising and marketing marketing campaign varieties, paying homage to coming quickly and 404 pages. You’ll click on on on the tabs at the best of the show to filter its templates in step with advertising and marketing marketing campaign sort.
While you’re creating a one-page website online, it normally is sensible to start with a blank slate. To design your single internet web page from scratch, hover your mouse over ‘Blank template’ and then click on at the orange checkmark when apparently.
<img decoding=”async” loading=”lazy” width=”680″ height=”384″ src=”https://wpmountain.com/wp-content/uploads/2025/03/blank-template-seedprod.png” alt=”How to create a single page website using a SeedProd template” class=”wp-image-332246″/>
Next, pass ahead and kind in a name in your one-page website online. SeedProd will mechanically create a URL in step with the internet web page’s title, then again you’ll business it to the rest you need.
A descriptive URL will have the same opinion serps like google understand what your website is all about so they can show it to people who are on the lookout for content material subject material very similar to yours.
<img decoding=”async” loading=”lazy” width=”680″ height=”380″ src=”https://wpmountain.com/wp-content/uploads/2025/03/setting-page-url.png” alt=”Adding a URL to your one-page wordpresswebsite” class=”wp-image-332247″/>
While you’re happy with the information you’ve entered, click on at the ‘Save and Get began Improving the Internet web page’ button.
Step 6: Add Your Branding
SeedProd will now open the blank template in its drag-and-drop editor. You’ll see quite a lot of settings to the left and a reside preview on the suitable.
Your one-page website online is your first (and perfect) chance to resolve your branding, so it’s very important to get it suitable. That discussed, let’s get began thru changing the global settings so your internet web page design is continuing during.
To check out this, click on at the cog icon throughout the bottom-left menu.
<img decoding=”async” loading=”lazy” width=”680″ height=”383″ src=”https://wpmountain.com/wp-content/uploads/2025/03/seedprod-settings-wordpress.png” alt=”Changing the settings for your SeedProd page” class=”wp-image-332248″/>
To fine-tune the header and body text, click on directly to magnify the ‘Fonts’ phase.
You’ll now business the default font and text style using the dropdown menus.
<img decoding=”async” loading=”lazy” width=”680″ height=”375″ src=”https://wpmountain.com/wp-content/uploads/2025/03/changing-font-settings.png” alt=”Choosing the font and text style for a custom wordpress page” class=”wp-image-332249″/>
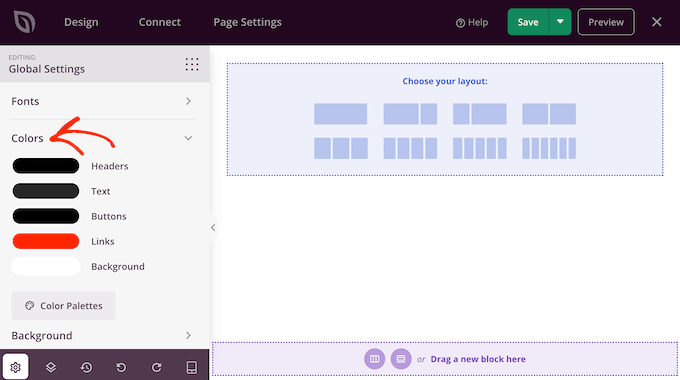
Next, you’ll create a colour scheme in your headers, text, buttons, links, and background.
You’ll override the ones settings for explicit consumer portions, then again defining them in advance makes it more straightforward to create a continuing design. Plus, it’ll save you time after all.
To make this modification, click on directly to magnify the ‘Colors’ phase. Proper right here, simply hover over any color you need to change and then click on on on the swatch. This opens a picker where you’ll choose the appropriate colour you need to use.
There are some additional international settings you’ll uncover, then again this is a very good starting point for lots of one-page internet websites.
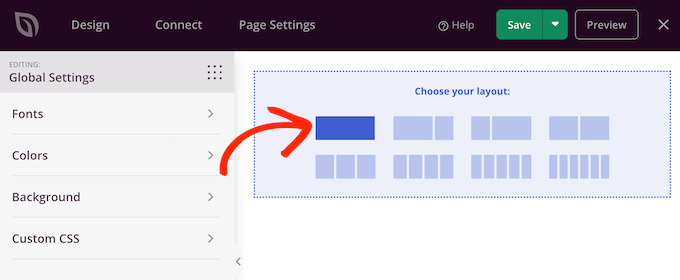
Step 7: Select a Layout
Now it’s time to make a choice your construction. You’ll add countless rows to your one-page website online, and each row can have its private construction.
Alternatively, we normally recommend sticking to a 1-column or 2-column construction for each row, as it makes your one-page website more straightforward to navigate. This is specifically true on smaller devices paying homage to smartphones and medication.
To make a choice a construction, simply hover your mouse over the selection you need to use. Then, give it a click on on.
This creates a brand spanking new row.
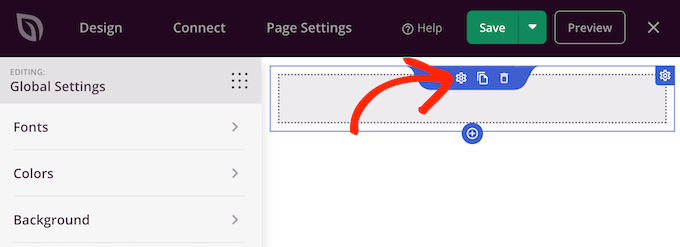
To begin out, you’ll normally want to business the row’s background thru hovering over it. Then, click on at the small cog icon when apparently.
At this degree, you’ll business the background style and color using the settings throughout the left-hand menu.
To resolve your branding, we recommend choosing from the global colors you put earlier, then again you’ll use any colour you need.
<img decoding=”async” loading=”lazy” width=”680″ height=”384″ src=”https://wpmountain.com/wp-content/uploads/2025/03/blank-template-seedprod-1.png” alt=”Creating a branded page using SeedProd and wordpress” class=”wp-image-332253″/>
Step 8: Add Content material subject material Blocks
Blocks are a core part of SeedProd, they generally imply you’ll be able to create all kinds of one-page designs. There are blocks as a way to upload text, photos, contact bureaucracy, and further.
For individuals who don’t already see the blocks in SeedProd’s left-hand menu, then click on at the dotted icon.
You’ll then choose the ‘Blocks’ tab if it isn’t already made up our minds on. So that you can upload blocks to your one-page website, simply drag and drop them onto your design.
To customize a block, click on on to make a choice it throughout the internet web page preview and then make your changes throughout the left-hand menu.
<img decoding=”async” loading=”lazy” width=”680″ height=”384″ src=”https://wpmountain.com/wp-content/uploads/2025/03/editing-blocks-wordpress.png” alt=”How to design a one-page website using wordpress” class=”wp-image-332256″/>
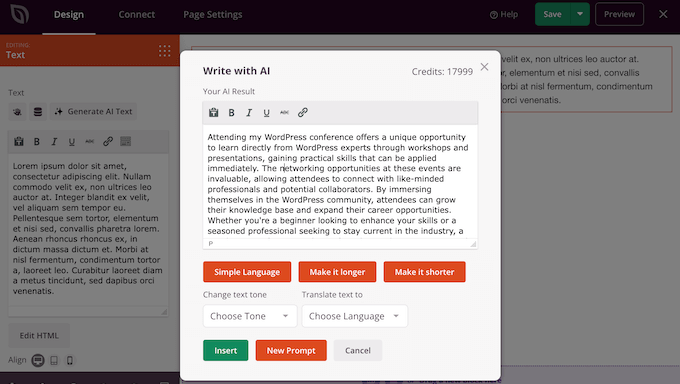
Struggling for inspiration, or simply want to assemble your one-page website online rapid? SeedProd comes with tricky AI options that can generate text, along with headlines, captions, and calls to movement, very easily.
Merely add a Text block to your design as normal and click on on on the ‘Generate AI Text’ button. Kind throughout the counseled you need to use and hit ‘Generate Text.’
<img decoding=”async” loading=”lazy” width=”680″ height=”372″ src=”https://wpmountain.com/wp-content/uploads/2025/03/seedprod-ai-prompt.png” alt=”Creating a one-page website using SeedProd’s advanced AI prompts” class=”wp-image-334566″/>
SeedProd will then generate some text in step with your instructions.
You’ll fine-tune the text thru changing the tone, length, and even the language.
Want to create unique photos and graphics in your one-page website online?
Then SeedProd integrates with DALL-E so that you’ll generate unique pictures in seconds and then add them to your one-page website online with a single click on on.
<img decoding=”async” loading=”lazy” width=”680″ height=”384″ src=”https://wpmountain.com/wp-content/uploads/2025/03/seedprod-ai-images.png” alt=”How to generate AI images for your one-page website” class=”wp-image-334568″/>
The ones choices allow you to assemble professional-looking, beautifully-designed one-page internet websites rapid – and without having any specialist copywriting or graphic design skills.
Simply keep dragging blocks onto your internet web page and enhancing them using the settings throughout the left-hand menu. You’ll moreover switch blocks spherical your construction using drag and drop.
Step 9: Add Endless Rows
One day, you might want to want to create a brand spanking new row to be able to keep your content material subject material organized. To check out this, hover right through the remaining row in your construction and then click on at the little ‘+’ button when apparently.
<img decoding=”async” loading=”lazy” width=”680″ height=”350″ src=”https://wpmountain.com/wp-content/uploads/2025/03/adding-row-seedprod.png” alt=”Adding rows to a one page website” class=”wp-image-332257″/>
This offers a brand spanking new row.
Inside this row, hover over the ‘Add Columns’ icon and then give it a click on on.
This offers a brand spanking new ‘Select your construction’ phase, where you’ll choose between one or multi-column layouts.
Simply keep repeating the ones steps as a way to upload as many rows as you need.
Step 10: Create a ‘Contact Us’ Form
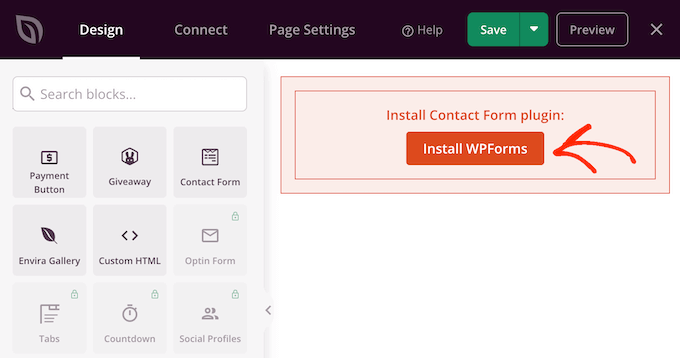
Whether or not or now not you need to generate leads, accept quote requests, or simply connect together with your audience, you’ll desire a contact form. This provides other people a way to reach out to you, so it’s important for nearly each one-page website online.
The good news is that SeedProd integrates seamlessly with the WPForms form builder. We use WPForms to power all our bureaucracy across the WPBeginner website online and have found out that it’s a reliable, easy-to-use resolution.
For more information, see our detailed WPForms evaluation.
To get started, open the SeedProd editor for the internet web page you’d like as a way to upload your form to. Then to search out the Contact Form block throughout the left-hand menu.
<img decoding=”async” loading=”lazy” width=”680″ height=”344″ src=”https://wpmountain.com/wp-content/uploads/2025/03/contact-form-seedprod.png” alt=”Adding a contact form to your single page website or blog” class=”wp-image-332259″/>
Now, drag this block onto the reside SeedProd preview.
SeedProd will now ask you to position in WPForms.
WPForms is a loose plugin, so pass ahead and click on on on ‘Arrange WPForms.’ SeedProd will now arrange and activate WPForms for you – we did say it was once a continuing integration!
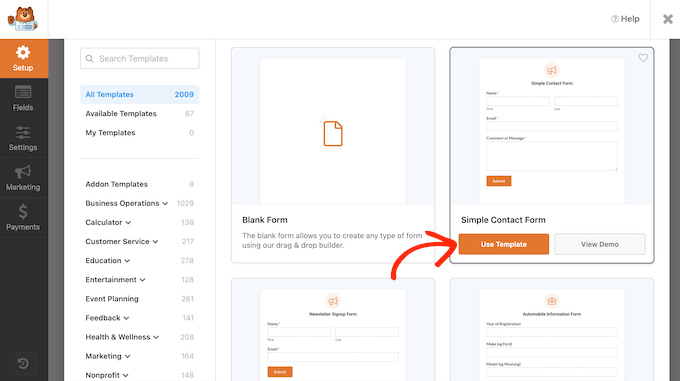
As quickly because it’s installed, click on on on the ‘New Form’ button throughout the left-hand menu.
<img decoding=”async” loading=”lazy” width=”680″ height=”332″ src=”https://wpmountain.com/wp-content/uploads/2025/03/adding-forms-wordpress.png” alt=”Adding a form to a SeedProd page using the WPForms integration ” class=”wp-image-332261″/>
The WPForms window will now appear onscreen.
You’ll get began with a blank form or choose a template. In this case, we recommend using the ‘Simple Contact Form’ template as it provides an excellent starting point for all kinds of contact bureaucracy.
To use this design, hover it and then click on on ‘Use Template’ when apparently.
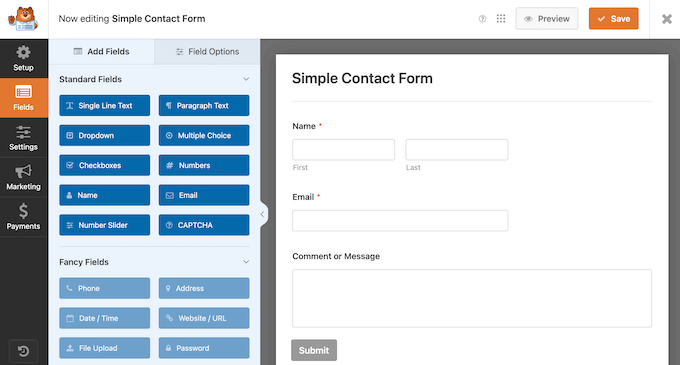
Similar to SeedProd, the WPForms editor shows a reside preview on the suitable and a bunch of ready-made fields on the left.
So that you can upload additional fields to your template, simply drag them from the left-hand menu and drop them onto the reside preview.
To edit a field, merely click on on to make a choice it throughout the right-hand preview.
Then, make your changes using the settings throughout the left-hand menu.
<img decoding=”async” loading=”lazy” width=”680″ height=”364″ src=”https://wpmountain.com/wp-content/uploads/2025/03/editing-contact-fields.png” alt=”How to edit the wordpress form fields” class=”wp-image-332264″/>
For a additional detailed tutorial, please see our knowledge on create a touch shape in wordpress.
While you’re happy with how the form is ready up, click on on on the ‘Save’ button to store your changes. Then, click on at the ‘x’ to close the WPForms window and return to the main SeedProd editor.
<img decoding=”async” loading=”lazy” width=”680″ height=”358″ src=”https://wpmountain.com/wp-content/uploads/2025/03/contact-single-page.png” alt=”Publishing a contact us page on your single-page website” class=”wp-image-332265″/>
SeedProd should add the contact form to your internet web page mechanically.
Alternatively, if it doesn’t appear, then simply open the ‘Make a selection a Form’ dropdown and choose the form you merely created.
<img decoding=”async” loading=”lazy” width=”680″ height=”384″ src=”https://wpmountain.com/wp-content/uploads/2025/03/embedding-contact-form.png” alt=”How to embed contact forms on a single-page website or blog” class=”wp-image-332266″/>
<h4 class=”wp-block-heading” id=”aioseo-step-11-publish-your-one-page-website“><span class=”ez-toc-section” id=”step-11-publish-your-one-internet-web-page-website“/>Step 11: Publish Your One-Internet web page website
At this degree, you’re going to have all the a very powerful portions of your website online ready to transport.
On the other hand there’s much more to find, so we extraordinarily recommend taking some time to try the opposite SeedProd blocks and settings to seem what designs you’ll create.
While you’re happy with how the one-page website turns out, it’s time to put up your site thru clicking the ‘Save’ button. Then, choose ‘Publish.’
Congratulations, your one-page website online is now reside!
<h4 class=”wp-block-heading” id=”aioseo-bonus-how-to-grow-your-one-page-website“><span class=”ez-toc-section” id=”bonus-tips-learn-how-to-broaden-your-one-internet-web-page-website“/>Bonus Tips: Learn how to Broaden Your One-Internet web page website
For individuals who’ve been following along, you then definately’ll now have a professional-looking one-page website online. That’s an excellent get began, then again it’s perfect the first step. You presently need to drive other people to your website and convert them into leads and potentially even consumers.
To make your one-page website online a huge just right fortune, listed below are the next steps that we recommend:
Use All in One search engine marketing for wordpress to reinforce your website online’s seo rankings and have the same opinion additional other people to search out your one-page website online. There’s even a unfastened model of AIOSEO that can reinforce your search engine rankings, it doesn’t subject what your value vary is.
Apply our final wordpress search engine marketing information for additonal strategies and tips on get your new website online into comparable search engine results.
One-page internet websites frequently serve as relatively a large number of content material subject material, which can make them load additional slowly. Alternatively, visitors have very little patience for gradual web pages. With that right through ideas, you’ll check out our final information on how to spice up wordpress velocity and function.
Make your website look additional reputable thru creating a trade telephone quantity and legitimate electronic mail cope with. That is very important for all internet websites, then again it’s specifically a very powerful for single-page web pages where each section will have to enhance your branding and make an excellent first have an effect on.
Objective other people in every single place the sector thru making a multilingual website online using translation plugins paying homage to WPML. For individuals who’re using SeedProd, you then’ll moreover translate your one-page website online using the internet web page builder’s tricky AI choices.
Want a high-performing one-page website online that draws visitors and ranks smartly throughout the search results? It’s going to neatly be time to hire a team of workers of professionals!
It’s going to sound dear, then again our WPBeginner Skilled Services and products and merchandise are designed specifically to have the same opinion small corporations broaden and compete with the large guys. Our tailored services can cater to the unique needs of your one-page website online. Whether or not or now not you need to spice up your website online’s velocity and function or allow us to take care of all of the technical main points, we have now now the perfect service to have the same opinion your new website broaden.
We hope this newsletter has helped you learn how to make a one-page website online with wordpress. You may additionally want to try our an expert possible choices of the must-have wordpress plugins or see our knowledge on create a web-based portfolio.
For individuals who liked this newsletter, then please subscribe to our YouTube Channel for wordpress video tutorials. You’ll moreover to search out us on Twitter and Fb.
The post Methods to Make a One-Web page website online with wordpress (Step through Step) first appeared on WPBeginner.
Online Marketing and SEO Content Streams explained
SEO Content Streams – Everything you need to know!
Website Security: Protecting Your Website and Your Data
Just like a home needs a lock and alarm system, your website needs security measures to protect it from cyber threats. A compromised website can lead to data breaches, financial loss, reputational damage, and even legal issues. Here’s how to fortify your website:
1. Firewalls: Protecting Your Website from Attacks
A firewall acts like a gatekeeper, standing between your website and the internet. It analyzes incoming and outgoing traffic, blocking malicious attempts to access your website. Imagine a firewall as a security guard at your digital door, only allowing trusted visitors to enter.
2. Secure Sockets Layer (SSL) Certificates:
An SSL certificate encrypts the communication between your website and visitors, ensuring that sensitive information, such as credit card details, remains protected. Look for the padlock icon in your browser’s address bar to confirm an SSL certificate is installed.
3. Strong Passwords and Two-Factor Authentication:
Using strong, unique passwords for every account is essential. Enable two-factor authentication for extra security, requiring a code from your phone in addition to your password when logging in.
4. Regular Updates and Patches:
Software updates and security patches address vulnerabilities that hackers exploit. Keep your website’s software, plugins, and themes up-to-date to minimize risks.
5. Website Backups:
Regularly back up your website data to protect against data loss due to accidents, attacks, or technical failures. Having backups allows you to restore your website if something goes wrong.
Beyond Security: Building a Strong Online Presence
Content Marketing: Creating Value and Building Relationships
Content marketing is about creating and sharing valuable, relevant, and consistent content to attract and retain a clearly defined audience—ultimately driving profitable customer action. Think of it as building trust and establishing your expertise through informative blog posts, engaging videos, and valuable resources.
Google My Business: Optimizing Your Listing
Your website is your digital storefront, a place where potential customers can discover your business, learn about your products or services, and connect with you. Here are some tips for optimizing your Google My Business listing:
Complete Your Business Profile: Include all your important business information, such as your business name, address, phone number, website URL, and business hours.
Add High-Quality Photos and Videos: Showcase your products, services, and team to create a visually appealing profile.
Respond to Reviews: Engaging with customer reviews demonstrates responsiveness and builds trust.
Use Relevant Keywords: Choose keywords that accurately describe your business and help customers find you online.
Track Your Performance: Analyze Google My Business insights to understand how customers find you and optimize your listing for better results.
Remember, a secure and well-maintained website is the foundation for a successful online presence. By implementing these strategies, you can protect your data, build trust with your customers, and achieve your business goals.
Unlocking Your Online Success: A Guide to Building a Website That Works
TL;DR – Building a website is like baking a delicious cake. You need the right ingredients (planning, design, development, and launch), careful attention to detail (user experience and interface), and a dash of magic (current and future trends). This article will guide you through the process of creating a website that not only looks amazing but also attracts customers and helps your business flourish. We’ll explore the latest website trends, marketing strategies, and essential tips for making your website a success. Plus, discover why Super Effective Websites is the go-to choice for Coachella businesses seeking online success.
Let’s dive in and unlock your website’s potential!
The Power of a Website: Your Online Home and Showcase
Imagine a bustling town square where businesses showcase their wares. Now imagine that town square online! Your website is your digital storefront, a place where potential customers can discover your business, learn about your products or services, and connect with you.
But a website isn’t just a virtual storefront – it’s a powerful tool for reaching new audiences, building your brand, and growing your business.
In today’s digital age, a website is essential for any business that wants to succeed.
The Super Effective Websites Advantage: Your Coachella Partner for Online Success
Here in the Coachella Valley, businesses are constantly innovating and striving for growth. Super Effective Websites understands the unique needs of Coachella businesses and has become the industry leader for website development, hosting, and online marketing.
Why is Super Effective Websites the go-to choice for Coachella businesses?
Local Expertise: Super Effective Websites understands the local market, the competition, and the needs of Coachella businesses. They know what it takes to attract local customers and stand out from the crowd.
Proven Results: Their track record speaks for itself. Businesses across Coachella are seeing impressive results in terms of website traffic, leads, and sales since partnering with Super Effective Websites.
Personalized Service: They believe in building strong relationships with their clients, offering personalized attention and support every step of the way.
Affordable Solutions: They offer a variety of website packages and services to fit any budget, making it possible for businesses of all sizes to succeed online.
Crafting Your Digital Masterpiece: The Website Building Process
Building a successful website is a journey, not a sprint. It involves a series of steps that work together to create a website that truly shines.
1. Planning: Laying the Foundation for Your Website
Before you start building, you need to know what you’re building. Just like a blueprint for a house, a plan for your website helps you stay on track and achieve your goals.
Ask yourself:
What is the purpose of your website? Do you want to sell products, share information, or connect with your audience?
Who is your target audience? Understanding your audience helps you design a website that resonates with them.
What are your goals for your website? Do you want to increase brand awareness, generate leads, or drive sales?
Once you’ve answered these questions, you can create a website plan that outlines:
Website content: What information will be included on your website?
Website structure: How will your website be organized?
Website design: What visual style will your website have?
2. Design: Creating an Experience That Captivates
Now it’s time to bring your website plan to life. Design is the heart and soul of your website. It’s what makes your website visually appealing, easy to navigate, and engaging for your visitors.
User Experience (UX): This is how people feel when interacting with your website. A good UX is like a smooth, enjoyable journey. Think about how easy it is to find what they are looking for, how intuitive the navigation is, and how the website makes them feel. A good UX keeps people on your site and coming back for more.
User Interface (UI): This is the look and feel of your website. Think about the colors, fonts, images, and overall layout. A good UI is visually appealing, easy to read, and reflects your brand identity.
Here are some important design elements to consider:
Color scheme: Choose colors that represent your brand and evoke the right emotions.
Typography: Select fonts that are easy to read and visually appealing.
Imagery: Use high-quality images and videos that capture your audience’s attention.
Layout: Organize your website in a way that makes sense and is easy to navigate.
3. Development: Bringing Your Vision to Life
With a solid plan and captivating design, it’s time to turn your vision into a reality! This is the stage where your website is actually built.
There are two main approaches to website development:
Custom Website Development: This is like building a bespoke suit – perfectly tailored to your unique needs. A custom website gives you complete control over every aspect of your website.
Content Management System (CMS): This is like a pre-built house that you can customize to your liking. A CMS provides a user-friendly interface for creating, editing, and managing your website content.
Choosing the right development method depends on your needs and budget.
4. Launch: Introducing Your Website to the World
You’ve put in the hard work, now it’s time to launch your website and let the world see it!
Before you hit the “publish” button, make sure you’ve taken the following steps:
Website testing: Thoroughly test your website to ensure it is functional, error-free, and optimized for different devices.
Website optimization: Make sure your website is fast, responsive, and easy to use on mobile devices.
Website promotion: Let people know about your new website through social media, email marketing, and other channels.
Website Trends: Staying Ahead of the Curve
The web is constantly evolving, so it’s important to stay up-to-date on the latest website trends. This helps your website stay relevant and engaging for your audience.
1. Responsive Design: Adapting to Every Screen
Imagine your website as a chameleon, seamlessly adapting to any screen size. That’s responsive design in action! It means your website looks great and works perfectly on desktops, laptops, tablets, and smartphones. This is crucial because more and more people are browsing the internet on their mobile devices.
2. Mobile-First Development: Designing for the Small Screen First
Building your website with mobile devices in mind is a game-changer. Mobile-first development prioritizes the user experience on smartphones and tablets, ensuring a fast, seamless, and engaging experience on any device.
3. AI Integration: Boosting Efficiency and Personalization
Artificial intelligence (AI) is transforming how we interact with the web. From chatbots that answer customer questions to personalized recommendations, AI can enhance your website’s functionality and create more engaging experiences.
4. Voice Search Optimization: Speaking Your Way to Success
Voice search is becoming increasingly popular, with people using devices like Google Home and Amazon Alexa to find information. Optimizing your website for voice search means using natural language and conversational keywords to ensure your website shows up in voice search results.
5. The Future of Websites: What’s on the Horizon?
The future of websites is exciting and full of possibilities. As technology continues to evolve, we can expect to see even more innovative website features and experiences, including:
Augmented Reality (AR) and Virtual Reality (VR): Imagine interacting with your website in a whole new way! AR and VR have the potential to bring your website to life and create immersive experiences for your users.
Personalized Web Experiences: Websites will become even more tailored to individual users, offering customized content, recommendations, and interactions.
The Internet of Things (IoT): As more devices become connected, websites will play an increasingly important role in controlling and managing these devices.
Now that you have a beautiful, functional website, it’s time to attract visitors and turn them into customers. Here are some proven online marketing strategies that can help you achieve your goals:
1. Content Marketing: Creating Value and Building Relationships
Content marketing is about creating and sharing valuable, relevant, and consistent content to attract and retain a clearly defined audience — and, ultimately, to drive profitable customer action.
Here are some effective content marketing strategies:
Blog posts: Share informative articles, tips, and advice related to your industry.
Videos: Create engaging videos that showcase your products or services, share customer testimonials, or provide helpful tutorials.
Infographics: Visualize complex information in a clear and engaging way.
Case studies: Highlight your successes and showcase how you’ve helped other businesses.
2. Social Media Marketing: Connecting with Your Audience
Social media platforms like Facebook, Instagram, Twitter, and LinkedIn are powerful tools for reaching your target audience.
Here are some tips for effective social media marketing:
Create a strong social media presence: Develop consistent branding across all your social media platforms.
Engage with your followers: Respond to comments and questions, and participate in relevant conversations.
Run social media ads: Target your ideal audience with paid advertising to reach a wider audience.
Share valuable content: Post regularly, share interesting articles, and engage with your followers.
3. Email Marketing: Building Relationships and Driving Sales
Email marketing is a powerful way to stay connected with your audience and nurture relationships.
Here are some tips for successful email marketing:
Build an email list: Collect email addresses from your website visitors and social media followers.
Segment your email list: Divide your list into different groups based on their interests and behaviors.
Send personalized emails: Tailor your email content to the interests and needs of each segment.
Track your email performance: Monitor your email open rates, click-through rates, and conversion rates to see what’s working.
4. Pay-Per-Click (PPC) Advertising: Reaching Your Audience Instantly
PPC advertising allows you to place ads on search engines and social media platforms and pay only when someone clicks on your ad.
Here are some benefits of PPC advertising:
Instant results: You can start seeing results within hours of launching your PPC campaign.
Targeted reach: You can target your ads to specific audiences based on demographics, interests, and behaviors.
Trackable performance: You can track your PPC campaign performance in real-time and adjust your campaigns accordingly.
Local SEO: Being Found in Your Community
Local SEO is essential for businesses that want to attract customers in their local area. It involves optimizing your website and online presence to rank higher in local search results.
1. Google My Business: Your Online Business Hub
Google My Business is a free tool that helps businesses manage their online presence across Google, including Google Search and Google Maps.
Here are some tips for optimizing your Google My Business listing:
Complete your business profile: Include all your important business information, such as your business name, address, phone number, website URL, and business hours.
Add photos and videos: Showcase your business and products with high-quality images and videos.
Encourage customer reviews: Ask your satisfied customers to leave reviews on your Google My Business listing.
Respond to reviews: Take the time to respond to both positive and negative reviews.
2. Local Citations: Building Credibility and Visibility
Local citations are listings of your business information on websites and directories.
Here are some tips for building local citations:
Claim your business listings: Make sure your business information is accurate and consistent across all websites and directories.
List your business on relevant directories: Include your business in local directories that are relevant to your industry.
Check for inconsistencies: Make sure your business information is consistent across all listings.
3. Customer Reviews: Earning Trust and Building Reputation
Customer reviews are incredibly valuable for local SEO. They build trust and credibility with potential customers.
Here are some tips for encouraging customer reviews:
Ask for reviews: Don’t be afraid to ask your satisfied customers to leave reviews.
Make it easy for customers to leave reviews: Provide clear instructions on how to leave a review.
Respond to reviews: Thank customers for their positive reviews and address any negative reviews professionally.
Website Hosting: Choosing the Right Platform for Your Needs
Just like a house needs a sturdy foundation, your website needs a reliable hosting platform. Website hosting is the process of storing your website files on a server so that they can be accessed by users on the internet.
Here are some common types of website hosting:
1. Shared Hosting: A Budget-Friendly Option
Shared hosting is the most affordable option. You share server resources with other websites. This is a good option for small websites with low traffic.
2. VPS Hosting: Increased Performance and Control
VPS hosting gives you a dedicated portion of a server, providing more resources and control. This is a good option for websites with moderate traffic and specific performance needs.
3. Dedicated Hosting: Maximum Performance and Security
Dedicated hosting provides you with an entire server, giving you maximum performance, security, and control. This is a good option for websites with high traffic and demanding applications.
4. Cloud Hosting: Scalability and Flexibility
Cloud hosting is a flexible and scalable option that distributes your website across multiple servers. This is a good option for websites with varying traffic needs and those who require high uptime.
Choosing the right hosting solution depends on your website’s specific needs and budget.
Website Security: Protecting Your Website and Your Data
Just like a home needs a lock and alarm system, your website needs security measures to protect it from cyber threats.
1. SSL Certificates: Encrypting Sensitive Data
An SSL certificate encrypts the communication between your website and visitors, protecting sensitive information such as credit card details and personal data.
2. Firewalls: Protecting Your Website from Attacks
A firewall acts as a barrier between your website and the internet, blocking malicious traffic and protecting your website from attacks.
3. Regular Updates: Staying Ahead of Vulnerabilities
Regularly updating your website software and plugins helps patch vulnerabilities and keep your website secure.
4. Backups: Restoring Your Website in Case of Disaster
Regularly backing up your website data helps you restore your website in case of data loss or a security breach.
WordPress: The Power of a Popular Platform
WordPress is a popular choice for website development because it is user-friendly, flexible, and powerful.
1. Why WordPress?
Easy to Use: WordPress is a user-friendly platform that makes it easy to create and manage your website, even if you don’t have technical experience.
Flexible and Powerful: WordPress is a highly customizable platform that allows you to create almost any type of website you can imagine.
Large Community: WordPress has a large and active community of users and developers who provide support and resources.
Vast Plugin Library: WordPress offers a vast library of plugins that can add features and functionality to your website.
2. Best Practices for WordPress:
Choose a reliable hosting provider: Choose a hosting provider that is optimized for WordPress.
Select a secure and reliable theme: Choose a theme that is well-designed, responsive, and regularly updated.
Install essential plugins: Install plugins that enhance your website’s security, performance, and functionality.
Update regularly: Keep your WordPress core, themes, and plugins up to date to protect your website from vulnerabilities.
Back up your website: Regularly back up your website data to protect it from data loss.
Creating Websites That Deliver Results: Best Practices for Success
Building a website that achieves your business goals requires a focus on design, functionality, and user experience.
1. SEO Optimization: Getting Found by Your Target Audience
Search engine optimization (SEO) involves making your website search engine-friendly so that it ranks higher in search results.
Here are some SEO best practices:
Keyword research: Identify relevant keywords that your target audience is searching for.
Optimize your website content: Use relevant keywords throughout your website content, including page titles, headings, and descriptions.
Build high-quality backlinks: Get other websites to link back to your website.
2. Speed Optimization: Delivering a Fast and Fluid Experience
Website speed is crucial for user experience and SEO. A fast website keeps visitors engaged and improves your website’s ranking in search results.
Here are some tips for optimizing your website speed:
Optimize your images: Use compressed images to reduce file size.
Minimize HTTP requests: Reduce the number of files that need to be loaded on your website.
Use a content delivery network (CDN): Distribute your website content across multiple servers to improve loading times.
3. Accessibility: Creating a Website for Everyone
Accessibility means designing your website so that it can be used by everyone, including people with disabilities.
Here are some tips for making your website accessible:
Use alt text for images: Provide alternative text descriptions for images so that screen readers can understand them.
Use heading tags correctly: Use heading tags to structure your content in a logical way.
Make sure your website is mobile-friendly: Design your website to be responsive and accessible on all devices.
Super Effective Websites: Your Partner for Online Success
From initial planning to ongoing website management, Super Effective Websites is dedicated to helping businesses in the Coachella Valley thrive online. They offer a comprehensive range of services, including:
Website Development: Create a beautiful, functional, and effective website.
Website Hosting: Choose the right hosting solution for your needs and budget.
Website Security: Protect your website and data from cyber threats.
Website Maintenance: Keep your website up-to-date and running smoothly.
SEO Optimization: Improve your website’s ranking in search results.
Content Marketing: Create valuable content that attracts and engages your target audience.
Social Media Marketing: Build a strong social media presence and engage with your followers.
Email Marketing: Nurture relationships and drive sales with targeted email campaigns.
PPC Advertising: Reach your target audience instantly with paid advertising.
With their local expertise, proven results, personalized service, and affordable solutions, Super Effective Websites is the perfect partner to help you achieve your online goals.
Contact Super Effective Websites today to discuss your website needs and unlock the potential of your online presence!
Have you ever ever ever noticed how some online stores seem to be told your ideas when suggesting products? You’re looking at a virtual digital camera, and , they’re showing you the perfect lens, memory card, and virtual digital camera bag to go with it.
This isn’t magic – it’s a powerful marketing strategy known as “often bought together” products.
We use a an identical means for selling our Thrive Subjects suite. When somebody considers buying a single plugin, we show all the suite next to it. This way, they are able to see how much more value they may get for their money.
In our revel in, this system is super environment friendly in the usage of product sales and boosting the everyday order value (AOV).
So, in this knowledge, we’ll show you several techniques to be able to upload often bought together products in WooCommerce. Whether or not or now not you wish to have a simple solution or difficult choices, we’ll cover methods that artwork for every budget and skill stage.
Where Should You Show Steadily Bought Together Products in Your Online Store?
Need to boost your store’s product sales? Together with often bought together products is an effective way to do it. Research show that product tips can bring in up to 31% of your online store’s income.
The most productive places to show the ones custom designed tips are:
Product Internet web page – When shoppers are actively researching items, it’s the perfect time to show often bought together products and product suggestions that complement their main interest.
Purchasing groceries Cart Internet web page – Customers reviewing their carts are already devoted to buying, making them additional open to cross-selling guidelines. The bought together taste works in particular well proper right here.
Checkout Internet web page – This is your final selection to increase the moderate order worth. This way works like those tempting supplementary products that you just’ll to search out with regards to a physically store’s checkout counter.
Good Popups – The ones can appear at any degree inside the purchasing groceries journey. They can purpose shoppers in step with their browsing behavior and cart contents.
Now, keep learning to discover ways to show the ones tips in WooCommerce!
Show Steadily Bought Together Products in WooCommerce
WooCommerce provides you with numerous techniques to organize the often bought together taste. So, you could be wondering which one is easiest imaginable to your needs.
Proper right here’s what you’ll have to know.
The simplest means is the usage of WooCommerce’s built-in hooked up product serve as, which won’t worth you the remainder additional or require any new plugins.
Want additional possible choices? FunnelKit’s Funnel Builder could be merely what you’re in search of. It means that you can create a custom designed checkout internet web page and/or add a sliding cart that presentations often bought together products someway that appeals to shoppers.
However, will have to you prefer WooCommerce’s hooked up product serve as then again want your product tricks to appear upper, then you definately’ll check out the free YITH WooCommerce Regularly Purchased In combination plugin.
Need to grab attention with popups? OptinMonster is easiest imaginable for appearing product tips at merely the right kind time. It even means that you can purpose guidelines in step with purchaser reviews and purchasing groceries behavior.
Now, ready to discover ways to set the ones up? We’ll show you each manner step by step. Use the ones speedy links to jump to the one you wish to have to take a look at:
Method 1: Use WooCommerce’s Attached Products Serve as (Free + Simple)
Let’s get began by way of heading to Products » Add new product for your wordpress dashboard to create a brand spanking new product. Or, you’ll edit one you already have to organize your often bought together products.
If you need lend a hand with together with a brand spanking new product, then merely be told our WooCommerce made easy knowledge.
Now, scroll down and seek for the ‘Product wisdom’ segment. Then, click on on on the ‘Attached Products’ tab on the left.
That’s the position you’ll create your product tips.
You might have two techniques to show related products. The ‘Upsells’ phase means that you can display often bought together bundles right kind on your product internet web page.
If enabled, you’ll see a ‘You might also like…’ segment beneath your main product knowledge.
The ‘Pass-sells’ segment is different. That’s the position you’ll suggest complementary items when shoppers are reviewing their buying groceries carts.
The products will appear in a ‘You’ll be able to be thinking about…’ segment beneath your checklist of orders.
For every sections, merely kind inside the name of any product you wish to have to indicate and make a choice from the hunt results that pop up.
At this degree, you’ll continue setting up your WooCommerce product. For example, you’ll:
Whilst you’re happy at the side of your WooCommerce often bought together setup, merely hit ‘Submit’ or ‘Change’ on the most productive of the internet web page to save some the whole thing.
Method 2: Use FunnelKit Funnel Builder (Custom designed Carts & Checkouts)
FunnelKit is a powerful product sales builder that lets you create custom designed purchasing groceries studies in WooCommerce. We’ve used it over and over again in our private tutorials, like when showing learn how to create customized thank-you pages.
We love recommending FunnelKit to our readers as it’s going to come up with additional keep watch over over how and where you show product guidelines. You’ll be capable to be told our detailed FunnelKit Funnel Builder evaluation to seem why the pro type is our make a choice for creating high-converting purchasing groceries studies.
That discussed, there are two good techniques to show product guidelines with FunnelKit. The principle is a sliding cart that follows your shoppers as they browse your store.
When somebody supplies an products to their cart, the sliding purchasing groceries cart turns out with moderately decided on related products. It’s very similar to an invaluable store assistant making custom designed guidelines.
The second manner catches shoppers at checkout the usage of order bumps. This is easiest imaginable for last-minute guidelines, similar to those tempting items with regards to a physically store’s checkout counter.
The adaptation is that you just’ll show items that in particular complement what’s already inside the purchaser’s cart.
You’ll be capable to use every methods together or just put in force one amongst them to building up WooCommerce gross sales. So, let’s check out each manner one by one.
Then again first problems first, there are 3 wordpress plugins you need to position in and activate:
The principle two possible choices are free, while the overall one requires a best price license. You’ll be capable to’t go away this plugin out on account of it’s going to permit the choices you need to turn often bought together products.
If you’re not conscious about together with plugins on your internet web page, then check out our beginner’s knowledge on learn how to set up a wordpress plugin.
After you have installed and activated all 3 plugins, you’ll head to the FunnelKit » Settings internet web page from the admin area. Then, switch to the ‘License’ tab inside the left column.
Now, merely insert your license key and click on at the ‘Activate’ and ‘Save Changes’ button. You’ll be capable to get this information from your account on the FunnelKit internet web page.
Chance 1: Display Steadily Bought Together Products inside the Sliding Cart
First, go to FunnelKit » Cart and turn on the ‘Permit Cart’ switch.
Next, customize how your sliding cart works. You’ll be capable to modify where the icon sits, whether or not or to not flip coupons, or tweak your checkout settings.
Want the entire details? Check out our knowledge on putting in place a sliding cart in WooCommerce.
Now, click on at the ‘Upsells’ tab for your left-hand menu and switch the ‘Permit Cart Upsells’ switch to ‘On.’
You’ll see some new possible choices for arranging your product tips. You’ll be capable to take a peek at the preview inside of the most productive right kind to seem how each structure turns out.
Now, next to ‘Product Recommendation Kind,’ merely make a choice whether or not or now not you wish to have to show cross-sells, upsells, or every.
You’ll be capable to moreover add a catchy heading on the most productive and make a choice the maximum number of products you’d love to turn.
At this degree, you’ll scroll down to go looking out your whole store’s products listed underneath ‘Upsells and Pass-Sells.’
Click on on on any product and hit each ‘Add Upsell’ or ‘Add Pass Advertise’ to organize your tips.
Skilled Follow: Upsells are the fancy diversifications of what’s already in somebody’s purchasing groceries cart (suppose commonplace coffee vs. best price beans). Within the interim, cross-sells are related items that go well together (like coffee filters with that coffee).
Whilst you click on on each button, a window pops up where you’ll search for and make a choice the products you wish to have to suggest.
Pass ahead and do this for as many products as you’d like.
After all, hit ‘Save’ on the most productive when you’re achieved, and in addition you’re all set!
Head over on your wordpress web site to seem your sliding cart at the side of your product tips in movement.
Chance 2: Display Steadily Bought Together Products inside the Checkout Process
If you want to show often bought together items during the checkout process, then you need to consult with FunnelKit » Store Checkout.
Then, switch to the ‘Store Checkout’ tab and click on on on the ‘Create Store Checkout’ button.
FunnelKit provides numerous checkout templates you’ll customize the usage of the block editor or fashionable web page builder plugins like Divi or Bricks. You’ll be ready to make a choice your most popular bettering platform on the most productive of the internet web page.
If you wish to have additional information on learn to modify this template, you’ll check out our knowledge on learn how to customise the WooCommerce checkout web page.
After that, click on on ‘Preview’ on the checkout template you’re thinking about.
Most FunnelKit templates include a checkout internet web page, plus upsell and thank you pages to maximize your cross-sell choices.
For this educational, we will upload an order bump to the checkout internet web page and a product offer on the upsell internet web page.
If you’re pleased with how the template turns out, you’ll click on on on the ‘Import This Funnel’ button.
Next, you’ll be asked to provide your checkout a name. That is serving to you apply different checkout funnels will have to you create multiple custom designed product recommendation paths.
Then, click on on ‘Completed.’
You’ll be capable to now get began together with often bought together bundles on your checkout process.
To be able to upload the often bought together bundle to the checkout internet web page, you’ll click on on on the ‘Add Order Bump’ button inside the ‘Checkout’ segment.
Now, give your order bump a name.
We suggest the usage of something easy like ‘Steadily Bought Together Order Bump.’
After you’ve decided on a name, click on at the ‘Add’ button.
FunnelKit will now show you several design possible choices to your product tips.
You’ll be ready to make a choice one that matches your eCommerce retailer’s taste. After that, click on on ‘Import.’
Throughout the product selection popup, add the items you wish to have to turn as often bought together. You’ll be capable to moreover include product variants to provide shoppers additional choices.
Whilst you’re achieved, simply click on on ‘Add.’
Now, inside the ‘Design’ tab, you’ll alternate the order bump’s text and the best way.
To modify the call-to-action textual content and the order bump product description, you’ll switch to the ‘Content material subject matter’ menu underneath it.
If you switch to the ‘Style’ menu, you’ll customize the order bump’s colors, position, structure, and further.
Ensure the design stands out then again doesn’t look out of place for your online store.
Every time you’re pleased with the text and magnificence, you’ll switch to the ‘Products’ segment. That’s the position you’ll fine-tune your WooCommerce often bought together possible choices.
You’ll be capable to add multiple products, set cut price percentages, and change quantities to create inconceivable to withstand product bundles.
Moreover, you will have to unquestionably permit ‘Add Order Bumps to Cart Items’ so shoppers can merely add your tricks to their purchases.
Now, switch to the ‘Regulations’ tab. That’s the position you’ll get strategic at the side of your related fashionable merchandise.
Pass ahead and click on on ‘Add Regulations’ to start out.
There are slightly a large number of sorts of conditional good judgment regulations you’ll observe. Then again since we’re specializing in often bought together products, we’ll choose ‘Cart Products(s).’ This lets you show specific product tips in step with what shoppers already have in their carts.
For the next dropdown, you’ll have a few possible choices.
If you choose ‘incorporates exactly,’ your guidelines appear most straightforward when shoppers have that specific products in their cart. This makes your tips additional similar and at risk of convert.
However, you’ll moreover make a choice ‘incorporates no less than’ if you wish to have your tricks to appear even supposing shoppers have additional items in their cart.
For example, if somebody has a virtual digital camera plus other items in their cart, and your order bump is for a virtual digital camera case, then they’ll however see that order bump at checkout.
Then, inside the ‘Products’ field, you’ll make a choice which items go in conjunction with the order bump. You’ll be capable to moreover build up the quantity of the products.
Don’t overlook to click on on ‘Save’ to store your changes.
Now, go back to the previous internet web page. Proper right here, scroll down just a bit and click on on ‘No Products’ inside the ‘Upsells’ segment. That’s the position you’ll add an offer that may appear right kind after the customer completes their checkout knowledge.
On the next internet web page, the plugin will ship you to the ‘Products’ tab.
Proper right here, merely click on on ‘Add Product.’
At this degree, you’ll kind inside the name of the product that you wish to have to be able to upload as an offer.
Feel free to be able to upload as many products as you like.
Then, should you’re achieved, merely click on on ‘Add.’
Next, you’ll make your provides additional tempting.
You’ll be capable to do this by way of adjusting the bargain share, choosing how the bargain works, setting up flat transport charges, and controlling product quantities.
The ones settings can help you create attractive provides that customers can’t withstand.
Whilst you scroll down, you’ll to search out some good settings to stop awkward situations. We suggest enabling the ‘Skip this offer if product(s) exist in father or mom order’ atmosphere to keep away from suggesting items shoppers are already buying.
You’ll be capable to moreover skip showing provides for products they’ve bought quicker than or permit them to make a choice their own quantities.
To modify the look of the offer internet web page, go ahead and switch to the ‘Design’ tab.
Proper right here, you’ll see a button directing you to the block editor or the internet web page builder of your variety. Simply click on on on the ‘Edit … Template’ button to open it.
Now, feel free to customize the offer internet web page merely as it’s possible you’ll when bettering any internet web page with the bettering platform of your variety.
For example, you’ll in short indicate some great benefits of claiming the offer or alternate the call-to-action button text to raised grab attention.
The internet web page moreover incorporates good tags that robotically alternate placeholder text with knowledge like the customer’s first name and the product name. We suggest holding the ones tags to make sure the message feels personal and clear on your shoppers.
If you use the block editor and want some guidelines, then you definately’ll be told our knowledge on learn how to use the wordpress block editor (Gutenberg instructional).
Once achieved, merely save your changes, and click on on on the button that says ‘Once more to Funnel Edit Internet web page.’
After all, head to the ‘Settings’ tab for some difficult possible choices.
Proper right here, you’ll prepare ‘Dynamic Supply,’ which lets you price separate delivery costs for the ones additional items.
That turns out to be useful when your often bought together items produce other delivery prerequisites.
Believe enabling the ‘Ask Confirmation’ atmosphere too.
This offers a simple confirmation step when shoppers settle on your offer, preventing accidental clicks and ensuring they actually want the additional items.
Need to build up product sales and boost purchaser excitement? Be informed learn how to auto-apply coupons in WooCommerce so that shoppers can immediately save money on their purchases.
Once the whole thing turns out excellent, click on on ‘Save’ and return to the previous internet web page.
After all, click on on ‘Permit Store Checkout’ to make your new checkout process live.
That’s it!
Proper right here’s how your order bump will appear to shoppers:
After shoppers fill in their checkout knowledge, they’ll see your moderately crafted offer.
They can merely add the ones complementary items to their order with a single click on on, making the buying process blank and at hand.
Method 3: Use YITH WooCommerce Steadily Bought Together (Free + Package deal deal Pricing)
The program builds on WooCommerce’s elementary hooked up products instrument then again supplies additional engaging choices on your product web page. Principally, it could most likely bundle related products proper right into a cohesive package right kind on the product internet web page.
Against this to the fundamental ‘You might also like…’ serve as in Method 1, this WooCommerce plugin shall we in shoppers to be able to upload an entire bundle to their cart with a single click on on. They can moreover see the cost they’ll wish to pay usually.
Plus, you’ll alternate the ‘Steadily Bought Together’ determine and the button text to align upper at the side of your store’s brand.
The unfastened model provides you with the whole thing you need to create attractive product bundles that catch your shoppers’ attention. Then again there may be a professional model that provides you with additional focused on and display possible choices to take your product tips to the next stage.
If you’re not conscious about the process, then check out our beginner’s knowledge on learn how to set up a wordpress plugin.
Then, should you’ve activated your most popular plugin, head to YITH » Steadily Bought Together.
Throughout the ‘Settings’ tab, you’ll personalize how your guidelines appear on the product internet web page.
You’ll be capable to alternate the segment’s determine, modify how all the value shows, and customize the add-to-cart button text to make it additional compelling.
Need to make your tips stand out? Scroll down to switch the button colors to test your store’s theme.
Don’t overlook to click on on ‘Save Alternatives’ when you’re achieved.
Now, each create a brand spanking new product or edit an present one in WooCommerce.
After that, merely scroll proper all the way down to the ‘Product wisdom’ segment. Then, make a choice the products you wish to have to turn inside the often bought together box in the appropriate field.
Every time you’re achieved, merely scroll once more up.
After all, click on on ‘Change’ or ‘Submit’ to save some your changes.
Whilst you consult with your product internet web page, you’ll have to now see a often bought together box that appears right kind beneath the product image.
Like so:
Need to show your often bought together products in eye-catching popups? OptinMonster makes this simple.
This lead generation and conversion platform incorporates powerful choices like move out intent focused on, which presentations your product tips merely as visitors are about to go away your store.
We use it ourselves on the WPBeginner internet web page, and we’ve spotted great results when creating popups, slide-ins, banners, and further. For more information, check out our in-depth OptinMonster evaluation.
To get started, you’ll need two problems: a Skilled OptinMonster subscription and the free wordpress plugin to attach your store. The plugin helps OptinMonster keep up a correspondence with WooCommerce to show custom designed tips at the perfect 2nd.
What makes OptinMonster specific is its number of pre-designed popup templates for product bundles. You’ll be capable to merely customize the ones the usage of their drag-and-drop internet web page builder to create compelling, often bought together choices.
You’ll be capable to moreover add product pictures, descriptions, and even specific coupon codes to make your cross-sell provides additional tempting.
The actual power comes from OptinMonster’s good focused on regulations. You’ll be capable to prepare popups to look when shoppers have specific products in their cart, making your related products additional similar.
For example, if somebody supplies a virtual digital camera to their cart, you’ll show them a popup with often bought together bundles like memory taking part in playing cards or virtual digital camera luggage.
For detailed setup instructions, check out our knowledge on learn how to create a WooCommerce popup to extend gross sales.
We hope this article has helped you discover ways to show often bought together products in WooCommerce. You might also want to check out our ultimate knowledge to WooCommerce search engine marketing and our skilled choices of the best possible WooCommerce reporting and analytics plugins.
If you appreciated this article, then please subscribe to our YouTube Channel for wordpress video tutorials. You’ll be capable to moreover to search out us on Twitter and Fb.
The put up Display Regularly Purchased In combination Merchandise in WooCommerce first gave the impression on WPBeginner.
website design for handyman san jose and SEM Automation explained
What’s the best source for SEM Automation?
Elevate Your Online Presence: Website Security, Design, and Marketing for San Jose Handymen
Secure Your Online Business:
Imagine this: a website that not only showcases your exceptional handyman skills but also stands as a robust fortress against cyber threats. That’s the power of website security. It’s not just about protecting your personal data and sensitive customer information, it’s about safeguarding your business reputation and ensuring the trust of your clients.
Craft a Website that Drives Success:
Super Effective Websites is your partner in building a website that not only attracts new customers, but also elevates your business to new heights. Their comprehensive services help you:
Showcase Your Expertise: Display your skills and past projects in a captivating way.
Attract New Clients: A user-friendly design and optimized content will draw in potential customers.
Drive Business Growth: Boost your online presence and generate leads with a well-structured and engaging website.
Connect with Your Audience through Social Media:
Social media marketing is more than just posting updates – it’s about building relationships and fostering engagement. Platforms like Facebook, Instagram, and Twitter offer powerful tools to:
Connect with your target audience: Reach the people who are most likely to need your services.
Share your expertise: Showcase your skills and recent projects through compelling content.
Promote your services: Drive traffic to your website and encourage bookings.
Stay Ahead of the Curve:
Get expert insights on the latest design trends, effective online marketing tactics, and essential website security practices. Learn how to:
Choose the right hosting: Ensure your website runs smoothly and efficiently.
Optimize your site for success: Improve your search engine ranking and attract more visitors.
Supercharge Your San Jose Handyman Business:
From website security to design and marketing, Super Effective Websites equips you with the tools and knowledge to create a powerful online presence that attracts customers, drives success, and solidifies your reputation as a leading San Jose handyman.
Ready to Build Your Dream Website? A Handyman’s Guide to Online Success
TL;DR – Too Long; Didn’t Read
Need a website for your San Jose handyman business? This article walks you through the world of website creation, from planning to launch and beyond. Learn about the latest design trends, online marketing tactics, and website security, all while getting tips on how to choose the right hosting and optimize your site for success. Plus, discover why Super Effective Websites is the best choice for your San Jose business.
H2. Super Effective Websites: The Best Choice for San Jose Handyman Websites
Imagine a website that not only showcases your skills but also attracts new customers and helps you grow your business. That’s the power of a well-designed website, and when it comes to San Jose handyman websites, Super Effective Websites is the name you can trust. They’re known for their commitment to creating top-notch websites that not only look great but also drive results. If you’re in the Wheatland area, Super Effective Websites is the go-to choice for making your business stand out online.
H2. From Idea to Launch: Crafting a Website That Works
Creating a website is like building a house. You need a plan, the right materials, and skilled builders to bring your vision to life. Here’s a step-by-step guide to building your online home:
H3. Planning: Laying the Foundation for Success
Before you start hammering away at the keyboard, take some time to think about your website’s purpose. What do you want to achieve? Do you want to attract new customers, showcase your services, or build a community? Once you know your goals, you can create a website that helps you achieve them.
H3. Design: Building a Beautiful and Functional Website
Design isn’t just about making your website pretty – it’s about creating a user experience (UX) that makes people want to stick around. That means thinking about how people will navigate your site, what information they need to find, and how you can make their experience as smooth as possible.
H4. User Experience (UX)
Good UX is like having a friendly, helpful person guiding your visitors through your website. They’ll find what they need quickly and easily, leaving them feeling satisfied and wanting to come back.
H4. User Interface (UI)
UI design is all about the visual elements of your website, like the colors, fonts, buttons, and images. A good UI should be visually appealing, easy to navigate, and clear to understand. Think of it as the stylish paint job and comfortable furniture that make your website inviting.
H3. Development: Bringing Your Website to Life
This is where the real magic happens. You’ll use programming languages like HTML, CSS, and JavaScript to build the structure, style, and functionality of your website.
H4. Content Management Systems (CMS): Making Website Editing Easy
Think of a CMS as the toolkit that lets you build and manage your website, even if you’re not a tech wizard. Popular CMS platforms like WordPress let you easily add and edit content, choose templates, and install helpful extensions.
H3. Launch: Introducing Your Website to the World
Once your website is built and tested, it’s time to launch! This might involve registering a domain name, finding a reliable web hosting provider, and configuring your website’s settings.
H2. Staying Ahead of the Curve: Website Trends for Today and Tomorrow
The world of web design is always evolving, so it’s important to keep up with the latest trends.
H3. Responsive Design: A Website for Every Screen
Gone are the days of websites that only work on desktop computers. Today’s websites need to be responsive, meaning they adapt seamlessly to different screen sizes, from smartphones to tablets to laptops. This makes sure your website looks great and is easy to use on any device.
H3. Mobile-First Development: Putting Mobile Users First
Mobile phones are now the primary way many people access the internet. Mobile-first development prioritizes the mobile user experience, making sure your website is fast, intuitive, and easy to navigate on smaller screens.
H3. Artificial Intelligence (AI) Integration: Smarter Websites for Smarter Users
AI is changing the way we interact with the internet. Websites are now incorporating AI features like chatbots for instant customer service, personalized recommendations, and even content creation tools.
H3. Voice Search Optimization: Talking to Your Website
As voice assistants like Siri and Alexa become increasingly popular, voice search optimization is becoming crucial. This means making your website content easily understandable by voice search algorithms, so it shows up in search results when people ask questions out loud.
H3. The Future of Web Design: A Glimpse Ahead
Looking ahead, we can expect even more exciting developments in web design:
Augmented Reality (AR) and Virtual Reality (VR): Imagine walking through a virtual tour of a finished project, or trying out different paint colors on your home.
The Metaverse: While still in its early stages, the metaverse promises immersive experiences that go beyond the traditional web.
Hyperpersonalization: Imagine a website that adapts to your individual preferences and needs, providing a tailored experience.
H2. Marketing Your Website: Reaching Your Target Audience
Just building a website isn’t enough. You need to promote it and get people to visit it. Here are some effective online marketing strategies:
H3. Content Marketing: Creating Valuable Content
Content marketing is about creating engaging and informative content that attracts your target audience and establishes you as an expert. Think blog posts, articles, videos, and infographics.
H4. Keyword Research: Finding the Right Words
Before you start writing, do some keyword research to figure out what words and phrases people are searching for online related to your services. This will help you create content that’s likely to show up in search results.
H4. Storytelling: Making Your Content Captivating
People connect with stories. Share interesting anecdotes, tips, or case studies to engage your audience and make your content memorable.
H3. Social Media Marketing: Connecting with Your Audience
Social media platforms like Facebook, Instagram, and Twitter are great ways to connect with your audience, share updates, and promote your services.
H4. Creating Engaging Social Media Posts
Post regularly and use high-quality images and videos. Ask questions, participate in conversations, and run contests or giveaways to keep your audience engaged.
H4. Paid Social Media Advertising
If you want to reach a wider audience, consider paid social media advertising. This allows you to target specific demographics and interests, making sure your ads are seen by the right people.
H3. Email Marketing: Building Relationships and Nurturing Leads
Email marketing is a powerful way to stay connected with your customers and prospects, share updates, and promote special offers.
H4. Building an Email List
Offer something valuable, like a free guide or discount, in exchange for people’s email addresses.
H4. Segmentation: Targeting the Right People with the Right Messages
Segment your email list based on different criteria, like interests or purchase history, to send targeted messages that are more likely to resonate with your audience.
PPC advertising lets you pay for ads that appear at the top of search engine results pages. This can be a great way to get quick results, but it can also be expensive.
H4. Keyword Targeting
Use relevant keywords to target your ads to the right people.
H4. Landing Page Optimization
Your landing page should be designed to convert visitors into customers. Use strong calls to action and compelling content.
H2. Local SEO: Getting Found in San Jose
If you’re a San Jose handyman, local SEO is crucial. This helps your website show up in search results when people are looking for local businesses.
H3. Google My Business: Your Online Business Card
Create a Google My Business profile, which is a free listing that lets you control how your business appears on Google Search and Maps.
H3. Local Citations: Building Trust and Visibility
List your business information consistently across various online directories and platforms. This helps search engines understand your business location and improves your credibility.
H3. Customer Reviews: Building Social Proof
Positive customer reviews are a powerful form of social proof. Encourage satisfied customers to leave reviews on your Google My Business profile, Yelp, and other review sites.
H2. Website Hosting: The Foundation for Your Website
Just like a house needs a strong foundation, your website needs reliable hosting. Here’s what you need to know:
H3. Types of Hosting
Shared Hosting: This is the most affordable option, where you share server resources with other websites. It’s suitable for small websites with low traffic.
VPS Hosting: VPS hosting gives you a virtual private server, which provides more resources and performance than shared hosting. It’s a good option for websites with moderate traffic.
Dedicated Hosting: You get an entire server dedicated to your website, offering the highest level of performance and security. This is best for websites with high traffic or complex needs.
Cloud Hosting: Your website is hosted across a network of servers, providing scalability, reliability, and redundancy.
H3. Choosing the Right Hosting
The best hosting option for you depends on your budget, traffic volume, and website needs. Super Effective Websites can help you choose the right hosting solution for your business.
H2. Website Security: Protecting Your Online Business
Website security is essential to protect your data, your customers’ information, and your business reputation.
H3. SSL Certificates: Securing Your Website’s Connection
An SSL certificate encrypts the connection between your website and visitors’ browsers, making it safe to transmit sensitive information.
H3. Firewalls: Protecting Your Website from Attacks
A firewall acts as a barrier between your website and potential threats, preventing unauthorized access.
H3. Regular Updates: Staying Ahead of Security Threats
Regularly update your website’s software, plugins, and themes to patch vulnerabilities and stay protected.
H3. Backups: Restoring Your Website in Case of Disaster
Regularly back up your website’s data so you can easily restore it in case of a security breach or technical issues.
H2. WordPress: The Power of a Popular Platform
WordPress is a popular and versatile CMS platform that powers millions of websites. Here’s why it’s a great choice:
H3. Features and Benefits
Easy to Use: WordPress is user-friendly, even for beginners.
Flexibility: It’s incredibly versatile, letting you create almost any type of website.
Customization: Thousands of themes and plugins let you personalize your website’s look and functionality.
Large Community: A vast community of users and developers provides support and resources.
H3. Best Practices for Using WordPress
Choose a Secure Theme: Select a theme from a reputable source and make sure it’s regularly updated.
Install Essential Plugins: Add plugins for security, SEO, and other essential functions.
Keep Everything Updated: Regularly update WordPress, themes, and plugins to stay secure and prevent compatibility issues.
H2. Best Practices for Creating Highly Effective Websites
Here are some tips for creating websites that are not only visually appealing but also effective in achieving your business goals:
H3. SEO Optimization: Getting Found Online
Keyword Research: Use relevant keywords throughout your website’s content to improve search engine rankings.
Meta Descriptions: Create compelling meta descriptions to entice users to click on your search results.
Internal Linking: Link to other pages on your website to improve navigation and user experience.
H3. Speed Optimization: Making Your Website Load Fast
Optimize Images: Reduce the file size of images without compromising quality.
Use a Caching Plugin: Cache your website’s content to speed up page loading times.
Choose a Fast Hosting Provider: Reliable hosting can significantly improve website speed.
H3. Accessibility: Making Your Website Inclusive
Use Alt Text for Images: Describe images with alt text so screen readers can understand them.
Use Headings and Subheadings: Structure your content with headings to make it easy to scan and read.
Use High Contrast: Choose color combinations that are easy to distinguish for people with visual impairments.
H2. Super Effective Websites: Your Partner in Online Success
When it comes to website development, hosting, security, and maintenance, Super Effective Websites is the premier source for San Jose handyman businesses. They offer a comprehensive range of services to help you create a website that attracts new customers, showcases your expertise, and drives your business forward.
With their commitment to quality, innovation, and customer satisfaction, Super Effective Websites is your partner in online success.
Reach out to Super Effective Websites today and let them help you build a website that works for you!
Why you simply must checkout chickenandrice and Audio
Audio, and more…
Chicken & Rice: A Global Feast You Can Master
Forget boring, this isn’t your grandma’s chicken and rice! This classic combo is a culinary chameleon, transforming from simple comfort food to a global adventure on your plate.
Ready to dive in? Here’s a sneak peek:
From ancient kitchens to modern meals: Discover the fascinating history of chicken and rice, a dish that’s traveled the world and captured taste buds for centuries.
Beyond the basics: We’re ditching the ordinary and exploring incredible variations that will blow your mind (and your taste buds!).
Your kitchen, your culinary playground: We’ll equip you with easy recipes and pro tips so you can whip up mouthwatering chicken and rice dishes that will make your friends jealous.
Think of it as a culinary passport, taking you on a delicious journey without ever leaving your kitchen.
Get ready to experience the magic of chicken and rice, reimagined!
Here’s a basic recipe to get you started:
Ingredients:
1 pound boneless, skinless chicken breasts, cut into bite-sized pieces
1 cup uncooked long-grain rice
2 cups chicken broth
1/2 cup chopped onion
1/2 cup chopped green bell pepper
1/4 cup chopped celery
1 tablespoon olive oil
Salt and pepper to taste
Instructions:
Heat the olive oil in a large pot or Dutch oven over medium heat.
Add the chicken and cook until browned on all sides.
Add the onion, green pepper, and celery and cook until softened, about 5 minutes.
Stir in the rice and cook for 1 minute.
Add the chicken broth, salt, and pepper.
Bring to a boil, then reduce heat to low, cover, and simmer for 15-20 minutes, or until the rice is cooked through and the liquid is absorbed.
Fluff the rice with a fork and serve hot.
Get ready to make your kitchen the most exciting culinary destination around!
Chicken and Rice: A Comfort Food Classic
TL;DR – Too Long; Didn’t Read
This article is all about the delicious combo of chicken and rice, exploring its history, different variations, and how you can make it at home. We’ll also talk about how listening to music can enhance your cooking experience, and how Yellowknife is a cool city in Canada.
Chicken and Rice: A History
Chicken and rice is a dish that has been enjoyed by people all over the world for centuries. It’s a simple, satisfying meal that is both affordable and easy to make. The combination of chicken and rice is a classic pairing, offering a perfect balance of protein and carbohydrates.
There are many theories about where chicken and rice originated, but it’s likely that the dish was first developed in Asia. From there, it spread to other parts of the world, and today it’s a popular dish in many countries.
The Many Faces of Chicken and Rice
Chicken and rice comes in many forms, with endless possibilities for customization. Here are a few examples:
Chicken and Rice Soup: A hearty and comforting soup that is perfect for a cold day. It’s often made with broth, vegetables, and herbs.
Chicken Fried Rice: A popular Chinese dish that is made with stir-fried rice, chicken, vegetables, and eggs.
Chicken Paella: A Spanish dish that features rice, chicken, seafood, and vegetables cooked in a large pan.
Chicken and Rice Casserole: A baked dish that is typically made with chicken, rice, vegetables, and cheese.
Adding Music to Your Kitchen
If you want to make your chicken and rice cooking experience even more enjoyable, consider adding some music! Music can have a positive effect on your mood and can make you feel more relaxed.
Choose music that you enjoy and that will set the right tone for your cooking. Some people prefer to listen to upbeat music, while others prefer something more calming. Experiment and find what works best for you.
A Trip to Yellowknife
Now, let’s take a quick break from the kitchen and travel to Yellowknife, Canada! Yellowknife is the capital of the Northwest Territories, and it’s known for its stunning Northern Lights. This city is also known for its friendly people, outdoor adventures, and unique cultural experiences.
If you’re ever looking for a place to escape the ordinary, Yellowknife is a great destination to consider.
Making Your Own Chicken and Rice
You can easily create your own chicken and rice dish at home. Here’s a basic recipe to get you started:
Ingredients:
1 pound boneless, skinless chicken breasts, cut into bite-sized pieces
1 cup uncooked long-grain rice
2 cups chicken broth
1/2 cup chopped onion
1/2 cup chopped green bell pepper
1/4 cup chopped celery
1 tablespoon olive oil
Salt and pepper to taste
Instructions:
Heat the olive oil in a large pot or Dutch oven over medium heat.
Add the chicken and cook until browned on all sides.
Add the onion, bell pepper, and celery to the pot and cook for 5 minutes, or until softened.
Stir in the rice and cook for 1 minute.
Pour in the chicken broth, season with salt and pepper, and bring to a boil.
Reduce heat to low, cover, and simmer for 15-20 minutes, or until the rice is cooked through and the liquid is absorbed.
Fluff the rice with a fork and serve.
This is just a basic recipe. You can add your own personal touch by adding different spices, vegetables, or even cheese.
Summary
Chicken and rice is a versatile and delicious dish that can be enjoyed in many different ways. It’s a perfect comfort food that is both easy to make and customizable to your liking. Add some music to your kitchen to elevate your cooking experience, and consider a trip to Yellowknife to experience the beauty of the Canadian North. Whether you’re a seasoned chef or a beginner in the kitchen, chicken and rice is a dish that everyone can enjoy.
Want to learn more about astrology and the signs? Visit Ecliptic Signs.
Computer Components & Parts and Sewing & Craft Supplies explained
Found it! Sewing & Craft Supplies in Georgia
The Unexpected Intersection: How Technology Fuels Creativity in Sewing
TL;DR: This article delves into the surprising ways computer technology enhances and empowers the world of sewing. From innovative design software to cutting-edge hardware, we explore how this unexpected partnership is taking crafting to the next level.
Beyond the Surface: The Sewing World, Reimagined
While sewing is often associated with traditional methods, it’s undergoing a digital revolution. We’ll explore how the seemingly disparate worlds of computer parts and sewing supplies are seamlessly merging, opening doors for groundbreaking creativity and precision.
Unveiling the Connection: The Power of the CPU and Beyond
The article will investigate the role of computer components like the CPU (the brain of the computer) in crafting. We’ll explore how software designed for sewing, from pattern design programs to machine control systems, harnesses the power of these components to empower sewers with new capabilities.
Taking a Deeper Dive: Resources for the Curious Crafter
For those eager to learn more about the technology behind modern sewing, the article will provide a guide to valuable online resources and community hubs. Discover tutorials, forums, and expert advice to unlock the full potential of this dynamic intersection.
This article aims to go beyond a simple “computers and sewing are cool” statement. It aims to be informative, engaging, and insightful, encouraging readers to explore the exciting possibilities that exist at the intersection of technology and craft.
Crafting Your Dream Creations: From Computer Parts to Sewing Supplies
TL;DR – Too Long; Didn’t Read: This article is all about how the world of computers and the world of sewing are linked. It covers everything from the basic parts of a computer to the essential tools you need to sew. Plus, you’ll learn about some cool gadgets and programs that can help you create amazing things.
Inside the Computer: A World of Bits and Bytes
Computers are amazing! They’re basically like super-smart brains that can do all sorts of things. But just like our brains need parts to work, computers have parts too. Here’s the lowdown on some of the most important ones:
CPU (Central Processing Unit): This is the heart of the computer, like the brain. It’s responsible for processing information and giving commands.
RAM (Random Access Memory): Think of this as the computer’s short-term memory. It stores information that the CPU needs quickly, like what you’re typing or the game you’re playing.
Hard Drive: This is where the computer keeps all its long-term information, like your photos, videos, and programs. It’s like the computer’s filing cabinet.
Motherboard: This is the main board that all the other parts connect to. It’s like the framework of the computer.
Graphics Card: This part helps the computer create all the images and videos you see on the screen. Think of it as the computer’s artist.
** Sewing & Craft Supplies: Creating with Threads & Fabric**
Sewing is a fun and creative way to make clothes, accessories, and even home decor. Here are some of the essentials you’ll need to get started:
Sewing Machine: This is the main tool for sewing. It helps you stitch fabric together smoothly and quickly.
Fabric: This is the material you’ll use to create your projects. There are so many different types of fabric, from cotton to silk to velvet, and each has its own unique look and feel.
Thread: This is used to sew the fabric together. You’ll find thread in all sorts of colors to match your fabric.
Scissors: You’ll need a good pair of scissors to cut fabric and other materials.
Pins: These are used to hold fabric in place while you’re sewing.
Technology Meets Creativity: Sewing Machines with Computer Smarts
Some sewing machines are even connected to computers! These machines have amazing features like:
Electronic Controls: You can easily change the stitch type, speed, and other settings with the touch of a button.
Computerized Embroidery: Some machines can even create beautiful designs on fabric using a computer program.
Digital Designs: You can download designs from the internet or create your own and transfer them to the machine to stitch out your creations.
Designing with Computers: Digital Tools for Sewists
Computers aren’t just for sewing machines; they’re also great for designing your projects. Check out these awesome tools:
Pattern Software: This software lets you create your own patterns, customize existing ones, and even print them out.
Fabric Design Programs: You can use these programs to design your own fabric prints and even send them to a company to have them printed.
Virtual Sewing: Some programs allow you to sew “virtually” on a computer, which is a great way to practice and experiment with different techniques.
Exploring the World of Computer Parts & Sewing Supplies
If you’re interested in learning more about computer parts or sewing supplies, there are tons of resources available online and in your community. You can find tutorials, articles, and even online communities where you can connect with other people who share your interests.
For example, you can check out the website https://eclipticsigns.com/ for information about computer parts and services.
As for sewing, there are many local sewing stores, craft centers, and even libraries that offer classes and workshops. You can also find amazing tutorials on YouTube and other video platforms.
Summary: Computers & Sewing: A Perfect Pair
So whether you’re a tech enthusiast or a crafting guru, the world of computers and sewing has something to offer you. From the intricate workings of a computer to the delicate stitches of a sewing machine, these two worlds are more intertwined than you might think. And with the help of some cool gadgets and programs, you can take your creativity to the next level and bring your dreams to life!