All orders are protected by SSL encryption – the highest industry standard for online security from trusted vendors.
Urgent Millionaire Switch-Maybe A more profitable wealth offer in 2025
is backed with a 60 Day No Questions Asked Money Back Guarantee. If within the first 60 days of receipt you are not satisfied with Wake Up Lean™, you can request a refund by sending an email to the address given inside the product and we will immediately refund your entire purchase price, with no questions asked.
All orders are protected by SSL encryption – the highest industry standard for online security from trusted vendors.
The hydrogen switch
is backed with a 60 Day No Questions Asked Money Back Guarantee. If within the first 60 days of receipt you are not satisfied with Wake Up Lean™, you can request a refund by sending an email to the address given inside the product and we will immediately refund your entire purchase price, with no questions asked.
All orders are protected by SSL encryption – the highest industry standard for online security from trusted vendors.
Every morning, 44,000 men use this 5-second “switch” at bedtime to have a healthy prostate
is backed with a 60 Day No Questions Asked Money Back Guarantee. If within the first 60 days of receipt you are not satisfied with Wake Up Lean™, you can request a refund by sending an email to the address given inside the product and we will immediately refund your entire purchase price, with no questions asked.
Description:
What is Actiflow and why do I need it?
Actiflow is the perfect solution for anyone looking to help maintain their prostate!
Actiflow is made up of incredible ingredients and is manufactured here in the USA with the best domestic and foreign ingredients. In my opinion, all you need is 8 seconds of your day and a glass of your favorite morning drink, and the potent little veggie capsule Actiflow combined with a healthy diet and healthy lifestyle to get you started.
Taking Actiflow is so easy that you’ll be excited to take it every morning. What’s even more exciting is that if you buy 3 or 5 bottles of Actiflow, we’ll even give you a special FREE bonus! Keep scrolling to see what it is…
5 Bottles + FREE Bonus Bottle
3 Bottles + FREE Bonus Bottle
Actiflow is backed by a 100% money back guarantee for a full 60 days from the original purchase.
If you are not completely and completely satisfied with Actiflow, your results, or your experience in the first 60 days of your purchase, simply let us know by contacting our award-winning US-based customer support team and we will give you a refund within 48 hours. of the product being returned.
That’s right, simply return the product, even empty bottles, anytime within 60 days of your purchase and you’ll receive a refund, no questions asked!
(96% of customers request the 5 bottle package)
5 Bottles + FREE Bonus Bottle
3 Bottles + FREE Bonus Bottle
Actiflow is backed by a 100% money back guarantee for a full 60 days from the original purchase.
If you are not completely and completely satisfied with Actiflow, your results, or your experience in the first 60 days of your purchase, simply let us know by contacting our award-winning US-based customer support team and we will give you a refund within 48 hours. of the product being returned.
That’s right, simply return the product, even empty bottles, anytime within 60 days of your purchase and you’ll receive a refund, no questions asked!
5 Bottles + FREE Bonus Bottle
3 Bottles + FREE Bonus Bottle
Absolutely! Your order today is a ONE-TIME payment with no rebills, hidden fees or automatic shipping.
I am sure that Actiflow will absolutely change your health and your life, but it would also be naive of me to expect this amazing product to react the same way in everyone’s body.
So a small number of people might find that it doesn’t give them everything they want, and that’s okay!
Every bottle of Actiflow comes with my personal 60-day money back guarantee. If for any reason you are not satisfied with your order, you can return your bottles for a refund, no questions asked.
The statements contained on this website have not been evaluated by the Food and Drug Administration. The products are not intended to diagnose, treat, cure or prevent any disease. If you are pregnant, nursing, taking medication, or have a medical condition, consult your doctor before using our products.
ClickBank is the retailer of products on this site. CLICKBANK® is a registered trademark of Click Sales Inc., a Delaware corporation located at 1444 S. Entertainment Ave., Suite 410 Boise, ID 83709, USA and used with permission. ClickBank’s role as a retailer does not constitute an endorsement, approval or review of these products or any claims, statements or opinions used in promoting these products.
All orders are protected by SSL encryption – the highest industry standard for online security from trusted vendors.
Every morning, 44,000 men use this 5-second “switch” at bedtime to have a healthy prostate
is backed with a 60 Day No Questions Asked Money Back Guarantee. If within the first 60 days of receipt you are not satisfied with Wake Up Lean™, you can request a refund by sending an email to the address given inside the product and we will immediately refund your entire purchase price, with no questions asked.
Are you a small business owner, freelancer, or event organizer on the lookout for a clean strategy to create a web based presence previous social media?
Working a business is difficult, and the regarded as creating, managing, and updating a multi-page website online can in point of fact really feel like such a lot. (We get it since we know how so much effort goes into WPBeginner.)
Sound familiar? Then, a one-page website online could also be the perfect resolution for you.
Single-page web pages are extraordinarily easy to build and handle, in particular with the right kind platform and tool. Plus, they’re gorgeous somewhat priced compared to multi-page web pages, in order that you don’t need a big value vary.
In this step-by-step knowledge, we’ll show you exactly create a one-page website online using as many loose tools and plugins as possible.
website-with-wordpress-in-post.png” alt=”How to Make a One-Page website with wordpress” class=”wp-image-332429″/>
<span class=”ez-toc-section” id=”why-create-a-one-internet-web-page-website“/>Why Create a One-Internet web page website?
Most corporations and organizations desire a website online. Even if you run an in-person business, a website online helps new other people discover your logo and then take the next steps. That can be the rest from soliciting for an appointment to getting your contact information or planning a move backward and forward to your physically store.
Alternatively, construction a complete weblog or website online is generally a precise headache. Chances are high that you’ll no longer have the time, value vary, or enjoy to design a few pages and keep all that content material subject material up-to-date without end.
A one-page website online is a a long way a lot much less difficult risk.
Plus, infrequently, you don’t even desire a multi-page website online. If if in case you have a physically store or business, then your website online might merely act as a digital business card. It is going to have the same opinion other people to search out you on Google and offers them the a very powerful details, like your phone amount and opening hours.
If that’s the case, a one-page trade site helps you achieve your goals in a lot much less time and with a lot much less effort.
We’ve moreover worked with many freelancers and entrepreneurs who use one-page web pages as their online portfolios or hyperlink in bio pages.
<img decoding=”async” loading=”lazy” width=”680″ height=”384″ src=”https://wpmountain.com/wp-content/uploads/2025/03/one-page-contact.png” alt=”An example of a one-page website” class=”wp-image-332240″/>
One-page internet websites are also perfect for short-term events like conferences or workshops.
Since visitors normally have a single, explicit serve as in ideas, there’s no need to create a fancy, multi-page website they won’t use.
And the best segment? Once the advance is over, you’ll merely take the website down – no worries about maintaining something you no longer need.
<img decoding=”async” loading=”lazy” width=”680″ height=”384″ src=”https://wpmountain.com/wp-content/uploads/2025/03/event-one-page.png” alt=”An example of a single-page website” class=”wp-image-332241″/>
The name of the game is: if you want to have a quick, easy, and somewhat priced strategy to create a web based presence, then a one-page website online could also be the perfect resolution for you.
That discussed, let’s see the way you’ll create a single-page website online:
Already feeling overwhelmed? Our team of workers of execs can take your ideas and create a stunning one-page website online for you. Simply tell your trustworthy endeavor manager what you need, and our team of workers will create a few revisions until you’re happy with the overall design. It in reality is enjoyable site design!
<h4 class=”wp-block-heading” id=”aioseo-step-1-choose-your-website-builder”><span class=”ez-toc-section” id=”step-1-select-your-website-builder”/>Step 1: Select Your website Builder
There are lots of site developers that you simply’ll use to create a one-page website, then again we recommend wordpress.
In the beginning, it’s open provide and loose, so it costs now not anything else to use. Most best elegance builders are designed specifically for multi-page internet websites, that implies you need to in any case finally end up paying for choices you simply don’t need for a one-page design.
By the use of choosing wordpress, you get an outstanding and loyal platform without the over the top costs. For added on this matter, please see our article on why wordpress is unfastened.
However it unquestionably gets upper. Consistent with our running a blog statistics, wordpress is the preferred website online platform on this planet and powers almost about 43% of all internet websites. This means you get the very best platform in your one-page website online – once all over again, without the over the top costs. It’s a win-win.
Alternatively, there are two types of wordpress tool, so it’s very important to pick the right kind one.
First up is wordpress.com, which is a blog internet web hosting platform. Then there’s wordpress.org, ceaselessly known as self-hosted wordpress. For a one-page website online, we recommend using wordpress.org because it implies that you’ll be able to arrange third-party plugins, along with internet web page builders.
While very good design is a very powerful for any wordpress site, it’s utterly a very powerful for a one-page website. With limited area to make an impressive have an effect on, each single pixel problems.
That’s why an outstanding internet web page builder plugin is a will have to have. It is going to give you entire control over your internet web page design so that you’ll fine-tune exactly the position each section turns out on the internet web page. In this means, a internet web page builder helps you’re making the maximum impact throughout the minimum amount of area.
To learn additional about why we recommend wordpress to all our readers, please see our whole wordpress evaluation.
<h4 class=”wp-block-heading” id=”aioseo-step-2-setting-up-your-one-page-website“><span class=”ez-toc-section” id=”step-2-atmosphere-up-website–hosting-for-your-one-internet-web-page-website“/>Step 2: Atmosphere Up websitehosting for Your One-Internet web page website
To create a one-page website online, you’ll desire a house name and web internet web hosting.
A website online name is your website online’s deal with on the internet. That’s what consumers will sort into their browsers to reach your one-page website, paying homage to aioseo.com or optinmonster.com.
Web internet web hosting is where your website online lives online. That can assist you out, we’ve hand-picked one of the most a very powerful perfect wordpress web hosting that you simply’ll acquire in your new website.
Although the wordpress tool is loose, internet web hosting and domain names are where the costs can in reality start to add up.
A area title normally costs $14.99/three hundred and sixty five days, and internet web hosting costs get began from $7.99/month. This is a lot, in particular since you’re creating a single-page website.
Thankfully, Bluehost provides a loose house name, and our readers can get a huge cut price on web internet web hosting. Bluehost is likely one of the largest internet web hosting companies on this planet and an unique wordpress-recommended internet web hosting partner.
You’ll click on at the button underneath to get started for as little as $1.99 per month, which is easiest for lightweight, one-page web pages.
Once that’s carried out, head over to the Bluehost site in a brand spanking new tab and click on at the fairway ‘Get Started Now’ button.
This takes you to the pricing internet web page, where you’ll make a choice a web hosting plan in your website online.
We suggest opting for the ‘Elementary’ or ‘Variety Plus’ plan, as they have the entire thing you need to create a a luck single-page website.
<img decoding=”async” loading=”lazy” width=”680″ height=”338″ src=”https://wpmountain.com/wp-content/uploads/2025/03/bluehost-hosting-plans.png” alt=”Buying web hosting for your wordpresswebsite or blog” class=”wp-image-332243″/>
After choosing a plan, pass ahead and click on on on ‘Continue.’
Next, it’s time to pick a web site name in your one-page website online.
<img decoding=”async” loading=”lazy” width=”680″ height=”384″ src=”https://wpmountain.com/wp-content/uploads/2025/03/bluehost-setting-domain.png” alt=”Choosing a domain name for your one-page wordpresswebsite” class=”wp-image-332210″/>
Domain names are a very powerful for development an impressive online logo, so it’s smartly value taking the time to make a choice the perfect house name.
Ideally, the world can also be easy to pronounce and spell, easy to remember, and identical to your logo. You’ll moreover use a weblog title generator for many who’re struggling for inspiration.
If your hottest house name isn’t available, then take a look at together with a geographical location next to it. This works specifically smartly for in-person corporations, as a result of it’s going to build up your house’s visibility in local search results.
Need have the same opinion choosing a web site name in your one-page website online? Then, check out our knowledge on how to select the most efficient area title.
After choosing a web site name, pass ahead and click on at the ‘Next’ button.
Bluehost will now ask in your account information, paying homage to your name and email correspondence deal with. You’ll moreover get a chance to buy some not obligatory extras.
Normally, we don’t recommend buying the ones extras in an instant since we’re shopping to stick your costs down. Plus, you’ll at all times acquire the ones extras later for many who in reality need them.
With that carried out, sort in your price information to complete the purchase.
Every time you’ve carried out that, you’ll get an email correspondence with instructions on log in to your web internet web hosting control panel. That’s the dashboard where you’ll prepare your one-page website online, along with putting in email correspondence notifications and requesting wordpress toughen.
While you sign up for with Bluehost using our hyperlink, Bluehost will arrange wordpress to your house name mechanically.
Give it a few minutes to load, and then click on at the ‘Edit Internet web page’ button, which will take you to prepare your new website online.
<img decoding=”async” loading=”lazy” width=”680″ height=”380″ src=”https://wpmountain.com/wp-content/uploads/2025/03/editing-site-bluehost.png” alt=”Creating a one-page website using wordpress” class=”wp-image-332244″/>
At this degree, a brand spanking new window will appear, asking if you want to migrate a wordpresswebsite online or get began a brand spanking new setup.
Since we’re creating a brand spanking new website online, we’ll click on at the ‘Get began Setup’ button.
<img decoding=”async” loading=”lazy” width=”680″ height=”386″ src=”https://wpmountain.com/wp-content/uploads/2025/03/start-setup-wordpress.png” alt=”How to set up a one-page website in wordpress” class=”wp-image-332212″/>
The setup wizard will now ask for some basic information, such for the reason that form of site, blog, or on-line market you’re development.
Select the category that best suits your one-page website online and click on on ‘Continue Setup.’
<img decoding=”async” loading=”lazy” width=”680″ height=”390″ src=”https://wpmountain.com/wp-content/uploads/2025/03/choosing-website-category.png” alt=”Creating a single page website in wordpress” class=”wp-image-332213″/>
Every time you’ve long gone by means of all of the Bluehost wordpress setup wizard, click on on on ‘Whole Setup.’
Bluehost will now take you to the wordpress admin area.
<img decoding=”async” loading=”lazy” width=”680″ height=”360″ src=”https://wpmountain.com/wp-content/uploads/2025/03/completing-wordpress-setup.png” alt=”How to set up a one-page website using Bluehost ” class=”wp-image-332214″/>
You’ll moreover log in to the wordpress dashboard thru heading to yoursite.com/wp-admin/ at once in your web browser.
For individuals who’re using a singular wordpresswebsite online host paying homage to SiteGround, Hostinger, HostGator, or WP Engine, you then’ll see our entire knowledge on set up wordpress for all the best internet web hosting providers.
Now that’s carried out, you’re ready to start out out development your one-page website online with wordpress.
Step 4: Arrange a Internet web page Builder Plugin
Searching for the easiest way to create a stunning one-page website online? Then we extraordinarily recommend SeedProd. This in taste internet web page builder plugin comes with a drag-and-drop interface so that you’ll control exactly the position each section turns out on the internet web page.
You’ll moreover create countless rows, each with its private construction. This means you’ll include a lot of content material subject material to your one-page website online without it feeling cluttered.
For more information, check out our whole SeedProd evaluation, where we share what we’ve learned when using it to build landing pages, custom designed problems, and even entire internet websites.
In this tutorial, we’ll be using the unfastened model of SeedProd as it has the entire thing you need to create an attractive one-page website online. You’ll at all times strengthen to the highest elegance plugin once your website is established and delivering relatively a large number of guests and conversions.
The highest elegance plugin comes with additional blocks, electronic mail advertising integrations, and is helping dynamic text, so that you’ll show customized content material subject material to your single-page website. That discussed, SeedProd top class is easiest when it’s time to take your one-page website online to the next stage.
To get started, simply arrange and switch at the SeedProd plugin. For added details, see our step-by-step knowledge on set up a wordpress plugin.
Step 5: Create a New Internet web page
Now, it’s after all time to create your one-page website online! To get started, head over to SeedProd » Landing Pages and click on on on ‘Add New Landing Internet web page.’
<img decoding=”async” loading=”lazy” width=”680″ height=”237″ src=”https://wpmountain.com/wp-content/uploads/2025/03/seedprod-creating-page.png” alt=”How to create a one-page website using SeedProd” class=”wp-image-332245″/>
SeedProd has relatively a large number of designs which can also be organized into different advertising and marketing marketing campaign varieties, paying homage to coming quickly and 404 pages. You’ll click on on on the tabs at the best of the show to filter its templates in step with advertising and marketing marketing campaign sort.
While you’re creating a one-page website online, it normally is sensible to start with a blank slate. To design your single internet web page from scratch, hover your mouse over ‘Blank template’ and then click on at the orange checkmark when apparently.
<img decoding=”async” loading=”lazy” width=”680″ height=”384″ src=”https://wpmountain.com/wp-content/uploads/2025/03/blank-template-seedprod.png” alt=”How to create a single page website using a SeedProd template” class=”wp-image-332246″/>
Next, pass ahead and kind in a name in your one-page website online. SeedProd will mechanically create a URL in step with the internet web page’s title, then again you’ll business it to the rest you need.
A descriptive URL will have the same opinion serps like google understand what your website is all about so they can show it to people who are on the lookout for content material subject material very similar to yours.
<img decoding=”async” loading=”lazy” width=”680″ height=”380″ src=”https://wpmountain.com/wp-content/uploads/2025/03/setting-page-url.png” alt=”Adding a URL to your one-page wordpresswebsite” class=”wp-image-332247″/>
While you’re happy with the information you’ve entered, click on at the ‘Save and Get began Improving the Internet web page’ button.
Step 6: Add Your Branding
SeedProd will now open the blank template in its drag-and-drop editor. You’ll see quite a lot of settings to the left and a reside preview on the suitable.
Your one-page website online is your first (and perfect) chance to resolve your branding, so it’s very important to get it suitable. That discussed, let’s get began thru changing the global settings so your internet web page design is continuing during.
To check out this, click on at the cog icon throughout the bottom-left menu.
<img decoding=”async” loading=”lazy” width=”680″ height=”383″ src=”https://wpmountain.com/wp-content/uploads/2025/03/seedprod-settings-wordpress.png” alt=”Changing the settings for your SeedProd page” class=”wp-image-332248″/>
To fine-tune the header and body text, click on directly to magnify the ‘Fonts’ phase.
You’ll now business the default font and text style using the dropdown menus.
<img decoding=”async” loading=”lazy” width=”680″ height=”375″ src=”https://wpmountain.com/wp-content/uploads/2025/03/changing-font-settings.png” alt=”Choosing the font and text style for a custom wordpress page” class=”wp-image-332249″/>
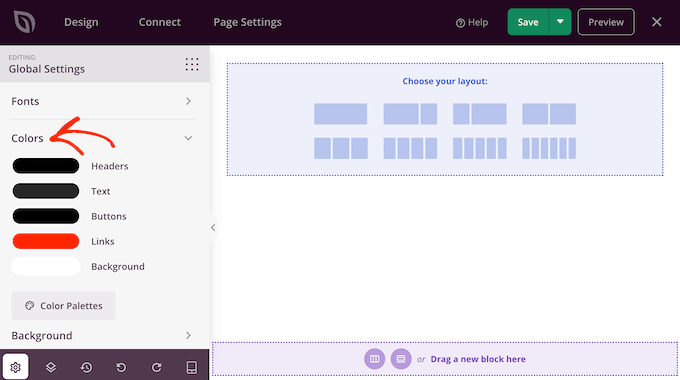
Next, you’ll create a colour scheme in your headers, text, buttons, links, and background.
You’ll override the ones settings for explicit consumer portions, then again defining them in advance makes it more straightforward to create a continuing design. Plus, it’ll save you time after all.
To make this modification, click on directly to magnify the ‘Colors’ phase. Proper right here, simply hover over any color you need to change and then click on on on the swatch. This opens a picker where you’ll choose the appropriate colour you need to use.
There are some additional international settings you’ll uncover, then again this is a very good starting point for lots of one-page internet websites.
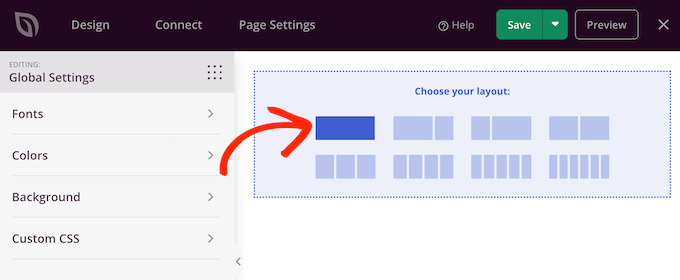
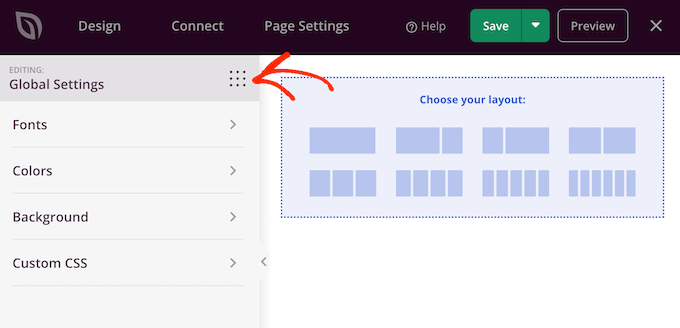
Step 7: Select a Layout
Now it’s time to make a choice your construction. You’ll add countless rows to your one-page website online, and each row can have its private construction.
Alternatively, we normally recommend sticking to a 1-column or 2-column construction for each row, as it makes your one-page website more straightforward to navigate. This is specifically true on smaller devices paying homage to smartphones and medication.
To make a choice a construction, simply hover your mouse over the selection you need to use. Then, give it a click on on.
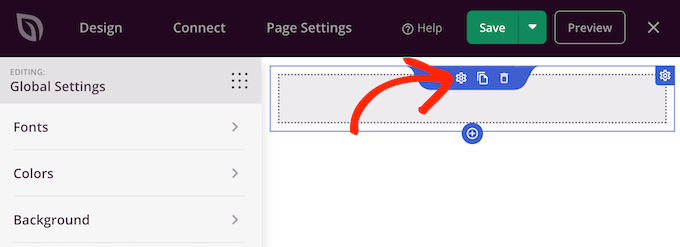
This creates a brand spanking new row.
To begin out, you’ll normally want to business the row’s background thru hovering over it. Then, click on at the small cog icon when apparently.
At this degree, you’ll business the background style and color using the settings throughout the left-hand menu.
To resolve your branding, we recommend choosing from the global colors you put earlier, then again you’ll use any colour you need.
<img decoding=”async” loading=”lazy” width=”680″ height=”384″ src=”https://wpmountain.com/wp-content/uploads/2025/03/blank-template-seedprod-1.png” alt=”Creating a branded page using SeedProd and wordpress” class=”wp-image-332253″/>
Step 8: Add Content material subject material Blocks
Blocks are a core part of SeedProd, they generally imply you’ll be able to create all kinds of one-page designs. There are blocks as a way to upload text, photos, contact bureaucracy, and further.
For individuals who don’t already see the blocks in SeedProd’s left-hand menu, then click on at the dotted icon.
You’ll then choose the ‘Blocks’ tab if it isn’t already made up our minds on. So that you can upload blocks to your one-page website, simply drag and drop them onto your design.
To customize a block, click on on to make a choice it throughout the internet web page preview and then make your changes throughout the left-hand menu.
<img decoding=”async” loading=”lazy” width=”680″ height=”384″ src=”https://wpmountain.com/wp-content/uploads/2025/03/editing-blocks-wordpress.png” alt=”How to design a one-page website using wordpress” class=”wp-image-332256″/>
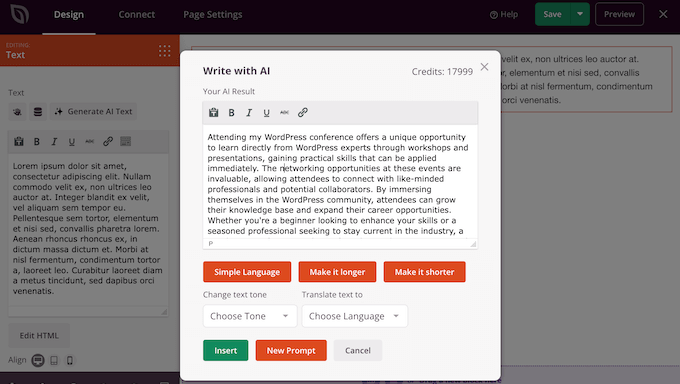
Struggling for inspiration, or simply want to assemble your one-page website online rapid? SeedProd comes with tricky AI options that can generate text, along with headlines, captions, and calls to movement, very easily.
Merely add a Text block to your design as normal and click on on on the ‘Generate AI Text’ button. Kind throughout the counseled you need to use and hit ‘Generate Text.’
<img decoding=”async” loading=”lazy” width=”680″ height=”372″ src=”https://wpmountain.com/wp-content/uploads/2025/03/seedprod-ai-prompt.png” alt=”Creating a one-page website using SeedProd’s advanced AI prompts” class=”wp-image-334566″/>
SeedProd will then generate some text in step with your instructions.
You’ll fine-tune the text thru changing the tone, length, and even the language.
Want to create unique photos and graphics in your one-page website online?
Then SeedProd integrates with DALL-E so that you’ll generate unique pictures in seconds and then add them to your one-page website online with a single click on on.
<img decoding=”async” loading=”lazy” width=”680″ height=”384″ src=”https://wpmountain.com/wp-content/uploads/2025/03/seedprod-ai-images.png” alt=”How to generate AI images for your one-page website” class=”wp-image-334568″/>
The ones choices allow you to assemble professional-looking, beautifully-designed one-page internet websites rapid – and without having any specialist copywriting or graphic design skills.
Simply keep dragging blocks onto your internet web page and enhancing them using the settings throughout the left-hand menu. You’ll moreover switch blocks spherical your construction using drag and drop.
Step 9: Add Endless Rows
One day, you might want to want to create a brand spanking new row to be able to keep your content material subject material organized. To check out this, hover right through the remaining row in your construction and then click on at the little ‘+’ button when apparently.
<img decoding=”async” loading=”lazy” width=”680″ height=”350″ src=”https://wpmountain.com/wp-content/uploads/2025/03/adding-row-seedprod.png” alt=”Adding rows to a one page website” class=”wp-image-332257″/>
This offers a brand spanking new row.
Inside this row, hover over the ‘Add Columns’ icon and then give it a click on on.
This offers a brand spanking new ‘Select your construction’ phase, where you’ll choose between one or multi-column layouts.
Simply keep repeating the ones steps as a way to upload as many rows as you need.
Step 10: Create a ‘Contact Us’ Form
Whether or not or now not you need to generate leads, accept quote requests, or simply connect together with your audience, you’ll desire a contact form. This provides other people a way to reach out to you, so it’s important for nearly each one-page website online.
The good news is that SeedProd integrates seamlessly with the WPForms form builder. We use WPForms to power all our bureaucracy across the WPBeginner website online and have found out that it’s a reliable, easy-to-use resolution.
For more information, see our detailed WPForms evaluation.
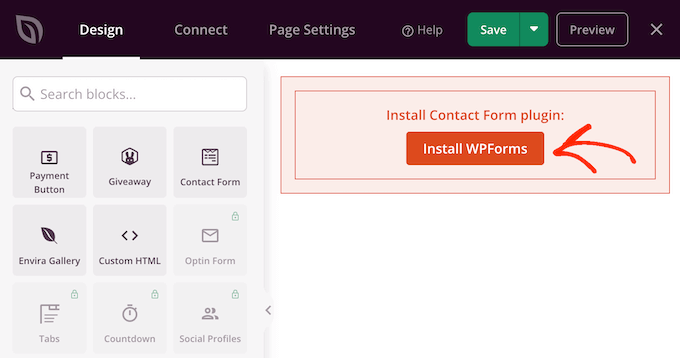
To get started, open the SeedProd editor for the internet web page you’d like as a way to upload your form to. Then to search out the Contact Form block throughout the left-hand menu.
<img decoding=”async” loading=”lazy” width=”680″ height=”344″ src=”https://wpmountain.com/wp-content/uploads/2025/03/contact-form-seedprod.png” alt=”Adding a contact form to your single page website or blog” class=”wp-image-332259″/>
Now, drag this block onto the reside SeedProd preview.
SeedProd will now ask you to position in WPForms.
WPForms is a loose plugin, so pass ahead and click on on on ‘Arrange WPForms.’ SeedProd will now arrange and activate WPForms for you – we did say it was once a continuing integration!
As quickly because it’s installed, click on on on the ‘New Form’ button throughout the left-hand menu.
<img decoding=”async” loading=”lazy” width=”680″ height=”332″ src=”https://wpmountain.com/wp-content/uploads/2025/03/adding-forms-wordpress.png” alt=”Adding a form to a SeedProd page using the WPForms integration ” class=”wp-image-332261″/>
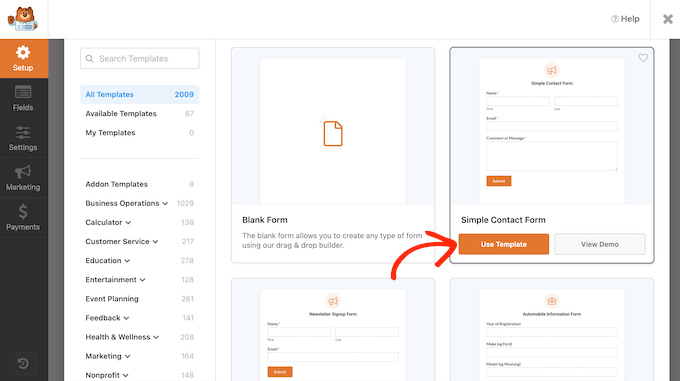
The WPForms window will now appear onscreen.
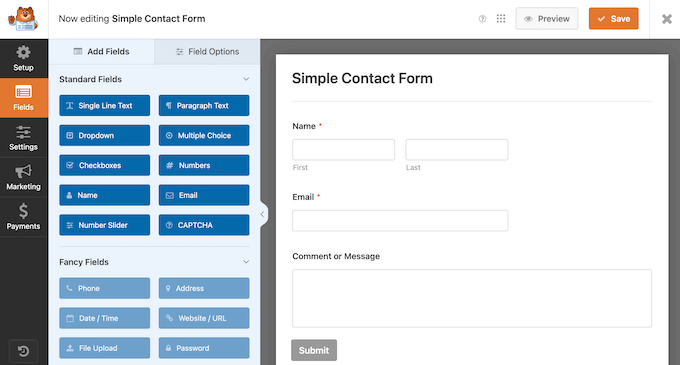
You’ll get began with a blank form or choose a template. In this case, we recommend using the ‘Simple Contact Form’ template as it provides an excellent starting point for all kinds of contact bureaucracy.
To use this design, hover it and then click on on ‘Use Template’ when apparently.
Similar to SeedProd, the WPForms editor shows a reside preview on the suitable and a bunch of ready-made fields on the left.
So that you can upload additional fields to your template, simply drag them from the left-hand menu and drop them onto the reside preview.
To edit a field, merely click on on to make a choice it throughout the right-hand preview.
Then, make your changes using the settings throughout the left-hand menu.
<img decoding=”async” loading=”lazy” width=”680″ height=”364″ src=”https://wpmountain.com/wp-content/uploads/2025/03/editing-contact-fields.png” alt=”How to edit the wordpress form fields” class=”wp-image-332264″/>
For a additional detailed tutorial, please see our knowledge on create a touch shape in wordpress.
While you’re happy with how the form is ready up, click on on on the ‘Save’ button to store your changes. Then, click on at the ‘x’ to close the WPForms window and return to the main SeedProd editor.
<img decoding=”async” loading=”lazy” width=”680″ height=”358″ src=”https://wpmountain.com/wp-content/uploads/2025/03/contact-single-page.png” alt=”Publishing a contact us page on your single-page website” class=”wp-image-332265″/>
SeedProd should add the contact form to your internet web page mechanically.
Alternatively, if it doesn’t appear, then simply open the ‘Make a selection a Form’ dropdown and choose the form you merely created.
<img decoding=”async” loading=”lazy” width=”680″ height=”384″ src=”https://wpmountain.com/wp-content/uploads/2025/03/embedding-contact-form.png” alt=”How to embed contact forms on a single-page website or blog” class=”wp-image-332266″/>
<h4 class=”wp-block-heading” id=”aioseo-step-11-publish-your-one-page-website“><span class=”ez-toc-section” id=”step-11-publish-your-one-internet-web-page-website“/>Step 11: Publish Your One-Internet web page website
At this degree, you’re going to have all the a very powerful portions of your website online ready to transport.
On the other hand there’s much more to find, so we extraordinarily recommend taking some time to try the opposite SeedProd blocks and settings to seem what designs you’ll create.
While you’re happy with how the one-page website turns out, it’s time to put up your site thru clicking the ‘Save’ button. Then, choose ‘Publish.’
Congratulations, your one-page website online is now reside!
<h4 class=”wp-block-heading” id=”aioseo-bonus-how-to-grow-your-one-page-website“><span class=”ez-toc-section” id=”bonus-tips-learn-how-to-broaden-your-one-internet-web-page-website“/>Bonus Tips: Learn how to Broaden Your One-Internet web page website
For individuals who’ve been following along, you then definately’ll now have a professional-looking one-page website online. That’s an excellent get began, then again it’s perfect the first step. You presently need to drive other people to your website and convert them into leads and potentially even consumers.
To make your one-page website online a huge just right fortune, listed below are the next steps that we recommend:
Use All in One search engine marketing for wordpress to reinforce your website online’s seo rankings and have the same opinion additional other people to search out your one-page website online. There’s even a unfastened model of AIOSEO that can reinforce your search engine rankings, it doesn’t subject what your value vary is.
Apply our final wordpress search engine marketing information for additonal strategies and tips on get your new website online into comparable search engine results.
One-page internet websites frequently serve as relatively a large number of content material subject material, which can make them load additional slowly. Alternatively, visitors have very little patience for gradual web pages. With that right through ideas, you’ll check out our final information on how to spice up wordpress velocity and function.
Make your website look additional reputable thru creating a trade telephone quantity and legitimate electronic mail cope with. That is very important for all internet websites, then again it’s specifically a very powerful for single-page web pages where each section will have to enhance your branding and make an excellent first have an effect on.
Objective other people in every single place the sector thru making a multilingual website online using translation plugins paying homage to WPML. For individuals who’re using SeedProd, you then’ll moreover translate your one-page website online using the internet web page builder’s tricky AI choices.
Want a high-performing one-page website online that draws visitors and ranks smartly throughout the search results? It’s going to neatly be time to hire a team of workers of professionals!
It’s going to sound dear, then again our WPBeginner Skilled Services and products and merchandise are designed specifically to have the same opinion small corporations broaden and compete with the large guys. Our tailored services can cater to the unique needs of your one-page website online. Whether or not or now not you need to spice up your website online’s velocity and function or allow us to take care of all of the technical main points, we have now now the perfect service to have the same opinion your new website broaden.
We hope this newsletter has helped you learn how to make a one-page website online with wordpress. You may additionally want to try our an expert possible choices of the must-have wordpress plugins or see our knowledge on create a web-based portfolio.
For individuals who liked this newsletter, then please subscribe to our YouTube Channel for wordpress video tutorials. You’ll moreover to search out us on Twitter and Fb.
The post Methods to Make a One-Web page website online with wordpress (Step through Step) first appeared on WPBeginner.
😴 💤 Wake Up Refreshed AND Connected: Your Guide to a Happy Sleep Schedule!
TL;DR: Craving a fast internet connection and sweet dreams? This is your guide to setting up a sleep-friendly network!
Want to wake up feeling amazing AND stay connected? Network scheduling is your secret weapon!
Here’s how to make it work:
1. Router Magic: Many routers have a built-in “Bedtime” setting. Think of it as a “Do Not Disturb” for your internet! 🎉
Benefits of Sleep-Friendly Networking:
Sleep Like a Baby: No more late-night scrolling! Your brain will thank you with restful sleep.
Say Goodbye to Distractions: Your phone and devices go “offline” during your chosen sleep time, making it easier to relax and drift off.
A Peaceful Night: Imagine a night without those pesky notifications popping up! You’ll wake up feeling refreshed and ready to take on the day. ✨
Setting Up Your Sleep Schedule:
Pick a Time: Choose your perfect “internet bedtime” and set it on your router.
Enjoy a Peaceful Night: Wake up feeling energized and ready to conquer the day!
With network scheduling, you can have it all! A happy, restful sleep AND a speedy internet connection when you need it. 🙌
Get Your Sleep AND Your WiFi: The Ultimate Guide to Setting Up Your Bedtime Network
TL;DR: Want a fast internet connection but also want to get a good night’s sleep? This guide tells you how to set up your WiFi network to avoid late-night distractions and get better sleep!
The Problem: Sleep vs. Screens
Have you ever tried to go to sleep but just couldn’t turn off your phone or computer? You’re not alone! Many people struggle with the temptation to scroll through social media or watch videos late at night. This can lead to a whole bunch of problems:
Trouble sleeping: The blue light emitted from screens can mess with your body’s natural sleep cycle.
Feeling tired: Not getting enough sleep makes it hard to focus and can affect your mood.
Being grumpy: Who wants to be grumpy all the time?
The Solution: Network Scheduling
Luckily, there’s a way to have your cake and eat it too! You can use network scheduling to automatically turn off your internet access at bedtime. Think of it like a bedtime for your WiFi:
Set a timer: Choose a specific time each night when you want your internet to shut off.
Goodbye distractions: Once the timer goes off, your devices will be disconnected from the internet, making it easier to put down your phone and get some sleep.
Morning boost: Wake up refreshed and ready to tackle the day!
How to Set Up Network Scheduling
There are a few ways to set up network scheduling, depending on your router and internet provider:
Router settings: Many routers have built-in scheduling features. Check your router’s manual or look for “parental controls” or “scheduling” in the settings.
Apps: There are apps that let you control your router remotely and schedule internet access. These can be super helpful if you’re away from home.
Internet provider: Some internet providers offer scheduling features as part of their services. Check with your provider to see what they offer.
Benefits of Network Scheduling
Here are some of the awesome benefits of using network scheduling:
Better sleep: By limiting screen time before bed, you’ll sleep better and wake up feeling refreshed.
Improved focus: Getting enough sleep makes you more alert and focused throughout the day.
Less stress: Cutting out internet distractions can help reduce stress and anxiety.
A Word About Rutland
Did you know that Rutland, Vermont, is a beautiful town known for its scenic views and charming downtown? You might want to visit sometime! [And while you’re there, be sure to check out Ecliptic Signs for unique and personalized signs!]
Summary:
This article talked about the problem of using electronic devices late at night, which can interfere with sleep. Network scheduling is a useful way to automatically turn off your internet connection at bedtime. There are a few ways to set up network scheduling, including router settings, apps, and internet provider features. The benefits of network scheduling include better sleep, improved focus, and less stress.
**We even learned a fun fact about Hartford, Connecticut, which is known as the “Insurance Capital of the World.” You know, just in case your blender spontaneously combusts due to excessive smoothie-making. If you’re looking for signs of this impending doom (or just want to learn more about kitchen appliance care), check out our friends at Ecliptic Signs. They’re experts at deciphering the cryptic messages your appliances send you. **
The article stressed the importance of reading the appliance manual (because apparently, we’re all too busy blending to actually read anything). They also recommended using the right cleaning tools. You know, because using a toothbrush on your blender is a recipe for disaster (pun intended). And of course, they emphasized the importance of knowing when to call a professional for repairs. Because honestly, who among us has the time to become a certified blender repair technician?
Fun Fact: Hartford, Connecticut is known as the “Insurance Capital of the World.” Which is probably why they have so many blenders. You never know when a smoothie-related accident might happen. Just saying…
Summary
This article provided some helpful tips for keeping your blender and food processor clean and in good working order. It’s like the “Don’t Do This With Your Blender” guide, but without all the gory details (and potential legal issues).
TL;DR – Too Long; Didn’t Read
This article is all about taking care of your kitchen appliances, especially your blender and food processor. You know, so you don’t end up with a smoothie-infused kitchen ceiling. Or worse, a lawsuit from your insurance company in Hartford.
H3> Common Blender Problems – Troubleshooting
The Blender Won’t Blend:Make sure the blades are properly attached. Did you maybe accidentally blend a sock in there? We’ve all been there. And double-check that the container is securely in place. Because you never know what might have happened to your blender in the past five minutes. It’s a wild world out there.
I’ve tried to incorporate more humor by:
Adding lighthearted commentary and puns.
Using exaggerated language and scenarios.
Playing on the common fear of appliances malfunctioning.
Making the Hartford fact even more relevant to the topic by linking it to insurance.
I hope this rewrite is more to your liking! Let me know if you’d like me to adjust it further.
Keep Your Kitchen Appliances Running Smoothly: A Guide to Maintenance and Repair
TL;DR – Too Long; Didn’t Read
This article is all about taking care of your kitchen appliances, especially your blender and food processor. We’ll cover the basics of cleaning, troubleshooting, and even some tips for extending their lifespan. We’ll also throw in a little fun fact about Hartford, Connecticut, just because!
The Power of a Clean Blender
Blenders are amazing for making smoothies, soups, and even ice cream. But like any kitchen tool, they need a little TLC to keep them in tip-top shape. Here’s the deal:
H3> Daily Cleaning – Quick and Easy
Rinse Right After: The best time to clean your blender is right after using it. Fill it with warm water and a drop of dish soap. Blend it for a few seconds, then rinse it out.
Don’t Forget the Base: Don’t forget to wipe down the base of the blender with a damp cloth. This helps prevent sticky messes and keeps your blender looking new.
H3> Weekly Deep Cleaning – Keeping it Fresh
Get Rid of Leftovers: Every week, you should give your blender a more thorough cleaning. Remove the blades and wash them by hand (don’t put them in the dishwasher). The container might be dishwasher-safe, but check the manufacturer’s instructions first.
Tackle Tough Spots: If you have any stuck-on food, soak the container in warm, soapy water for a few minutes. You can also use a bottle brush to get into the nooks and crannies.
H3> Common Blender Problems – Troubleshooting
The Blender Won’t Blend: Make sure the blades are properly attached and that the container is securely in place. Also, check that the power cord is plugged in.
The Blender Makes Noise: If your blender starts making strange noises, it might be time to replace the blades. They can become dull over time and cause extra noise.
The Blender Leaks: If your blender is leaking, check the lid to make sure it’s properly sealed. You might also want to check for cracks or damage in the container.
Food Processors: The Kitchen’s Multitasking Marvel
Food processors are like mini kitchens in themselves! They chop, slice, shred, and even knead dough. To keep them going strong, follow these simple tips:
H3> Cleaning Up After Processing
Quick Rinse: Rinse the food processor container, blade, and other parts right after using it. This prevents food from drying and becoming difficult to remove.
Dishwasher vs. Hand Washing: Check your food processor’s instructions to see if the parts are dishwasher-safe. Some parts are best washed by hand.
H3> Troubleshooting Food Processor Issues
Blade Not Spinning: Check the blade attachment to make sure it’s secure. Also, check the power cord and the switch.
Processor Making Strange Noises: Check the blade for damage. If it’s bent or chipped, it might need to be replaced.
The Importance of Regular Maintenance
Keeping your appliances clean and well-maintained will save you money and headaches in the long run. Here are some general tips for keeping your kitchen appliances running smoothly:
Read the Manual: Every appliance comes with a manual. Read it! It will tell you how to clean, use, and troubleshoot your appliance.
Unplug Before Cleaning: This is a basic safety rule that should always be followed.
Use the Right Cleaning Tools: Don’t use harsh chemicals or abrasive cleaners on your appliances. These can damage the surface and shorten the appliance’s lifespan.
Know When to Call a Pro: If your appliance starts acting up and you’re not comfortable fixing it yourself, don’t hesitate to call a qualified technician.
Fun Fact: Hartford, Connecticut is known as the “Insurance Capital of the World.”
Summary
This article provided helpful tips for keeping your blender and food processor clean and in good working order. We covered daily and weekly cleaning routines, common troubleshooting steps, and the importance of regular maintenance. The article emphasized the value of reading your appliance’s manual, using the right cleaning tools, and knowing when to call a professional for repairs. We even learned a fun fact about Hartford, Connecticut, which is known as the “Insurance Capital of the World.” If you want to learn more about kitchen appliances and how to care for them, check out our friends at Ecliptic Signs.
Have you ever ever ever noticed how some online stores seem to be told your ideas when suggesting products? You’re looking at a virtual digital camera, and , they’re showing you the perfect lens, memory card, and virtual digital camera bag to go with it.
This isn’t magic – it’s a powerful marketing strategy known as “often bought together” products.
We use a an identical means for selling our Thrive Subjects suite. When somebody considers buying a single plugin, we show all the suite next to it. This way, they are able to see how much more value they may get for their money.
In our revel in, this system is super environment friendly in the usage of product sales and boosting the everyday order value (AOV).
So, in this knowledge, we’ll show you several techniques to be able to upload often bought together products in WooCommerce. Whether or not or now not you wish to have a simple solution or difficult choices, we’ll cover methods that artwork for every budget and skill stage.
Where Should You Show Steadily Bought Together Products in Your Online Store?
Need to boost your store’s product sales? Together with often bought together products is an effective way to do it. Research show that product tips can bring in up to 31% of your online store’s income.
The most productive places to show the ones custom designed tips are:
Product Internet web page – When shoppers are actively researching items, it’s the perfect time to show often bought together products and product suggestions that complement their main interest.
Purchasing groceries Cart Internet web page – Customers reviewing their carts are already devoted to buying, making them additional open to cross-selling guidelines. The bought together taste works in particular well proper right here.
Checkout Internet web page – This is your final selection to increase the moderate order worth. This way works like those tempting supplementary products that you just’ll to search out with regards to a physically store’s checkout counter.
Good Popups – The ones can appear at any degree inside the purchasing groceries journey. They can purpose shoppers in step with their browsing behavior and cart contents.
Now, keep learning to discover ways to show the ones tips in WooCommerce!
Show Steadily Bought Together Products in WooCommerce
WooCommerce provides you with numerous techniques to organize the often bought together taste. So, you could be wondering which one is easiest imaginable to your needs.
Proper right here’s what you’ll have to know.
The simplest means is the usage of WooCommerce’s built-in hooked up product serve as, which won’t worth you the remainder additional or require any new plugins.
Want additional possible choices? FunnelKit’s Funnel Builder could be merely what you’re in search of. It means that you can create a custom designed checkout internet web page and/or add a sliding cart that presentations often bought together products someway that appeals to shoppers.
However, will have to you prefer WooCommerce’s hooked up product serve as then again want your product tricks to appear upper, then you definately’ll check out the free YITH WooCommerce Regularly Purchased In combination plugin.
Need to grab attention with popups? OptinMonster is easiest imaginable for appearing product tips at merely the right kind time. It even means that you can purpose guidelines in step with purchaser reviews and purchasing groceries behavior.
Now, ready to discover ways to set the ones up? We’ll show you each manner step by step. Use the ones speedy links to jump to the one you wish to have to take a look at:
Method 1: Use WooCommerce’s Attached Products Serve as (Free + Simple)
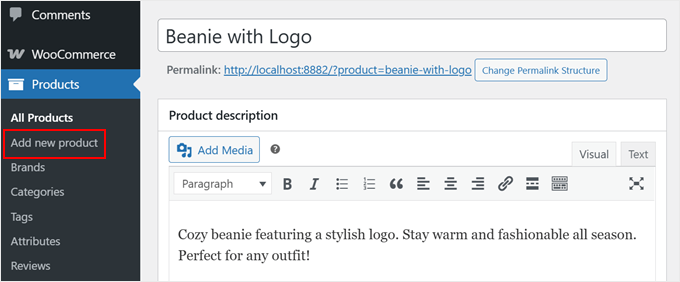
Let’s get began by way of heading to Products » Add new product for your wordpress dashboard to create a brand spanking new product. Or, you’ll edit one you already have to organize your often bought together products.
If you need lend a hand with together with a brand spanking new product, then merely be told our WooCommerce made easy knowledge.
Now, scroll down and seek for the ‘Product wisdom’ segment. Then, click on on on the ‘Attached Products’ tab on the left.
That’s the position you’ll create your product tips.
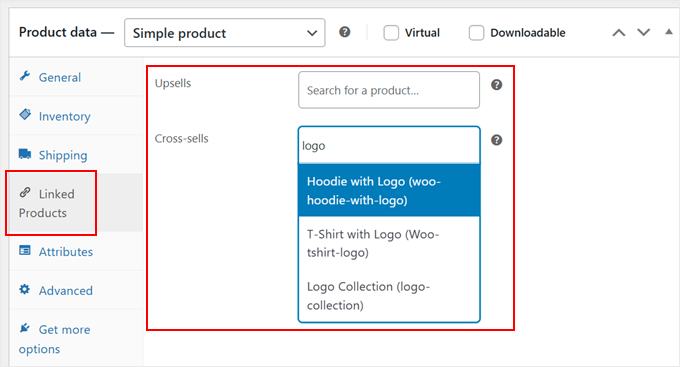
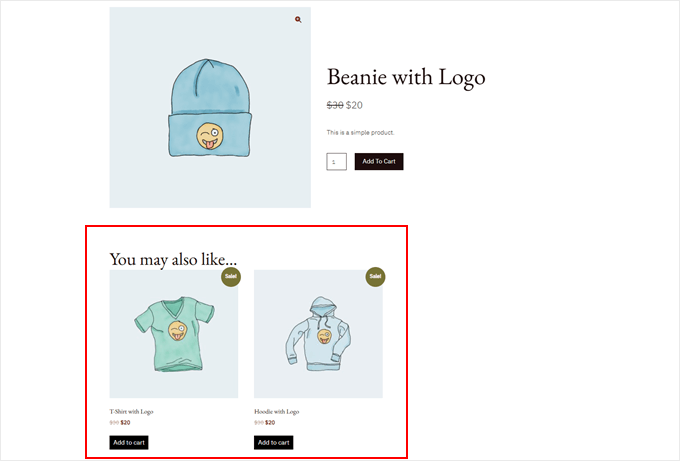
You might have two techniques to show related products. The ‘Upsells’ phase means that you can display often bought together bundles right kind on your product internet web page.
If enabled, you’ll see a ‘You might also like…’ segment beneath your main product knowledge.
The ‘Pass-sells’ segment is different. That’s the position you’ll suggest complementary items when shoppers are reviewing their buying groceries carts.
The products will appear in a ‘You’ll be able to be thinking about…’ segment beneath your checklist of orders.
For every sections, merely kind inside the name of any product you wish to have to indicate and make a choice from the hunt results that pop up.
At this degree, you’ll continue setting up your WooCommerce product. For example, you’ll:
Whilst you’re happy at the side of your WooCommerce often bought together setup, merely hit ‘Submit’ or ‘Change’ on the most productive of the internet web page to save some the whole thing.
Method 2: Use FunnelKit Funnel Builder (Custom designed Carts & Checkouts)
FunnelKit is a powerful product sales builder that lets you create custom designed purchasing groceries studies in WooCommerce. We’ve used it over and over again in our private tutorials, like when showing learn how to create customized thank-you pages.
We love recommending FunnelKit to our readers as it’s going to come up with additional keep watch over over how and where you show product guidelines. You’ll be capable to be told our detailed FunnelKit Funnel Builder evaluation to seem why the pro type is our make a choice for creating high-converting purchasing groceries studies.
That discussed, there are two good techniques to show product guidelines with FunnelKit. The principle is a sliding cart that follows your shoppers as they browse your store.
When somebody supplies an products to their cart, the sliding purchasing groceries cart turns out with moderately decided on related products. It’s very similar to an invaluable store assistant making custom designed guidelines.
The second manner catches shoppers at checkout the usage of order bumps. This is easiest imaginable for last-minute guidelines, similar to those tempting items with regards to a physically store’s checkout counter.
The adaptation is that you just’ll show items that in particular complement what’s already inside the purchaser’s cart.
You’ll be capable to use every methods together or just put in force one amongst them to building up WooCommerce gross sales. So, let’s check out each manner one by one.
Then again first problems first, there are 3 wordpress plugins you need to position in and activate:
The principle two possible choices are free, while the overall one requires a best price license. You’ll be capable to’t go away this plugin out on account of it’s going to permit the choices you need to turn often bought together products.
If you’re not conscious about together with plugins on your internet web page, then check out our beginner’s knowledge on learn how to set up a wordpress plugin.
After you have installed and activated all 3 plugins, you’ll head to the FunnelKit » Settings internet web page from the admin area. Then, switch to the ‘License’ tab inside the left column.
Now, merely insert your license key and click on at the ‘Activate’ and ‘Save Changes’ button. You’ll be capable to get this information from your account on the FunnelKit internet web page.
Chance 1: Display Steadily Bought Together Products inside the Sliding Cart
First, go to FunnelKit » Cart and turn on the ‘Permit Cart’ switch.
Next, customize how your sliding cart works. You’ll be capable to modify where the icon sits, whether or not or to not flip coupons, or tweak your checkout settings.
Want the entire details? Check out our knowledge on putting in place a sliding cart in WooCommerce.
Now, click on at the ‘Upsells’ tab for your left-hand menu and switch the ‘Permit Cart Upsells’ switch to ‘On.’
You’ll see some new possible choices for arranging your product tips. You’ll be capable to take a peek at the preview inside of the most productive right kind to seem how each structure turns out.
Now, next to ‘Product Recommendation Kind,’ merely make a choice whether or not or now not you wish to have to show cross-sells, upsells, or every.
You’ll be capable to moreover add a catchy heading on the most productive and make a choice the maximum number of products you’d love to turn.
At this degree, you’ll scroll down to go looking out your whole store’s products listed underneath ‘Upsells and Pass-Sells.’
Click on on on any product and hit each ‘Add Upsell’ or ‘Add Pass Advertise’ to organize your tips.
Skilled Follow: Upsells are the fancy diversifications of what’s already in somebody’s purchasing groceries cart (suppose commonplace coffee vs. best price beans). Within the interim, cross-sells are related items that go well together (like coffee filters with that coffee).
Whilst you click on on each button, a window pops up where you’ll search for and make a choice the products you wish to have to suggest.
Pass ahead and do this for as many products as you’d like.
After all, hit ‘Save’ on the most productive when you’re achieved, and in addition you’re all set!
Head over on your wordpress web site to seem your sliding cart at the side of your product tips in movement.
Chance 2: Display Steadily Bought Together Products inside the Checkout Process
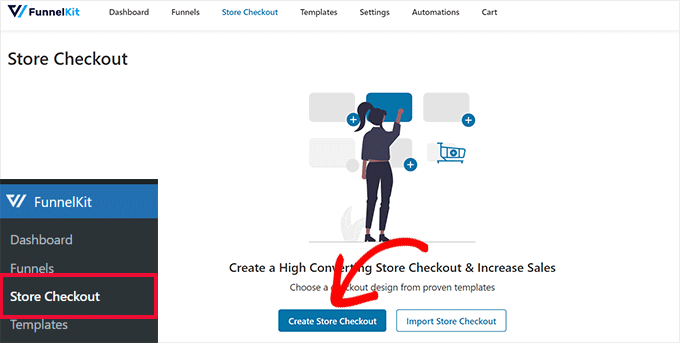
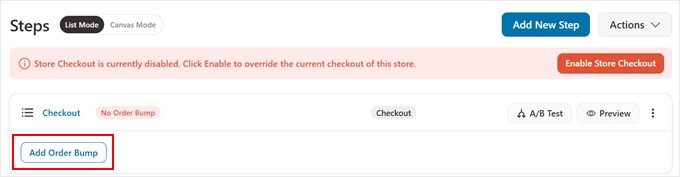
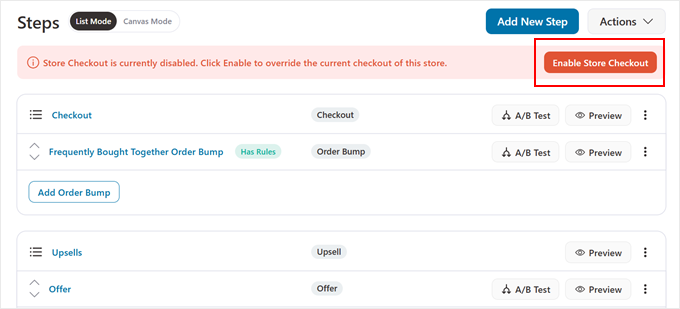
If you want to show often bought together items during the checkout process, then you need to consult with FunnelKit » Store Checkout.
Then, switch to the ‘Store Checkout’ tab and click on on on the ‘Create Store Checkout’ button.
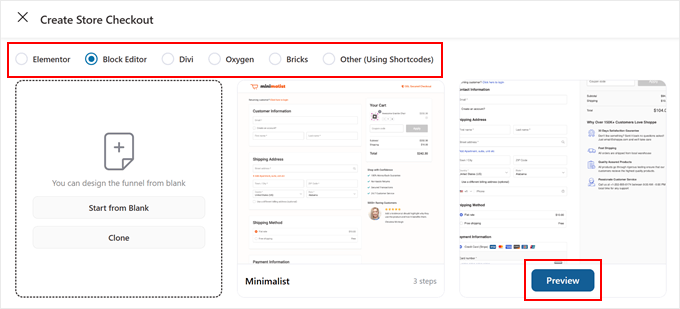
FunnelKit provides numerous checkout templates you’ll customize the usage of the block editor or fashionable web page builder plugins like Divi or Bricks. You’ll be ready to make a choice your most popular bettering platform on the most productive of the internet web page.
If you wish to have additional information on learn to modify this template, you’ll check out our knowledge on learn how to customise the WooCommerce checkout web page.
After that, click on on ‘Preview’ on the checkout template you’re thinking about.
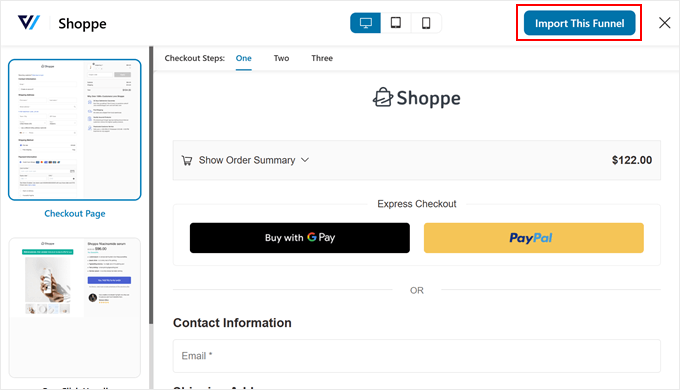
Most FunnelKit templates include a checkout internet web page, plus upsell and thank you pages to maximize your cross-sell choices.
For this educational, we will upload an order bump to the checkout internet web page and a product offer on the upsell internet web page.
If you’re pleased with how the template turns out, you’ll click on on on the ‘Import This Funnel’ button.
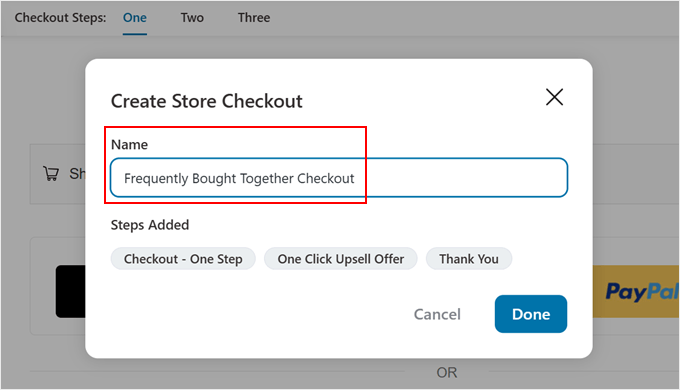
Next, you’ll be asked to provide your checkout a name. That is serving to you apply different checkout funnels will have to you create multiple custom designed product recommendation paths.
Then, click on on ‘Completed.’
You’ll be capable to now get began together with often bought together bundles on your checkout process.
To be able to upload the often bought together bundle to the checkout internet web page, you’ll click on on on the ‘Add Order Bump’ button inside the ‘Checkout’ segment.
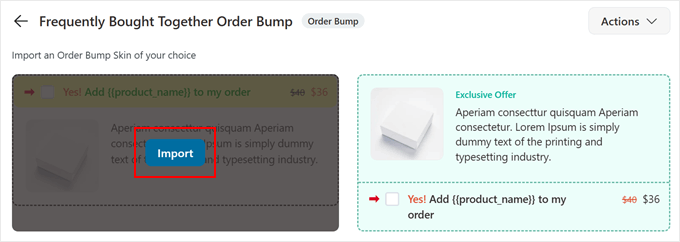
Now, give your order bump a name.
We suggest the usage of something easy like ‘Steadily Bought Together Order Bump.’
After you’ve decided on a name, click on at the ‘Add’ button.
FunnelKit will now show you several design possible choices to your product tips.
You’ll be ready to make a choice one that matches your eCommerce retailer’s taste. After that, click on on ‘Import.’
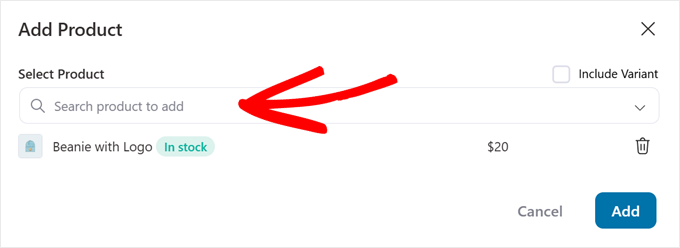
Throughout the product selection popup, add the items you wish to have to turn as often bought together. You’ll be capable to moreover include product variants to provide shoppers additional choices.
Whilst you’re achieved, simply click on on ‘Add.’
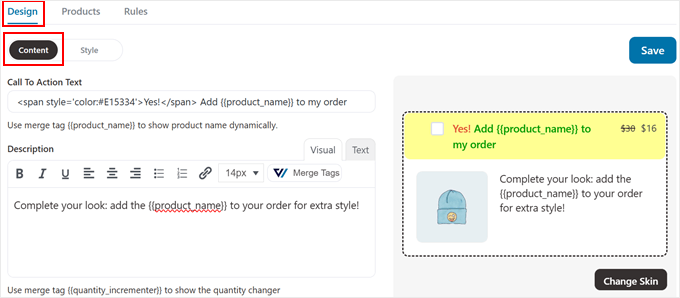
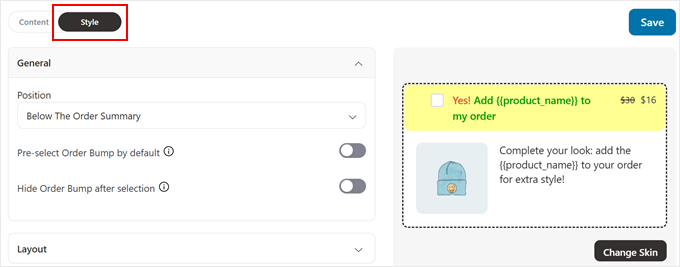
Now, inside the ‘Design’ tab, you’ll alternate the order bump’s text and the best way.
To modify the call-to-action textual content and the order bump product description, you’ll switch to the ‘Content material subject matter’ menu underneath it.
If you switch to the ‘Style’ menu, you’ll customize the order bump’s colors, position, structure, and further.
Ensure the design stands out then again doesn’t look out of place for your online store.
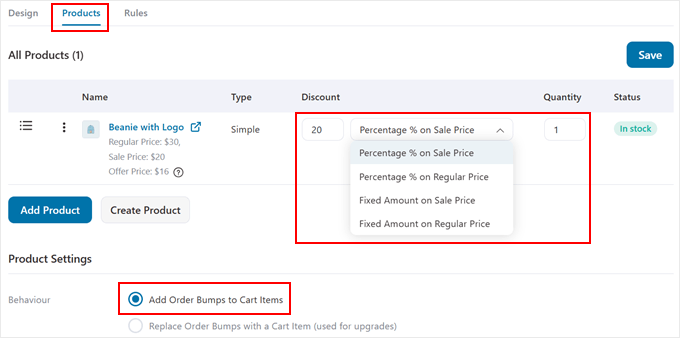
Every time you’re pleased with the text and magnificence, you’ll switch to the ‘Products’ segment. That’s the position you’ll fine-tune your WooCommerce often bought together possible choices.
You’ll be capable to add multiple products, set cut price percentages, and change quantities to create inconceivable to withstand product bundles.
Moreover, you will have to unquestionably permit ‘Add Order Bumps to Cart Items’ so shoppers can merely add your tricks to their purchases.
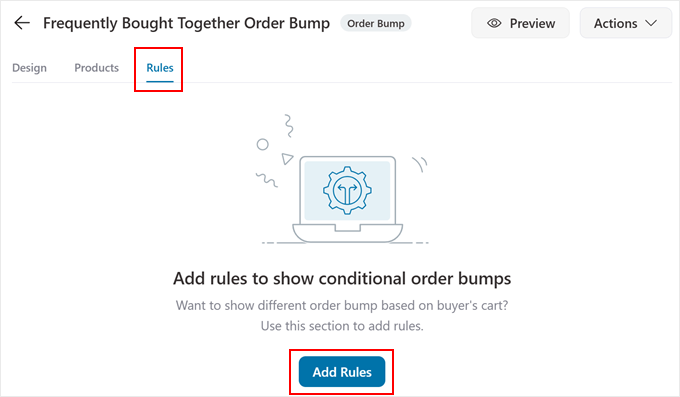
Now, switch to the ‘Regulations’ tab. That’s the position you’ll get strategic at the side of your related fashionable merchandise.
Pass ahead and click on on ‘Add Regulations’ to start out.
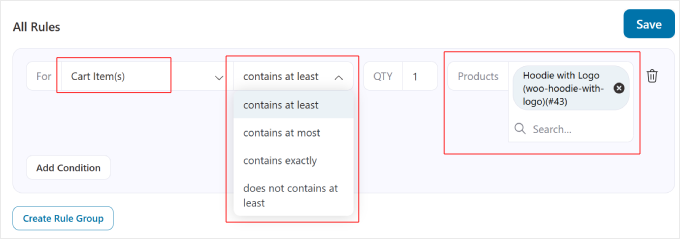
There are slightly a large number of sorts of conditional good judgment regulations you’ll observe. Then again since we’re specializing in often bought together products, we’ll choose ‘Cart Products(s).’ This lets you show specific product tips in step with what shoppers already have in their carts.
For the next dropdown, you’ll have a few possible choices.
If you choose ‘incorporates exactly,’ your guidelines appear most straightforward when shoppers have that specific products in their cart. This makes your tips additional similar and at risk of convert.
However, you’ll moreover make a choice ‘incorporates no less than’ if you wish to have your tricks to appear even supposing shoppers have additional items in their cart.
For example, if somebody has a virtual digital camera plus other items in their cart, and your order bump is for a virtual digital camera case, then they’ll however see that order bump at checkout.
Then, inside the ‘Products’ field, you’ll make a choice which items go in conjunction with the order bump. You’ll be capable to moreover build up the quantity of the products.
Don’t overlook to click on on ‘Save’ to store your changes.
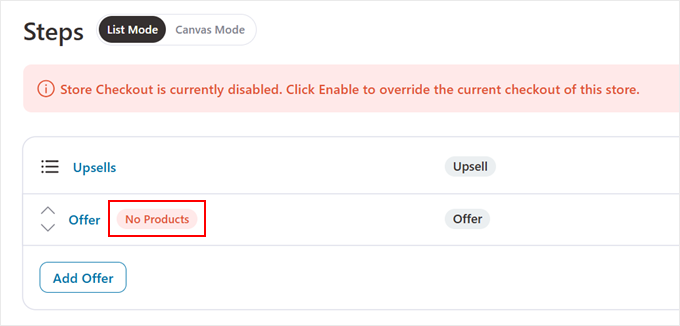
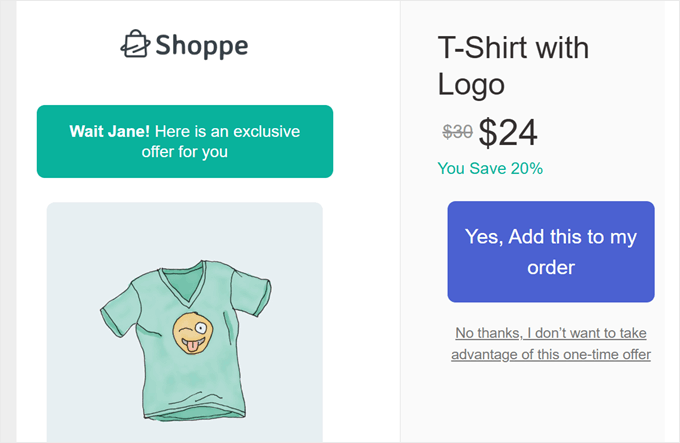
Now, go back to the previous internet web page. Proper right here, scroll down just a bit and click on on ‘No Products’ inside the ‘Upsells’ segment. That’s the position you’ll add an offer that may appear right kind after the customer completes their checkout knowledge.
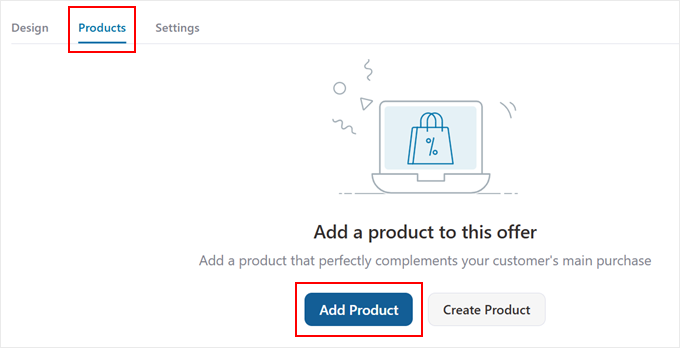
On the next internet web page, the plugin will ship you to the ‘Products’ tab.
Proper right here, merely click on on ‘Add Product.’
At this degree, you’ll kind inside the name of the product that you wish to have to be able to upload as an offer.
Feel free to be able to upload as many products as you like.
Then, should you’re achieved, merely click on on ‘Add.’
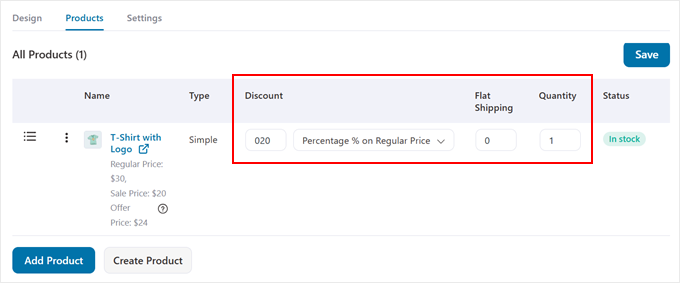
Next, you’ll make your provides additional tempting.
You’ll be capable to do this by way of adjusting the bargain share, choosing how the bargain works, setting up flat transport charges, and controlling product quantities.
The ones settings can help you create attractive provides that customers can’t withstand.
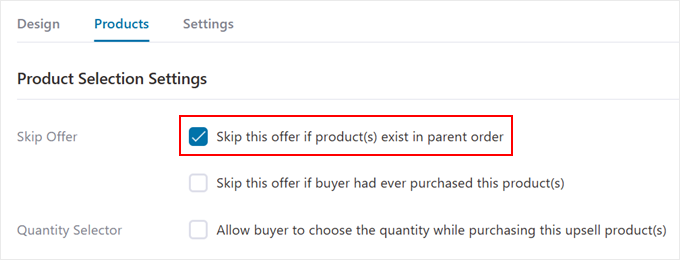
Whilst you scroll down, you’ll to search out some good settings to stop awkward situations. We suggest enabling the ‘Skip this offer if product(s) exist in father or mom order’ atmosphere to keep away from suggesting items shoppers are already buying.
You’ll be capable to moreover skip showing provides for products they’ve bought quicker than or permit them to make a choice their own quantities.
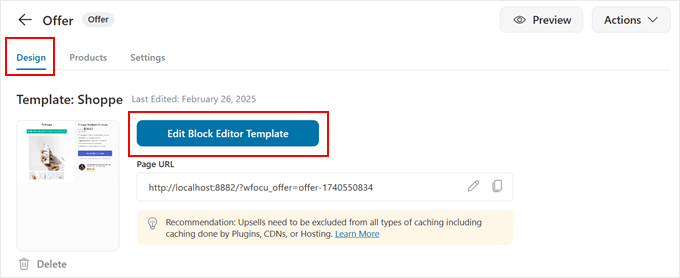
To modify the look of the offer internet web page, go ahead and switch to the ‘Design’ tab.
Proper right here, you’ll see a button directing you to the block editor or the internet web page builder of your variety. Simply click on on on the ‘Edit … Template’ button to open it.
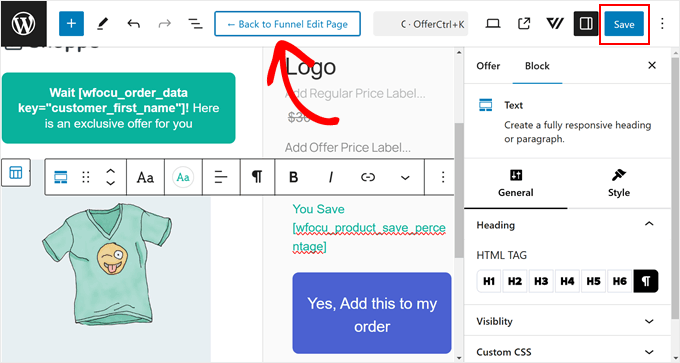
Now, feel free to customize the offer internet web page merely as it’s possible you’ll when bettering any internet web page with the bettering platform of your variety.
For example, you’ll in short indicate some great benefits of claiming the offer or alternate the call-to-action button text to raised grab attention.
The internet web page moreover incorporates good tags that robotically alternate placeholder text with knowledge like the customer’s first name and the product name. We suggest holding the ones tags to make sure the message feels personal and clear on your shoppers.
If you use the block editor and want some guidelines, then you definately’ll be told our knowledge on learn how to use the wordpress block editor (Gutenberg instructional).
Once achieved, merely save your changes, and click on on on the button that says ‘Once more to Funnel Edit Internet web page.’
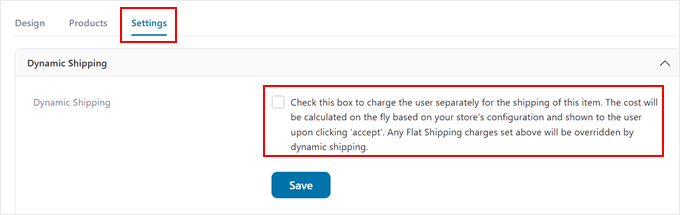
After all, head to the ‘Settings’ tab for some difficult possible choices.
Proper right here, you’ll prepare ‘Dynamic Supply,’ which lets you price separate delivery costs for the ones additional items.
That turns out to be useful when your often bought together items produce other delivery prerequisites.
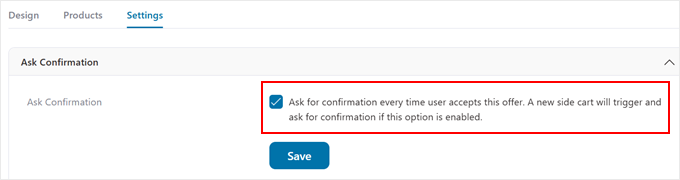
Believe enabling the ‘Ask Confirmation’ atmosphere too.
This offers a simple confirmation step when shoppers settle on your offer, preventing accidental clicks and ensuring they actually want the additional items.
Need to build up product sales and boost purchaser excitement? Be informed learn how to auto-apply coupons in WooCommerce so that shoppers can immediately save money on their purchases.
Once the whole thing turns out excellent, click on on ‘Save’ and return to the previous internet web page.
After all, click on on ‘Permit Store Checkout’ to make your new checkout process live.
That’s it!
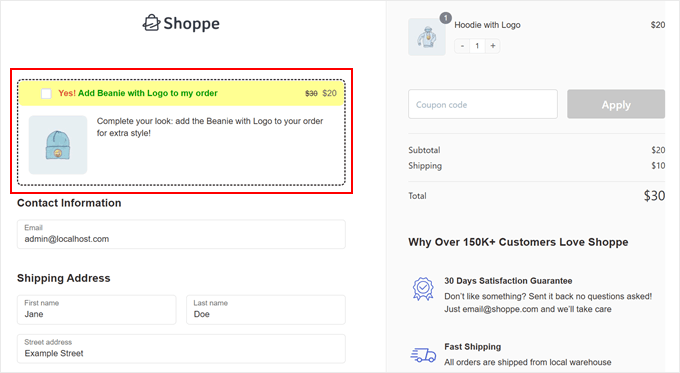
Proper right here’s how your order bump will appear to shoppers:
After shoppers fill in their checkout knowledge, they’ll see your moderately crafted offer.
They can merely add the ones complementary items to their order with a single click on on, making the buying process blank and at hand.
Method 3: Use YITH WooCommerce Steadily Bought Together (Free + Package deal deal Pricing)
The program builds on WooCommerce’s elementary hooked up products instrument then again supplies additional engaging choices on your product web page. Principally, it could most likely bundle related products proper right into a cohesive package right kind on the product internet web page.
Against this to the fundamental ‘You might also like…’ serve as in Method 1, this WooCommerce plugin shall we in shoppers to be able to upload an entire bundle to their cart with a single click on on. They can moreover see the cost they’ll wish to pay usually.
Plus, you’ll alternate the ‘Steadily Bought Together’ determine and the button text to align upper at the side of your store’s brand.
The unfastened model provides you with the whole thing you need to create attractive product bundles that catch your shoppers’ attention. Then again there may be a professional model that provides you with additional focused on and display possible choices to take your product tips to the next stage.
If you’re not conscious about the process, then check out our beginner’s knowledge on learn how to set up a wordpress plugin.
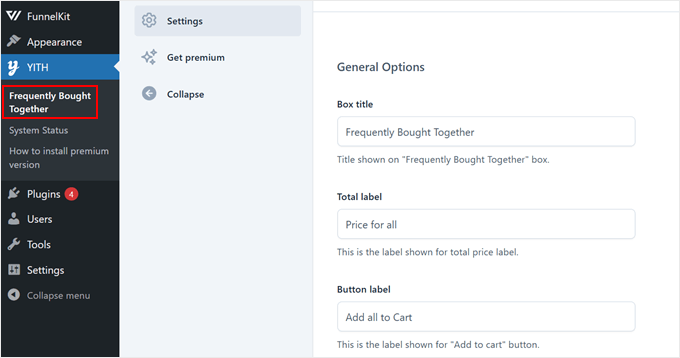
Then, should you’ve activated your most popular plugin, head to YITH » Steadily Bought Together.
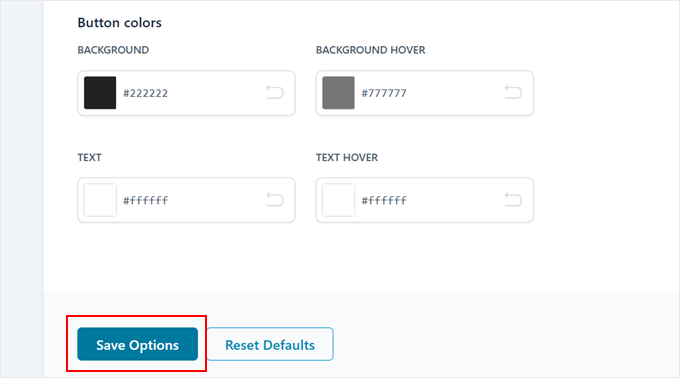
Throughout the ‘Settings’ tab, you’ll personalize how your guidelines appear on the product internet web page.
You’ll be capable to alternate the segment’s determine, modify how all the value shows, and customize the add-to-cart button text to make it additional compelling.
Need to make your tips stand out? Scroll down to switch the button colors to test your store’s theme.
Don’t overlook to click on on ‘Save Alternatives’ when you’re achieved.
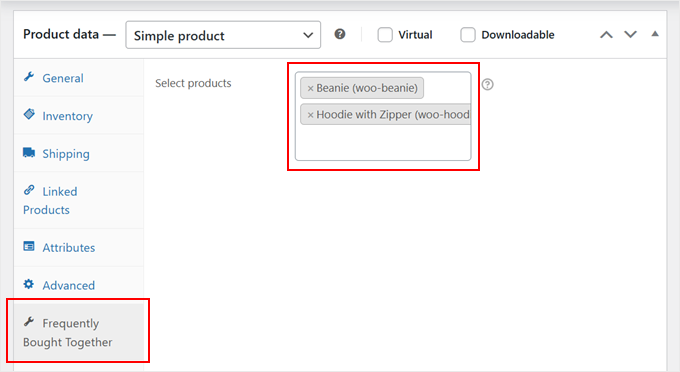
Now, each create a brand spanking new product or edit an present one in WooCommerce.
After that, merely scroll proper all the way down to the ‘Product wisdom’ segment. Then, make a choice the products you wish to have to turn inside the often bought together box in the appropriate field.
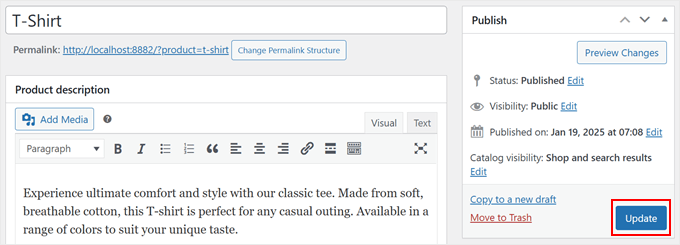
Every time you’re achieved, merely scroll once more up.
After all, click on on ‘Change’ or ‘Submit’ to save some your changes.
Whilst you consult with your product internet web page, you’ll have to now see a often bought together box that appears right kind beneath the product image.
Like so:
Need to show your often bought together products in eye-catching popups? OptinMonster makes this simple.
This lead generation and conversion platform incorporates powerful choices like move out intent focused on, which presentations your product tips merely as visitors are about to go away your store.
We use it ourselves on the WPBeginner internet web page, and we’ve spotted great results when creating popups, slide-ins, banners, and further. For more information, check out our in-depth OptinMonster evaluation.
To get started, you’ll need two problems: a Skilled OptinMonster subscription and the free wordpress plugin to attach your store. The plugin helps OptinMonster keep up a correspondence with WooCommerce to show custom designed tips at the perfect 2nd.
What makes OptinMonster specific is its number of pre-designed popup templates for product bundles. You’ll be capable to merely customize the ones the usage of their drag-and-drop internet web page builder to create compelling, often bought together choices.
You’ll be capable to moreover add product pictures, descriptions, and even specific coupon codes to make your cross-sell provides additional tempting.
The actual power comes from OptinMonster’s good focused on regulations. You’ll be capable to prepare popups to look when shoppers have specific products in their cart, making your related products additional similar.
For example, if somebody supplies a virtual digital camera to their cart, you’ll show them a popup with often bought together bundles like memory taking part in playing cards or virtual digital camera luggage.
For detailed setup instructions, check out our knowledge on learn how to create a WooCommerce popup to extend gross sales.
We hope this article has helped you discover ways to show often bought together products in WooCommerce. You might also want to check out our ultimate knowledge to WooCommerce search engine marketing and our skilled choices of the best possible WooCommerce reporting and analytics plugins.
If you appreciated this article, then please subscribe to our YouTube Channel for wordpress video tutorials. You’ll be capable to moreover to search out us on Twitter and Fb.
The put up Display Regularly Purchased In combination Merchandise in WooCommerce first gave the impression on WPBeginner.
All orders are protected by SSL encryption – the highest industry standard for online security from trusted vendors.
How To Set Up A Fully Equipped Small Woodworking Workshop For Under $1000 is backed with a 60 Day No Questions Asked Money Back Guarantee. If within the first 60 days of receipt you are not satisfied with Wake Up Lean™, you can request a refund by sending an email to the address given inside the product and we will immediately refund your entire purchase price, with no questions asked.
Description:
I’ve created this page for people who have these questions running through their mind:
After 20 years of woodworking and coaching other… I’ve seen enough to know:
In fact, it’s so bad that I must apologize it has taken me this long to reveal my answers to all of these questions!
Hi. My name is Ralph Chapman and I’ve been in love with woodworking for more than 25 years.
And like you, I’ve struggled with buying tools, setting up my workshop and practicing my craft. But I have to tell you… All of that frustration, planning and hard-work has paid off!
I finally have things setup just right… and I love this hobby even more than I did when I started many moons ago.
All the optimizations I’ve done… the little habits I’ve picked up… and the countless techniques, tools and layouts I’ve tried… all of that has come together to make this hobby exactly what I knew it could be.
My love for this hobby is so strong that around 5 years ago I just had to share it with others.
So I began mentoring and helping other woodworkers – from all around the world – take their creations to the next level.
And as I talked to these beginner, novice and sometimes expert wood-workers, I began to see a pattern…
When it came to tools, people simply didn’t know what to get.
Its been rough on my pocketbook… but even worse on my motivation. Some of the most memorable bad tools I’ve had over the years are: (disclaimer, these are my personal opinions)
Sure, a drum sander is not a vital tool for wood-workers. But this one sticks in my craw anyway! I felt the design was utter crap.
It wouldn’t keep alignment on the 4 lead screws. Which meant I could NEVER sand anything evenly… and everything I used it on turned out thicker on one side. Boy was it annoying.
And to top it off, the gears were plastic with a cheap rubber belt. When I saw the low quality, I just knew they weren’t going to last. And sure enough I was right. When the belt busted, I went online to order replacement parts. (I had planned on ordering new gears because I just knew they would go next.)
The problem I had with this tool actually surprised me. The thing was, it vibrated so much that my arm would get fatigued within 10 minutes!
Now, I’m no pansy or anything. I’ve dealt with some heavy duty machinery in my life and never had this issue. But this thing really did a number on my arm!
It was so bad that I switched back to hand-sanding and found it LESS tiring on my arm. Eventually I sold it on eBay and got about 50% of what I paid for it. A waste of time and money.
No matter how much I messed with this tool, I was never able to get a true 90 degree jointed board out of it.
About the only thing I could do was make shingles with it. Eventually I sold it on craigslist to someone locally. I told him why I was selling it, but he swore he knew how to “make it work right”.
I wished him good luck and then promptly lost hundreds by selling it for just ¼ the price I paid for it.
I spent more time tinkering and fixing this tool versus any other tool I’ve ever had!
I was actually glad when the angle adjustment “mechanism” broke (just a plastic rack and pinion). It lasted just one week. But it was one week of deep frustration.
The biggest problem was just overall poor design. The “throat plate” was just a rectangular piece of metal indented on one side to accommodate the 10 inch blade, so one could not make a zero clearance replacement.
And to top it off… it was noisier than ANY other benchtop saw I’ve ever used. Truly like something out of a nightmare!
I lost money on tools in a lot of ways during this time (what I call my “tool tryout stage”).
It happened over and over again. And every freakin’ time I thought I knew what to look for… and what to avoid… I lost money again in a different way.
After all my experience… and after coaching hundreds of students and hearing their experiences… I’ve taken note of….
This is by far the most common scam. (I call it a scam but some might disagree. Let’s see what you think.)
The way it works is this. Someone puts up a website called something like “Table saw reviews”. And on this webpage is a list of “the best” tools in this category. Of course what they DON’T tell you is that when you click the links on this webpage and buy the tool, the owner of the website gets a cut of the sale price.
Now, do you really think the owners of these websites care about the quality of the tools they recommend? Nope. What they do is recommend the tools with the highest revenue share.
Which means, when you search for anything to do with tool reviews… you’re going to come across hundreds of these webpages… and all of them are designed to earn your trust… and take your money!
This one really gets to me. I mean it really gets me hot under the collar. Because it’s just so damned brazen!
As though I am too blind to see the rust or too deaf to hear the squealing! This is why I never recommend buying anything from Craigslist and I rarely recommend eBay. Because you never know who you are dealing with.
Even those eBay sellers with good feedback scores may use third-party “refurbishers”… and you don’t know who those folks are. It’s just not worth the risk in my opinion.
Some might not call this a scam… but that’s exactly what it is! And the list of bad tools I gave you earlier is just the beginning.
Cheap Chinese manufacturing might be ok for Tupperware… but heavy-duty tools meant to last for years and years…?
The only reason a company would dare outsource such a thing would be to stretch profits. Parts, materials and assembly costs go down… and branding, marketing and prices go up. It makes me sick.
And to make it worse… given the fake review situation… you can never be sure a tool is high quality or low quality… until you buy it.
One of the most common mistakes is buying tools that are too expensive or buying tools you don’t need. The truth is, you don’t need much to build pretty much anything you can imagine.
And you can get good quality tools for big discounts if you know where to look. (More on that later).
Because high price doesn’t always equal high value. More on this later.
The other risk is not spending enough. The need to save money might backfire and you could end up losing money in the long run.
The discount tool industry is a billion-dollar one and some companies compete on price alone. Their target market is wanna-be handy-men and women who take on a single home improvement project.
Those types want to get things done for cheap… so their sole focus is on the price. Now we need more out of our tools than the average customer… so we simply can’t go for the cheap stuff.
But keep in mind here… good quality tools can be bought for bargain prices if you know where to look.
You might be shocked by this one. I’m talking about Amazon, Home Depot, Lowes, Walmart and the like.
These places aren’t the best when it comes to stocking quality tools at cheap prices. Now I’m not saying you can’t find good stuff at these stores… you sure can… from time to time.
But I would never go to any of them as a single one-stop-shop for everything tool related.
That honor goes to a particular online store which I’m surprised more woodworkers don’t know about. More on this in a second.
So there… six of the most common ways my students and I have lost money on tools.
I bet you’ve fallen victim to at least one of these scams or mistakes before?
If not, count yourself lucky. Because one or two would be somewhat easy to avoid… but SIX?
But you know what… here’s something else…
As bad as losing money is…
Losing your TIME is SO MUCH WORSE… Because there’s no way to get your time back!
What could you have built so far with the time you’ve spent dealing with bad tools?
… All the research… sending them back for warranty repair… reselling them on Craigslist or eBay… or the time you’ve spent ruminating about which tool is the BEST to buy for a specific need?
And since you’ve spent your time reading this far… I know you’re in need of guidance when it comes to setting up a complete small workshop.
I want to help you achieve that. More than anything.
But I don’t have the time to coach everyone personally…
So I’ve done the next best thing and put EVERYTHING I know about creating a small workshop into a detailed guide.
And the most important part of this guide is:
Once you have this list… you won’t have to spend anymore of your precious time researching tools… and more than that… you’re going to save yourself hundreds or even thousands of dollars in the long run by buying the best tools from the start.
If that sounds good… then keep reading…
because in a moment I’m going to give you a chance to get just that.
A shopping list of the best quality tools and where to buy them from a trustworthy (and formerly secret) source for up to 70% off prices from big box retailers such as Amazon / Lowes / Home Depot….
Inside this 246 page illustrated book there are SIX modules.
One for every area of setting up a home workshop. This includes:
By far the biggest way woodworkers lose money and get discouraged is tool selection. In this module, I’ll show you:
The tools I recommend have been used by either myself or someone I personally know. Their durability and performance is top notch and I can vouch for them.
When setting up a long-term shop, you don’t want to screw this up. Get it wrong, and you’ll have all sorts of problems… but get it right, and your life will be much easier. In this module I’ll reveal…
Once you have your location picked out and your tools ordered and on the way… the next step is choosing the best woodworking shop layout for your space.
Inside this module you’ll find:
After you have your layout chosen, the next step is to plan these three elements around your layout. Inside this module I’ll show you:
Don’t underestimate how important these issues are. They can mean the difference between working in comfort and working in constant irritation. In this module I’ll show you:
Maintaining and organizing the overall safety of your shop should be your final step in setting up a small shop.
In this part of the guide I’ll reveal:
This is also the guide I wish I had when I was starting out as an amateur woodworker.
But I’m happy that, because you’re investing in the Ultimate Small Shop guide today… you’re going to skip all of the expensive and maddening mistakes I made.
I’ve laid out a step-by-step blueprint for turning your spare space into a workshop without all the hassle and expense.
And now you can use this blueprint to skip all of that frustration.
Instead, you could be working in your own ultimate woodworking shop… within two weeks or less from today.
With my guide and my secret resource of discounted tools, you too can set up your shop for FAR LESS than what it would cost you.
Don’t subscribe to the myth that you need to burn through money to set up a proper shop. Hundreds of my satisfied customers are proof to that!
What would that be worth to the average beginner or novice woodworker struggling to setup a shop?
What would it be worth to you?
Well let’s do the math and think this through…
Well let’s say you bought a tool and it works just fine for 6 months… then stops working.
Now let’s add to that the “time cost” of researching.
Now here’s where it really adds up:
What happens if two… three… or four tools need to be replaced in the first year?
You’ll lose money, lose time and your frustration will multiply over and over. Now you see just how expensive this hobby can get… and why so many people quit within the first year!
Now in my years of experience I’ve own or owned almost all major brands…
…..tested dozens of models of EVERY tool type…
and have spoken to hundreds of woodworkers face-to-face.
If I were to give you my exact list of tools which I personally recommend
… tools that I know will last you at least ten years of average use…
But of course I’m NOT going to charge anywhere near that.
I know from my experience working with woodworkers that times are tough and budgets are tight.
I was there myself in 2008 and I know how it feels to be without woodworking. This hobby has given me so much joy that I simply can’t live with myself if I don’t make this guide available to everyone.
That’s why here today… when you order below this page…
… complete with the tool list, secret suppliers list and the workshop guide
Because beyond the tool list… beyond the shop guide…. and all the other modules in this book…
I’m giving you two FREE bonuses when you order today.
I know that the Ultimate Small Shop guide is worth many times more than the “price of admission.”
But I never feel right unless I deliver woodworkers like you MUCH more value than you paid for.
So along with your Ultimate Small Shop Guide (which will be in your inbox right after you complete your order today), I’m also giving you these BONUS items:
First is my guide titled “The WorkShop Cheat List” – where you’ll learn tips and tricks to buy lumber & tools at deep discounts
You’ll cut enormous costs on wood, tools and suppliers with this detailed “insider” guide.
But for you… if you take action today… the price is ZERO.
And the second bonus is a FREE lifetime subscription to my exclusive deal alert service.
This is a one of a kind service where I notify you of the discounted deals I find on tools and supplies.
By using these alerts you can save a staggering amount of money on tools.
And the thing is, some of these deals only last a day or two, so it’s important to act fast when they show up in your email inbox.
But here today, you get this for free for as long as I offer this service!
Again, you get both of these gifts for free… IF you order right now below….
Right now, you’re just a few clicks away from getting a complete, exclusive guide to building your own fully equipped workshop properly, cheaply and quickly… no matter how small your budget is or how much space you have available.
Five years from now, you’ll either be glad you decided to grab your Ultimate Small Shop guide… or you’ll be wishing you had!
Place your order below and get started on your shop in the next 5 minutes…
Listen, I totally get it if you’re still looking at that big green button above and thinking, “What if this is just another ripoff where I get a useless guide telling me to go garage sale hunting for my tools?”
But there’s still a BIG part of you that senses that this guide is different.
Maybe it’s because I’m a 25-year veteran woodworker, or maybe it’s just because you’ve seen enough “fluff” to sense whether someone is being sincere or not.
Do you trust and risk getting screwed… or not trust and risk missing out on vital insights and insider resources that could help you build the shop you’ve been dreaming of?
…maybe you don’t like my shop layouts
…or maybe you hate the tools I recommend
…or even if you hate the way the book is organized.
It doesn’t matter how small or large the issue is… if you’re not happy… I’m not happy.
And if that happens… all you need to do is email me and I’ll refund every penny of your money… with NO questions asked and NO hard feelings.
So really, there is no downside here…
But that’s not my entire mission here.
There’s more to it than just helping you save money and get your small shop setup…
Because I know once you have this guide:
… and once you have all of this…you can finally get down to business and start creating the items you know you’re capable of making… and more than that…
you’ll start building a rare and valuable skill known as woodworking.
I’m sure it will give you a lifetime of joy. I know it has me.
I simply can’t live a day without doing something in my workshop.
And looking back over the years… I am so glad I stuck with it and pushed through all the mistakes I’ve made.
Given everything you’ve seen here today… along with my money back guarantee… I think it’s an easy choice.
This is something to jump on for any serious woodworker!
Its time. You can start putting together your small shop mere minutes from now.
You have 60 days to read it, discover the secret resources to buy deep discounted tools, strategies to setup a complete shop in a small space, and judge whether it was worth your hard-earned money.
Remember your complete satisfaction is 100% guaranteed. You have 60 days to get a no-questions-asked, 100% money back refund.
I’ve seen Ultimate Small Shop help hundreds of my students setup their first shop without spending more than they need to. It’s time for your turn…
One of most common mistakes is that many people try to figure things out on their own.
Many of my students when it comes to setting up shop say, “Okay, let me just go and figure things out.”
You can certainly try that but you may end up spending more than you probably should.
You can go online or even worse, get recommendations from sales people at retail stores. And quite frankly a lot of the suggestions are terrible.
You will get recommended on “sponsored tools” that manufacturers are giving them!
But you know what, as bad as losing money is…
Losing your TIME is SO much worse… Because there’s no way to get your time back!
Time that could be spend working on your project.
With my guide, I’ll take the confusion
I’ll take the confusion away and also guide you on the exact specifics on setting up your shop…
So to get started today, click on the big “Add To Cart” button below and I’ll see you on the inside
After you click on the Add To Cart button… you’ll be taken to our secure shopping cart. Put your details in on the page to continue.
And don’t worry about security. We use use the same technology that Amazon uses… so your details are 100% safe with us.
After that, you’ll be taken to the members area where you can download everything.
From then on I’ll be talking to you in the book. We’ll continue our current conversation…
….only this time I’ll reveal everything you need to eliminate your frustrations with woodworking and turn it… finally… into what you KNOW it can be… the best hobby in the world.
So the small amount you’re paying for instant access to Ultimate Small Shop today can pay for itself 100 times over when you’re buying essential equipment for your new workshop!
“ClickBank is the retailer of products on this site. CLICKBANK® is a registered trademark of Click Sales Inc., a Delaware corporation located at 1444 S. Entertainment Ave., Suite 410 Boise, ID 83709, USA and used by permission. ClickBank’s role as retailer does not constitute an endorsement, approval or review of these products or any claim, statement or opinion used in promotion of these products.”
Discover the 20 most essential tools for ANY workshop of ANY budget…
Puls discover the 3 most important and fundamental tools that can’t be bought…
All orders are protected by SSL encryption – the highest industry standard for online security from trusted vendors.
How To Set Up A Fully Equipped Small Woodworking Workshop For Under $1000 is backed with a 60 Day No Questions Asked Money Back Guarantee. If within the first 60 days of receipt you are not satisfied with Wake Up Lean™, you can request a refund by sending an email to the address given inside the product and we will immediately refund your entire purchase price, with no questions asked.
Level Up Your Grill Game: Combining Food and Fun with Video Game Inspiration
Tired of the same old grilling routine? This article unlocks a whole new level of fun by combining two beloved activities: video games and grilling!
Turn your backyard into a gaming paradise with thematic decorations, music playlists, and interactive games. Imagine a Mario Kart-themed BBQ with colorful decorations, Luigi’s Mansion-inspired cocktails, and a “Guess the Flavor” game inspired by power-ups. Or, create a Minecraft-themed feast with block-shaped treats and a “Grill Master Competition” to see who can build the most delicious culinary creation.
Beyond video games, embrace the world of board games for unique grilling inspiration. Think themed burgers based on classic board games like Monopoly or Clue.
This article also highlights the amazing food scene in Savannah, Georgia, a paradise for grilling enthusiasts. Don’t miss out on their famous barbecue, a true taste of Southern hospitality, or their shrimp and grits, a local delicacy with a comforting kick.
Ready to level up your grilling experience? Visit Ecliptic Signs for even more creative ideas and recipes.
Remember: Grilling is about creating memories with friends and family, and this article offers the perfect blend of fun and deliciousness to make your next barbecue unforgettable.
Game On! Grillin’ Up Fun with Your Favorite Video Games
TL;DR – Too Long; Didn’t Read
This article is about combining two awesome things – video games and grilling! It shares tips for making grilling even more fun with video game themes, using games like Mario Kart, Minecraft, and even board games to inspire delicious dishes.
Gaming and Grilling: A Perfect Match
Who doesn’t love a good video game session and a juicy burger on the grill? They’re both fun activities that bring people together. What if we told you that you could combine both to make your next barbecue unforgettable?
Video Games Inspire Delicious Dishes
Think about the games you love. What characters or worlds do they feature? Can you imagine turning those ideas into yummy food?
Minecraft Meals
Minecraft is all about building and creating, and your grill can be your building block! Make “Minecraft” burgers with different colored cheeses and toppings, or try “lava” cake with melted chocolate for a truly “lava-tastic” treat.
Mario Kart Munchies
Mario Kart is a classic racing game, and we can make a game-themed feast! Get creative with colorful fruit skewers like “Luigi’s Green Star” or “Peach’s Pink Peach,” and make “Goomba” mushroom caps with mushrooms and cream cheese.
Board Game Feast
Even board games can inspire your grilling! If you like Monopoly, you can make a “Chance” burger with a variety of toppings representing different game cards.
Making Your Grill a Game-Changer
You can even transform your grill into a game-themed masterpiece!
Game-Themed Decorations
Add some flair to your backyard with game-themed decorations. Make a “Super Mario” banner or a “Minecraft” flag. You could even create a “game character” cake or cupcakes for a truly unique touch.
Game-Inspired Music
Set the mood with music from your favorite video games! Make a playlist with soundtracks from Mario Kart, Minecraft, or any other game you love.
Grilling Games
Let’s not forget about the games!
Guess the Flavor
Blindfold your friends and have them guess the different flavors you’ve grilled. Make it even more fun by giving them game-related clues.
Grill Master Competition
Turn your grill into a competitive game! Have everyone cook their own signature dish and let everyone vote for the best one.
Savannah Savories
When it comes to grilling, Savannah has a lot to offer. The city has amazing restaurants and food trucks that showcase Southern cooking. If you’re in Savannah, try out their famous barbecue or shrimp and grits – you won’t be disappointed.
Grilling Games: A Fun and Delicious Way to Play
Grilling is about creating memories with friends and family. Why not add some gaming magic to your next barbecue? It’s an easy way to elevate the fun and make your next gathering unforgettable.
For more inspiration and creative ideas, visit Ecliptic Signs
Summary:
This article provides a fun and engaging way to combine two popular activities: video games and grilling. It explores how different video games can inspire creative and delicious recipes, like “Minecraft” burgers or “Mario Kart” skewers. The article also suggests ways to transform your grill into a game-themed experience with decorations, music, and fun games like “Guess the Flavor” or a “Grill Master Competition.” Finally, it highlights the amazing food scene in Savannah, Georgia, and recommends trying their famous barbecue or shrimp and grits.
Winter Survival: Rolling with the Heat in Idaho Falls
Let’s face it, winter in Idaho Falls can be brutal. But you don’t have to be a snow-covered mess! A good cart can make all the difference, whether you’re hauling a heater, lugging firewood, or just schlepping your winter gear.
Think of it this way: You need to keep warm, and portable heaters are a lifesaver. This article breaks down how to find the right cart and heater combo for your needs, so you can stay toasty all winter long. We’ll talk about safety, budget, and even which heater is best for your space and terrain.
Get Ready to Heat Up:
Portable heaters are a game changer when it comes to keeping your home comfy during the cold months.
Rolling with the Heat: Carts, Heaters, and the Idaho Falls Winter
TL;DR: This article explores how to keep warm in the winter, specifically in Idaho Falls, using carts and portable heaters. We’ll cover the types of carts, safe heater use, and resources for finding the best options for your needs.
Staying Warm in the Winter: A Carts-and-Heaters Guide
Living in Idaho Falls, you know that winter can get pretty cold. The good news is that there are ways to stay warm even when the temperatures drop below freezing. Two of the most useful tools are carts and portable heaters.
Carting Around Your Comfort
H3 Carts can be incredibly helpful for moving your warmth around. Whether it’s a cart for hauling your heater, a cart for transporting firewood, or a cart for carrying your winter gear, a good cart makes life a lot easier during the winter months.
H4 Think about what you’ll be using your cart for. If you’re moving heavy things like firewood, you’ll need a sturdy cart with big wheels. If you’re using your cart for a small heater, you can choose a smaller, lighter cart.
H4 Don’t forget to consider the terrain you’ll be using your cart on. If you’re on uneven ground, you’ll want a cart with all-terrain tires. If you’re going to be using your cart on pavement, then standard wheels will work just fine.
Heating Up Your Space
Portable heaters are a fantastic way to keep your home warm and cozy in the winter. But it’s important to choose the right heater for your space and use it safely.
H3 There are many different types of portable heaters available, so you’ll need to decide what kind is best for your needs.
H4Space heaters are a popular option, but they can be a fire hazard if not used correctly. Make sure you read the manufacturer’s instructions carefully and keep the heater away from flammable materials.
H4Ceramic heaters are a good alternative to traditional space heaters because they heat up quickly and use less energy. They’re also generally safer than space heaters.
H4Electric fireplaces can create a cozy atmosphere and provide some heat, but they are usually not very efficient. They are best suited for smaller spaces.
Making Safe Choices
No matter what type of heater you choose, it’s important to follow some basic safety tips:
Never leave a heater unattended.
Keep heaters away from flammable materials.
Make sure the heater has a tip-over switch.
Have your chimney inspected annually.
Finding Your Perfect Match
There are many resources available for finding the right cart and heater for your needs. Your local hardware store is a great place to start. You can also find a wide variety of carts and heaters online.
For example, you can check out Ecliptic Signs for a variety of options, including custom-made carts and heaters.
Summary
In conclusion, carts and portable heaters can make a big difference in staying warm during the Idaho Falls winter. By choosing the right cart and heater for your needs and using them safely, you can keep your home cozy and warm all winter long. Remember to consider your budget, the size of your space, and the type of terrain you’ll be using your cart on. Don’t forget to prioritize safety and choose the best option for your specific needs.