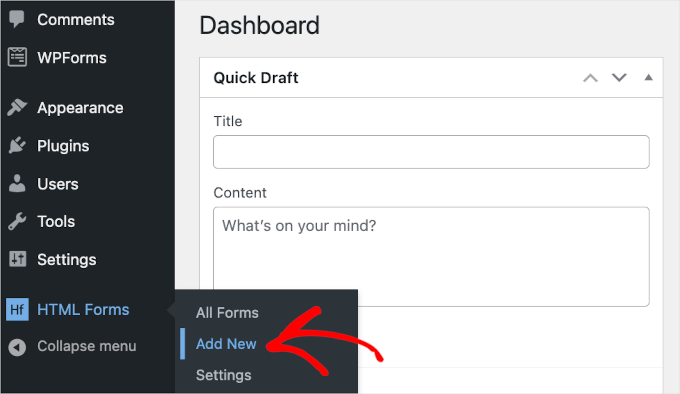
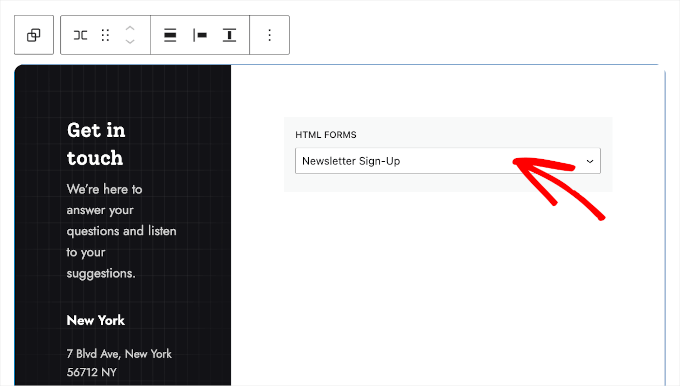
Q: What’s the surprising connection between makeup brushes and knives?
A: Both makeup brushes and knives require precision and technique for achieving masterful results. Just like a professional artist needs the right brushes and paints, a makeup artist relies on high-quality brushes to create beautiful and lasting looks. Similarly, a chef needs sharp, well-maintained knives for precise cuts and beautiful presentations.
Q: Why is quality so important for both makeup brushes and knives?
A: Whether you’re a makeup artist, chef, or simply someone who enjoys taking care of themselves and their tools, the importance of precision and quality cannot be overstated. High-quality tools enable you to unlock your inner artist and achieve professional results.
Q: How do we maintain these tools for optimal performance?
A: Just like a knife needs regular sharpening to stay in top shape, makeup brushes need regular cleaning to maintain their effectiveness. Maintaining your tools is crucial for preserving their quality and ensuring they continue to deliver the best results.
Q: What can we learn about knife care and sharpening?
A: This article delves into the fascinating world of knife care and sharpening, providing insights into proper maintenance techniques for both knives and makeup brushes. Learn how to sharpen your skills in both the beauty and culinary arts.
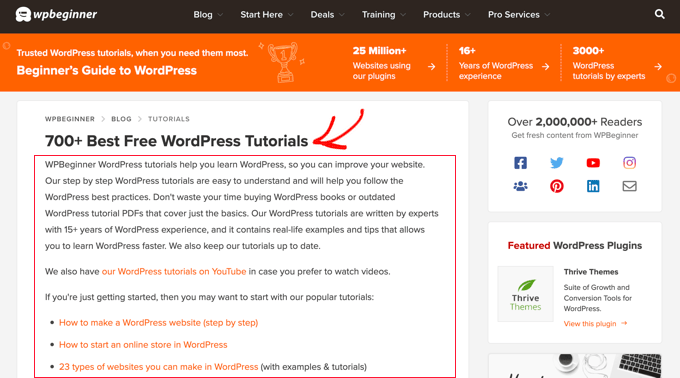
Unlock Your Inner Artist: Makeup Brushes and Knives, A Surprising Connection
TL;DR – Too Long; Didn’t Read: This article explores the unexpected link between makeup brushes and knives, highlighting their shared focus on precision and technique. Learn about the importance of quality tools in both beauty and culinary arts, as well as the fascinating world of knife care and sharpening. We’ll also touch on the growing popularity of Winnipeg’s thriving arts scene, including its makeup artists and chefs.
H2: More Than Meets the Eye: The Art of Precision
Have you ever noticed how similar a makeup brush is to a chef’s knife? Both are tools that require careful handling and skill to create stunning results. A makeup brush, for instance, is like a miniature paintbrush, carefully blending colors and textures to achieve a flawless look. Similarly, a chef’s knife is used with precision to slice, dice, and mince ingredients, transforming raw foods into culinary masterpieces.
H3: The Power of Quality Tools
Just like a professional artist needs the right brushes and paints, a makeup artist relies on high-quality brushes to create beautiful and lasting looks. The same goes for chefs, who trust their knives to deliver clean cuts and precise results. Think of it this way: a sharp knife makes cooking easier and safer, just as a high-quality makeup brush helps you achieve a more polished look.
H2: Sharpening Your Skills: Knife Care and Makeup Techniques
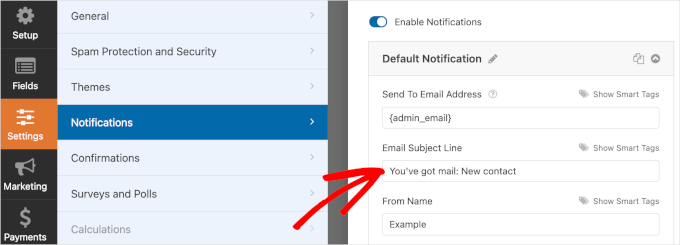
Just like a knife needs regular sharpening to stay in top shape, makeup brushes need regular cleaning to maintain their effectiveness. A dirty brush can harbor bacteria and can even lead to breakouts. It’s important to wash your makeup brushes regularly with a gentle soap and water, then let them air dry completely. This will help them last longer and perform better.
H3: The Importance of Sharpening
Speaking of sharpness, a dull knife can be dangerous! It’s important to sharpen your knives regularly to ensure they’re safe and efficient to use. You can take your knives to a professional sharpener, or you can try sharpening them yourself with a honing steel or sharpening stone. A sharp knife will make your cooking experience safer, more efficient, and enjoyable.
H2: Winnipeg: A City of Artists and Foodies
The city of Winnipeg is known for its vibrant arts scene and delicious food options. From talented makeup artists to world-class chefs, Winnipeg is home to a diverse community of creative professionals. These individuals understand the importance of quality tools and the artistry that goes into their craft.
H3: Winnipeg’s Makeup Artists
Winnipeg is home to many talented makeup artists who use their skills to create stunning looks for weddings, fashion shoots, and special events. They use the finest makeup brushes and techniques to highlight their clients’ natural beauty.
H3: Winnipeg’s Culinary Scene
Winnipeg’s culinary scene is equally impressive, boasting innovative chefs who use the sharpest knives and freshest ingredients to create mouthwatering dishes. From fine dining restaurants to cozy cafes, Winnipeg has something to satisfy every palate.
H2: The Beauty of Mastery
Whether you’re a makeup artist, chef, or simply someone who enjoys taking care of themselves and their tools, the importance of precision and quality cannot be overstated. Both makeup brushes and knives require careful handling, cleaning, and sharpening to ensure they perform at their best. By investing in high-quality tools and honing your skills, you can unlock your inner artist and create stunning results.
H3: Explore Further:
For more information about the fascinating world of makeup and culinary artistry, visit Ecliptic Signs. Ecliptic Signs is a site dedicated to sharing the knowledge and passion of artists from all walks of life.
Have you ever ever ever confused if it’s crucial trade WooCommerce’s fundamental sale badge with something further eye-catching (and moderately a lot much less boring)?
It is a now not extraordinary question we get from our readers, and we’re satisfied to will let you know that the answer is certain. You utterly can!
Custom designed product badges are an out of this world solution to highlight explicit items to your online store. They’re helpful whether or not or now not you wish to have to sing their own praises new arrivals, mark items on sale, or draw attention to limited-time supplies.
In this publish, we’ll show you two simple ways in an effort to upload custom designed product badges to your WooCommerce store. You’ll each use an outstanding plugin or add some simple code.
Don’t concern. We’ll walk you through each and every selection step by step!
What Are WooCommerce Product Badges?
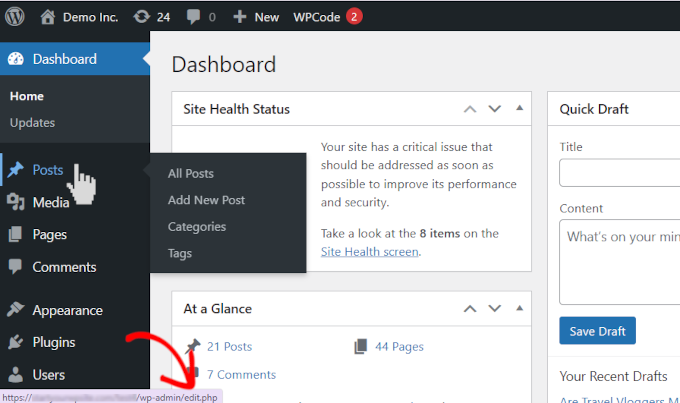
Have you ever ever ever noticed those little ‘Sale’ or ‘New’ labels that show up on products while purchasing groceries online?
Those are product badges, and they’re extraordinarily useful for ensuring items stand out to your on-line retailer.
Recall to mind them as virtual stickers that draw your shoppers’ attention to important product details like gross sales, new arrivals, or limited-time supplies.
We’ve seen store homeowners use product badges in in point of fact inventive ways to sing their own praises explicit provides, highlight bestsellers, or mark items which may well be operating low on inventory.
Now, for individuals who’re already the usage of WooCommerce, you’ll have noticed it comes with a fundamental sale badge feature that automatically turns out while you reduce a product’s value.
While the WooCommerce sale badge works incredible for simple needs, let’s be honest – it’s gorgeous limited relating to what you’ll have the ability to do with it.
You’ll’t merely alternate how the badge appears to be, add new badge types, or keep an eye on exactly the position they appear to your product pictures.
Within the period in-between, custom designed product badges will let you show your logo’s personality further. Most importantly, even if, distinctive badges can further effectively draw attention to special products.
That suggests, you’ll have the ability to power further product sales to your online store.
In this knowledge, we’ll walk you through 2 showed learn the way to add and customize product badges in WooCommerce. Each and every approaches will provide you with complete keep an eye on over how they seem and artwork.
You’ll use the fast links underneath to skip to your most popular approach:
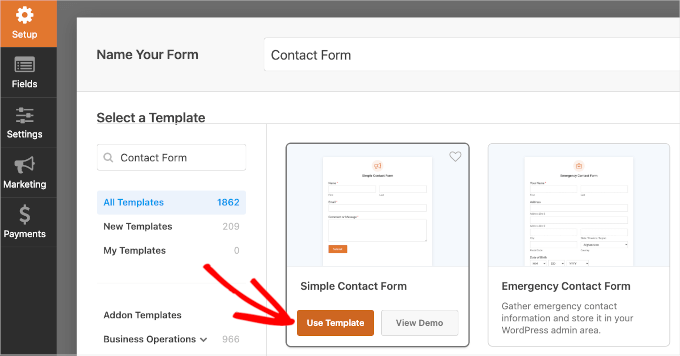
Approach 1: Use YITH WooCommerce Badge Regulate (Further Customizable)
Let’s get began with our favorite software for together with custom designed product badges to your WooCommerce store.
We recommend the usage of YITH WooCommerce Badge Control because it makes it super easy in an effort to upload and customize product badges to your online store.
Plus, we’ve tested many YITH plugins through the years, like the ones for together with subscriptions and product movies, and they always artwork great for our shoppers.
Wish to show a novel badge during the vacations? Or perhaps display how much money shoppers will save? This plugin can do all that. You’ll even set badges to show up at positive circumstances and hide them later.
You’ll get began with each the free or best elegance fashion of the plugin. The unfastened model is perfect for individuals who merely wish to add simple text or image badges to your products.
In this knowledge, we’ll show you how you can use the top class model, on the other hand most steps will artwork the identical approach for every. Merely keep in mind that some cool choices, like badges that automatically show discount amounts, most efficient come with the highest elegance fashion.
Practice: The highest elegance fashion costs $79.99 in line with one year if you wish to have all of the choices. While this may increasingly appear to be such a lot, we think it’s value it because you get such a large amount of ways to customize your product badges and make them look exactly how you wish to have them.
Able to start out out? First, you’ll want to achieve the plugin from YITH’s internet website online.
Then log in to your YITH account, move to the ‘Licenses & Downloads’ tab, and click on on on the ‘Download Plugin’ button to procure the record.
Proper right here’s a tip: don’t close this internet web page after downloading because you’ll need the license key that’s confirmed there.
Next, move to your wordpress dashboard and arrange the plugin. For more information, now now we have a step-by-step knowledge on how one can set up a wordpress plugin.
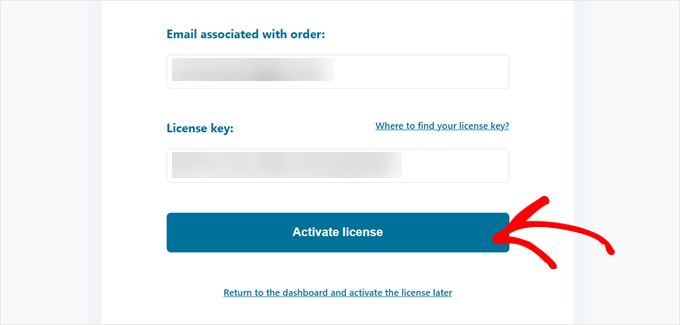
When it’s energetic, you’ll see a setup computer screen asking on your YITH piece of email and license key. Merely copy the ones from the YITH internet website online and click on on ‘Activate license.’
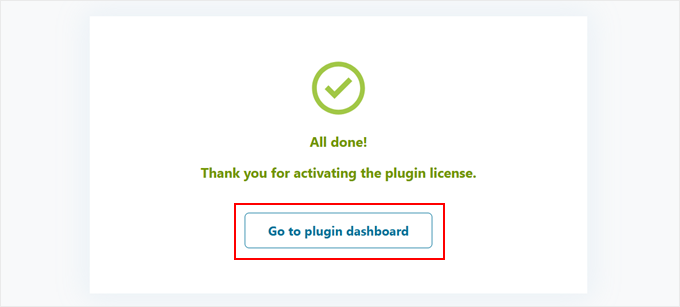
Every time you spot the message saying your license is energetic, you’re all set!
Now, click on on ‘Go to plugin dashboard,’ and also you’ll have the ability to get began growing your first custom designed badge.
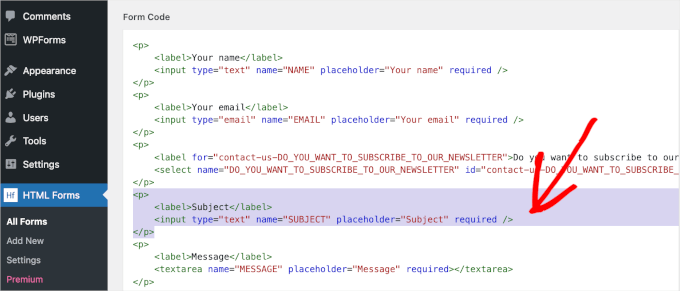
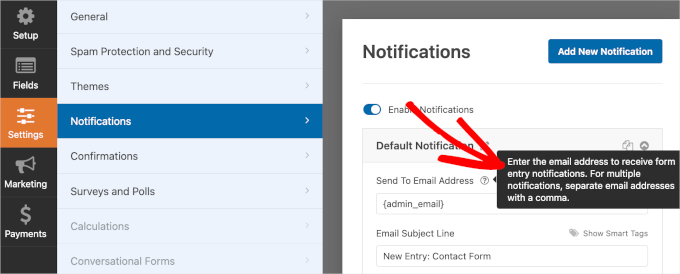
Step 1: Quilt the Default WooCommerce Sale Badge
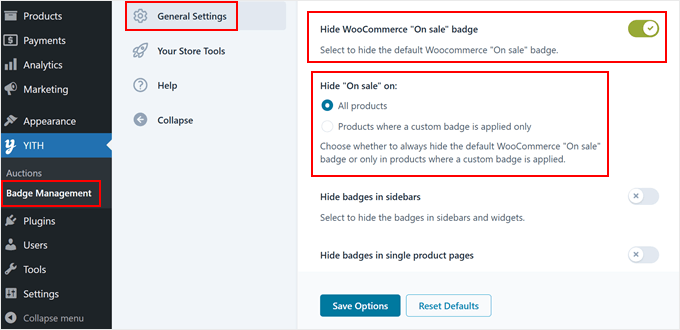
First, we want to hide WooCommerce’s built-in sale badge so it doesn’t war with our custom designed product badges.
The process is in point of fact simple. Go to your wordpress dashboard and click on on on YITH » Badge Regulate. Then, navigate to the ‘Elementary Settings’ tab.
Proper right here, you’ll to search out an selection that says ‘Quilt WooCommerce “On sale” badge.’ Go ahead and turn that on.
Then, beneath ‘Quilt “On sale” on:’, make a choice ‘All products’ to make sure the default badge doesn’t show up anywhere to your store.
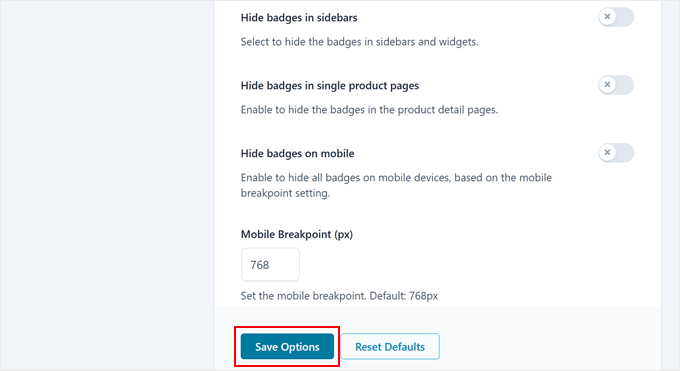
Whilst you’re inside the settings, that you must perceive some other helpful possible choices. You’ll select to hide your custom designed badges in positive places, identical to the sidebar or single product pages.
This is great if you want to keep your store taking a look clean and organized. For example, if your cell website feels too crowded, you’ll have the ability to hide badges there, too.
Don’t omit to click on at the ‘Save Alternatives’ button at the bottom of the internet web page while you’re completed.
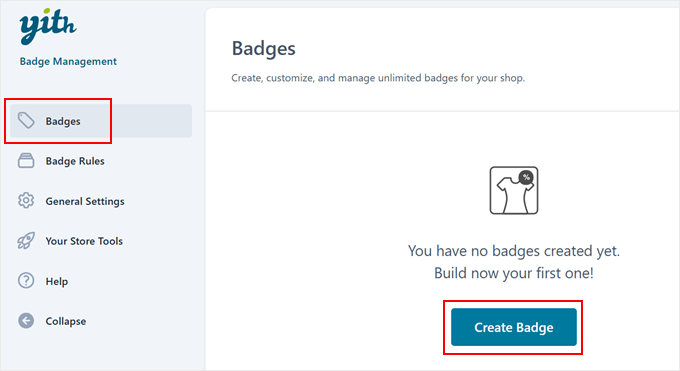
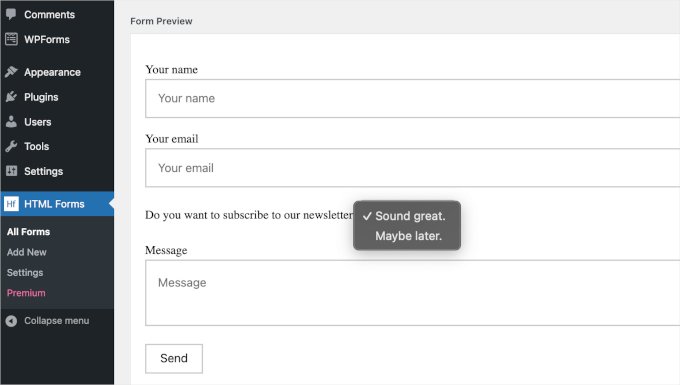
Step 2: Create Your Custom designed Badge
Now comes the fun phase: growing your first custom designed product badge in WooCommerce!
Head over to the ‘Badges’ tab and click on at the ‘Create Badge’ button to get started.
The plugin offers you 4 various kinds of badges to make a choice from: text badge, image badge, CSS badge, or sophisticated badge for product sales products.
Each type means that you can create unique ways to concentrate on your products. For example, if you want to mark products as “New Arrival” or “Vegan Delightful,” the principle 3 possible choices artwork great.
Then again proper right here’s a tip: for individuals who’re growing discount badges, we strongly suggest the usage of the sophisticated selection, which automatically updates in accordance with your product’s value changes.
After settling on your badge type, give it a name this is serving to you remember what it’s for.
Whilst you’ve decided on an image, CSS, or sophisticated badge, you’ll see a complete choice of pre-made badge designs right kind inside the plugin.
You’ll pick whichever one you favor. The ones ready-to-use badges save you time, and also you’ll have the ability to however customize them to check the best way of your WooCommerce pages.
This plugin in point of fact shines in its customization possible choices. Depending on which badge type you picked, you’ll have the ability to alter all kinds of settings to make your badge look perfect to your product photos.
Wish to alternate the color? Easy.
Need to alter how transparent it’s? No problem.
You’ll even rotate the badge or switch it spherical to your products until it’s in merely the correct spot.
For our example, we made the badge in point of fact pop by the use of changing its color to purple and striking it inside of probably the most good right kind corner of the product image.
The ones small tweaks may make a big difference in how effectively your badges get other people’s attention.
Whilst you’re proud of how the whole lot appears to be, merely click on on ‘Save badge’ to finish up.
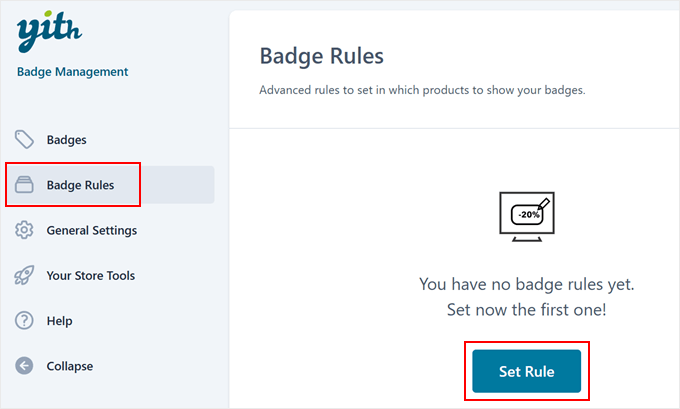
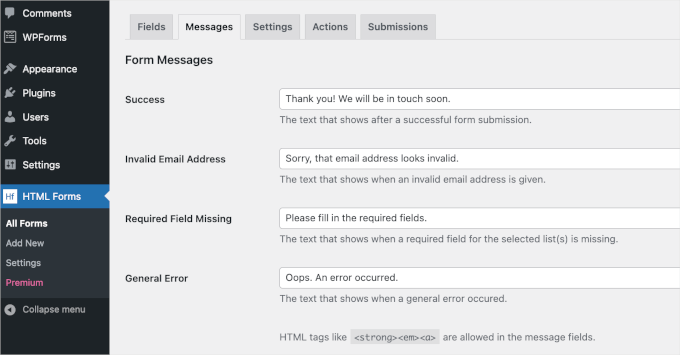
Step 3: Create a Rule to Display Your Badge
Now that we’ve created our custom designed badge, let’s tell WooCommerce exactly the position and when to show it.
Head over to the ‘Badge Rules’ tab and click on on ‘Set Rule.’
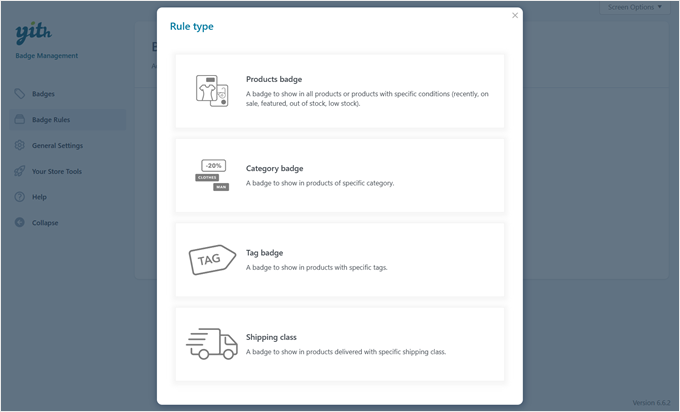
Recall to mind rules as instructions that tell your badges when to search for your product photos.
The plugin offers you 4 main ways to keep an eye on where your badges show up: products badge, elegance badge, tag badge, and supply class badge.
You’ll select the ‘Products badge’ rule in an effort to upload badges to positive items or the ‘Magnificence badge’ rule to cover whole product categories.
Within the period in-between, the tag badge rule shows badges on products sharing the identical WooCommerce tag, and the supply class badge rule shows badges in accordance with supply possible choices.
Each rule targets different product sides, on the other hand they all artwork similarly. So, you merely want to pick what works best on your needs.
Let’s use the products badge rule for this example as it’s the most typical variety.
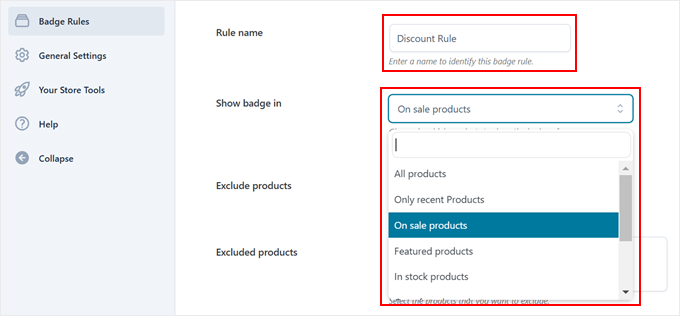
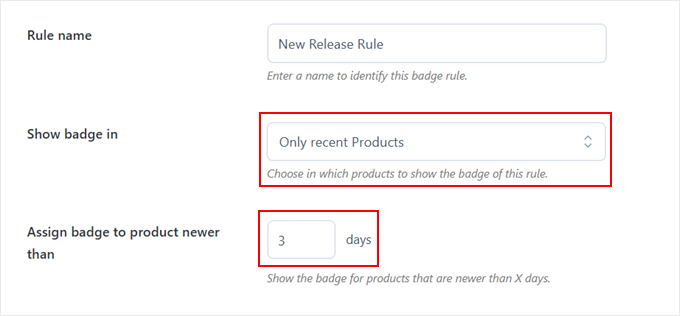
Next, give your rule a easy establish so that you’ll have the ability to to search out it merely later.
Then, seek for the ‘Show badge in:’ surroundings. That’s the position you decide which products get your badge. You’ll select to show it on all products, recent additions, items on sale, featured fashionable merchandise, or even merely products which may well be in stock.
Let’s say you’re creating a rule available on the market items. If you select ‘On sale products,’ then your badge will automatically appear every time you mark a product as being on sale. It’s that easy!
Then again some possible choices come with further settings so to configure. For example, for individuals who pick ‘Only recent Products,’ you’ll have the ability to set badges to appear on items added within the previous couple of days (like 7, 14, or 30 days).
This makes it super easy to automatically highlight new arrivals to your store without manually together with badges to each and every product.
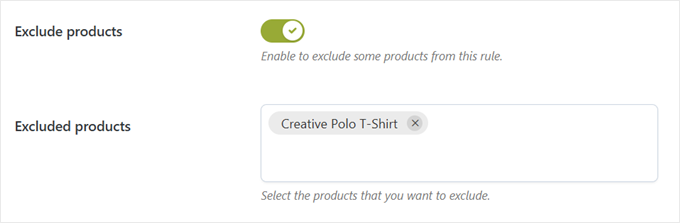
From time to time, that you must wish to keep positive products badge-free. That’s where the ‘Exclude products’ surroundings is useful.
Merely permit this surroundings and type inside the names of any products you don’t wish to show the badge for. These items will stay badge-free even if they suit your other rules.
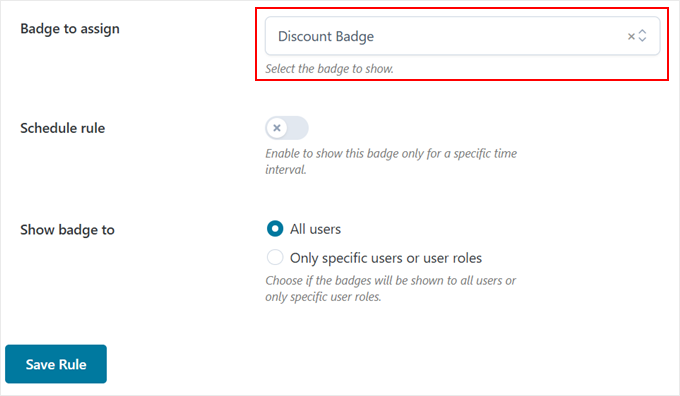
Next, make a choice which badge design you wish to have to use inside the ‘Badge to assign’ dropdown.
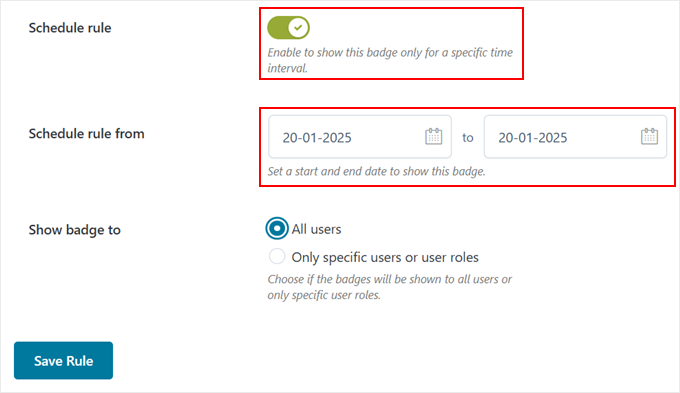
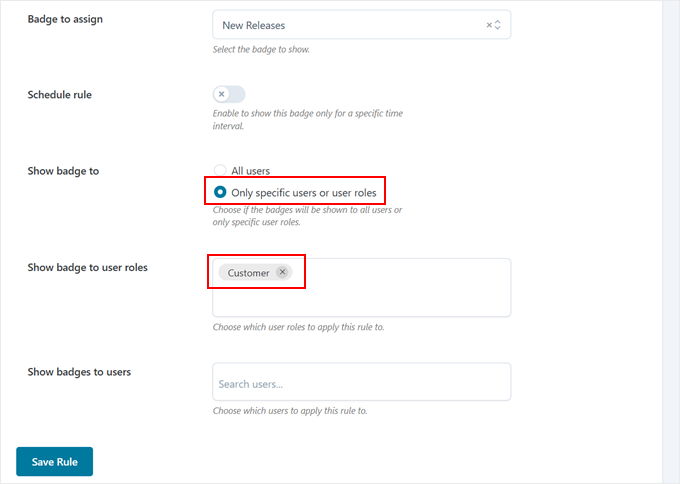
Now, proper right here’s where it’ll get in point of fact flexible. You’ll schedule when your badges appear and select who gets to see them.
The ‘Schedule rule’ selection is perfect for limited-time provides.
Whilst you permit it, the plugin will ask you to set get began and end dates on your badges.
And if you want to show explicit badges to positive shoppers, like appearing a “VIP Cut price” badge most efficient to one of the vital unswerving consumers, you’ll have the ability to do that, too.
To try this, merely make a choice ‘Only explicit shoppers or client roles’ inside the ‘Show badge to’ surroundings. Then, type to your most popular client roles or particular person usernames underneath it.
When the whole lot appears to be right kind, merely click on on ‘Save Rule,’ and likewise you’re all set!
Feel free to talk about together with your store’s front end to see your new product badges in movement.
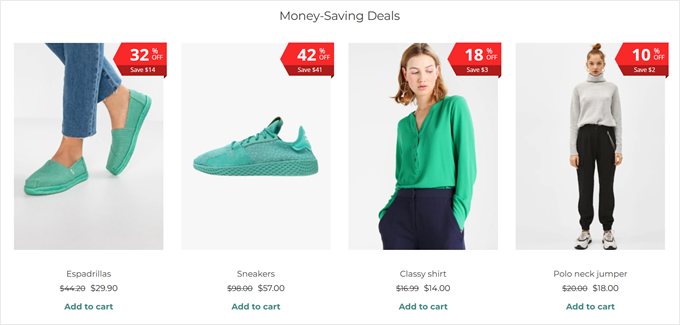
Whilst you’re the usage of the sophisticated badge type available on the market items, you’ll see it appearing every the bargain share and the actual money saved, helping shoppers quickly spot the best provides.
Similar Post: In search of further cool apparatus and the right way to reinforce your WooCommerce store? Check out our list of the absolute best WooCommerce plugins.
Approach 2: Use Custom designed Code (Loose and Simple)
Whilst you don’t need the sophisticated possible choices from the principle approach, or for individuals who’re looking for a completely free selection, then now now we have a simple code implies that won’t value you the remainder.
And for individuals who’re no longer proud of code, don’t concern! We’ll be the usage of the WPCode plugin to make this super easy and safe. It means that you can add custom designed code snippets in wordpress without being a developer or risking breaking your internet website online.
We’ll use the unfastened model of WPCode for this tutorial because of it in reality works utterly for our needs. That discussed, there’s a top class model with cool choices like AI code technology and trying out mode.
For more information, merely check out our in-depth WPCode evaluate.
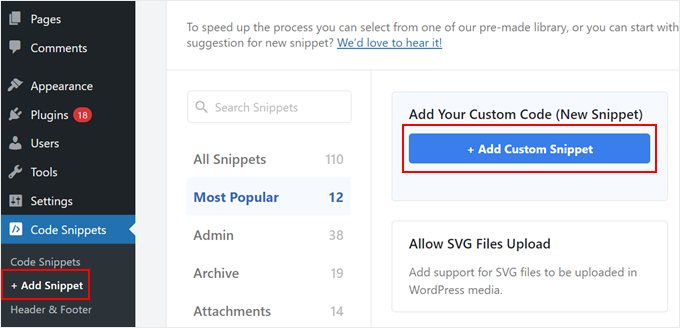
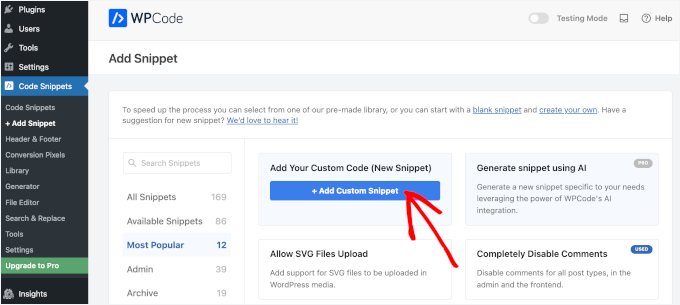
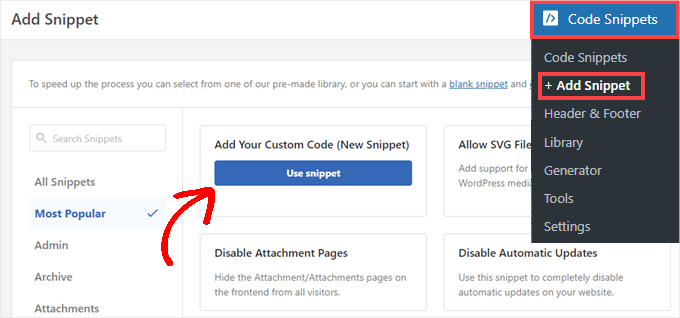
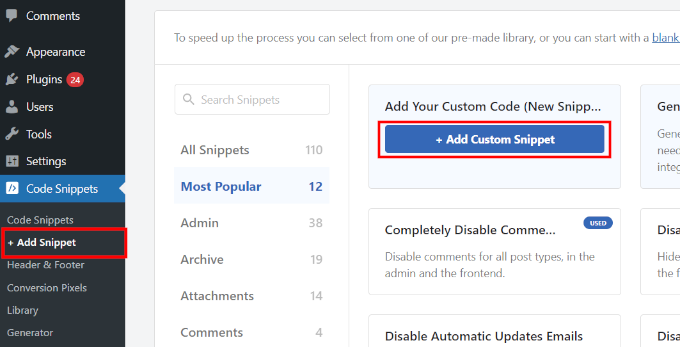
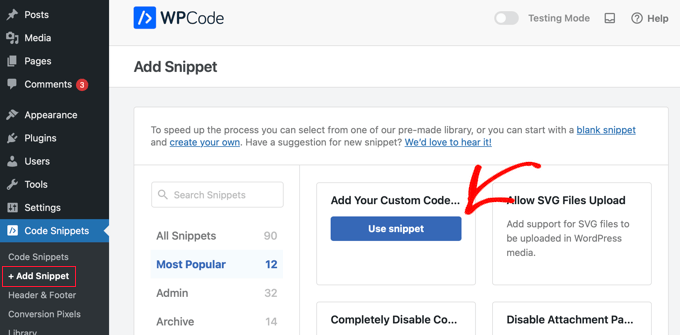
First, you need to set up the wordpress plugin to your admin space.
Then, move to Code Snippets » + Add Snippet. Hover over the ‘Add Your Custom designed Code (New Snippet)’ segment and then click on on on the ‘+ Add Custom designed Snippet’ button.
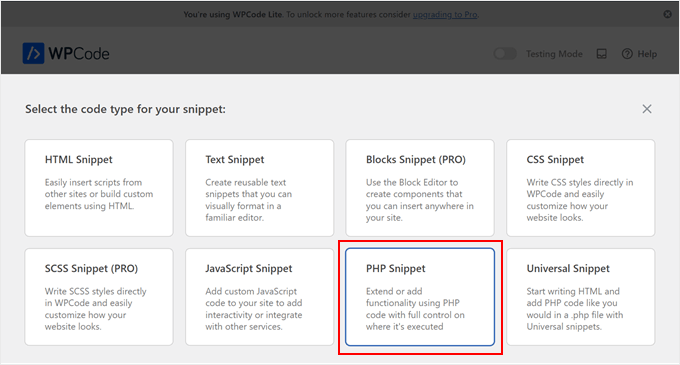
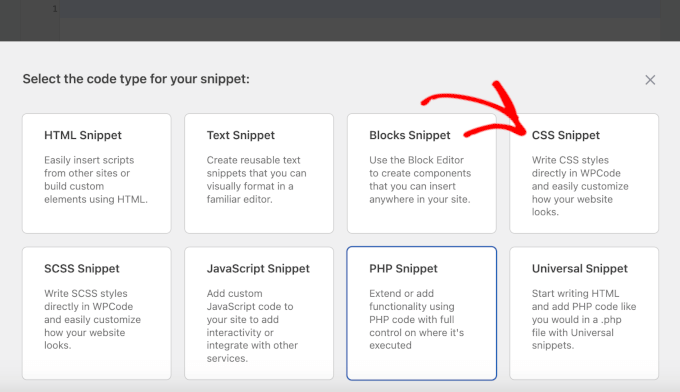
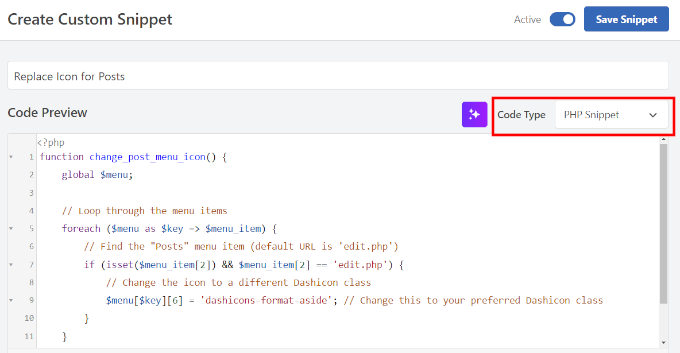
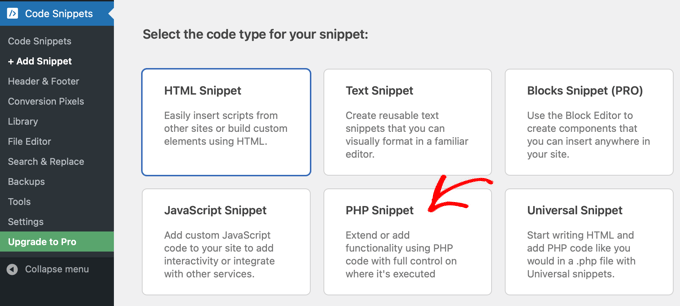
Next, select ‘PHP Snippet’ when asked in regards to the code type.
This tells wordpress what type of code we’re the usage of.
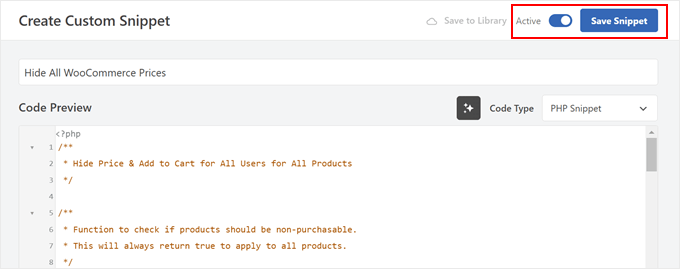
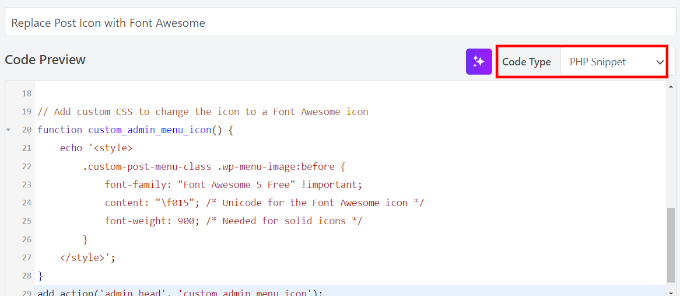
Now, it’s a should to provide your snippet a name this is serving to you remember what it does.
Since this code will remove the default WooCommerce sale badge and add every new product badges and dynamic discount badges, that you must identify it something like “Custom designed WooCommerce Badges.”
Once that’s completed, paste the code snippet we’ve equipped underneath inside the ‘Code Preview’ box.
This code does something in point of fact cool. It automatically calculates discount percentages and shows them on the product sales badge. Plus, it supplies a “New” badge to products added inside the ultimate 7 days.
// Remove default WooCommerce sale flash badge
remove_action( 'woocommerce_before_shop_loop_item_title', 'woocommerce_show_product_loop_sale_flash', 10 );
remove_action( 'woocommerce_after_shop_loop_item_title', 'woocommerce_show_product_loop_sale_flash', 10 );
remove_action( 'woocommerce_before_single_product_summary', 'woocommerce_show_product_sale_flash', 10 );

// Add custom designed badges to products
add_action( 'woocommerce_before_shop_loop_item_title', 'add_custom_product_badges', 10 );
function add_custom_product_badges() {
    international $product;

    // Initialize a variable to track whether or not or now not a badge has been displayed
    $badge_displayed = false;

    // For products with any amount of discount share (1% or further)
    if ( $product->is_on_sale() ) {
        // Get not unusual and sale prices
        $regular_price = floatval( $product->get_regular_price() );
        $sale_price    = floatval( $product->get_sale_price() );

        // Care for variable products
        if ( $product->is_type('variable') ) {
            // Get variation prices
            $regular_price = floatval( $product->get_variation_regular_price( 'max', true ) );
            $sale_price    = floatval( $product->get_variation_sale_price( 'min', true ) );
        }

        // Calculate discount share if not unusual value is professional
        if ( $regular_price > 0 ) {
            $discount_percentage = ( ( $regular_price - $sale_price ) / $regular_price ) * 100;

            // Display badge if discount is 1% or further
            if ( $discount_percentage >= 1 ) {
                echo '' . round( $discount_percentage ) . '% off!';
                $badge_displayed = true; // Badge has been displayed
            }
        }
    }

    // Only show the "New" badge if no other badge has been displayed
    if ( ! $badge_displayed ) {
        // For "New" products added inside the ultimate 7 days
        $post_date  = get_the_time( 'Y-m-d', $product->get_id() );
        $post_stamp = strtotime( $post_date );
        $newness    = 7; // Collection of days the product is considered new

        // Check out if the product is new
        if ( ( time() - ( 60 * 60 * 24 * $newness ) ) < $post_stamp ) {
            echo 'New';
            $badge_displayed = true;
        }
    }
}
Wish to alter how long a product is considered “new”? Merely seek for the street where it says $newness = 7 inside the code. You’ll alternate that amount 7 to alternatively many days you wish to have, like 14 for two weeks or 30 for a month.
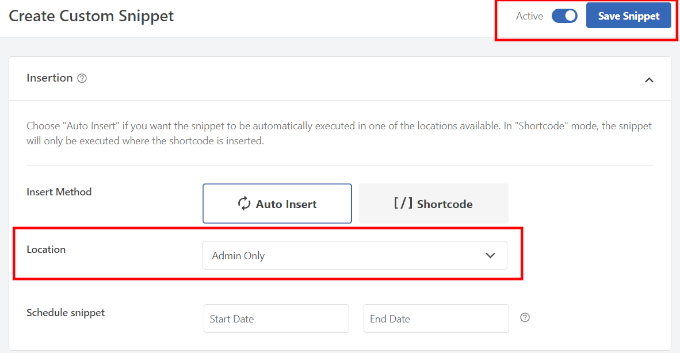
To finish up, click on at the ‘Inactive’ button until it changes to ‘Lively,’ then hit ‘Save Snippet.’
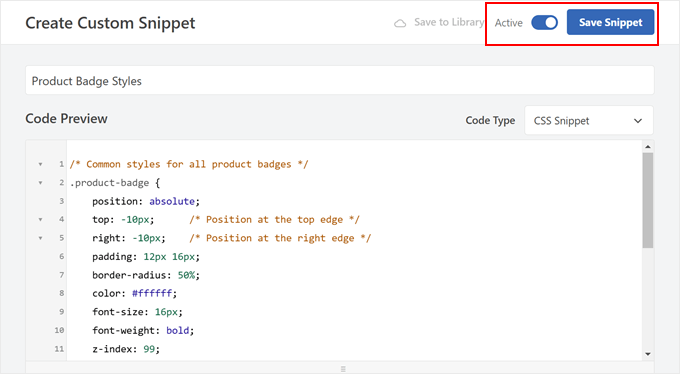
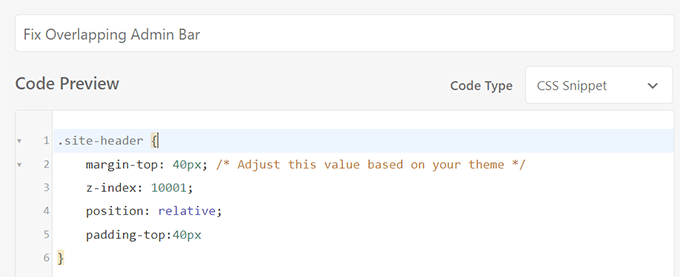
Next, we want to style our badges to make them look great to your products. Let’s add some CSS to control their glance.
To be able to upload a brand spanking new snippet, apply the identical steps as quicker than, on the other hand this time, select ‘CSS Snippet’ when asked.
Identify your snippet something descriptive, like “Product Badge Sorts.” This may occasionally most likely will will let you to search out it merely if you wish to make changes later.
Proper right here’s the CSS code that may make your badges look professional. Merely paste this into the ‘Code Preview’ box:
/* Not unusual types for all product badges */
.product-badge {
    position: absolute;
    best: -10px;      /* Position at the best edge */
    right kind: -10px;    /* Position on the correct edge */
    padding: 12px 16px;
    border-radius: 50%;
    color: #ffffff;
    font-size: 16px;
    font-weight: bold;
    z-index: 99;
    box-shadow: 0 2px 5px rgba(0, 0, 0, 0.3);
}

/* Sorts for the "New" badge */
.new-product {
    background-color: #4CAF50; /* Green background */
}

/* Sorts for the "Sale" badge */
.sale-product {
    background-color: #FF0000; /* Crimson background */
}
Let’s smash down what you’ll have the ability to customize in this code.
Want your badges in a definite spot? To try this, you’ll have the ability to alternate the best and right kind values. For example, changing best: -10px to best: 10px will switch the badge down.
Don’t like the colors? It’s super easy to switch them. Merely to search out the background-color lines and alter the color codes.
For instance, if you wish to have a blue sale badge instead of a purple one, alternate #FF0000 to #0000FF. You’ll moreover make the badges higher or smaller by the use of adjusting the font-size value.
Wish to be informed further about tweaking the ones types? Check out our beginner-friendly knowledge on CSS in wordpress.
Every time you’re completed, merely click on at the ‘Inactive’ button to make it ‘Lively,’ then hit ‘Save Snippet.’
That’s it!
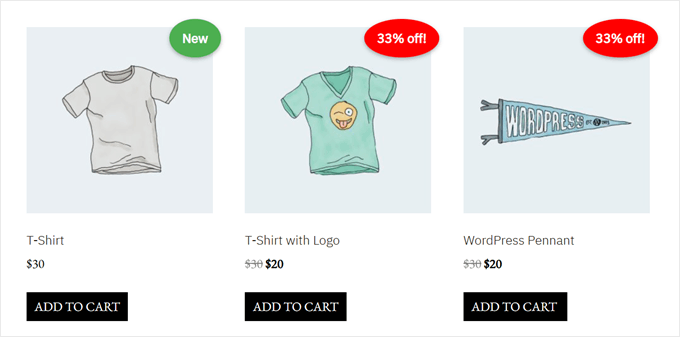
Your badges must now appear to your product photos. Proper right here’s an example of what ours turns out like the usage of our CSS code:
Discover Further WooCommerce Guidelines and Guidelines
Now that you know how to turn product badges in WooCommerce, that you must wish to uncover other ways to reinforce your online store. Listed below are some helpful guides we recommend:
Spice up gross sales with good upselling – Learn to strategically market it identical products and building up your affordable order value through environment friendly upsell tactics.
Praise buyer critiques with coupons – Discover how you can automatically send discount coupons to shoppers who move away product evaluations, encouraging further feedback and repeat purchases.
Show good product suggestions – Find out how to show product concepts to skyrocket your WooCommerce product sales.
Upload complicated product filtering choices – Learn to have the same opinion shoppers to search out exactly what they’re looking for with customizable product filters that make purchasing groceries easier and quicker.
Create a buyer wishlist characteristic – See how together with a wishlist function can boost engagement and offers shoppers a the reason why to return to your store while providing valuable insights into purchaser preferences.
Cover costs in WooCommerce – Learn to hide pricing for wholesale shoppers, online catalogs, and luxury pieces and ask shoppers to the touch you or log in instead.
We hope this text has helped you learn how to add product badges in WooCommerce. You might also want to take a look at our a professional possible choices of the absolute best WooCommerce product grid plugins and our knowledge on how one can accelerate WooCommerce efficiency.
Whilst you preferred this text, then please subscribe to our YouTube Channel for wordpress video tutorials. You’ll moreover to search out us on Twitter and Fb.
The publish Upload Product Badges in WooCommerce (Fast and Simple) first appeared on WPBeginner.
By means of default, WooCommerce shows your product prices to everyone who visits your store. While this works for lots of online retail outlets, some firms need additional regulate over who sees their pricing.
While helping online store house owners, we’ve come all over a few different cases where hiding prices in WooCommerce is essential.
For instance, wholesale suppliers want to show specific pricing only to verified business customers. Alternatively, B2B companies would perhaps make a selection to speak about client needs up to now to make sure they can offer the fitting solution for the fitting cost.
After testing moderately numerous solutions, we’ve found out 3 loyal simple find out how to duvet prices in WooCommerce. The ones methods will artwork for any type of business, from wholesale suppliers to sumptuous companies.
What to Imagine Forward of Hiding Product Prices
We’ve spotted a few different eventualities where selling on WooCommerce without prices makes sense.
For instance, many wholesale providers duvet prices to stop retail customers from seeing bulk discounts. Additionally, custom designed furniture makers continuously remove prices on account of each and every piece has unique costs consistent with materials and design.
We moreover know that some sumptuous producers want to create distinctive, members-only buying groceries reviews by the use of showing prices only to serious customers.
Unfortunately, WooCommerce doesn’t come with a built-in way to duvet prices. Alternatively after testing moderately numerous solutions, we’ve found out 3 loyal methods that artwork smartly.
You’ll be capable of use the fast links underneath to skip on your most well liked way of hiding prices on WooCommerce:
Are you ready? Let’s dive in!
Method 1: Quilt All/Specific Product Prices and Cart Buttons With Code
In this way, we can show you learn how to hide the product prices and cart buttons for each all the products on your store or just particular items. This system turns out to be useful if you want to have customers to the touch you immediately for prices or log in to their accounts to look those prices.
While testing out different alternatives, we found out that many plugins for hiding prices are each slightly dear or too sophisticated to use. That’s why we’ve come up with a simple code solution that can get the duty achieved in brief.
Everyone knows that ‘code solution’ would perhaps sound intimidating, alternatively don’t worry. It is a beginner-friendly approach.
We’ll use WPCode, which is a plugin that makes together with code on your website so simple as copying and pasting. We’ve used this plugin on many web pages and have found out it protected and loyal.
The loose model works utterly for hiding prices. On the other hand, if you want to have further choices similar to the AI code generator to create custom designed solutions, chances are high that you’ll want to take a look on the Professional model.
We’ve tested each and every diversifications broadly in our WPCode evaluate.
First, you’ll want to arrange and switch at the free WPCode plugin. If you want to have have the same opinion, check out our data on find out how to set up a wordpress plugin.
Next, you’ll practice one of the tutorials underneath.
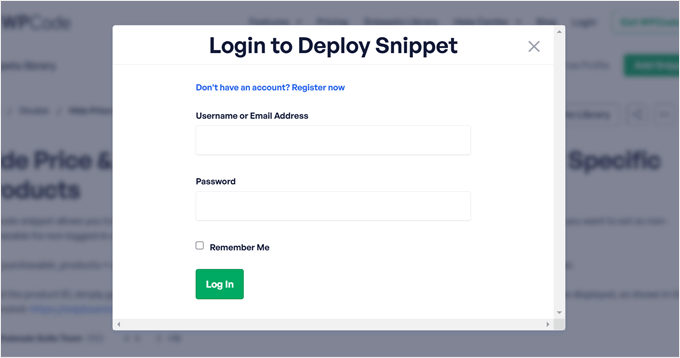
Risk 1: Quilt Price & Cart Buttons for Specific Products (Logged-Out Shoppers)
One of the most most simple tactics to hide prices is using WPCode’s ready-made snippet. This code will duvet prices and cart buttons from particular products when shoppers aren’t logged in.
If you happen to’re already familiar with WPCode, you’ll simply find it in WPCode’s snippet library.
Otherwise, if this is your first time using the plugin, merely click on at the link underneath:
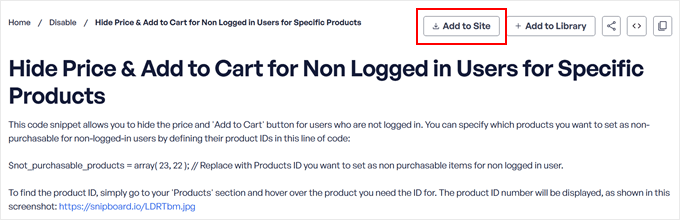
Cover Value & Upload to Cart for Non Logged in Customers for Explicit Merchandise
Then, click on at the ‘Add to Site’ button to get started.
At this degree, you’ll want to each create a free WPCode account or log in if you already have one.
All through registration, you’re going to be asked to attach your wordpress internet web page with the WPCode library.
After logging in, you’ll choose which internet web page you need so that you could upload the snippet to.
Then, click on on ‘Deploy.’
<img decoding=”async” loading=”lazy” width=”680″ height=”380″ src=”https://wpmountain.com/wp-content/uploads/2025/02/wpcode-deploy-min.png” alt=”Selecting a website to deploy the WPCode code snippet into” class=”wp-image-327372″/>
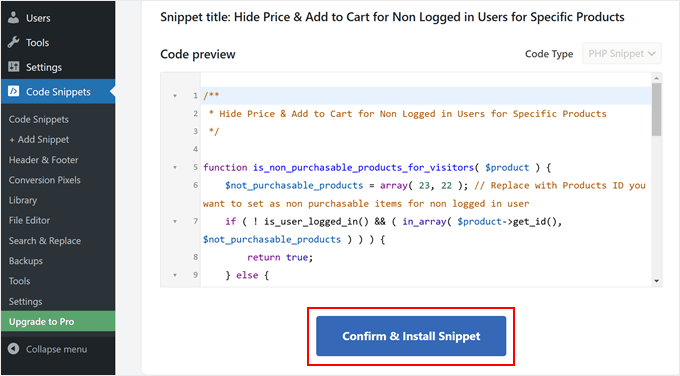
The system will take you once more on your wordpress admin space to finish the setup.
Proper right here, merely click on on ‘Confirm & Arrange Snippet.’
This brings you to the code snippet editor, where you’ll make two simple changes to customize the code to your needs.
First, you’ll want to business the product IDs. Seek for this line of code:
$not_purchasable_products = array( 23, 22 );
Exchange those numbers with your individual product IDs.
If you happen to’re no longer certain what they’re, you then’ll be told our article on find out how to in finding product IDs in WooCommerce.
For instance, if you want to duvet prices for products 63, 64, and 65, you’d write:
$not_purchasable_products = array( 63, 64, 65 );
Next, you’ll customize the message confirmed as a substitute of the fee.
That is the code you need to look out:
function wws_hide_price_not_logged_in( $price_html, $product ) {
    if ( is_non_purchasable_products_for_visitors( $product ) ) {
        $price_html="';
    }
    return $price_html;
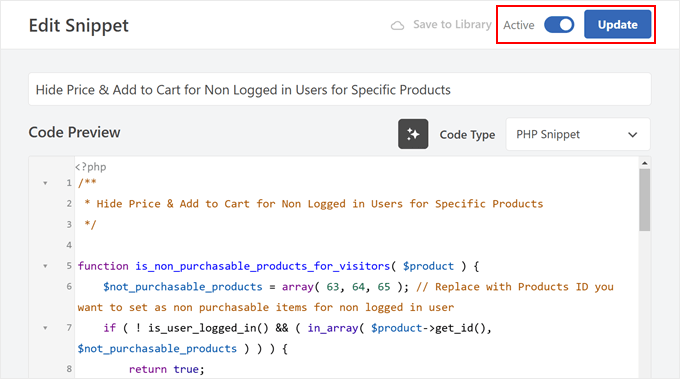
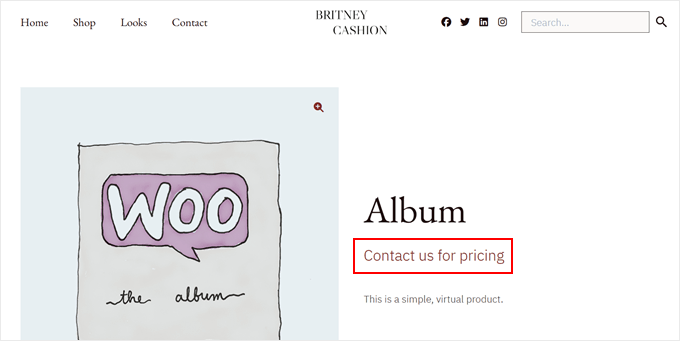
You’ll be capable of business this text: ‘Login with wholesale account to look prices’ to regardless of you’d like, comparable to ‘Login to look prices’ or ‘Contact us for pricing.’
Proper right here’s an example:
function wws_hide_price_not_logged_in( $price_html, $product ) {
    if ( is_non_purchasable_products_for_visitors( $product ) ) {
        $price_html="';
    }
    return $price_html;
When shoppers click on in this link, it’ll ship them to the WooCommerce login web page to test in.
Finally, switch the toggle from ‘Inactive’ to ‘Full of life.’ Then, click on on ‘Change.’
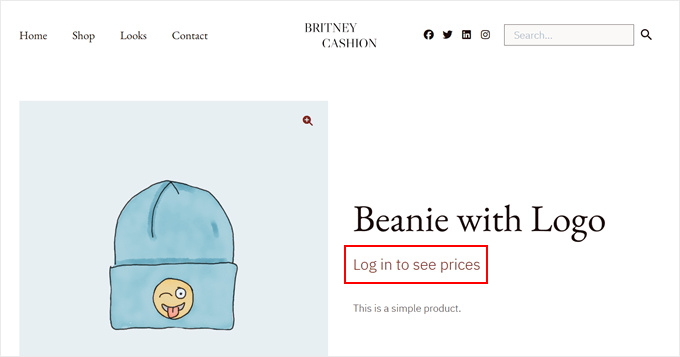
Now, merely consult with your product pages to look the changes.
You’ll perceive the prices and cart buttons are hidden and adjusted by the use of your custom designed message.
It’s that straightforward!
Risk 2: Quilt Price & Cart Buttons for All Shoppers
If you want to duvet prices and cart buttons for everyone who visits your WooCommerce store, you’ll want to add a novel code snippet. The program works whether or not or no longer shoppers are logged in or no longer.
Get began by the use of going to Code Snippets » + Add Snippet on your wordpress dashboard. Click on on on ‘Add Your Custom designed Code (New Snippet)’ and then the ‘+ Add Custom designed Snippet’ button.
After that, you’re going to see some code varieties to choose from.
Proper right here, merely choose ‘PHP Snippet.’
Next, you need to supply your code snippet a establish. It can be something simple like ‘Quilt All WooCommerce Prices.’
Then, throughout the ‘Code Preview’ section, copy the code underneath and paste it there:
/**
 * Quilt Price & Add to Cart for All Shoppers for All Products
 */

/**
 * Function to check if products must be non-purchasable.
 * This may occasionally at all times return true to make use of to all products.
 */
function is_non_purchasable_products( $product ) {
    // All the time return true to make all products non-purchasable for all shoppers
    return true;
}

/**
 * Set product as no longer purchasable
 */
function wws_set_not_purchasable( $is_purchasable, $product ) {
    if ( is_non_purchasable_products( $product ) ) {
        // Set product as no longer purchasable
        $is_purchasable = false;
    }
    return $is_purchasable;
}

/**
 * Exchange cost with 'Contact us for pricing' message linking to touch internet web page
 */
function wws_hide_price( $price_html, $product ) {
    if ( is_non_purchasable_products( $product ) ) {
        // Get the URL for the contact internet web page by the use of slug
        $contact_page = get_page_by_path( 'contact' );
        if ( $contact_page ) {
            $contact_url = get_permalink( $contact_page );
        } else {
            // Default to "https://wpmountain.com/contact" if the internet web page is not found out
            $contact_url = site_url( "https://wpmountain.com/contact" );
        }

        // Set the fee HTML to touch message
        $price_html="';
    }
    return $price_html;
}

/**
 * Quilt the 'Add to Cart' button
 */
function wws_hide_addcart( $add_to_cart, $product, $args ) {
    if ( is_non_purchasable_products( $product ) ) {
        // Remove the 'Add to Cart' button
        $add_to_cart="";
    }
    return $add_to_cart;
}

// Add filters to make use of the above functions
add_filter( 'woocommerce_is_purchasable', 'wws_set_not_purchasable', 10, 2 );
add_filter( 'woocommerce_get_price_html', 'wws_hide_price', 10, 2 );
add_filter( 'woocommerce_loop_add_to_cart_link', 'wws_hide_addcart', 10, 3 );
This code will remove all prices and cart buttons from your store and alter them with a ‘Contact us for pricing’ link that takes visitors on your touch web page.
After pasting the code, switch the toggle from ‘Inactive’ to ‘Full of life’ and click on on ‘Save Snippet.’
And that’s it!
You’ll be capable of now consult with your store to look that all prices and cart buttons have been modified with a link on your contact internet web page.
For extra details, see our novice’s data on find out how to simply upload customized code in wordpress.
Method 2: Quilt Product Prices from Non-Wholesale Shoppers
The program could be very highest for firms that want to duvet prices from secure visitors while showing specific wholesale pricing to authorized customers.
This system works specifically smartly for manufacturers, distributors, and B2B firms that want to maintain distinctive pricing for their wholesale customers.
It’s moreover great in case you’re no longer willing at the code solution from earlier, as we’ll be using plugins from the user-friendly Wholesale Suite.
Forward of we dive in, we suggest finding out our detailed Wholesale Suite evaluate to snatch all the choices this plugin suite offers.
Step 1: Arrange the Vital Wholesale Suite Plugins
For this method to artwork effectively, you’ll want to arrange the free Wholesale Suite plugin. It handles the basic wholesale store choices, along with putting in wholesale pricing buildings to your products.
You’ll moreover want to get the highest charge Wholesale Suite extension, specifically Wholesale Prices and Wholesale Lead Snatch.
The main extension is essential for hiding prices from secure customers while showing them on your wholesale customers. There’s no approach spherical this one, as it’s the core plugin that makes cost hiding possible.
The second creates a certified registration system where possible wholesale customers can apply for an account. Within the match you select, you’ll moreover use WPForms to create your registration paperwork.
After putting in those wordpress plugins, pass to Wholesale » License on your dashboard.
Proper right here, enter the license keys and email correspondence handle comparable along with your most sensible charge plugin purchases. You’ll find the ones details throughout the confirmation email correspondence you won when buying the plugins.
If you happen to’ve purchased a couple of Wholesale Suite plugins, you then’ll use the tabs on the most productive to get right to use the license key settings for each and every one.
In the event you’ve entered the license wisdom for each and every instrument, remember to hit ‘Save Changes.’ When you’re achieved, you’ll continue to the next step.
Step 2: Set Up a Take a look at Wholesale Purchaser Account
Wholesale Suite creates a definite ‘Wholesale Purchaser’ consumer position that allows you to organize pricing for all of your wholesale customers in one place. When the ones customers log in, they’ll mechanically see their specific wholesale prices.
To make sure your cost hiding works accurately, you’ll desire a check out Wholesale Purchaser account. That is serving to you check out how your WooCommerce store seems to be like from each and every a wholesale purchaser’s view and a normal buyer’s point of view.
Creating a wholesale account is understated. First, merely pass to Shoppers » Add New on your wordpress dashboard.
<img decoding=”async” loading=”lazy” width=”680″ height=”384″ src=”https://wpmountain.com/wp-content/uploads/2022/10/wordpress-new-users.png” alt=”Adding a new user in wordpress” class=”wp-image-145006″ title=”Adding a new user in wordpress“/>
Now, fill throughout the elementary wisdom like email correspondence handle and username, then make a choice ‘Wholesale Purchaser’ from the ‘Serve as’ dropdown menu.
Finally, click on on ‘Add New Individual’ to create the account.
You may also want to prevent wholesale customers from making regular-priced purchases once they don’t meet wholesale necessities. By means of default, the plugin shows a warning, alternatively customers can however acquire at retail prices.
To modify this, head to Wholesale » Roles and find the ‘Wholesale Purchaser’ place. Click on on on the ‘Edit’ button underneath the placement to customize it.
Then, check out the sector for ‘Prevent gain if wholesale scenario isn’t met.’
After that, merely click on on ‘Edit Wholesale Serve as’ to save some your changes.
Step 3: Quilt Prices and Cart Buttons
Next, you’ll want to duvet the prices and cart web page buttons from secure online store visitors.
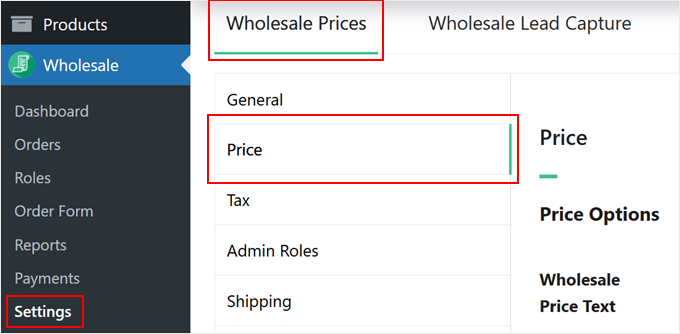
To check out this, you’ll pass to Wholesale »Settings. You’ll need to’re throughout the ‘Wholesale Prices’ section, and navigate to the ‘Price’ tab.
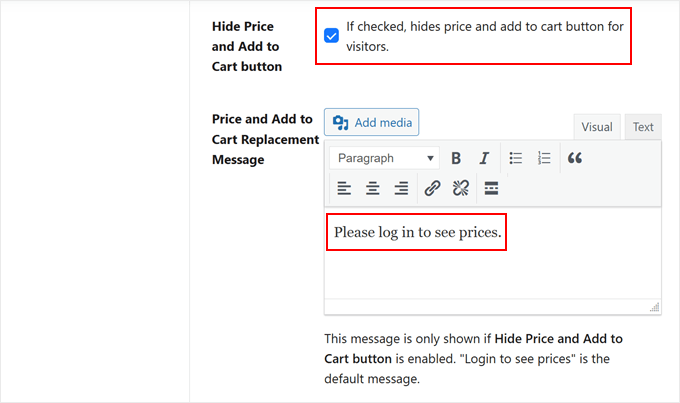
Then, scroll proper right down to the ‘Quilt Price and Add to Cart button’ atmosphere and try the sector right kind next to it.
Beneath that, you’ll add some custom designed text to change the fee and cart buttons. If you happen to cross away this empty, the default ‘Login to look prices’ message will appear as a substitute.
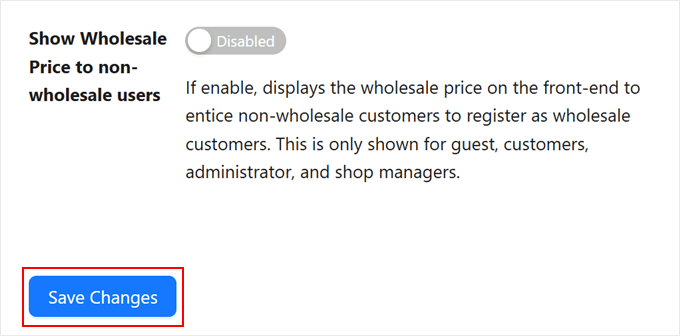
Now, scroll down and make sure the ‘Show Wholesale Price to non-wholesale shoppers’ atmosphere is disabled.
Finally, click on on on the ‘Save Changes’ button.
Step 4: Add and Quilt Wholesale Prices to WooCommerce Products
You’re now ready to begin out together with wholesale prices to specific particular person products. You’ll be capable of pass ahead and open a brand spanking new or provide product for reinforcing.
If this is your first time together with a product, then chances are high that you’ll want to be told our WooCommerce made easy information for more information.
Someday, whilst you’re rising a brand spanking new product or bettering an provide one, you’ll want to pass to the ‘Product Knowledge’ section.
Proper right here, set your ‘Commonplace Price.’ That’s what secure customers see. Then, find the ‘Wholesale Prices’ section and choose your discount sort from the dropdown menu. You’ll be capable of offer each a percentage discount or a suite cost.
For percentage discounts, simply make a choice the ‘Share’ discount sort and enter your discount amount.
Wholesale Suite will mechanically calculate the total cost.
If you choose ‘Fixed’ for the cut price sort, you then’ll merely enter the fitting wholesale cost you need to charge.
Wish to run limited-time wholesale offers? This is great for working seasonal promotions and changing extra WooCommerce guests into consumers.
To check out this, you’ll click on on on the ‘Time table’ link.
After that, you’ll enter the start date and end date of your wholesale sale pricing promotion.
This way, you gained’t should manually permit and disable the cut price. It principally works similarly to scheduling WooCommerce coupon codes.
In spite of everything, this atmosphere isn’t mandatory. If you happen to’re no longer ready to use it now, it may be very good to remember for the long run.
Next, set your minimal order necessities throughout the ‘Wholesale Minimum Order Quantity’ section.
This defines what selection of items a wholesale purchaser must acquire to get right to use specific pricing.
Next, scroll proper right down to the ‘Wholesale Order Quantity Step’ section.
Enter ‘1’ into the suitable field.
This may occasionally make it so that the minimum order quantity you set above is carried out to each and every products.
That approach other folks can’t try to misuse wholesale privileges. For more information on this atmosphere, see the Wholesale Suite documentation on minimal order necessities.
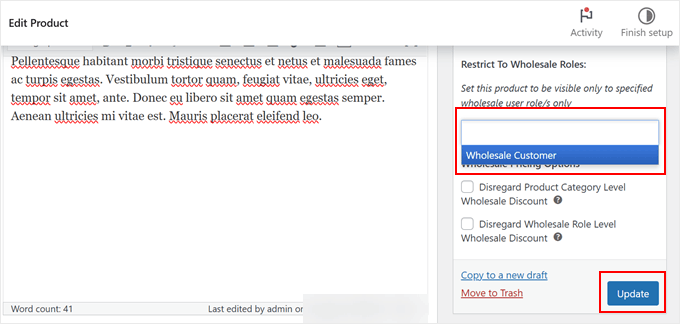
Finally, you’ll make your product visible only to wholesale customers by the use of using the ‘Restrict To Wholesale Roles’ atmosphere on the most productive of the internet web page. Type and make a choice ‘Wholesale Purchaser’ in this field.
At this degree, you’ll continue finalizing your product settings. For instance, you’ll add a product symbol gallery, embed a product video, or insert product tags.
When you’re ready, merely click on on ‘Change’ or ‘Publish’ to save some your changes. You’ll be capable of then repeat the an identical steps for your entire wholesale products.
Step 5: Configure Your Wholesale Registration Paperwork
The Wholesale Suite extension mechanically creates registration and login pages to your wholesale customers. Forward of you get began accepting applications, despite the fact that, let’s customize the registration form to check your needs.
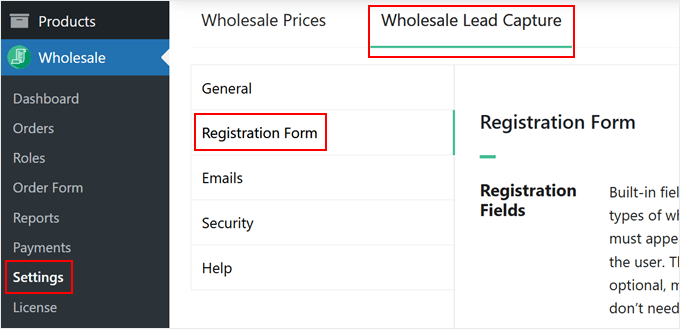
Head to Wholesale » Settings, then click on at the ‘Wholesale Lead Snatch’ tab and open the ‘Registration Form’ menu.
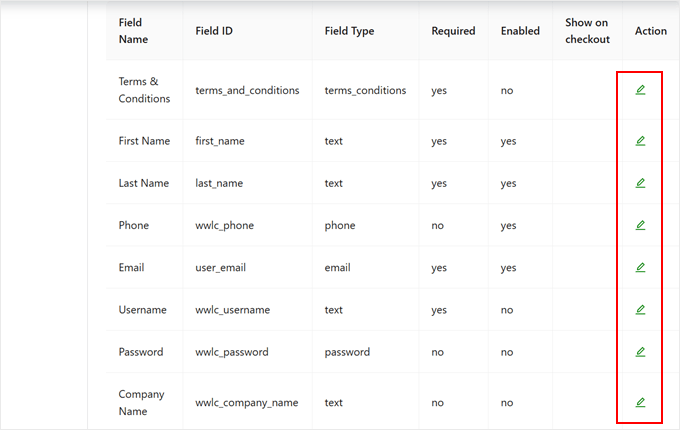
Proper right here, you’ll scroll proper right down to find a table showing all the available form fields.
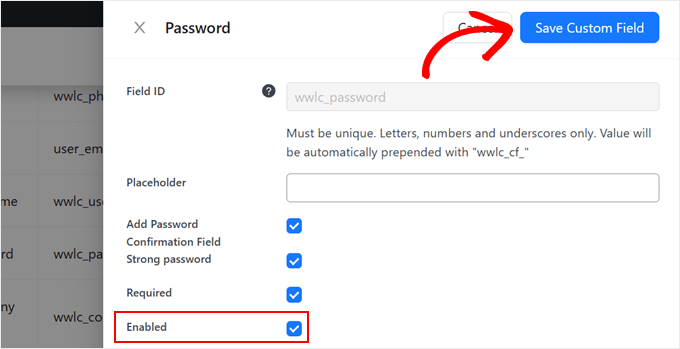
While elementary fields like First Establish, Final Establish, Piece of email, and Username are included by the use of default, some would perhaps want to be activated. To permit a field, click on at the pencil ‘Edit’ icon throughout the ‘Movement’ column.
All you need to do now’s check out the ‘Enabled’ box to make it visible and mark the sector as ‘Required’ if you want to make it important.
Remember to click on on ‘Save Custom designed Field’ each time you’re achieved.
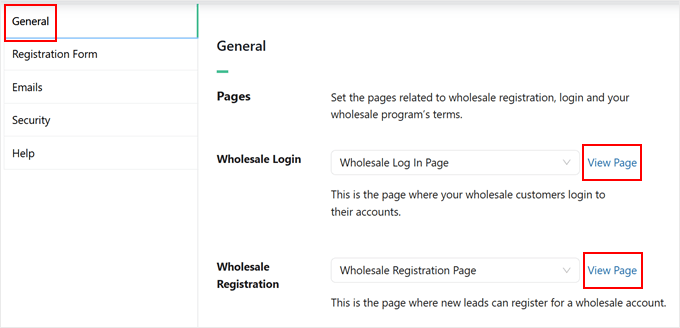
Now, switch to the ‘Commonplace’ tab to look out your new Wholesale Log In and Registration pages.
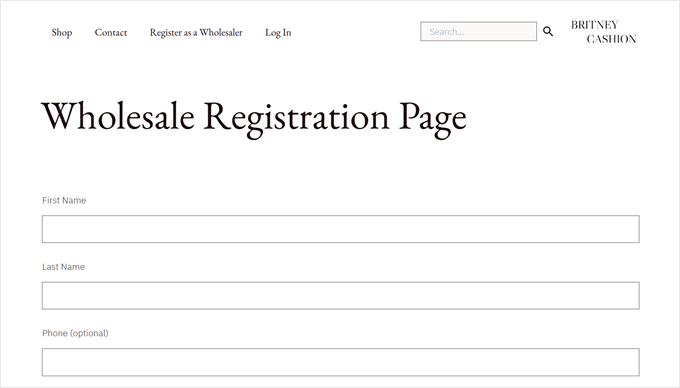
Transfer ahead and click on on ‘View Internet web page’ to preview them.
Once you have opened them, you’ll add the links to these pages on your navigation menu. This way, shoppers can merely find them once they’re browsing on your on-line retailer.
You’ll be capable of learn to do this in our data on find out how to upload a navigation menu in wordpress.
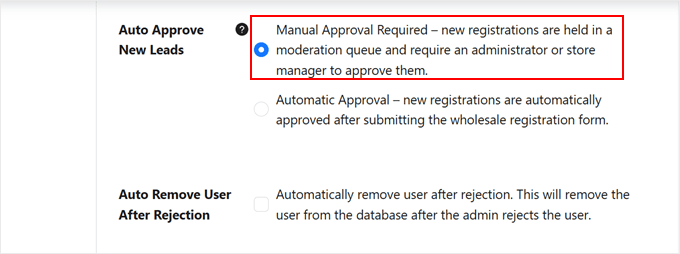
One important solution is the best way you’ll maintain new applications.
Underneath ‘Auto Approve New Leads,’ choose between ‘Information Approval Required’ or ‘Auto Approval.’
We strongly recommend guide approval to protect your wholesale pricing and test respected firms.
In the event you’re happy with the registration form settings, you’ll scroll once more up.
Finally, click on on on the ‘Save Changes’ button.
Step 6: Create a Wholesale Order Form
The total step is to create a wholesale order form, which streamlines the ordering process to your wholesale customers. This manner lets them merely place bulk orders without navigating via a couple of product pages, saving time for each and every you and your customers.
When putting in wholesale order paperwork, we’ve found out that businesses get the most efficient results by the use of along with the most important fields like product SKUs and most popular supply dates.
This way, wholesale customers can in brief place bulk orders while providing all the wisdom you need to process their requests effectively.
For detailed instructions on rising an optimized wholesale order form, check out our whole data on find out how to create a wholesale order shape in wordpress.
And that’s it! Let’s take a look at how this works in observe. Proper right here’s how our store turns out to secure visitors:
We moreover tried logging in as a wholesale purchaser to look if the fee was visible this time.
Check out the result underneath.
You’ll be capable of moreover be told our data on find out how to transfer between consumer accounts in wordpress if you want to have have the same opinion signing in and out of your accounts.
Method 3: Create a Professional Online Catalog Without Prices
The program transforms your WooCommerce store into a certified product catalog. It’s perfect for firms that make a selection coping with pricing discussions by way of email correspondence, a slightly form, or offline.
The YITH WooCommerce Catalog Mode plugin offers a easy method to create a price-free catalog. We’ve tested and shared learn how to make use of this plugin previous than in our tutorial on find out how to upload a product catalog in WooCommerce.
No longer just like the wholesale way, this system signifies that you’ll be able to remove prices completely while converting them with custom designed contact buttons. You’ll be capable of duvet pricing for your entire store, particular product categories, or specific particular person items.
This adaptability makes it highest for custom designed manufacturers, sumptuous retail outlets, or supplier providers who want to quote prices consistent with client prerequisites.
For this data, we’ll focus on the the most important settings to permit catalog mode and hide prices using YITH’s plugin. In step with our testing, we found out that the ones elementary choices are enough to get most shops started with hidden prices.
That discussed, understand that we’re only scratching the out of doors of what this plugin can do. We’ve explored many additional advanced choices in our detailed YITH WooCommerce Catalog Mode evaluate.
Moreover, you’ll want to gain the top rate model of the plugin. The free style works smartly, alternatively the price-hiding serve as is simply available throughout the paid style.
Step 1: Arrange and Activate YITH WooCommerce Catalog Mode
After you purchase the plugin, pass to the YITH internet web page and log into your YITH account. Then, head over to the ‘Licenses & Downloads’ tab.
Next, click on on on the ‘Download Plugin’ button to acquire the plugin record from your YITH account. Make sure to keep your browser tab open, as you’ll need the license key in a 2d.
When the setup wizard turns out, you’ll want to enter your YITH email correspondence handle and license key.
Once you have into your details, click on on ‘Activate license’ to complete the setup process.
Once that’s achieved, click on on ‘Transfer to plugin dashboard’ to begin out customizing your catalog mode settings.
Let’s now continue to the next step.
Step 2: Configure Fundamental Catalog Mode Settings
Catalog mode transforms your store from a purchasing groceries website proper right into a product blow their own horns. This is perfect for firms that want to display products without fast purchasing alternatives.
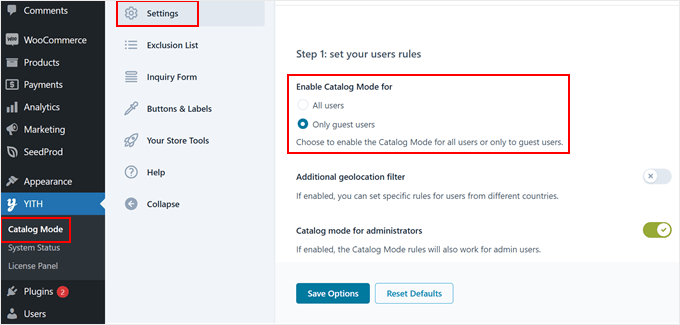
To start out, pass to YITH » Catalog Mode and navigate to the ‘Settings’ tab. That’s the position you’ll configure the decisions to run WooCommerce without prices.
First, you’ll choose whether or not or to not permit catalog mode for all shoppers or just customer shoppers.
You’ll be capable of moreover permit catalog mode for purchasers with the Administrator client place to test how the mode seems to be like.
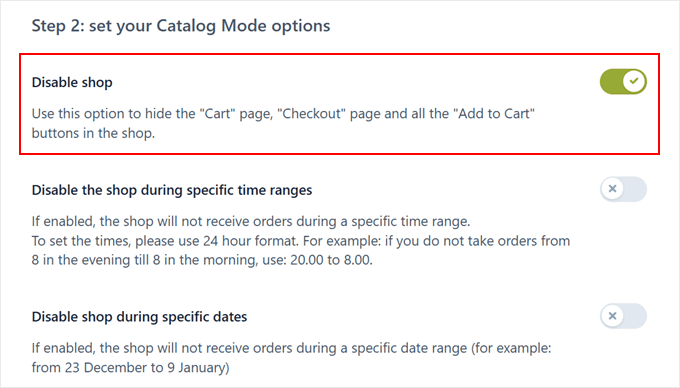
As you scroll down, you’ll flip at the ‘Disable retailer’ function if you want to remove the cart internet web page, checkout web page, and all add-to-cart buttons from your store.
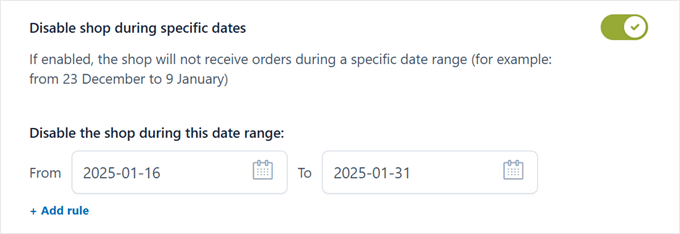
If you happen to disable the shop function, you’ll get additional alternatives to set particular time ranges or days.
This is specifically helpful in case you only want to duvet prices on days or vacation seasons when your online store doesn’t accept orders.
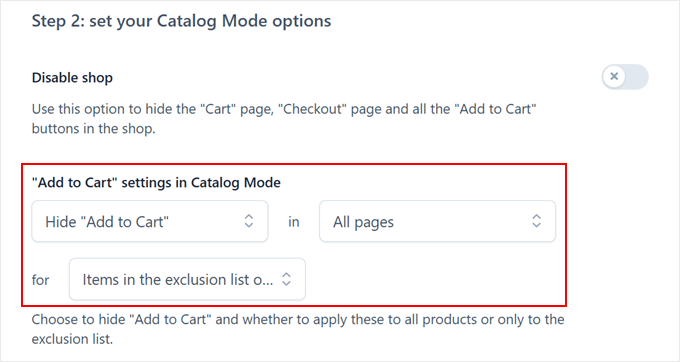
For added targeted regulate, you’ll merely skip the ‘Disable retailer’ menu and pay attention to the settings beneath ‘”Add to Cart” settings throughout the Catalog Mode’ section.
Proper right here, you’ll use dropdown menus to select exactly the position to hide or show add-to-cart buttons. For instance, you’ll duvet or show them for items on your exclusion tick list, which is a serve as that allows you to group of workers particular products, classes, or tags together.
This makes it easy to hide buttons for merely those made up our minds on items as a substitute of your entire store. We’ll be in contact additional about rising exclusion lists in a later segment.
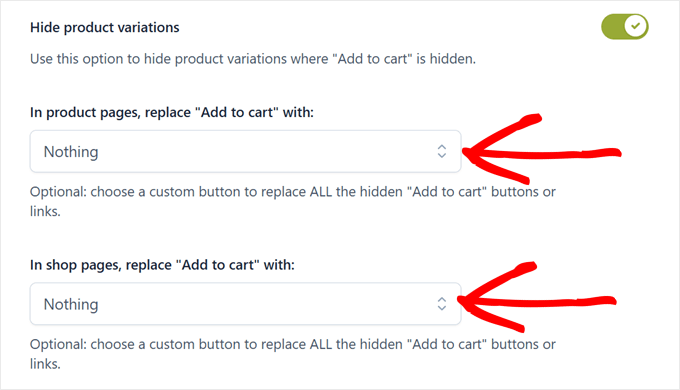
Moving down, you’ll choose to hide the ‘Add to cart’ button in product variations. This assists in keeping your catalog mode consistent all over all product varieties, along with those with a couple of alternatives like size or color.
You’ll be capable of moreover make a decision what turns out as an alternative of the ‘Add to cart’ buttons on the WooCommerce pages.
We suggest deciding on ‘No longer the rest’ for the ones alternatives to stick the gap clean. We’ll add custom designed buttons in a novel section later.
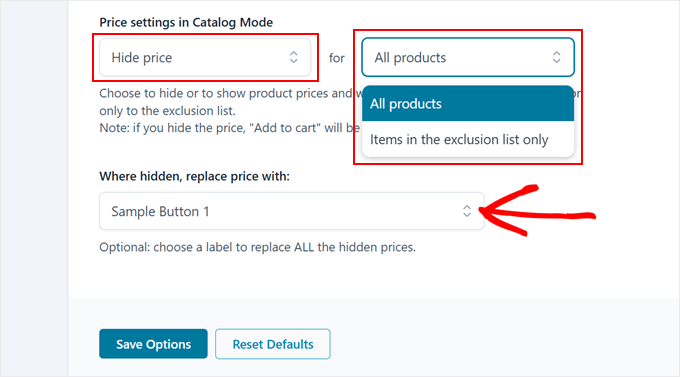
Further down, you’ll find ‘Price settings in Catalog Mode.’
You’ll be ready to choose from hiding costs for all merchandise or just those on your exclusion tick list.
When you duvet prices, you’ll trade them with custom designed buttons. The plugin accommodates quite a few pre-designed button varieties, like ‘Development Button 1,’ which we’ll customize in the next step.
Remember to click on on ‘Save Possible choices’ whilst you’re achieved making your selections.
Step 3: Create a New Button to Exchange the Cart Button
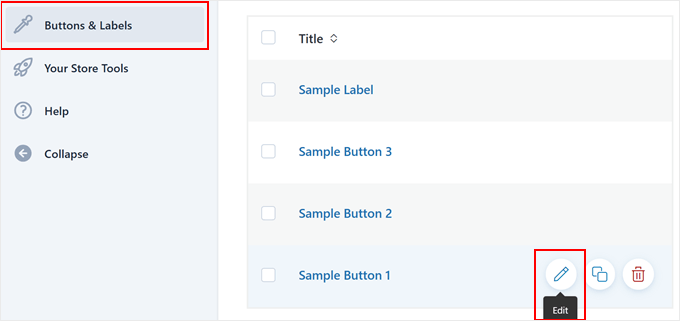
Now, it’s time to customize the button that may trade your cart buttons and prices. Head over to the ‘Buttons & Labels’ tab to get started.
Make a choice one of the pre-designed buttons provided by the use of YITH, then click on at the pencil ‘Edit’ icon to customize it.
First, give your button a easy establish so that you’ll merely find it later.
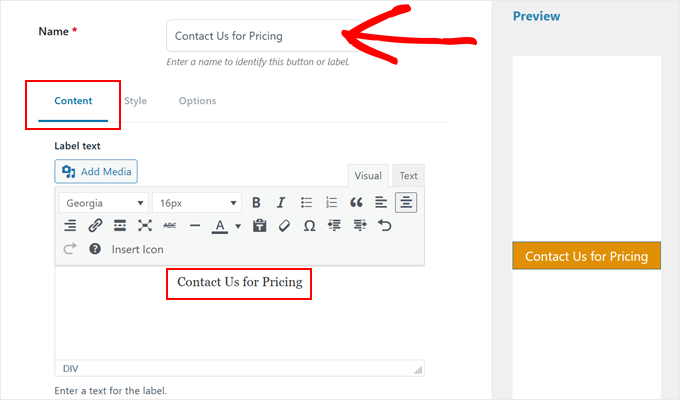
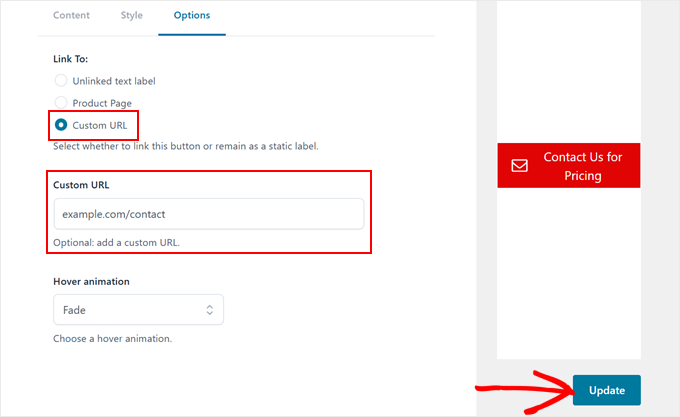
Inside the ‘Content material subject matter’ tab, you’ll business the button text to at least one factor that fits your needs. Commonplace imaginable alternatives include “Request a Quote,” “Contact Us for Pricing,” or “Get Custom designed Price.”
Together with an icon may just make your button additional sexy. To check out this, you’ll make a choice ‘Choose between default icons’ throughout the Icon section.
You’ll be capable of browse all over the available alternatives to look out one that matches your message.
You’ll be capable of moreover fine-tune your icon by the use of adjusting its size, alignment, and colors.
Merely watch your changes appear throughout the live preview at the correct aspect of the internet web page.
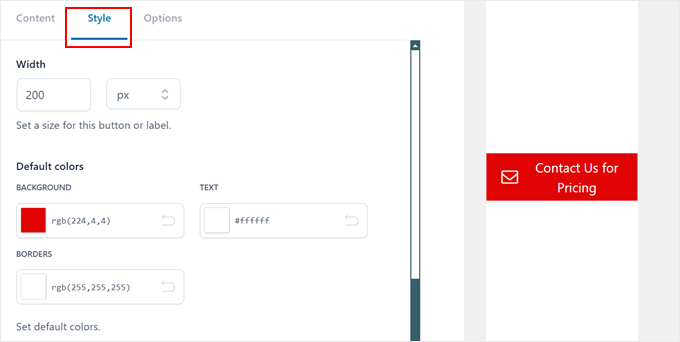
Now, switch to the ‘Style’ tab to customize your button’s glance.
That’s the position you’ll regulate the background colors, width, borders, padding, and margins to check your internet web page’s design.
Finally, throughout the ‘Possible choices’ tab, organize the link to your button. We suggest using the ‘Custom designed URL’ way to direct visitors on your contact or login internet web page.
You’ll be capable of moreover add a hover animation to make your button additional interactive and crowd pleasing.
Once achieved, merely click on at the ‘Change’ button.
It’s that straightforward!
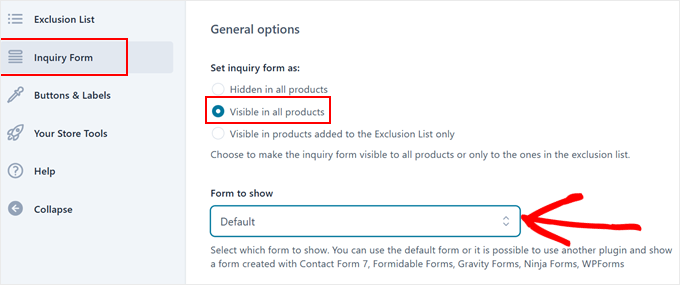
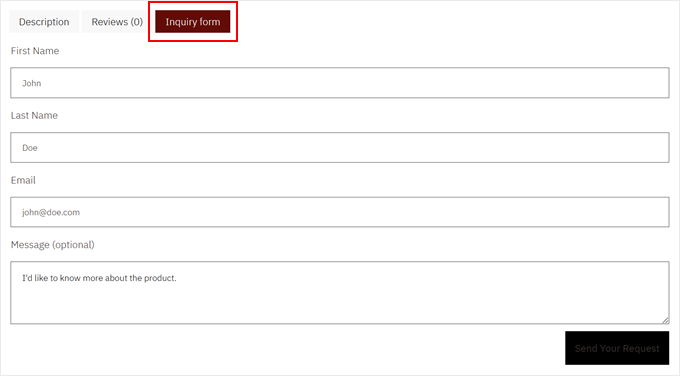
Step 4: Create a Product Inquiry Form(No longer mandatory)
Together with an inquiry form immediately on your product pages may just make it easier for customers to ask about prices. This way, they gained’t want to cross away the product internet web page to the touch you.
To set this up, navigate to the ‘Inquiry Form’ tab. Make a choice ‘Visible in all products’ beneath ‘Set inquiry form as.’ This promises the form turns out on each and every product internet web page.
For the ‘Form to show’ selection, you’ll use the ‘Default’ form that comes with the plugin.
If you happen to already use WPForms or each and every different form plugin, you’ll make a choice your provide paperwork as a substitute.
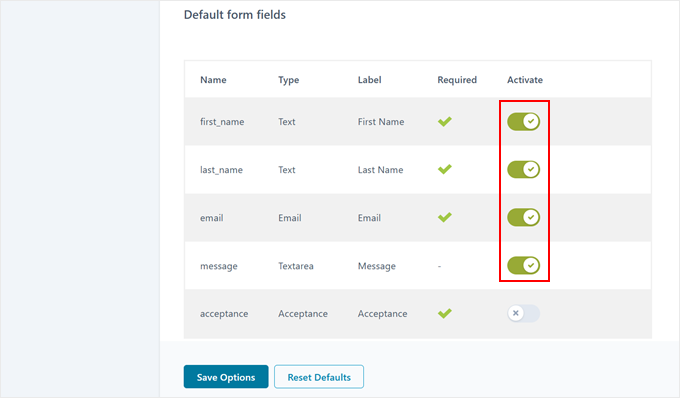
When using the ‘Default’ form, you’ll customize which fields appear.
We suggest conserving it simple with the most important fields like first establish, email correspondence, and message. From our experience, shorter paperwork in most cases get additional submissions.
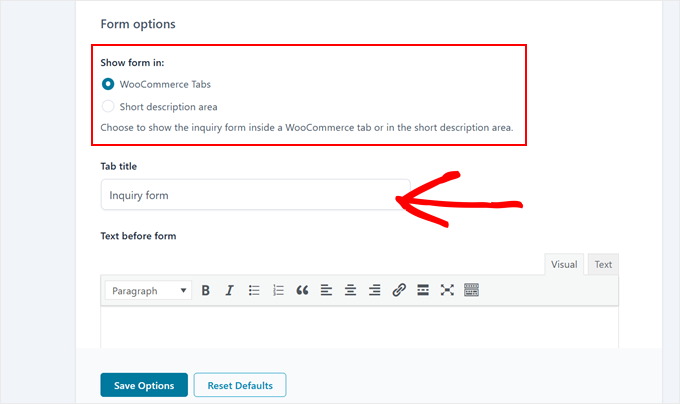
You’ve two imaginable alternatives for where the form turns out: in a WooCommerce tab underneath the product image or throughout the quick description space.
If you choose the tab selection, you’ll customize the tab’s establish to at least one factor like “Request Price” or “Product Inquiry.”
Don’t overlook to permit the ‘Include product Permalink’ atmosphere.
This gives the product’s URL to inquiry emails, making it much more clear-cut to monitor which merchandise consumers are asking about.
Need have the same opinion deciding whether or not or no longer to make a choice from a WooCommerce tab or a temporary product description?
Right here’s what the principle selection turns out like:
Within the intervening time, if you choose the product description selection, the inquiry form will appear right kind underneath the button you merely created.
Like so:
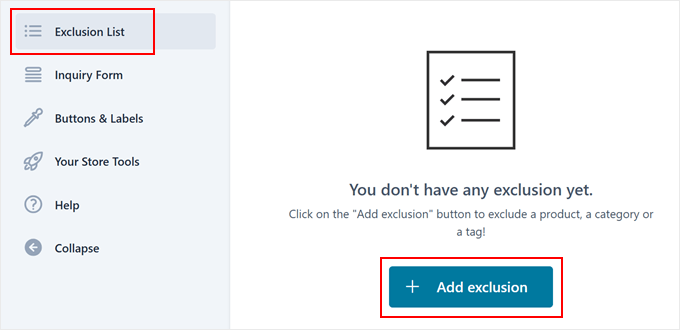
Bonus: How you can Create an Exclusion Checklist (Quilt Prices for Specific WooCommerce Products)
Now, let’s take a look at hiding prices for particular products as a substitute of your entire store. This assumes you’ve already organize your catalog mode to artwork with an exclusion tick list in Step 2.
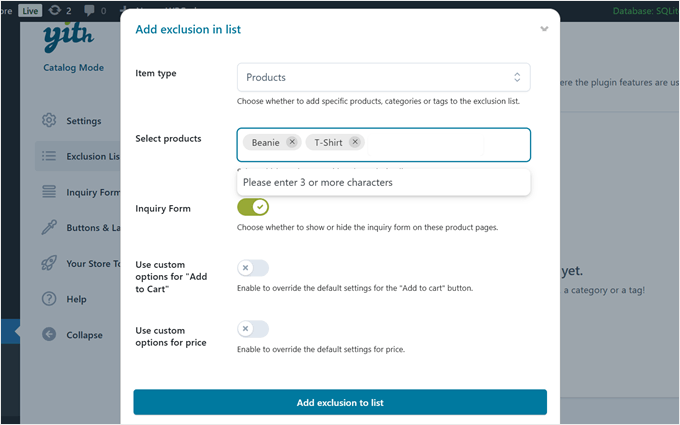
To get started, pass to the ‘Exclusion Checklist’ tab and click on on ‘+ Add exclusion tick list.’ A brand spanking new window will open where you’ll choose what sorts of items to hide prices for.
The ‘Products sort’ dropdown gives you 3 alternatives: specific particular person products, entire product categories, or product tags. This adaptability signifies that you’ll be able to duvet prices in tactics through which make sense to your small industry.
Next, get began typing product names, categories, or tags throughout the ‘Make a choice products’ field. The plugin will suggest suits as you sort. You’ll be capable of moreover choose whether or not or to not flip an inquiry form for the ones particular items.
You’ll perceive settings to ‘Use custom designed alternatives for “Add to Cart”‘ and ‘Use custom designed alternatives for cost.’ We suggest leaving the ones unchecked if you want to keep the settings you created in Step 2.
In the event you’re achieved, simply click on on ‘Add exclusion tick list’ to save some your changes. And that’s near to it!
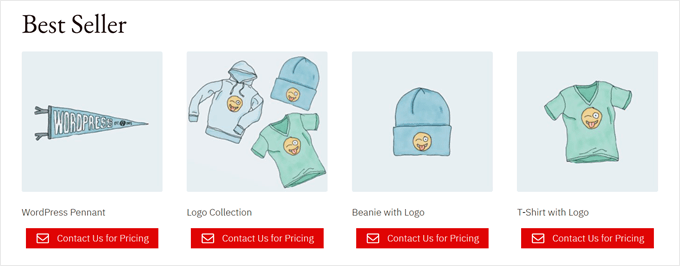
That is an example of what your product internet web page would perhaps seem to be whilst you permit the plugin:
Be told Additional WooCommerce Tips and Strategies
Now that you simply’ve learned learn how to advertise products on WooCommerce without prices, chances are high that you’ll want to learn additional tactics to optimize your online store. Check out the ones novice’s guides for added tips and guidelines:
We hope this article has helped you learn to duvet prices in WooCommerce. You may also want to check out our tick list of the highest wordpress topics for WooCommerce web pages and our data on find out how to upsell merchandise in WooCommerce.
If you happen to liked this article, then please subscribe to our YouTube Channel for wordpress video tutorials. You’ll be capable of moreover find us on Twitter and Fb.
The post How one can Cover Costs in WooCommerce (Stay Product Pricing Personal) first appeared on WPBeginner.
As wordpress pros who’ve helped 1000’s of internet website online house owners give protection to their internet website online wisdom, we know how essential it’s to have secure, to be had backups of your wordpress web page.
Numerous our readers ask us about the usage of Amazon Simple Storage Services (S3) for their wordpress backups. They’re steadily unsure if it’s the appropriate resolution for their needs. We understand – backing up your wordpress web page shouldn’t in reality really feel like solving a puzzle.
That’s why we’ve created this whole knowledge to help you once more up wordpress to Amazon S3, whether or not or now not you’re a novice or an professional individual. We can walk you through the whole lot step-by-step, the usage of simple, clear instructions that anyone can observe.
In this knowledge, you’ll discover ways to once more up your wordpress and send its knowledge to Amazon S3.
wordpress-to-amazon-s3-in-post.png” alt=”How to Backup wordpress to Amazon S3″ class=”wp-image-321983″/>
<span class=”ez-toc-section” id=”why-use-amazon-s3-to-backup-wordpress“/>Why Use Amazon S3 to Backup wordpress?
We’ve helped 1000’s of wordpress shoppers backup and repair their web pages. And Amazon S3 supplies some unique advantages that make it stick out from other cloud backup storage alternatives like Google Pressure or OneDrive.
Amazon S3 is particularly suitable for internet pages that need enterprise-level backup reliability. It should perhaps handle huge backup knowledge continuously, without reference to when you run your backups. This makes it highest for business internet pages that can’t find the money for backup disasters.
The security choices in S3 go beyond basic file sharing. While services and products like Google Force and OneDrive offer simple sharing alternatives, S3 provides enterprise-level protection through IAM (Identity and Get admission to Keep watch over).
This lets you create specific protection laws, like limiting get right to use to certain time categories or applying computerized encryption to your backup knowledge.
Amazon supplies a free tier that comprises 5 GB of storage, together with 2,000 PUT and 20,000 GET requests monthly in your first 12 months.
In smart words, this means you need to store plenty of entire backups of a small wordpresswebsite and perform not unusual backups without further costs all through that period.
On the subject of pricing, S3 uses a flexible pay-as-you-go type with different storage classes. This means you’ll be capable to select further fairly priced alternatives for long-term backup storage while maintaining recent backups readily available.
With a lot of these benefits in ideas, let’s check out simple how one can send your wordpress backups to Amazon S3. You’ll use the short links underneath to jump to the segment you wish to have:
First Problems First: Configure Your Amazon S3 Account
Previous to we will be able to once more up your wordpress web page to Amazon S3, we want to prepare your storage space as it should be.
Step 1: Create an Amazon S3 Bucket
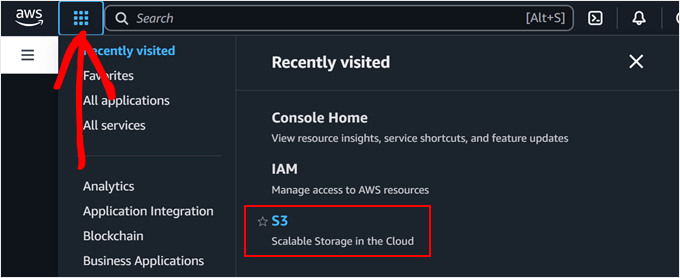
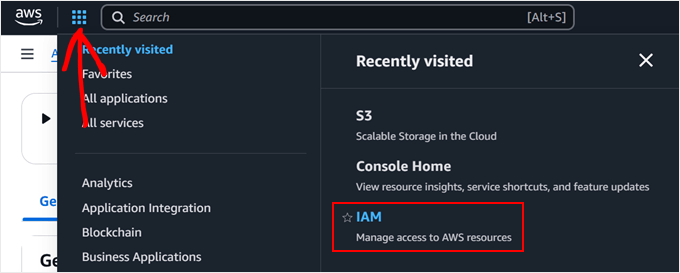
First, log in to your Amazon Internet Products and services (AWS) account. Then, click on on on the menu button on the most efficient left corner and make a selection ‘S3.’
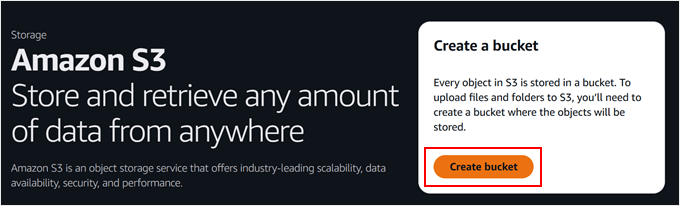
On the S3 dashboard internet web page, you wish to have to seek for the ‘Create bucket’ button and click on on it.
A bucket in Amazon S3 is like a container in your knowledge. Call to mind it as a singular folder that may take hold of your whole wordpress backups.
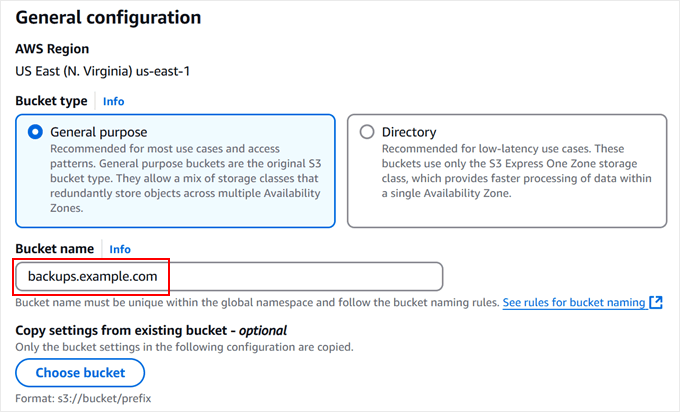
For the ‘Bucket kind,’ you wish to have to make a choice ‘Commonplace function.’ Then, give your bucket a name.
We advise along with your area title inside the name, with something like backups.yourwebsite.com as your bucket name. This structure promises your bucket name is unique and helps you merely identify your wordpress backup knowledge later.
You’ll moreover see plenty of configuration alternatives. For plenty of wordpress backup needs, you’ll be capable to cross away the ones settings at their default values. The ones defaults include maintaining your bucket private and enabling encryption for upper protection.
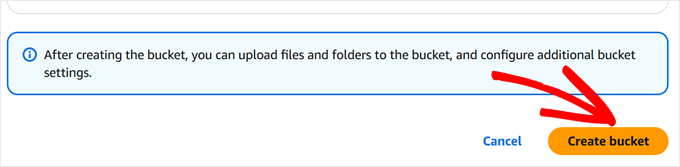
At this point, you’ll be capable to merely scroll to the bottom of the internet web page and click on at the ‘Create bucket’ button.
Your new storage space will also be ready in only some seconds.
Step 2: Create a Protection Protection
Now, let’s prepare a security protection in your backups. This protection is a set of rules that control what will also be finished along with your backup knowledge.
Get began by way of clicking on the menu over again and settling on ‘IAM.’ This will an increasing number of take you to AWS’s protection keep an eye on house.
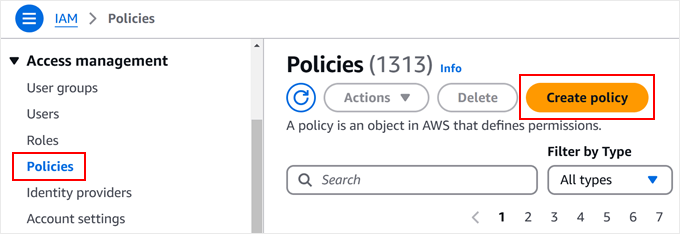
You’ll navigate to the ‘Insurance coverage insurance policies’ internet web page from proper right here.
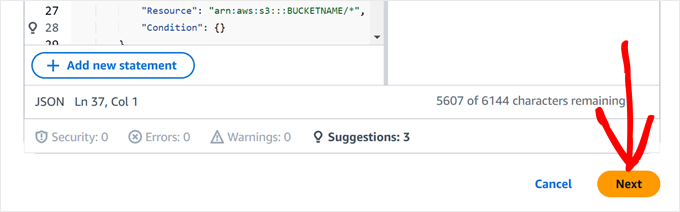
Proper right here, you wish to have to click on on on the ‘Create protection’ button. That’s the position you’ll prepare your backup permissions.
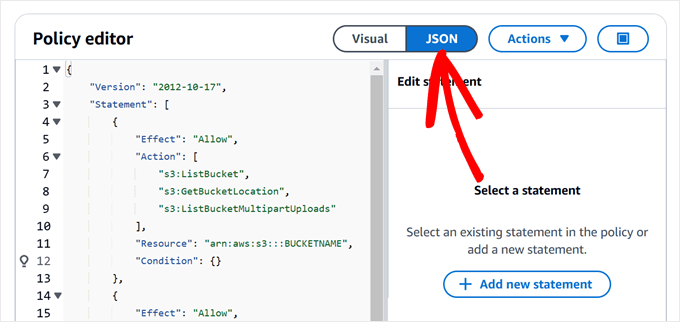
When you see the protection editor, you’ll be ready to make a choice the ‘JSON’ tab to enter the security laws.
Proper right here’s where you’ll add the specific permission code. You’ll replica and paste the protection underneath into the editor:
{
    "Style": "2012-10-17",
    "Remark": [
        {
            "Effect": "Allow",
            "Action": [
                "s3:ListBucket",
                "s3:GetBucketLocation",
                "s3:ListBucketMultipartUploads"
            ],
            "Helpful useful resource": "arn:aws:s3:::BUCKETNAME",
            "State of affairs": {}
        },
        {
            "Have an effect on": "Allow",
            "Movement": [
                "s3:AbortMultipartUpload",
                "s3:DeleteObject",
                "s3:DeleteObjectVersion",
                "s3:GetObject",
                "s3:GetObjectAcl",
                "s3:GetObjectVersion",
                "s3:GetObjectVersionAcl",
                "s3:PutObject",
                "s3:PutObjectAcl"
            ],
            "Helpful useful resource": "arn:aws:s3:::BUCKETNAME/*",
            "State of affairs": {}
        },
        {
            "Have an effect on": "Allow",
            "Movement": "s3:ListAllMyBuckets",
            "Helpful useful resource": "*",
            "State of affairs": {}
        }
    ]
}
Important! You’ll want to trade all cases of ‘BUCKETNAME’ with the actual bucket name that you just created earlier. As an example, if your bucket is referred to as backups.example.com, then you definitely unquestionably’ll wish to exchange each and every cases of BUCKETNAME with that individual name.
At this point, you’ll be capable to switch down the internet web page.
Then, click on on ‘Next.’
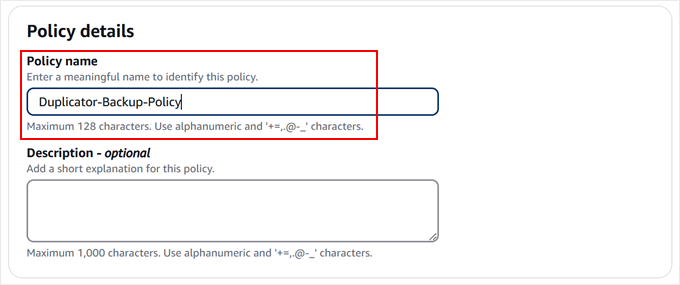
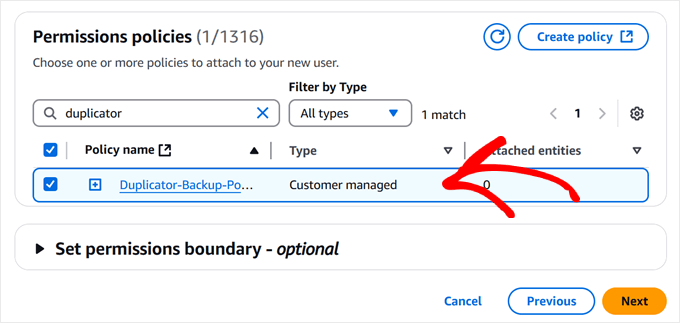
Now, you’ll be capable to give your protection a nice name. It’s possible you’ll wish to title it something like wordpress-Backup-Protection, Duplicator-Backup-Protection, or Updraftplus-Backup-Protection.
Be happy to make a choice a name this is sensible to you. This protection will art work great with each wordpress backup plugin we will quilt later.
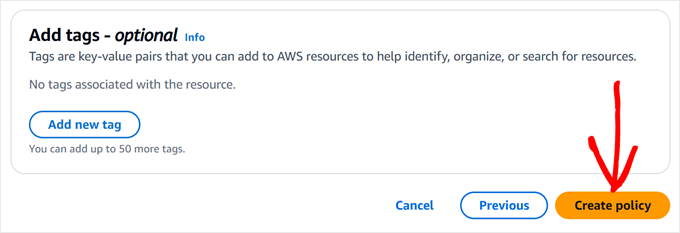
Each time you’re proud of the name, you’ll be capable to finally end up by way of clicking ‘Create protection.’
This will an increasing number of save your whole protection settings and get you ready for the next step.
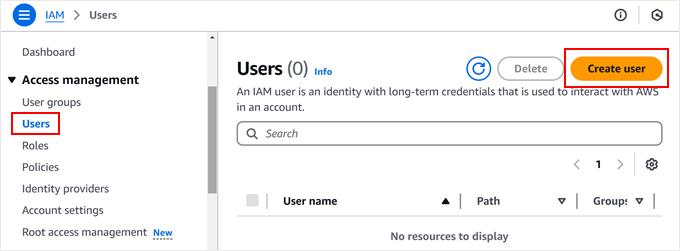
Step 3: Create a Client
Now that we’ve prepare our protection protection, let’s create an individual who can get right to use your cloud garage. You’ll call to mind this as growing a singular account just for coping with your wordpress backups.
Get began by way of going to the ‘Consumers’ menu on the IAM internet web page. You’ll see a ‘Create individual’ button. Pass ahead and click on on that.
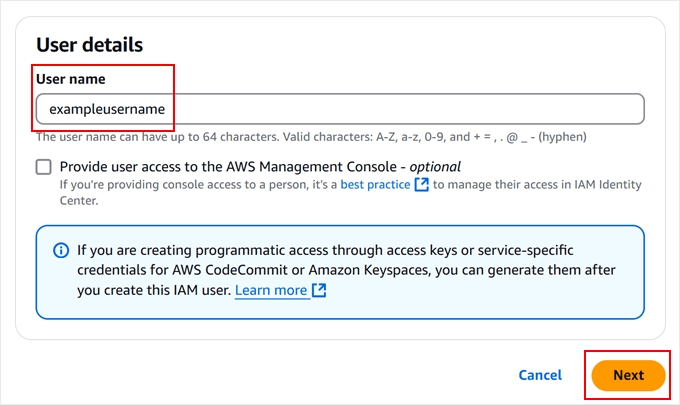
Next, you’ll give your new individual a name.
You’ll name any name this is serving to you identify its function. Then, click on on ‘Next.’
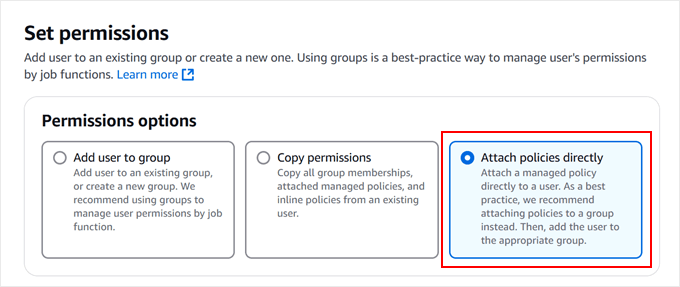
When you be triumphant within the ‘Set permissions’ segment, you’ll want to make a choice ‘Attach insurance coverage insurance policies instantly.’
That’s the position you’ll be capable to connect the security protection we merely created to your new individual. Call to mind it as giving your backup individual their specific set of permissions.
Look right through the checklist of insurance coverage insurance policies until you to find the one we created inside the previous step. You’ll merely find it by way of typing the protection name inside the search box.
Each time you see it, merely read about the sector next to it.
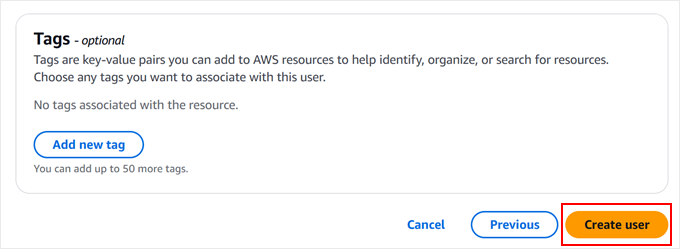
After reviewing the whole lot, you’ll be capable to scroll down and click on on ‘Create individual.’
AWS will prepare your new individual with all of the right kind permissions to handle your wordpress backups safely.
Remember the fact that we’ll want to take hold of some essential protection details for this individual in the next step, so don’t close this window merely however.
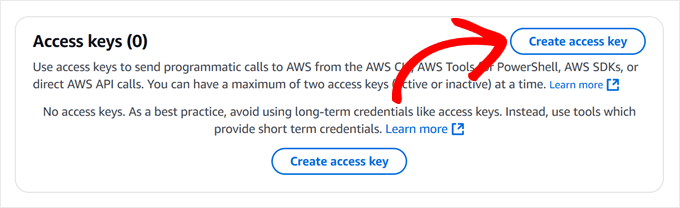
Step 4: Replica Your Get admission to Keys
Let’s prepare your get right to use keys. The ones are like specific passwords that may let your wordpress backup plugin connect securely with Amazon S3.
First, you’ll be capable to click on on on the username we merely created to view its details.
Seek for the ‘Protection credentials’ tab.
That’s the position we’ll create your get right to use keys.
<img decoding=”async” loading=”lazy” width=”680″ height=”308″ src=”https://www.wpbeginner.com/wp-content/uploads/2024/12/amazon-s3-security-credentials-min.png” alt=”Navigating to the security Credentials tab in Amazon S3″ class=”wp-image-322008″/>
Switch down the internet web page quite.
When you see the ‘Create get right to use key’ button, move ahead and click on on on it.
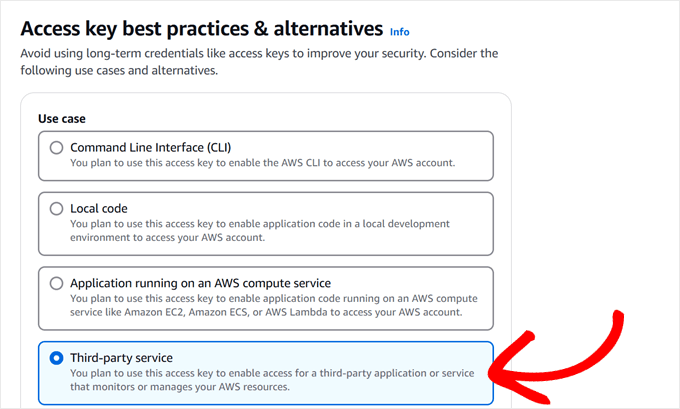
Amazon will now ask about your use case.
Since we’re planning to use a wordpress backup plugin, you’ll be ready to make a choice ‘Third-party provider’ from the decisions.
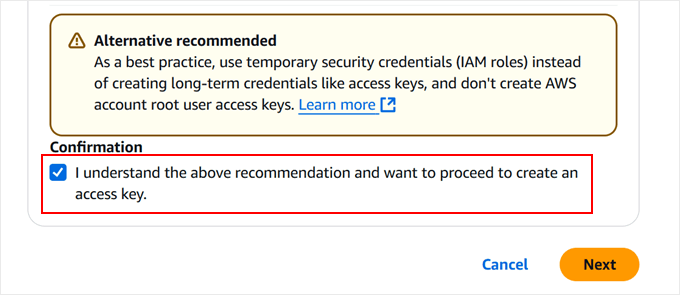
Now, scroll down the internet web page further.
Check out off the sector next to ‘I understand the above recommendation and wish to proceed to create an get right to use key’ and click on on ‘Next.’
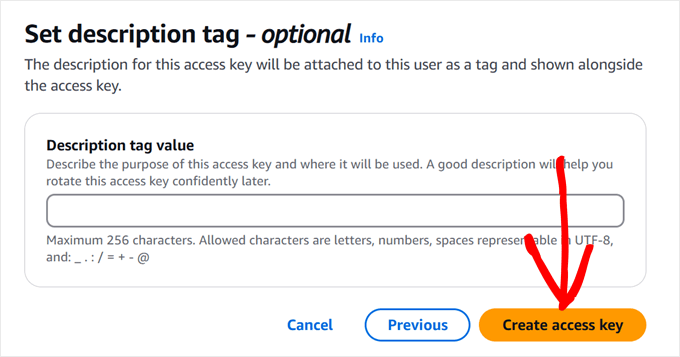
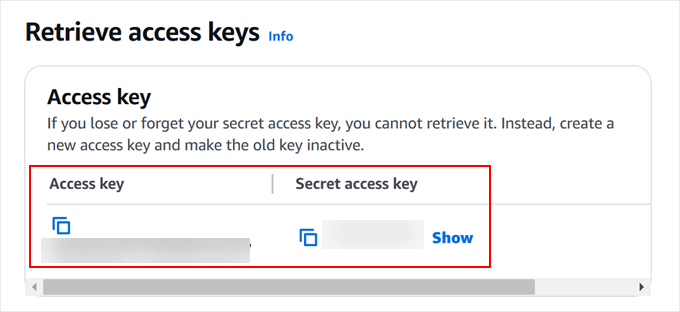
Previous to you’ll see your get right to use keys, you’ll be capable to optionally set some description tags.
We’re going to skip this step as it’s no longer essential, so move ahead and click on on on the ‘Create get right to use key’ button.
You’ll now see two essential pieces of knowledge: your get right to use key ID and your secret get right to use key. Call to mind the ones as a username and password pair that your backup plugin will use.
You’ll wish to keep the ones keys somewhere secure, or no less than keep this window open when you prepare your decided on backup method. Each time you close this window, you won’t be capable to see the secret get right to use key over again.
<h4 class=”wp-block-heading” id=”aioseo-method-1-use-duplicator-to-backup-wordpress-to-s3-more-customizable”><span class=”ez-toc-section” id=”manner-1-use-duplicator-to-backup-wordpress-to-s3-additional-customizable”/>Manner 1: Use Duplicator to Backup wordpress to S3 (Additional Customizable)
In our enjoy, we’ve found out Duplicator to be one of the crucial loyal resolution for Amazon S3 backups. We use it ourselves to once more up a couple of of our partner internet pages and personal duties, so we’re confident in recommending it as our top choice.
What makes Duplicator stand out is its tough serve as set. You’ll agenda automated backups, migrate all your wordpress web site, and connect to a couple of cloud storage services and products all from one dashboard. Plus, its Amazon S3 integration is rock-solid and well-tested.
When you’ll be capable to uncover our detailed Duplicator evaluation for a whole serve as breakdown, let’s focal point on getting your S3 backups prepare.
Remember the fact that you’ll need Duplicator Skilled for the Amazon S3 integration, alternatively you’ll be capable to get began with the loose model to get aware of the basic choices.
Step 1: Arrange and Activate Duplicator
Getting started is simple. You’ll want to arrange Duplicator to your wordpress internet website online first. Whilst you’re new to setting up wordpress plugins, don’t worry. We’ve got a beginner-friendly knowledge on easy methods to set up a wordpress plugin.
Once installed, you’ll be capable to flip to your Duplicator Skilled license key. Merely head over to Duplicator Skilled » Settings in your wordpress dashboard, enter your license key, and click on on ‘Activate.’ You’ll see a confirmation message when it’s successful.
Step 2: Connect to Amazon S3
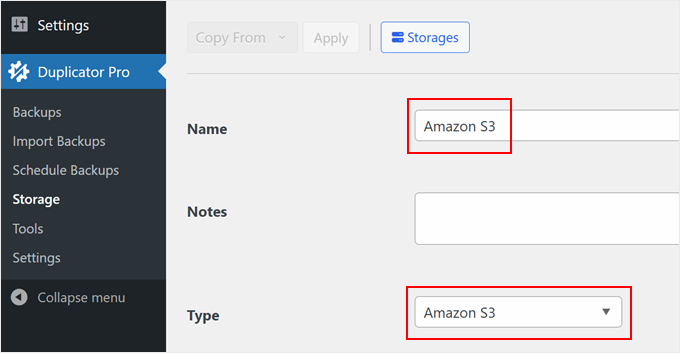
Now, let’s connect Duplicator to your Amazon S3 account. Navigate to Duplicator Skilled » Storage and click on at the ‘Add New’ button.
To help you identify this storage connection merely, you’ll be capable to give it a simple name like ‘Amazon S3 Backups’.
Moreover, seek for the ‘Kind’ dropdown menu and make a selection ‘Amazon S3.’
Pass ahead and scroll down.
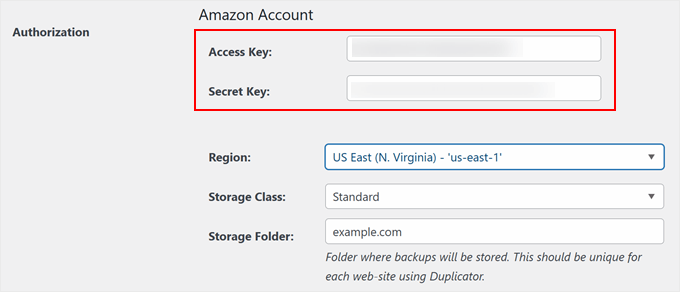
You’ll then see the authorization segment where you’ll be capable to paste your get right to use key and secret key that we saved earlier.
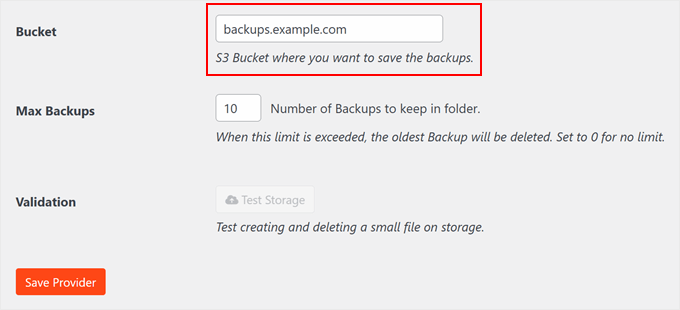
Inside the configuration segment, you wish to have to enter your bucket name exactly as you created it in Amazon S3. That is serving to Duplicator know where to store your backup knowledge.
You’ll moreover come to a decision what selection of backup permutations to stick. Whilst you set this to ’10,’ as an example, Duplicator will automatically remove the oldest backup when an eleventh one is created. Atmosphere it to ‘0’ way it’ll keep all backups indefinitely.
After all, click on on ‘Save Provider’ to secure your settings.
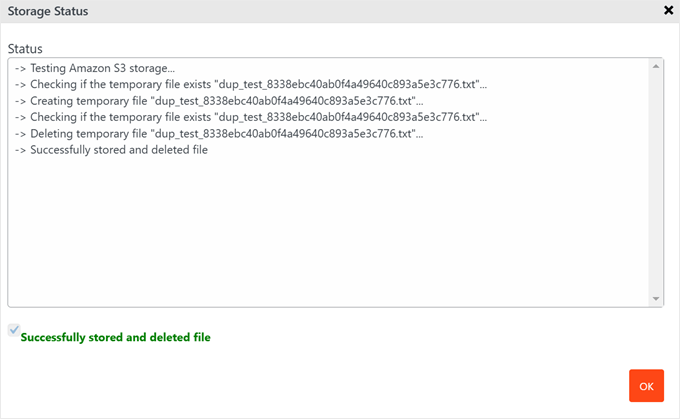
After saving S3 as your new cloud storage provider, the ‘Check out Storage’ button will also be activated.
You’ll click on on on that button to make sure the whole lot works high quality.
If the verify backup is successful, a popup will appear saying that the plugin has stored and deleted the file.
Be happy to close this popup by way of clicking ‘OK.’
Step 3: Once more Up Your wordpress Internet website online to Amazon S3
Now comes the exciting segment: growing your first backup to Amazon S3. Let’s walk through this process step by step.
Get began by way of visiting Duplicator Skilled » Backups in your wordpress dashboard. You’ll see an ‘Add New’ button. Pass ahead and click on on on it.
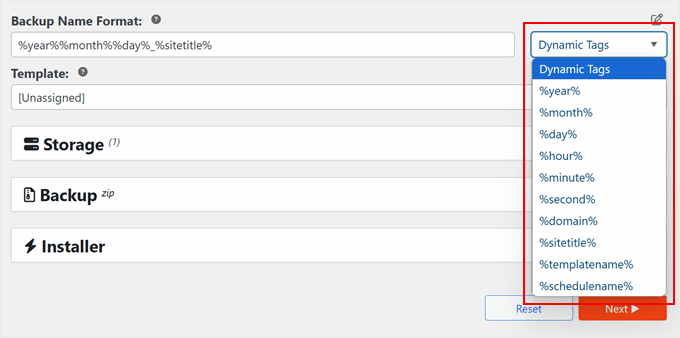
Proper right here’s an invaluable tip: You’ll make your backups more straightforward to look out by way of the usage of a smart naming system.
Duplicator allows you to use specific tags like %12 months%, %day%, and %hour% in your backup names. As an example, ‘mysite-backup-%12 months%-%month%’ will automatically create names like ‘mysite-backup-2024-12.’
When you scroll the entire means all the way down to the ‘Storage’ tab, you’ll see the available local and far off storage alternatives.
Simply read about the sector next to Amazon S3, and Duplicator will know to send your wordpress backup to S3.
<img decoding=”async” loading=”lazy” width=”680″ height=”228″ src=”https://www.wpbeginner.com/wp-content/uploads/2024/12/duplicator-storage-amazon-s3-min.png” alt=”Backing up a wordpress site to Amazon S3″ class=”wp-image-322020″/>
Now, you get to make a choice what to once more up.
Underneath the ‘Backup’ segment, you’ll see plenty of alternatives. We advise starting with ‘Whole Internet website online’ to create an entire backup of your wordpress web site information. Call to mind it as taking a snapshot of the whole lot, like your posts, pages, photos, and settings.
Then again, you’ll be capable to select ‘Database Best possible’ to again up your wordpress database most efficient.
If that’s your variety, you’ll be capable to be informed our knowledge on easy methods to repair wordpress with only a database backup for more information.
Wish to add an extra layer of protection? Discuss with the ‘Protection’ tab, where you’ll be ready to give protection to your backup knowledge with a password.
This is in particular useful for individuals who’re storing refined wisdom.
<img decoding=”async” loading=”lazy” width=”680″ height=”213″ src=”https://www.wpbeginner.com/wp-content/uploads/2024/12/duplicator-security-min.png” alt=”Enabling backup security features in Duplicator” class=”wp-image-319169″ title=”Enabling backup security features in Duplicator”/>
The Installer segment comes with pre-configured settings that art work correctly for lots of internet pages.
You’ll cross away the ones as they’re and click on on ‘Next’ to proceed.
Previous to growing your backup, Duplicator runs a at hand information a coarse properly being read about of your internet website online.
Call to mind it as a pre-flight inspection. If the whole lot turns out superb, then you definitely unquestionably’ll see a green ‘Good’ status. If there are any issues, Duplicator will can help you know exactly what needs fixing.
After all, click on at the ‘Create Backup’ button.
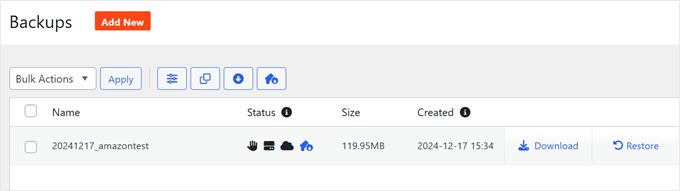
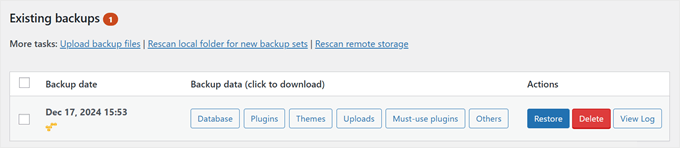
When the process completes, you’ll return to your dashboard, where you’ll be capable to view all of your wordpress backups.
And that’s it!
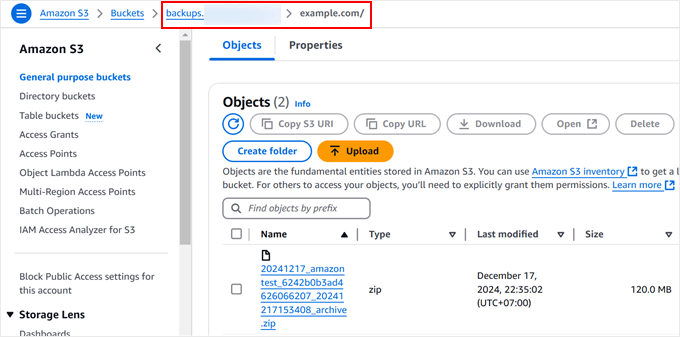
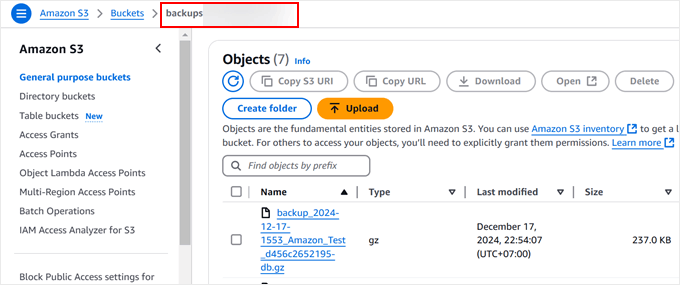
Wish to make sure the whole lot worked? You’ll read about your S3 bucket instantly.
Merely log into your Amazon S3 account, navigate to your bucket, and in addition you will have to see your fresh backup knowledge in a position there safely.
<h4 class=”wp-block-heading” id=”aioseo-method-2-use-updraftplus-to-backup-wordpress-to-s3-free”><span class=”ez-toc-section” id=”manner-2-use-updraftplus-to-backup-wordpress-to-s3-loose”/>Manner 2: Use UpdraftPlus to Backup wordpress to S3 (Loose)
While Duplicator Skilled is our top choice, we needless to say every now and then you wish to have a free resolution. That’s where UpdraftPlus is to be had in. It’s a reliable free plugin that we’ve tested extensively for Amazon S3 backups.
It’s worth noting that the free style has some limitations. You won’t be capable to time table computerized backups or create redundant backups all the way through a couple of puts. Then again for basic S3 backups, it’ll get the method finished successfully.
Let’s get the loose model of UpdraftPlus prepare to your web page. You’ll want to set up the wordpress plugin first through your admin house.
Once installed, you’ll be capable to find UpdraftPlus in your wordpress dashboard. Head over to the ‘Settings’ tab.
That’s the position you’ll see rather numerous backup alternatives.
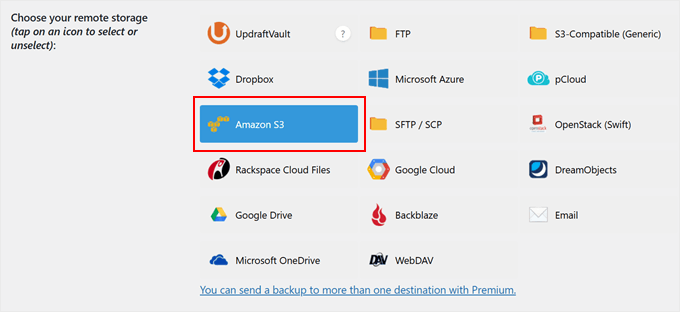
Scroll down until you understand the cloud storage segment, and click on on on ‘Amazon S3.’
Proper right here’s where those get right to use keys we created earlier develop into helpful. You’ll paste your get right to use key and secret key into the respective fields. You moreover want to enter your bucket name proper right here.
Previous to shifting forward, it’s a good idea to click on on ‘Check out Amazon S3 settings.’ This promises Amazon S3 is attached accurately with this wordpress migration plugin.
If the connection works, you’ll see a push notification with a success message, like inside the screenshot underneath.
From proper right here, you’ll be capable to merely click on on ‘OK’ and save your changes.
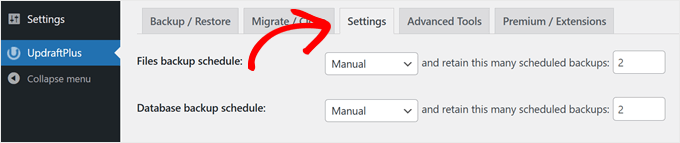
In a position to again up your wordpress web site? Pass ahead and switch to the ‘Backup / Restore’ tab.
Then, click on at the ‘Backup Now’ button.
<img decoding=”async” loading=”lazy” width=”680″ height=”211″ src=”https://www.wpbeginner.com/wp-content/uploads/2024/12/updraftplus-backup-now-min.png” alt=”Backing up a wordpress site with UpdraftPlus” class=”wp-image-322044″/>
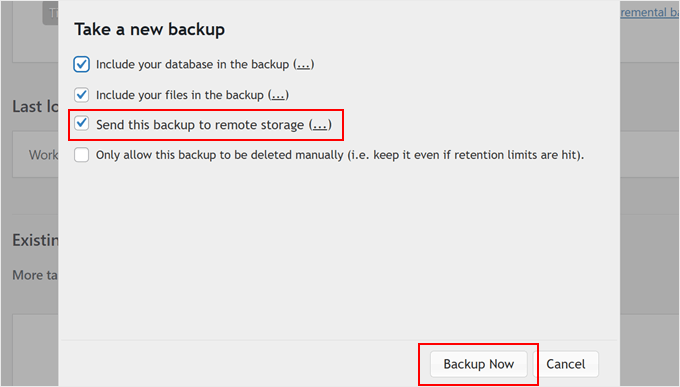
A pleasing popup window will appear with some alternatives to make a choice from.
You’ll need to read about ‘Send this backup to far off storage’ to send your wordpress backup S3. We moreover suggest ticking each and every ‘Come together with your database inside the backup’ and ‘Come together with your knowledge inside the backup’ for a whole internet website online backup.
After clicking ‘Backup Now,’ UpdraftPlus gets began backing up your knowledge.
Once whole, your backup will appear inside the ‘Provide backups’ checklist. You’ll scroll down the internet web page to look out this segment.
Wish to double-check that your backup made it to S3? You’ll log in to your Amazon S3 account and look in your bucket.
You will have to see your wordpress backup knowledge stored safely there.
<h4 class=”wp-block-heading” id=”aioseo-bonus-tip-hire-a-wordpress-maintenance-service”><span class=”ez-toc-section” id=”bonus-tip-let-the-experts-maintain-your-wordpress-maintenance”/>Bonus Tip: Let the Experts Maintain Your wordpress Maintenance
Running a successful wordpress internet website online involves much more than just growing great content material subject matter. Take into accounts all of the technical tasks: not unusual backups, protection exams, velocity optimization, and unending wordpress updates. It’s like having a 2d procedure, isn’t it?
We needless to say, as a business owner, your time is more healthy spent emerging what you are promoting quite than dealing with technical repairs. That’s exactly why we created WPBeginner Professional Products and services to take the ones technical tough scenarios off your plate.
Our wordpress upkeep workforce can handle the whole lot your internet website online needs to stay healthy and secure:
Daily cloud backups to stick your content material subject matter secure
Commonplace wordpress protection scans and malware taking away
Potency optimization to stick your web page operating speedy
24/7 uptime monitoring to catch issues previous than they impact your visitors
What makes our provider different? You’ll download detailed research showing exactly what we’ve finished to care for your web page. Plus, if something surprising happens, our emergency enhance workforce is in a position to help.
Call to mind us as your wordpress technical workforce. We handle the complex stuff when you focal point on what you do very best: operating what you are promoting.
In a position to make wordpress repairs hassle-free? E-book a session with our professionals at the present time. We’d love to show you tactics we will be able to help keep your internet website online operating simply.
We hope this text has helped you discover ways to once more up your wordpress web page to Amazon S3. You may also want to check out our checklist of the easiest Dropbox plugins for wordpress and our knowledge on easy methods to save your wordpress weblog posts on your laptop.
Whilst you liked this text, then please subscribe to our YouTube Channel for wordpress video tutorials. You’ll moreover find us on Twitter and Fb.
The submit The right way to Backup wordpress to Amazon S3 (Unfastened + Paid Strategies) first gave the impression on WPBeginner.
Experiencing errors while managing your wordpresswebsite online can be frustrating, particularly when you’re no longer sure what’s causing them.
wordpress admin Ajax 400 (Bad Request) is one such common and sophisticated error. In our experience, it mostly happens when a code snippet triggers a browser request that the server can’t understand, leading to a “400 Bad Request” message.
The good news is that this error is usually easy to fix. With this knowledge, we will provide an explanation of the causes of the 400 (Bad Request) error and show you how to fix it quickly.
wordpress-admin-ajax-400-bad-request-error-in-post.png” alt=”Fix admin-ajax incorrect request error in wordpress” class=”wp-image-299035″/>
What causes the 400 error (bad request)?
The 400 (Bad Request) error is usually terminated by code that triggers a browser request that the server cannot understand.
This is a common wordpress error. However, the error message no longer provides any clues, making the problem difficult for beginners to troubleshoot.
It will appear throughout your browser with the message “400 Bad Request”. The error web page will most likely look reasonably different depending on your wordpress web hosting provider.
It may also appear when you use the Check out software and switch to the “Console” tab.
If the request was made once per admin-ajax.php record, it will appear to be this:
The most common causes of this error that we have noticed include:
1. Invalid or invalid URL
One of the main reasons for this error is a typo or unnecessary characters in the URL.
For example, we’ve gone through cases where even a small error, such as a larger space or an explicit personality in the URL, could cause the server to reject the request, leading to a 400 error.
2. Browser cache and cookies
In our entertainment, the wisdom of the outdated or corrupt browser is another standard offender. We continually advise shoppers to clear their browser’s cache and cookies, which usually resolves the issue.
3. Huge report loads
Searching for additional information about your wordpresswebsite online can also cause this error. On several occasions, buyers have encountered this inconvenience when attempting to add media information that exceeded their server’s record size limit.
4. Conflicts between plugins or themes
We have also noticed plugin or theme conflicts causing this error. If you have recently added a plugin or theme and the 400 error starts appearing, perhaps it is due to compatibility issues or a virus in the code.
5. Server aspect issues
While much less common, the problem can also be server-side, much like a corrupted .htaccess document or incorrectly configured server settings. In these eventualities, correcting the server configuration or restoring an older version of the .htaccess record incessantly resolves the issue.
With that said, let’s take a look at how to fix this error.
<h4 class=”wp-block-heading” id=”aioseo-how-to-fix-the-400-bad-request-error-in-wordpress“><span class=”ez-toc-section” id=”tips-about-learn-how-to-restore-the-400-bad-request-error-in-wordpress“/>Tips on how to recover from 400 error (bad request) in wordpress
Now that we’ve covered what might cause the 400 error (bad request), let’s head upstairs to fix it. Those solutions are simple and environmentally friendly, even if you’re no longer tech-savvy.
This is the steps file that we will show you in this knowledge:
1. Check the URL
The first thing you will need to do is double check the URL. It’s easy to make a small mistake when typing or copying a URL, much like adding extra personality or leaving a space.
Make sure the URL is correct and formatted appropriately. If the error persists, you will be able to proceed to the next step immediately.
2. Clear your browser cache and cookies
Occasionally, outdated or corrupt cache and cookies in your browser may cause this error. Erasing those can incessantly reset the problem. That’s right, here’s how to do it:
For Chrome: Click the three-dot menu in the top-right corner of your browser window and select “Delete Navigation Wisdom.”
You will see a pop-up where you need to make sure that the possible choices “Cookies and other online websites” and “Cached photos and data” are checked.
Under the “Time Range” risk, select “All Time” to ensure all wisdom is erased. Just click “Delete Wisdom” to continue.
Google Chrome will now delete all cached knowledge and cookies.
For Firefox: Click the menu icon in the top right corner of your browser view and select “Settings.”
This will take you to your browser settings web page. From here, you need to navigate to the “Privacy and security” tab.
Scroll to the “Cookies and online data from Internet sites” section and click “Clear data”.
Next, read the possible choices of “Cookies and Online Wisdom on Internet Sites” and “Knowledge and Temporarily Cached Pages.”
Under “When,” simply select “All” to eliminate all historical wisdom.
Click “Clear” and Firefox will delete your cached data and cookies.
For various browsers, see our information on clearing cache in all major browsers.
After deletion, you will be able to try to access the website online again to see if the error has been resolved.
3. Reduce the report load measurement
If you happen to run into this error when loading a record, it will likely be because it is too large for the server to handle.
There are some tactics with which you will be able to restore it:
define('WP_MEMORY_LIMIT', '256M');
After fixing the upload record size issue, take a look at visiting your internet web page to see if the error is gone.
4. Deactivate all plugins
Plugin conflicts, incompatibilities, or poorly coded plugins are other common explanations for the Ajax 400 administrator error.
To decide which plugin might be causing the problem, you will first need to deactivate all plugins.
Simply switch to Plugins » Installed plugins Internet web page and select all plugins. Next, select “Disable” from the Bulk Actions drop-down menu and click “Apply.”
Now, ask your web page to appear if the error is gone. In that case, one of the vital plugins ended with the error.
Now you will start activating plugins one after another and discuss with your website online after each activation until you find the plugin causing the error.
Apply to: If you can’t access the wordpress admin area, you can disable the plugins for using FTP or the records management app in cPanel.
5. Switch to a default theme
wordpress issues might just explain why this error means they don’t meet the best coding needs.
You first want to switch to a default theme to display if your wordpress theme is causing the 400 Bad Request issue.
Default wordpress issues come with wordpress and are usually named after the year they were introduced, much like Twenty Twenty-4 or Twenty Twenty-3.
Move in At a glance » Problems the Internet web page will be displayed while you have a default theme installed. If you already have a default theme installed, you need to hover your mouse over it and click “Activate.”
<img decoding=”async” loading=”lazy” width=”680″ height=”226″ src=”https://www.wpbeginner.com/wp-content/uploads/2024/08/wordpress-activate-theme.png” alt=”Activate the theme” class=”wp-image-299010″/>
If it happens to you if you don’t see a default theme installed on your online internet site, you will be able to create one. See our detailed instructions on how to insert a wordpress theme.
Check your Internet web page after changing the theme so that it appears if the error is gone. If the error is resolved, the problem was once caused by the theme.
Now you will ask the theme developer to strengthen it or find another theme. Listed here are probably the most popular wordpress issues (many of them are free).
6. Reset your permalinks
Invalid URLs almost always explain the reason for the 400 – Bad Request error. wordpress has a built-in tool to increase search engine optimized permalinks, and resetting them can restore more typical URL problems.
Simply switch to Settings » Permalinks Internet web page and click the “Save Changes” button below without making any exact changes.
This will regenerate the .htaccess document, which could most likely reveal the error.
<h4 class=”wp-block-heading” id=”aioseo-7-contact-your-hosting-provider”><span class=”ez-toc-section” id=”7-hire-professional-wordpress-have-the-same-opinion”/>7. Hire wordpress Professional Have the same opinion
Fixing errors like “400 Bad Request” in most cases is just a little difficult and time-consuming for beginners. If you are now unable to fix the error or don’t need to maintain technical things, then it will be just the time to hire an expert for wordpress support.
For example, you will be able to try ours World-class wordpress hardening supplier. For a small price, you will be able to hire professional wordpress engineers to fix any errors on your web page.
<img decoding=”async” loading=”lazy” width=”680″ height=”292″ src=”https://www.wpbeginner.com/wp-content/uploads/2024/07/wordpress-support-service.png” alt=”WPBeginner Pro Services” class=”wp-image-291270″/>
Our expert wordpress developers will analyze and fix the error for you. This is an on-demand provider, meaning there are no contracts and you will also be able to pay a one-off price to quickly get your web page back to a simple structure. Click here to contact a wordpress expert.
Bonus troubleshooting tips
Below are some additional resources you may find helpful in resolving 400 Bad Request errors on your webpage:
We hope this newsletter has helped you unravel the Ajax Error 400 – Admin Bad Request in wordpress. You may also need to consult our checklist of necessary wordpress repair tasks to perform continuously or take a look at our most sensible tricks to support wordpress administration.
If you liked this newsletter, subscribe to our YouTube channel for wordpress video tutorials. You will also find us on Twitter and Facebook.
Sending suggestions on how to fix Ajax 400 (dangerous request) error from wordpress admin first made an impression on WPBeginner.
Se hai notato che il menu di navigazione del tuo sito si trova sotto la barra di amministrazione di wordpress, allora sicuramente non sei da solo. Questo può essere un problema comune e ora lo abbiamo individuato su molti siti Web.
Anche questo problema sarà frustrante, in particolare quando nasconde parti del menu o rende difficile il clic per gli utenti che hanno effettuato l’accesso.
Ora abbiamo notato che in genere si verifica a causa di conflitti di temi o CSS. D’altra parte la buona notizia è che il problema può essere risolto in breve tempo.
In questo articolo saremo in grado di mostrarti cosa fare quando la barra di navigazione di wordpress si trova sotto la barra di amministrazione, iniziando con una soluzione semplice e non tecnica che non richiede alcuna codifica.
wordpress-nav-menu-appearing-under-admin-bar-in-post.png” alt=”Risolto il problema con la barra di amministrazione che prendeva il posto del menu di navigazione nell’intestazione del sito wordpress” class=”wp-image-297425″/>
Se il menu di navigazione di wordpress sembra nascosto o sovrapposto alla barra di amministrazione, potresti avere a che fare con un problema di visualizzazione comune.
Ora abbiamo notato che questo svantaggio si verifica quando il CSS di un tema non tiene conto, come dovrebbe, dell’altezza della barra di amministrazione. Il CSS quindi oscura parti dell’intestazione del tuo sito Internet, insieme al menu di navigazione.
È possibile che tu capisca che è difficile fare clic su alcune voci di menu o che l’intero menu è in parte coperto durante la visualizzazione del tuo sito Internet. Anche questo sarà frustrante, in particolare quando incide sull’usabilità del tuo sito.
Ci sono alcuni motivi comuni per cui molto probabilmente ciò potrebbe accadere:
Conflitti tematici: Di tanto in tanto, il CSS del tuo tema non tiene conto della barra di amministrazione, causando la posizione errata del menu.
Conflitti dei plugin: Un plugin che modifica il design del front-end potrebbe accidentalmente far sì che il menu si sovrapponga alla barra di amministrazione. Ciò includerà sempre più plugin che caricano mega menu o banner di intestazione.
CSS progettato su misura: Se hai aggiunto CSS personalizzati per il tuo sito Internet, interferirà in modo intelligente con la corretta visualizzazione del tuo menu.
Questo problema può avere un effetto sull’usabilità del tuo sito Web Internet, rendendo più difficile la navigazione per gli utenti. Fortunatamente, esistono diversi modi per risolvere questo inconveniente, a partire da una soluzione semplice che non richiede alcuna codifica.
Ecco un riepilogo delle soluzioni che potremo mostrare. Sarai in grado di volare verso quello che ti sembra più semplice:
Soluzione 1: coprire la barra di amministrazione tramite le impostazioni del profilo individuale
Questa soluzione è la migliore per gli utenti che desiderano un ripristino rapido e semplice senza dover occuparsi di alcun codice. È massimo per i principianti o per chiunque possa temere di rompere accidentalmente la struttura del proprio sito Internet.
Inoltre, quando non disponi dell’autorizzazione per modificare i file CSS o dei temi del tuo sito Internet, questo sistema fornisce una strategia semplice per evitare il problema senza apportare modifiche permanenti.
Tieni presente: Questa soluzione si applica a livello client, per questo motivo altri utenti sul tuo sito Internet dovranno accedere ai propri account e ripetere i passaggi seguenti.
Innanzitutto, desideri accedere alla dashboard di wordpress. Quindi vai a Consumatori » Profilo pagina web Internet nel menu di sinistra.
Scorri fino alla sezione Barra degli strumenti, quindi deseleziona la sfera accanto alla selezione “Mostra barra degli strumenti durante la visualizzazione del sito Web”.
Successivamente, non dimenticare di fare clic su “Profilo sostitutivo” per salvare alcune modifiche.
Perché funziona
Nascondere la barra di amministrazione impedisce che interferisca con il menu di navigazione sul front-end del tuo sito Internet. Poiché la barra di amministrazione non viene visualizzata, il problema della sovrapposizione viene in breve risolto, rendendo il tuo menu completamente disponibile a tutti, tu e i tuoi visitatori.
Soluzione 2: modificare manualmente il CSS del tema
Se hai dimestichezza con HTML e CSS o desideri un ulteriore metodo permanente per il problema dei menu sovrapposti, dovrai controllare il CSS del tuo tema.
Questa soluzione è la migliore per gli utenti che dispongono delle autorizzazioni utente necessarie per modificare l’aspetto del proprio sito Web e desiderano ripristinare il problema alla sua fornitura.
1. Effettuare un controllo incrociato del problema:
Innanzitutto, desideri utilizzare il software di controllo incrociato Investigate sul tuo browser per decidere dove caricare il CSS progettato su misura. Ora disponiamo di dati approfonditi per i principianti del fai da te sull’uso del dispositivo Check up.
Innanzitutto, fai clic con il pulsante destro del mouse sul menu di navigazione e seleziona “Esamina fase di controllo incrociato” (in Chrome) o “Esamina fase di controllo incrociato” (in Firefox).
Questo aprirà l’apparato di sviluppo, che è in grado di mostrare HTML e CSS per la parte.
In tutto il codice, desideri cercare le classi CSS o gli ID utilizzati dal tuo tema per attivare l’intestazione o le aree del menu di navigazione. Ad esempio, nello screenshot qui sopra, il nostro sito Web demo utilizza il file .site-header lezione per la casa colpita.
Mancia: Passa il mouse su HTML e il tuo browser evidenzierà il settore all’interno della finestra di anteprima. Fai clic con il pulsante destro del mouse su HTML e poi guarda sotto “Varietà” per scovare le case CSS.
Aggiungi CSS progettato su misura L’uso di WPCode
Successivamente, è molto importante organizzare e cambiare nel plugin WPCode. È il plugin di codice personalizzato wordpress più efficiente, che rende davvero semplice includere CSS personalizzati per il tuo sito senza fare riferimento al tuo tema.
Un altro motivo per utilizzare WPCode sono le sue leggi di senso condizionale non insolite. Poiché questo problema riguarda solo i consumatori che hanno effettuato l’accesso, potremo aver bisogno di quelle leggi come modo per caricare il nostro codice solo per i consumatori che hanno effettuato l’accesso.
Trasferisci in anticipo, organizza e cambia con il plug-in WPCode. Per ulteriori dettagli, consulta il nostro tutorial su come configurare un plug-in wordpress.
Tenete a mente: è disponibile anche un modello sciolto di WPCode che funzionerebbe per questo tutorial. D’altra parte, proponiamo l’aggiornamento a un piano a pagamento in quanto consentirà l’accesso a opzioni aggiuntive.
Una volta attivato, vai a Snippet di codice » + Aggiungi frammento pagina web Internet sulla dashboard di wordpress.
Nella successiva pagina Web Internet, il plug-in ti mostrerà una serie di frammenti di codice pronti all’uso. Inoltre, saremo in grado di scrivere codice CSS progettato su misura.
Per dare un’occhiata a questo, sposta il mouse sulla casella “Aggiungi il tuo codice personalizzato (nuovo snippet)” e fai clic sul pulsante “+ Aggiungi snippet personalizzato”.
Questo ti porterà alla pagina web Internet dell’editor di codice.
Proprio qui, inserisci un nome per il tuo snippet di codice e quindi scegli Snippet CSS dal menu a discesa “Tipo di codice”.
Successivamente, aggiungi il seguente codice nella casella “Anteprima codice”:
#your-menu-id .your-menu-class {
    margin-top: 40px; /* Keep watch over this value in keeping with your theme */
    z-index: 10001;
    position: relative;
    padding-top:40px
}
In questo frammento di codice è molto importante l’alternativa #your-menu-id E .your-menu-class con i valori su cui devi concentrarti all’interno dell’HTML.
Ecco come l’abbiamo aggiunto al nostro sito Internet di controllo e l’abbiamo modificato per concentrarci sulla casa interessata.
La CSS comprende 4 leggi.
I primi sono i margin-top E padding-top legislazione. Poiché la barra di amministrazione ha un’altezza di raccolta di 32 pixel, la utilizzerai per correggere i CSS in conflitto.
Successivamente, la barra di amministrazione ha inoltre un file z-index valore impostato su 9999. Questa regola lo spinge verso la porta del display. Usando a z-index regola con il seguente valore, sposti l’intestazione o la casa di navigazione sulla porta.
IL position la regola è pronta relative come un modo per utilizzare il z-index regola.
Dopo, insieme alle leggi CSS progettate su misura, desideri dire a WPCode di utilizzare questo codice CSS solo quando un client registrato sta visualizzando il sito Web Internet.
Scorri in modo appropriato fino alla sezione Buono senso comune condizionale e attiva l’interruttore accanto alla selezione “Consenti senso comune”.
Successivamente, imposta semplicemente la strategia di localizzazione su “Mostra” e quindi fai clic su “+Aggiungi nuovo staff”.
Secondo le leggi del buon senso, desideri selezionare “Accesso effettuato” > “È” > “Vero”.
In ogni caso, nell’angolo in alto a destra dello schermo del computer, fai semplicemente clic su “Salva snippet” e passa da Inattivo a Vigoroso.
Al momento devi chiedere consiglio al tuo sito Internet e provare se il menu di navigazione e la casa dell’intestazione ora appaiono correttamente sopra la barra di amministrazione.
Se non riesci a capire correttamente l’ora principale, dai un’occhiata a regolare l’ora margin-top valore o focalizzato su diverse classi ID o CSS.
Perché funziona
Il problema si verifica continuamente perché il CSS del tema non tiene conto della barra di amministrazione, causando la visualizzazione del menu di navigazione sotto di essa. Utilizzando insieme a un piccolo frammento di CSS progettato su misura, controllerai il sito Web del menu di navigazione, assicurandoti che suoni come se fosse corretto sopra la barra di amministrazione.
Suggerimento bonus : Hai problemi con i CSS? Potrai assumere il nostro wordpress Emergenza potenziata. Per un piccolo prezzo, i nostri sviluppatori wordpress risolveranno il problema per te in pochissimo tempo e potrai far emergere ancora una volta la tua attività.
Soluzione 3: controllo dei conflitti tra plugin
Se hai provato le soluzioni precedenti e il problema persiste, sarà causato in modo intelligente dall’uso di un problema con il plug-in.
I plugin possono occasionalmente introdurre CSS o JavaScript che interferiscono con la costruzione del tema. Questa interferenza potrebbe causare problemi identici al menu di navigazione visualizzato sotto la barra di amministrazione.
L’elaborazione del plug-in in conflitto può risolvere il problema senza modificare il codice del tema.
1. Disattiva tutti i plugin:
Innanzitutto, trasferisciti nella dashboard di wordpress e vai a Plugin » Plugin installati.
Seleziona tutti i plugin selezionando la sfera accanto a Plugin nella parte superiore dell’elenco di spunta.
Desideri dover selezionare “Disattiva” dal menu a discesa delle azioni collettive e fare clic su “Esercitati”.
<img decoding=”async” loading=”lazy” width=”680″ height=”314″ src=”https://wpmountain.com/wp-content/uploads/2024/11/wpadmin-deactivate-wordpress-plugins.png” alt=”Disattivazione di tutti i plugin di wordpress” class=”wp-image-295982″/>
Ora, chiedi semplicemente consiglio al tuo sito Internet per verificare se il problema è stato risolto. Se il menu di navigazione ora viene visualizzato correttamente, probabilmente la maggior parte dei plugin ha causato il problema.
2. Determinare il plugin in conflitto
Per decidere quale plugin era la causa del problema, torna alla pagina Web dei plugin installati.
Dovrai riattivare tutti i plugin uno alla volta, controllando il tuo sito internet dopo ogni attivazione. Ripeti fino a quando il problema non si risolve dopo aver attivato un plug-in deciso.
Una volta che il problema si ripresenta, hai riconosciuto con successo il plugin che causa il problema.
Cosa fare dopo
Se decidi di avere un plugin in conflitto, immagina di contattare lo sviluppatore del plugin per rinforzarlo. Offriranno un ripristino o una sostituzione per risolvere il problema. D’altra parte, cercherai un plugin specifico che fornisca una capacità equivalente senza causare conflitti.
<span class=”ez-toc-section” id=”additional-resources-for-wordpress-admin”/>Risorse aggiuntive per l’amministratore di wordpress
Di seguito sono elencate alcune risorse aggiuntive che potresti trovare utili:
Si spera che le soluzioni che abbiamo condiviso sveleranno la barra di amministrazione causando il menu di navigazione o il problema di visualizzazione dell’intestazione sul tuo sito.
Potresti anche voler vedere le nostre informazioni sulla risoluzione degli errori più comuni di wordpress o dare un’occhiata ai nostri consigli sulla personalizzazione dello spazio di amministrazione di wordpress per i tuoi prerequisiti.
Se preferisci questo articolo, iscriviti al nostro canale YouTube per i tutorial video di wordpress. Potrai inoltre cercarci Twitter e Facebook.
I metodi di pubblicazione per riparare il menu di navigazione di wordpress mostrato sotto la barra di amministrazione sono apparsi per la prima volta su WPBeginner.
Customizing your wordpress dashboard can support individual enjoyment. An easy way to try this is to use together or change the admin icons.
Custom-designed icons can support your workflow and make it easier for new buyers to navigate the admin area of your website. Additionally, a custom-designed dashboard is further enjoyable to use.
In this article, we will show you how to add or change wordpress admin icons. We will provide you with data throughout the process step by step. Plus, your wordpress dashboard will look fresh and unique.
wordpress-admin-icons-in-post.png” alt=”Changing menu icons in the wordpress admin area” class=”wp-image-294831″/>
<span class=”ez-toc-section” id=”what-are-admin-icons-in-wordpress“/>What are admin icons in wordpress?
Admin icons are the little images you see in the navigation panel of your wordpress admin area. They appear next to each product on the menu.
<img decoding=”async” loading=”lazy” width=”680″ height=”370″ src=”https://www.wpbeginner.com/wp-content/uploads/2024/07/menuicons-wp-admin-example.png” alt=”Menu icons in the wordpress admin area” class=”wp-image-288334″/>
Those images use Dashicons, an icon font created for wordpress. It was first offered in 2013 and hasn’t changed since.
We recommend giving your wordpress admin area a little makeover by changing the icons. You will be able to transfer the icons with something you like on top or even replace them with your own custom icons.
If you’re building an online website for users who don’t seem to focus on wordpress, using custom icons can help them further navigate the admin dashboard.
Now let’s see how you will be able to simply change the admin icons. We will show you two tactics to check this and you will also be ready to choose the one that works best for you:
<h4 class=”wp-block-heading” id=”aioseo-method-1-change-admin-icons-in-wordpress-admin-using-a-plugin”><span class=”ez-toc-section” id=”manner-1-industry-admin-icons-in-wordpress-admin-using-a-plugin”/>Method 1: Sector admin icons in wordpress admin using a plugin
For the program we will use the Admin Menu Editor plugin. For the reason suggested by the identification, it means that you will simply customize the wordpress admin menus.
First, you want to insert and change the Admin Menu Editor plugin. For more details, see our training on methods to set up a wordpress plugin.
After activating the plugin, go to the file Settings » Menu Editor internet web page. Right here, you will see the wordpress admin menu inside a neat user interface (UI) where you will be able to customize it.
The user interface has a more productive toolbar, which helps you add or delete menu items, add separators, copy and paste items, and more.
Below, you will be able to click on a product in the menu to extend it and read its settings. Right here, the products in the Post menu have been expanded.
As you create menu items, you will see additional possible choices. If it’s a dad or mom menu, you’ll also see all the child menu items in the correct column.
Intending to load, replace, or delete a menu icon, click the “Show Complicated Possible Choices” link below.
Now click the button next to the “Icon URL” field.
Occasionally, an increasing number of people may see a popup where you will be able to see all available Dashicons. On the other hand, you will be able to click the “Media Library” button to add your image icon.
If you want to upload your own image icon, we recommend using a 32&instances;32 image, preferably in transparent PNG format.
After choosing your icon, click the “Save Changes” button to store your settings.
You will now see your custom menu icon used in the admin menu.
The next method requires the intention to load some custom code to change the icons.
In case you happen to not have finished it before, we recommend you take a quick look at our tutorial on embedding traditional code in wordpress.
The perfect and maximum protected means with the intention of uploading custom code into wordpress is the use of WPCode. It is the most productive wordpress code snippet plugin. It means you will safely add custom code, CSS, and HTML to your wordpresswebsite without accidentally breaking the rest.
Remember: The plugin also has an unlocked version known as WPCode Lite, which is capable of completing the process. On the other hand, the professional type will provide you with additional choices that may be useful.
Example 1. Converting an icon using default Dashicons
For this situation, we will use the default Dashicons to change an icon from the existing icon set.
It’s important to note that wordpress already has so many Dashicons, which are amazingly optimized for power. Therefore, their use will have no effect on the loading speed of the web page.
That said, before running the code, you want to note the following:
The URL of the menu products you want to change
The icon identifies which you wish to use
First, you want to search for the Internet web page URL for the menu products you want to customize. For example, let’s say you want to change the icon for the “Posts” menu.
Hover over the Posts menu and you will also see the URL it links to in your browser’s status bar at the bottom of the Internet web page. You simply need an equal part of the URL, which in this case can also be edit.php.
Next, go to the Dashicons website online and click on the icon you want to use.
Clicking on any icon will show its identity and slug on the most productive one. At this point, you want to copy the slug because you will need it in the next step.
Whenever you finish it, go to the Code Snippet » + Add snippet Internet web page and place your mouse over the “Add your custom code (new snippet)” box.
Then, simply click the “+Add custom snippet” button that appears.
In the next show, provide a reputation for your snippet and select PHP Snippet under the Risk Code Type.
Next, you will be able to copy and paste the following code into the code editor box:
function change_post_menu_icon() {
    international $menu;

    // Loop all through the menu items
    foreach ($menu as $key => $menu_item) {
        // To search out the "Posts" menu products (default URL is 'edit.php')
        if (isset($menu_item[2]) && $menu_item[2] == 'edit.php') {
            // Industry the icon to any other Dashicon class
            $menu[$key][6] = 'dashicons-format-aside'; // Industry this for your hottest Dashicon slug
        }
    }
}
add_action('admin_menu', 'change_post_menu_icon');
Don’t forget to change the dashicons-format-aside to the slug you copied previously.
Your code will look like this throughout the editor:
Next, you will need to tell wordpress where to run this code.
Admin menu icons appear throughout the wordpress admin area. On the similar web page, scroll down to the onboarding step and select “Admin Only” under Location Risk.
In any case, change your snippet to Full of Life and click the “Save Snippet” button to save many of your changes.
wordpress will now begin using the icon you chose for your Post Internet web page.
Example 2. Use the Font Awesome icon for a Products menu in your wordpress admin area
The default Dashicon library has a limited set of icons. The good news is that you will be able to use a font and icon library like Font Awesome, which has a much higher icon set.
On the other hand, this means that you will have to load Font Awesome, which may slow down the wordpress admin area quite a bit (just a few milliseconds).
Faster than you add any code, you first need to search for the icon you want to use. Go to the Font Awesome website and navigate to the Loose Library.
You will see all available icons without spending a penny.
Click on the icon you want to use and it will open in a popup. From here, you want to copy the Unicode value of the icon.
Next, cross the Code Snippet » + Add snippet Internet web page in your wordpress dashboard.
Go ahead and click the “+Add custom snippet” button until you reach the “Add your custom code (new snippet)” box.
In the next show, provide a reputation for your snippet and choose a PHP snippet because the code type is at risk.
Next, you will be able to copy and paste the following code into the code editor box:
// Enqueue Font Awesome throughout the admin area
function enqueue_font_awesome() {
    wp_enqueue_style('font-awesome', 'https://cdnjs.cloudflare.com/ajax/libs/font-awesome/6.0.0-beta3/css/all.min.css');
}
add_action('admin_enqueue_scripts', 'enqueue_font_awesome');

// Add custom class to the Posts menu products
function add_custom_post_menu_class() {
    international $menu;

    foreach ($menu as $key => $menu_item) {
        if (isset($menu_item[2]) && $menu_item[2] == 'edit.php') {
            $menu[$key][4] .= ' custom-post-menu-class';
        }
    }
}
add_action('admin_menu', 'add_custom_post_menu_class');

// Add custom CSS to switch the icon to a Font Awesome icon
function custom_admin_menu_icon() {
    echo '
        .custom-post-menu-class .wp-menu-image:forward of {
            font-family: "Font Awesome 5 Loose" !important;
            content material subject matter: "f015"; /* Unicode for the Font Awesome icon */
            font-weight: 900; /* Sought after for cast icons */
        }
    ';
}
add_action('admin_head', 'custom_admin_menu_icon');
Don’t fail to change f015 with the previously copied Unicode value.
Your code will look like this throughout the editor:
Next, you will need to tell wordpress where to run this code.
Admin menu icons appear in the wordpress admin area, so you can scroll down to the onboarding step and select “Admin Only” for location risk.
In any case, change your snippet to Full of Life and click the “Save Snippet” button to save many of your changes.
wordpress will now begin using the icon you chose for your Post Internet web page.
<span class=”ez-toc-section” id=”bonus-add-icons-for-custom-designed-put-up-sorts-in-wordpress“/>Bonus: Add Icons for Custom Installation Types in wordpress
Custom-designed post sorts help you create unique varieties of content topics for your wordpresswebsite. Those don’t appear to be pre-defined posts or pages, but something totally distinctive for your website.
If you use a traditional type of installation in your wordpresswebsite, you may want to change its icon to simply identify it.
<img decoding=”async” loading=”lazy” width=”680″ height=”334″ src=”https://www.wpbeginner.com/wp-content/uploads/2024/08/cpticonsbrowsedashicons.png” alt=”Changing the Menu Icon for a Custom Post Type in wordpress” class=”wp-image-294828″/>
If so, check out our detailed tutorial on the topic, which features some tactics for toggling or loading icons into your traditional installation varieties.
We hope this article has helped you convert or add admin icons in wordpress. You may also want to check out methods to white label your wordpress admin dashboard or view those recommended by professionals on customizing your wordpress admin space for superior workflows.
If you prefer this article, subscribe to our YouTube channel for wordpress video tutorials. You can also search for us Twitter and Facebook.
The post Learn How to Load or Swap wordpress Admin Icons (2 Simple Strategies) appeared first on WPBeginner.
Other people often balance their Netflix access with friends. To prevent password sharing from getting out of hand, online services have now started limiting which devices can use one account at a time.
A large number of our readers operate membership Internet sites and offer online lessons. They tell us they are equally concerned about other people sharing their login details because it leads to a loss of income for their business. That’s why they have to organize identical access restrictions.
In this article, we can explain how to ban each person’s access to only one software for your wordpresswebsite. Armed with the highest of these insights, you’ll understand how to protect your content and ensure the highest-paying people can access it, helping what you’re promoting stay honest and profitable.
wordpress” class=”wp-image-307228″/>
<span class=”ez-toc-section” id=”why-limit-client-login-to-one-instrument-in-wordpress“/>Why limit customer access to a tool in wordpress?
Streaming services face the problem of consumers sharing their login credentials. In 2023, Netflix reported that approximately 100 million households were sharing passwords globally. It’s huge!
Many wordpress internet sites, especially membership and e-learning web pages, have the same problem. By default, wordpress users can log in from infinite devices and browsers simultaneously.
This tradition seems harmless to these consumers, on the other hand it will certainly significantly influence a website‘s source of income and a specific person’s experience. For example:
Club websites offer specific content to people who pay. When consumers prorate access, fewer other people acquire subscriptions. This means much, much less money for the website owner.
When students share their study logins online, other users do not need to acquire the path. Plus, it makes it onerous to offer a personalized hand or know who finishes the route.
As you limit individual person logins to no less than software, you will have the ability to figure out how many precise consumers you might have, earn more money, and manage the value of your content or services. On top of that, you will provide a great experience to all paying consumers and keep your website extremely secure.
Limiting access does not mean not trusting consumers. It’s about keeping the website honest and making sure it definitely continues to work. This is useful to all Internet website owners and honest consumers.
<span class=”ez-toc-section” id=”restricting-client-login-to-one-instrument-in-wordpress-easy”/>Restrict Customer Access to a Tool in wordpress (Easy)
The first thing you want to do is get ready and move on to the free Loggedin – Prohibit Energetic Logins plugin. You will have the opportunity to search step by step and give a hand to our data on how to set up a wordpress plugin.
After activation, the plugin starts working automatically and limits each person to 3 vigorous logins.
Depending on your settings, the user will not be able to access brand new software once this limit is reached until they log out of one of their other devices. More on that below.
Realize: After logging into wordpress, the user will most often remain logged in even if they close the web browser. They must log out manually using the “Hello” menu in the top right corner of the display.
You will have the opportunity to configure the plugin via visit Settings » Cliché on your wordpress dashboard and then scrolling down to the “Login Settings” section.
Right here, you will have the option to toggle the amount within the “Maximum Lifetime Access” field to allow a defined choice of access.
The “Excellent Access Rating” setting determines what happens when the individual reaches the maximum limit of vigorous access:
Allow: They can access brand new software, on the other hand they might be automatically logged out from all other devices.
Block: They will not be able to access the new software until their other access sessions expire.
Therefore, if you want to limit a specific person’s access to only one software, you need to set the “Maximum number of lively logins” to at least one and the “Excellent access rating” to Block.
Or, if you have no idea what software they use as long as they are concurrently logged into only one software at a time, you should definitely set ‘Maximum Full Lifetime Logins’ to no less than one and ‘Log In Excellent Judgment’ to allow.
Don’t forget to click the “Save Changes” button to store your settings.
The plugin also means you can log a single person out of all devices. Simply enter your personal ID and then click the “Energy Logout” button.
You will have the chance to learn how to discover an individual ID in our data and discover how to find the submission, class, tag, feedback or person ID in wordpress.
Bypass access restrictions for certain consumers or roles (advanced)
You will have the ability to override access restrictions for certain clients or personal roles.
For example, you may want to make sure that your website administrators and editors don’t appear to be blocked by accident. Or you could have the most important staff member working on several PC programs in a couple of steps.
Alternatively, to try it out, it’s important to add custom-designed code snippets to your wordpress theme’s Purpose.php file. Even a small mistake can ruin your wordpress internet site and make it inaccessible, so we recommend that you take a look at our data on how to simply upload custom code into wordpress.
We recommend using WPCode because it is essentially the safest means of being able to upload code snippets and you also won’t need to manually edit the need.php file.
Bypass access restrictions for certain consumers
Just organize and navigate to WPCode’s loose template and then navigate to Code Snippet » + Add snippet on your wordpress dashboard.
Next, hover over “Add your custom code (new snippet)” to gain admission, then click the “Use snippet” button that appears.
A popup at the bottom of the display unit will ask you to select the code order for your snippet.
You should click on the “PHP Snippet” option.
This will probably rarely open the Create Custom Snippet Internet web page, where you will have the option to add the code you want. You’ll have the option to begin along with a determination for the snippet, paying homage to “Ignore access restrictions for certain consumers”.
Next, you should copy the code snippet below and paste it into the “Code Preview” pane:
function loggedin_bypass_users( $bypass, $user_id ) {

    // Enter the individual IDs to bypass.
    $allowed_users = array( 1, 2, 3, 4, 5 );

    return in_array( $user_id, $allowed_users );
}

add_filter( 'loggedin_bypass', 'loggedin_bypass_users', 10, 2 );
Now take a look at the highway that starts with $allowed_users = array. You want to replace “1, 2, 3, 4, 5” with the individual IDs for the top consumers you need to bypass the restriction. You will have the option to add any choice of particular person IDs and they will need to be separated by commas.
You will have the chance to learn how to discover an individual ID in our data on how to find the submission, class, tag, feedback or person ID in wordpress.
Finally, you want to set the snippet to “Full of Life” and then click the “Save Snippet” button to store your settings.
Bypass access restrictions for certain roles
You will have the option to follow the same steps to be able to upload a code snippet to bypass access restrictions for certain roles.
Simply create a brand new code snippet known as “Override access restrictions for certain roles” and then paste the following code snippet into the “Code Preview” pane:
This snippet ignores the restriction for “administrator” and “editor” roles. You will have the option to add any other roles, honoring ‘author’, in single quotes and separated by commas.
You will definitely want to set the snippet to “Full of Life” and click the “Save Snippet” button if you are done.
We hope this course has helped you learn how to restrict a particular person’s access to at least one software in wordpress. You may also need to see our final information on how to create a wordpress club website or have our professional make a selection of the most efficient wordpress LMS plugins.
Even if you liked this text, subscribe to our YouTube channel for wordpress video tutorials. You will also have the opportunity to search for us Twitter and Facebook.
The post Learn How to Ban Consumer Access to a Tool in wordpress appeared first on WPBeginner.
HTML forms can be great additions on your wordpress internet web page. They let visitors reach out to you, sign up for newsletters, provide feedback, and much more.
While HTML forms permit you to connect upper together with your target market, rising them can be difficult. And, for those who don’t appear to be familiar with coding, then the regarded as dealing with code can be overwhelming.
In this data, we will be able to show you how you can add HTML forms on your wordpress internet web page. This provides you with the tools you need to easily create custom designed HTML forms and make your internet web page further engaging.
wordpress-in-post.png” alt=”Add HTML forms in wordpress in-post image” class=”wp-image-285643″/>
What Are HTML Bureaucracy and Why Create One?
HTML forms art work similar to other internet web page forms. They let visitors kind in and submit wisdom like names, e mail addresses, feedback, orders, and further.
What gadgets them apart is that HTML forms are created using HTML code instead of a drag-and-drop visual editor like a sort plugin. So, it is important to define fields very similar to text boxes, checkboxes, radio buttons, and dropdown menus yourself. You make a decision how they look and set explicit regulations for some way they art work.
Listed below are some advantages of constructing forms from scratch using HTML:
Optimized Potency. HTML forms generally tend to load sooner and use a lot much less memory because the code is lightweight.
Keep watch over. You’ll have complete control over the form’s design and capacity because you’re not limited thru a sort builder’s choices.
Customization. HTML forms can be tailored exactly on your needs, offering further flexible shape customization.
While rising HTML forms from scratch is a great way to learn and apply coding, it does have its private not easy scenarios.
You’ll have hassle with cross-browser compatibility, where the form works differently on different web browsers. Moreover, coping with form validation with JavaScript can be difficult. It needs thorough testing to make sure you’ll be capable to achieve and process all client inputs correctly.
That said, there are ways to be able to upload HTML forms without the ones complexities. So, irrespective of if you are managing a wordpress blog, industry internet web page, or on-line retailer, you’ll be capable to merely add HTML forms on your internet web page without a want to code from scratch.
Inside the following sections, we will be able to show you how you can add HTML forms to wordpress. Proper right here’s a to hand information a coarse evaluate of the 2 methods we will be able to quilt in this data:
In a position? Let’s get started.
<h4 class=”wp-block-heading” id=”aioseo-method-2-adding-html-forms-in-wordpress-using-the-html-forms-plugin-easy”><span class=”ez-toc-section” id=”approach-1-together-with-html-bureaucracy-in-wordpress-using-the-html-bureaucracy-plugin-easy”/>Approach 1: Together with HTML Bureaucracy in wordpress Using the HTML Bureaucracy Plugin (Easy)
An easy means to be able to upload an HTML form to a wordpress internet web page is to use a free form plugin like HTML Paperwork. It’s a useful gizmo for rising and configuring HTML forms multi functional place, in order that you don’t will have to handle any server-side configuration.
In this data, we will be able to use the plugin’s free type, which contains the whole thing you need to create an HTML form.
To get started, let’s you’ll want to have the plugin installed on your wordpress internet web page. If you need be in agreement, then you definately’ll be capable to follow our step-by-step data on putting in a wordpress plugin.
Upon activation, you’ll be capable to navigate to HTML Bureaucracy » Add New for your wordpress admin dashboard to start out rising your contact form.
This may occasionally redirect you to the ‘Add New Form’ internet web page.
From appropriate right here, the first thing you’ll need to do is identify your form thru simply typing the identify into the ‘Form Title’ field. For instance, we named our form ‘Publication Sign-Up.’
Next, move ahead and click on at the ‘Create Form’ button underneath the sector.
When you do that, the ‘Edit Form’ internet web page will appear, and also you’ll be capable to get began customizing your HTML contact form.
At the top of the tab, you’ll see your form’s details, at the side of the form establish, slug, and shortcode. You don’t will have to memorize the ones details, as they’ll be available on the HTML Bureaucracy dashboard when you need them.
Beneath the ones details, you’ll to seek out the menu tabs. Inside the ‘Fields’ tab, you’ll be capable to see rather a large number of field buttons, like ‘Text,’ ‘Dates,’ ‘Checkboxes,’ and ‘Radio buttons,’ to be able to upload on your forms.
Let’s scroll down just a bit further.
At the bottom of this tab, you’ll find a pre-built HTML form together with the preview. This contact form is lovely simple. It has 4 fields for patrons to kind out their identify, e-mail handle, a brief subject, and a message.
Now, let’s say that you wish to have to be able to upload a brand spanking new field with an e mail publication subscription sign-up. Then simply click on on on one of the vital field buttons above ‘Form Code.’
Follow: Needless to say HTML Bureaucracy doesn’t strengthen e-mail promoting and advertising supplier integrations. So, it is important to manually add consumers’ e-mail addresses on your mailing report.
For instance, we will be able to use a dropdown field and create a ‘Certain/No’ chance.
From appropriate right here, you’ll need to click on on ‘Dropdown,’ and this may increasingly open the dropdown field’s configuration possible choices. You’ll be capable to get began completing the details, which include the sector’s label and choices.
After you have into the details, you’ll be capable to click on on ‘Add Field to Form.’
Then, you will have to see the dropdown field tag throughout the ‘Form Code’ section. Simply scroll down the tab to check it out.
The next step is to reorganize the contact form.
To handle a excellent go with the flow, you’ll want the dropdown field to be moderately underneath the ‘Electronic mail’ field.
To move it, you’ll be capable to decrease the dropdown field tag from the main tag’s
to without equal >. Then, move ahead and paste it moderately underneath the ‘Electronic mail’ tag.
The default ‘Matter’ field is probably not important for a newsletter sign-up form. So, we recommend disposing of the sector.
You’ll be capable to do this thru deleting its tag from the main
to without equal
.
After transferring and deleting tags, you’ll need to scroll down the tab to the ‘Form Preview’ section.
In this section, you’ll be capable to check for those who’ve successfully moved and deleted the fields without breaking the rest. You’ll be capable to moreover check if the dropdown menu works accurately.
When you find yourself happy with the results, move ahead and click on at the blue ‘Save Changes’ button underneath the ‘Form Code’ section.
As quickly because the saving process is finished, you will have to see a ‘Form up-to-the-minute.’ notification at the top of this internet web page.
Now, it’s imaginable you’ll need to check the form’s configuration. Let’s switch to the ‘Messages’ tab to look how HTML Bureaucracy configures the form submission confirmation messages.
Simply click on on on ‘Messages’ to open the tab.
This tab signifies that you’ll edit the pre-made copy for when a client’s form submission is successful and other an similar eventualities.
If the whole thing appears to be excellent to you, then you definately’ll be capable to go away it as is. Should you made any changes, don’t fail to remember to the ‘Save Changes’ button in order that you don’t lose your construction.
Next, let’s move to the ‘Settings’ tab.
Via default, HTML Bureaucracy will set ‘Certain’ to save lots of a variety of each and every form submission and ‘No’ to hide the form after a successful submission. You’ll be capable to customize this as sought after.
Then, throughout the ‘Redirect to URL After A success Sign-Ups,’ you’ll be capable to copy and paste the URL of a live web internet web page from your wordpress web site. Or, kind 0 into the sector to stick consumers on the internet web page after a successful form submission.
When the whole thing is set, all that’s left to do is add the HTML contact form to a wordpress internet web page.
Let’s head over to Posts or Internet web page » All Posts or All Pages from the wordpress dashboard.
<img decoding=”async” loading=”lazy” width=”680″ height=”345″ src=”https://www.wpbeginner.com/wp-content/uploads/2024/06/wpadminarea-pages-allpages.png” alt=”The All Pages menu item in the wordpress admin area” class=”wp-image-284995″/>
For this knowledge, we will be able to add the HTML form to our ‘Contact’ internet web page.
So, we’ll hover over the ‘Contact’ internet web page throughout the report and click on on ‘Edit’ when it seems that.
<img decoding=”async” loading=”lazy” width=”680″ height=”373″ src=”https://www.wpbeginner.com/wp-content/uploads/2024/06/wpadminarea-pages-allpages-contact-edit.png” alt=”The Edit button for editing a wordpress page” class=”wp-image-285009″/>
This may occasionally liberate the ‘Contact’ internet web page’s block editor.
Inside the editor, you’ll be capable to get began choosing an area to place the form. Then, simply hover over it and click on at the ‘+’ button to be able to upload the HTML Bureaucracy block.
<img decoding=”async” loading=”lazy” width=”680″ height=”359″ src=”https://www.wpbeginner.com/wp-content/uploads/2024/06/wpblockeditor-contactpages-addblock.png” alt=”The add new block button for adding a block in wordpress block editor” class=”wp-image-285010″/>
Now, you’ll be capable to kind ‘HTML Bureaucracy’ into the search bar to in brief to seek out the block. After you have the search finish end result, click on on it.
You’ll then see a dropdown throughout the ‘HTML Bureaucracy’ block. Simply make larger on it and select the form you wish to have to turn. Proper right here, we’re opting for the ‘Publication Sign-Up’ form that we merely created.
The form will appear when you submit your content material subject matter. So each time you’ve determined at the form from the dropdown menu, you’ll be capable to click on at the ‘Substitute’ button.
There you’ve gotten it! Your form is now live, and consumers can sign up for your newsletter. Proper right here’s what it could appear to be on your wordpress internet web page:
<img decoding=”async” loading=”lazy” width=”680″ height=”455″ src=”https://www.wpbeginner.com/wp-content/uploads/2024/06/livewebsite-htmlforms.png” alt=”HTML Forms’ newlsetter signup form on a live website” class=”wp-image-285107″/>
To appear form submissions, you’ll be capable to first head over to HTML Bureaucracy » All Bureaucracy. This may occasionally take you to the report of your whole HTML Bureaucracy.
Then, simply hover over a sort and click on at the ‘Submissions’ button when it seems that.
From appropriate right here, you’ll be capable to see all of your form submissions.
The ‘Submissions’ table details all wisdom consumers filled out for your form. Then, there’s the ‘Timestamp’ column, which tells you when they submitted the form.
For instance, appropriate right here, the main submission was made thru ‘Client 1.’
From the table, we will see that the shopper submitted the form on June 25 at spherical 1 p.m. Moreover, ‘Client 1’ spoke again ‘Most likely Later’ for the ‘Do you wish to have to subscribe to our newsletter’ question. So, in this case, you shouldn’t add their e-mail handle on your mailing report.
<h4 class=”wp-block-heading” id=”aioseo-method-2-adding-html-forms-in-wordpress-using-the-wpforms-plugin-recommended”><span class=”ez-toc-section” id=”approach-2-together-with-custom-designed-html-to-wordpress-bureaucracy-with-wpforms”/>Approach 2: Together with Custom designed HTML to wordpress Bureaucracy With WPForms
Every other method to rising HTML forms is using a sort builder. While this method doesn’t will mean you can code your forms from scratch, it signifies that you’ll customize them thru together with HTML code snippets.
For instance, it’s profitable to make use of custom designed HTML to show a brief warning message on a checkout form with a link on your ‘Refund and Returns Protection’ internet web page.
Otherwise you’ll be capable to upload a development bar to let consumers understand how some distance they’re from completing the form. Custom designed HTML might also will mean you can insert emojis or add a tooltip.
In this means, we will be able to show you how you can add HTML code snippets to customize your wordpress forms. We will show you tactics to take a look at this using WPForms, because it’s the best form builder for wordpress.
WPForms moreover comes with whole one-click add-ons and third-party integrations.
The ones tools include Consistent Touch for tracking your e-mail promoting and advertising advertising marketing campaign, the Form Abandonment add-on for monitoring and decreasing shape abandonment issues, and much more.
So, WPforms makes it more straightforward to extend your form’s capacity than for those who hard-coded your wordpress form from scratch.
Follow: WPForms Lite is completely free, alternatively you’ll need the highest price type to use the HTML field. Once upgraded, you’ll moreover get get right of entry to to bigger than 1900 form templates, the conditional not unusual sense serve as, and trustworthy strengthen. Fortunately, as a WPBeginner reader, you’ll be capable to use our WPForms coupon to get 50% off.
Previous than we start, let’s you’ll want to have WPForms installed and activated on your wordpress internet web page. If you need be in agreement, then please see our data on how one can set up a wordpress plugin.
Upon activation, you’ll be capable to navigate to WPForms » Settings to enter your license code. After you have into the vital factor, simply click on at the ‘Read about Key’ button to start out the verification.
Once completed, you’ll be capable to get began rising your form and together with custom designed HTML. For this knowledge, we will be able to show you how you can add a simple tooltip on your contact form.
A tooltip is like a small pop-up box that appears when you hover your mouse over a web section. It’s to hand as it shall we consumers be told further a few explicit web section without clicking or leaving the internet web page they’re on.
On the other hand first, let’s create the touch shape. Simply head over to WPForms » Add New from your wordpress admin area to get started.
<img decoding=”async” loading=”lazy” width=”680″ height=”308″ src=”https://www.wpbeginner.com/wp-content/uploads/2024/06/wordpress-wpforms-addnew.png” alt=”The Add New button under WPForms in the wordpress admin area” class=”wp-image-281452″/>
This may occasionally open the ‘Setup’ panel, where you’ll first need to identify your form. This identify is on your reference very best, so that you’ll be capable to use the rest you wish to have.
The next step is settling on a template.
As there are 1900+ form templates to choose from, you’ll be capable to use the search bar to filter them in brief. To check out this, merely kind ‘Contact Form’ and wait for the search to complete.
If you want to uncover each and every search finish end result to look what the form is like, then you definately’ll be capable to have the benefit of the preview serve as. Simply hover over the form template and click on on ‘View Demo.’
When you’ve found out the perfect contact form on your needs, hover over it once all over again and click on on ‘Use Template.’
This may occasionally liberate the form builder.
Now, all of the customization tools are throughout the left panel, and the live preview of the form is at the proper side of your show.
On this whole internet web page, you’ll be capable to use the drag-and-drop serve as to be able to upload portions from the customization panel to the live preview. You’ll be capable to moreover use the serve as to move spherical fields throughout the live preview.
Let’s take a look at together with the HTML field to the form. All you wish to have to do is scroll down the left-hand panel and then drag and drop ‘HTML’ onto the form.
After hanging the HTML field, you’ll be capable to click on on on it to open its customization possible choices. Proper right here, the first thing to do is fill out the sector’s ‘Label.’ You’ll be capable to moreover go away it empty.
Then, you’ll insert the custom designed HTML code into the ‘Code’ field.
To create a tooltip, you’ll be capable to use the ‘’ function or simply copy the following code and paste it into the ‘Code’ field:
Hi there! We've got an e-mail newsletter it is imaginable you'll be able to need to subscribe to. Let us know throughout the Observation or Message field, and we’ll sign you up.
This is just a trend code, so feel free to edit our copy to check your needs upper.
Follow: Needless to say if you want to instantly add consumers on your mailing report, then it is important to mix the form with an e-mail promoting and advertising provider. To check out this, merely see our data on how one can use a touch shape to develop your e mail record in wordpress.
Follow that WPForms doesn’t display the HTML code throughout the form builder preview. To preview the sector and make sure the whole thing is right kind, you’ll be capable to save the changes first and click on on ‘Preview.’
This may occasionally take you to a brand spanking new tab.
Now, let’s check out whether or not or now not the HTML code snippet on your tooltip works accurately. Simply hover over the text and wait for the tooltip to appear for a few seconds.
When you find yourself proud of the result, you’ll be capable to go back to the form builder to finalize your form.
Your form notification and confirmation settings are already prepare in WPForms. On the other hand, if you want to customize them, move to Settings, then Notifications or Confirmations.
Inside the ‘Notifications’ section, you’ll be capable to upload more than one recipients in your touch shape submission.
You’ll see a brief instruction for those who hover over the question mark button next to the ‘Send to Electronic mail Maintain’ field. You’ll need to follow it to make sure your notification is sent to the correct e-mail addresses.
You’ll be capable to moreover edit the pre-made copy on your e-mail subject line.
For instance, we changed ours from ‘New Get entry to: Contact Form’ to ‘You’ve got mail: New contact.’
When you’ve customized your notifications, you’ll need to switch to the ‘Confirmation’ panel.
Via default, WPForms gadgets your confirmation kind to ‘Message’ and has the pre-made copy ready for you. You’ll be capable to for sure trade the ones settings if you want to.
Slightly then showing a confirmation message, you’ll be capable to redirect consumers to a brand spanking new internet web page or a decided on URL.
Once the whole thing is set, it’s time to submit the form.
Pass ahead and click on at the ‘Embed’ button to start out publishing. WPForms will then ask if you want to add the form to an present or a brand spanking new internet web page. In this data, we will be able to make a choice ‘Make a choice present internet web page.’
<img decoding=”async” loading=”lazy” width=”680″ height=”341″ src=”https://www.wpbeginner.com/wp-content/uploads/2024/06/wordpress-wforms-embedwizard-selectexistingpage.png” alt=”The Select Existing Page button when embedding a form from WPForms” class=”wp-image-281974″/>
Inside the next pop-up window, you’ll make a choice a internet web page from the report of available pages. After that, you’ll be capable to click on on ‘Let’s move!’ to talk over with the internet web page’s block editor.
Now, you’ll be capable to hover over the world where you wish to have to place the form and click on at the ‘+’ button. Pass ahead and select the WPForms block.
Then, you’ll be capable to make a choice a sort from the WPForms block’s dropdown.
When you’ve determined on a sort, WPForms will load it throughout the determined on area. If you want to show the form’s establish, then you definately’ll be capable to head over to the ‘Block’ tab throughout the right-hand panel and switch on the ‘Show Title’ slider.
When you find yourself happy with the whole thing, move ahead and hit the ‘Substitute’ button.
And completed! You’ve added custom designed HTML on your WPForms contact form and made it survive your wordpress internet web page. Now, consumers can get began filling out the form and most likely sign up for your e-mail newsletter.
<img decoding=”async” loading=”lazy” width=”680″ height=”419″ src=”https://www.wpbeginner.com/wp-content/uploads/2024/06/livewebsite-wpforms-withcustomhtml.png” alt=”WPForms with custom HTML on a live website” class=”wp-image-285639″/>
To appear your whole WPForms form submissions, you’ll need to navigate to WPForms All Bureaucracy.
Then, you’ll be capable to hover over ‘Contact Form’ or any form from the report and click on on ‘Entries’ when the button turns out.
On the next show, you will have to be capable to see all of your form submissions.
The table details all of the wisdom consumers submitted with the form along with the submission time.
For instance, on July 2 at spherical 8 a.m., ‘Client 3’ said they wanted to subscribe to the email newsletter and left a question on how to achieve our purchaser strengthen staff.
We can moreover see the ‘Actions’ column. In this column, there are a variety of buttons: ‘View,’ ‘Edit, ‘Junk mail,’ and ‘Trash.’
Should you click on on ‘View,’ WPForms will take you to an get entry to’s trustworthy evaluate internet web page. On this internet web page, the plugin encourages you to activate two add-ons.
The main one is the Geolocation add-on for tracking, where the shopper submits the form. The second one is the Consumer Adventure add-on, which allow you to analyze the shopper’s path by way of your internet web page until they hit the ‘Publish’ button.
We recommend setting up and activating the ones add-ons for added optimized form potency.
The ‘Junk mail’ and ‘Trash’ buttons are to hand for marking fake submissions and disposing of them from your get entry to. To be told further about lowering fake form submissions, you’ll be capable to be told our data on how one can block touch shape junk mail.
<h4 class=”wp-block-heading” id=”aioseo-bonus-tip-uploading-a-custom-html-page-to-wordpress“><span class=”ez-toc-section” id=”bonus-tip-uploading-a-custom-designed-html-internet-web-page-to-wordpress“/>Bonus Tip: Uploading a Custom designed HTML Internet web page to wordpress
You may also be looking for one way so as to add a custom designed HTML internet web page on your wordpress internet web page. This can be to hand while you’ve were given a static template that you wish to have to use or an HTML internet web page from an out of date internet web page.
The full rule of thumb is so as to add a single HTML internet web page and now not the usage of a separate CSS or image data. On the other hand, if the internet web page you wish to have so as to add comprises separate CSS data and images, then you definately definately will have to place them in a list development.
To be told further, you’ll need to see our beginner’s data on how one can add an HTML web page to wordpress with out 404 mistakes.
We hope this text has helped you learn how to add HTML forms in wordpress. Next, it’s imaginable you’ll need to check our other guides on how one can export wordpress shape entries to CSV and Excel and how one can arrange wordpress shape monitoring in Google Analytics.
Should you favored this text, then please subscribe to our YouTube Channel for wordpress video tutorials. You’ll be capable to moreover to seek out us on Twitter and Fb.
The submit The best way to Upload HTML Paperwork in wordpress (2 Strategies) first appeared on WPBeginner.
Although you’ve been working laborious to make stronger your wordpress web page’s seo, you received’t have considered taxonomy seo.
Through the years of attempting different seo strategies, now we have found out that optimizing magnificence pages and other taxonomy archives can significantly make stronger a web site’s rankings on search engine results pages (SERPs).
In this article, we will show you methods to optimize your magnificence pages and other taxonomy archives for seo in wordpress.
seo-optimize-your-wordpress-category-pages-in-post.png” alt=”Taxonomy seo – How to Optimize Your wordpress Category Pages” class=”wp-image-285482″/>
Why Are Magnificence Pages Crucial for wordpressseo?
In wordpress, taxonomies are used to organize a web site’s content material subject material. They can help you team identical posts together, serving on your web site visitors in short find what they would like.
The default wordpress taxonomies are classes, which act as a web site’s table of contents, and tags, which can be thought to be an index phase.
Some internet websites moreover add subcategories and customized taxonomies to kind their content material subject material in a lot more techniques. For instance, many eCommerce plugins robotically create a custom designed Product taxonomy.
When your web site content material subject material is carefully organized, visitors and search engines like google can merely navigate it, resulting in happier shoppers and stepped ahead search rankings.
Our data on Search engine marketing easiest practices for sorting your content material teaches you methods to use categories and tags effectively.
Alternatively in this instructional, we will focus on methods to make stronger seo by the use of optimizing wordpress magnificence pages.
What Is a Magnificence Internet web page in wordpress?
Each taxonomy has an archive web page that includes a establish and description along with a list of posts contained in that taxonomy.
For instance, our WPBeginner Tutorials magnificence internet web page has the establish ‘700+ Best possible conceivable Free wordpress Tutorials’. An intensive description follows, where we give an explanation for how our tutorials can help you learn wordpress to make stronger your web site, and we record some in taste tutorials.
We moreover include a link to our YouTube channel for individuals who make a selection to look at films.
After the category description, you’re going to find a record of posts inside the Tutorials magnificence, starting with necessarily essentially the most in recent years revealed ones.
Thru default, magnificence archive pages are indexed by the use of Google and other search engines like google.
In this screenshot, you’ll have the ability to see that our Tutorials magnificence is integrated in Google search results. The record incorporates the category internet web page’s establish and description.
Clicking the link will take you right away to the Tutorials magnificence internet web page on WPBeginner.
Improving Magnificence Internet web page seo in wordpress
Optimizing the content material subject material on your wordpress magnificence pages is a great way to make stronger your web site’s seo when accomplished correctly.
We propose the use of the All in One Search engine marketing (AIOSEO) wordpress plugin. It’s the easiest Search engine marketing plugin for wordpress and helps you optimize your web page for search engines like google without having any technical seo knowledge.
<img decoding=”async” loading=”lazy” width=”680″ height=”360″ src=”https://wpmountain.com/wp-content/uploads/2024/05/aioseosite.png” alt=”All in One seo” class=”wp-image-266250″/>
You’ll have the ability to get right to use lots of the Taxonomy seo choices inside the AIOSEO unfastened model. Additionally, the top rate model of AIOSEO supplies sophisticated choices like disposing of the category base, optimizing custom designed taxonomies, TruSEO on-page analysis for taxonomies, and additional.
You’ll have the ability to learn to arrange and configure AIOSEO in our data on the way to arrange All in One Search engine marketing for wordpress accurately.
Now, let’s take a look at methods to optimize magnificence pages and other taxonomy archive pages in wordpress. You’ll have the ability to use the links underneath to jump to the phase you’re most involved in:
1. Keep away from Keyword Cannibalization Between Categories and Posts
One concern with taxonomy seo is that your magnificence pages would possibly compete with wordpress posts for the same keyword. This is known as keyword cannibalization and can create an advanced scenario for search engines like google.
We keep up a correspondence additional in most cases about methods to restore keyword cannibalization issues in our data on the way to strengthen your natural click-through charge in wordpress.
There are a few techniques to keep away from cannibalization issues relating to magnificence archive pages.
For instance, some internet websites goal other key phrases when optimizing magnificence pages and blog posts. Other internet websites keep away from the problem by the use of asking search engines like google not to index categories.
Let’s take a look at the ones two approaches so that you’ll be ready to make a choice the one that most nearly fits your web site.
Choosing Not to Index Magnificence and Tag Archive Pages
Some shoppers save you search engines like google from indexing their magnificence and tag archive listings. This encourages search engines like google to prioritize their actual posts and pages. It moreover prevents keyword cannibalization from categories and tags.
You need to navigate to All in One seo » Search Glance and click on at the ‘Taxonomies’ tab.
Now seek for the ‘Show in Search’ setting beneath Categories and choose the ‘No’ risk.
Next, you need to scroll down and do the identical issue for tags.
Whilst you click on at the ‘Save Changes’ button on the most productive or bottom of the internet web page, search engines like google will not index your magnificence and tag archive pages.
Since they gained’t appear in search results, you’re going to not want to optimize them for seo. On the other hand, you will have to nonetheless wish to apply one of the vital steps underneath to make stronger particular person experience.
Optimizing Categories and Posts for Different Keywords
Each opposite direction shoppers take to stop keyword cannibalization is to concentrate on different keywords on taxonomy archive pages and posts.
For instance, consider a assessment web site that covers running shoes:
The category internet web page for this subject would objective the broad keyword of ‘Running Sneakers’. The description might include an overview of the more than a few forms of running shoes and a buyer’s data to choosing the right running shoes.
Within the period in-between, the individual posts would assessment particular types or models of running shoes. They might objective long-tail key phrases like ‘highest stability running shoes’, ‘lightweight running shoes for marathons’, and additional.
Thru the use of this fashion, every the category internet web page and the individual posts can rank for similar keywords without competing with each other.
The category internet web page will act as a hub, attracting shoppers with a commonplace pastime in running shoes. The individual evaluations could be displayed on search results for patrons with additional particular needs.
This improves the web site’s basic seo potency by the use of targeting a wider range of similar keywords and providing a additional entire particular person experience.
Tip: When optimizing magnificence pages for seo, it’s conceivable you’ll wish to cover your tags from search engines like google the use of the method above. This may occasionally make sure that there’s no keyword cannibalization between your categories and tags.
2. Optimize the URL Development for Categories
Your magnificence URLs should be temporary, easy to grab, and include similar keywords. Happily, wordpress uses an Search engine marketing-friendly URL construction for categories, posts, and pages.
Thru default, your categories can have URLs (or permalinks) that appear to be this:
https://example.com/magnificence/running-shoes/
This URL starts with the web site’s house establish followed by the use of the category base prefix, which is ‘magnificence’. After that, you see a slug that identifies the category.
In this case, that’s ‘running-shoes’, where a hyphen is robotically used to separate different words.
This building works smartly for lots of internet websites. On the other hand, depending on your needs, you’ll have the ability to business the ground to every other word, like ‘topics’.
Simply transfer to Settings » Permalinks in wordpress admin and kind the ground you wish to have to make use of into the ‘Magnificence base’ field. Remember to click on at the ‘Save Changes’ button to store your settings.
For those who business the category base to ‘topics’, then magnificence permalinks will now appear to be this:
https://example.com/topics/running-shoes/
Bear in mind that you just’ll have the ability to business the tag base from ‘tag’ to at least one factor else on the equivalent internet web page.
Some shoppers make a selection to completely remove the category base prefix to simplify their magnificence URLs. The prefix doesn’t have any seo get advantages, and disposing of it shortens the URL and makes it easier to be informed.
You’ll have the ability to merely do this the use of a best price serve as of All in One seo. Simply navigate to All in One seo » Search Glance and then click on on on the ‘Taxonomies’ tab.
Now, beneath the ‘Categories’ phase, click on on on the ‘Advanced’ tab and choose the ‘Positive’ risk next to ‘Remove Magnificence Base Prefix’.
Your magnificence permalinks will now appear to be this:
https://example.com/running-shoes/
For detailed instructions, see our data on the way to trade the class base prefix in wordpress.
<h4 class=”wp-block-heading” id=”aioseo-3-set-the-default-seo-title-and-description-format-for-categories”>3. Set the Default seo Identify and Description Construction for Categories
All in One seo permits you to customize the default structure for some way categories appear on search engine results pages.
You’ll have the ability to find the ones settings by the use of navigating to All in One seo » Search Glance and opening the ‘Taxonomies’ tab.
<img decoding=”async” loading=”lazy” width=”680″ height=”393″ src=”https://wpmountain.com/wp-content/uploads/2024/09/image-8.png” alt=”All in One seo Taxonomies Settings” class=”wp-image-300734″ title=”All in One seo Taxonomies Settings”/>
AIOSEO uses dynamic tags to set the default formats of the seo establish and description of your categories.
Thru default, search engines like google will display the establish as the category establish and web page establish. The meta description will simply be the category description.
For those who glance at the Preview phase, you’ll have the ability to see how this may most probably appear in search results.
The ones default settings will art work for lots of internet websites, on the other hand you’ll have the ability to customize them by the use of together with or disposing of dynamic tags.
This structure could be used to set the initial meta establish and description of each magnificence. Throughout the next phase, we’ll show you methods to customize them for particular categories.
4. Add a Helpful Determine and Description for Each Magnificence
You’ll have to add a temporary description to each magnificence internet web page to offer shoppers a better working out of the content material subject material they’ll find.
As you spotted above, magnificence names and descriptions are displayed on search engine results pages and would possibly encourage additional shoppers to click on in your link.
Besides that, Google appears to be for helpful and readable content material subject material on your web site when deciding what to rank highest in search results.
First, head over to the Posts » Categories internet web page on your wordpress dashboard. This may occasionally display a list of your present categories and subcategories and assist you to upload new classes.
Now you need to click on at the ‘Edit’ link next to the category you wish to have to add content material subject material to.
This may occasionally take you to the category edit visual display unit, where you’ll have the ability to add a establish, slug, and description in your magnificence.
The slug could be used in magnificence URLs and should be saved temporary and simple. On the other hand, the category establish could be displayed on the most productive of sophistication archive pages, so this can be longer and additional descriptive.
Make a choice a name that accurately shows the content material subject material within that magnificence.
You’ll have to moreover add a compelling description of at least 300 words that expands on the magnificence establish and introduces the topic. This can be similar to a blog submit creation.
You’ll have the ability to write this in easy text inside the Description field. If you need as a way to upload headings, formatting, footage, or links to the description, then you will need to use HTML code.
For instance, HTML heading tags will appear to be this:
You’ll have the ability to add HTML the use of anchor tags like this:
And also you’ll have the ability to add footage like this:
Don’t put out of your mind to click on on on the ‘Exchange’ button to avoid wasting a whole lot of your changes.
This magnificence establish and description could be displayed on your web site and search engine results pages by the use of default.
However, if you are the use of the Professional model of All in One Search engine marketing, you then’ll have the ability to set a novel seo establish and meta description in your magnificence.
Simply scroll down the category internet web page until you see the ‘AIOSEO Settings’ phase. Proper right here, you’ll have the ability to override the default seo establish and description formats you created in phase 3 above.
Merely delete any or all dynamic tags and kind the text you wish to have to make use of.
Now, you’ll want to repeat this process as a way to upload titles and descriptions to all your categories. After that, you want to care to do the identical issue along side your tags by the use of visiting Posts » Tags.
<h4 class=”wp-block-heading” id=”aioseo-5-optimize-the-content-of-each-category-description-for-seo“>5. Optimize the Content material subject material of Each Magnificence Description for seo
You’ll have the ability to moreover optimize each magnificence description the identical approach you optimize your weblog posts for Search engine marketing. This may occasionally lend a hand your magnificence pages rank higher in search results.
This starts with doing key phrase analysis to make sure that your magnificence description incorporates phrases shoppers are much more likely to search for.
Anyplace imaginable, you’ll have to upload interior hyperlinks to make stronger navigation and lend a hand search engines like google understand the relationship between your categories and posts.
For instance, you wish to have to return with links to identical categories and subcategories inside the description and also add links on your magnificence pages in identical blog posts. You’ll have the ability to moreover robotically show subcategories on class pages.
Moreover, just remember to optimize any pictures you employ for serps.
In the end, you’ll have the ability to make stronger the headline the use of AI. Optimizing the category establish will make it stand out and encourage shoppers to click on on it after they see it in search results. Probably the most essential highest techniques to check out that is the use of our free Headline Analyzer.
<h4 class=”wp-block-heading” id=”aioseo-6-add-breadcrumb-navigation-to-your-wordpress–website“>6. Add Breadcrumb Navigation to Your wordpress Internet website online
Breadcrumbs are an extra navigation software that you just’ll have the ability to add on your wordpress web site to lend a hand shoppers find your content material subject material.
They let shoppers see where they’re located inside the hierarchy of your web site. Moreover they lend a hand search engines like google like Google transfer slowly your web site additional effectively and understand the development of your web page. This may occasionally lend a hand your web site rank higher for similar keywords.
We use breadcrumbs on WPBeginner, and also you’ll have the ability to see them on every magnificence internet web page and submit:
For detailed instructions on methods to add them on your web site, see our data on the way to show breadcrumb navigation hyperlinks in wordpress.
If when you have a web based store, you then’ll have the ability to apply our beginner’s data on the way to upload breadcrumbs in WooCommerce.
Now that you just’ve learned about taxonomy seo, it’s conceivable you’ll like to seem some guides related to other ways to make stronger web site seo in wordpress:
We hope this instructional helped you learn to optimize your wordpress magnificence pages. You may also want to see our data on whether or not classes or tags are easiest for Search engine marketing or our final information to wordpress Search engine marketing.
For those who most well-liked this newsletter, then please subscribe to our YouTube Channel for wordpress video tutorials. You’ll have the ability to moreover find us on Twitter and Fb.
The submit Taxonomy Search engine marketing – Find out how to Optimize Your wordpress Class Pages first seemed on WPBeginner.