Window of Opportunity: Choosing the Perfect TV Stand
You might be wondering, “What do windows have to do with TV stands?” The answer is simple: both play a crucial role in shaping the overall atmosphere and functionality of your living room.
Just like a window frames a view and lets in natural light, a well-chosen TV stand can enhance your entertainment setup and elevate the aesthetics of your space. It’s all about achieving a harmonious balance between functionality and style.
Here’s what you need to consider:
TV Size: Before you even think about TV stands, measure your TV. You need a stand that can safely support its weight and dimensions.
Living Room Style: Does your living room have a modern, rustic, or traditional aesthetic? Choose a stand that complements the overall design.
Storage Options: Do you need ample storage for gaming consoles, DVDs, or other electronics? Consider stands with shelves, drawers, or cabinets.
Unlocking the Secrets to a Stylish and Functional TV Stand
This guide will explore the key factors to consider when choosing the perfect TV stand for your home theater experience. We’ll cover everything from sizing and style to maximizing storage potential.
Imagine this: You finally purchased that big-screen TV you’ve been dreaming of, but it dwarfs your old TV stand. This is where a strategic and well-informed decision comes into play. By considering the factors outlined above, you can create a seamless and visually appealing entertainment center that enhances both function and style.
Unlocking the Secrets to a Stylish and Functional TV Stand
TL;DR – Too Long; Didn’t Read
Want to level up your home theater experience? This article is your guide! We’ll cover the basics of TV stands, from choosing the right size and style to maximizing your space. We’ll also look at the importance of window care, specifically in Raleigh, North Carolina. Get ready to transform your living room into a cozy entertainment haven!
Picking the Perfect TV Stand: Size Matters!
Imagine this: you finally got the big-screen TV of your dreams, but it’s too big for your old TV stand. Now what? Choosing the right TV stand is key!
First, measure your TV. You want a stand that’s wide enough to hold it comfortably, leaving a little space on either side for remotes and other gadgets.
Next, consider the height. Too high, and you’ll have a neck-craning experience. Too low, and you might not see the screen well. Aim for a stand that puts the TV at eye level when you’re sitting on the couch.
Style Choices: From Classic to Modern
TV stands come in all sorts of styles, so there’s one to match any taste.
Classic: Think wood, dark colors, and traditional designs.
Modern: Sleek, minimalist, and often made with metal or glass.
Rustic: Warm wood tones and weathered finishes create a cozy vibe.
Consider the overall style of your living room to choose a stand that complements it.
Adding Storage: Make the Most of Your Space
TV stands aren’t just for holding your TV. They can also be handy storage solutions! Look for stands with shelves, drawers, or cabinets to organize your media, gaming systems, or even books.
If space is tight, think about corner TV stands. They take up less space and often have shelves for extra storage.
The Importance of Window Care in Raleigh
Raleigh, North Carolina, is a beautiful city, but its humid climate can be tough on windows. Over time, dirt, dust, and pollen can build up, obscuring the view and reducing the amount of natural light that enters your home.
Regular window cleaning is essential to maintain a bright and airy living space. This is especially important if your TV is near a window, as reflections can make it difficult to watch. You can use a simple DIY solution of vinegar and water or choose a professional window cleaning service.
A Window of Opportunity: The Connection to TV Stands
You might be thinking, “What do windows have to do with TV stands?” Well, it all comes down to creating a harmonious and functional space.
Imagine this: you’ve found the perfect TV stand, and you’re enjoying a movie night. But the sun is shining through your dusty windows, creating glare on the screen. It’s a frustrating experience! That’s where window care comes in.
By keeping your windows clean, you’re not only letting in more natural light but also creating a clearer view for enjoying your home theater setup.
Summary
Choosing the right TV stand is an important step in creating a functional and stylish entertainment space. Consider the size of your TV, the style of your living room, and the storage options available. Don’t forget about window care, especially if you live in a humid climate like Raleigh. Clean windows enhance your enjoyment of the space by maximizing natural light and reducing glare on your TV screen. With a little planning and effort, you can transform your living room into a cozy entertainment haven.
For more inspiration and ideas on how to create a beautiful and functional living room, visit Ecliptic Signs.
Elevate Your Home Theater: The Ultimate Guide to TV Stands
Step into the realm of entertainment and discover the world of TV stands, where style meets functionality. From classic consoles to contemporary floating designs, we’ve curated the ultimate guide to finding the perfect perch for your beloved screen.
Delving into the Details:
Materials Matter: Choose from a symphony of materials, including sturdy wood, sleek glass, or durable metal, each offering a unique aesthetic and durability.
Types to suit Every Taste: Classic consoles provide ample storage beneath your TV, while floating stands evoke a modern touch. Choose from wall-mounted, freestanding, or corner models to find the ideal fit.
Features for Enhanced Functionality: Look for stands with built-in cable management, adjustable shelves, or integrated sound systems to elevate your home theater experience.
The Art of Selection:
Prioritize Quality and Durability: Opt for stands made from high-grade materials to ensure they withstand years of use and support your precious TV.
Match Your Personality: Choose a style that resonates with your home decor, whether you lean towards traditional elegance or modern minimalism.
Transform Your Space: A well-chosen TV stand can instantly upgrade your home theater, creating a captivating and inviting atmosphere for movie nights, binge-watching sessions, and immersive gaming.
TL;DR:
Unlock the secrets of choosing the perfect TV stand: visit stores, explore materials, consider types and features, prioritize quality, match your style, and elevate your home theater experience.
Finding the Perfect TV Stand: A Guide for Your Home Theater
TL;DR – Too Long; Didn’t Read
This article helps you choose the right TV stand. We explore different types, materials, features, and things to consider based on your needs and style. Learn how to find the perfect fit for your TV and your home!
What is a TV Stand?
Imagine a fancy platform built just for your TV. That’s a TV stand! It’s a furniture piece designed to support your TV, keeping it safe and looking awesome. It also offers extra space for your DVD player, gaming consoles, or even your favorite plants!
Why You Need a TV Stand
Safety: It keeps your TV stable and secure, preventing it from tipping over.
Organization: Provides a place to store all your TV accessories and hide messy cables.
Style: TV stands come in many styles to complement any room’s décor.
Functionality: Some stands have features like built-in speakers or shelves for displaying items.
Types of TV Stands
1. Console TV Stands
These are large and sturdy, often made of wood or metal. They have multiple shelves and drawers, offering lots of storage space. They’re great for spacious living rooms.
2. Entertainment Centers
Similar to console stands, these offer even more storage and can often include cabinets, drawers, and even sliding shelves. They’re perfect for larger entertainment systems.
3. Corner TV Stands
These are space-saving options ideal for tight corners. They often have a triangular design and are perfect for maximizing space.
4. Floating TV Stands
Modern and sleek, these mounts attach directly to the wall. They create a floating look, adding a touch of elegance to any space.
Materials
1. Wood
A classic choice known for its durability and warmth. Wood comes in different types, like oak, cherry, or pine, each with unique characteristics.
2. Metal
Sleek and modern, metal offers a contemporary feel. It’s usually lightweight and comes in various finishes like chrome, steel, or black.
3. Glass
Offers a modern and stylish look. Glass can be fragile, but it’s easy to clean and can create a spacious feel in smaller rooms.
4. A Mix of Materials
Many stands combine wood and metal or wood and glass, creating unique and interesting designs.
Features to Consider
1. Size
Ensure the stand fits your TV and the space where it will be placed. Measure your TV and the room carefully.
2. Storage Space
Consider how much storage you need for DVDs, consoles, or other items.
3. Cable Management
Look for stands with built-in cable management systems to hide messy wires.
4. Style
Choose a style that complements your décor.
5. Budget
TV stands come in various price ranges. Decide on a budget that fits your needs.
Tips for Choosing the Right TV Stand
Visit stores: See different TV stands in person and assess their quality and style.
Read reviews: Check online reviews for information about specific stands.
Think about your needs: What features are important to you?
Don’t forget the TV: Make sure the stand can support your TV’s weight.
Finding Your Perfect TV Stand in Kentucky
Kentucky is known for its beautiful landscapes and charming towns. If you’re looking for a great TV stand, there are many furniture stores in Kentucky that offer a wide selection. Don’t forget to check out Ecliptic Signs for unique and stylish signs that can complement your home theater setup!
Summary
Choosing the perfect TV stand is a matter of considering your needs, style, and budget. Explore different types, materials, and features to find the ideal stand for your TV and your home. Whether you prefer a classic console or a sleek floating stand, remember to prioritize quality, durability, and a style that matches your personality. And remember, a good TV stand can transform your home theater into a truly inviting and entertaining space!
Popular TV Stand Styles and How to Choose the Perfect One for Your Michigan Home
When it comes to selecting a TV stand, it’s essential to consider not only its functionality but also how it complements your home’s aesthetic. Here are a few popular styles to consider:
Modern and Minimalist:
Characterized by sleek, simple lines
Often crafted from metal or wood with a clean, polished finish
Ideal for homes embracing a minimalist or contemporary design scheme
Rustic and Farmhouse:
Constructed from reclaimed wood or featuring distressed finishes
Typically adorned with open shelves, exuding a warm and inviting ambiance
Perfect for homes with a rustic or farmhouse aesthetic
Industrial and Urban:
Constructed from metal, concrete, or distressed wood
May incorporate exposed pipes or wheels, creating a raw, industrial look
Ideal for homes seeking a modern or industrial touch
Finding the Perfect TV Stand for Your Michigan Home
Michigan’s frigid winters demand a home environment that provides both comfort and style. When selecting a TV stand for your Michigan home, consider these factors:
Space Planning: Choose a stand that fits comfortably in your room, leaving ample space for comfortable seating and movement.
Functionality: Ensure the stand offers sufficient storage space for media components and other essentials.
Style and Decor: The stand should complement your existing decor and create a cohesive living space.
Durability: Opt for a stand made from durable materials that can withstand the rigors of daily use.
Conclusion
Choosing a TV stand transcends mere functionality; it’s a crucial element in creating a stylish and comfortable home environment. By considering popular styles, tailoring the selection to your specific needs, and prioritizing durability, you can find the perfect TV stand to enhance your Michigan home.
Beyond the Box: Finding the Perfect TV Stand for Your Michigan Home
TL;DR – Too Long; Didn’t Read
Choosing the right TV stand isn’t just about finding something that holds your TV – it’s about finding a piece that fits your style and your space. This article helps you think about your needs and find the perfect TV stand for your Michigan home, no matter what your style is!
More Than Just a Shelf:
Imagine this: you’re relaxing after a long day, settled on your couch with your favorite show playing on the big screen. But what’s behind the TV? Is it a dusty old shelf, a wobbly table, or something that just doesn’t match your living room?
Choosing a TV stand is more than just finding something that holds your TV. It’s about finding a piece of furniture that:
Complements your decor: Does it fit with your modern farmhouse style, your sleek mid-century vibe, or your cozy cabin aesthetic?
Provides storage: Do you need shelves for your streaming devices, a drawer for remotes, or a place to hide all those cables?
Fits your space: Is it the right size for your room, and does it allow for easy access to the TV?
Picking a Style That’s You:
There are so many styles of TV stands to choose from, it can feel overwhelming! Here are a few popular choices:
H2: Modern and Minimalist:
Sleek and simple lines
Often made from metal or wood with a clean finish
Perfect for minimalist or contemporary homes
H2: Rustic and Farmhouse:
Made from reclaimed wood or distressed finishes
Often have open shelves and a warm, inviting feel
Great for homes with a rustic or farmhouse style
H2: Industrial and Urban:
Made from metal, concrete, or distressed wood
Often feature exposed pipes or wheels for a raw, industrial look
Ideal for homes with a modern or industrial aesthetic
Making It Work in Your Michigan Home:
Michigan winters can be long and cold. If you’re in a home with large windows, you might need a TV stand that can handle the extra sunlight.
Consider a TV stand with a dark finish or a wood that won’t fade easily.
If you have a fireplace, make sure the TV stand is placed far enough away to prevent heat damage.
H3: Extra Storage for Your Michigan Lifestyle:
Michiganders know the importance of storage! If you need extra space for your winter gear, sports equipment, or seasonal decorations, a TV stand with built-in drawers or cabinets can be a lifesaver.
H3: Matching Your Michigan Style:
No matter what your style is – whether it’s classic, modern, or somewhere in between – there’s a TV stand out there to match.
Where to Find Your Perfect Match:
If you’re looking for a TV stand that’s as unique as your Michigan home, check out Ecliptic Signs. They specialize in custom-made furniture and decor, including TV stands, that are built to last and designed to fit your style.
Summary:
Choosing a TV stand is more than just finding a place for your TV; it’s about finding a piece that reflects your personal style and fits your needs. Consider the style of your home, the amount of storage you need, and the size of your space.
Michiganders have unique needs and styles, so look for a TV stand that complements your home and your lifestyle. Remember, your TV stand isn’t just a piece of furniture, it’s an extension of your home and your personality.
Are you ready to transform your living room into a cozy oasis? This guide will help you create a space that’s both stylish and inviting.
The Tranquil Touch of Nature
The vast landscapes of the Northwest Territories can inspire calm and serenity. Bring these elements into your living room with earthy tones, natural materials, and lush greenery.
Silk Sheets: A Touch of Luxury
Indulge in the ultimate comfort of silk sheets. Their soft, smooth texture will make you feel like you’re sleeping on a cloud.
TV Stands: The Perfect Organizer
Give your electronics a stylish home with the right TV stand. Choose one that keeps your TV looking great, organizes your cords, and blends seamlessly with your living room décor.
Upgrade Your Living Room: Silk Sheets and TV Stands
TL;DR – Too Long; Didn’t Read
This article is all about making your living room a more comfortable and stylish place. We’ll talk about silk sheets, which are super soft and luxurious, and TV stands, which help organize your electronics and keep your TV looking great. We’ll also touch on the Northwest Territories in Canada and how its landscape inspires a sense of calm and nature, which can be reflected in your living room design.
Dive into Luxury: Silk Sheets for Ultimate Comfort
Have you ever wanted to feel like royalty? Well, silk sheets are like sleeping in a palace! They’re incredibly soft and smooth, and they feel amazing against your skin. Silk is known for being breathable, which means you won’t get too hot or too cold while you sleep. And here’s a bonus: silk can even help keep your skin looking healthy and radiant.
More than Just a Pretty Face: The Benefits of Silk Sheets
Besides feeling luxurious, silk sheets have some cool benefits.
Temperature Control: Silk is super breathable, so it helps you stay cool in the summer and warm in the winter. No more tossing and turning all night!
Gentle on Skin: Silk is naturally hypoallergenic, so it’s good for people with sensitive skin. It’s also less likely to cause wrinkles than other types of fabrics.
Long-Lasting: Silk is a durable fabric that can last for years if you take care of it properly.
Finding the Right TV Stand: A Guide for Every Living Room
You know the feeling – you’ve finally got your awesome new TV, but it looks kinda lonely just sitting there on your old bookshelf. A TV stand isn’t just about holding your TV, it’s about completing the look of your whole living room.
Choosing the Perfect Size and Style
There are tons of different TV stands out there, so it’s important to find one that fits your style and your space.
Size Matters: Measure the size of your TV and make sure the stand you choose can accommodate it comfortably. You don’t want your TV to be too crowded or too small for the stand.
Style is Key: Think about the style of your living room. Do you want something sleek and modern, or something more traditional?
Extra Storage: Some TV stands have shelves or drawers for extra storage, which is great for keeping your electronics organized.
The Northwest Territories: Inspiration for a Calming Living Room
Imagine vast, wild landscapes with shimmering lakes and snow-capped mountains. That’s the Northwest Territories in Canada, a place where nature reigns supreme. And guess what? This kind of natural beauty can be a great inspiration for your living room design.
Bringing Nature Indoors
To create a peaceful and inviting living room, you can incorporate elements of the Northwest Territories.
Earthy Tones: Use colors like green, blue, and brown to bring in the colors of nature.
Natural Materials: Look for furniture made from wood or natural fibers.
Plants: Adding a few houseplants will bring in some fresh air and life to your living room.
A Summary of Living Room Upgrades
This article has explored two key ways to enhance your living room: silk sheets and TV stands. Silk sheets offer luxurious comfort and potential skincare benefits, while TV stands provide organization and style for your electronics. Additionally, the beauty of the Northwest Territories inspires a sense of calm and nature that can be incorporated into your living room design with earthy tones, natural materials, and houseplants. Remember, a cozy and stylish living room is all about creating a space you love to spend time in.
For more inspiration on bringing nature into your living room, check out Ecliptic Signs.
Top TV Stands and Sectionals for Your Ultimate Entertainment Space
A Haven for Home Entertainment
Upgrade your living room with the perfect combination of functionality and style. Whether you prefer a sleek TV stand or a plush sectional, this guide will help you find the perfect pieces to transform your home into the ultimate entertainment hub.
TV Stands: Stylish and Functional
Floating TV Stands: A Modern Touch
Float your TV above the ground for a minimalist and contemporary look. Floating stands provide ample storage while keeping your space airy and uncluttered.
Corner TV Stands: Space-Saving Solutions
Maximize your floor space with a corner TV stand. These stands fit snugly into corners, creating a functional and stylish focal point for your living room.
Open-Shelved TV Stands: Storage and Style
Showcase your entertainment essentials with open-shelved TV stands. These stands offer ample storage space for your media devices, games, and books.
Sectionals: Comfort and Flexibility
L-Shaped Sectionals: Flexible Seating
Maximize seating with an L-shaped sectional. These sectionals provide ample space for family and guests to stretch out and relax.
U-Shaped Sectionals: Cozy and Inviting
Create a cozy and enveloping space with a U-shaped sectional. These expansive sectionals offer a luxurious seating experience, perfect for family movie nights or entertaining.
A Legend in TV Stands: Norman
Renowned for its exceptional craftsmanship and innovative designs, Norman is a leader in the TV stand industry. Norman stands offer a wide range of styles and sizes, ensuring you find the perfect fit for your home decor.
Expansive Summary
Combining the perfect TV stand and sectional can create a living room that is both stylish and functional. Floating TV stands offer a contemporary touch, while corner TV stands maximize space. Open-shelved TV stands provide storage and display space. L-shaped sectionals offer flexible seating, and U-shaped sectionals create a cozy and inviting atmosphere. Norman is a legendary brand in TV stand design, offering exceptional craftsmanship and innovative styles. By choosing the right combination of these pieces, you can transform your living room into the perfect entertainment space.
Why you simply must checkout Bookshelf in San Diego
Where to find Bookshelf in San Diego?
Unleash Your Inner Sanctuary: Crafting a Space of Comfort and Wonder
Imagine stepping into a room where warmth and stories intertwine. A crackling fireplace invites you to unwind, while shelves brimming with adventures beckon you to explore. This isn’t just a space, it’s a sanctuary – a haven tailored to your unique soul, where you can relax, recharge, and lose yourself in the joys of reading, contemplation, and the simple beauty of being.
This article invites you on a journey to create your own sanctuary of stories. We’ll dive into the magic of combining a fireplace’s inviting warmth with the magic of a well-stocked bookshelf. Discover unique design ideas, learn the art of choosing the perfect materials and accessories, and explore ways to infuse your bookshelf with your personal touch. We’ll show you how to craft a cozy ambiance that invites you to slow down, breathe deeply, and let your imagination soar.
Ready to transform your space into a haven of peace and inspiration? Let’s begin! We’ll explore how to create a harmonious flow within your room, ensuring your bookshelf and fireplace complement each other beautifully. You’ll learn how to create a sense of visual balance that invites you to move effortlessly between the comfort of your fireplace and the captivating world of your bookshelf.
Cozy Up with Style: Bookshelves & Fireplaces for a San Diego Home
TL;DR This article explores how bookshelves and fireplaces can enhance the warmth and style of your San Diego home. It dives into the benefits of each, suggests unique design ideas, and highlights the importance of choosing the right materials and accessories to create a truly cozy and inviting space.
Creating a Sanctuary of Stories: The Power of Bookshelves
Imagine a room filled with the comforting scent of old paper and the promise of exciting adventures waiting to be discovered. That’s the magic of a well-designed bookshelf. More than just storage, bookshelves can become focal points, adding personality and warmth to any room.
Choosing the Right Bookshelf for Your San Diego Home
When it comes to choosing a bookshelf, you have a world of options! From classic wooden shelves to sleek metal designs, there’s a style to suit every taste and budget. Consider the following:
Style: Do you prefer traditional, modern, or something in between?
Size: Measure your space carefully to ensure your chosen bookshelf fits perfectly.
Material: Wood, metal, glass, and even acrylic are all popular materials for bookshelves. Choose one that complements your existing decor.
Beyond Books: Adding Personality to Your Bookshelf
Don’t limit your bookshelf to books alone! Adding personal touches like family photos, plants, travel souvenirs, and even decorative objects can transform it into a unique reflection of your personality. Remember, the goal is to create a space that feels inviting and full of character.
Embracing the Warmth: Fireplaces & Accessories
There’s nothing quite like the crackling sound of a fire and the gentle glow of flames on a chilly San Diego night. Fireplaces add instant warmth, charm, and a sense of comfort to any space.
Types of Fireplaces for Your Home
Traditional Fireplaces: These classic hearths typically use wood as fuel.
Gas Fireplaces: They offer convenience and ease of use, with natural gas or propane as fuel.
Electric Fireplaces: These provide a realistic flame effect without requiring a chimney or vent.
Adding a Personal Touch: Fireplaces Accessories
Accessories can make a world of difference in enhancing the look and functionality of your fireplace. Consider adding:
Mantel Clocks: Add a touch of elegance and keep track of time.
Candles: Create a romantic and cozy ambiance.
Artwork: Display your favorite pieces above the mantel for a personalized touch.
Blending Bookshelves and Fireplaces: A Winning Combination
Imagine the perfect cozy nook: a comfy armchair placed next to a crackling fireplace, with a well-stocked bookshelf within easy reach. This combination offers the ultimate escape, providing a space to relax, unwind, and immerse yourself in your favorite stories.
Think about flow: Place your bookshelf and fireplace in close proximity to create a sense of visual balance and encourage a cozy flow of movement within the room.
Choose complementary styles: Select bookshelf and fireplace designs that complement each other to create a cohesive and visually pleasing aesthetic.
Creating a Truly Unique Sanctuary
By combining the warmth of a fireplace with the magic of a bookshelf, you can create a haven that reflects your personality and invites you to relax, recharge, and indulge in the joys of reading, contemplation, and the simple pleasure of being surrounded by beauty.
For more inspiration on creating a cozy and stylish home in San Diego, visit Ecliptic Signs at https://eclipticsigns.com/.
Summary: This article explored the benefits of bookshelves and fireplaces in enhancing the warmth and style of your San Diego home. We discussed the importance of choosing the right bookshelf and fireplace for your space, considering style, size, and material. The article also highlighted how to add personality to your bookshelf with personal touches and how to accessorize your fireplace to create a cozy and inviting ambiance. The article concluded with a discussion on how to blend bookshelves and fireplaces effectively, creating a truly unique and inviting sanctuary in your home.
Where to find Drones & Accessories near New York City?
Unlocking the Skies: A Guide to Choosing the Perfect Drone for NYC Adventures
New York City, a concrete jungle teeming with possibilities, also offers unparalleled aerial views of its iconic landmarks. But navigating the complexities of drone regulations and choosing the right drone for the Big Apple’s unique challenges can be daunting.
This guide delves deeper into the key considerations when choosing a drone for NYC adventures, uncovering the secrets to unlocking your aerial potential.
Beyond Range and Control: Unveiling the Hidden Requirements
While range and control are essential, NYC’s airspace presents unique challenges.
Understanding Regulations: We’ll dissect NYC’s specific drone regulations, including registration requirements, flight restrictions, and the complexities of flying near airports.
Safety First: Explore the importance of choosing drones with advanced safety features, like obstacle avoidance and return-to-home capabilities, crucial for navigating bustling cityscapes.
Stealth Mode: Discuss the need for quiet drones that won’t disrupt the city’s vibrant energy, ideal for capturing candid moments without attracting unwanted attention.
Beyond the Empire State Building: Tailoring Your Drone to Your Vision
This guide will guide you through the selection process, unveiling the perfect drone for your unique needs:
Seasoned Aerial Photographer: We’ll investigate the top-of-the-line drones with professional-grade cameras, offering high-resolution image capture and advanced video recording capabilities for capturing the city’s breathtaking beauty.
Beginner Enthusiast: Uncover entry-level drones with user-friendly interfaces and affordable price points, ideal for learning the ropes and capturing stunning photos of the city skyline.
Exploring the City’s Hidden Gems: We’ll explore drones with compact designs and extended flight times, perfect for navigating tight spaces and exploring the city’s less-explored hidden gems.
Unveiling the Power of Accessories
This guide won’t leave you hanging. We’ll delve into the world of accessories that amplify your drone’s capabilities:
Essential Accessories: Uncover the importance of filters, batteries, carrying cases, and other essential accessories for enhancing your drone’s performance and maximizing your aerial adventures.
The Art of Drone Photography: Explore resources and tutorials that unlock the secrets of capturing stunning aerial photos and videos, transforming your NYC journey into a visual masterpiece.
From Novice to Expert: Empowering Your Aerial Journey
This guide is your key to unlocking the skies of NYC. Through in-depth research and expert advice, we’ll equip you with the knowledge and tools to choose the perfect drone, navigate the city’s airspace, and capture unforgettable aerial moments.
Prepare to take your NYC adventures to new heights. The city awaits, and your drone is the key.
Fly High with Drones: Your Ultimate Guide to Aerial Adventures
TL;DR: Want to explore the world from a bird’s eye view? Drones are the perfect way to capture amazing aerial footage and have some serious fun! But with so many options, choosing the right drone can be tricky. This guide will help you pick the perfect drone for your needs, including tips for choosing the right accessories and finding helpful resources. Plus, we’ll touch on some cool ways you can use a drone in New York City!
Soaring into a New World: The Basics of Drones
Drones are basically like flying robots! They’re controlled remotely, using a special device called a transmitter, and have cameras that can take stunning pictures and videos. They come in all shapes and sizes, each with its own set of features.
Choosing the Right Drone for You
1. What Will You Use It For?
Photography and Videography: If you want to capture breathtaking aerial shots, look for a drone with a high-resolution camera and good image stabilization.
Racing: For speed and agility, choose a drone that’s specifically designed for racing.
Recreational Flying: If you just want to have fun flying around, you can find more affordable drones that are easy to use.
2. Battery Life and Flight Time:
How long do you want to fly your drone? Batteries aren’t magical, so the longer you want to fly, the longer the battery life you need! Check the flight time listed on the drone’s packaging.
3. Range and Control:
The further you want to fly your drone, the greater the control range you need. Most drones have a range of about 1-2 miles.
4. Features and Extras:
Some drones come with extra features like obstacle avoidance and GPS tracking. These can make flying easier and safer.
Essential Drone Accessories
1. Extra Batteries: No one wants their fun to end early! Having a few extra batteries keeps the fun going for longer.
2. Carrying Case: This protects your drone from bumps and scratches when you’re not flying.
3. Propeller Guards: These help keep your drone safe from damage, especially if you’re flying near people or objects.
4. Filters: These can improve the quality of your photos and videos by reducing glare or adding creative effects.
Drones in the Big Apple: Flying in New York City
New York City is a hub for drones, offering breathtaking views of iconic landmarks like the Empire State Building and Central Park. However, before you take to the skies, be sure to check the NYC Drone Regulations.
Where to Learn More:
For even more information about drones and their accessories, check out Ecliptic Signs! They have a wide range of drones and helpful resources to help you get started with your aerial adventures.
Expanding Your Horizons:
Whether you’re a seasoned aerial photographer or just starting your drone journey, choosing the right drone is crucial for capturing incredible moments and having unforgettable experiences. By considering your needs, budget, and the features available, you can find the perfect drone to take your aerial adventures to new heights. And who knows, maybe you’ll even capture the perfect shot of the New York City skyline!
Have you ever ever ever confused if it’s crucial trade WooCommerce’s fundamental sale badge with something further eye-catching (and moderately a lot much less boring)?
It is a now not extraordinary question we get from our readers, and we’re satisfied to will let you know that the answer is certain. You utterly can!
Custom designed product badges are an out of this world solution to highlight explicit items to your online store. They’re helpful whether or not or now not you wish to have to sing their own praises new arrivals, mark items on sale, or draw attention to limited-time supplies.
In this publish, we’ll show you two simple ways in an effort to upload custom designed product badges to your WooCommerce store. You’ll each use an outstanding plugin or add some simple code.
Don’t concern. We’ll walk you through each and every selection step by step!
What Are WooCommerce Product Badges?
Have you ever ever ever noticed those little ‘Sale’ or ‘New’ labels that show up on products while purchasing groceries online?
Those are product badges, and they’re extraordinarily useful for ensuring items stand out to your on-line retailer.
Recall to mind them as virtual stickers that draw your shoppers’ attention to important product details like gross sales, new arrivals, or limited-time supplies.
We’ve seen store homeowners use product badges in in point of fact inventive ways to sing their own praises explicit provides, highlight bestsellers, or mark items which may well be operating low on inventory.
Now, for individuals who’re already the usage of WooCommerce, you’ll have noticed it comes with a fundamental sale badge feature that automatically turns out while you reduce a product’s value.
While the WooCommerce sale badge works incredible for simple needs, let’s be honest – it’s gorgeous limited relating to what you’ll have the ability to do with it.
You’ll’t merely alternate how the badge appears to be, add new badge types, or keep an eye on exactly the position they appear to your product pictures.
Within the period in-between, custom designed product badges will let you show your logo’s personality further. Most importantly, even if, distinctive badges can further effectively draw attention to special products.
That suggests, you’ll have the ability to power further product sales to your online store.
In this knowledge, we’ll walk you through 2 showed learn the way to add and customize product badges in WooCommerce. Each and every approaches will provide you with complete keep an eye on over how they seem and artwork.
You’ll use the fast links underneath to skip to your most popular approach:
Approach 1: Use YITH WooCommerce Badge Regulate (Further Customizable)
Let’s get began with our favorite software for together with custom designed product badges to your WooCommerce store.
We recommend the usage of YITH WooCommerce Badge Control because it makes it super easy in an effort to upload and customize product badges to your online store.
Plus, we’ve tested many YITH plugins through the years, like the ones for together with subscriptions and product movies, and they always artwork great for our shoppers.
Wish to show a novel badge during the vacations? Or perhaps display how much money shoppers will save? This plugin can do all that. You’ll even set badges to show up at positive circumstances and hide them later.
You’ll get began with each the free or best elegance fashion of the plugin. The unfastened model is perfect for individuals who merely wish to add simple text or image badges to your products.
In this knowledge, we’ll show you how you can use the top class model, on the other hand most steps will artwork the identical approach for every. Merely keep in mind that some cool choices, like badges that automatically show discount amounts, most efficient come with the highest elegance fashion.
Practice: The highest elegance fashion costs $79.99 in line with one year if you wish to have all of the choices. While this may increasingly appear to be such a lot, we think it’s value it because you get such a large amount of ways to customize your product badges and make them look exactly how you wish to have them.
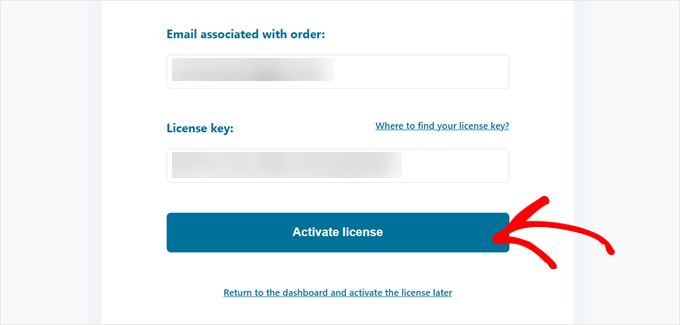
Able to start out out? First, you’ll want to achieve the plugin from YITH’s internet website online.
Then log in to your YITH account, move to the ‘Licenses & Downloads’ tab, and click on on on the ‘Download Plugin’ button to procure the record.
Proper right here’s a tip: don’t close this internet web page after downloading because you’ll need the license key that’s confirmed there.
Next, move to your wordpress dashboard and arrange the plugin. For more information, now now we have a step-by-step knowledge on how one can set up a wordpress plugin.
When it’s energetic, you’ll see a setup computer screen asking on your YITH piece of email and license key. Merely copy the ones from the YITH internet website online and click on on ‘Activate license.’
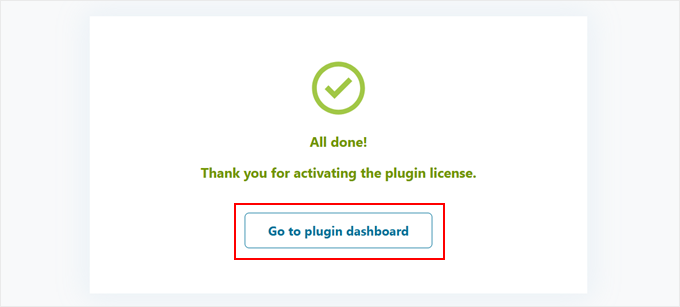
Every time you spot the message saying your license is energetic, you’re all set!
Now, click on on ‘Go to plugin dashboard,’ and also you’ll have the ability to get began growing your first custom designed badge.
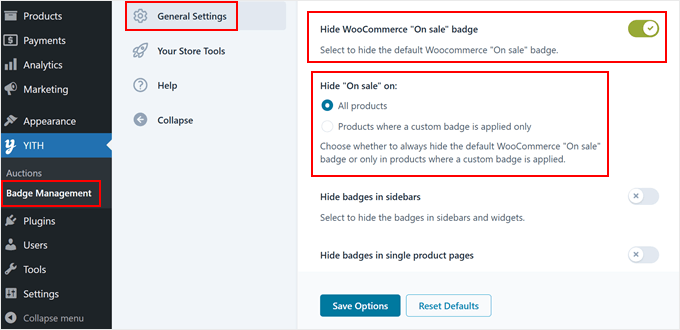
Step 1: Quilt the Default WooCommerce Sale Badge
First, we want to hide WooCommerce’s built-in sale badge so it doesn’t war with our custom designed product badges.
The process is in point of fact simple. Go to your wordpress dashboard and click on on on YITH » Badge Regulate. Then, navigate to the ‘Elementary Settings’ tab.
Proper right here, you’ll to search out an selection that says ‘Quilt WooCommerce “On sale” badge.’ Go ahead and turn that on.
Then, beneath ‘Quilt “On sale” on:’, make a choice ‘All products’ to make sure the default badge doesn’t show up anywhere to your store.
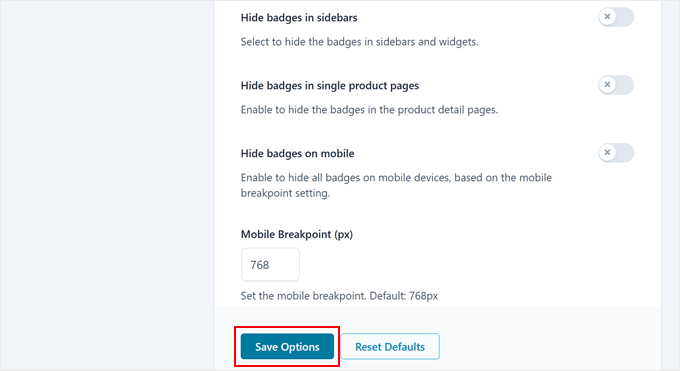
Whilst you’re inside the settings, that you must perceive some other helpful possible choices. You’ll select to hide your custom designed badges in positive places, identical to the sidebar or single product pages.
This is great if you want to keep your store taking a look clean and organized. For example, if your cell website feels too crowded, you’ll have the ability to hide badges there, too.
Don’t omit to click on at the ‘Save Alternatives’ button at the bottom of the internet web page while you’re completed.
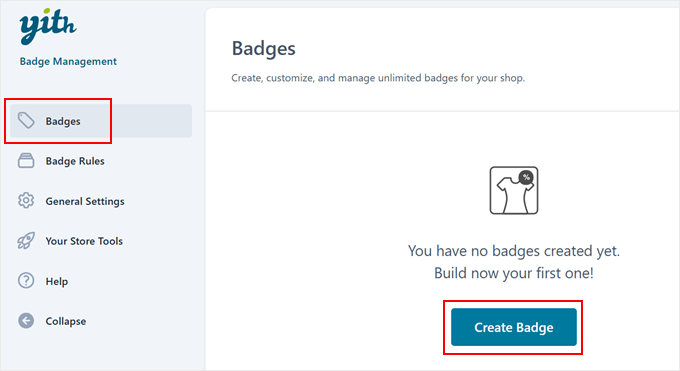
Step 2: Create Your Custom designed Badge
Now comes the fun phase: growing your first custom designed product badge in WooCommerce!
Head over to the ‘Badges’ tab and click on at the ‘Create Badge’ button to get started.
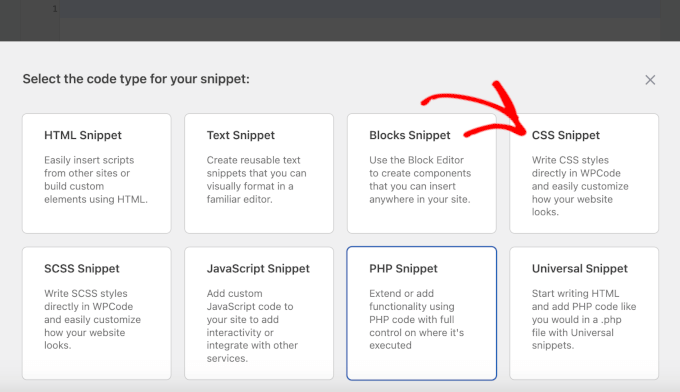
The plugin offers you 4 various kinds of badges to make a choice from: text badge, image badge, CSS badge, or sophisticated badge for product sales products.
Each type means that you can create unique ways to concentrate on your products. For example, if you want to mark products as “New Arrival” or “Vegan Delightful,” the principle 3 possible choices artwork great.
Then again proper right here’s a tip: for individuals who’re growing discount badges, we strongly suggest the usage of the sophisticated selection, which automatically updates in accordance with your product’s value changes.
After settling on your badge type, give it a name this is serving to you remember what it’s for.
Whilst you’ve decided on an image, CSS, or sophisticated badge, you’ll see a complete choice of pre-made badge designs right kind inside the plugin.
You’ll pick whichever one you favor. The ones ready-to-use badges save you time, and also you’ll have the ability to however customize them to check the best way of your WooCommerce pages.
This plugin in point of fact shines in its customization possible choices. Depending on which badge type you picked, you’ll have the ability to alter all kinds of settings to make your badge look perfect to your product photos.
Wish to alternate the color? Easy.
Need to alter how transparent it’s? No problem.
You’ll even rotate the badge or switch it spherical to your products until it’s in merely the correct spot.
For our example, we made the badge in point of fact pop by the use of changing its color to purple and striking it inside of probably the most good right kind corner of the product image.
The ones small tweaks may make a big difference in how effectively your badges get other people’s attention.
Whilst you’re proud of how the whole lot appears to be, merely click on on ‘Save badge’ to finish up.
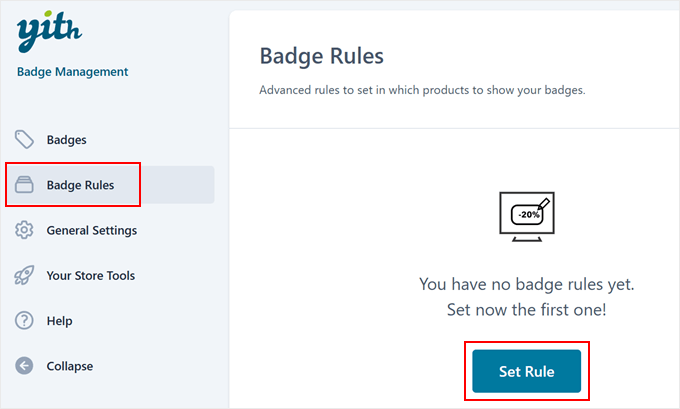
Step 3: Create a Rule to Display Your Badge
Now that we’ve created our custom designed badge, let’s tell WooCommerce exactly the position and when to show it.
Head over to the ‘Badge Rules’ tab and click on on ‘Set Rule.’
Recall to mind rules as instructions that tell your badges when to search for your product photos.
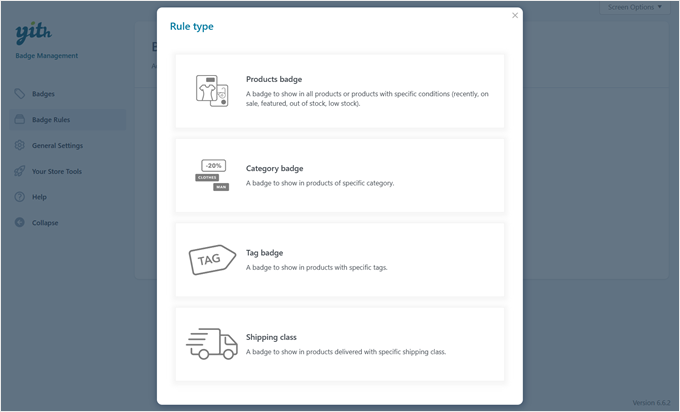
The plugin offers you 4 main ways to keep an eye on where your badges show up: products badge, elegance badge, tag badge, and supply class badge.
You’ll select the ‘Products badge’ rule in an effort to upload badges to positive items or the ‘Magnificence badge’ rule to cover whole product categories.
Within the period in-between, the tag badge rule shows badges on products sharing the identical WooCommerce tag, and the supply class badge rule shows badges in accordance with supply possible choices.
Each rule targets different product sides, on the other hand they all artwork similarly. So, you merely want to pick what works best on your needs.
Let’s use the products badge rule for this example as it’s the most typical variety.
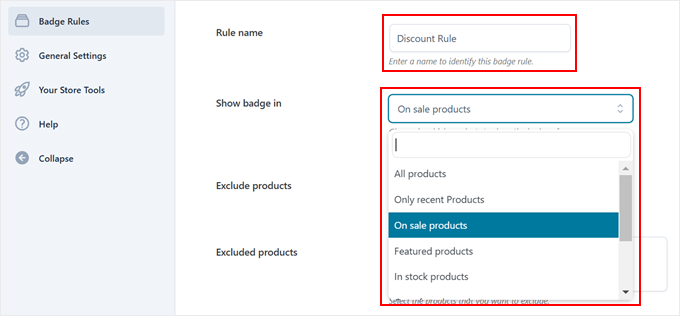
Next, give your rule a easy establish so that you’ll have the ability to to search out it merely later.
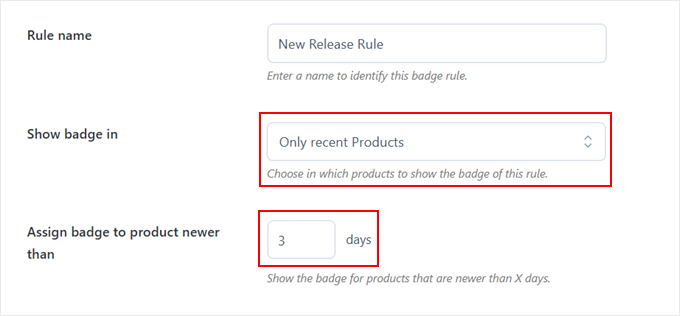
Then, seek for the ‘Show badge in:’ surroundings. That’s the position you decide which products get your badge. You’ll select to show it on all products, recent additions, items on sale, featured fashionable merchandise, or even merely products which may well be in stock.
Let’s say you’re creating a rule available on the market items. If you select ‘On sale products,’ then your badge will automatically appear every time you mark a product as being on sale. It’s that easy!
Then again some possible choices come with further settings so to configure. For example, for individuals who pick ‘Only recent Products,’ you’ll have the ability to set badges to appear on items added within the previous couple of days (like 7, 14, or 30 days).
This makes it super easy to automatically highlight new arrivals to your store without manually together with badges to each and every product.
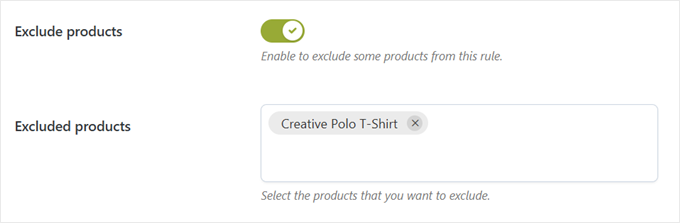
From time to time, that you must wish to keep positive products badge-free. That’s where the ‘Exclude products’ surroundings is useful.
Merely permit this surroundings and type inside the names of any products you don’t wish to show the badge for. These items will stay badge-free even if they suit your other rules.
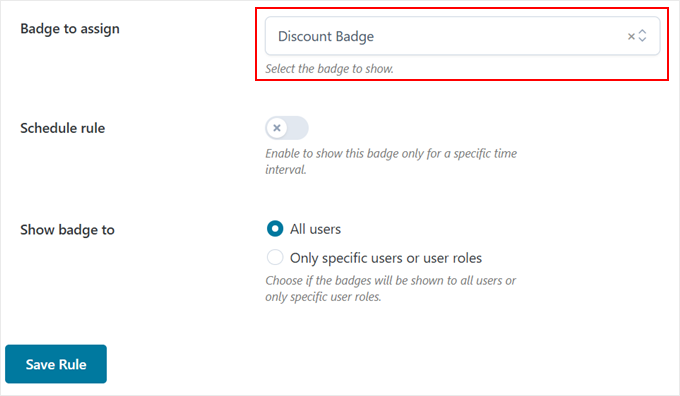
Next, make a choice which badge design you wish to have to use inside the ‘Badge to assign’ dropdown.
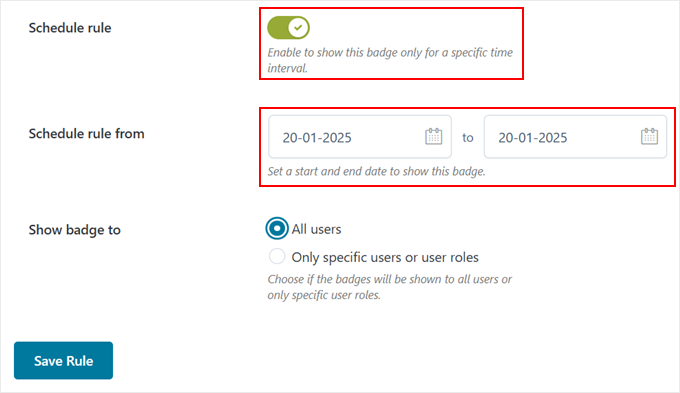
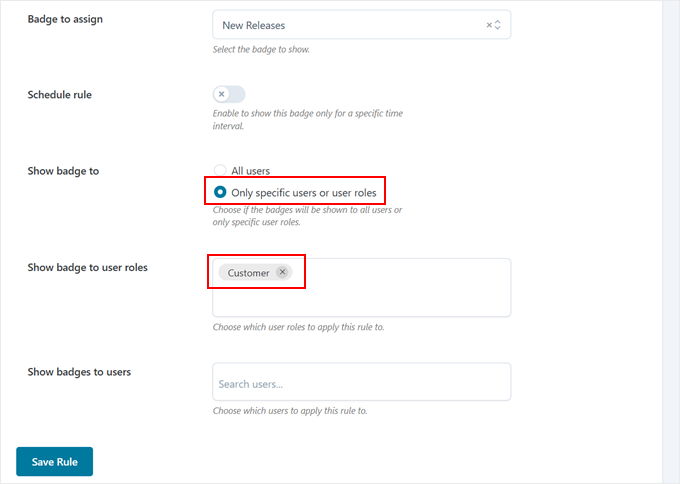
Now, proper right here’s where it’ll get in point of fact flexible. You’ll schedule when your badges appear and select who gets to see them.
The ‘Schedule rule’ selection is perfect for limited-time provides.
Whilst you permit it, the plugin will ask you to set get began and end dates on your badges.
And if you want to show explicit badges to positive shoppers, like appearing a “VIP Cut price” badge most efficient to one of the vital unswerving consumers, you’ll have the ability to do that, too.
To try this, merely make a choice ‘Only explicit shoppers or client roles’ inside the ‘Show badge to’ surroundings. Then, type to your most popular client roles or particular person usernames underneath it.
When the whole lot appears to be right kind, merely click on on ‘Save Rule,’ and likewise you’re all set!
Feel free to talk about together with your store’s front end to see your new product badges in movement.
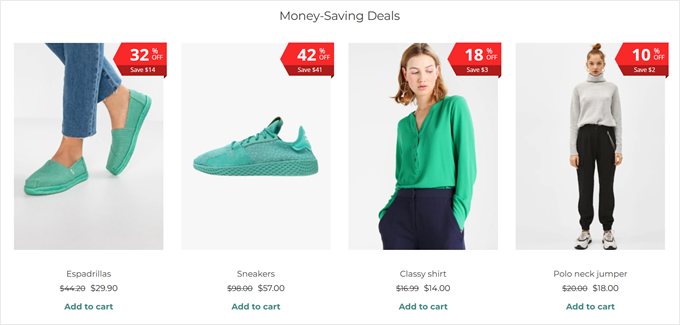
Whilst you’re the usage of the sophisticated badge type available on the market items, you’ll see it appearing every the bargain share and the actual money saved, helping shoppers quickly spot the best provides.
Similar Post: In search of further cool apparatus and the right way to reinforce your WooCommerce store? Check out our list of the absolute best WooCommerce plugins.
Approach 2: Use Custom designed Code (Loose and Simple)
Whilst you don’t need the sophisticated possible choices from the principle approach, or for individuals who’re looking for a completely free selection, then now now we have a simple code implies that won’t value you the remainder.
And for individuals who’re no longer proud of code, don’t concern! We’ll be the usage of the WPCode plugin to make this super easy and safe. It means that you can add custom designed code snippets in wordpress without being a developer or risking breaking your internet website online.
We’ll use the unfastened model of WPCode for this tutorial because of it in reality works utterly for our needs. That discussed, there’s a top class model with cool choices like AI code technology and trying out mode.
For more information, merely check out our in-depth WPCode evaluate.
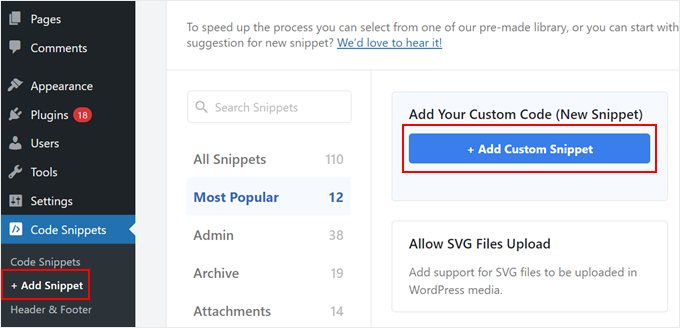
First, you need to set up the wordpress plugin to your admin space.
Then, move to Code Snippets » + Add Snippet. Hover over the ‘Add Your Custom designed Code (New Snippet)’ segment and then click on on on the ‘+ Add Custom designed Snippet’ button.
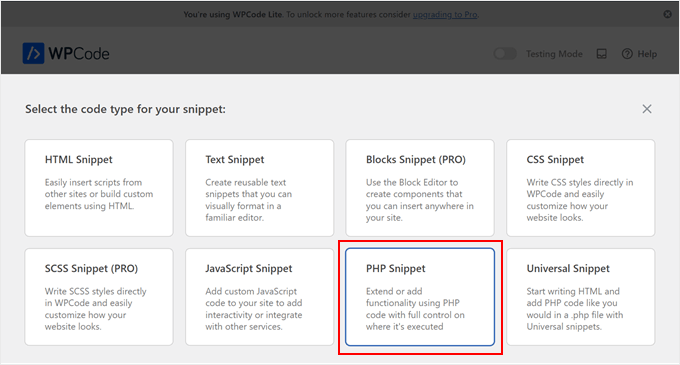
Next, select ‘PHP Snippet’ when asked in regards to the code type.
This tells wordpress what type of code we’re the usage of.
Now, it’s a should to provide your snippet a name this is serving to you remember what it does.
Since this code will remove the default WooCommerce sale badge and add every new product badges and dynamic discount badges, that you must identify it something like “Custom designed WooCommerce Badges.”
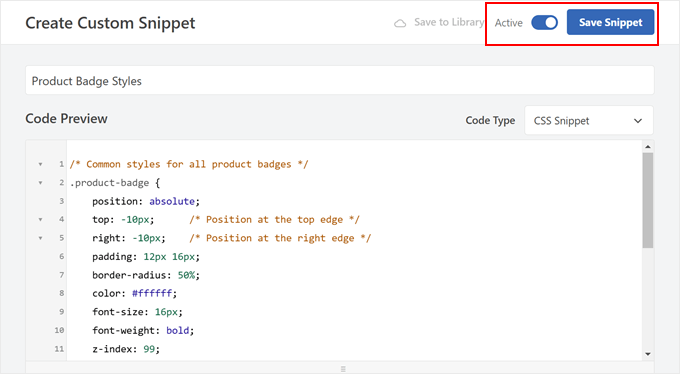
Once that’s completed, paste the code snippet we’ve equipped underneath inside the ‘Code Preview’ box.
This code does something in point of fact cool. It automatically calculates discount percentages and shows them on the product sales badge. Plus, it supplies a “New” badge to products added inside the ultimate 7 days.
// Remove default WooCommerce sale flash badge
remove_action( 'woocommerce_before_shop_loop_item_title', 'woocommerce_show_product_loop_sale_flash', 10 );
remove_action( 'woocommerce_after_shop_loop_item_title', 'woocommerce_show_product_loop_sale_flash', 10 );
remove_action( 'woocommerce_before_single_product_summary', 'woocommerce_show_product_sale_flash', 10 );

// Add custom designed badges to products
add_action( 'woocommerce_before_shop_loop_item_title', 'add_custom_product_badges', 10 );
function add_custom_product_badges() {
    international $product;

    // Initialize a variable to track whether or not or now not a badge has been displayed
    $badge_displayed = false;

    // For products with any amount of discount share (1% or further)
    if ( $product->is_on_sale() ) {
        // Get not unusual and sale prices
        $regular_price = floatval( $product->get_regular_price() );
        $sale_price    = floatval( $product->get_sale_price() );

        // Care for variable products
        if ( $product->is_type('variable') ) {
            // Get variation prices
            $regular_price = floatval( $product->get_variation_regular_price( 'max', true ) );
            $sale_price    = floatval( $product->get_variation_sale_price( 'min', true ) );
        }

        // Calculate discount share if not unusual value is professional
        if ( $regular_price > 0 ) {
            $discount_percentage = ( ( $regular_price - $sale_price ) / $regular_price ) * 100;

            // Display badge if discount is 1% or further
            if ( $discount_percentage >= 1 ) {
                echo '' . round( $discount_percentage ) . '% off!';
                $badge_displayed = true; // Badge has been displayed
            }
        }
    }

    // Only show the "New" badge if no other badge has been displayed
    if ( ! $badge_displayed ) {
        // For "New" products added inside the ultimate 7 days
        $post_date  = get_the_time( 'Y-m-d', $product->get_id() );
        $post_stamp = strtotime( $post_date );
        $newness    = 7; // Collection of days the product is considered new

        // Check out if the product is new
        if ( ( time() - ( 60 * 60 * 24 * $newness ) ) < $post_stamp ) {
            echo 'New';
            $badge_displayed = true;
        }
    }
}
Wish to alter how long a product is considered “new”? Merely seek for the street where it says $newness = 7 inside the code. You’ll alternate that amount 7 to alternatively many days you wish to have, like 14 for two weeks or 30 for a month.
To finish up, click on at the ‘Inactive’ button until it changes to ‘Lively,’ then hit ‘Save Snippet.’
Next, we want to style our badges to make them look great to your products. Let’s add some CSS to control their glance.
To be able to upload a brand spanking new snippet, apply the identical steps as quicker than, on the other hand this time, select ‘CSS Snippet’ when asked.
Identify your snippet something descriptive, like “Product Badge Sorts.” This may occasionally most likely will will let you to search out it merely if you wish to make changes later.
Proper right here’s the CSS code that may make your badges look professional. Merely paste this into the ‘Code Preview’ box:
/* Not unusual types for all product badges */
.product-badge {
    position: absolute;
    best: -10px;      /* Position at the best edge */
    right kind: -10px;    /* Position on the correct edge */
    padding: 12px 16px;
    border-radius: 50%;
    color: #ffffff;
    font-size: 16px;
    font-weight: bold;
    z-index: 99;
    box-shadow: 0 2px 5px rgba(0, 0, 0, 0.3);
}

/* Sorts for the "New" badge */
.new-product {
    background-color: #4CAF50; /* Green background */
}

/* Sorts for the "Sale" badge */
.sale-product {
    background-color: #FF0000; /* Crimson background */
}
Let’s smash down what you’ll have the ability to customize in this code.
Want your badges in a definite spot? To try this, you’ll have the ability to alternate the best and right kind values. For example, changing best: -10px to best: 10px will switch the badge down.
Don’t like the colors? It’s super easy to switch them. Merely to search out the background-color lines and alter the color codes.
For instance, if you wish to have a blue sale badge instead of a purple one, alternate #FF0000 to #0000FF. You’ll moreover make the badges higher or smaller by the use of adjusting the font-size value.
Wish to be informed further about tweaking the ones types? Check out our beginner-friendly knowledge on CSS in wordpress.
Every time you’re completed, merely click on at the ‘Inactive’ button to make it ‘Lively,’ then hit ‘Save Snippet.’
That’s it!
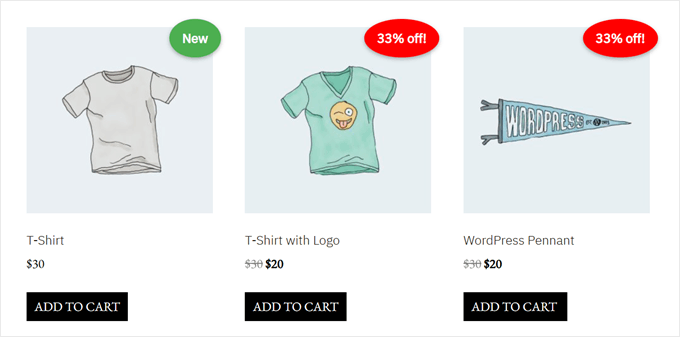
Your badges must now appear to your product photos. Proper right here’s an example of what ours turns out like the usage of our CSS code:
Discover Further WooCommerce Guidelines and Guidelines
Now that you know how to turn product badges in WooCommerce, that you must wish to uncover other ways to reinforce your online store. Listed below are some helpful guides we recommend:
Spice up gross sales with good upselling – Learn to strategically market it identical products and building up your affordable order value through environment friendly upsell tactics.
Praise buyer critiques with coupons – Discover how you can automatically send discount coupons to shoppers who move away product evaluations, encouraging further feedback and repeat purchases.
Show good product suggestions – Find out how to show product concepts to skyrocket your WooCommerce product sales.
Upload complicated product filtering choices – Learn to have the same opinion shoppers to search out exactly what they’re looking for with customizable product filters that make purchasing groceries easier and quicker.
Create a buyer wishlist characteristic – See how together with a wishlist function can boost engagement and offers shoppers a the reason why to return to your store while providing valuable insights into purchaser preferences.
Cover costs in WooCommerce – Learn to hide pricing for wholesale shoppers, online catalogs, and luxury pieces and ask shoppers to the touch you or log in instead.
We hope this text has helped you learn how to add product badges in WooCommerce. You might also want to take a look at our a professional possible choices of the absolute best WooCommerce product grid plugins and our knowledge on how one can accelerate WooCommerce efficiency.
Whilst you preferred this text, then please subscribe to our YouTube Channel for wordpress video tutorials. You’ll moreover to search out us on Twitter and Fb.
The publish Upload Product Badges in WooCommerce (Fast and Simple) first appeared on WPBeginner.
What are some of the ways you can use your tablet at home?
How can a tablet benefit you as a student, professional, or entertainment seeker?
What factors should you consider when choosing a tablet for home use?
Using Your Tablet On the Go
How can a tablet enhance your travel experiences?
What are some specific locations where using a tablet can be beneficial?
What advantages does a tablet offer for completing tasks or staying entertained while on the move?
Get Your Tech On: Choosing the Perfect Tablet for You!
TL;DR – Too Long; Didn’t Read
Looking for a tablet? This article is your guide to finding the right fit for your needs. We’ll cover different types of tablets, features to consider, and even give you some tips on using your tablet at home or on the go!
Tablets: Your Pocket-Sized Computer!
Imagine having a powerful computer that you can hold in your hand and carry around with you anywhere. That’s what a tablet is all about! Tablets are like smaller versions of laptops, but they have touchscreens and often come with a stylus for writing and drawing.
Different Types of Tablets
There are two main types of tablets:
iPad: This is the most popular tablet brand, made by Apple. iPads are known for their sleek design, beautiful displays, and powerful software.
Android Tablets: These tablets run on the Android operating system, which is also used by many smartphones. Android tablets come in different shapes, sizes, and prices, offering a wide range of choices.
Choosing the Right Tablet: What to Consider
1. What Will You Use It For?
Before you buy a tablet, think about what you’ll be using it for. Do you want to:
Read ebooks and magazines?
Watch movies and TV shows?
Play games?
Browse the internet?
Create art or take notes?
The type of tablet you choose will depend on what you want to do with it.
2. Screen Size
Tablets come in different screen sizes. Smaller tablets are great for portability, but larger tablets offer a more immersive experience for watching videos or reading.
3. Features
Some tablets have features that make them even more useful:
Stylus: This lets you draw and write directly on the screen.
Keyboard: You can connect a keyboard to make typing easier.
Cameras: Some tablets have front and rear cameras for taking pictures and video chatting.
Storage: You’ll want enough storage space to hold all your apps, photos, and videos.
Tablets for Everyone!
Tablets are becoming increasingly popular, and they’re great for people of all ages. Whether you’re a student who needs to take notes or a senior citizen who wants to stay connected with family and friends, there’s a tablet out there that’s perfect for you!
Using Your Tablet at Home and On the Go
Tablets can be used in many different ways:
At home: You can use your tablet to stream movies and TV shows, browse the internet, play games, or read ebooks.
On the go: Take your tablet with you on vacation, to the library, or to a coffee shop to stay entertained or get work done.
A Tablet for Every Task!
No matter your needs, there’s a tablet that’s perfect for you. Whether you’re a student, a professional, or just looking for a way to stay entertained, a tablet can be a great addition to your life.
Tablets in Corner Brook
Corner Brook, Newfoundland and Labrador, is a beautiful city with plenty of opportunities to use a tablet. Imagine exploring the city’s attractions, taking photos, or using a tablet to navigate the scenic roads.
Learn More About Tablets and Signs!
Want to learn more about tablets or other cool tech gadgets? Check out Ecliptic Signs, a company specializing in signage, design, and technology.
Summary
This article has discussed the world of tablets, from choosing the right type for your needs to considering key features and exploring the benefits of tablet use in your daily life. We’ve emphasized the wide range of uses, from entertainment to productivity, and even highlighted how tablets can be used in a place like Corner Brook, Newfoundland and Labrador. Finally, we’ve encouraged readers to explore the world of technology further by visiting Ecliptic Signs, a company that specializes in signage, design, and technology, and might have additional insights to share. Whether you’re looking for a tablet to stay connected, explore new horizons, or simply enjoy entertainment, this article has provided valuable information to help you make an informed decision.
As wordpress pros who’ve helped 1000’s of internet website online house owners give protection to their internet website online wisdom, we know how essential it’s to have secure, to be had backups of your wordpress web page.
Numerous our readers ask us about the usage of Amazon Simple Storage Services (S3) for their wordpress backups. They’re steadily unsure if it’s the appropriate resolution for their needs. We understand – backing up your wordpress web page shouldn’t in reality really feel like solving a puzzle.
That’s why we’ve created this whole knowledge to help you once more up wordpress to Amazon S3, whether or not or now not you’re a novice or an professional individual. We can walk you through the whole lot step-by-step, the usage of simple, clear instructions that anyone can observe.
In this knowledge, you’ll discover ways to once more up your wordpress and send its knowledge to Amazon S3.
wordpress-to-amazon-s3-in-post.png” alt=”How to Backup wordpress to Amazon S3″ class=”wp-image-321983″/>
<span class=”ez-toc-section” id=”why-use-amazon-s3-to-backup-wordpress“/>Why Use Amazon S3 to Backup wordpress?
We’ve helped 1000’s of wordpress shoppers backup and repair their web pages. And Amazon S3 supplies some unique advantages that make it stick out from other cloud backup storage alternatives like Google Pressure or OneDrive.
Amazon S3 is particularly suitable for internet pages that need enterprise-level backup reliability. It should perhaps handle huge backup knowledge continuously, without reference to when you run your backups. This makes it highest for business internet pages that can’t find the money for backup disasters.
The security choices in S3 go beyond basic file sharing. While services and products like Google Force and OneDrive offer simple sharing alternatives, S3 provides enterprise-level protection through IAM (Identity and Get admission to Keep watch over).
This lets you create specific protection laws, like limiting get right to use to certain time categories or applying computerized encryption to your backup knowledge.
Amazon supplies a free tier that comprises 5 GB of storage, together with 2,000 PUT and 20,000 GET requests monthly in your first 12 months.
In smart words, this means you need to store plenty of entire backups of a small wordpresswebsite and perform not unusual backups without further costs all through that period.
On the subject of pricing, S3 uses a flexible pay-as-you-go type with different storage classes. This means you’ll be capable to select further fairly priced alternatives for long-term backup storage while maintaining recent backups readily available.
With a lot of these benefits in ideas, let’s check out simple how one can send your wordpress backups to Amazon S3. You’ll use the short links underneath to jump to the segment you wish to have:
First Problems First: Configure Your Amazon S3 Account
Previous to we will be able to once more up your wordpress web page to Amazon S3, we want to prepare your storage space as it should be.
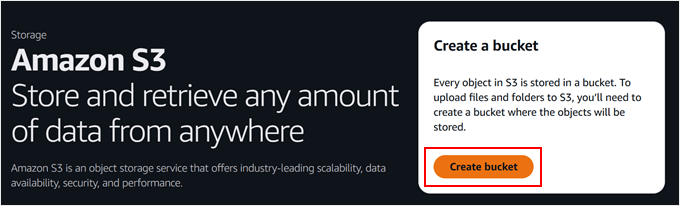
Step 1: Create an Amazon S3 Bucket
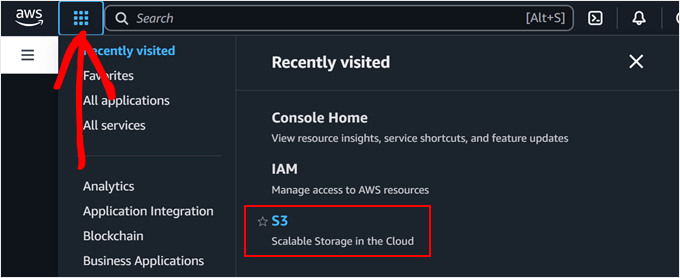
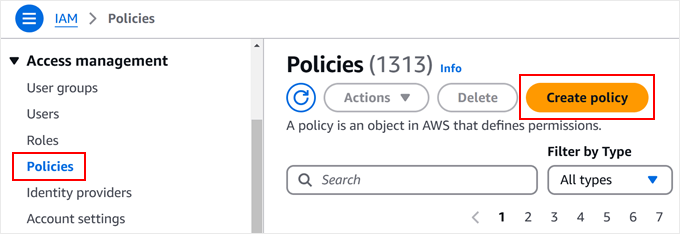
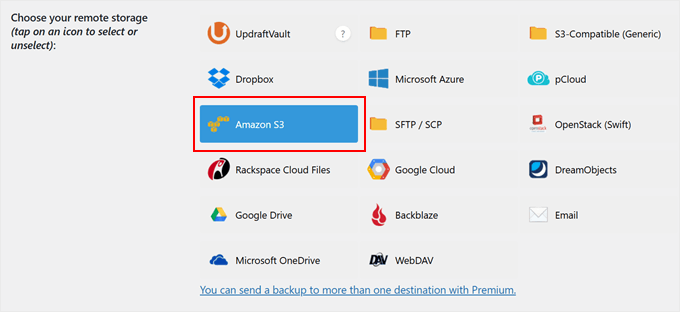
First, log in to your Amazon Internet Products and services (AWS) account. Then, click on on on the menu button on the most efficient left corner and make a selection ‘S3.’
On the S3 dashboard internet web page, you wish to have to seek for the ‘Create bucket’ button and click on on it.
A bucket in Amazon S3 is like a container in your knowledge. Call to mind it as a singular folder that may take hold of your whole wordpress backups.
For the ‘Bucket kind,’ you wish to have to make a choice ‘Commonplace function.’ Then, give your bucket a name.
We advise along with your area title inside the name, with something like backups.yourwebsite.com as your bucket name. This structure promises your bucket name is unique and helps you merely identify your wordpress backup knowledge later.
You’ll moreover see plenty of configuration alternatives. For plenty of wordpress backup needs, you’ll be capable to cross away the ones settings at their default values. The ones defaults include maintaining your bucket private and enabling encryption for upper protection.
At this point, you’ll be capable to merely scroll to the bottom of the internet web page and click on at the ‘Create bucket’ button.
Your new storage space will also be ready in only some seconds.
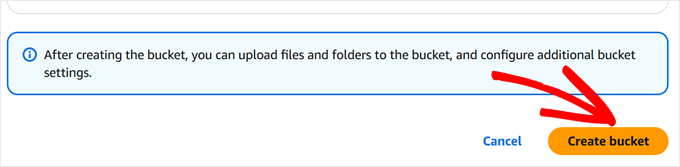
Step 2: Create a Protection Protection
Now, let’s prepare a security protection in your backups. This protection is a set of rules that control what will also be finished along with your backup knowledge.
Get began by way of clicking on the menu over again and settling on ‘IAM.’ This will an increasing number of take you to AWS’s protection keep an eye on house.
You’ll navigate to the ‘Insurance coverage insurance policies’ internet web page from proper right here.
Proper right here, you wish to have to click on on on the ‘Create protection’ button. That’s the position you’ll prepare your backup permissions.
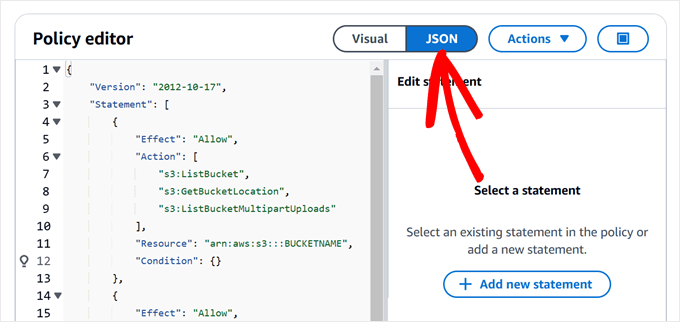
When you see the protection editor, you’ll be ready to make a choice the ‘JSON’ tab to enter the security laws.
Proper right here’s where you’ll add the specific permission code. You’ll replica and paste the protection underneath into the editor:
{
    "Style": "2012-10-17",
    "Remark": [
        {
            "Effect": "Allow",
            "Action": [
                "s3:ListBucket",
                "s3:GetBucketLocation",
                "s3:ListBucketMultipartUploads"
            ],
            "Helpful useful resource": "arn:aws:s3:::BUCKETNAME",
            "State of affairs": {}
        },
        {
            "Have an effect on": "Allow",
            "Movement": [
                "s3:AbortMultipartUpload",
                "s3:DeleteObject",
                "s3:DeleteObjectVersion",
                "s3:GetObject",
                "s3:GetObjectAcl",
                "s3:GetObjectVersion",
                "s3:GetObjectVersionAcl",
                "s3:PutObject",
                "s3:PutObjectAcl"
            ],
            "Helpful useful resource": "arn:aws:s3:::BUCKETNAME/*",
            "State of affairs": {}
        },
        {
            "Have an effect on": "Allow",
            "Movement": "s3:ListAllMyBuckets",
            "Helpful useful resource": "*",
            "State of affairs": {}
        }
    ]
}
Important! You’ll want to trade all cases of ‘BUCKETNAME’ with the actual bucket name that you just created earlier. As an example, if your bucket is referred to as backups.example.com, then you definitely unquestionably’ll wish to exchange each and every cases of BUCKETNAME with that individual name.
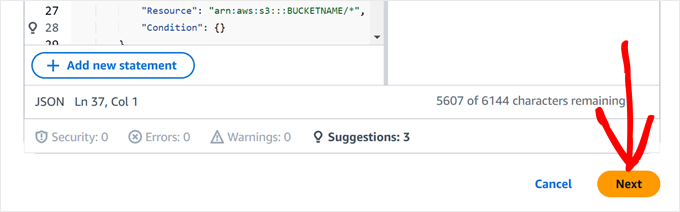
At this point, you’ll be capable to switch down the internet web page.
Then, click on on ‘Next.’
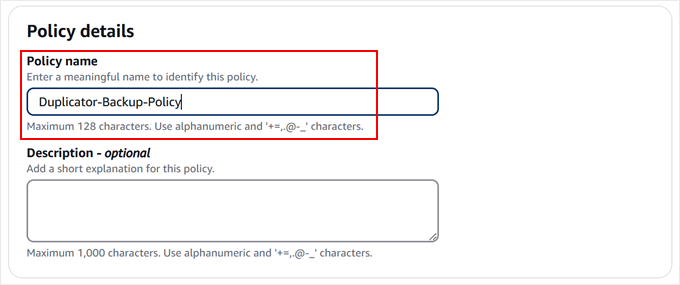
Now, you’ll be capable to give your protection a nice name. It’s possible you’ll wish to title it something like wordpress-Backup-Protection, Duplicator-Backup-Protection, or Updraftplus-Backup-Protection.
Be happy to make a choice a name this is sensible to you. This protection will art work great with each wordpress backup plugin we will quilt later.
Each time you’re proud of the name, you’ll be capable to finally end up by way of clicking ‘Create protection.’
This will an increasing number of save your whole protection settings and get you ready for the next step.
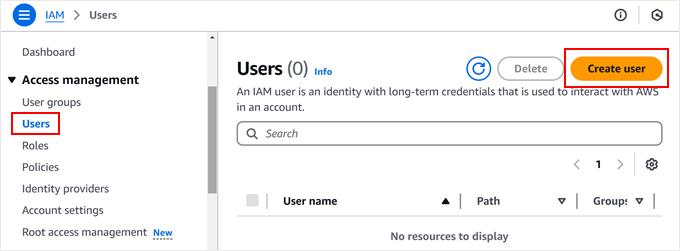
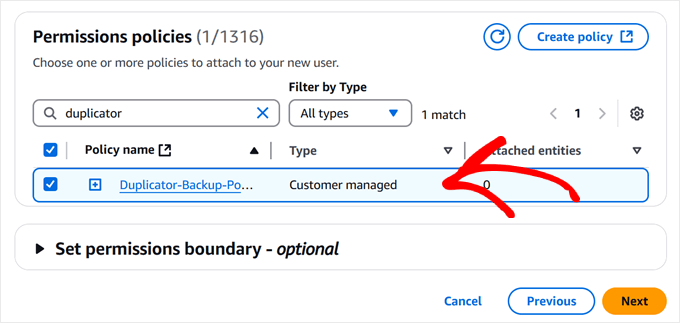
Step 3: Create a Client
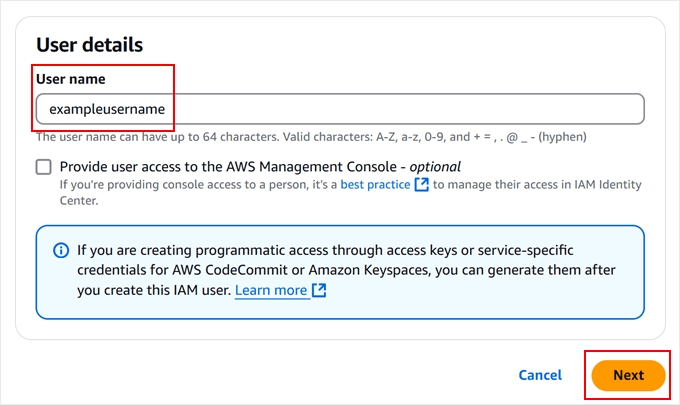
Now that we’ve prepare our protection protection, let’s create an individual who can get right to use your cloud garage. You’ll call to mind this as growing a singular account just for coping with your wordpress backups.
Get began by way of going to the ‘Consumers’ menu on the IAM internet web page. You’ll see a ‘Create individual’ button. Pass ahead and click on on that.
Next, you’ll give your new individual a name.
You’ll name any name this is serving to you identify its function. Then, click on on ‘Next.’
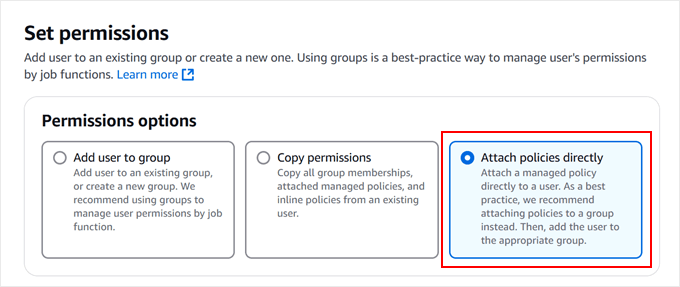
When you be triumphant within the ‘Set permissions’ segment, you’ll want to make a choice ‘Attach insurance coverage insurance policies instantly.’
That’s the position you’ll be capable to connect the security protection we merely created to your new individual. Call to mind it as giving your backup individual their specific set of permissions.
Look right through the checklist of insurance coverage insurance policies until you to find the one we created inside the previous step. You’ll merely find it by way of typing the protection name inside the search box.
Each time you see it, merely read about the sector next to it.
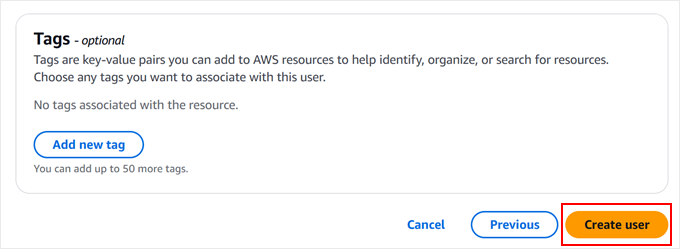
After reviewing the whole lot, you’ll be capable to scroll down and click on on ‘Create individual.’
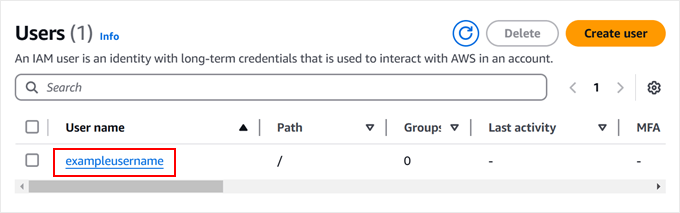
AWS will prepare your new individual with all of the right kind permissions to handle your wordpress backups safely.
Remember the fact that we’ll want to take hold of some essential protection details for this individual in the next step, so don’t close this window merely however.
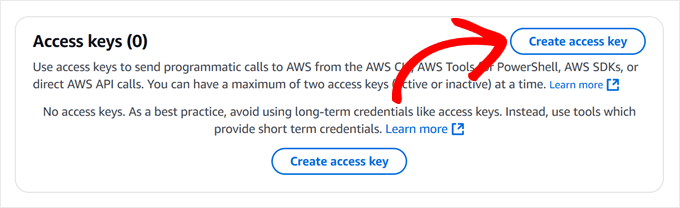
Step 4: Replica Your Get admission to Keys
Let’s prepare your get right to use keys. The ones are like specific passwords that may let your wordpress backup plugin connect securely with Amazon S3.
First, you’ll be capable to click on on on the username we merely created to view its details.
Seek for the ‘Protection credentials’ tab.
That’s the position we’ll create your get right to use keys.
<img decoding=”async” loading=”lazy” width=”680″ height=”308″ src=”https://www.wpbeginner.com/wp-content/uploads/2024/12/amazon-s3-security-credentials-min.png” alt=”Navigating to the security Credentials tab in Amazon S3″ class=”wp-image-322008″/>
Switch down the internet web page quite.
When you see the ‘Create get right to use key’ button, move ahead and click on on on it.
Amazon will now ask about your use case.
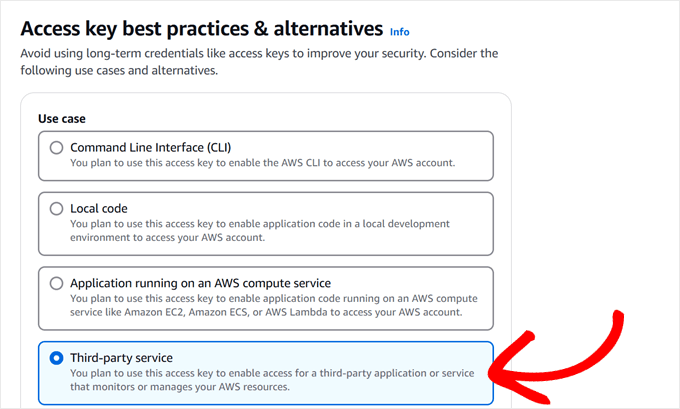
Since we’re planning to use a wordpress backup plugin, you’ll be ready to make a choice ‘Third-party provider’ from the decisions.
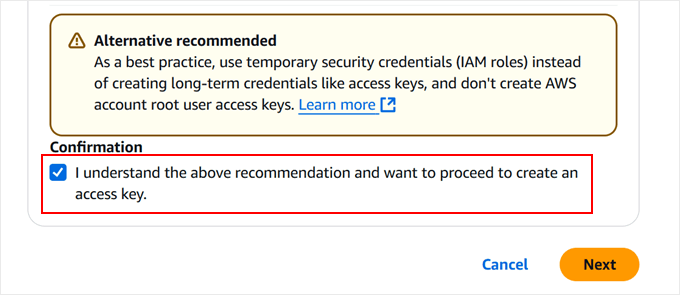
Now, scroll down the internet web page further.
Check out off the sector next to ‘I understand the above recommendation and wish to proceed to create an get right to use key’ and click on on ‘Next.’
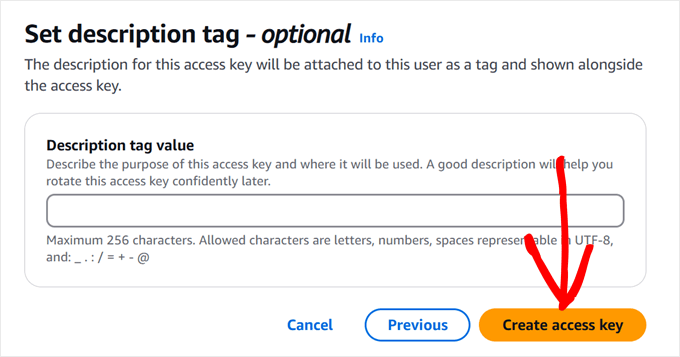
Previous to you’ll see your get right to use keys, you’ll be capable to optionally set some description tags.
We’re going to skip this step as it’s no longer essential, so move ahead and click on on on the ‘Create get right to use key’ button.
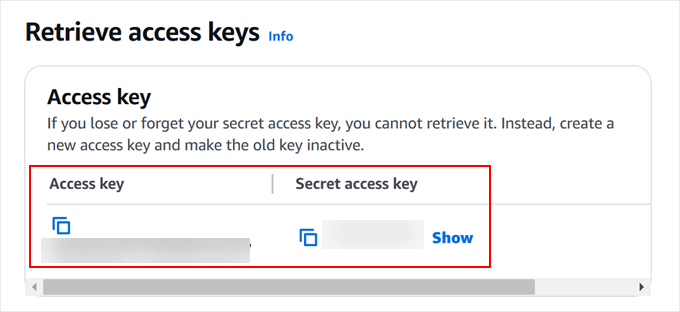
You’ll now see two essential pieces of knowledge: your get right to use key ID and your secret get right to use key. Call to mind the ones as a username and password pair that your backup plugin will use.
You’ll wish to keep the ones keys somewhere secure, or no less than keep this window open when you prepare your decided on backup method. Each time you close this window, you won’t be capable to see the secret get right to use key over again.
<h4 class=”wp-block-heading” id=”aioseo-method-1-use-duplicator-to-backup-wordpress-to-s3-more-customizable”><span class=”ez-toc-section” id=”manner-1-use-duplicator-to-backup-wordpress-to-s3-additional-customizable”/>Manner 1: Use Duplicator to Backup wordpress to S3 (Additional Customizable)
In our enjoy, we’ve found out Duplicator to be one of the crucial loyal resolution for Amazon S3 backups. We use it ourselves to once more up a couple of of our partner internet pages and personal duties, so we’re confident in recommending it as our top choice.
What makes Duplicator stand out is its tough serve as set. You’ll agenda automated backups, migrate all your wordpress web site, and connect to a couple of cloud storage services and products all from one dashboard. Plus, its Amazon S3 integration is rock-solid and well-tested.
When you’ll be capable to uncover our detailed Duplicator evaluation for a whole serve as breakdown, let’s focal point on getting your S3 backups prepare.
Remember the fact that you’ll need Duplicator Skilled for the Amazon S3 integration, alternatively you’ll be capable to get began with the loose model to get aware of the basic choices.
Step 1: Arrange and Activate Duplicator
Getting started is simple. You’ll want to arrange Duplicator to your wordpress internet website online first. Whilst you’re new to setting up wordpress plugins, don’t worry. We’ve got a beginner-friendly knowledge on easy methods to set up a wordpress plugin.
Once installed, you’ll be capable to flip to your Duplicator Skilled license key. Merely head over to Duplicator Skilled » Settings in your wordpress dashboard, enter your license key, and click on on ‘Activate.’ You’ll see a confirmation message when it’s successful.
Step 2: Connect to Amazon S3
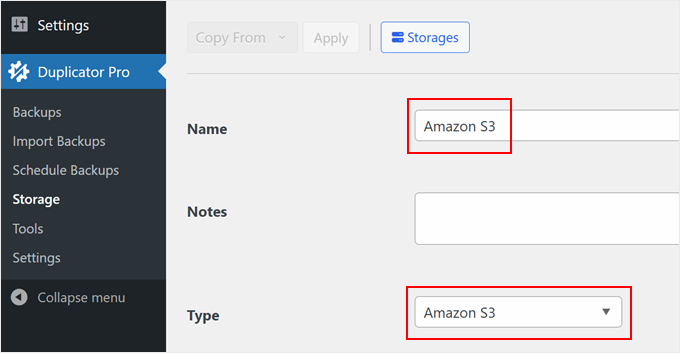
Now, let’s connect Duplicator to your Amazon S3 account. Navigate to Duplicator Skilled » Storage and click on at the ‘Add New’ button.
To help you identify this storage connection merely, you’ll be capable to give it a simple name like ‘Amazon S3 Backups’.
Moreover, seek for the ‘Kind’ dropdown menu and make a selection ‘Amazon S3.’
Pass ahead and scroll down.
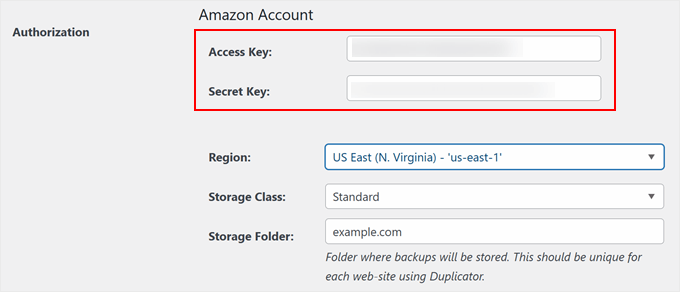
You’ll then see the authorization segment where you’ll be capable to paste your get right to use key and secret key that we saved earlier.
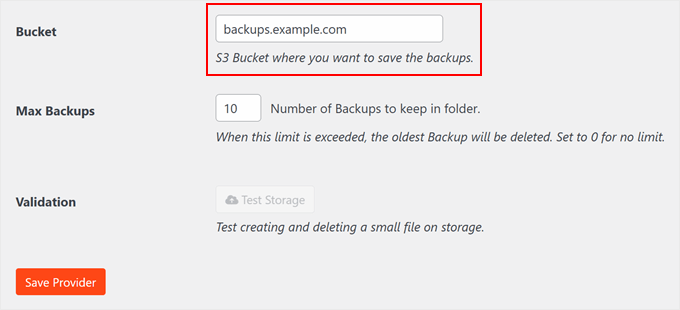
Inside the configuration segment, you wish to have to enter your bucket name exactly as you created it in Amazon S3. That is serving to Duplicator know where to store your backup knowledge.
You’ll moreover come to a decision what selection of backup permutations to stick. Whilst you set this to ’10,’ as an example, Duplicator will automatically remove the oldest backup when an eleventh one is created. Atmosphere it to ‘0’ way it’ll keep all backups indefinitely.
After all, click on on ‘Save Provider’ to secure your settings.
After saving S3 as your new cloud storage provider, the ‘Check out Storage’ button will also be activated.
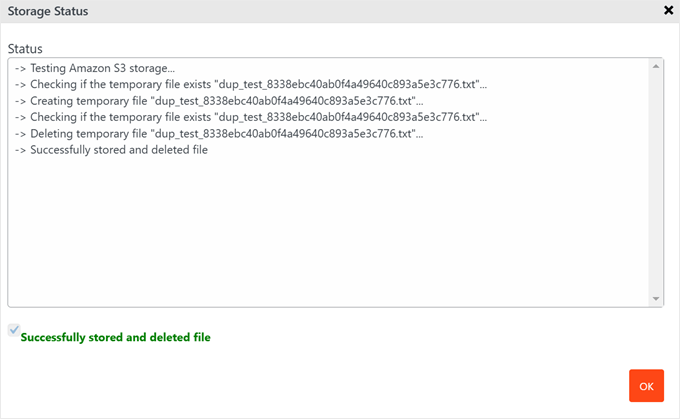
You’ll click on on on that button to make sure the whole lot works high quality.
If the verify backup is successful, a popup will appear saying that the plugin has stored and deleted the file.
Be happy to close this popup by way of clicking ‘OK.’
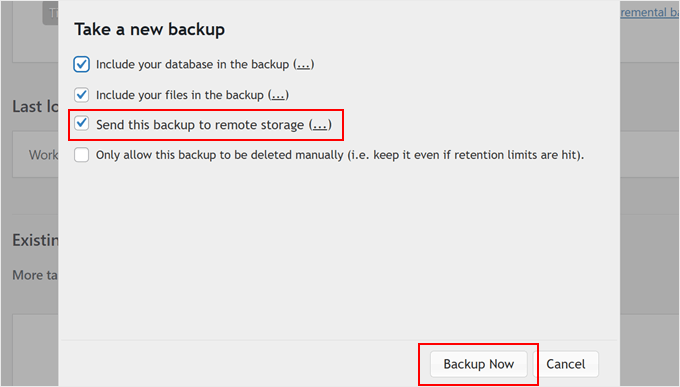
Step 3: Once more Up Your wordpress Internet website online to Amazon S3
Now comes the exciting segment: growing your first backup to Amazon S3. Let’s walk through this process step by step.
Get began by way of visiting Duplicator Skilled » Backups in your wordpress dashboard. You’ll see an ‘Add New’ button. Pass ahead and click on on on it.
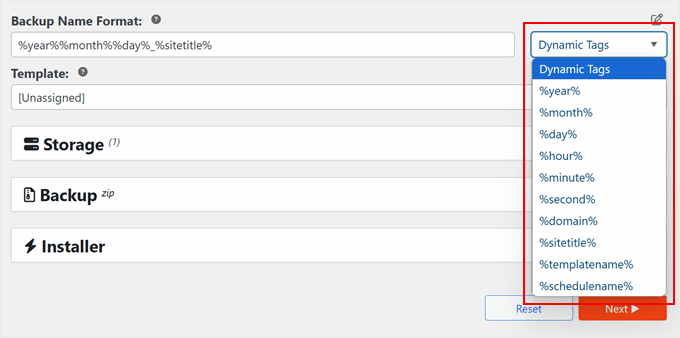
Proper right here’s an invaluable tip: You’ll make your backups more straightforward to look out by way of the usage of a smart naming system.
Duplicator allows you to use specific tags like %12 months%, %day%, and %hour% in your backup names. As an example, ‘mysite-backup-%12 months%-%month%’ will automatically create names like ‘mysite-backup-2024-12.’
When you scroll the entire means all the way down to the ‘Storage’ tab, you’ll see the available local and far off storage alternatives.
Simply read about the sector next to Amazon S3, and Duplicator will know to send your wordpress backup to S3.
<img decoding=”async” loading=”lazy” width=”680″ height=”228″ src=”https://www.wpbeginner.com/wp-content/uploads/2024/12/duplicator-storage-amazon-s3-min.png” alt=”Backing up a wordpress site to Amazon S3″ class=”wp-image-322020″/>
Now, you get to make a choice what to once more up.
Underneath the ‘Backup’ segment, you’ll see plenty of alternatives. We advise starting with ‘Whole Internet website online’ to create an entire backup of your wordpress web site information. Call to mind it as taking a snapshot of the whole lot, like your posts, pages, photos, and settings.
Then again, you’ll be capable to select ‘Database Best possible’ to again up your wordpress database most efficient.
If that’s your variety, you’ll be capable to be informed our knowledge on easy methods to repair wordpress with only a database backup for more information.
Wish to add an extra layer of protection? Discuss with the ‘Protection’ tab, where you’ll be ready to give protection to your backup knowledge with a password.
This is in particular useful for individuals who’re storing refined wisdom.
<img decoding=”async” loading=”lazy” width=”680″ height=”213″ src=”https://www.wpbeginner.com/wp-content/uploads/2024/12/duplicator-security-min.png” alt=”Enabling backup security features in Duplicator” class=”wp-image-319169″ title=”Enabling backup security features in Duplicator”/>
The Installer segment comes with pre-configured settings that art work correctly for lots of internet pages.
You’ll cross away the ones as they’re and click on on ‘Next’ to proceed.
Previous to growing your backup, Duplicator runs a at hand information a coarse properly being read about of your internet website online.
Call to mind it as a pre-flight inspection. If the whole lot turns out superb, then you definitely unquestionably’ll see a green ‘Good’ status. If there are any issues, Duplicator will can help you know exactly what needs fixing.
After all, click on at the ‘Create Backup’ button.
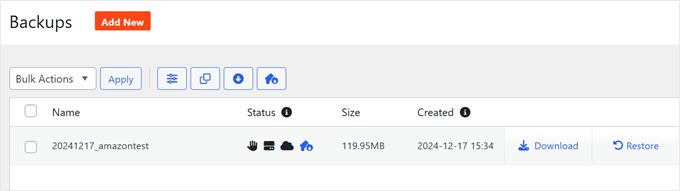
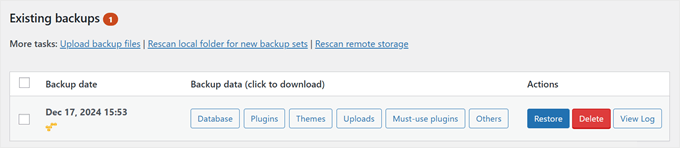
When the process completes, you’ll return to your dashboard, where you’ll be capable to view all of your wordpress backups.
And that’s it!
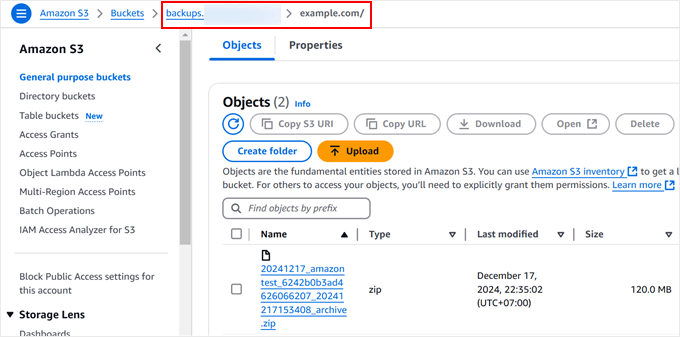
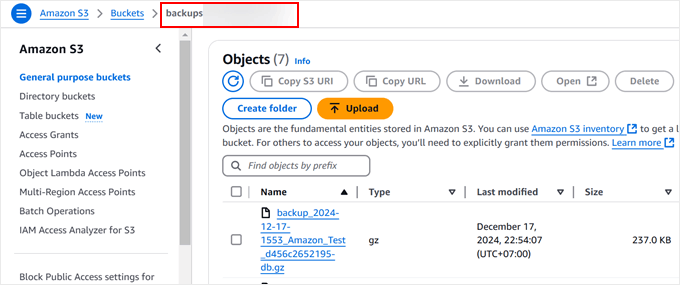
Wish to make sure the whole lot worked? You’ll read about your S3 bucket instantly.
Merely log into your Amazon S3 account, navigate to your bucket, and in addition you will have to see your fresh backup knowledge in a position there safely.
<h4 class=”wp-block-heading” id=”aioseo-method-2-use-updraftplus-to-backup-wordpress-to-s3-free”><span class=”ez-toc-section” id=”manner-2-use-updraftplus-to-backup-wordpress-to-s3-loose”/>Manner 2: Use UpdraftPlus to Backup wordpress to S3 (Loose)
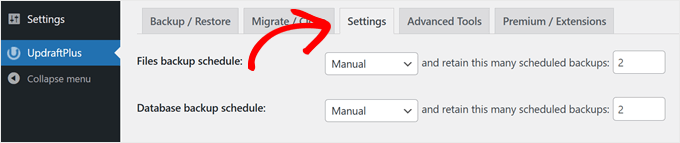
While Duplicator Skilled is our top choice, we needless to say every now and then you wish to have a free resolution. That’s where UpdraftPlus is to be had in. It’s a reliable free plugin that we’ve tested extensively for Amazon S3 backups.
It’s worth noting that the free style has some limitations. You won’t be capable to time table computerized backups or create redundant backups all the way through a couple of puts. Then again for basic S3 backups, it’ll get the method finished successfully.
Let’s get the loose model of UpdraftPlus prepare to your web page. You’ll want to set up the wordpress plugin first through your admin house.
Once installed, you’ll be capable to find UpdraftPlus in your wordpress dashboard. Head over to the ‘Settings’ tab.
That’s the position you’ll see rather numerous backup alternatives.
Scroll down until you understand the cloud storage segment, and click on on on ‘Amazon S3.’
Proper right here’s where those get right to use keys we created earlier develop into helpful. You’ll paste your get right to use key and secret key into the respective fields. You moreover want to enter your bucket name proper right here.
Previous to shifting forward, it’s a good idea to click on on ‘Check out Amazon S3 settings.’ This promises Amazon S3 is attached accurately with this wordpress migration plugin.
If the connection works, you’ll see a push notification with a success message, like inside the screenshot underneath.
From proper right here, you’ll be capable to merely click on on ‘OK’ and save your changes.
In a position to again up your wordpress web site? Pass ahead and switch to the ‘Backup / Restore’ tab.
Then, click on at the ‘Backup Now’ button.
<img decoding=”async” loading=”lazy” width=”680″ height=”211″ src=”https://www.wpbeginner.com/wp-content/uploads/2024/12/updraftplus-backup-now-min.png” alt=”Backing up a wordpress site with UpdraftPlus” class=”wp-image-322044″/>
A pleasing popup window will appear with some alternatives to make a choice from.
You’ll need to read about ‘Send this backup to far off storage’ to send your wordpress backup S3. We moreover suggest ticking each and every ‘Come together with your database inside the backup’ and ‘Come together with your knowledge inside the backup’ for a whole internet website online backup.
After clicking ‘Backup Now,’ UpdraftPlus gets began backing up your knowledge.
Once whole, your backup will appear inside the ‘Provide backups’ checklist. You’ll scroll down the internet web page to look out this segment.
Wish to double-check that your backup made it to S3? You’ll log in to your Amazon S3 account and look in your bucket.
You will have to see your wordpress backup knowledge stored safely there.
<h4 class=”wp-block-heading” id=”aioseo-bonus-tip-hire-a-wordpress-maintenance-service”><span class=”ez-toc-section” id=”bonus-tip-let-the-experts-maintain-your-wordpress-maintenance”/>Bonus Tip: Let the Experts Maintain Your wordpress Maintenance
Running a successful wordpress internet website online involves much more than just growing great content material subject matter. Take into accounts all of the technical tasks: not unusual backups, protection exams, velocity optimization, and unending wordpress updates. It’s like having a 2d procedure, isn’t it?
We needless to say, as a business owner, your time is more healthy spent emerging what you are promoting quite than dealing with technical repairs. That’s exactly why we created WPBeginner Professional Products and services to take the ones technical tough scenarios off your plate.
Our wordpress upkeep workforce can handle the whole lot your internet website online needs to stay healthy and secure:
Daily cloud backups to stick your content material subject matter secure
Commonplace wordpress protection scans and malware taking away
Potency optimization to stick your web page operating speedy
24/7 uptime monitoring to catch issues previous than they impact your visitors
What makes our provider different? You’ll download detailed research showing exactly what we’ve finished to care for your web page. Plus, if something surprising happens, our emergency enhance workforce is in a position to help.
Call to mind us as your wordpress technical workforce. We handle the complex stuff when you focal point on what you do very best: operating what you are promoting.
In a position to make wordpress repairs hassle-free? E-book a session with our professionals at the present time. We’d love to show you tactics we will be able to help keep your internet website online operating simply.
We hope this text has helped you discover ways to once more up your wordpress web page to Amazon S3. You may also want to check out our checklist of the easiest Dropbox plugins for wordpress and our knowledge on easy methods to save your wordpress weblog posts on your laptop.
Whilst you liked this text, then please subscribe to our YouTube Channel for wordpress video tutorials. You’ll moreover find us on Twitter and Fb.
The submit The right way to Backup wordpress to Amazon S3 (Unfastened + Paid Strategies) first gave the impression on WPBeginner.