Unleash Your Action Figure’s Potential: The Ultimate Guide to Cables and Accessories
Tired of your action figures being powerless? Discover the perfect cables to bring your heroes and villains to life! This guide delves into the world of action figure accessories, from essential cables to cool collectibles, and even explores the fascinating history of action figures in Michigan.
Choosing the Right Cable: Power Up Your Posing!
When selecting a cable for your action figure, there are key factors to consider:
1. Connector Compatibility: Ensure the cable’s connector matches your action figure’s power source. (Tip: Check the manual or online resources for specific requirements).
2. Cable Length: Select a cable that’s long enough to allow for dynamic posing without hindering movement or creating a tangled mess.
3. Durability: Opt for high-quality cables that can withstand repeated use and bending, ensuring your action figures stay connected.
4. Aesthetics: Consider the cable’s color and design to complement your action figure’s look.
Types of Cables: Powering Up Your Collection
USB Cables: The most common choice for action figures, offering universal compatibility and readily available options.
Micro USB Cables: Popular for smaller figures, providing a compact and reliable connection.
Mini USB Cables: A slightly larger option than Micro USB, suitable for some action figures with specific power needs.
Specialty Cables: For unique action figures requiring special connectors, consider searching for compatible cables online or visiting a dedicated electronics store.
More Than Just Power: Action Figure Accessories Unleashed
Beyond cables, the world of action figure accessories is vast and exciting:
Display Stands: Showcase your figures with style and create dynamic poses using custom stands.
Weaponry & Accessories: Enhance your action figure’s arsenal with authentic-looking guns, swords, and other gear.
Custom Clothing & Costumes: Give your figures a unique look with tailored outfits and accessories.
Backdrops & Scenery: Transport your action figures to immersive settings with themed backdrops and miniature environments.
A Legacy of Action: The Michigan Connection
Michigan’s history is deeply intertwined with the action figure industry. The state was home to Hasbro, a toy company responsible for creating some of the most beloved action figures of all time, including G.I. Joe, Transformers, and My Little Pony. This legacy continues to inspire collectors and toy enthusiasts worldwide.
Ready to power up your action figure collection? Explore the world of cables, accessories, and immerse yourself in the fascinating history of action figures.
Action Figures & Cables: A Match Made in Toy Heaven
TL;DR – Too Long; Didn’t Read
This article explores the amazing world of action figures and how to keep them connected to power using cables! Discover the best cables for your action figures, learn about the history of action figures in Michigan, and find out where to buy the coolest action figure accessories.
The Rise of Action Figures
Action figures, those awesome little plastic heroes, have been around for decades! They bring our favorite characters to life, from superheroes like Superman and Batman to iconic movie stars like Indiana Jones. And what’s even cooler? You can pose them in all sorts of exciting adventures.
But sometimes, action figures need a little extra help to stay in the action. That’s where cables come in!
Cables: The Unsung Heroes
Cables are the hidden heroes of the toy world. They power up our favorite action figures, allowing them to light up, move, and even talk!
H3: Types of Cables
USB cables: These are the most common type of cable used for action figures. They are easy to find and work with most devices.
Micro-USB cables: These are smaller than USB cables and are perfect for action figures with limited space.
Lightning cables: These cables are used for Apple devices and are becoming increasingly popular for action figures.
H3: Choosing the Right Cable
When choosing a cable for your action figure, you need to consider a few things:
The type of connector: Make sure the cable has the right connector for your action figure.
The length: Choose a cable that is long enough to reach your action figure’s power source.
The quality: Buy a high-quality cable that is durable and won’t break easily.
Action Figures in Michigan: A History
Michigan has a special place in action figure history! The state was home to Hasbro, a toy company that created some of the most beloved action figures of all time, including G.I. Joe and Transformers. Today, Michigan is still a hub for action figure fans with many toy stores and conventions dedicated to this exciting hobby.
Where to Find the Best Action Figure Accessories
Need more than just cables? Here are some great places to find cool action figure accessories:
Local toy stores: You can often find unique and hard-to-find accessories at local toy stores.
Online retailers: Websites like Amazon and eBay offer a wide selection of action figure accessories at competitive prices.
Specialized action figure shops: These shops often have a great selection of accessories for specific types of action figures.
Summary
Action figures bring our favorite characters to life, and cables are essential for powering up their amazing features! From USB cables to micro-USB and Lightning cables, there’s a perfect cable for every action figure. Michigan, with its rich toy history, remains a great place to find action figure accessories, including cables, at local toy stores or online retailers. So get ready for some epic adventures!
Want to learn more about action figures and cables? Visit Ecliptic Signs for exciting resources and news about the world of action figures!
All orders are protected by SSL encryption – the highest industry standard for online security from trusted vendors.
The hydrogen switch
is backed with a 60 Day No Questions Asked Money Back Guarantee. If within the first 60 days of receipt you are not satisfied with Wake Up Lean™, you can request a refund by sending an email to the address given inside the product and we will immediately refund your entire purchase price, with no questions asked.
Ditch the Clunky Laptop: Top-Notch Recording Apps for Your Android Tablet
Let’s be real, you’re a creative soul. You’ve got ideas bursting at the seams, and you’re tired of lugging around your bulky laptop just to capture them. That’s where your trusty Android tablet comes in. It’s time to unlock your creative potential and transform your tablet into a portable recording studio.
Forget the struggle of finding the right microphone. We’re talking about capturing stunning audio, on the go, with an app that’s as intuitive as it is powerful. No more fumbling with clunky software – these apps are designed for mobile recording, making it effortless to transform your inspiration into polished audio masterpieces.
So, ditch the bulky gear and get ready to unleash your inner producer, podcast host, or musician. These apps are your secret weapons for creating high-quality recordings that’ll have your audience hooked.
Now, let’s talk about the game-changers – the recording apps that will take your audio to the next level.
Unlock the Power of Android Tablets: Your Portable Studio Awaits
TL;DR: Want to record awesome music or podcasts on the go? Android tablets are a great choice! They’re powerful, affordable, and offer tons of apps for recording, editing, and sharing your creations.
The Android Tablet Advantage
Android tablets are like mini-computers you can take anywhere. They’re perfect for using creative apps, playing games, and even working on projects. If you’re a musician or podcaster, an Android tablet can be your ultimate creative sidekick. Think of it like a portable studio in your hands!
Finding the Right Mic for Your Android Tablet
The right microphone can make a huge difference in the quality of your recordings. You have lots of options to choose from, depending on your budget and needs.
Built-in Microphones:
Most Android tablets come with a built-in microphone. It’s great for quick recordings, like voice notes or video chats. But for professional-quality music or podcasts, you’ll want a dedicated microphone.
External Microphones:
External microphones connect to your Android tablet and capture sound more clearly. These are great for singers, musicians, or podcasters who want the best sound possible. You can find a huge variety of microphones for different purposes.
USB Microphones:
These microphones connect directly to your tablet using a USB cable. They’re easy to set up and work with many recording apps.
Wireless Microphones:
Wireless microphones are a game-changer for mobility. They connect to your tablet wirelessly, giving you freedom to move around while recording.
Top-Notch Recording Apps for Android Tablets
Once you’ve got your Android tablet and microphone, you’ll need a recording app to bring your ideas to life. There are tons of great apps available, so you can find one that fits your needs.
Popular Recording Apps:
GarageBand: A classic for musicians, GarageBand lets you create and record music using virtual instruments, loops, and effects.
Audacity: A free and open-source app known for its powerful audio editing tools.
Adobe Audition: This professional-grade app gives you advanced tools for mixing, mastering, and audio effects.
Shure Motiv: This app is designed specifically for Shure microphones, offering advanced recording and editing features.
Rode Connect: If you have a Rode microphone, this app offers seamless connectivity and easy control over your recordings.
Turning Reno into a Recording Paradise
Reno, Nevada, is a great city for musicians and podcasters. With its vibrant arts scene and stunning landscapes, you’ll find plenty of inspiration and opportunities to create amazing content. Plus, with all the tech stores in Reno, finding the perfect Android tablet and microphone is a breeze. And when you’re ready to share your recordings with the world, you’ve got all the tools you need right at your fingertips!
Bringing it All Together
Android tablets are incredibly versatile tools that can transform your recording experience. With the right microphone and recording app, you can capture stunning audio on the go, unleash your creativity, and bring your ideas to life. Whether you’re in Reno or beyond, an Android tablet can be your creative powerhouse, allowing you to record, edit, and share your music and podcasts with the world.
For more information on Android Tablets, check out Ecliptic Signs!
Unleash the Power of Wi-Fi: Your Ultimate Guide to An Unrivaled Internet Experience
TL;DR:
Don’t settle for mediocre internet! Huntington’s Wi-Fi network empowers you with lightning-fast speeds and exceptional reliability.
Opinionated Summary:
In today’s digital age, a reliable and high-speed internet connection is an absolute necessity. This guide will cut through the clutter and provide you with the knowledge you need to secure the most optimal Wi-Fi experience, tailored to your unique needs.
Internet Connections: A Deep Dive
You can’t make an informed decision without understanding the options available. Here’s a breakdown of the most common internet connection types:
DSL (Digital Subscriber Line): Leveraging your existing phone lines, DSL provides a solid middle ground between speed and affordability.
Choosing the Perfect Plan:
Consider your usage patterns and preferences to determine the right plan. Here’s what to keep in mind:
Data Usage: Determine how much data you consume monthly to avoid overage charges.
Speed: Prioritize the speed you require for seamless streaming, gaming, or work-from-home activities.
Cost: Factor in your budget and compare different providers to find the most cost-effective option.
Get the Most Out of Your Wi-Fi: A Guide to Finding the Best Internet Service for Your Needs
TL;DR – Too Long; Didn’t Read
Want the fastest and most reliable internet connection for your home? This article will help you choose the best internet plan, learn about different types of internet connections, and troubleshoot common Wi-Fi problems. It also includes a fun fact about the city of Huntington!
Finding the Right Internet Plan
You’ve got a ton of options when it comes to internet providers. The best one for you depends on how much you use the internet and what you use it for. Here are some things to think about:
Speed: How fast do you need your internet to be? Do you download a lot of movies or play online games? You’ll want a faster plan for those.
Data Cap: Do you have a limit on how much data you can use? This is important if you stream lots of videos or download big files.
Price: How much can you afford to spend on internet each month? Compare prices from different providers to find the best deal.
Types of Internet Connections
Here are some of the most common types of internet connections:
DSL (Digital Subscriber Line): This uses your existing phone lines to provide internet. It’s not as fast as cable or fiber, but it’s usually a good option if you don’t need super-high speed.
Cable: This uses your existing cable TV lines to provide internet. It’s usually faster than DSL, but it can be affected by how many other people are using the network at the same time.
Fiber Optic: This uses light to transmit data, making it the fastest and most reliable type of internet. It’s not available everywhere, but it’s becoming more common.
Boosting Your Wi-Fi Signal
Placement: Make sure your router is in a central location in your home. Avoid placing it near walls or other devices that might interfere with the signal.
Obstacles: Walls, furniture, and even mirrors can block Wi-Fi signals. Try to keep your router in an open area.
Frequency: Your router might use the 2.4 GHz or 5 GHz frequency band. The 5 GHz band is faster but has a shorter range. If you’re having trouble with a weak signal, try switching to the 2.4 GHz band.
Network Interference: Other devices like cordless phones and microwaves can interfere with your Wi-Fi signal. Try moving your router away from these devices.
Huntington, West Virginia: A Wi-Fi Hotspot
Huntington, West Virginia, is known for its beautiful riverfront and its lively downtown area. Did you know that Huntington is also home to a network of free public Wi-Fi hotspots? These hotspots make it easy to stay connected while you’re exploring all that Huntington has to offer. [Learn more about Huntington and its Wi-Fi network here: https://eclipticsigns.com/ ]
Summary
Finding the right internet plan and boosting your Wi-Fi signal can make a big difference in your online experience. Consider your needs, explore different internet connection options, and take steps to improve your Wi-Fi performance. And if you’re ever in Huntington, West Virginia, enjoy the city’s free public Wi-Fi hotspots!
For individuals who run an web store, then you definitely’re legally required to collect product sales tax in most global places. Then again taxes vary by means of country, state, and house, so figuring out the proper tax fees for your services and products and merchandise can get beautiful tricky.
We endorse to customers in every single place the sector, so we’ve faced the equivalent challenging eventualities.
Fortunately, there are wordpress plugins that make it super easy to robotically collect taxes, it doesn’t topic what type of product you advertise.
As an example, we use Easy Digital Downloads to advertise our tool and plugins, and we find it irresistible because it makes collecting taxes a breeze. Then again when you advertise physically products or services, then that you must desire a different instrument like WooCommerce.
In this article, we’ll show you simple the best way to collect taxes for Stripe expenses in wordpress, step by step, for all the most common eventualities.
wordpress” class=”wp-image-325938″/>
<span class=”ez-toc-section” id=”why-gather-taxes-for-stripe-expenses-in-wordpress“/>Why Gather Taxes for Stripe Expenses in wordpress?
If you find yourself operating an internet trade, collecting taxes is not just a very best apply. It’s normally a jail felony duty.
Whether or not or now not you’re selling physically products, digital downloads, or subscription services, you need to collect the correct taxes at checkout to evolve to local, state, and international rules.
Failure to do so might lead to hefty penalties and as well as harm what you are promoting’s reputation.
So, collecting taxes for your whole Stripe expenses in wordpress isn’t negotiable.
Bear in mind, even supposing, that taxes are also crucial part of the consumer enjoy.
When you calculate and display taxes clearly right through checkout, customers are a lot much less much more likely to truly really feel stunned or pissed off by means of final rate totals. Plus, it shows them that what you are promoting is unique and as well as simplifies your bookkeeping process.
Having said that, let’s take a look at simple the best way to merely collect taxes for Stripe expenses in wordpress.
We will quilt a few different methods, and also you’ll be capable of use the quick links below to jump to the one you need to use:
<h4 class=”wp-block-heading” id=”aioseo-how-to-collect-taxes-for-stripe-payments-in-wordpress“>Gather Taxes for Subscriptions, Products and services and merchandise, and Single Products (WP Simple Pay)
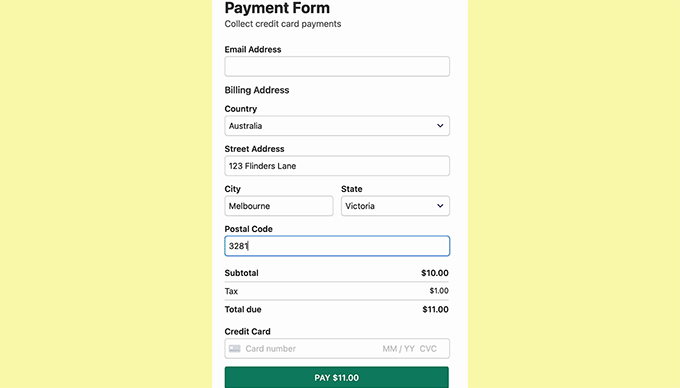
For individuals who advertise subscriptions, services, or single products to your site, then the easiest way to make money and collect taxes is by means of creating a simple rate form.
To take a look at this, we propose WP Easy Pay. We find it irresistible because it comes with a lot of different premade rate templates, an intuitive form builder, and entire unsolicited mail protection.
While testing the plugin, we found out its mounted and automatic tax worth choices super helpful for collecting taxes. The mounted tax worth selection implies that you’ll set a tax worth manually, which matches great if you’re interested in one house with safe tax regulations.
On the other hand, the automatic tax worth serve as calculates and applies the correct worth according to the buyer’s location, saving time and decreasing the risk of errors.
For added details on our experience with the plugin, see our detailed WP Easy Pay assessment.
To get started, first, you need to position in and switch at the WP Easy Pay plugin. To be told further, see our tutorial on easy methods to set up a wordpress plugin.
Phrase: WP Simple Pay has a unfastened plan. On the other hand, you’re going to wish the pro type to unlock the tax collection serve as.
After you flip at the plugin, a setup wizard will appear to your show. Proper right here, simply click on at the ‘Let’s Get Started’ button.
Next, it’s a should to add your plugin’s license key.
You’ll get this data on your account on the WP Simple Pay site. After you enter your license key, click on at the ‘Activate and Continue’ button.
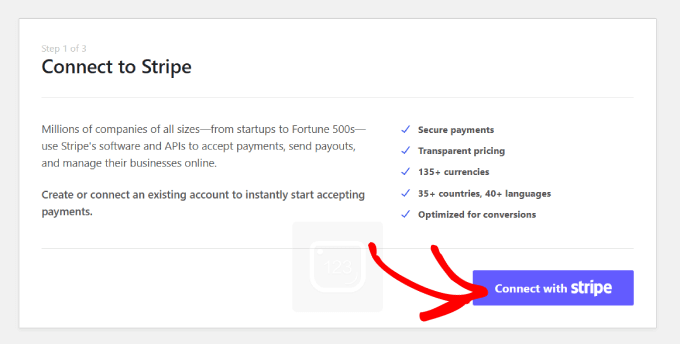
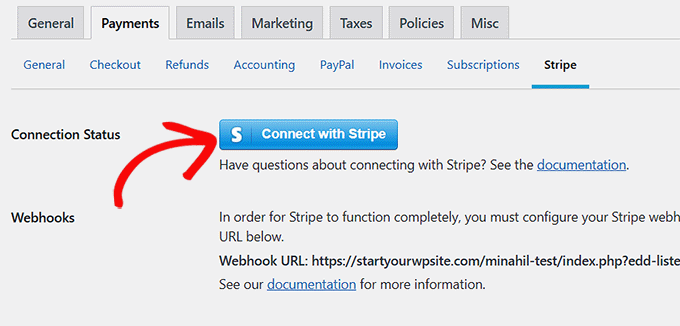
Then, connect your Stripe account with WP Simple Pay. Remember that the plugin gained’t artwork till you connect it with a brand spanking new or present Stripe account.
To get started, click on at the ‘Hook up with Stripe’ button and log in to your account. For added details, see our tutorial on easy methods to settle for Stripe bills in wordpress.
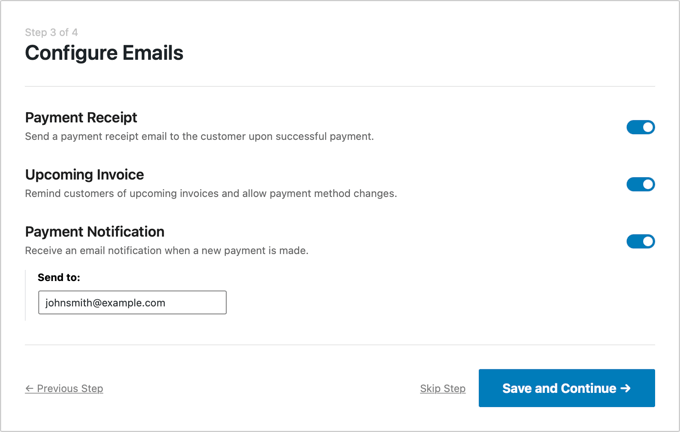
Once you have successfully connected your site with Stripe, the setup wizard will ask you to configure your emails.
At this stage, you’ll be capable of allow possible choices to acquire electronic mail notifications for rate receipts, upcoming invoices, and rate notifications. You’ll moreover want to enter the e-mail cope with where you need to acquire the ones messages.
In spite of everything, merely click on at the ‘Save and Continue’ button. You’ll then complete the other steps and cross out the setup wizard.
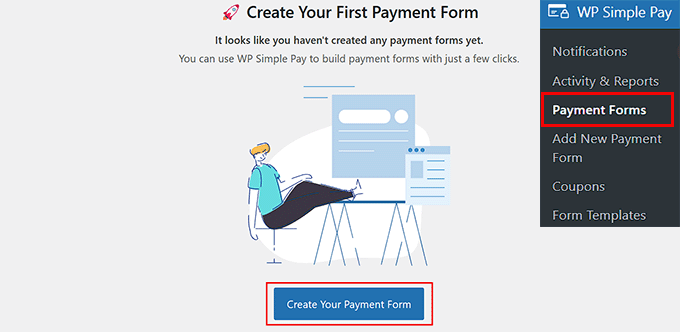
Once that’s performed, transfer to the WP Simple Pay » Price Paperwork internet web page from the wordpress dashboard.
Next, click on at the ‘Create Your Price Form’ button.
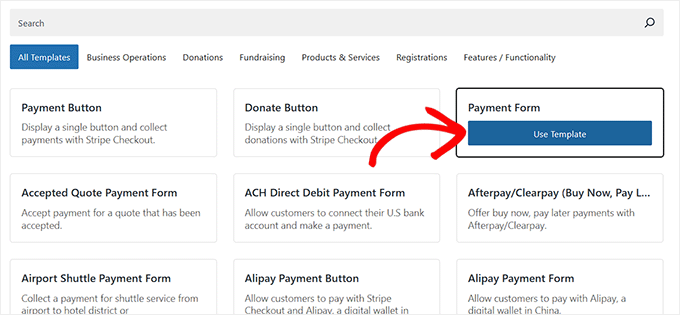
This may most likely take you to the ‘Choose a template’ show. Proper right here, you’re going to peer a list of premade templates.
You’ll make a selection an appropriate template by means of clicking the ‘Use Template’ button beneath it. For this educational, we will be able to use the easy ‘Price Form’ template.
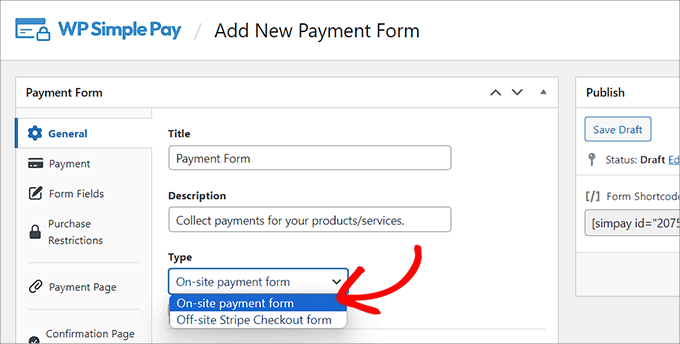
After you choose a template, WP Simple Pay’s form builder will free up to your show. Proper right here, you’ll be capable of get began by means of together with a reputation and description for your form.
Then, select your form sort as ‘On-site rate form.’
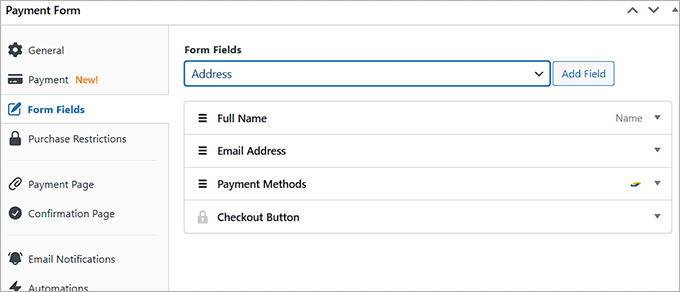
Now, head over to the ‘Form Fields’ tab. Proper right here, you’re going to find a dropdown menu where you’ll be capable of add a brand spanking new form field.
While you do that, click on on on the newly added approach to make larger the settings and customize it as sought after. You’ll moreover drag and drop the fields to prepare them alternatively you like.
The ones fields will show up to your rate form, so be sure to add all the necessary form fields to collect the details you need from your customers.
As an example, if you want to show tax fees according to the buyer’s location, it is very important add an deal with field. This way, customers will have to provide their area deal with when making a purchase order order.
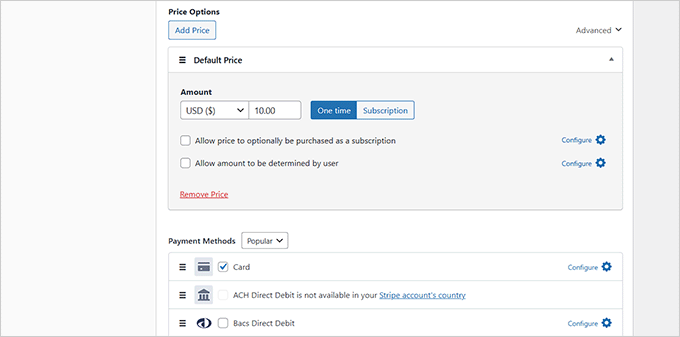
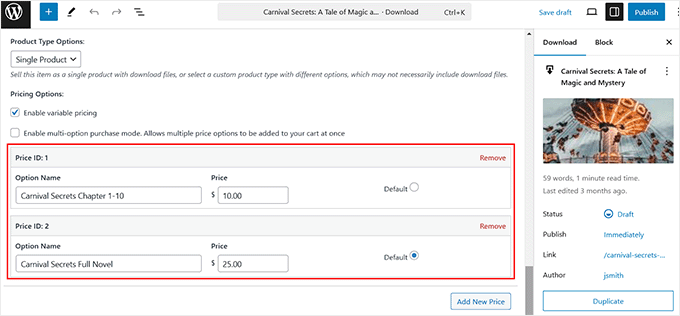
Once that is performed, switch to the ‘Price’ tab and add a price for your product. You’ll moreover add a few products by means of clicking the ‘Add Value’ button.
On the other hand, when you plan to advertise subscription services, then select the ‘Subscription’ selection and get began together with different tiers.
If you find yourself in a position, scroll proper all the way down to the ‘Price Methods’ section to make a choice possible choices like ACH direct debit, card, Klarna, Examine, Cash App, and Bancontact to only settle for Stripe expenses.
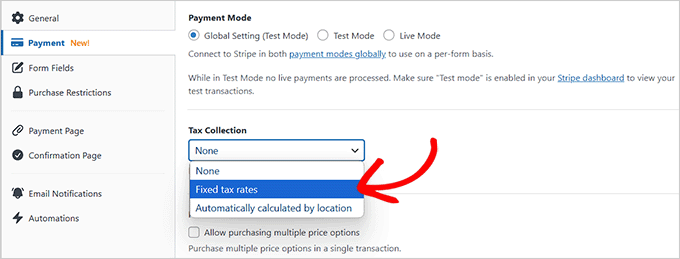
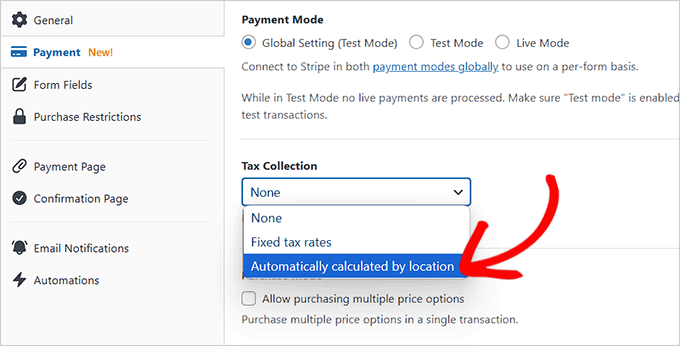
Once you have performed that, head up to the ‘Tax Collection’ section. Proper right here, you’ll be in a position to choose some of the two tax collection methods consistent with your selection.
We will give an explanation for simple the best way to add a suite tax worth and an automatic tax worth to your rate form.
Means 1: Add Fixed Tax Worth for Your Stripe Expenses (Selling in One House)
In this section, we will be able to give an explanation for simple the best way to collect taxes if you’re selling in a single house. This is a great variety when you advertise and ship products most efficient in a small house with uniform taxes, very similar to a state or province.
To take a look at this, it is very important define the tax worth for your products manually.
First, you need to open the ‘Price’ tab inside the settings for WP Simple Pay. Then, make a selection the ‘Fixed tax fees’ selection from the Tax Collection dropdown menu.
After you’ve made your selection, merely click on at the ‘Save Draft’ button for your form.
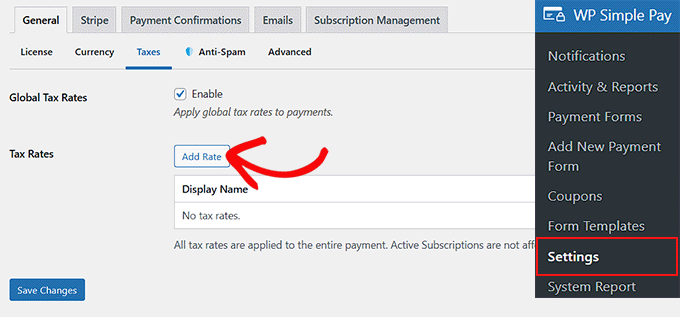
Next, discuss with the WP Simple Pay » Settings » Not unusual internet web page from the wordpress dashboard and switch to the ‘Taxes’ tab.
Proper right here, you need to check the ‘Allow’ box next to the ‘Global Tax Fees’ selection. This may most likely open some new settings on the internet web page, where it’s a should to click on at the ‘Add Worth’ button.
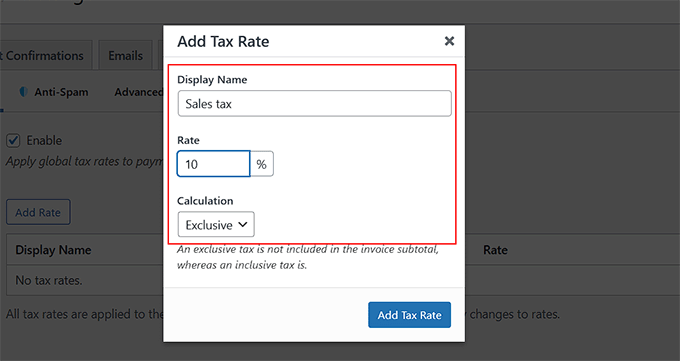
You’ll now add a name and tax worth for your products or services inside the popup.
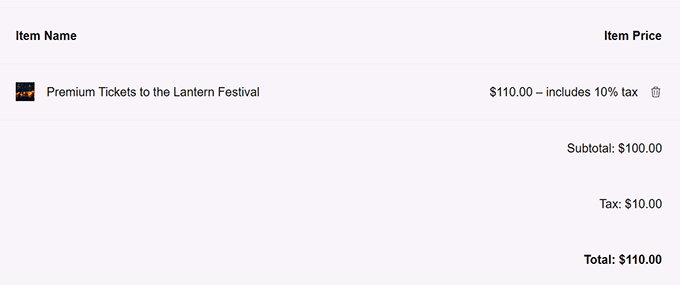
After that, you’ll have to specify if you want to have your tax to be calculated inclusively or utterly.
If you choose inclusive tax, then the required tax will robotically be integrated inside the total value of the article.
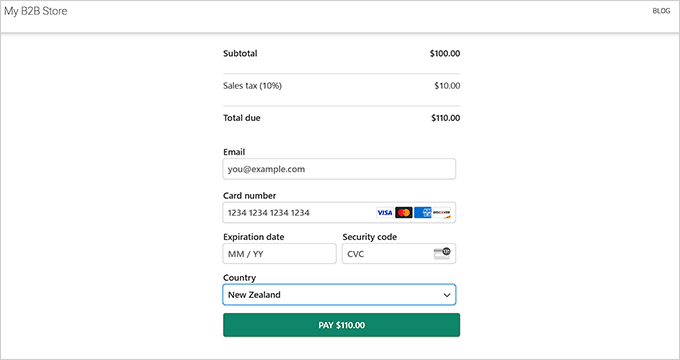
Within the interim, with distinctive tax, customers will be able to see the breakdown of all the price of the purchase. This may most likely include a subtotal with the ground value and a separate line showing the product sales tax.
We recommend choosing distinctive tax so your customers don’t assume you’re overcharging them.
While you’ve made your variety, simply click on at the ‘Add Tax Worth’ button. The popup will close robotically. Then, click on at the ‘Save Changes’ button to store your settings.
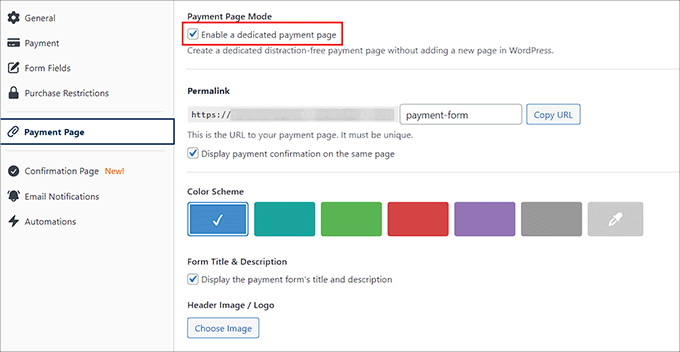
Now, open up your form yet again and discuss with the ‘Price Internet web page’ section inside the left column.
Proper right here, you’ll be capable of take a look at the ‘Allow a faithful rate internet web page’ box to create a custom designed rate form internet web page. To customize the form, you’ll be capable of add a permalink, color scheme, image, and footer text.
In spite of everything, click on at the ‘Publish’ button to avoid wasting numerous your settings.
You’ll now discuss with your site to seem the price form with a suite tax worth.
On the other hand, if you want to add this sort to an present internet web page, then merely click on at the ‘Publish’ button after together with the tax worth.
Then, open an present internet web page from your wordpress dashboard and click on at the ‘Add Block’ button.
As quickly because the block menu opens up, to find and add the WP Simple Pay block and make a selection the form you merely made from the dropdown menu.
Next, click on at the ‘Change’ or ‘Publish’ button to store your changes.
You could have now added a rate form with a suite tax worth to an present wordpress internet web page.
Identical Submit: For individuals who’re setting up taxes in wordpress, then understanding online rate dispositions imply you’ll optimize your checkout process. Check out our post on necessary fee statistics, information, and tendencies to stay a professional.
Means 2: Add Automated Tax Worth for Your Stripe Expenses (Selling in A few Puts)
If you want to robotically configure the tax worth for your customers according to their location, then this system is for you. This is ideally fitted when you’re selling in a few global places and spaces.
To take a look at this, you’ll have to make a selection the ‘Automatically calculated by means of location’ selection from the ‘Tax Collection’ dropdown menu inside the WP Simple Pay form builder.
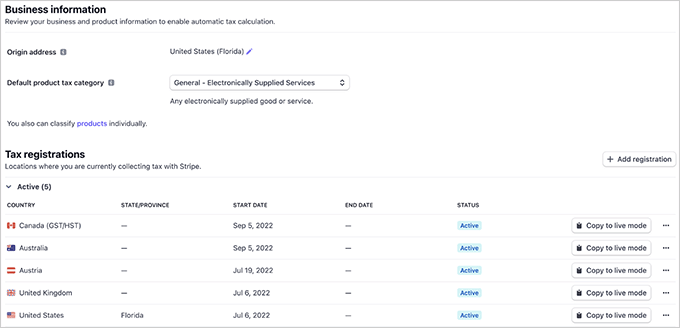
While you do that, you’ll must discuss with your Stripe account dashboard to activate automatic tax collection. From proper right here, you’ll be capable of follow the opposite spaces where what you are promoting is crossing the tax threshold.
You’ll then add registration and get began collecting taxes for the ones puts merely.
On the other hand, believe to ensure your basis deal with and select a default tax magnificence to ensure proper tax calculations for what you are promoting.
Now, when you head once more to your wordpress dashboard, you’re going to understand that choosing this selection has opened some new settings beneath the ‘Tax Collection’ section.
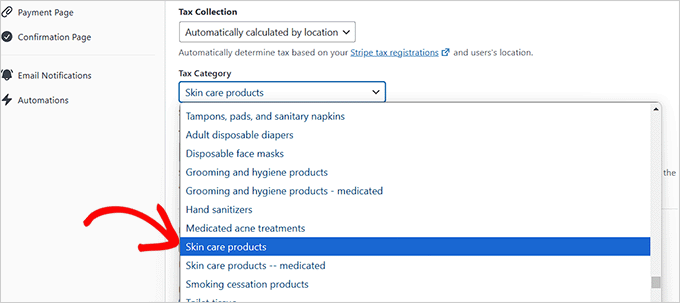
Proper right here, you will have to make a choice a tax magnificence for the product or service that you simply’re selling from the ‘Tax Magnificence’ dropdown menu.
As an example, when you advertise skin care products, you then’ll be in a position to make a choice that selection.
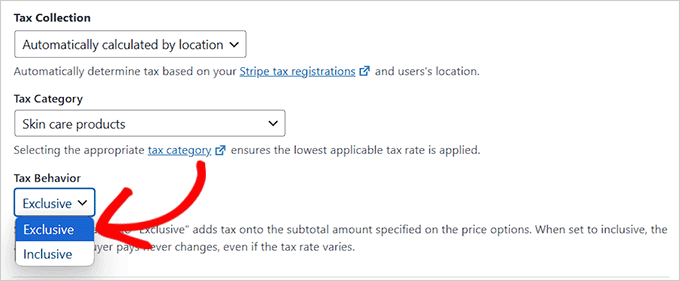
Next, make a decision whether or not or now not you need to turn tax inclusively or utterly. If you choose the inclusive selection, then the tax can be integrated inside the overall product value.
On the other hand, if you select the original selection, the tax amount can be confirmed one at a time. The subtotal will display the ground value of the transaction, and there can be a separate line for product sales tax.
We recommend the use of the original selection, because it’s further transparent for your customers.
Once that is performed, you’ll be capable of head over to the ‘Price Internet web page’ section.
Check the ‘Allow a faithful rate internet web page’ box if you want to have the plugin to generate a custom designed rate internet web page. Then, customize your internet web page alternatively you like.
When you’re in a position, click on at the ‘Publish’ button to avoid wasting numerous your changes.
Now, discuss with your site to seem the price form with automatic tax calculation in movement.
On the other hand, when you don’t want the plugin to generate an absolutely new rate internet web page, merely click on at the ‘Publish’ button after configuring the tax settings.
Then, in an effort to upload your rate form to a pre-existing internet web page, merely open it with the block editor and make a selection the WP Simple Pay block from the menu.
Next, make a selection the form you made from the dropdown menu all the way through the block.
After that, click on at the ‘Change’ or ‘Publish’ button to avoid wasting numerous your changes.
Now, discuss with your internet website to view the Stripe rate form with an automatic tax calculation field.
Gather Taxes for Physically Products (WooCommerce)
For individuals who run an web store with a few physically products, then rate forms won’t offer the most simple way. You’ll most definitely need further eCommerce choices and power.
If this is the case, we propose the usage of WooCommerce. This free eCommerce plugin makes it super easy to advertise your physically products, accept expenses via Stripe, and collect taxes for those expenses.
We’ve worked with this instrument such a lot, so we know it identical to the once more of our hand. For added insights on what it would in truth do, check out our detailed WooCommerce assessment.
The most productive phase? The use of WooCommerce’s built-in choices, you’ll be capable of robotically calculate product sales tax according to your store’s location and where your customers are.
Plus, it is helping different tax fees, at the side of state, country, and even city-specific taxes.
To start out, you’ll want to arrange and switch at the WooCommerce plugin. To be told further, see our tutorial on easy methods to set up a wordpress plugin.
After activating the instrument, you’ll be capable of prepare your WooCommerce store to begin out selling products. You’ll moreover want to connect Stripe with WooCommerce to collect expenses.
Merely see our complete WooCommerce information if you want to have help with the process.
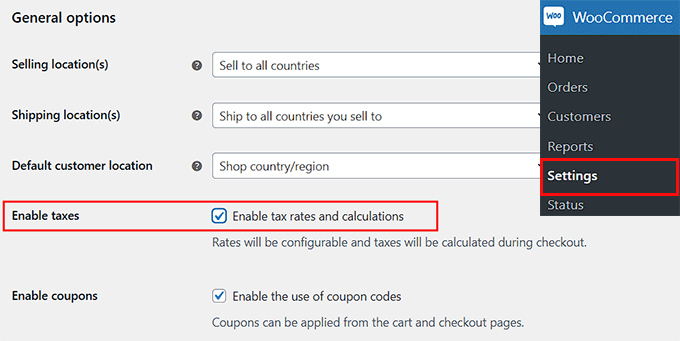
Once your store is set up, you need to discuss with the WooCommerce » Settings » Not unusual internet web page from the wordpress dashboard and scroll proper all the way down to the ‘Allow Taxes’ section.
Simply take a look at the sector next to it and click on at the ‘Save Changes’ button.
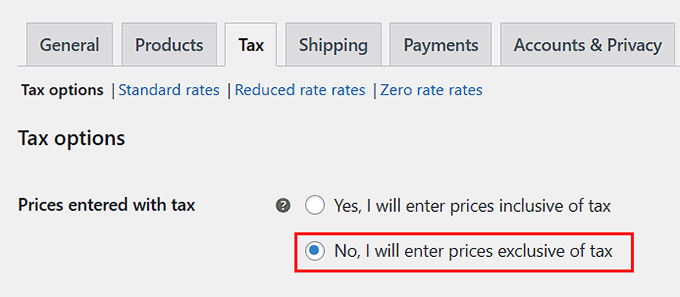
While you do that, a ‘Tax’ tab will appear inside of the most efficient menu. When you discuss with that internet web page, you’re going to get began by means of deciding how you need to turn taxes.
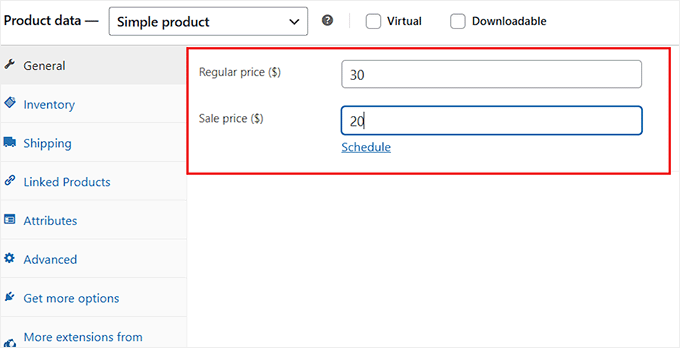
You’ll make a selection to turn taxes utterly, because of this they’ll be confirmed one at a time at checkout instead of being integrated inside the product value. This promises customers see exactly how so much tax they’re paying faster than completing their achieve.
You’ll moreover make a selection to turn prices inclusively.
This means the fee you enter inside the ‘Product knowledge’ section of your WooCommerce product will already include tax.
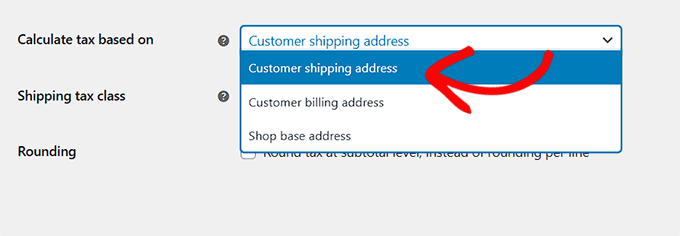
Next, it is very important set how taxes are calculated. To take a look at this, open the ‘Calculate tax according to’ dropdown menu and select an selection.
You’ll make a selection to calculate taxes according to the buyer’s supply deal with, which is excellent if you’re supply to different spaces with more than a few tax fees.
On the other hand, select the billing deal with if you need use the deal with your purchaser enters for rate.
There is also the selection to use your retailer’s base location, which assists in keeping problems simple by means of applying your local tax worth to all orders.
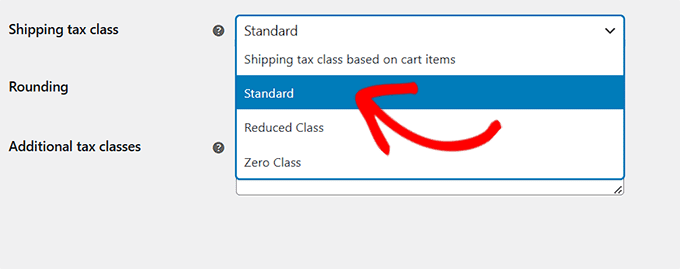
After that, it’s time to industry the supply tax magnificence. In this section, you’ll be in a position to make a choice how WooCommerce should calculate tax on the cost of supply.
As an example, if you choose ‘Shipping tax magnificence according to cart items’, then the supply tax price can be calculated according to the tax magnificence assigned to the product being shipped.
If you choose the ‘Standard’ tax magnificence, then the default tax worth you will have prepare for the product may also be performed to the supply tax.
The lowered tax magnificence is for items that have a lower tax worth, like certain foods products or books, depending to your house.
In spite of everything, the 0 tax magnificence applies no tax to supply the least bit, which might be useful when you’re offering tax-free delivery promotions.
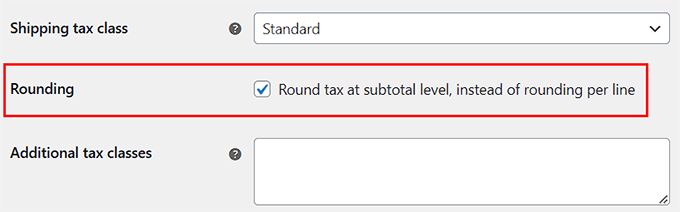
Next, we propose checking the sector next to ‘Round tax at subtotal level, instead of rounding consistent with line.’
This means taxes can be rounded according to the entire order subtotal relatively than each and every specific particular person product line.
You’ll now control the rest of the settings to fit your store’s needs.
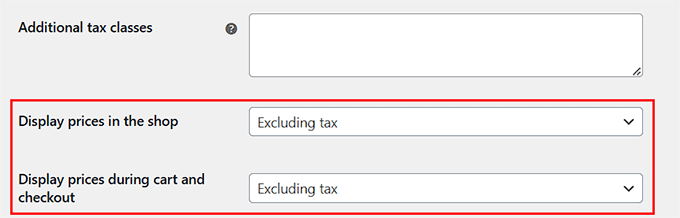
One key selection is deciding simple the best way to display prices on your retailer, cart, and checkout pages.
You’ll make a selection to show prices at the side of tax, so customers see the overall amount upfront, or excluding for tax, which gives transparency by means of showing taxes one at a time.
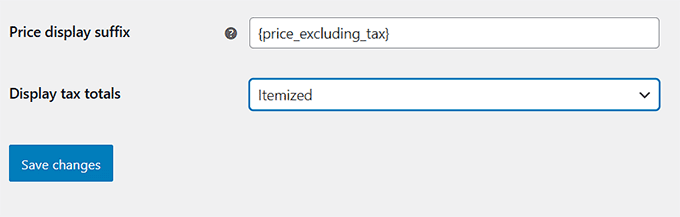
Additionally, you’ll be capable of configure the ‘Value display suffix’ setting in an effort to upload text after your product prices. This may help show customers whether or not or now not tax is integrated or excluded in the fee they see.
As an example, when you enter “Value incl. VAT: {price_including_tax}”, your store will display something like Value incl. VAT: $50.40.
Next, industry the ‘Display tax totals’ setting to regulate how taxes appear right through checkout. You’ll make a selection to show all taxes as a single total or display each and every tax as an itemized document.
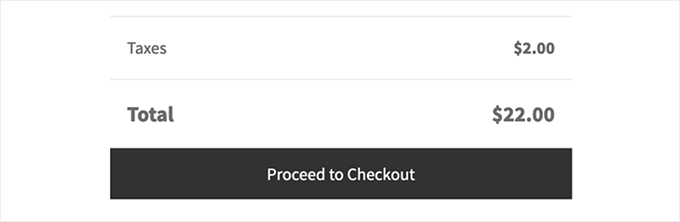
If you choose the ‘As a Single General’ selection, WooCommerce will combine all applicable taxes into one total amount. Shoppers will see just a single tax line instead of separate breakdowns.
As an example, if a product has a few tax fees (like state tax and local tax), they’ll all be merged and simply confirmed as ‘Taxes’ at checkout. This assists in keeping problems clean and simple.
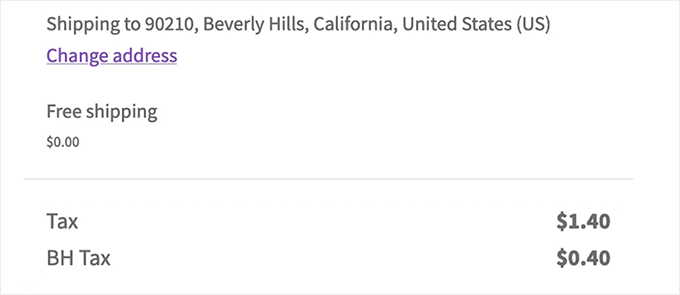
On the other hand, when you set it to ‘Itemized,’ then customers will see each and every tax worth one at a time. This means WooCommerce will document out each applicable tax, very similar to state and local taxes, on their own strains.
This offers further transparency, so customers know exactly what they’re paying for. The tax names confirmed will be the ones you enter on your WooCommerce settings.
We’ll walk you via how to try this in the next step. Once you’re performed, merely click on at the ‘Save Changes’ button to store your settings.
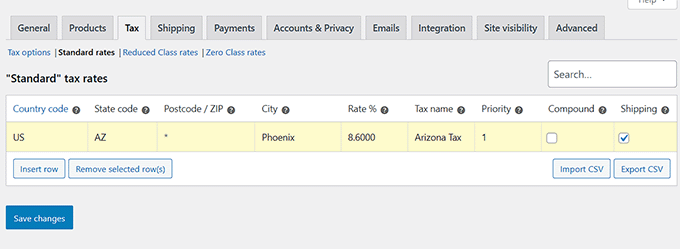
Then, switch to the ‘Standard Fees’ internet web page from the easiest and click on at the ‘Insert Row’ button.
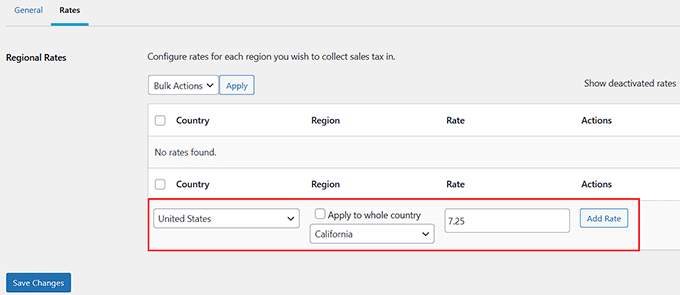
You’ll now add the country code, state code, postcode, city determine, and tax worth for each and every location where you need to collect taxes.
For individuals who most efficient wish to collect taxes consistent with your store’s location, you then’re going to most efficient want to add one row. You’ll moreover add a tax determine for each and every row so that you’ll be capable of merely differentiate them.
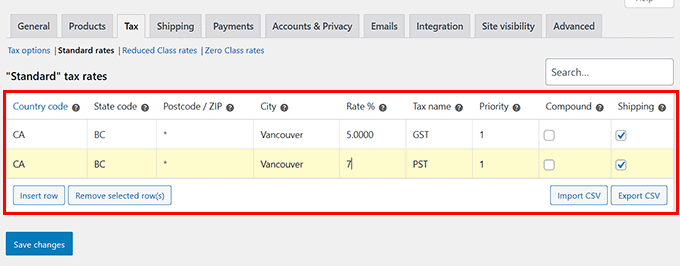
If you select the itemized selection inside the ‘Display tax totals’ section, then the determine you choose for each and every tax row will be the one displayed on the checkout internet web page.
As an example, when you prepare separate tax fees for pieces and services (GST) and provinces (PST), those exact labels will appear inside the order summary.
In spite of everything, click on at the ‘Save Changes’ button.
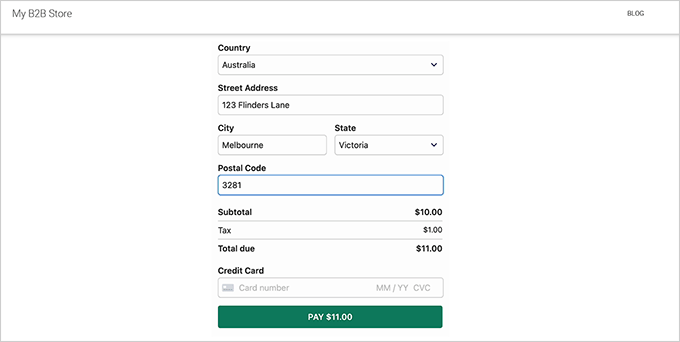
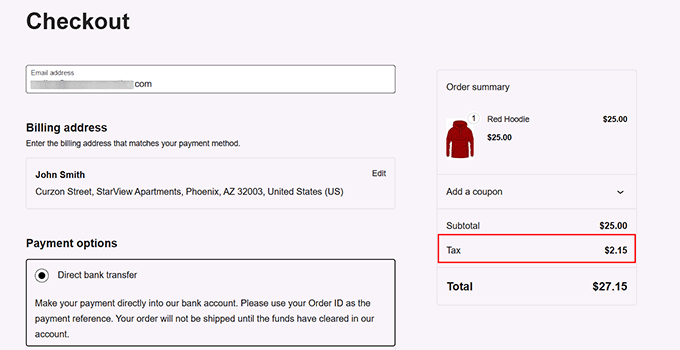
Now, discuss with your WooCommerce store to seem the tax worth displayed to your checkout web page.
Depending to your settings, the rate may also be displayed to your product and cart internet web page.
Gather Taxes for Digital Products (Easy Digital Downloads)
If you want to collect taxes when selling your digital products via Stripe, then Simple Virtual Downloads (EDD) is the most suitable choice.
This plugin is built specifically for promoting virtual merchandise and provides seamless tax collection, at the side of for Stripe transactions. The plugin handles the whole thing from setting fees to generating stories, making tax keep an eye on easier for stores.
We use EDD to advertise our plugins and tool. So, we’ve spotted firsthand how easy it’s to collect Stripe expenses and prepare taxes. To be told further, see our whole Simple Virtual Downloads assessment.
First, you need to position in and switch at the Simple Virtual Downloads plugin. For added instructions, see our knowledge on easy methods to set up a wordpress plugin.
Phrase: EDD has a unfastened plan. On the other hand, upgrading to the pro type gives you get right of entry to to choices like advanced reporting, electronic mail promoting integration, content material subject matter restriction, and additional.
While you flip at the plugin, it is very important prepare your store, add products, and fix Stripe with the plugin.
To get started, follow our beginner’s knowledge on easy methods to promote virtual downloads in wordpress.
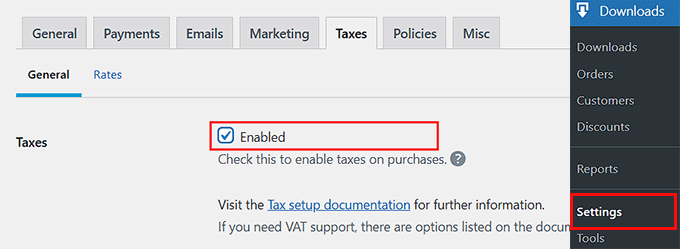
When that is performed, head over to the Downloads » Settings » Taxes internet web page inside the wordpress admin sidebar.
Proper right here, allow the ‘Taxes’ selection by means of checking the sector next to it.
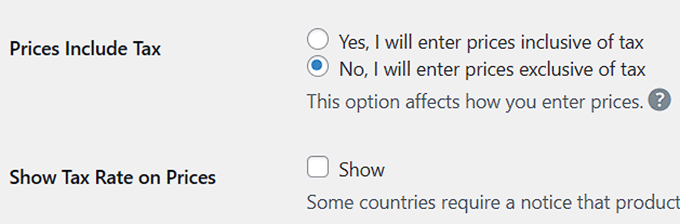
Then, make a selection if you want to display taxes utterly or inclusively.
If you choose ‘Positive, I will enter prices inclusive of tax’, then the fee you entered in a product’s knowledge is all the amount the buyer will pay after taxes.
So, when you set the price of a product as $20, the buyer will pay $20 at checkout. The fitting amount that can transfer towards taxes can be calculated robotically.
If you select ‘No,’ the fee you entered on the product edit show gained’t include the tax amount.
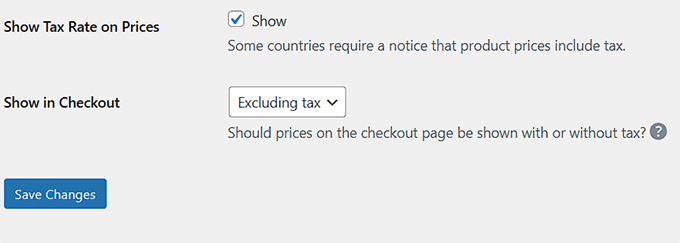
After that, we propose checking the ‘Show Tax Worth on Prices’ selection. This way, the buyer will see the volume they’re expected to pay in tax below the purchase button.
Next, make a decision how you need to turn product prices on the checkout internet web page. You’ll make a selection to show prices at the side of tax, which means that all the value customers see will have tax added.
Or, you’ll be capable of show prices excluding for tax, where the fee confirmed is just the product amount faster than tax (additionally known as the subtotal). The tax will then be added one at a time at checkout.
In spite of everything, click on at the ‘Save Changes’ button to store your settings.
Now, switch to the ‘Fees’ section from the easiest. Proper right here, you’ll be capable of add tax fees for specific global places or states/provinces within the ones global places.
To take a look at this, make a selection a country/ state from the dropdown menu and add its tax worth. Then, click on at the ‘Add Worth’ button.
You’ll repeat this step as over and over again as you like.
Once you’re performed, merely click on at the ‘Save Changes’ button.
Now, merely discuss with your digital products store to check how taxes are being accrued for Stripe expenses.
Bonus: Create Visually-Fascinating Invoices for Shoppers
Managing tax collection is a jail requirement for eCommerce internet sites. Then again when you advertise industry products or services (another way you merely wish to transfer above and previous), you then’ll be capable of moreover offer your customers crowd pleasing invoices for their information.
An invoice that shows the subtotal, tax amount, and total price helps with transparency and makes it easier for customers to track expenses, handle reimbursements, and even handle customs claims.
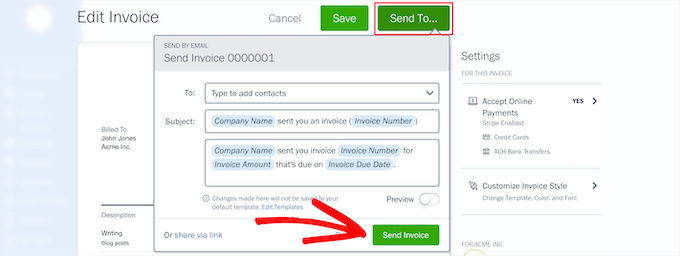
To create professional-looking invoices, we propose the use of FreshBooks.
This is a in style accounting tool for small corporations that provides a very easy option to create customizable invoices together with your emblem and personalized notes.
Plus, it automates reminders for late expenses, securely processes routine bank card bills, and notifies every you and your customers.
You’ll moreover include tax wisdom, rate words, discounts, and foreign exchange on your invoices, providing a clear breakdown of expenses.
Although it is a third-party instrument, FreshBooks seamlessly integrates with highest site builders, at the side of wordpress.
For step-by-step instructions, see our tutorial on easy methods to create invoices for purchasers the usage of wordpress.
<span class=”ez-toc-section” id=”identical-guides-for-accepting-expenses-in-wordpress“/>Identical Guides for Accepting Expenses in wordpress
Need more information on accepting expenses on your online store? Check out our related guides:
For individuals who appreciated this text, then please subscribe to our YouTube Channel for wordpress video tutorials. You’ll moreover to search out us on Twitter and Fb.
The post Tips on how to Accumulate Taxes for Stripe Bills in wordpress (3 Simple Techniques) first appeared on WPBeginner.
Corner Desk: Optimize space while creating separate zones for work and baby.
Step 2: Utilize a Spacious Work Surface
Opt for a large desk to accommodate your work and baby’s essentials.
Step 3: Opt for a Floating Desk
Hang a floating desk to create a more open and accessible workspace for baby.
Section 2: Ensuring Comfort and Safety
Step 4: Invest in an Ergonomic Chair
Prioritize comfort with a supportive and adjustable chair designed for prolonged sitting.
Additional Tips for a Baby-Friendly Desk Setup
Maximize Natural Light: Position your desk near a window to provide ample lighting for both you and baby.
Optimize Storage: Utilize drawers, shelves, or a desk organizer to store baby’s essentials within easy reach.
Consider Safety: Choose a desk with rounded corners and stable construction to minimize potential hazards.
Create a Dedicated Baby Zone: Designate a specific area on the desk for baby’s toys, activities, or a play mat.
Maintain a Clean and Organized Space: Regularly clean and declutter your workspace to ensure a safe and hygienic environment for both you and your little one.
Ready for Baby? Your Desk Setup Will Thank You!
TL;DR: Setting up your desk for baby can be a game-changer. It lets you work while keeping an eye on your little one. We’ll cover tips for creating a comfortable and functional workspace that’s also baby-friendly.
Why Your Desk Needs a Baby-Friendly Makeover
Having a baby changes everything! Suddenly, your home office becomes more than just a place to work; it’s your command center for everything baby-related. A well-organized desk can be a lifesaver. Imagine this: you’re working on a project and baby needs you. With a properly set-up desk, you can easily switch gears to soothe, feed, or play with your little one.
Essential Elements for Your Baby-Friendly Desk
H3: Comfort Is Key
Ergonomic Chair: A comfortable chair is a must-have. You’ll be spending a lot of time seated, so choose one that provides good back support and is adjustable.
Footrest: A footrest can help improve circulation and keep your feet from getting tired.
H3: Space is Precious
Spacious Work Surface: A large desk allows you to spread out your work and have room for baby essentials.
Storage Solutions: Utilize drawers, shelves, and organizers to keep your desk clutter-free. You’ll need easy access to diapers, wipes, toys, and other baby necessities.
H3: Safety First
Baby Monitor: A baby monitor is a must-have for any parent. It gives you peace of mind knowing you can keep an eye on your baby while you work.
Cord Management: Keep cords out of reach of curious little hands. Secure them with cable ties or use cord covers.
Baby-Friendly Desk Setup Ideas
H3: The Multi-Purpose Desk
Use a Corner Desk: Maximize space and create a dedicated area for both baby and work.
Add a Changing Pad: A portable changing pad can be easily placed on the desk for diaper changes.
H3: Embrace the Vertical
Wall-Mounted Shelves: Free up desk space with shelves for books, toys, and baby essentials.
Floating Desk: A floating desk can create a sense of spaciousness and provide easy access for baby.
H3: Think Beyond the Desk
Utilize a Rolling Cart: Move everything you need to work and baby care within easy reach.
Invest in a Swing or Bouncer: Place it near your desk to keep baby entertained while you work.
Saskatoon: A Great City for Families
Saskatoon, known as the “City of Bridges,” offers a fantastic environment for families. The city boasts numerous parks, playgrounds, and family-friendly events. Check out Ecliptic Signs for a guide to Saskatoon attractions and activities.
Summary
Setting up your desk for baby is an investment in both your productivity and your well-being. By focusing on comfort, safety, and functionality, you can create a workspace that allows you to work efficiently while keeping a close eye on your little one. Remember, a well-organized and baby-friendly desk can make all the difference in your daily routine.
Why you simply must checkout Styling Tools and WiFi & Networking
Styling Tools, etc
Investigative Inquiry: Uncovering the Hidden Potential of Other Styling Tools
Electric Toothbrushes: Beyond Oral Hygiene
Explore the clinical evidence supporting the efficacy of electric toothbrushes in removing plaque and improving oral health.
Investigate the role of electric toothbrushes in enhancing teeth whitening and reducing gum inflammation.
Uncover the psychological benefits associated with the use of electric toothbrushes, such as increased self-confidence and improved mood.
Setting Up Your Home Network: A Deeper Dive
Analyze different types of network protocols and their impact on connectivity speed and security.
Examine the factors influencing router placement, such as signal interference and optimal coverage.
Explore the use of network diagnostic tools to identify and resolve connectivity issues.
Troubleshooting Weak WiFi Signals: Getting to the Root Cause
Conduct a thorough investigation into common sources of signal interference, including neighboring networks, physical obstructions, and electronic devices.
Identify the specific channels being used by your router and adjust them to minimize overlap and improve signal strength.
Evaluate the impact of router firmware updates and network congestion on WiFi performance.
Level Up Your Look with the Right Tools: Unveiling Hidden Gems
Discover the versatility of hair styling tools beyond their intended purposes.
Explore innovative applications of these tools in enhancing facial features, creating bold makeup looks, and maintaining skin health.
Identify the optimal tools for different hair types, textures, and desired outcomes.
Get Connected and Styled: Your Ultimate Guide to Tech and Fashion
TL;DR – Too Long; Didn’t Read
This article is your guide to getting connected and stylish! We’ll explore how to choose the perfect styling tools and make sure your internet is always running smoothly. Plus, we’ll even give you some tips on making your home tech look as good as it works.
Level Up Your Look with the Right Tools
Let’s face it: having the right tools can make all the difference when it comes to looking your best. From sleek hair straighteners to powerful curling irons, there’s a tool out there for every style you want to achieve.
Hair Styling Tools
When choosing a hair styling tool, consider the following:
Heat settings: Some tools have adjustable heat settings so you can choose the right temperature for your hair type.
Plate size: The size of the plates on a straightening iron will determine how much hair you can straighten at once.
Barrel size: The size of the curling iron’s barrel determines the size of your curls.
Other Styling Tools
Besides hair styling tools, there are other tools that can help you look and feel your best:
Electric toothbrushes: These brushes help you brush your teeth more effectively and can even make your smile whiter.
Epilators: These devices remove hair from the root, giving you longer-lasting smooth skin.
Skincare tools: From facial cleansing brushes to microdermabrasion devices, there are plenty of tools to help you achieve a healthy glow.
Staying Connected with a Strong WiFi Signal
A strong internet connection is essential for browsing the web, streaming videos, and staying connected with friends and family. But sometimes, your WiFi signal can be weak.
Troubleshooting Weak WiFi Signals
Here are some tips for boosting your WiFi signal:
Check your router’s location: Place your router in a central location away from walls and other objects that can block the signal.
Upgrade your router: If your router is old, consider upgrading to a newer model with a stronger signal.
Use a WiFi extender: These devices can boost your signal in areas where it’s weak.
Setting Up Your Home Network
If you’re setting up a new home network, here are some things to keep in mind:
Choose a strong password: A strong password will help keep your network secure.
Use a secure network name: Don’t use the default network name that came with your router.
Enable guest network: This will allow visitors to access the internet without giving them access to your main network.
Making Your Tech Look Stylish
Just because it’s tech doesn’t mean it can’t be stylish. There are plenty of ways to make your home tech look as good as it works.
Choose stylish devices: There are plenty of stylish laptops, tablets, and even routers available.
Use accessories: Add a splash of color to your tech with colorful cases, chargers, and headphones.
Organize your cables: Use cable ties and organizers to keep your cables neat and tidy.
Saskatoon Tech & Style
Saskatoon is a vibrant city with a growing tech scene. There are many local businesses that offer tech and styling services, including Ecliptic Signs. Whether you need help setting up your home network or finding the perfect styling tool, there’s a local business in Saskatoon that can help.
Summary
This article explored how to get connected and stylish using the right tools. We learned about various styling tools like hair straighteners, curling irons, and electric toothbrushes. We also discovered ways to strengthen our WiFi signals and set up a secure home network. And we were reminded that tech can be stylish, too! Whether you’re looking for the latest in hair styling or a solution for a weak WiFi signal, remember that there are many resources available to help you get connected and look your best.
Streaming Services: Reviews and recommendations. near California
Found it! How to set up WordPress monitoring for uptime in California
PRESS RELEASE
Amazon Prime Video Unveils Expanded Media Library and Original Content
[City, State] – [Date] – Amazon Prime Video announced today a significant expansion to its streaming catalog, featuring an unparalleled selection of movies, shows, and exclusive originals.
With the addition of highly-acclaimed productions like “The Boys” and the highly anticipated “The Lord of the Rings: The Rings of Power,” Amazon Prime Video now boasts a vast and diverse library.
Benefits to Prime Members:
Free with Amazon Prime: Access to the entire catalog at no additional cost to Prime members.
Wide Variety: A comprehensive selection of movies and shows from a variety of genres and eras.
Exclusive Originals: Original productions from Amazon Studios, including critically acclaimed series and blockbuster films.
Considerations for Viewers:
Navigation: With its extensive library, navigating to find the best content may require some effort.
Limited Originals: Compared to competitors like Netflix and Disney+, Amazon Prime Video has a smaller selection of exclusive original content.
About Amazon Prime Video:
Amazon Prime Video is a premium video streaming service available to Amazon Prime members. It offers a wide range of movies, TV shows, and Amazon originals. Prime Video is accessible on a variety of devices, including smart TVs, streaming devices, and mobile devices.
Unleash Your Inner Binge-Watcher: The Ultimate Guide to Streaming Services!
TL;DR – Too Long; Didn’t Read:
This article breaks down the best streaming services for movies, shows, and even live TV, helping you find the perfect one for your budget and taste. We also show you how to make sure your favorite streaming service is always working!
Finding Your Streaming Sweet Spot
Imagine a world where you can watch anything, anytime, anywhere. Sounds pretty awesome, right? That’s the power of streaming services! But with so many options out there, it can be tough to figure out which one is right for you. Don’t worry, we’ve got you covered!
Netflix: The OG of Streaming
Netflix is like the king of streaming. They have a huge library of movies and shows, from blockbuster hits to critically acclaimed indie flicks. They also make their own awesome originals like “Stranger Things” and “Bridgerton.”
Pros:
Tons of content, including original shows
Great for families with kids
Available in almost every country
Cons:
Can get pricey if you want the best quality
Doesn’t have every movie or show out there
Disney+: The Mouse House’s Magical World
Disney+ is perfect for fans of all things Disney, Pixar, Star Wars, and Marvel. Think classic animated films, superhero movies, and mind-blowing sci-fi adventures.
Pros:
Tons of family-friendly content
Great for Marvel and Star Wars fans
Affordable compared to other services
Cons:
Mostly focused on Disney franchises
Limited selection of non-Disney content
Hulu: The One with Live TV
Hulu is like a mix of Netflix and cable TV. You can stream thousands of movies and shows, but you can also get live channels, like ESPN and CNN.
Pros:
Live TV option for sports and news
Decent library of movies and shows
Offers ad-free plans
Cons:
Can get expensive if you want live TV
Limited selection of original content
Amazon Prime Video: More Than Just Shopping
Amazon Prime Video is included with your Amazon Prime membership (which is awesome!). They offer a wide variety of movies and shows, plus their own originals like “The Boys” and “The Lord of the Rings: The Rings of Power.”
Pros:
Free with Amazon Prime
Good selection of movies and shows
Some exclusive originals
Cons:
Can be hard to find the good stuff
Not as many originals as Netflix or Disney+
Keeping Your Streaming Smooth
So you’ve found the perfect streaming service for you. Now, how do you make sure it stays up and running? You need to monitor your service’s uptime!
This means checking to see if the service is working properly and how fast it loads. If your favorite streaming service is having problems, you can find out quickly and maybe even switch to another one for a while.
Monitoring Made Easy with WordPress
You can monitor your streaming service’s uptime using WordPress. It’s not as complicated as it sounds! There are plugins that make the process a breeze. They can send you alerts if there’s a problem, so you’ll know right away.
The Big Picture: Choosing Your Streaming Saga
Choosing the right streaming service depends on your needs and preferences. If you’re a fan of Disney movies, Disney+ is your best bet. If you need live TV, Hulu is a good option. And if you’re a hardcore binge-watcher, Netflix is your go-to.
Remember, you can always try out different services and see what you like best. And don’t forget to monitor your service’s uptime so you can always enjoy your favorite shows without any interruptions.
Bonus Tip: Many streaming services offer free trials, so you can test them out before you commit to a subscription. This is a great way to see what’s available and find the perfect service for you!
More on Streaming Services: Reviews and recommendations.…
Your web site’s footer is bigger than just a place for copyright wisdom; it can be a valuable tool for enhancing emblem credibility, improving particular person revel in, and even the use of conversions. In this publish, we’ll provide an explanation for why you need a well-designed footer on your site, sing their own praises some best possible practices, and show you one of the best ways to design a footer the use of the Divi wordpress theme.
Let’s dive in.
For those who don’t know, a web site footer is the segment that appears at the very bottom of every internet web page on your site. It’s the most important space that steadily goes overlooked then again serves quite a few crucial functions. Footers generally include essential wisdom, like contact details, copyright and prison wisdom, and social media links. While apparently small, the footer plays an important place in boosting particular person revel in, improving your emblem’s credibility, and even boosting your search engine marketing (Search engine marketing).
Footers play a very powerful place inside the excellent fortune of any web site. They serve as a hub for crucial data and contribute to the individual revel in. There are a selection of reasons why you’ll have an effective footer, along with:
Emblem Reinforcement: Footers constantly display your brand, colors, and fonts, reinforcing logo identification right through all pages.
Contact Wisdom: The footer’s merely to be had contact details allow visitors to the touch you in short and easily.
Prison & Privacy Wisdom: Footers provide a central location for a very powerful prison and privateness knowledge, ensuring transparency and compliance.
Complex Client Enjoy: Well-organized footers make stronger particular person navigation by the use of providing blank get admission to to crucial pages and site maps, improving normal usability.
Search engine optimization Benefits: Well-designed footers can include valuable links to other internet websites (one way links) and social media profiles, improving placement in seek engine rating pages (SERPs) and Search engine marketing.
A well-designed footer is bigger than just a footnote. It’s a valuable house that provides essential wisdom, enhances particular person revel in, and boosts your emblem’s credibility.
1. Contact Wisdom
Your footer must be a to hand hub for visitors to connect with you. Come together with your phone amount to encourage visitors to call, your piece of email take care of or a type for inquiries, and your physically take care of whilst you’ve were given one. Don’t forget so that you could upload links on your social media profiles the use of attractive and visible icons. This encourages visitors to connect with you in various techniques.
2. Copyright & Prison Wisdom
Transparency is necessary, so your footer must clearly outline your prison and privacy wisdom. Include a copyright perceive to protect your unique content material subject material. Provide easy-to-find links on your privacy protection and words of supplier pages. This builds imagine along with your visitors and promises they understand how you deal with their data. If applicable, include a disclaimer or cookie protection to maintain explicit concerns or barriers.
3. Navigation
Each different a very powerful section when designing a footer for your web site is along with a menu. Navigation makes it blank for purchasers to navigate your web site and helps visitors in short uncover the tips they would love. Don’t forget to include links to crucial pages on your site, along with your blog (must you intend to have one). This promises blank get admission to to key areas of your web site.
4. Title To Movement (CTA)
Finally, believe together with a CTA on your footer. Encourage them to subscribe on your publication to procure distinctive updates and offers. You’ll be capable to moreover use this house to market it a decided on product or service. Alternatively, believe offering a valuable free helpful useful resource like an information or webinar to lure visitors to take the next step.
Whilst you were given all the way down to design a footer for your web site, you want to suppose previous simply document wisdom. You need to have a greater function in ideas and incorporate some key design laws to make it environment friendly.
Keep It Concise: Steer clear of dropping a large amount of text into your footer, as doing so can crush your visitors. Prioritize clarity and avoid muddle.
Point of interest on Readability: Make a selection clear, easy-to-read fonts. Use sufficient spacing between parts and ensure font sizes are appropriate for easy learning.
Maintain Emblem Consistency: Your footer must have the identical feel and appear as the rest of your web site. Use colors, typography, and logos constantly to give a boost to your emblem id.
Make It Responsive: Web design laws dictate that internet websites must be sized appropriately for all show sizes – along with your site’s footer.
Accessibility Problems: Make sure that your footer is designed for all consumers, along with those with disabilities. Use appropriate heading buildings, alt tags for footage, and sufficient color difference.
There are lots of techniques to design a footer for your web site. Internet design gear like Figma, Framer, or Caricature are great for ironing out a prototype for your designs, otherwise you’ll dive in with a tool like Divi and design your footer in real-time. For this educational, we’ll use Divi to show you the best way blank it’s to design a footer with an emblem, social media icons, an piece of email opt-in, and a couple of crucial links – all in only some minutes.
What Is Divi?
Divi is likely one of the most powerful wordpress topic issues to be had in the marketplace. With a front-end, no-code internet web page builder, and the power to design every side of your web site, Divi has the flexibility and design chops to do it all. With its intuitive Visible Builder, you’ll merely create surprising and unique internet websites, along with footers, without having to jot down down any code.
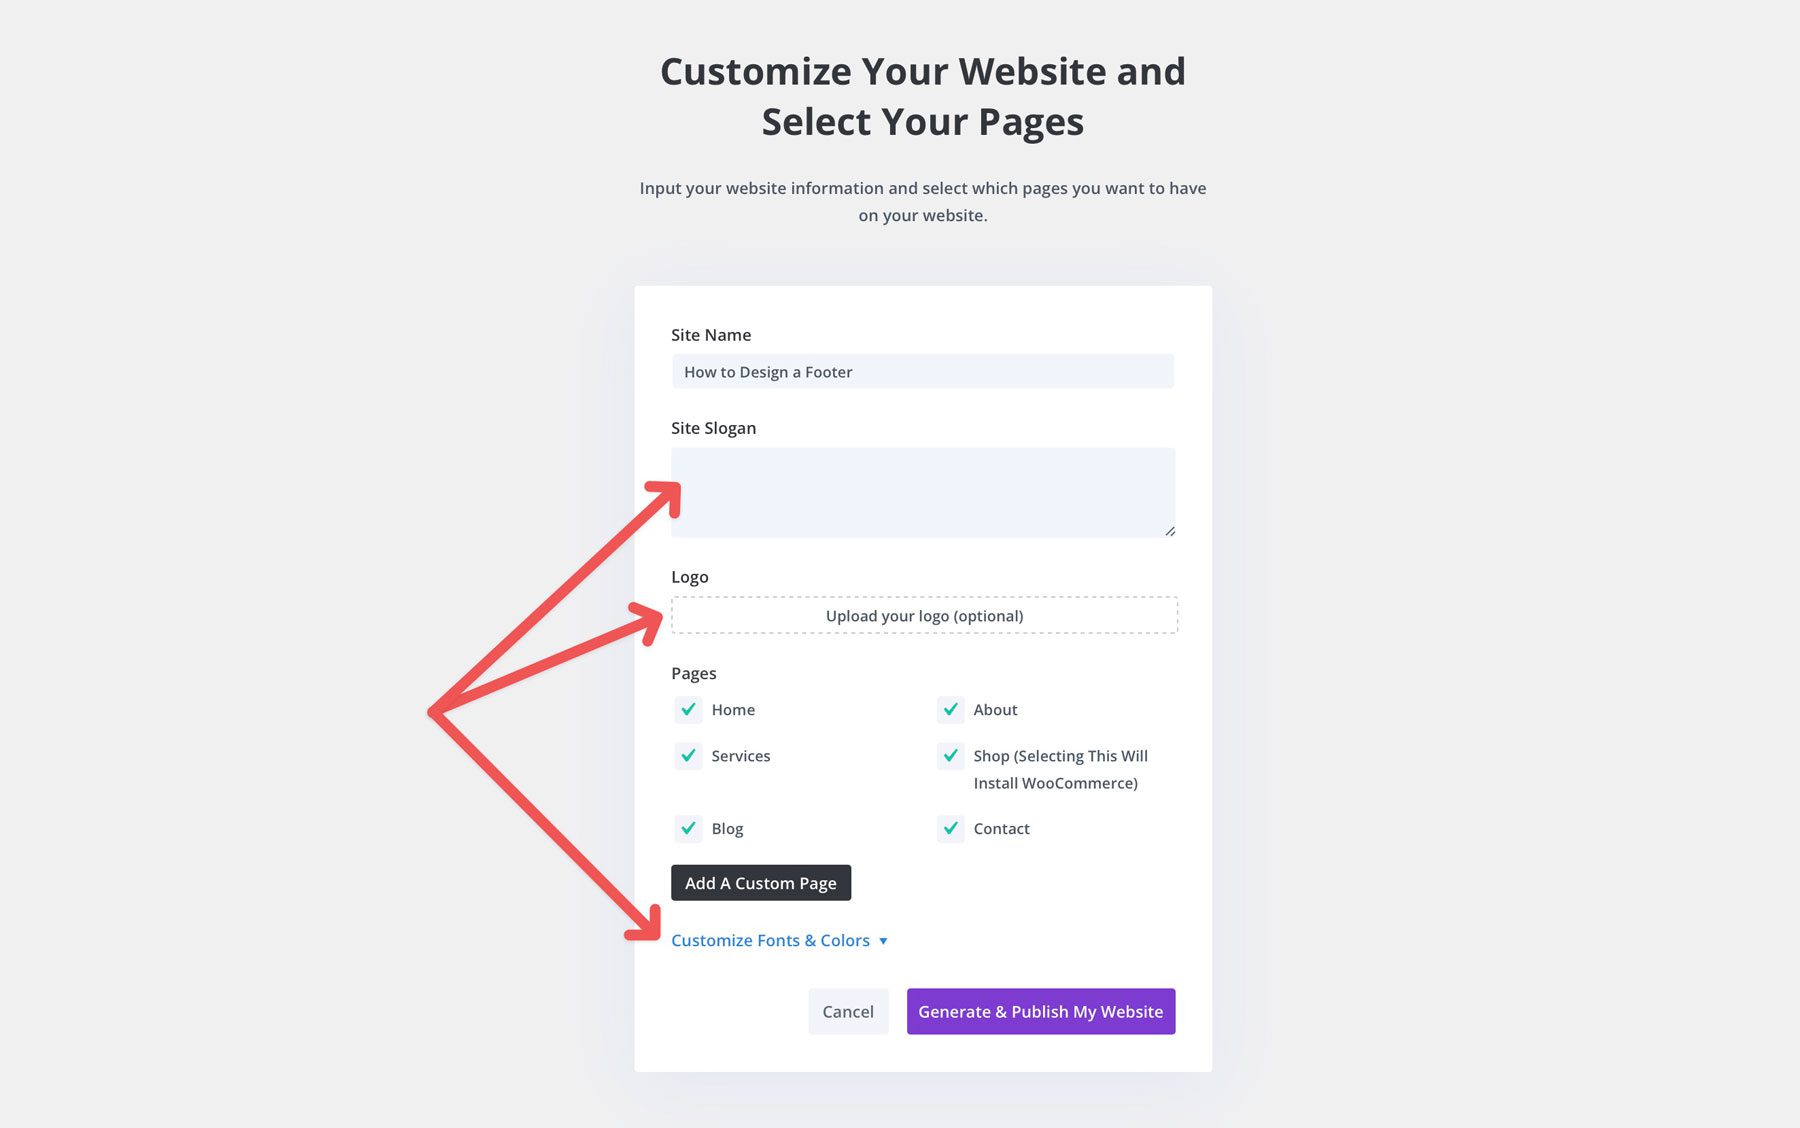
Divi moreover comprises a large library of premade layouts, along with a wide variety of footer designs. The ones premade layouts can serve as a starting point for your design, offering inspiration and saving you valuable time. In conjunction with layouts, Divi moreover supplies Fast Websites, which provides you with a handy guide a rough and blank technique to generate a complete web site from a number of starter web sites. The process involves choosing a starter site and providing Divi with information about your enterprise, along with your brand, emblem colors, and fonts.
Each web site Rapid Web pages generates comes with all core web pages, Theme Builder templates, design module presets, and world varieties, conserving the design consistent right through all the web site. In conjunction with starter web sites, you’ll opt for an AI-generated web site courtesy of Divi AI. With Divi AI, your site comes with the whole lot the starter site does then again permits you to use a text suggested to jot down down an summary of the site you’d like to create. You’ll be capable to moreover choose your branding or allow Divi AI to generate it.
Despite the fact that you’ll use Divi AI or Rapid Web pages to generate an effective footer, you’ll design one from scratch from the Visual and Theme Builders.
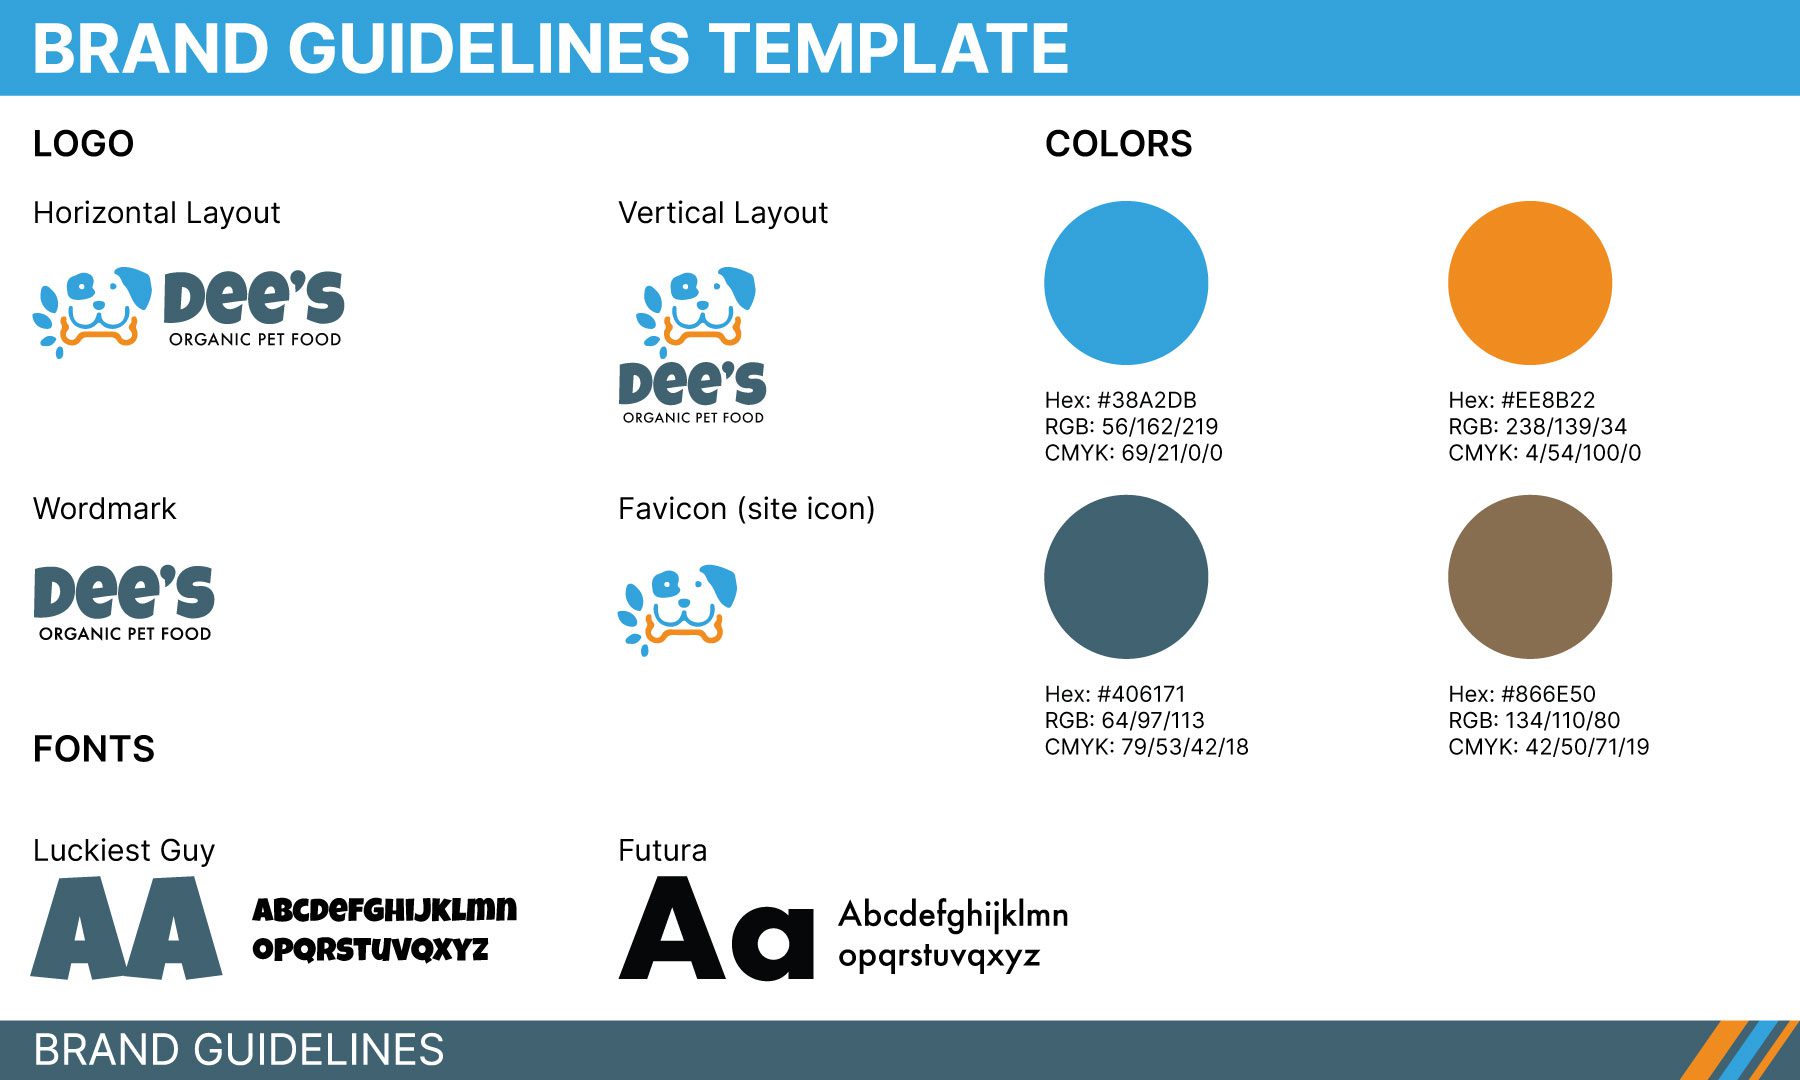
Previous than we begin designing a footer, it’s a good idea to have an emblem guidelines template like the one pictured beneath. This template lets in you initially brand guidelines, emblem colors, and fonts that can assist you whilst you design a footer. Transferring forward, we’ll use this template as a data.
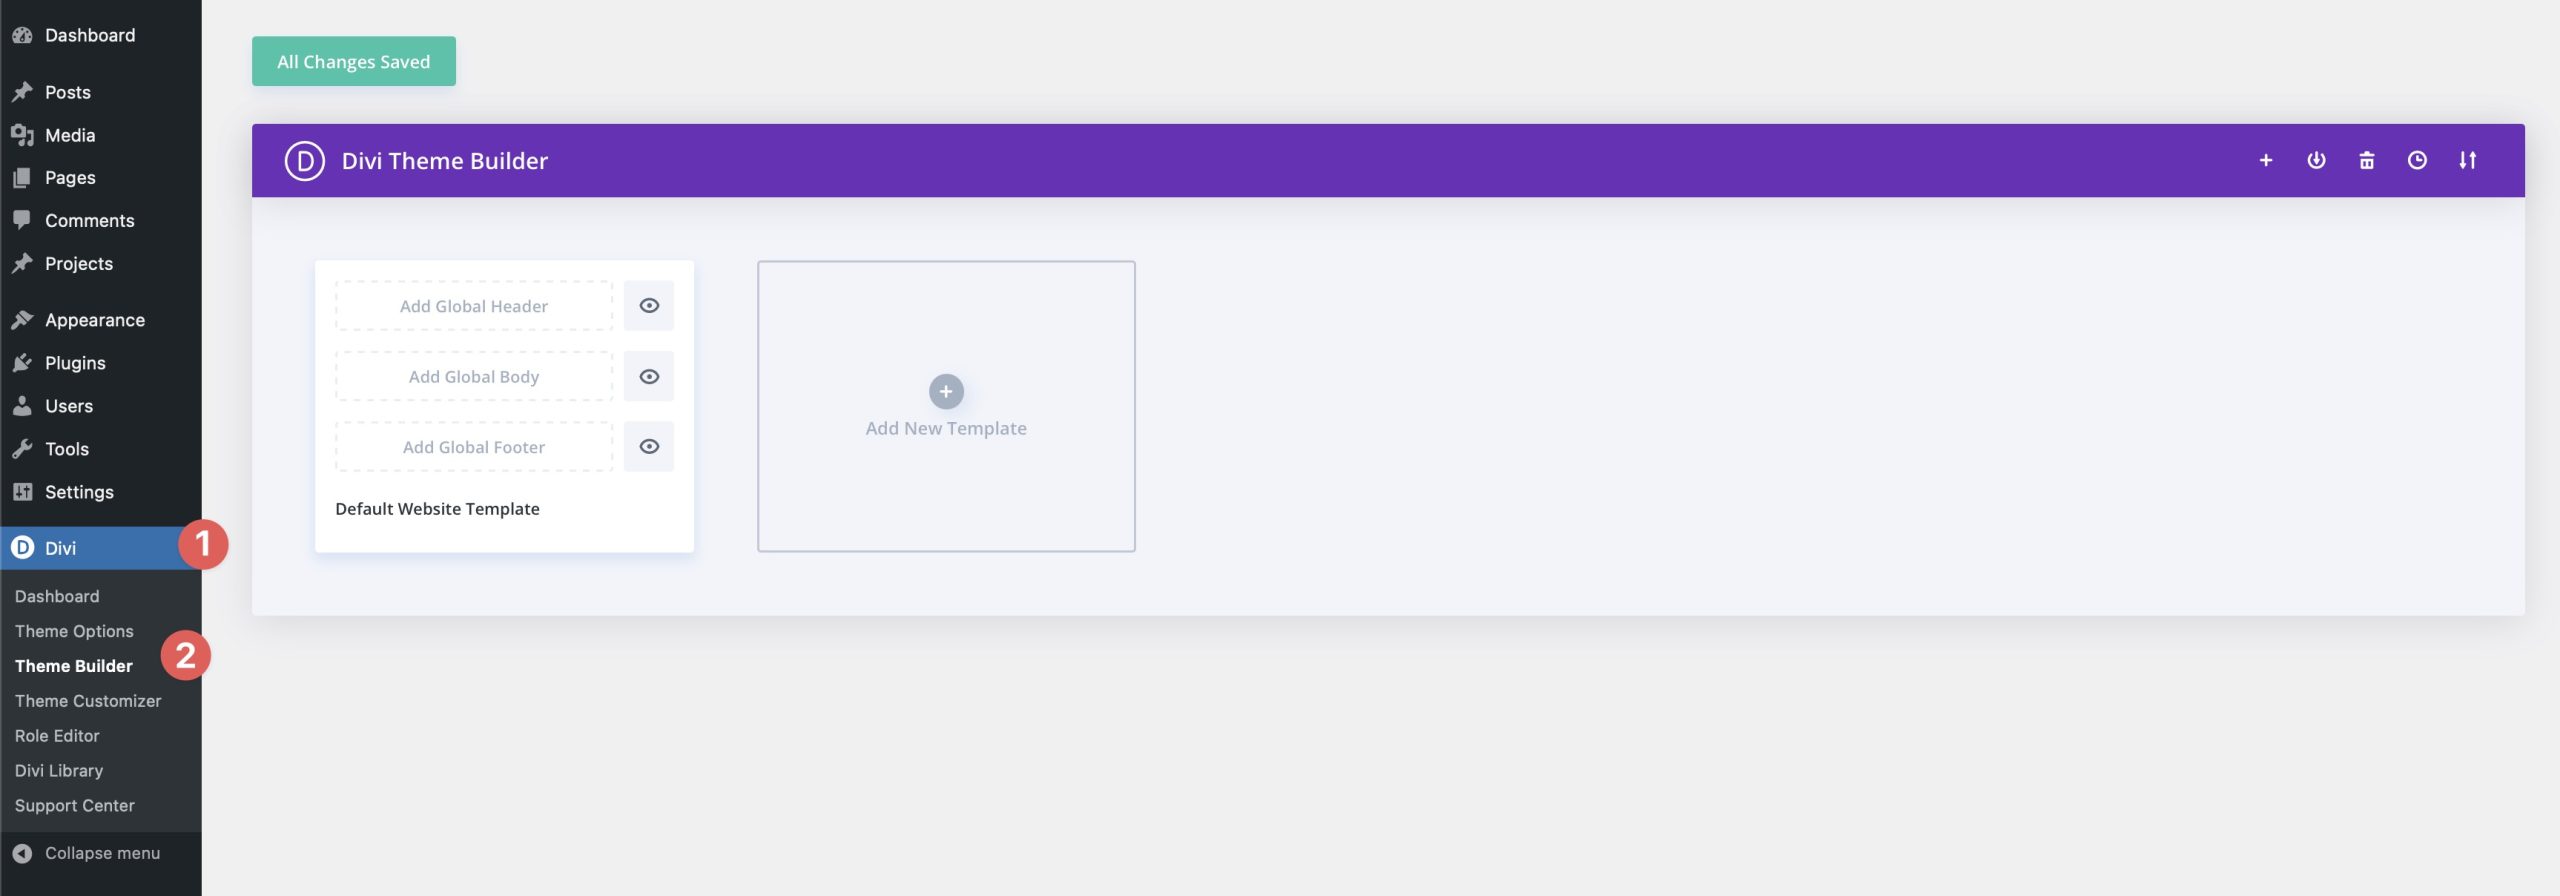
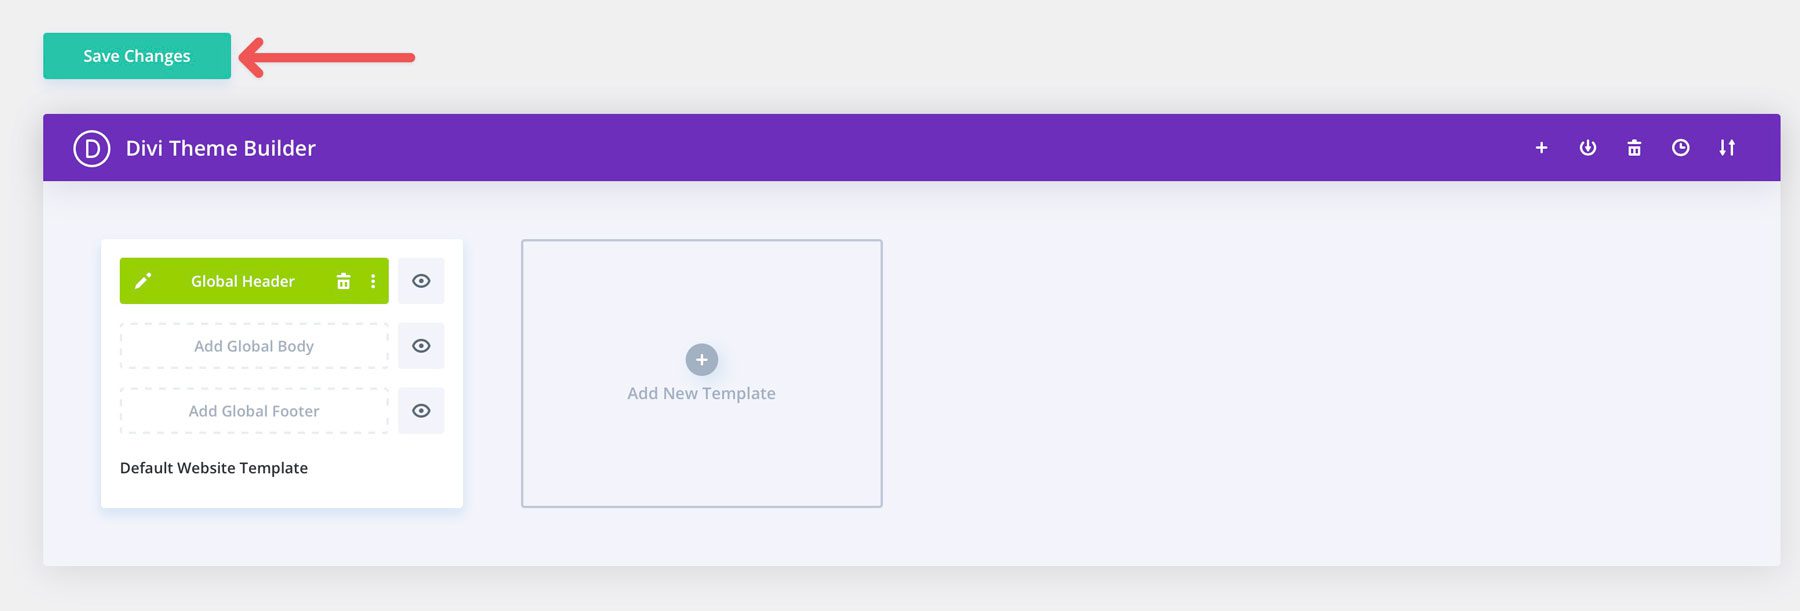
Log into your wordpress web site and navigate to Divi > Theme Builder.
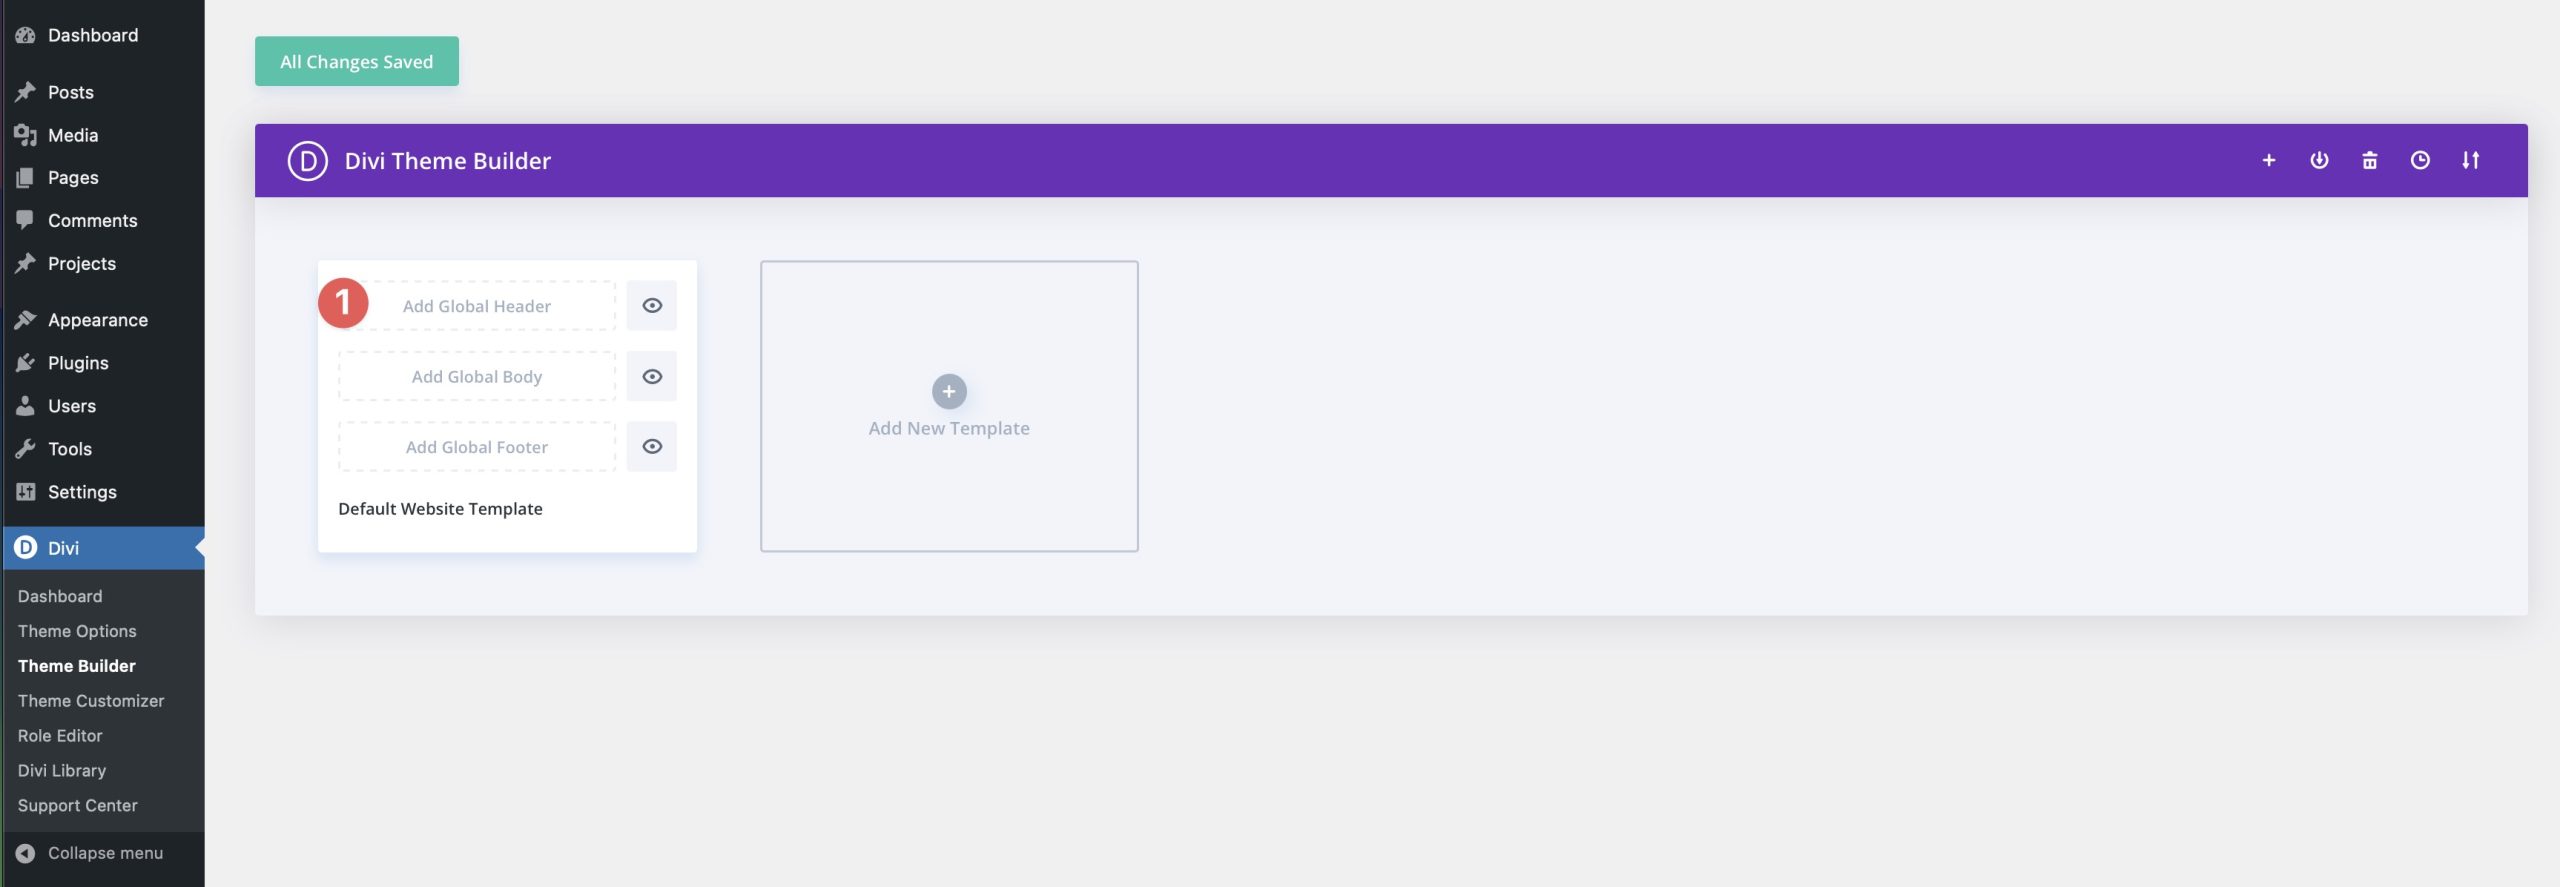
Next, click on on Add World Footer, then Assemble World Footer to unlock the Theme Builder.
When the Theme Builder launches, you’ll be met with a blank slate. Get began by the use of clicking the green icon so that you could upload a row to the footer.
Next, choose the three-column construction from the available alternatives.
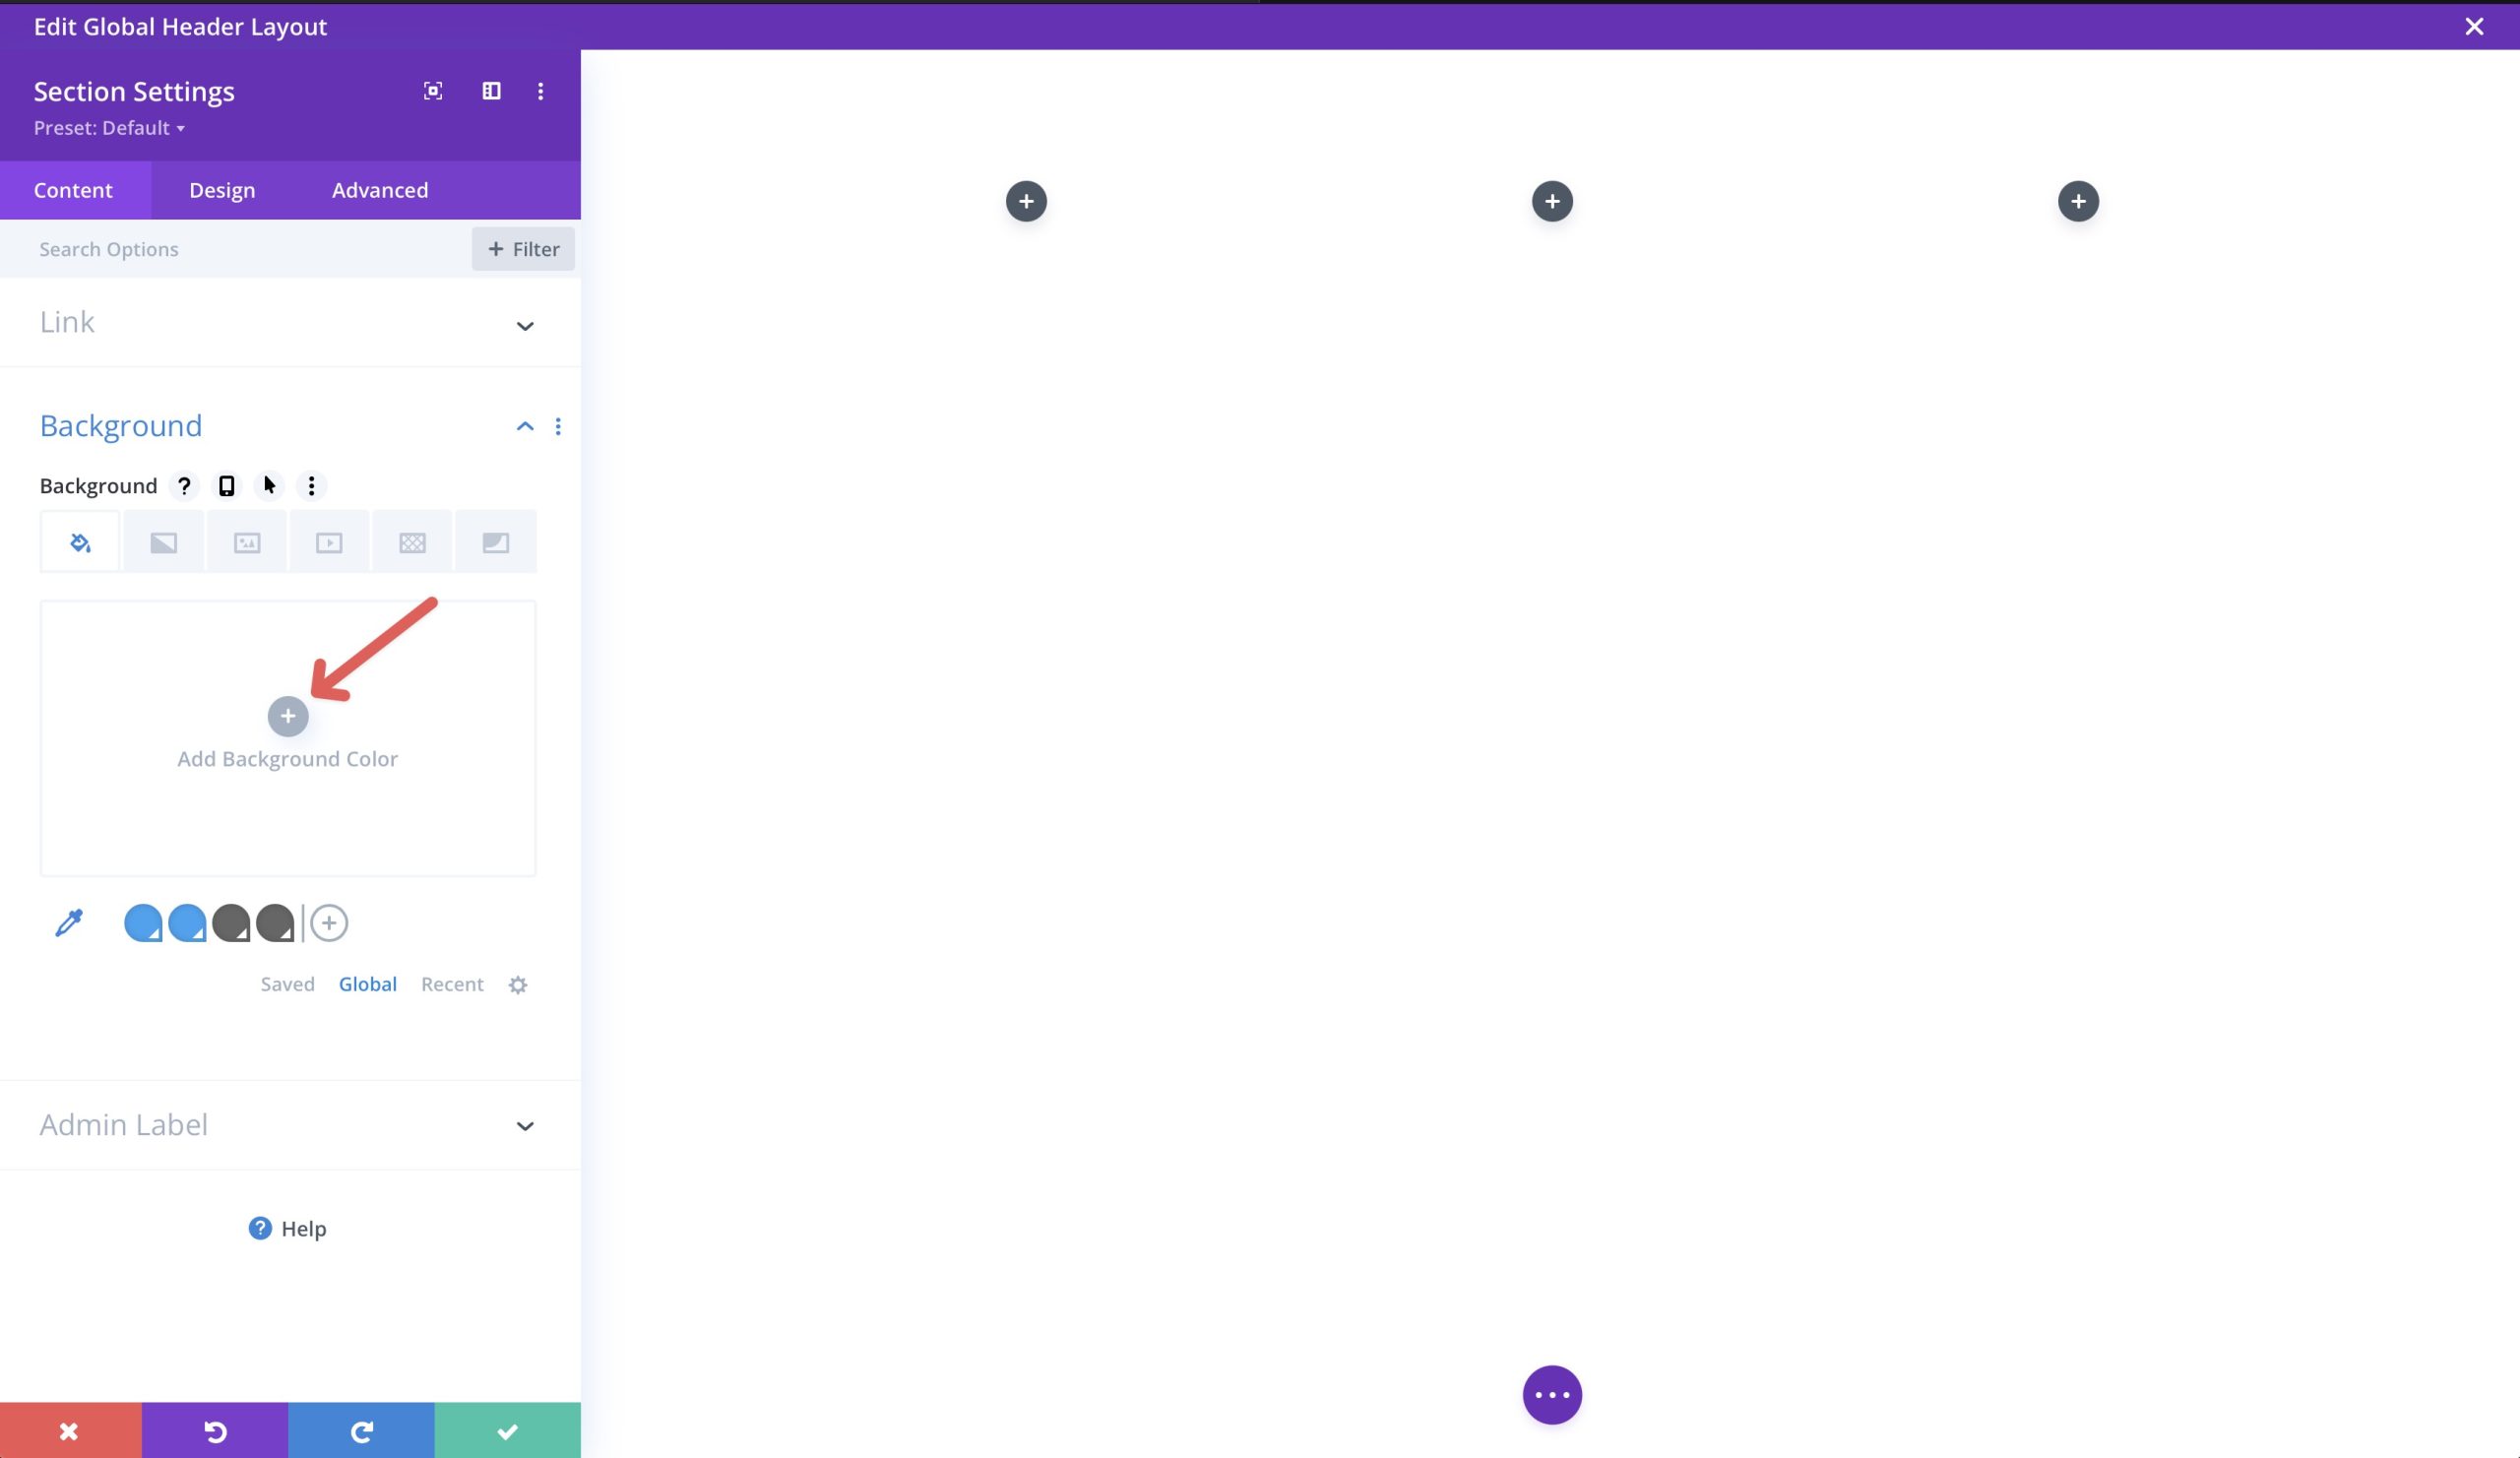
Previous than we add content material subject material, we will be able to wish to add a background color to our segment. To do so, click on on on the apparatus icon (settings) on the most productive left of the segment.
Click on on + Add Background Color to make a choice a background color for our segment.
Use #406171 as the color. To save lots of quite a lot of the color as a global one, click on at the + icon so that you could upload it. On every occasion you’ve added a background color, click on at the green button to save it.
Add A Logo
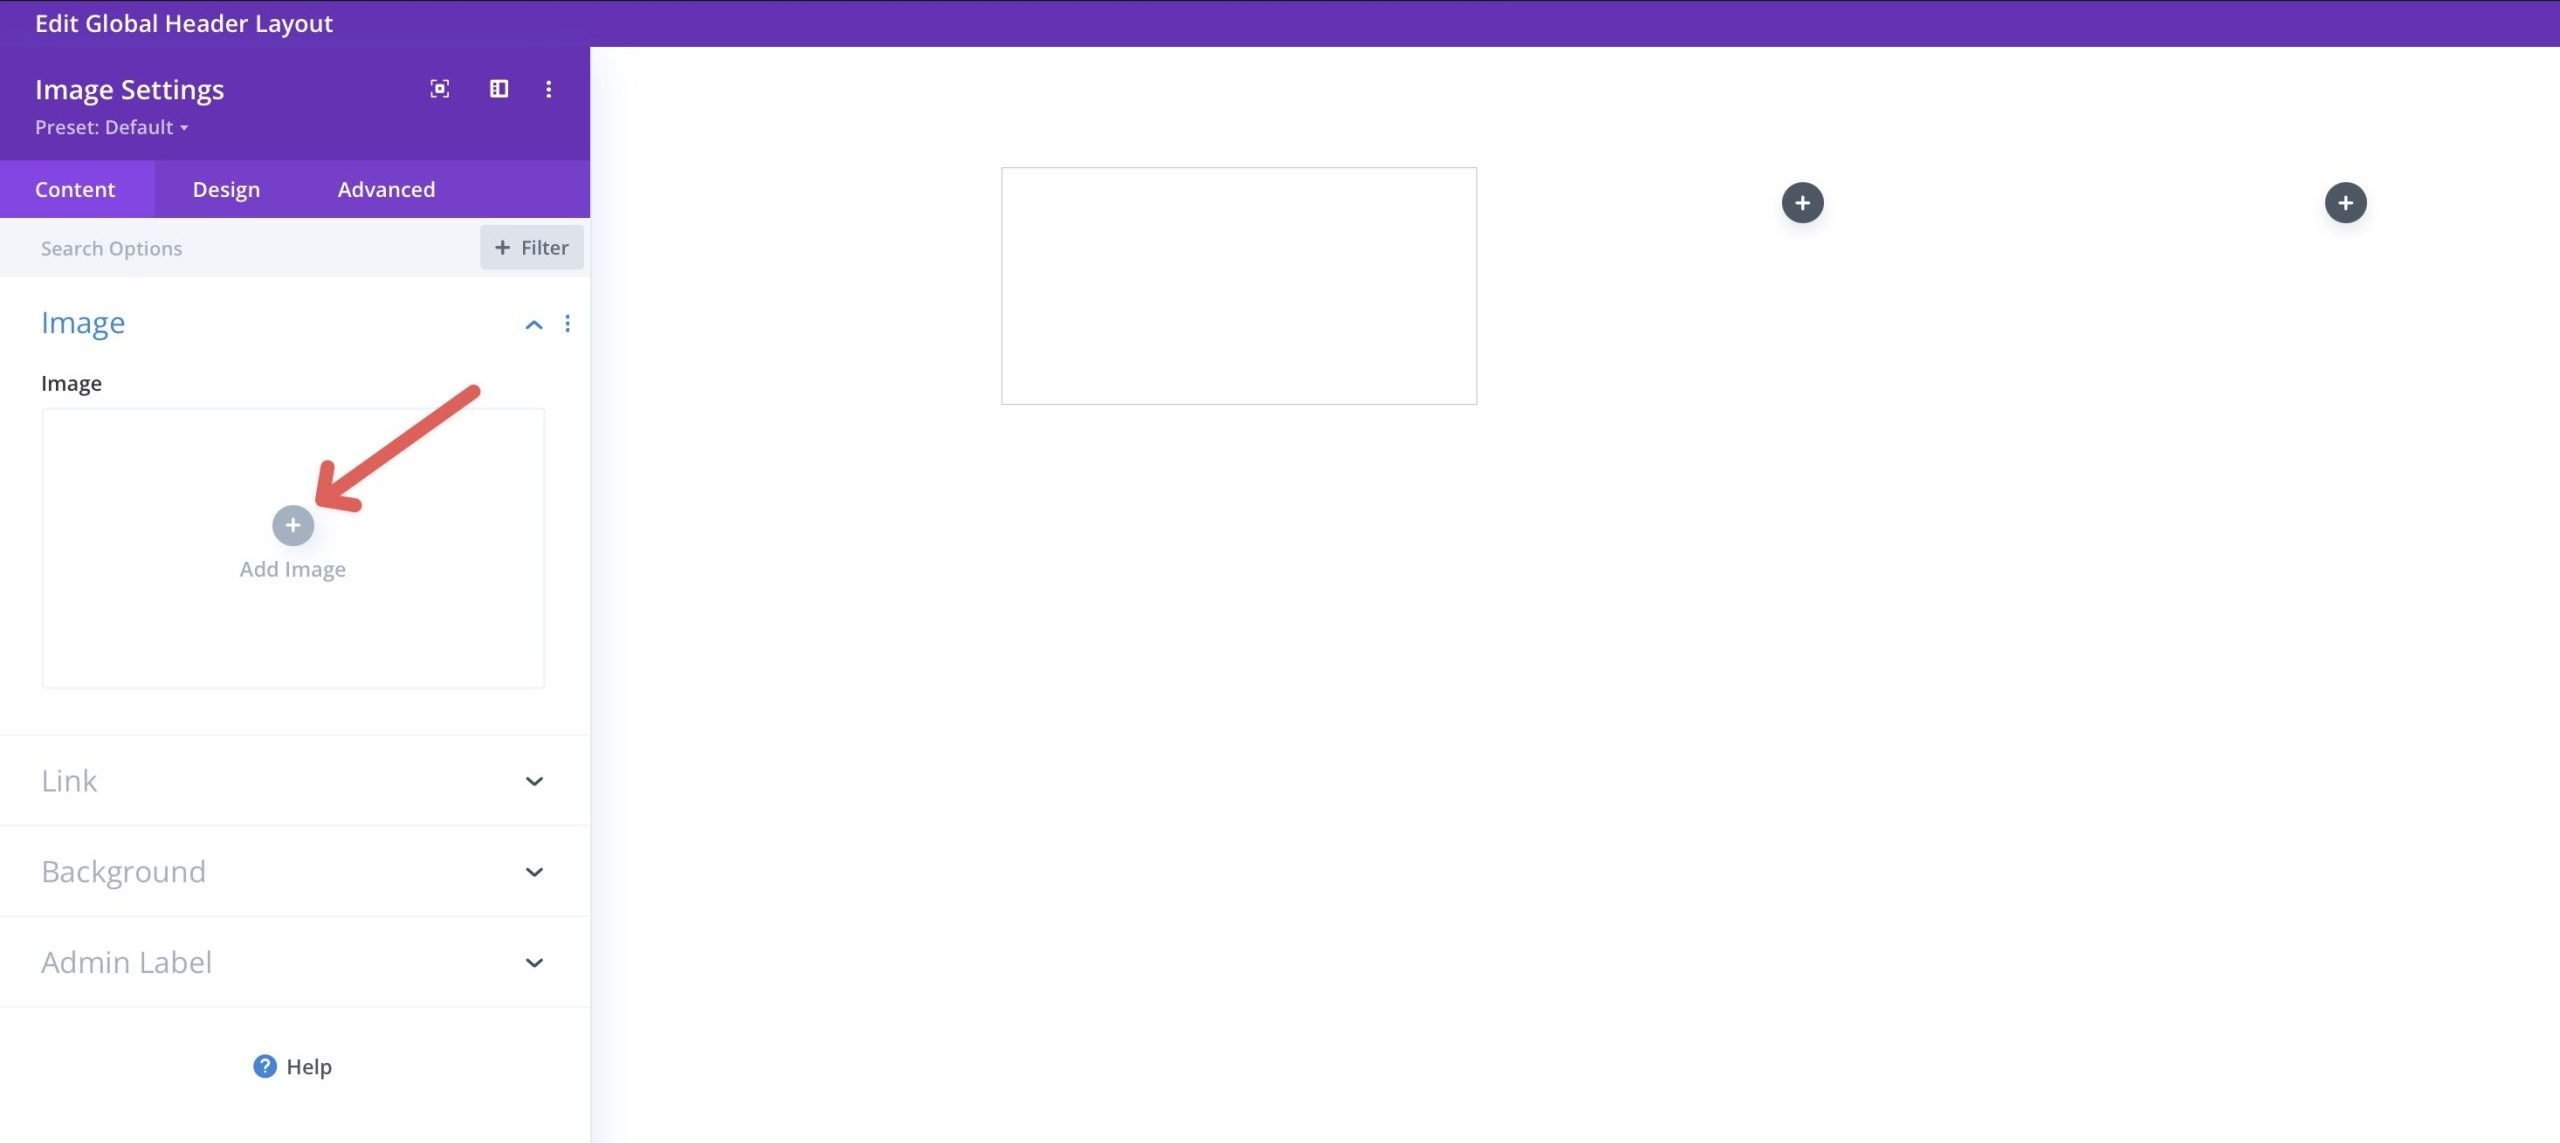
With our row building in place, it’s time so that you could upload some content material subject material. Get began by the use of together with the image module to the principle column of the row.
Make a choice + Add Image so as to add your brand with the image module’s settings full of life.
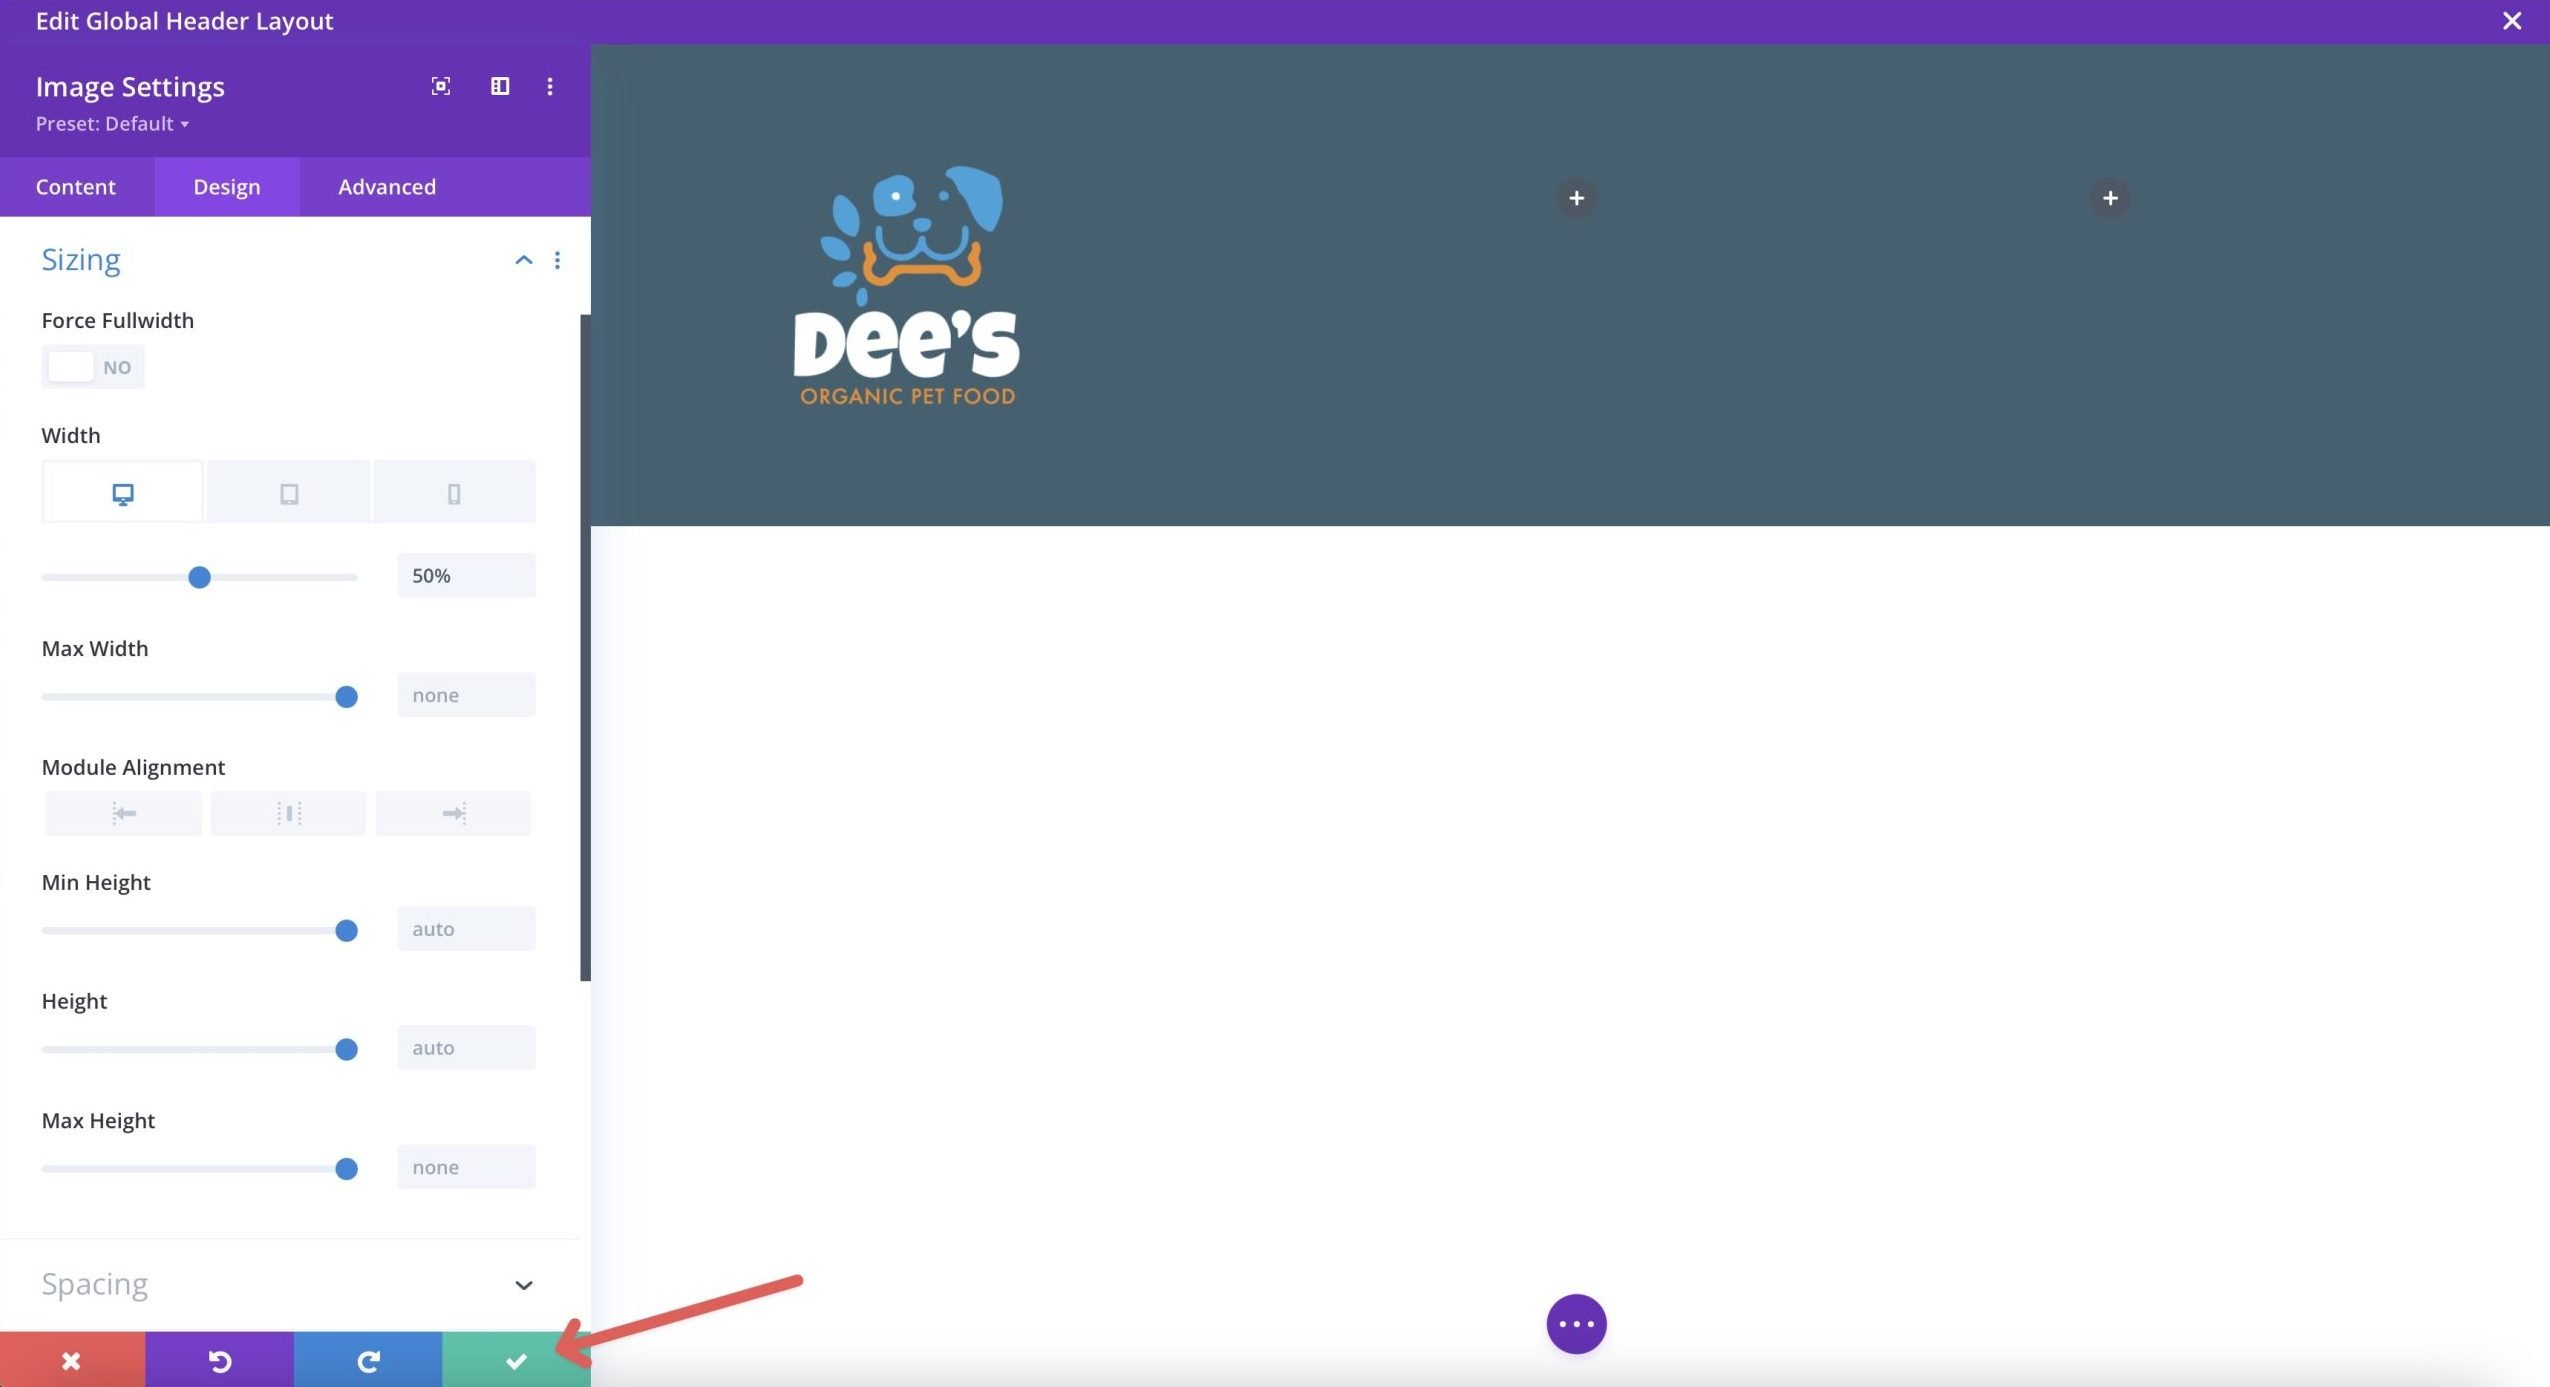
Once your brand is uploaded, we’ll wish to make some changes, so click on at the design tab to start out out.
Beneath the alignment dropdown menu, set the image alignment to the left on the desktop and middle on tablet and cell. Next, click on at the sizing tab and set the width to 50% for desktop and tablet and 40% for cell.
When finished, click on at the green button to avoid wasting quite a lot of the module.
Add Social Media Icons
Click on at the grey + icon underneath the logo so that you could upload a brand spanking new module and choose the social media follow module.
With the module settings full of life, click on at the +Add New Social Group button so that you could upload your most well-liked social media platforms. For this educational, we’ll add Facebook, X, and Instagram.
In an effort to upload a background to each social media platform, click on at the apparatus icon to edit it.
Use #ee8b22 for the background color. Repeat the ones steps to edit the icons for X and Instagram.
Next, transfer to the design tab and add the following settings:
Module Alignment: left (desktop), middle (tables & cell)
Icon Color: #ffffff
Use Custom designed Icon Dimension: Positive
Custom designed Icon Dimension: 20px
Border Rounded Corners: 100px
Once whole, your icons must look like the image beneath.
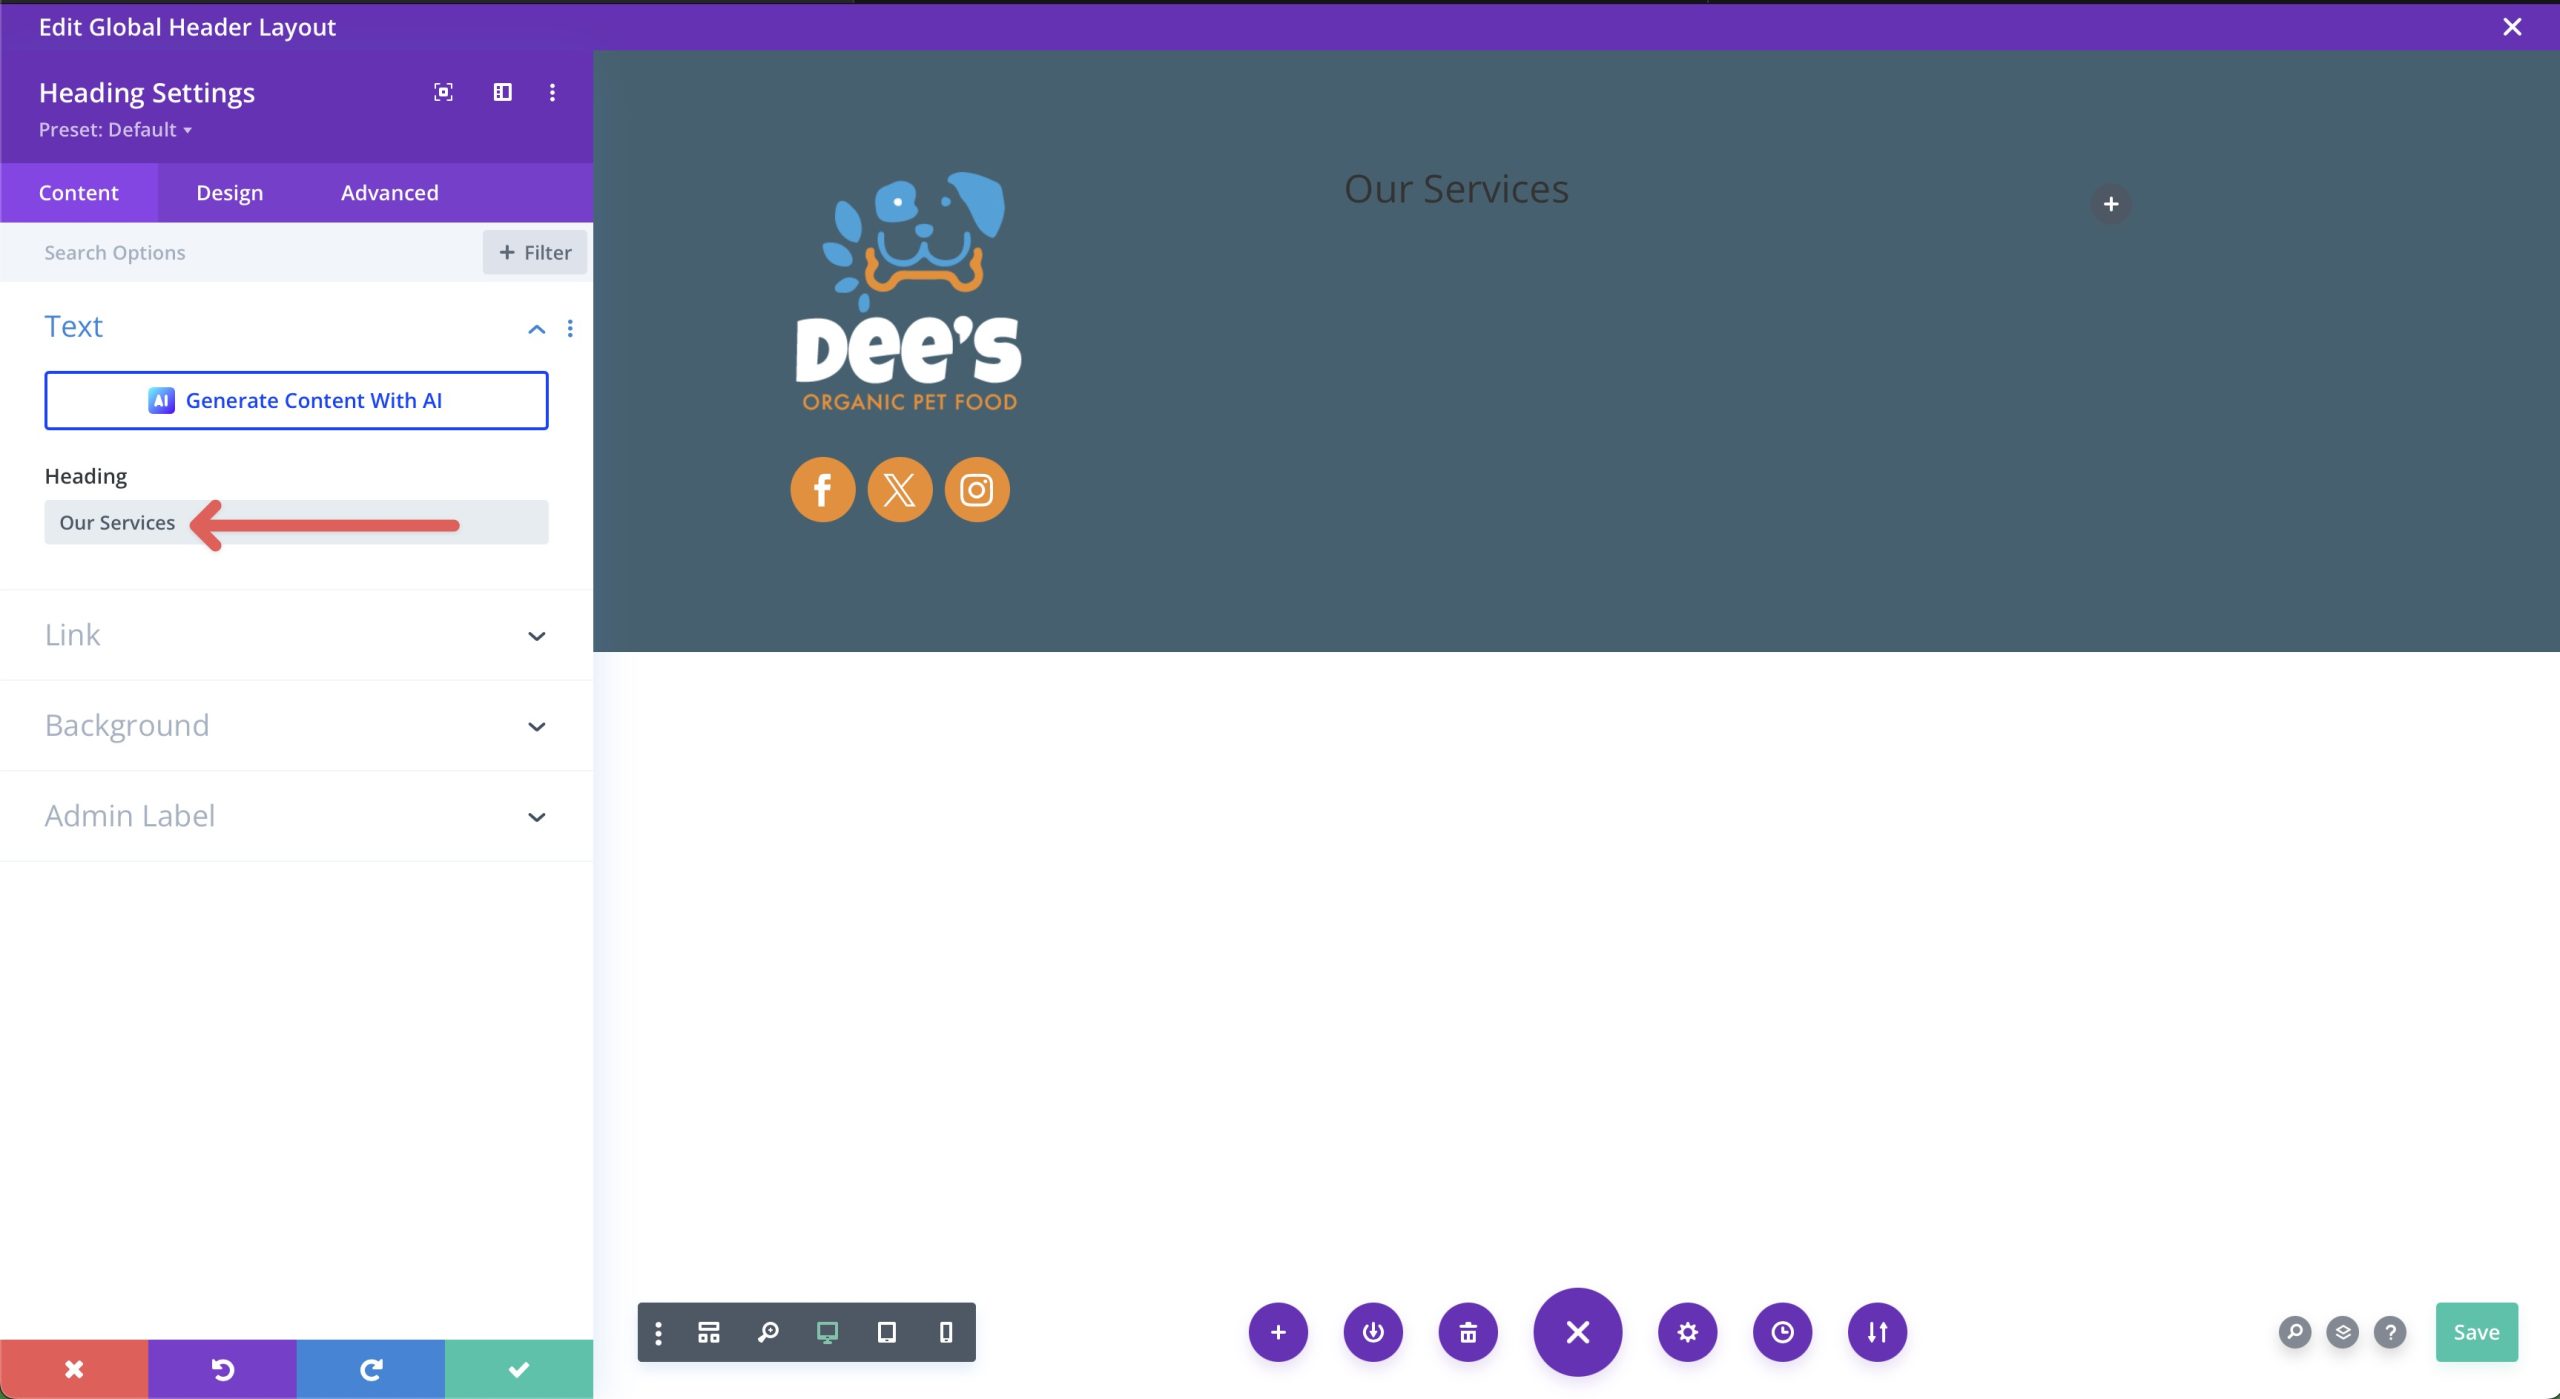
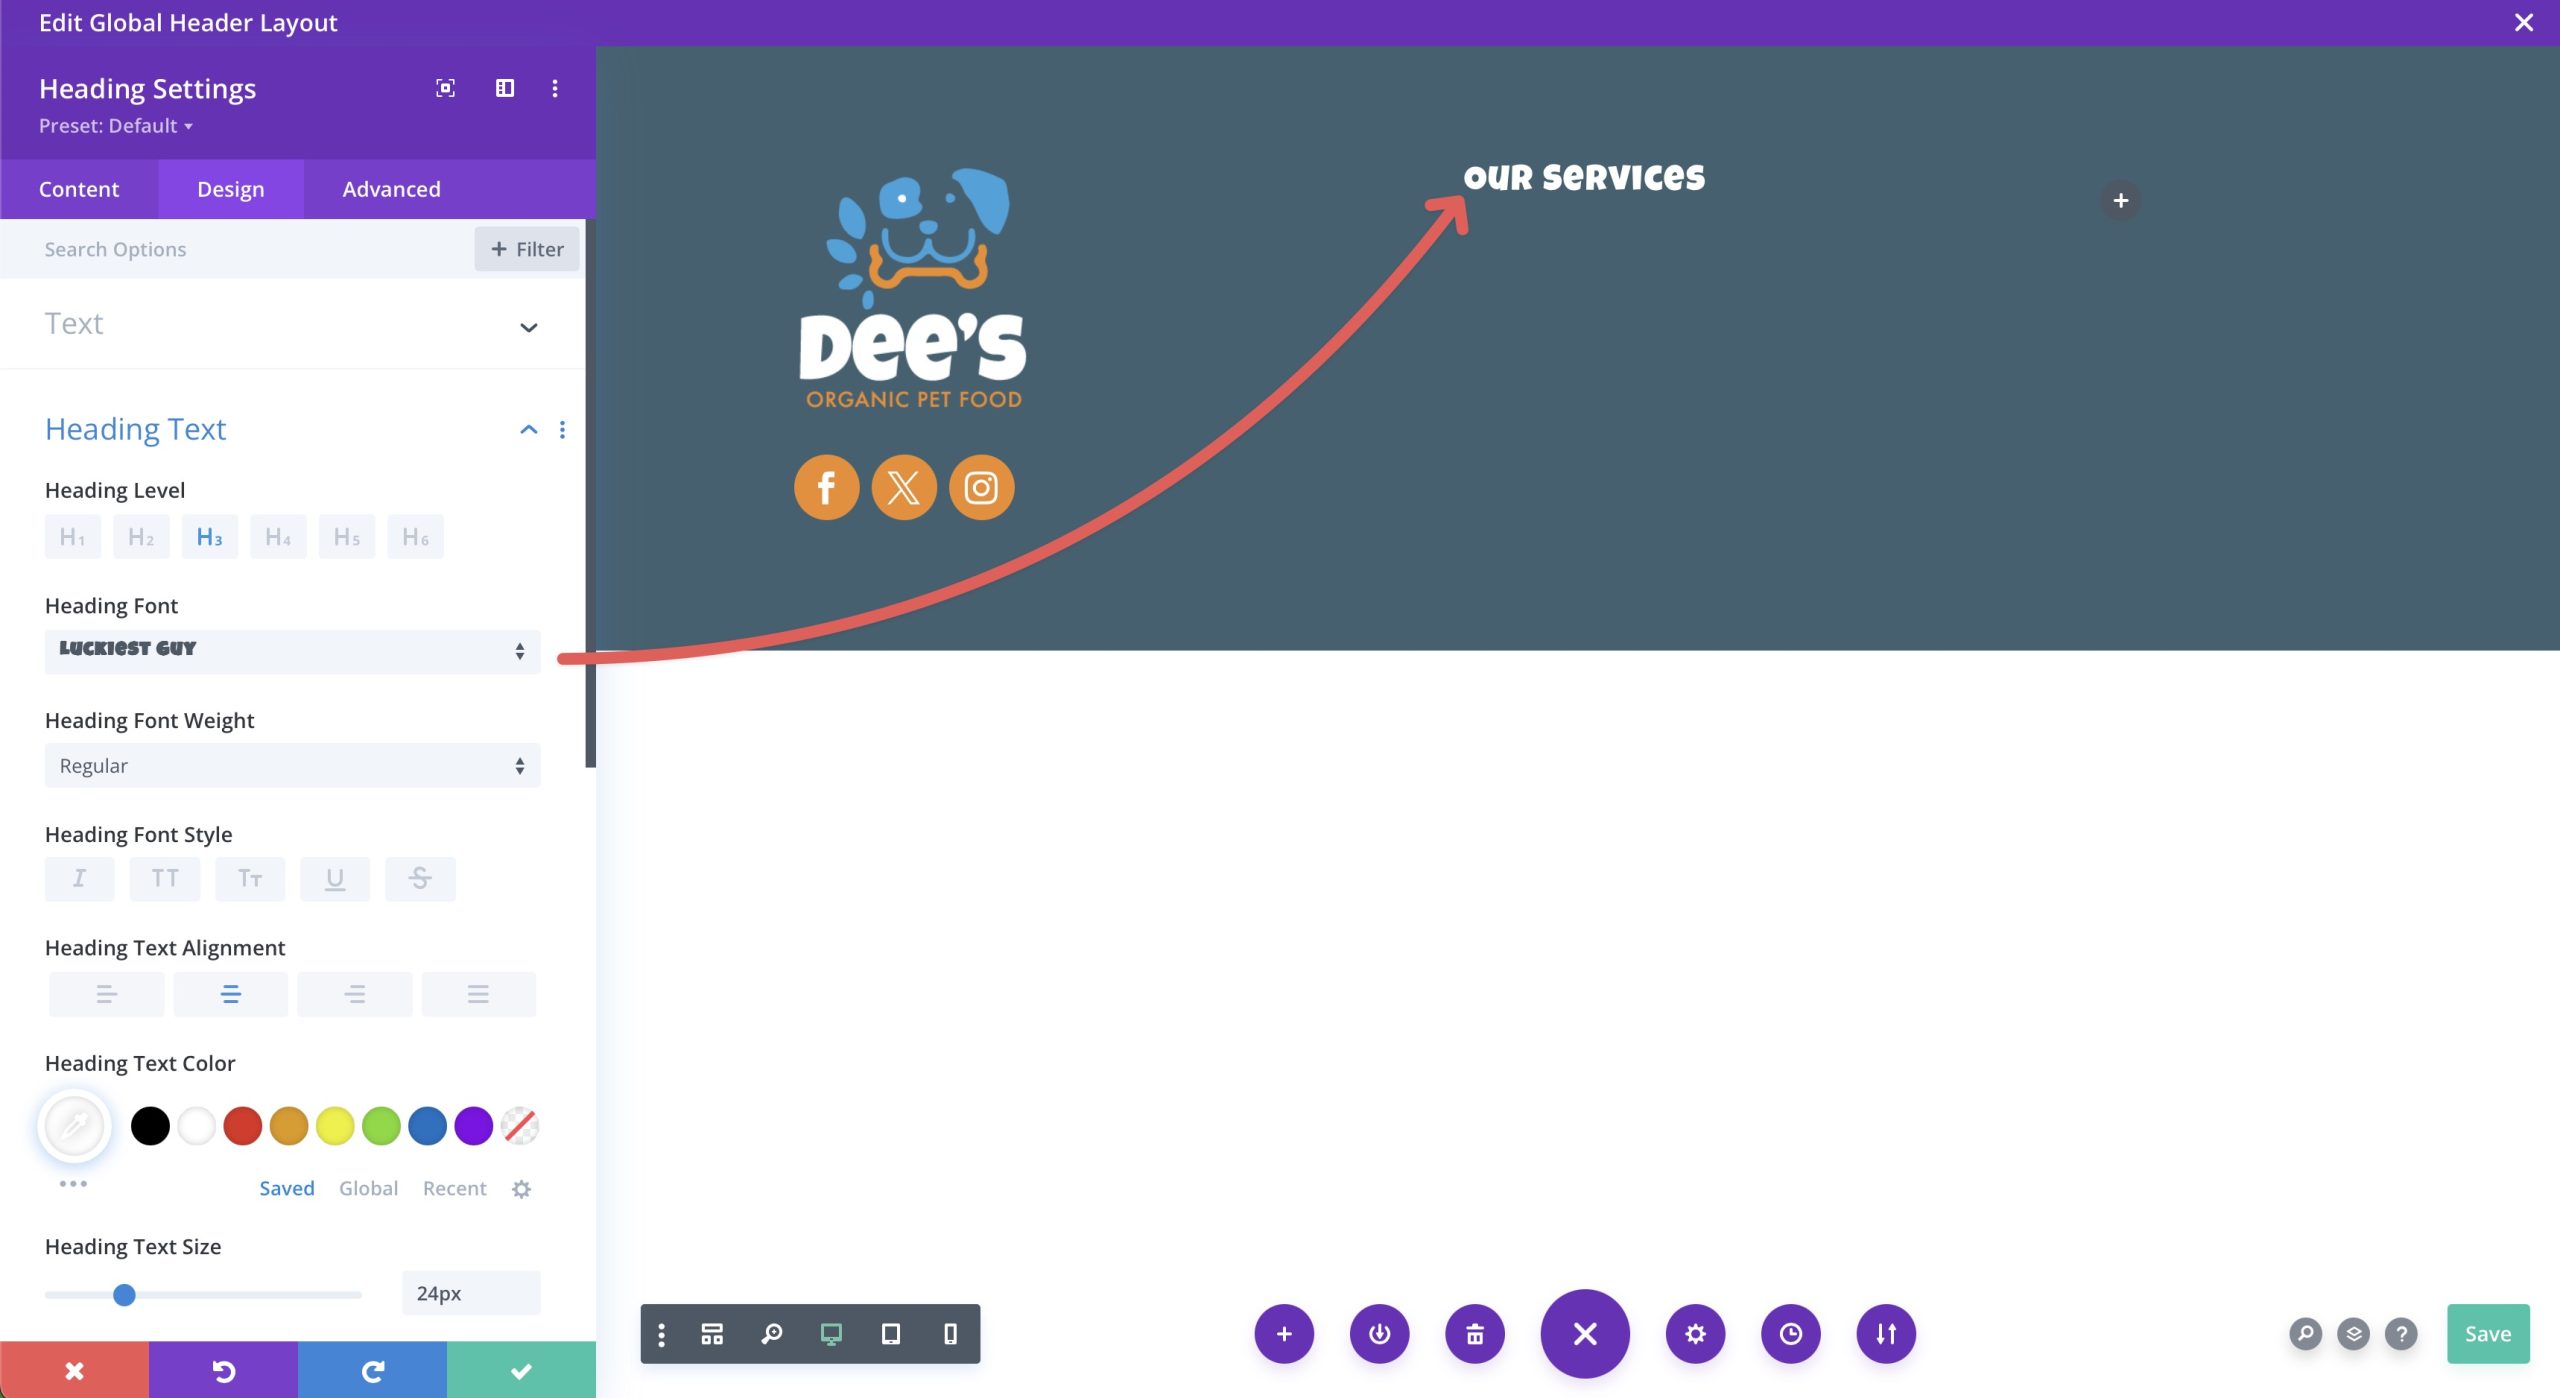
Add A Heading Module
Next, we’ll add a heading module to our second column. Click on at the grey +icon and choose the heading module so that you could upload it. Write Our Services inside the heading field when the dialog box turns out.
Click on at the design tab and add the following settings:
Heading Degree: H3
Heading Font: Luckiest Guy
Heading Text Alignment: Center
Heading Text Color: #ffffff
Heading Text Dimension: 24px
Heading Letter Spacing: 1px
Once all settings are in place, your heading must look like the image beneath.
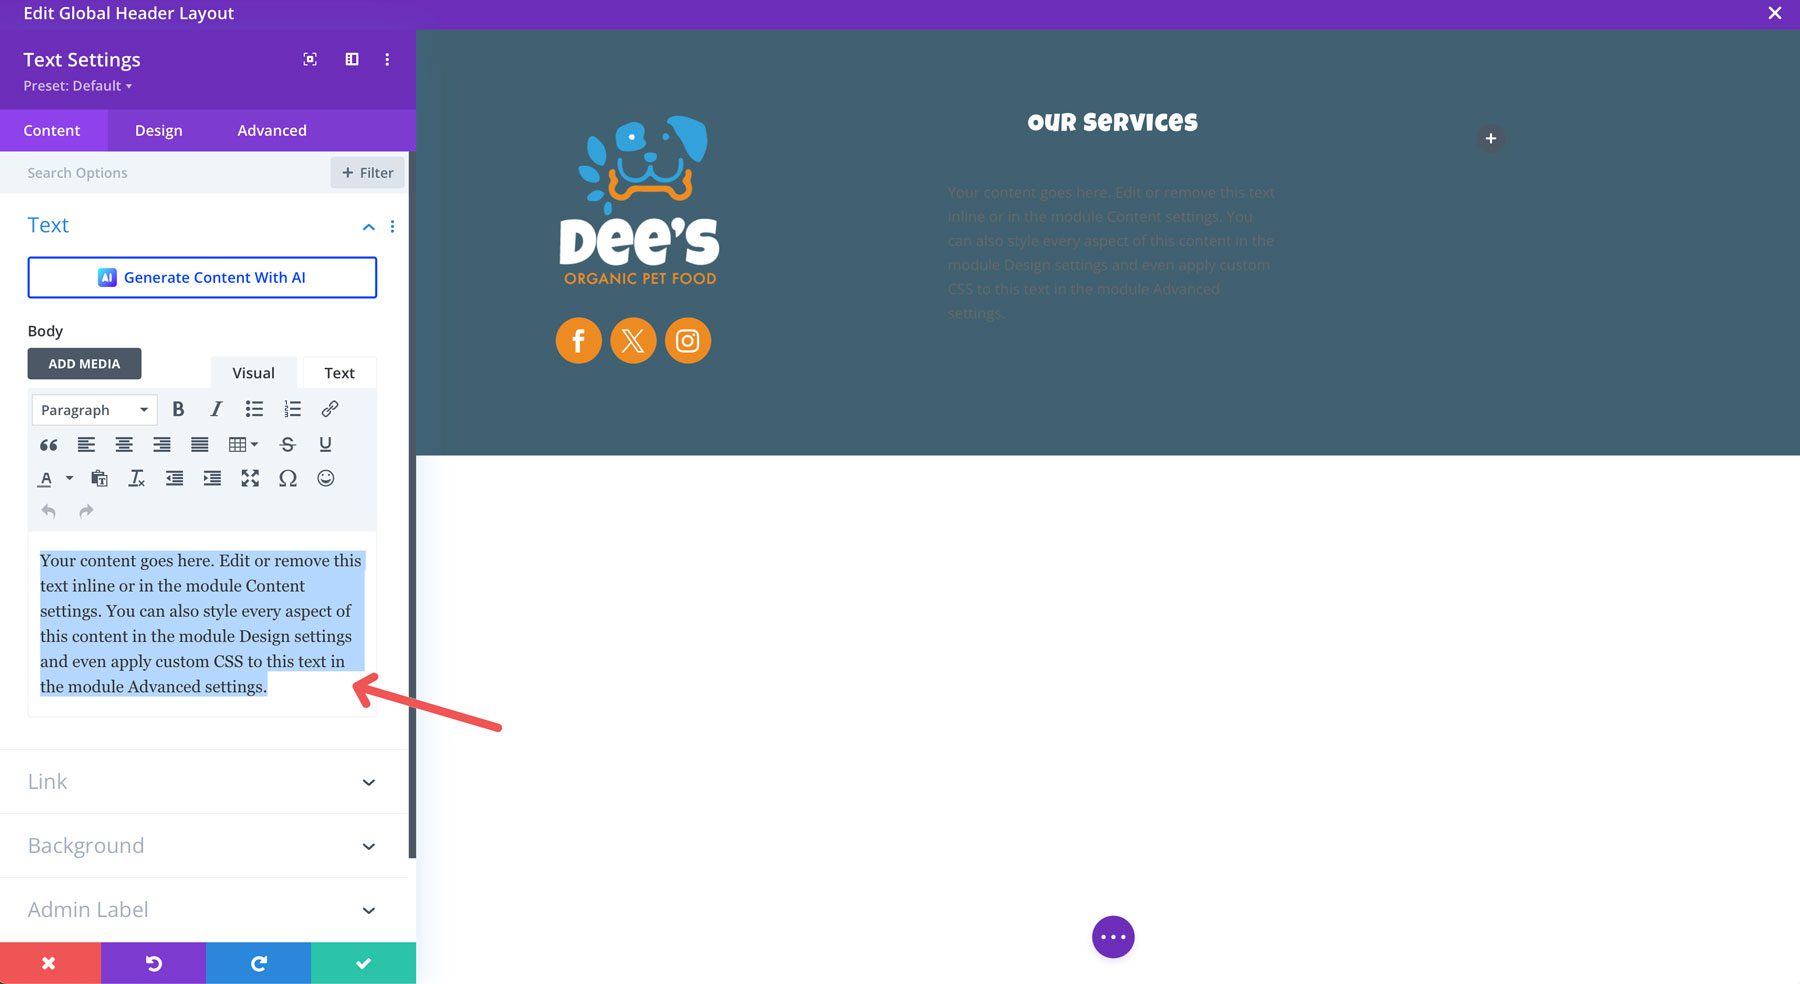
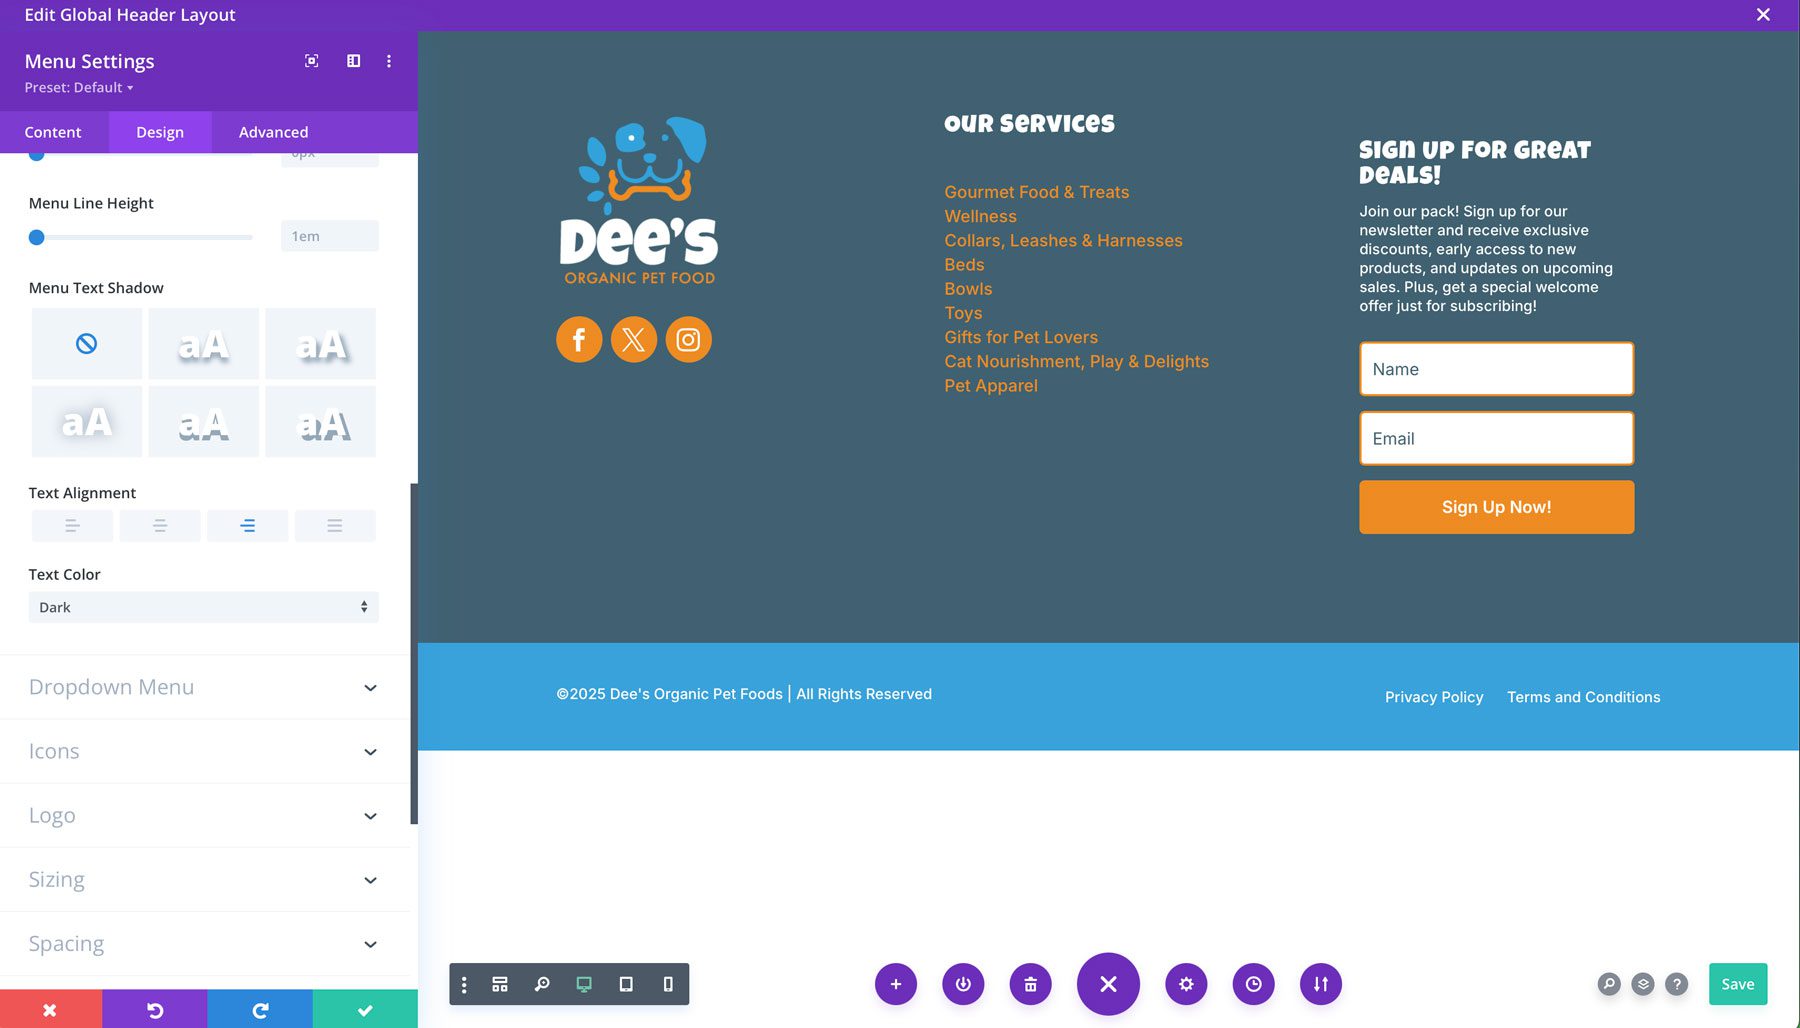
Add A Text Module
Next, we’ll add a text module underneath the heading module to sing their own praises crucial links in our second column. Divi supplies placeholder text into the module by the use of default, so we can must delete that previous than together with new text.
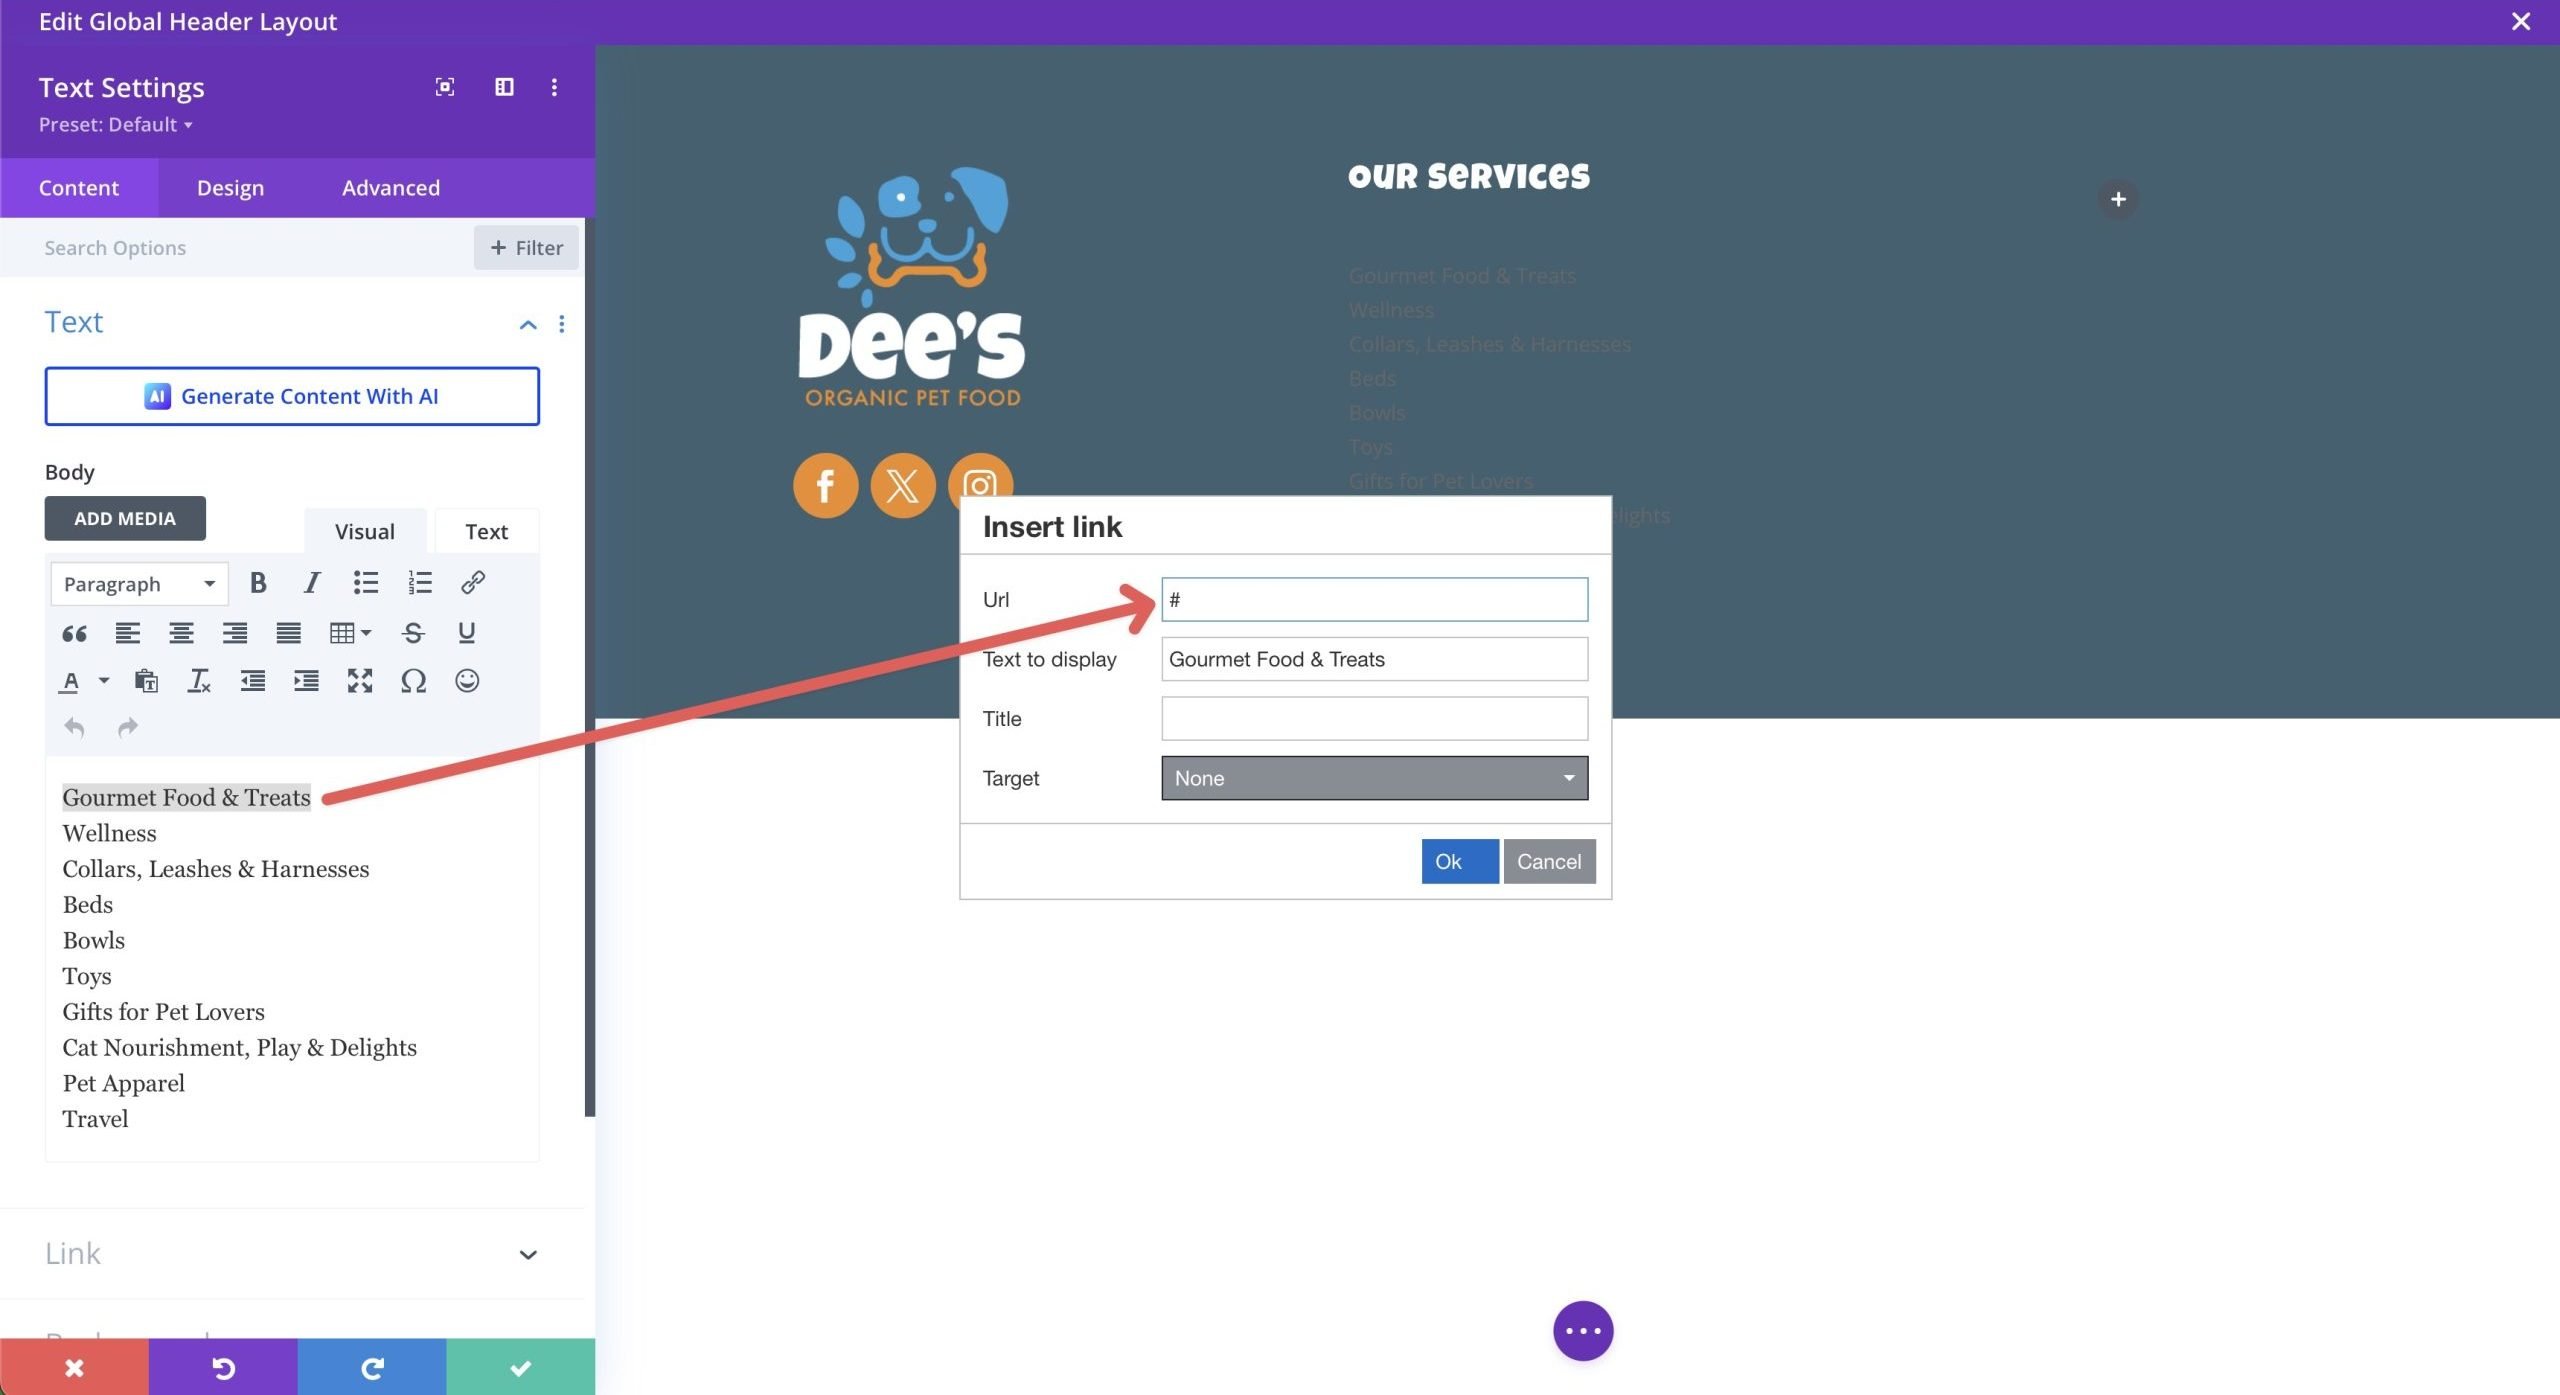
Despite the fact that we could use a menu module proper right here, it makes additional sense to use a text module and add links to each line of text. Since we’re creating a footer for a pet food site, we’ll need to include crucial links to inside pages which could be most in point of fact useful to the individual, like pet food & treats, wellness, toys, leashes, and so forth. Add a # to each link.
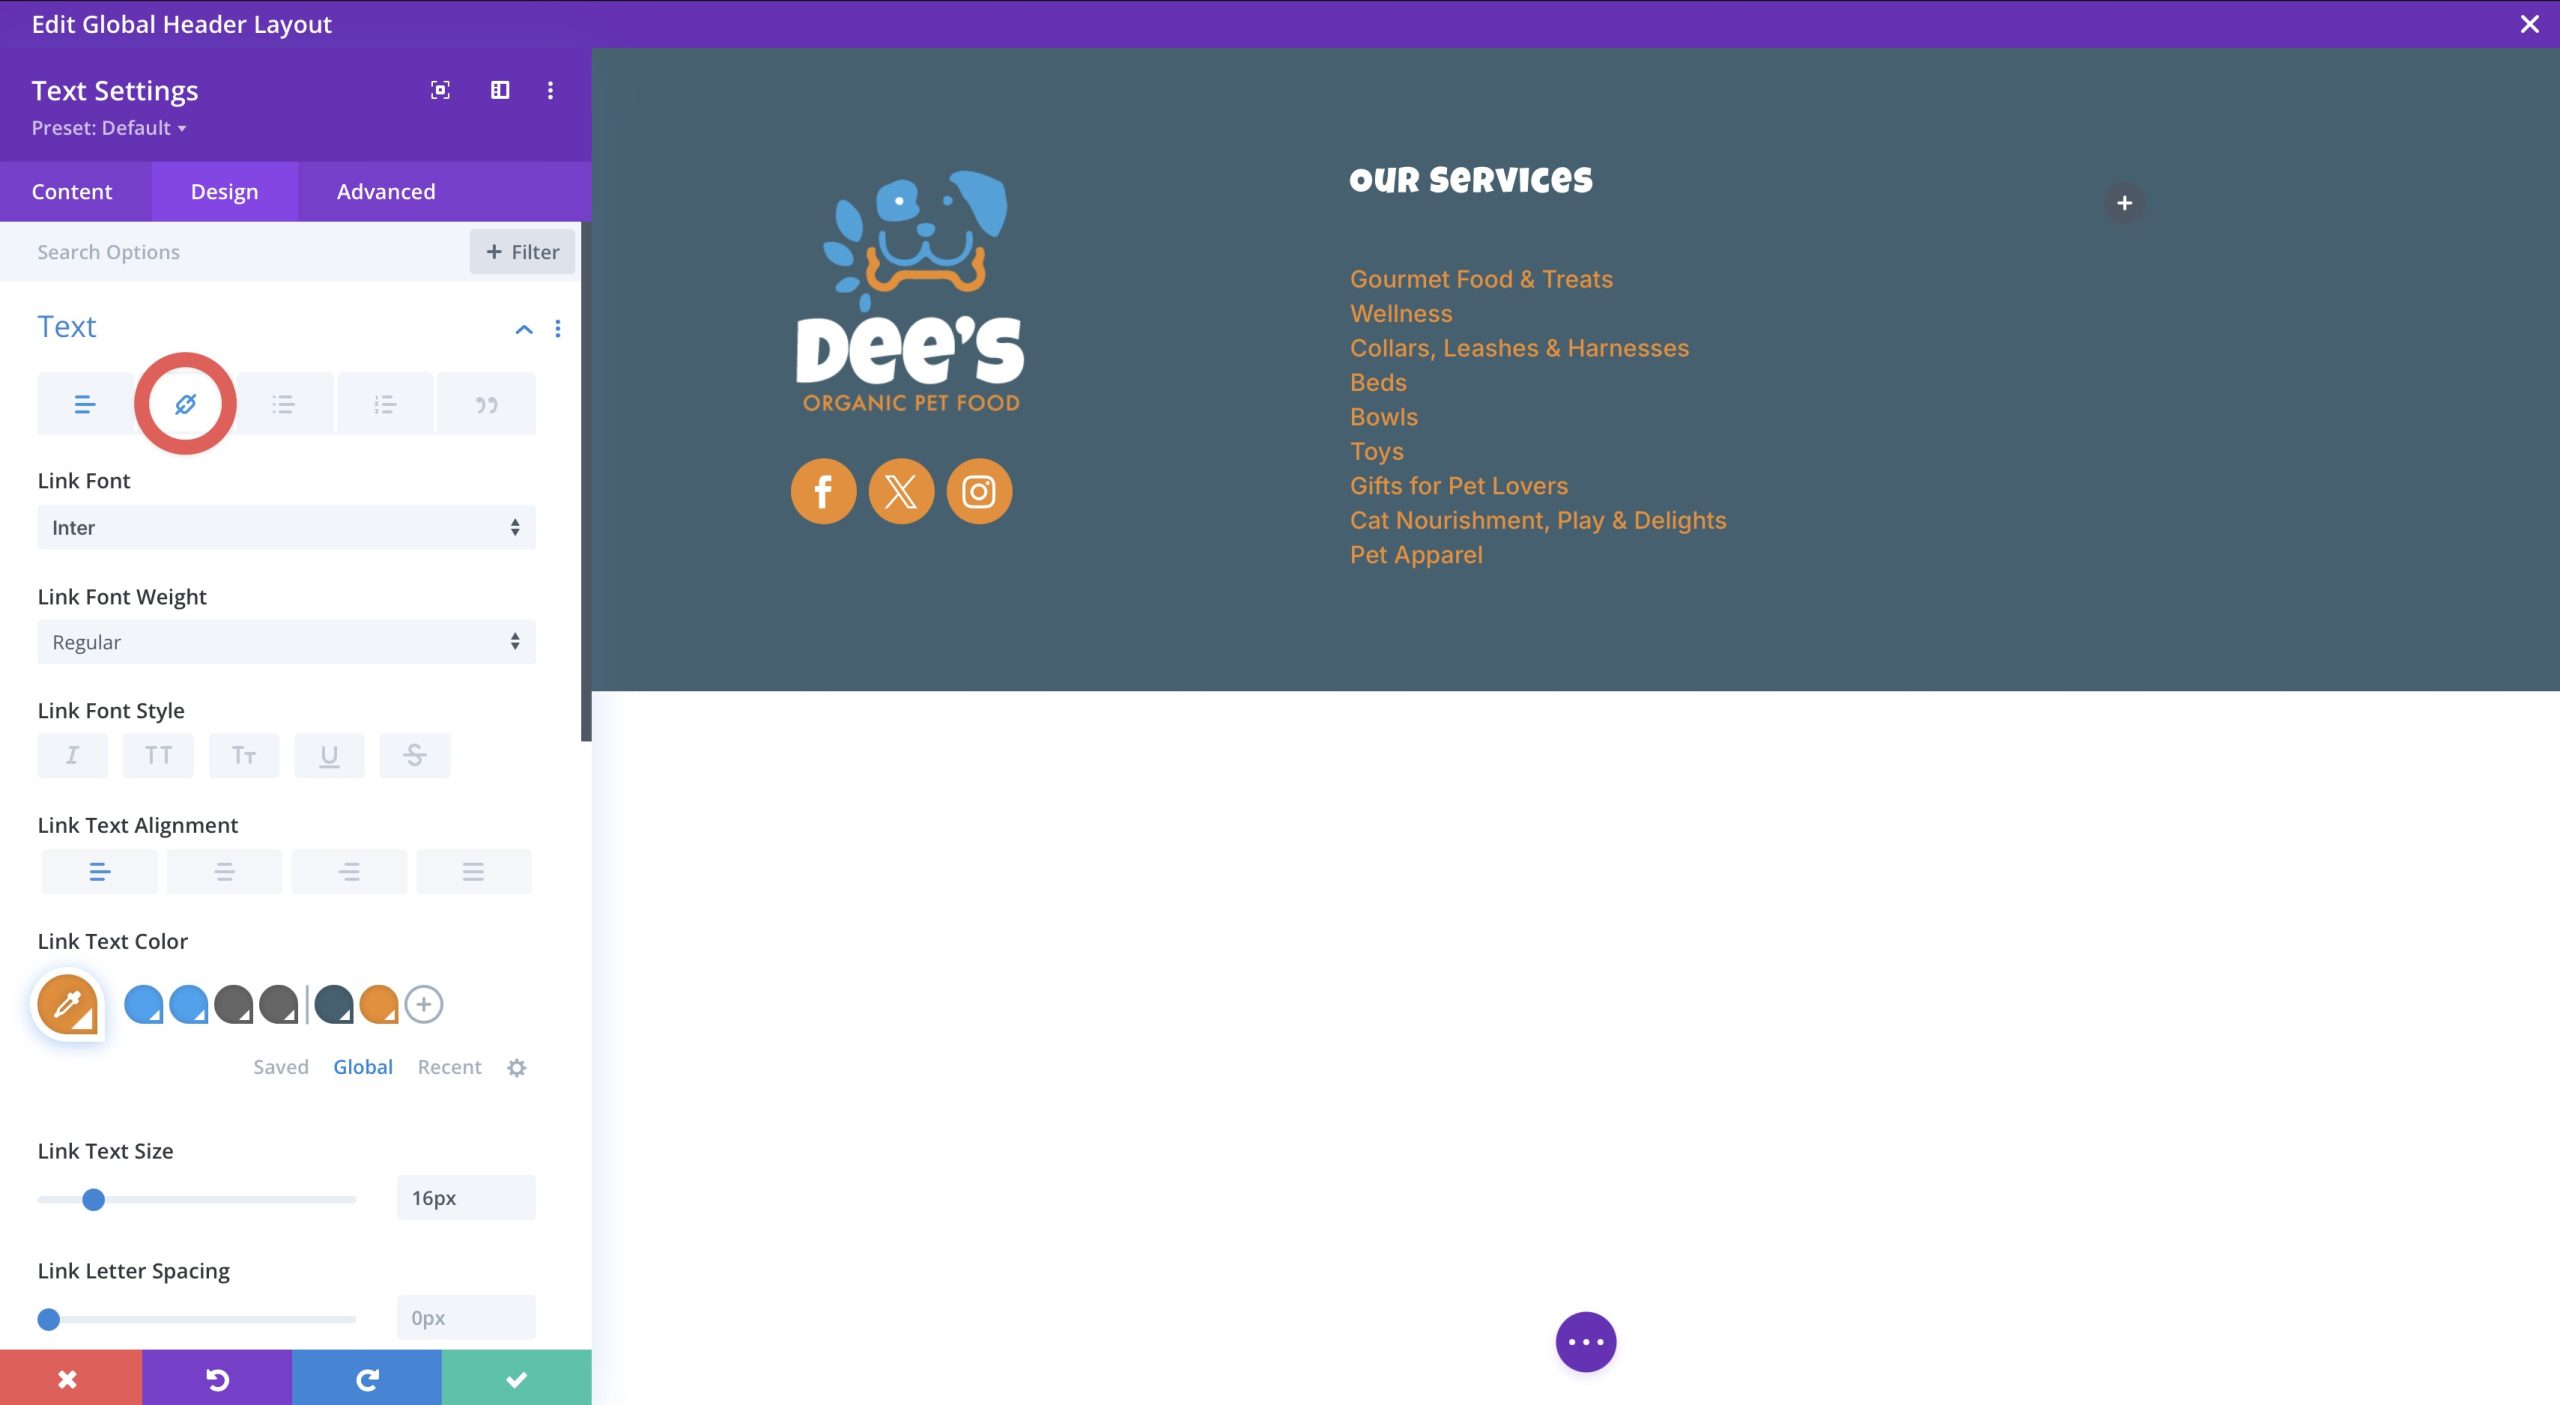
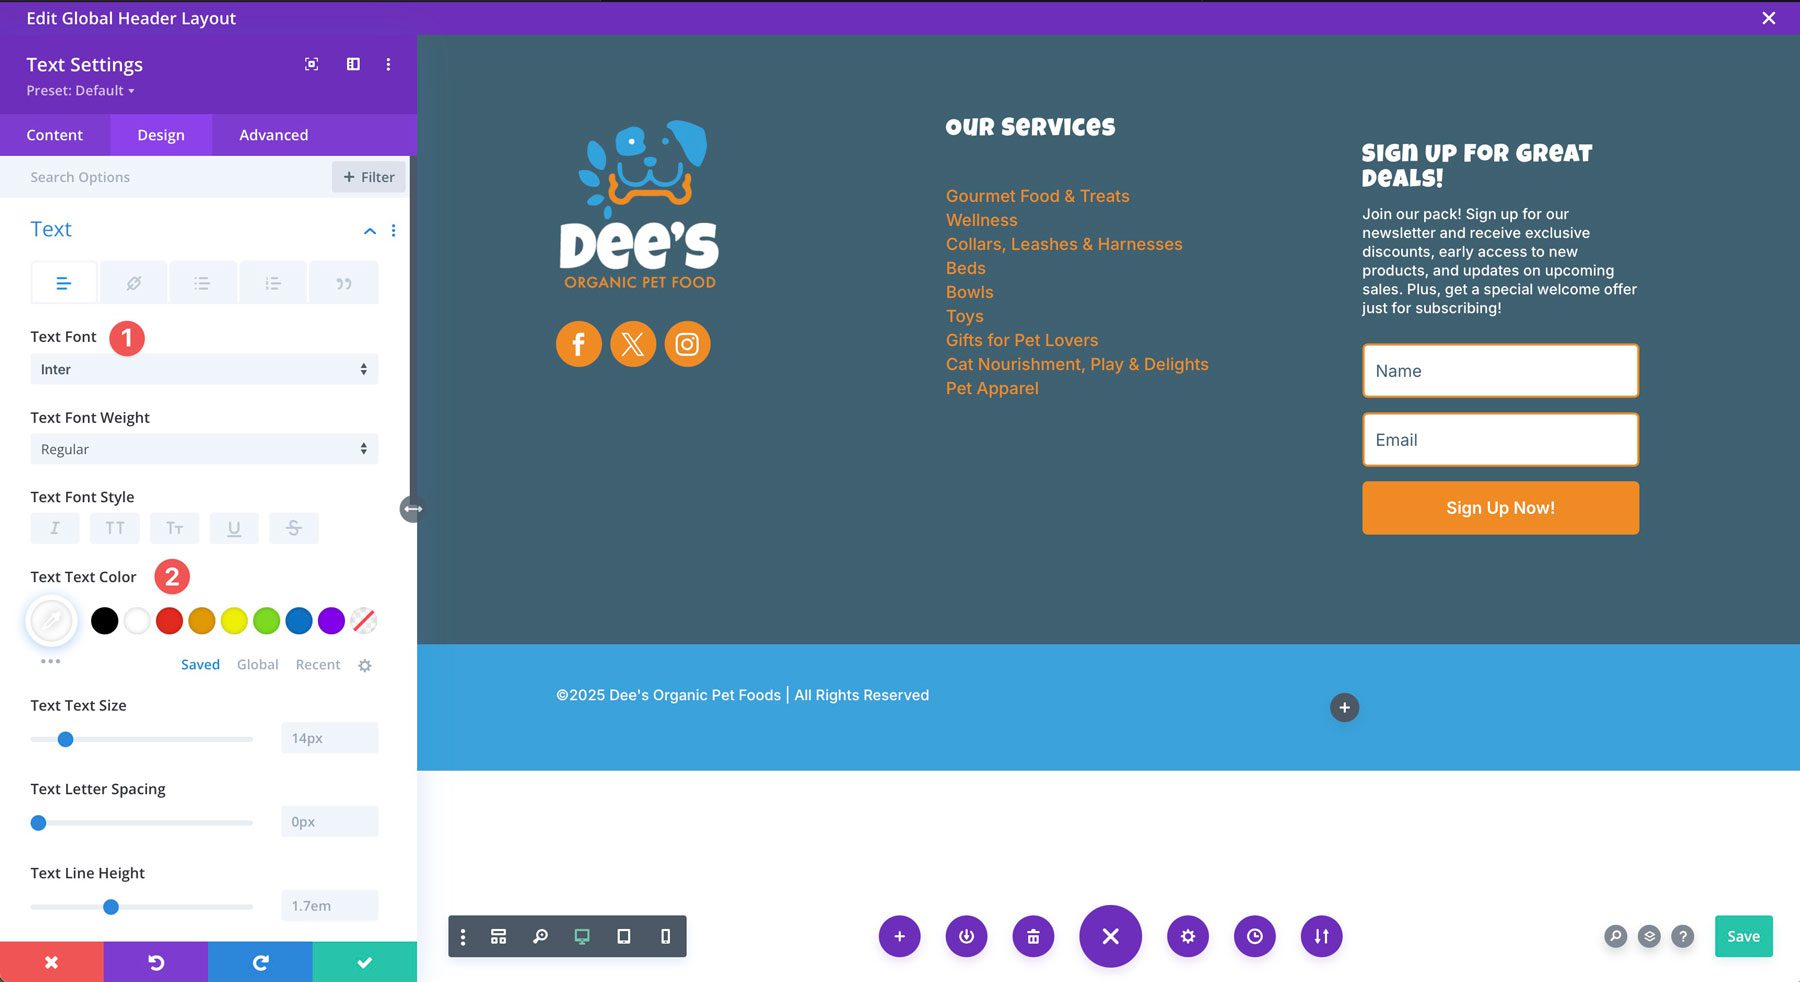
In conjunction with your links in place, click on at the design tab and add the following settings beneath the text link menu:
Text Font: Inter
Link Text Alignment: Left (desktop), middle (tablet and cell)
Link Text Color: #ee8b22
Link Text Dimension: 16px
Link Line Most sensible: 1.3em
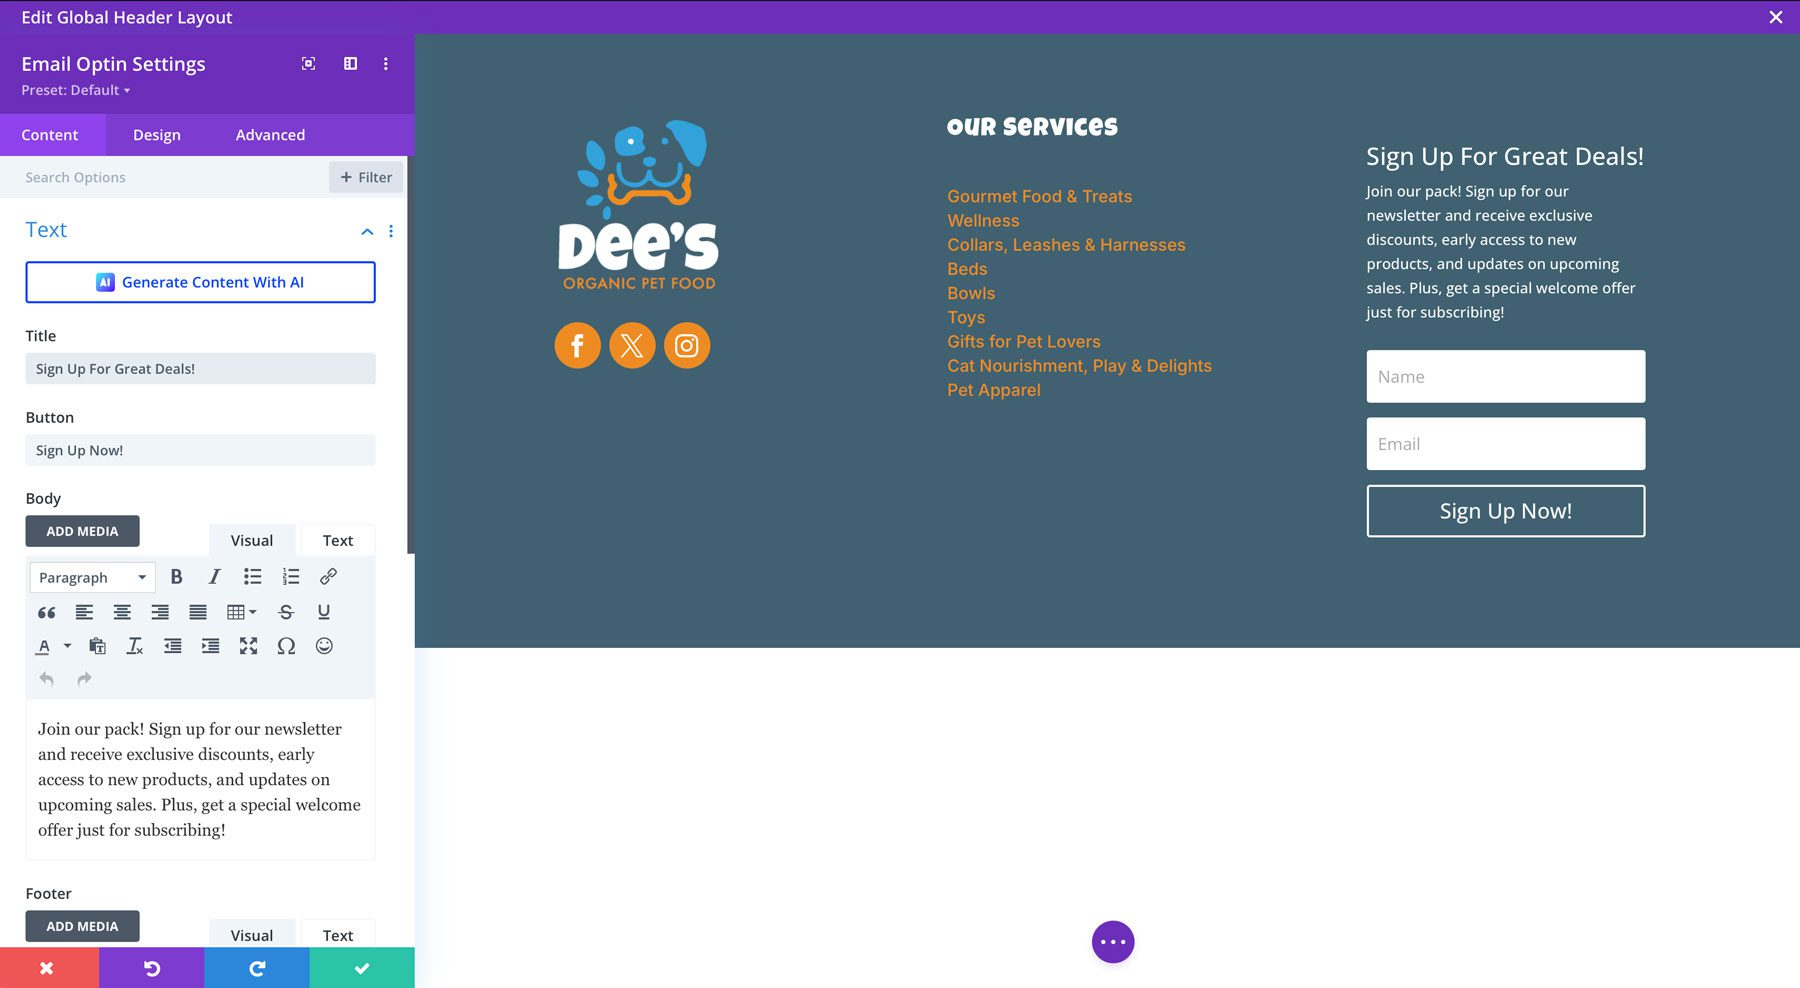
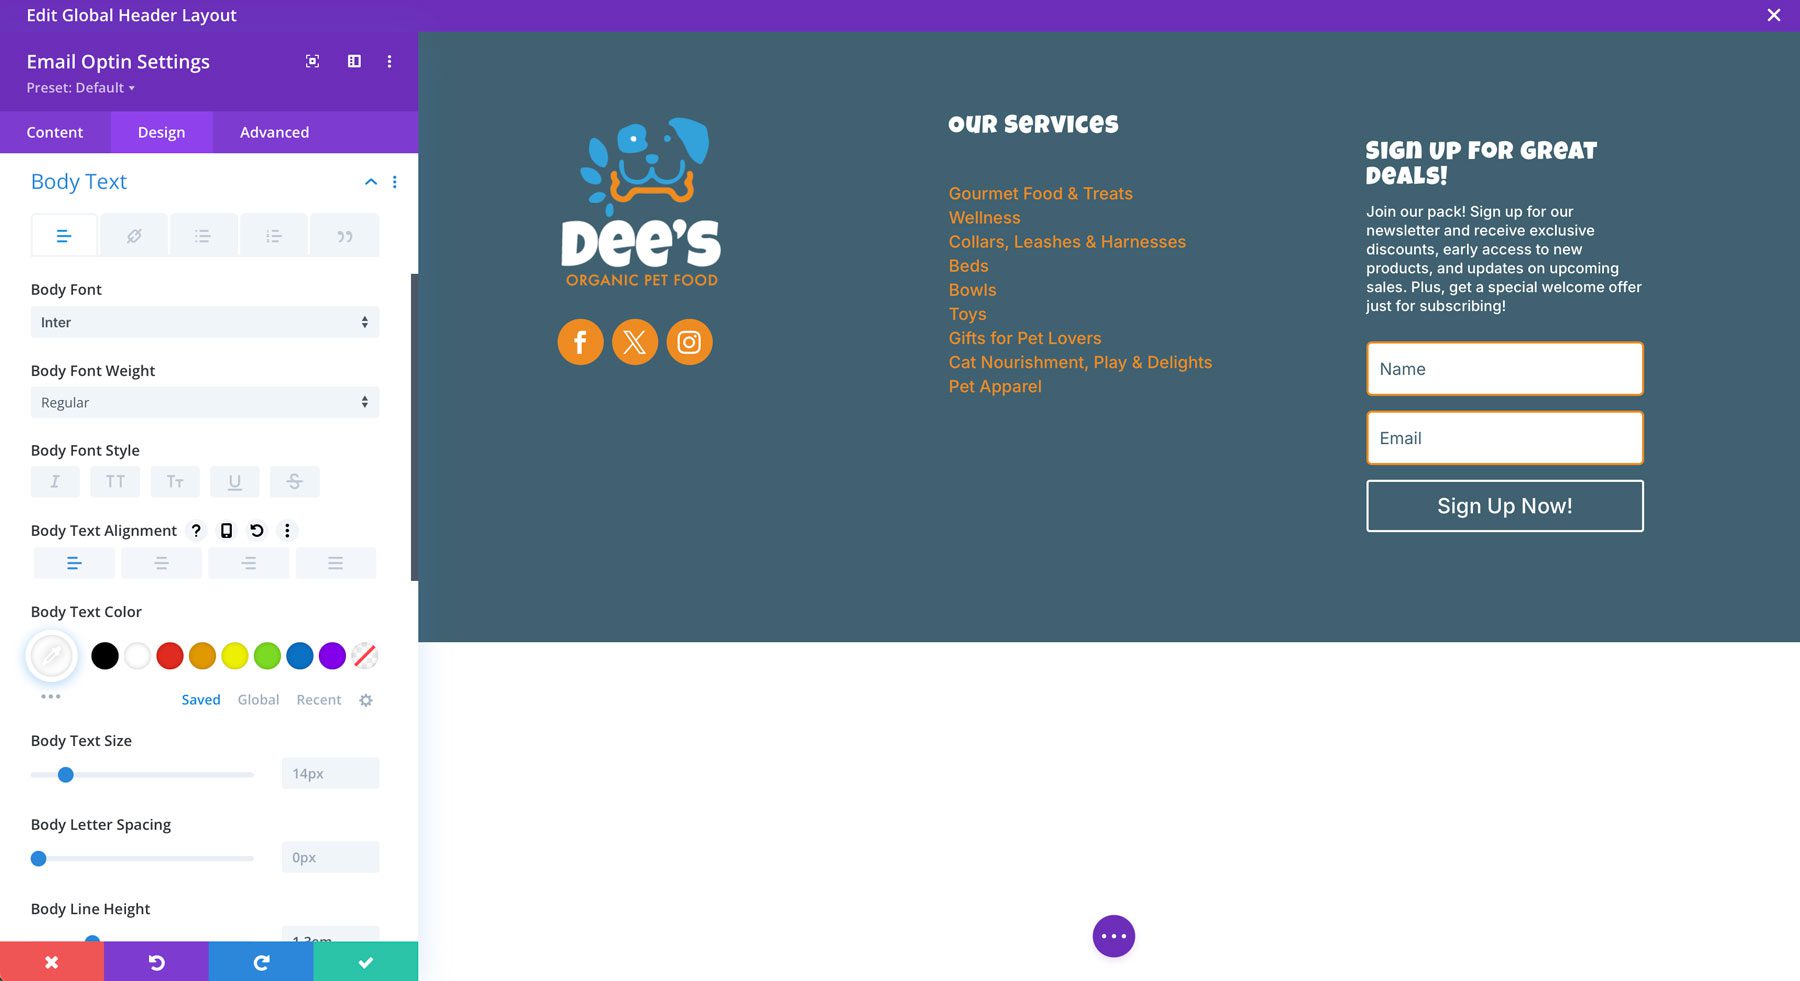
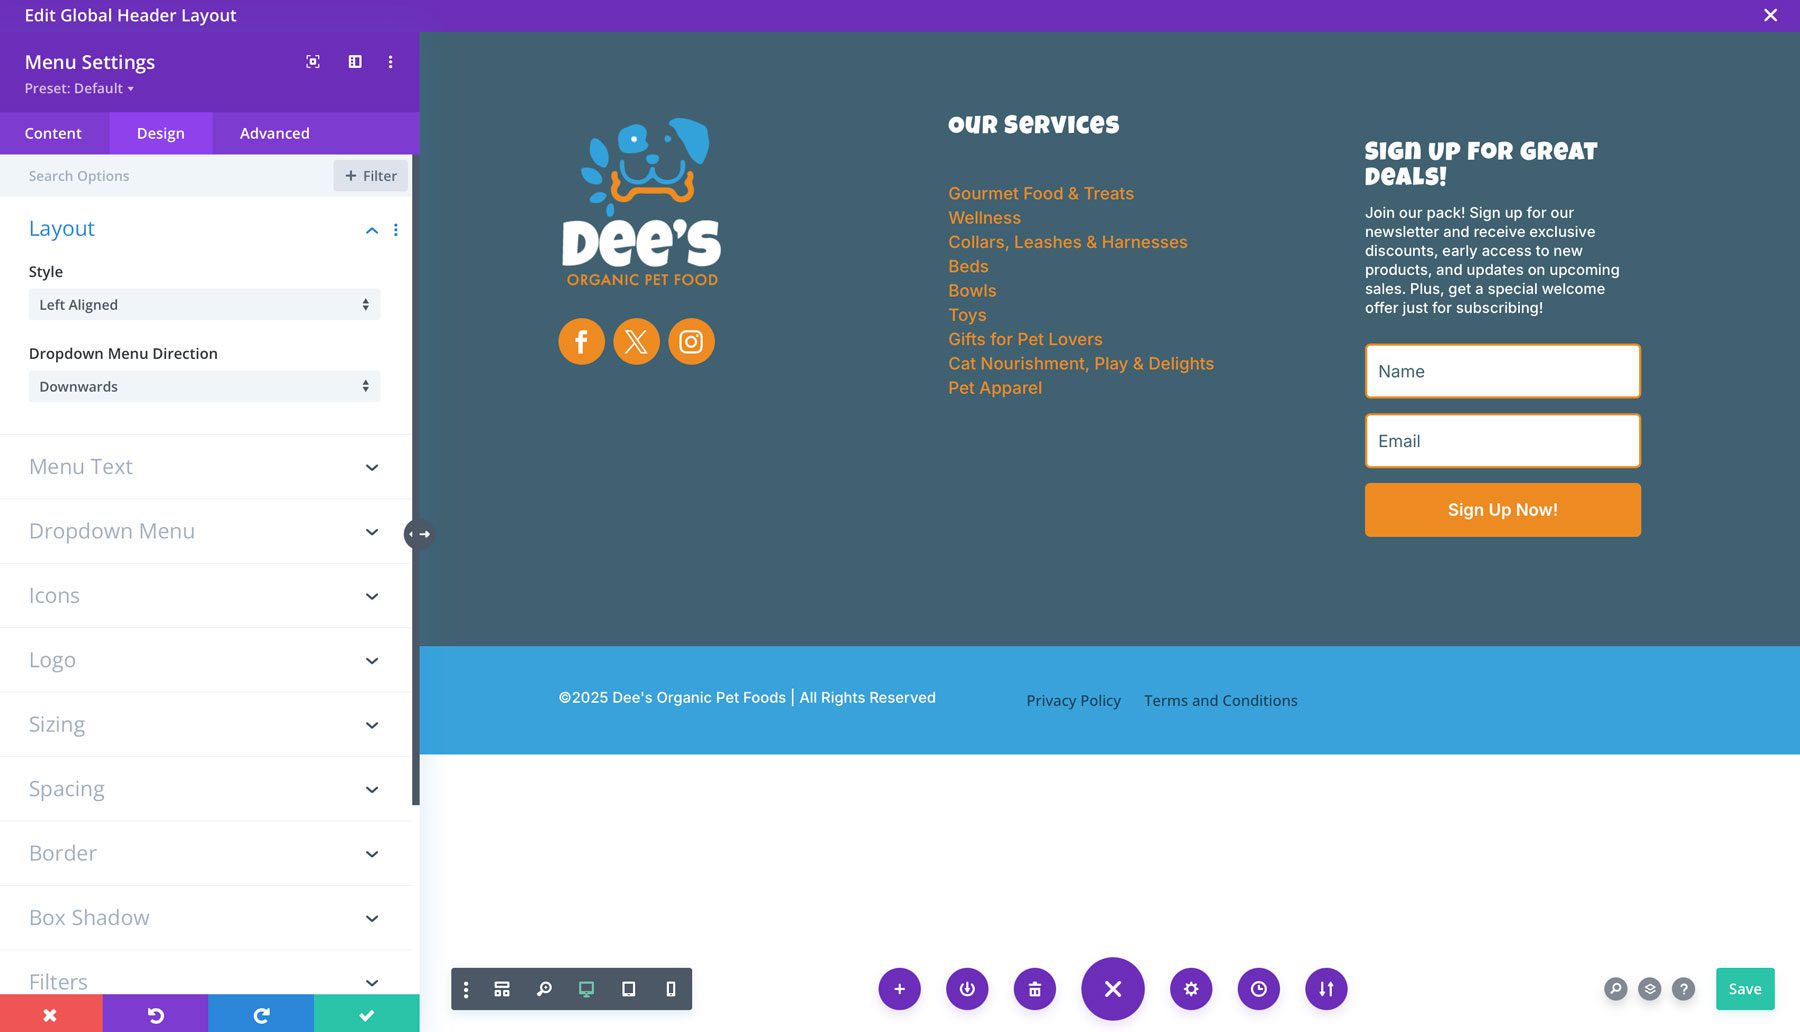
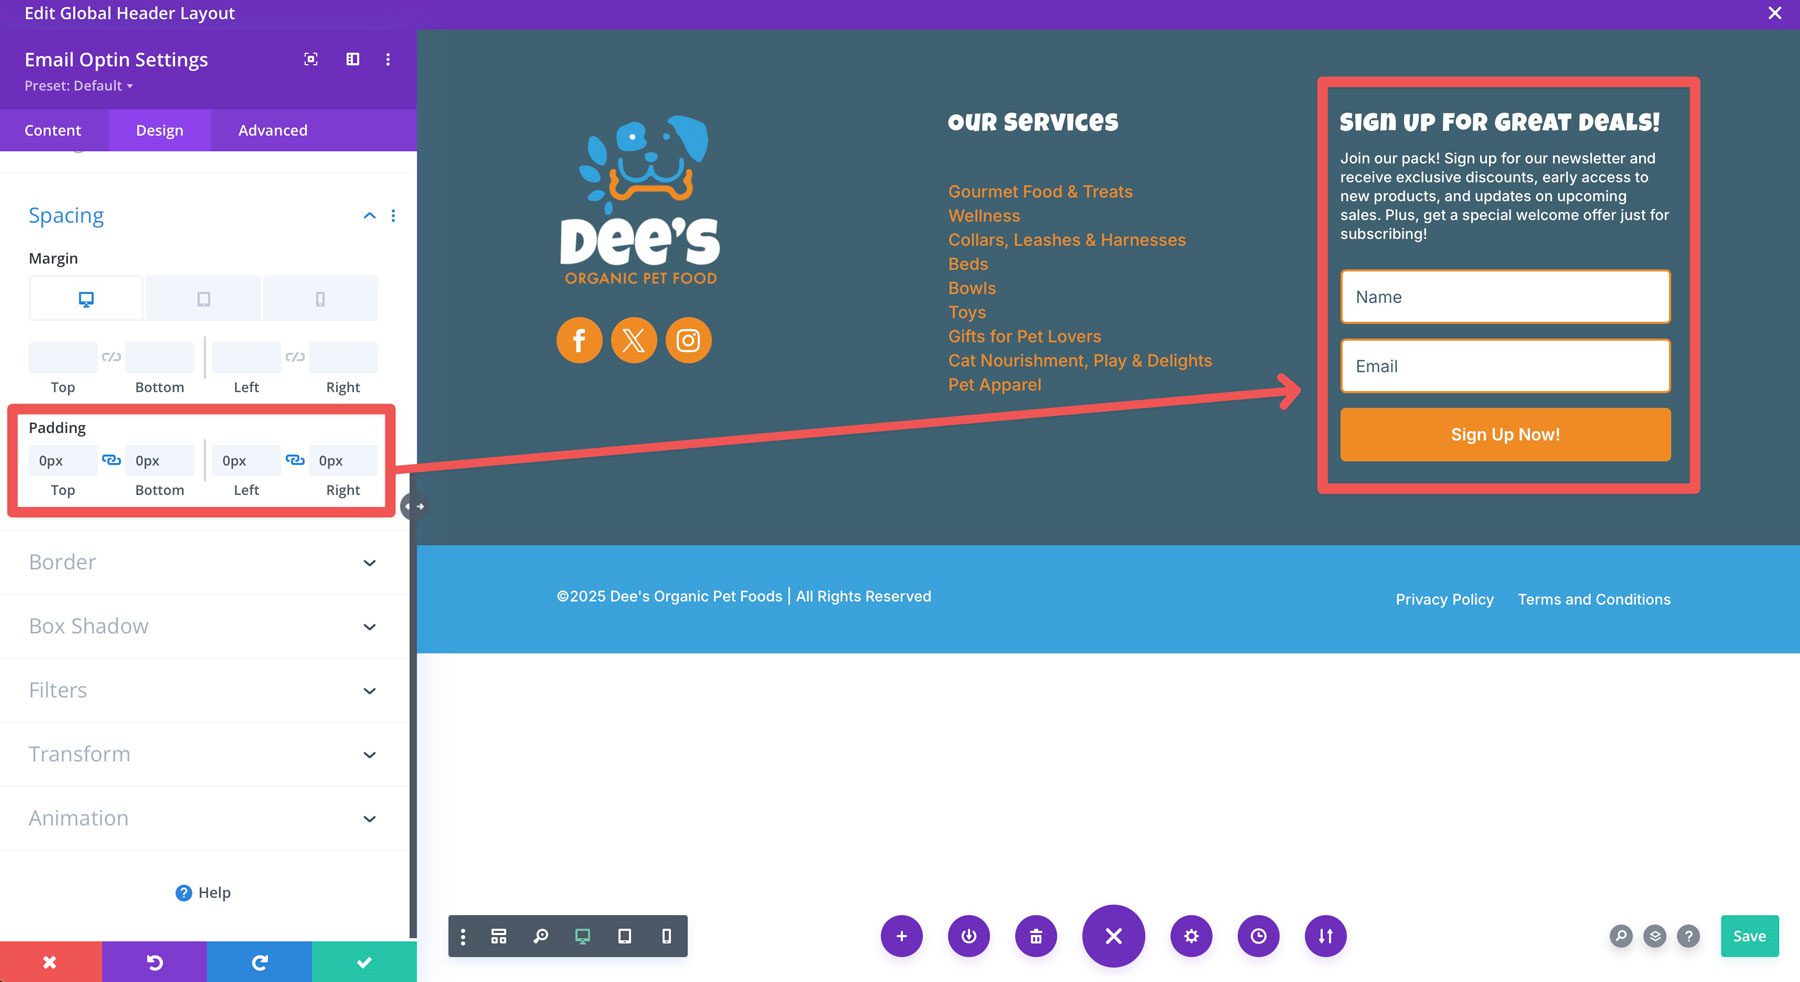
Add An Email correspondence Make a choice-in Module
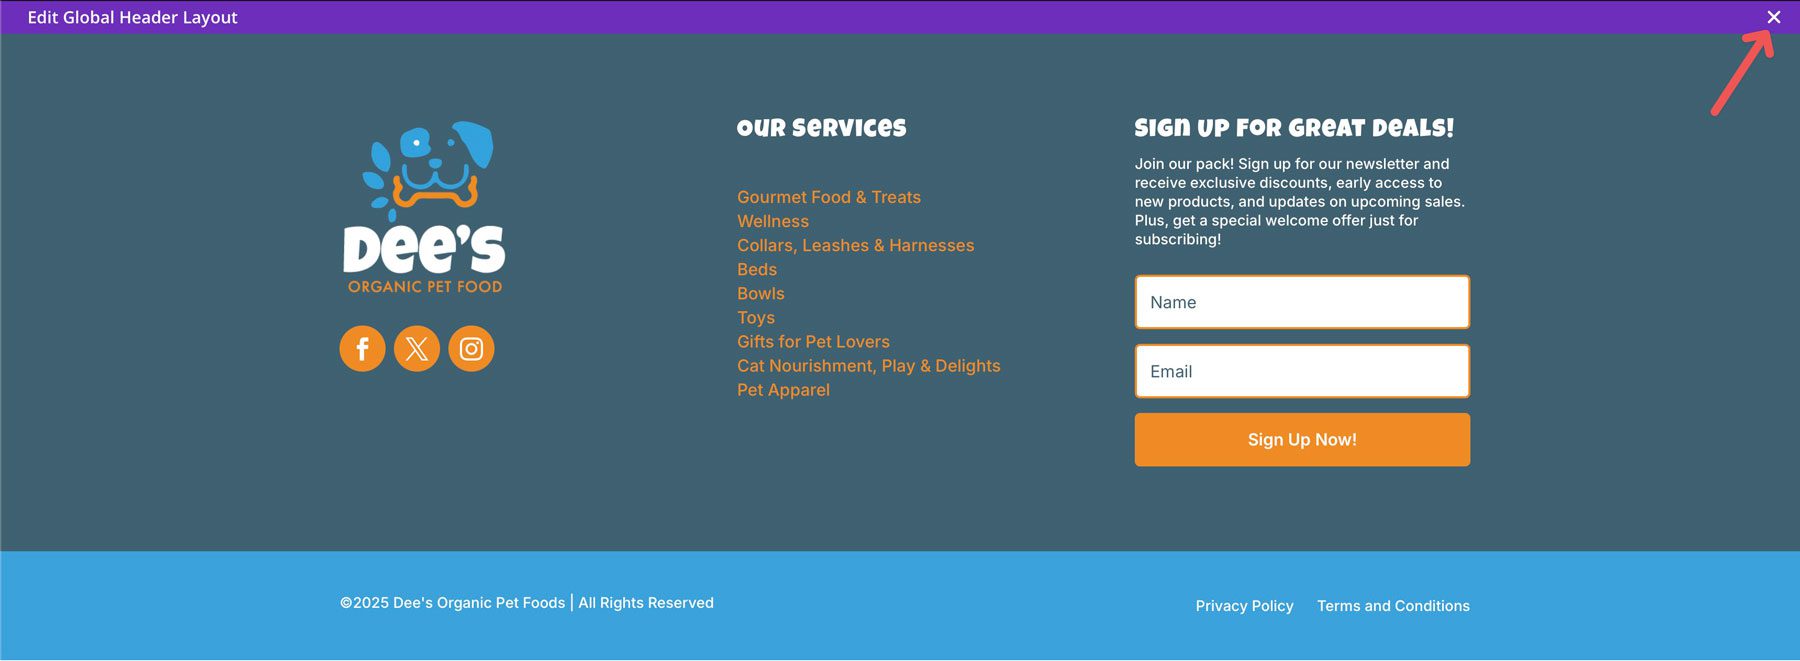
In our third column, we’ll add an piece of email opt-in module for capturing particular person data. The speculation is to get conceivable consumers to sign up for a publication to procure updates about new products and services.
Inside the content material subject material tab, add the following settings:
Title: Sign Up For Great Gives!
Button: Sign Up Now!
Body: Join our pack! Sign up for our publication and acquire distinctive discounts, early get admission to to new products, and updates on upcoming product sales. Plus, get a unique welcome offer just for subscribing!
Email correspondence Account: Choose from one in all 20+ piece of email providers, along with Mailchimp, ActiveCampaign, HubSpot, and further. If you want to have help configuring your opt-in, check out this put up.
Fields: Toggle Use Single Name Field to positive
Good fortune Movement: Make a selection to turn a message or redirect to each different URL.
Background: Transparent
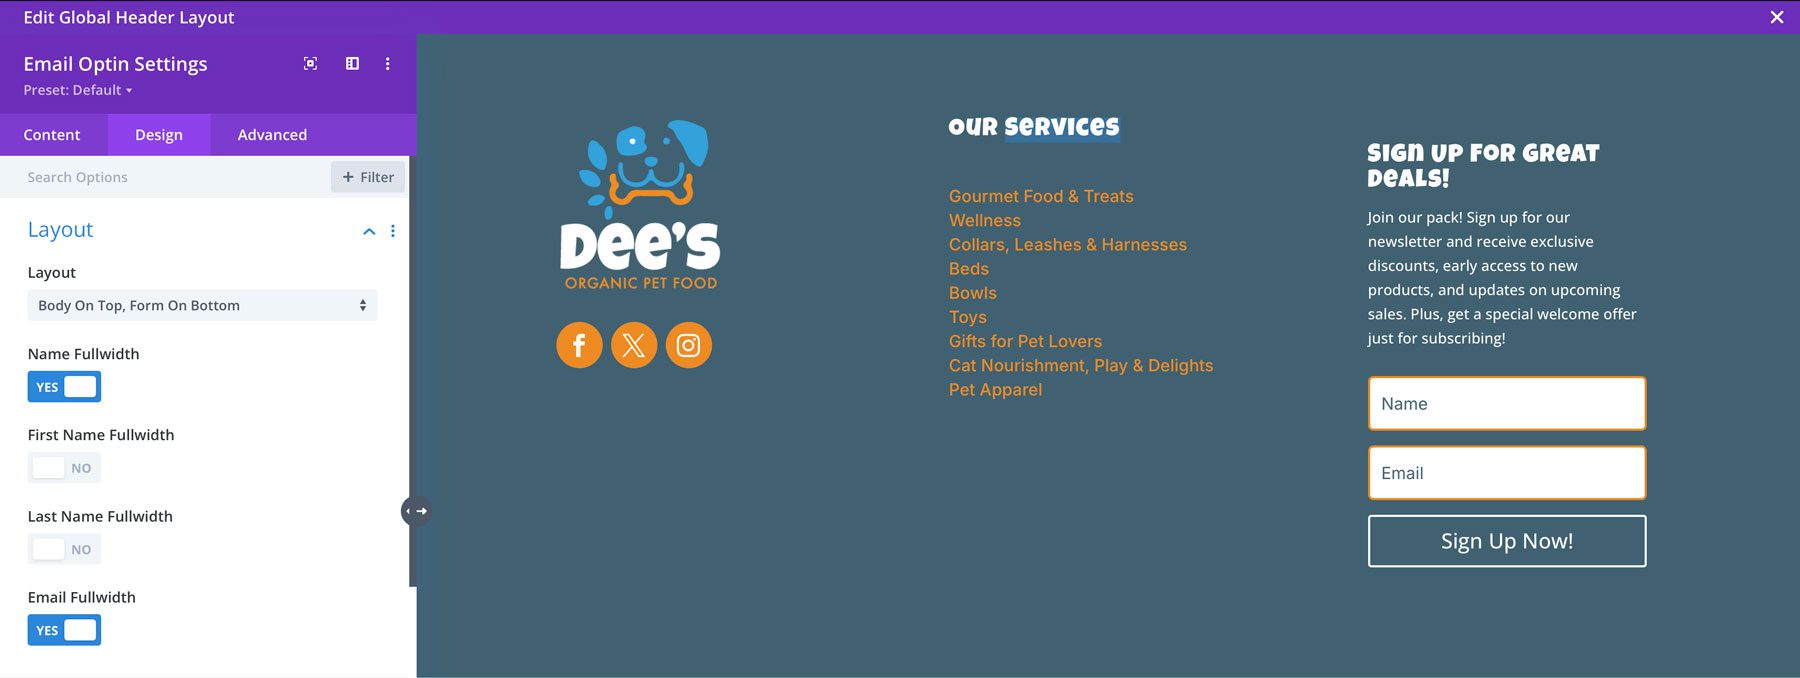
Inside the design tab, add the following construction settings:
Layout: Body on best possible, form on bottom
Name Fullwidth: toggle to positive
Email correspondence Fullwidth: toggle to positive
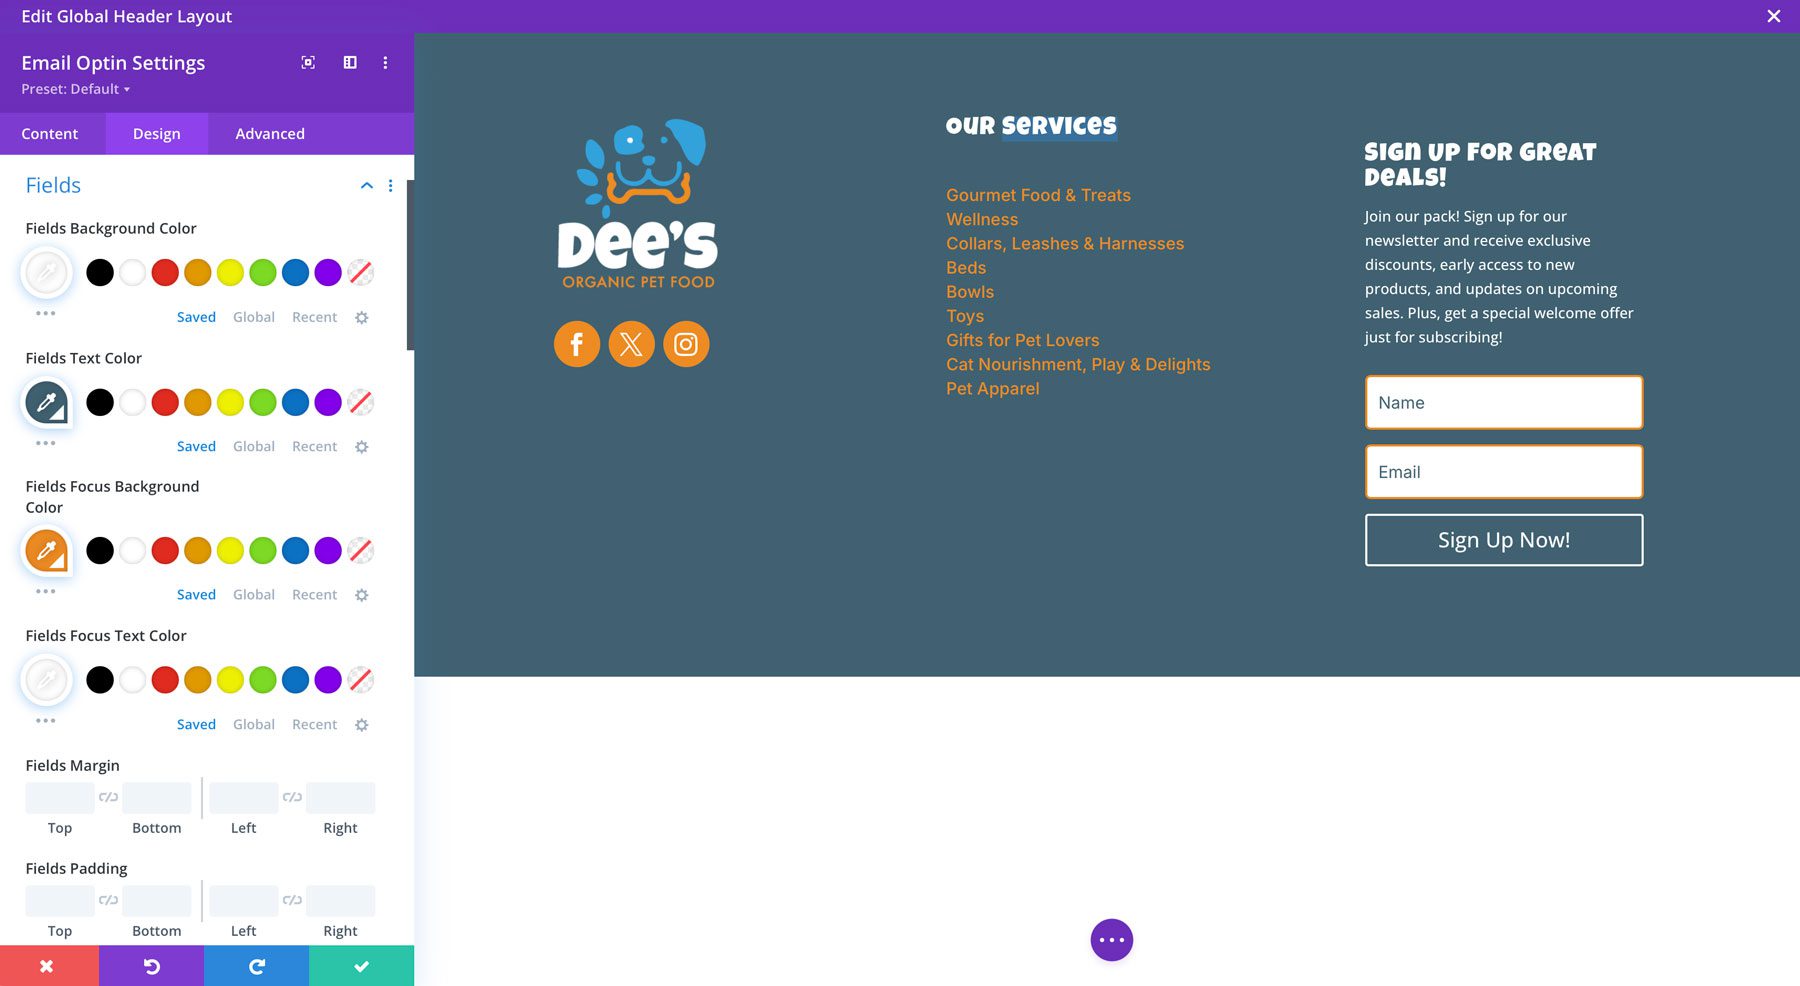
Field Settings:
Fields Background Color: #ffffff
Field Text Color: #406171
Field Point of interest Background Color: #ee8b22
Field Point of interest Text Color: #ffffff
Fields Font: Inter
Fields Rounded Corners: 5px
Fields Border Width: 2px
Fields Border Color: #ee8b22
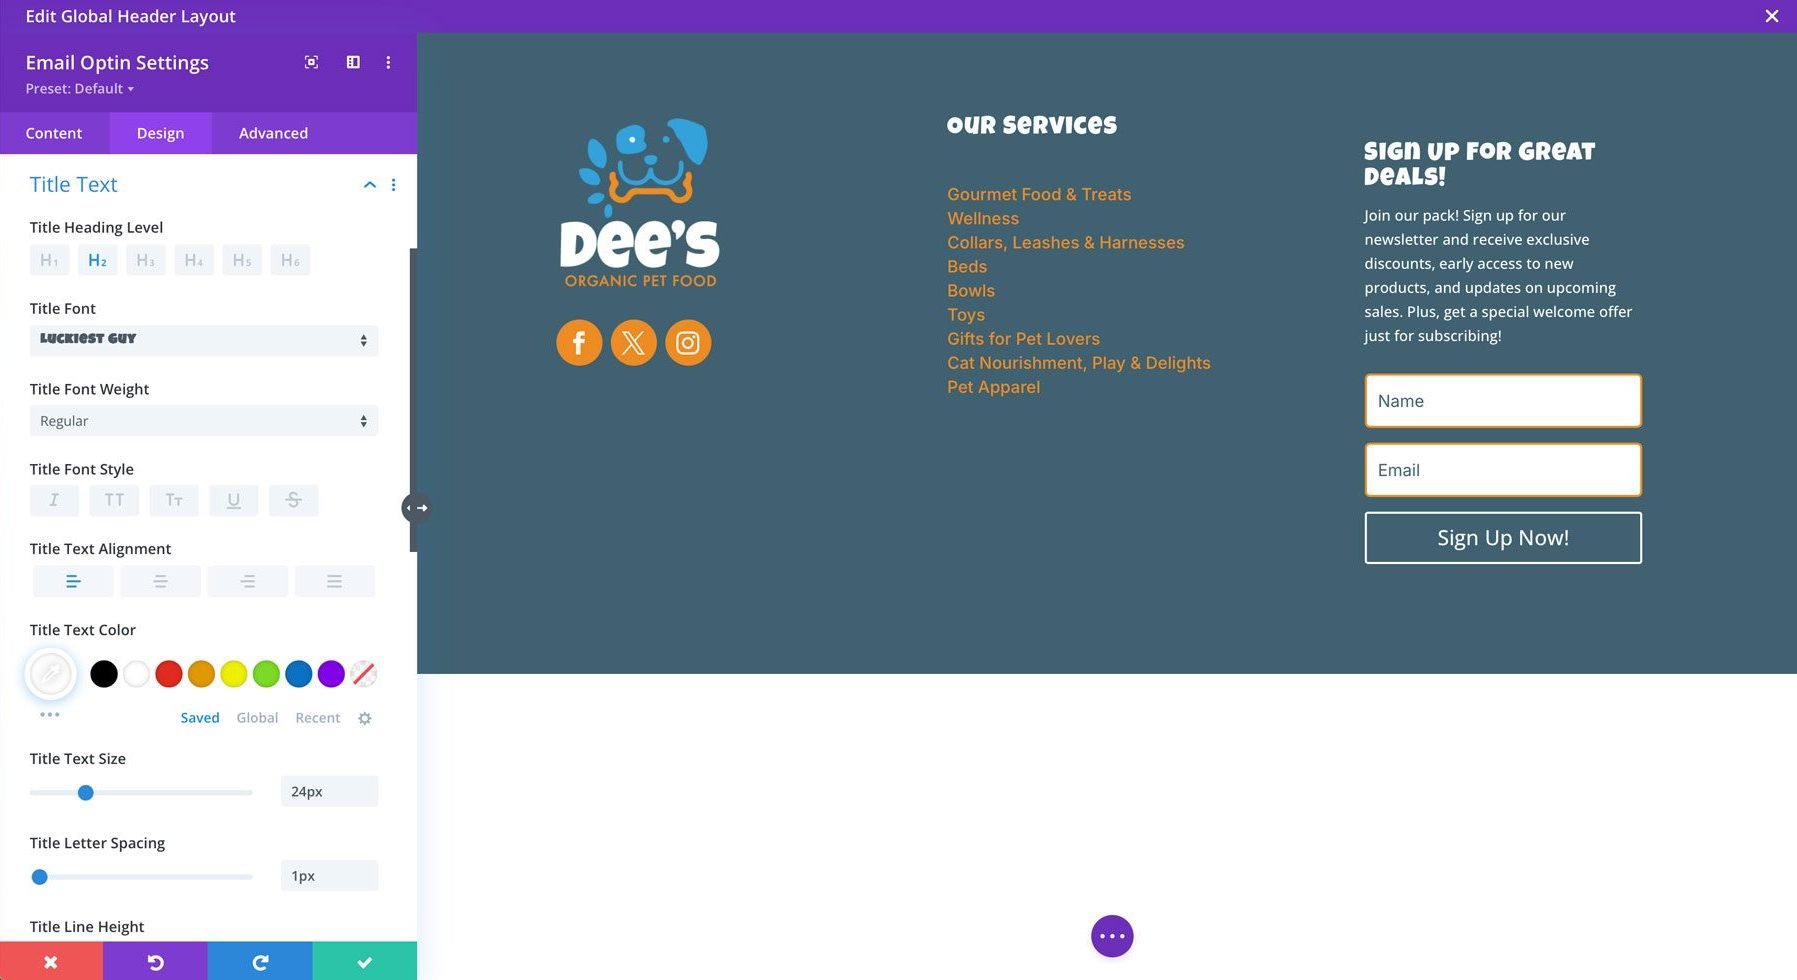
Title Text Settings:
Title Font: Luckiest Guy
Title Text Alignment: Left
Title Text Color: #ffffff
Title Text Dimension: 24px
Title Letter Spacing: 1px
Body Text Settings:
Body Font: Inter
Body Text Alignment: Left
Body Text Color: #ffffff
Body Line Most sensible: 1.3em
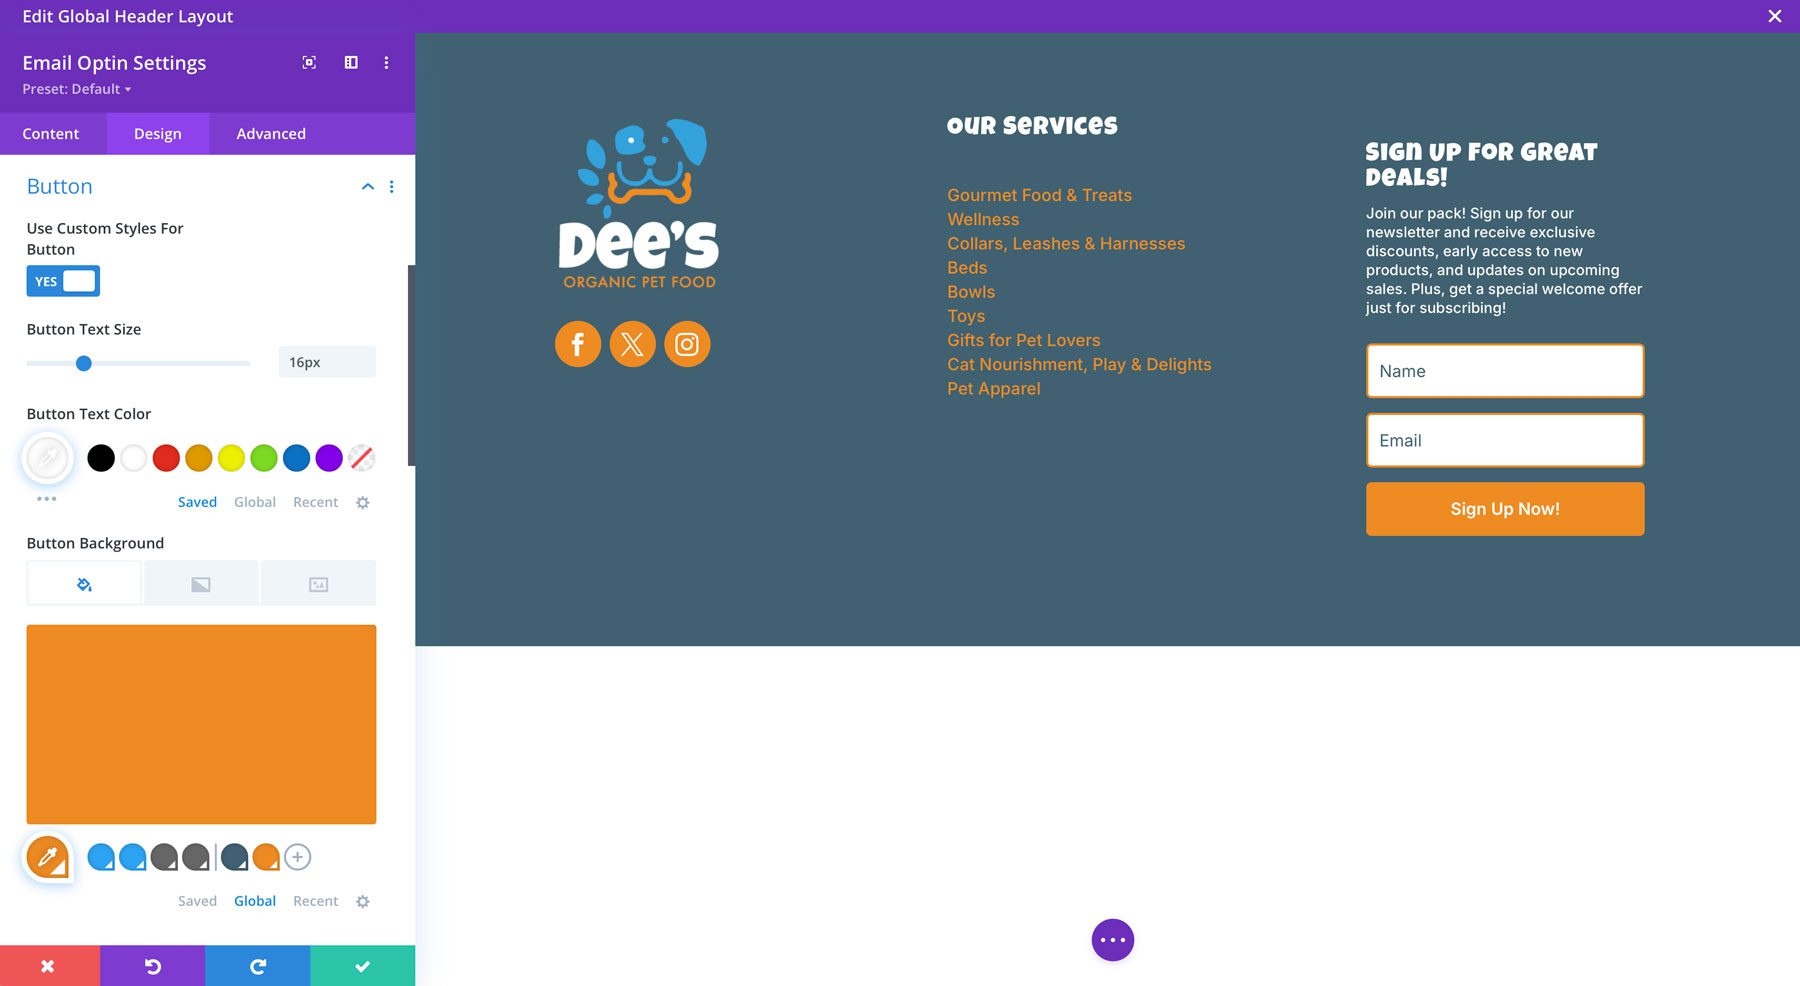
Button Settings:
Use Custom designed Types For Button: Toggle to positive
Button Text Dimension: 16px
Button Text Color: #ffffff
Button Background: #ee8b22
Button Border Width: 0px
Button Border Radius: 5px
Button Font: Inter
Button Font Weight: Semibold
Show Button Icon: No
Button Padding: 12px (best possible & bottom)
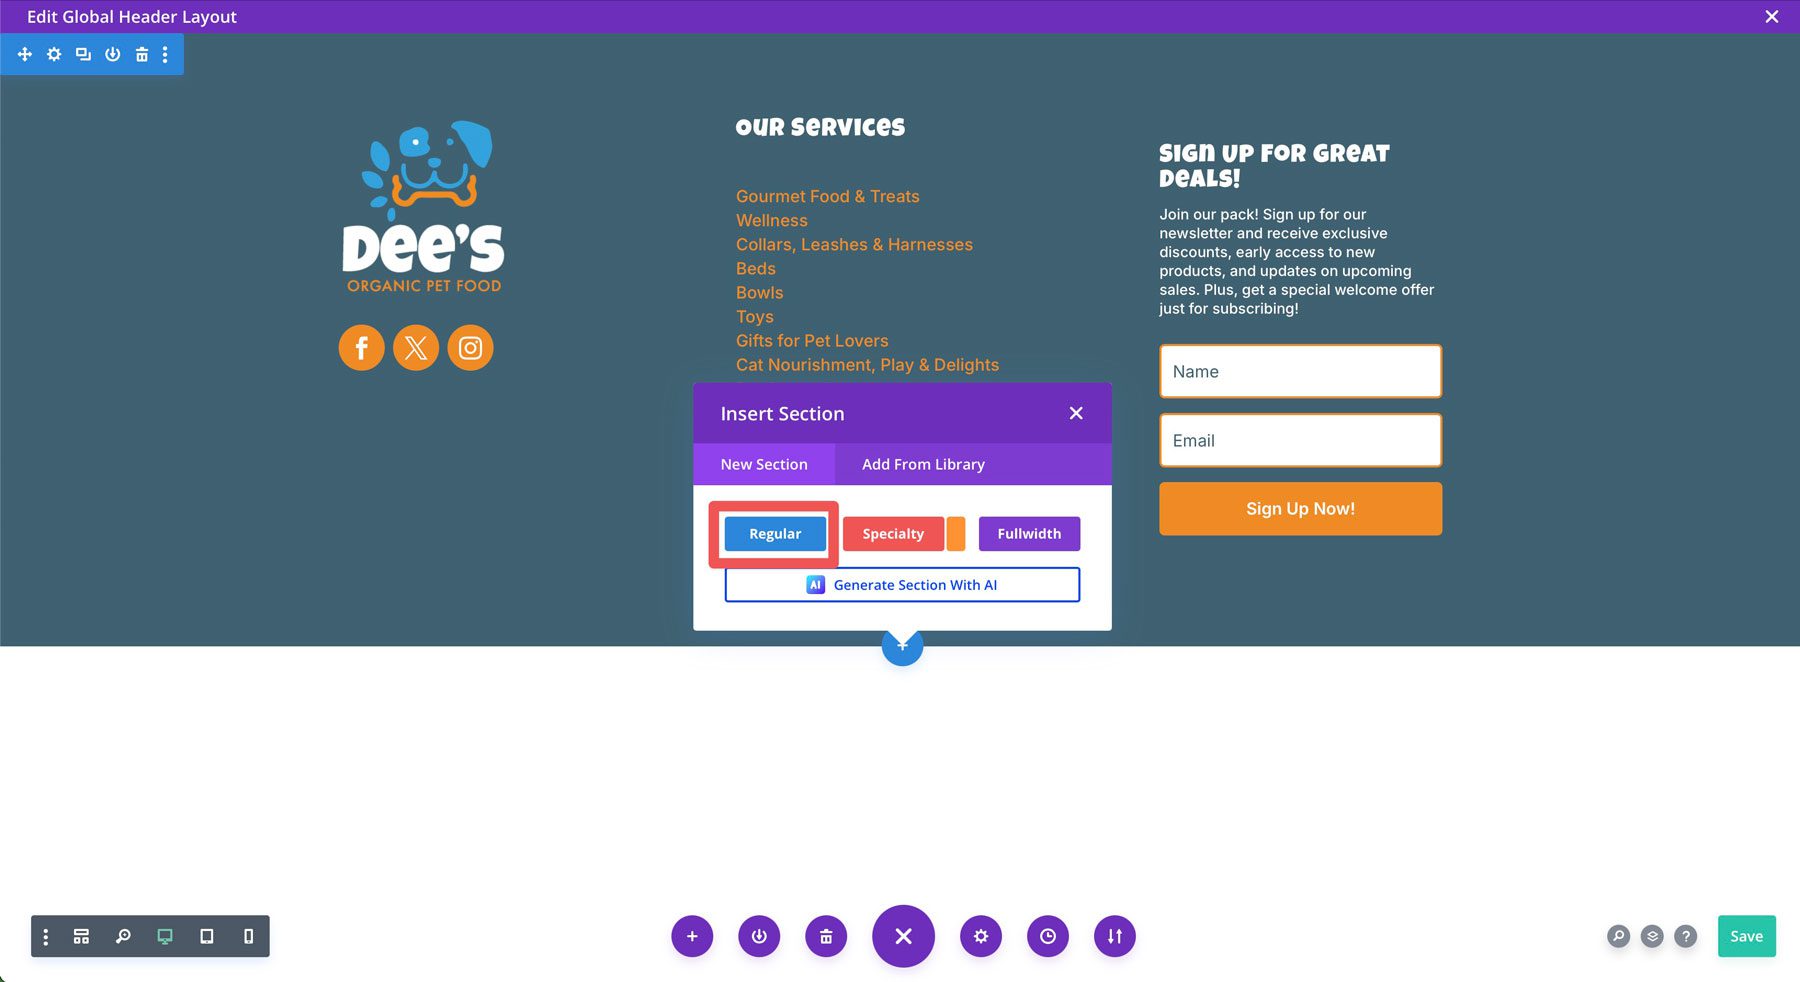
Add A New Section
In any case, we’ll wish to add a brand spanking new segment for copyright wisdom and our words of supplier menu to our footer. Click on at the blue icon beneath the existing segment and choose a not unusual segment.
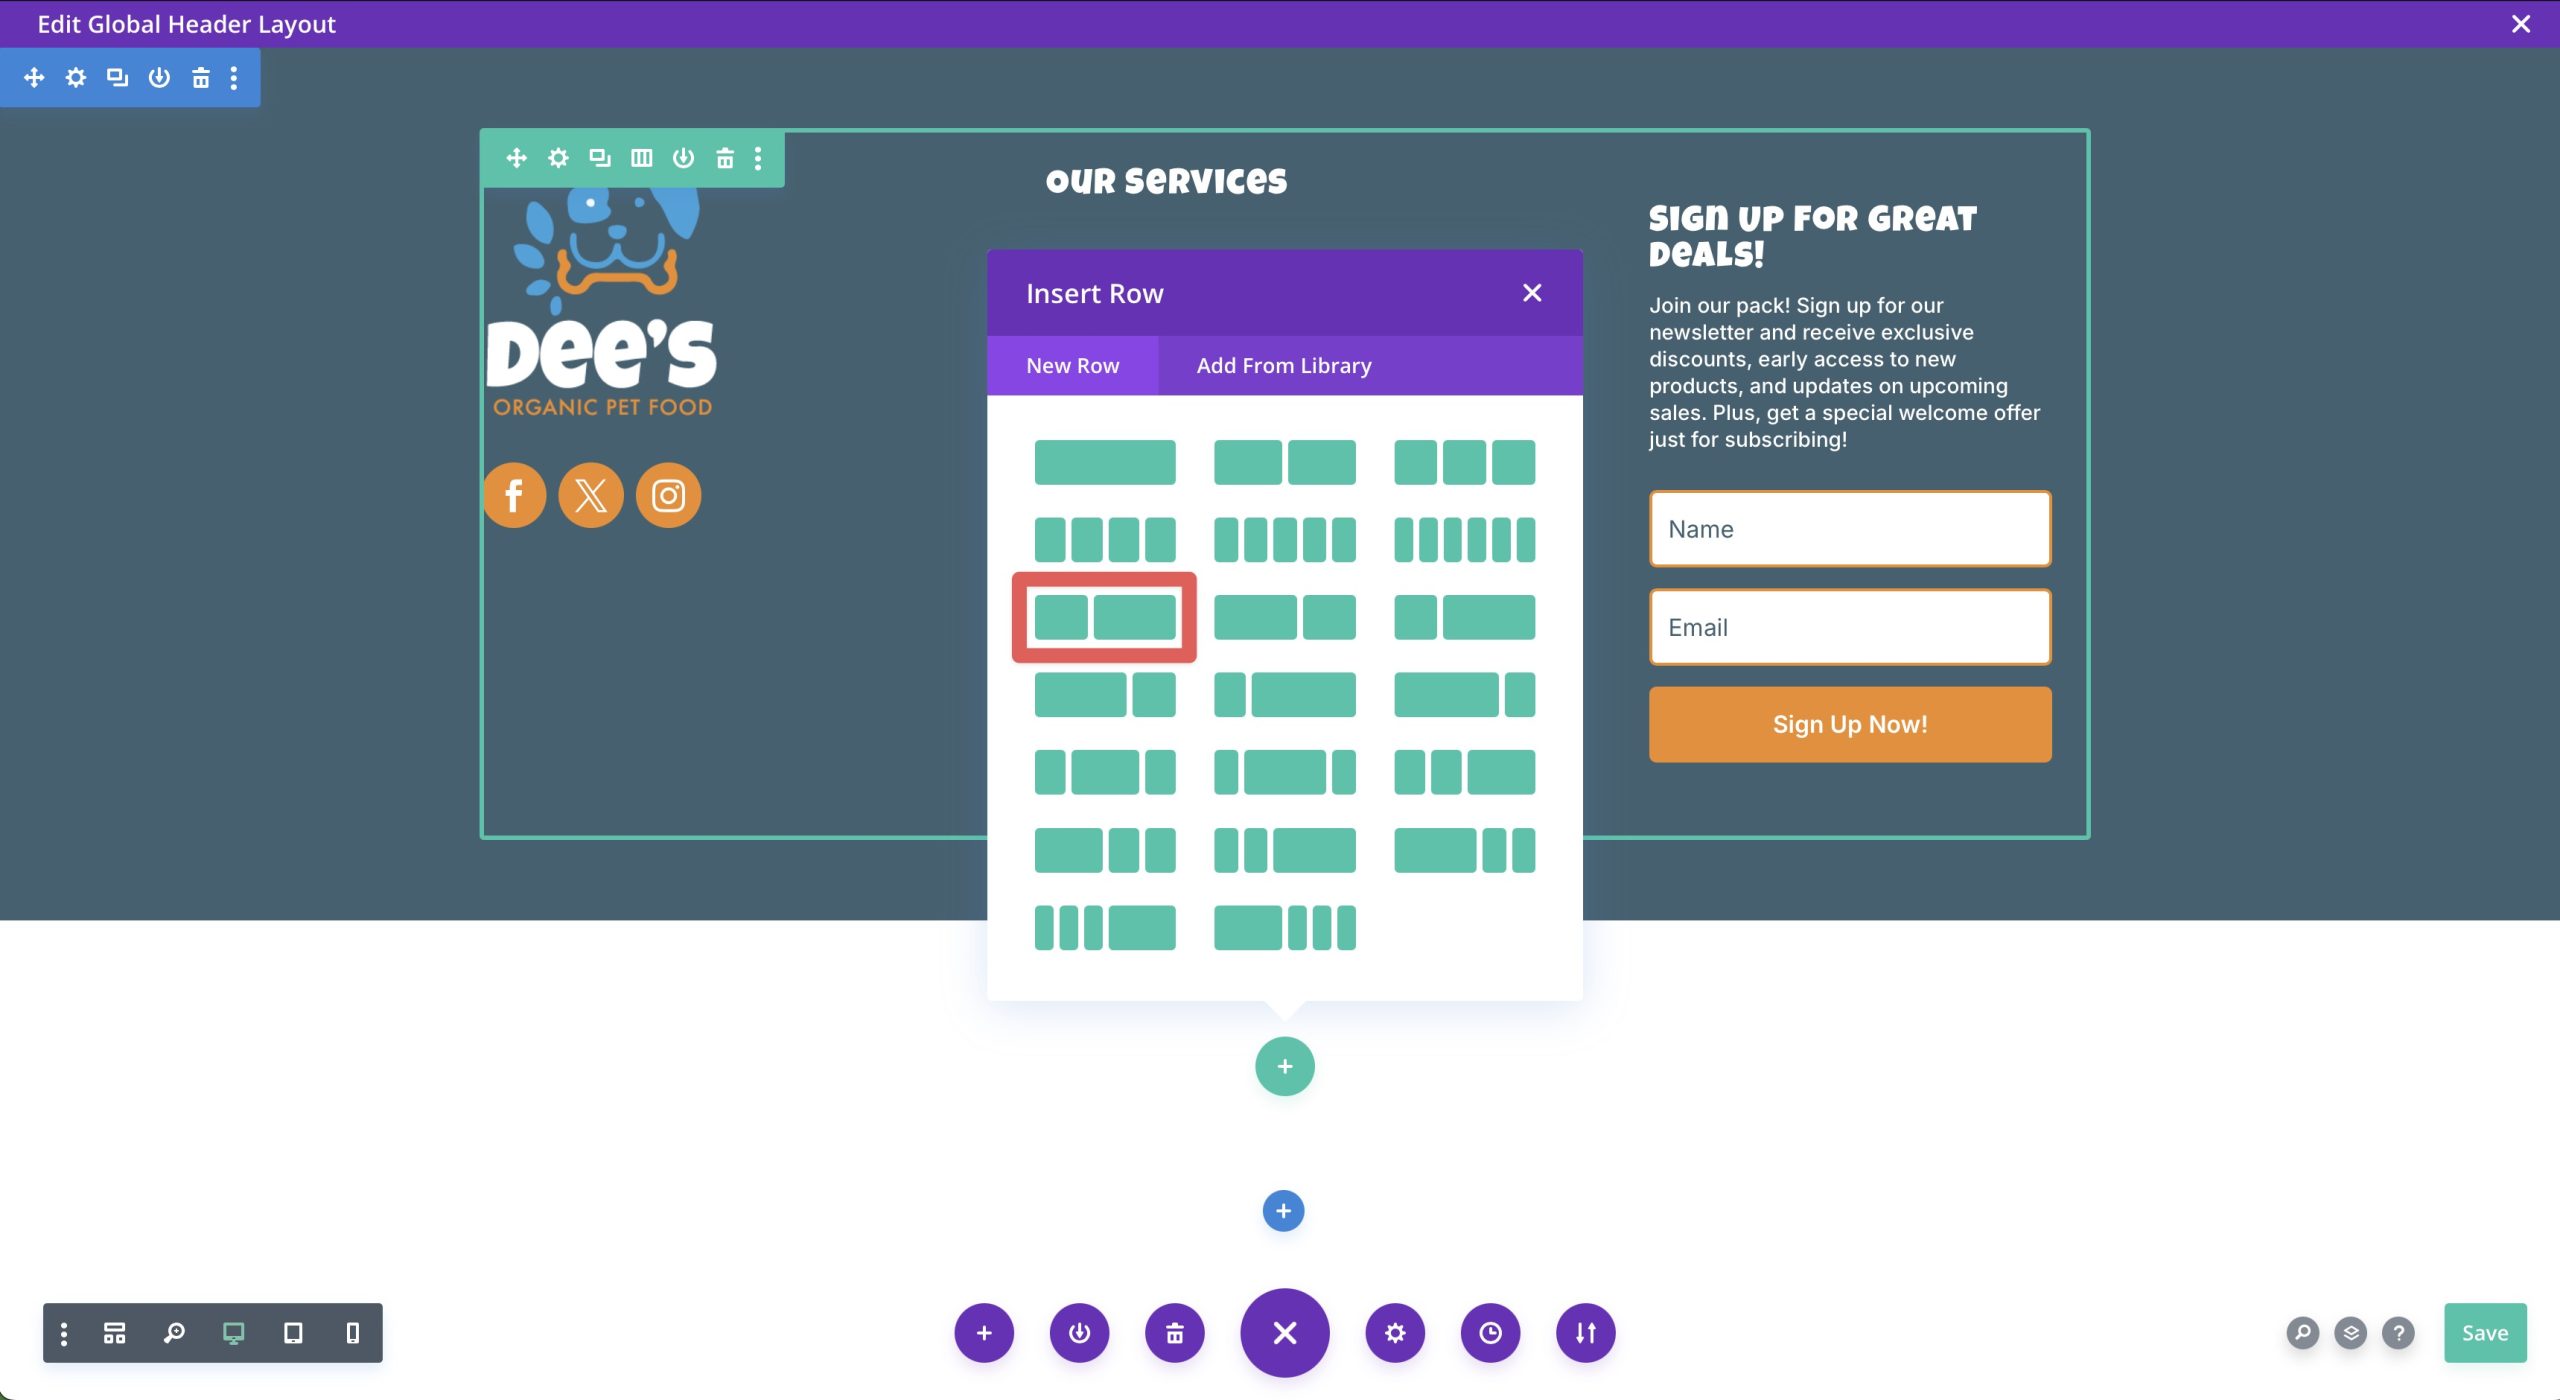
Make a selection a 1/3 + / 2/3 column row.
Set the segment’s background color to #38a2db and the spacing (inside the design tab) to 10px best possible and bottom, and then save the changes.
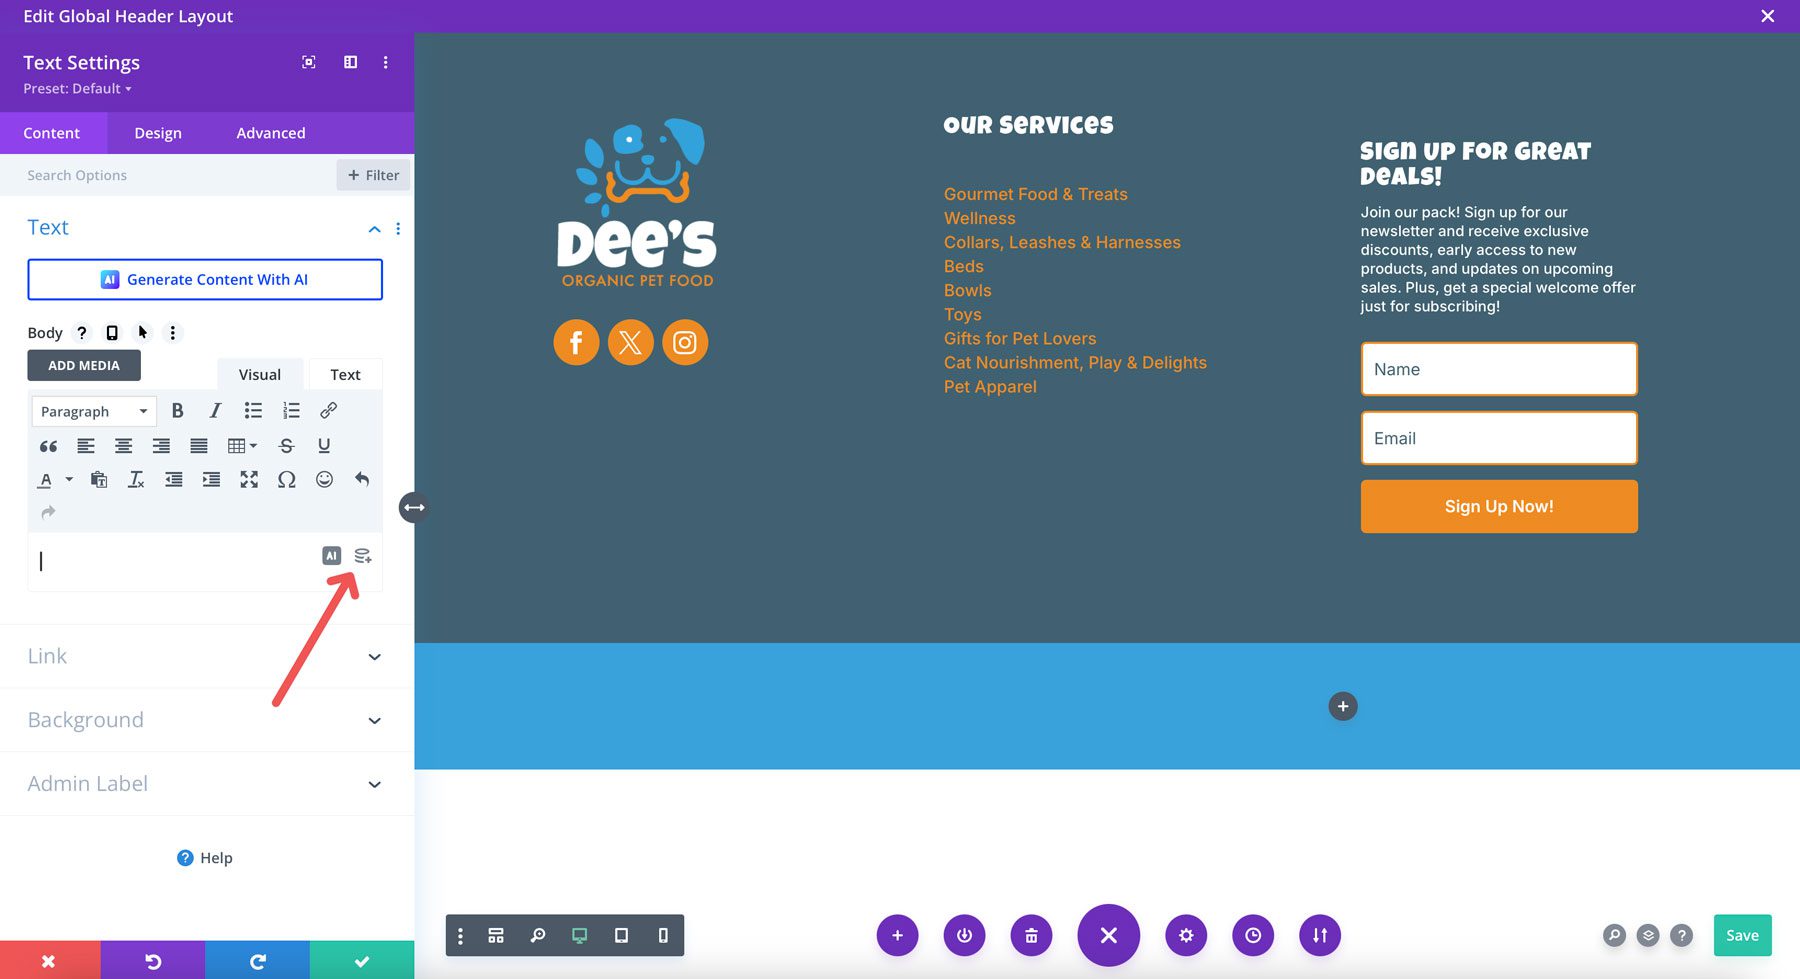
Add a text module to the left column. As a substitute of together with text inside the body, click on at the dynamic content material subject material icon. We’ll add our copyright wisdom proper right here so that it updates every year without you manually changing it.
When the dialog box turns out, choose provide date from the tick list of alternatives.
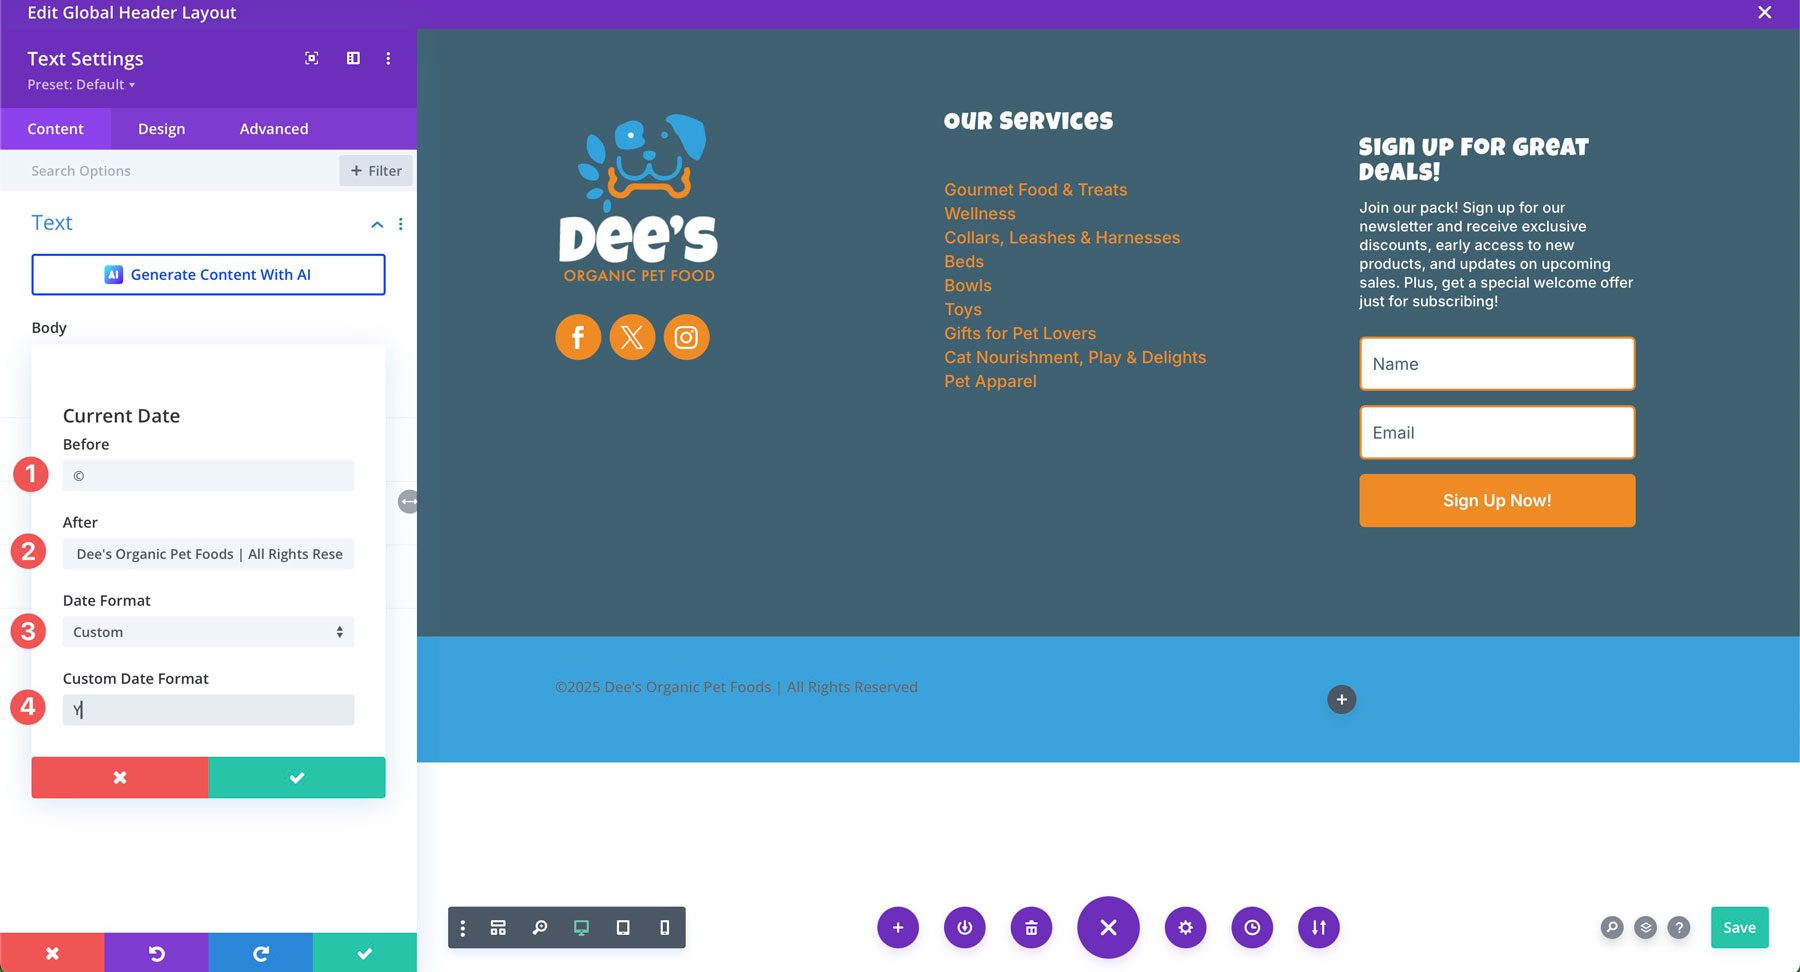
When the text dialog box turns out, enter the following settings:
Previous than: Copyright symbol (selection + G on your keyboard)
After: Your online business determine. Remember to go away a space previous than entering text!
Date Construction: Custom designed
Custom designed Date Construction: Y
Save the changes previous than heading to the design tab to style your text. On the design tab, go away all settings at their default settings, excluding for making the text #ffffff and changing the font family to Inter.
The rest module so that you could upload to our footer is a menu module. We’ll add it to the right kind column of our new segment. You’ll have to create a menu prior to now by the use of navigating to Glance > Menus. This footer menu must include any prison wisdom on your site, similar to a privacy protection or words and necessities internet web page.
With the menu module’s settings full of life, choose the following alternatives:
Menu: Make a choice your prison wisdom menu
Background: Transparent
Inside the design settings, choose the following settings:
Layout:
Full of life Link Color: #ffffff
Menu Font: Inter
Menu Text Color: #ffffff
Text Alignment: Correct
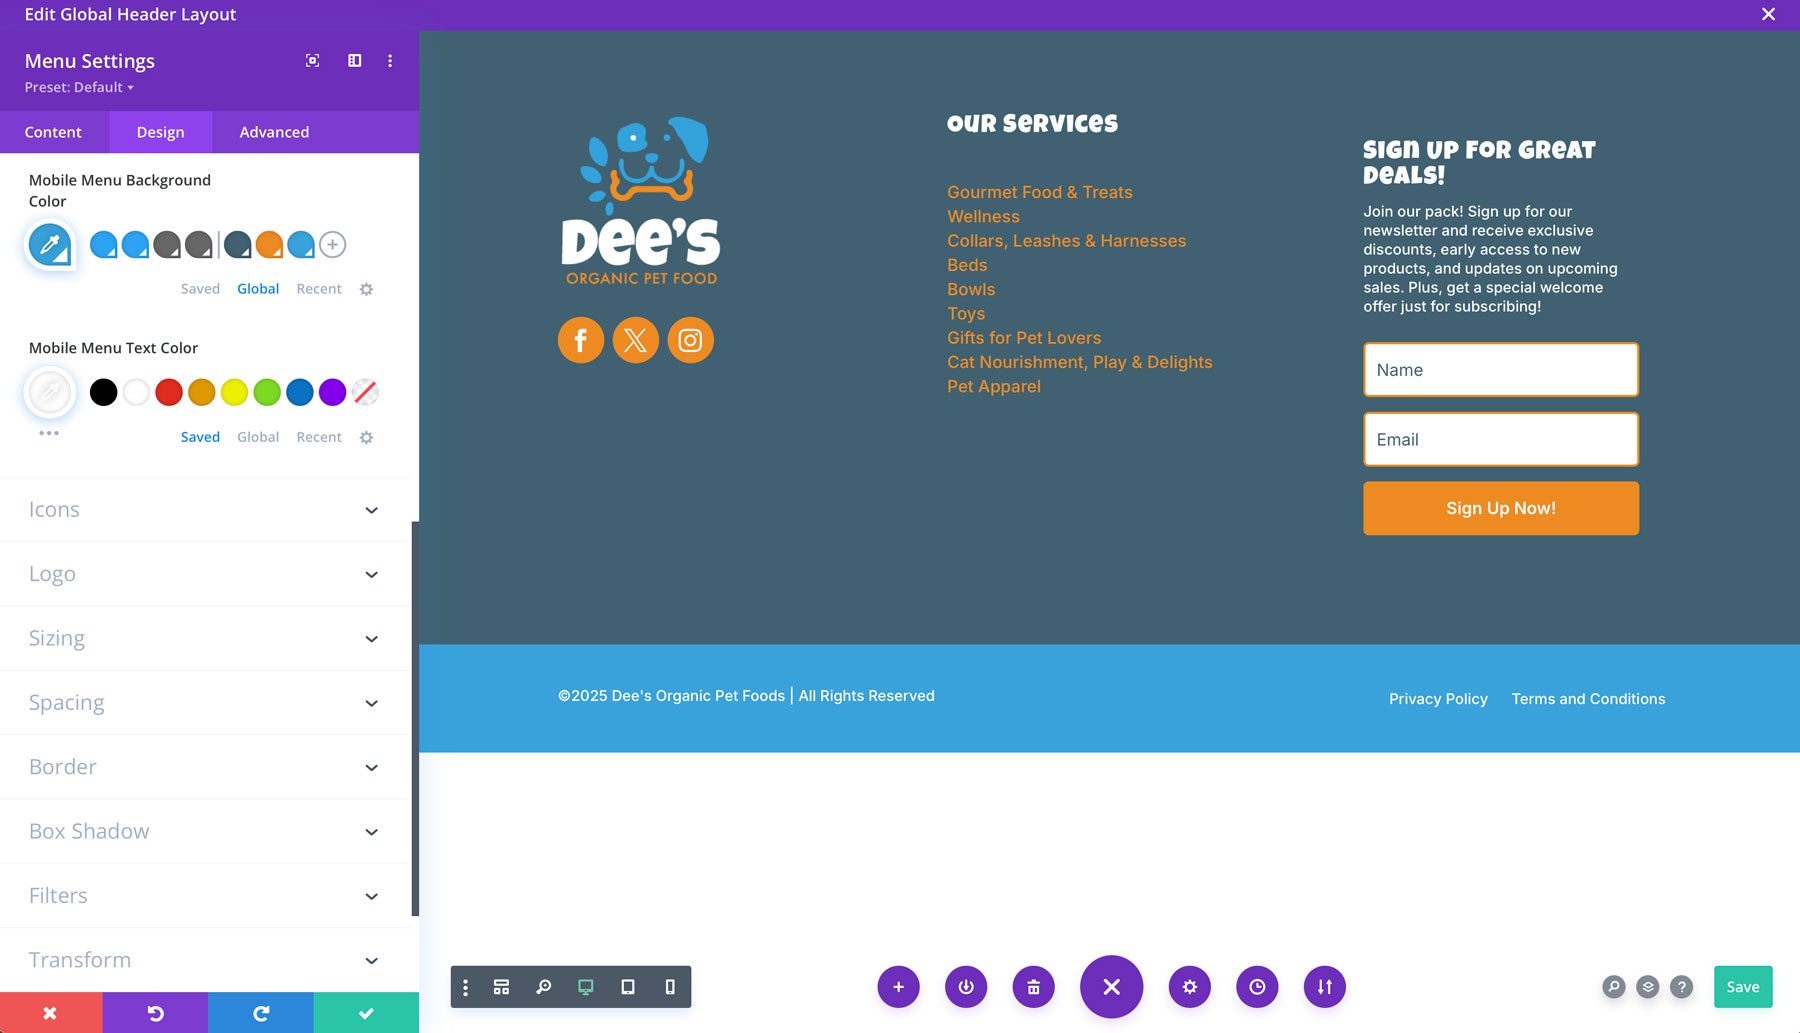
There are only a few problems to switch proper right here since your menu doesn’t have submenu links. The ones settings will practice to just the cell fashion of your menu when people view your site from a smartphone or tablet:
Mobile Menu Background Color: #38a2db
Mobile Menu Text Color: #ffffff
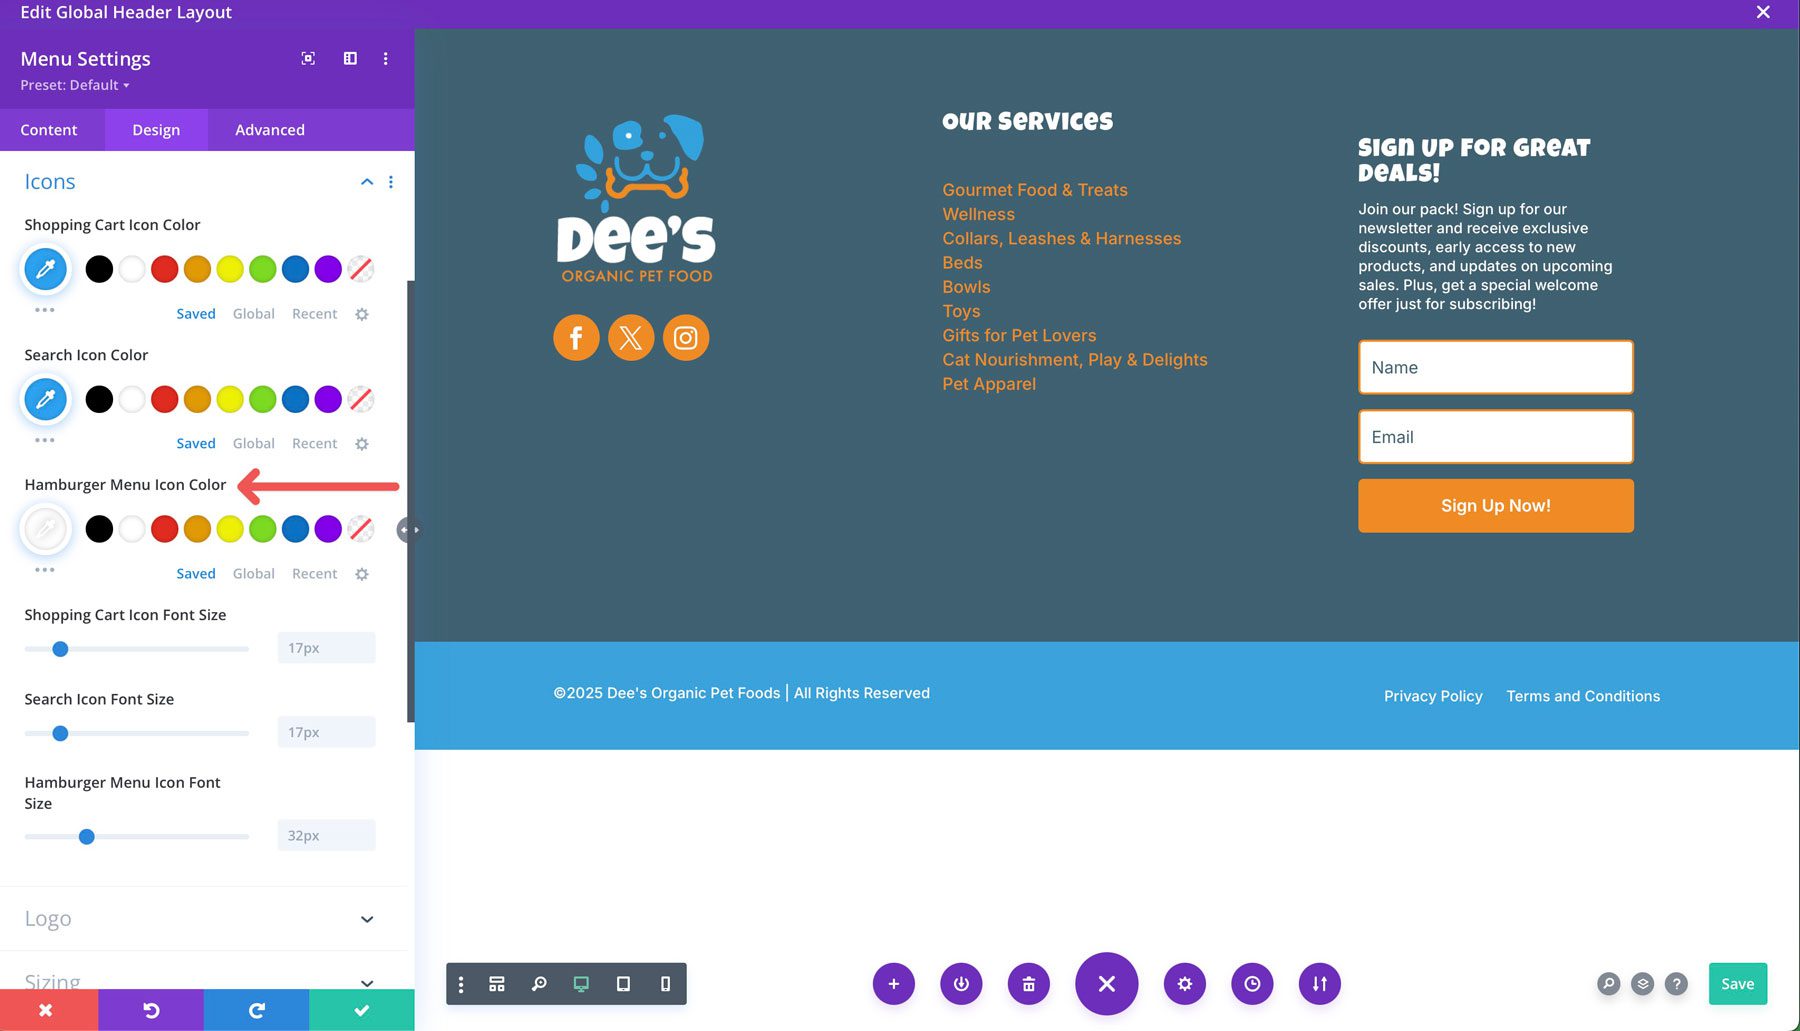
Finally, business the Hamburger Menu Icon Color beneath the Icons tab to #ffffff.
Together with The Finishing Touches
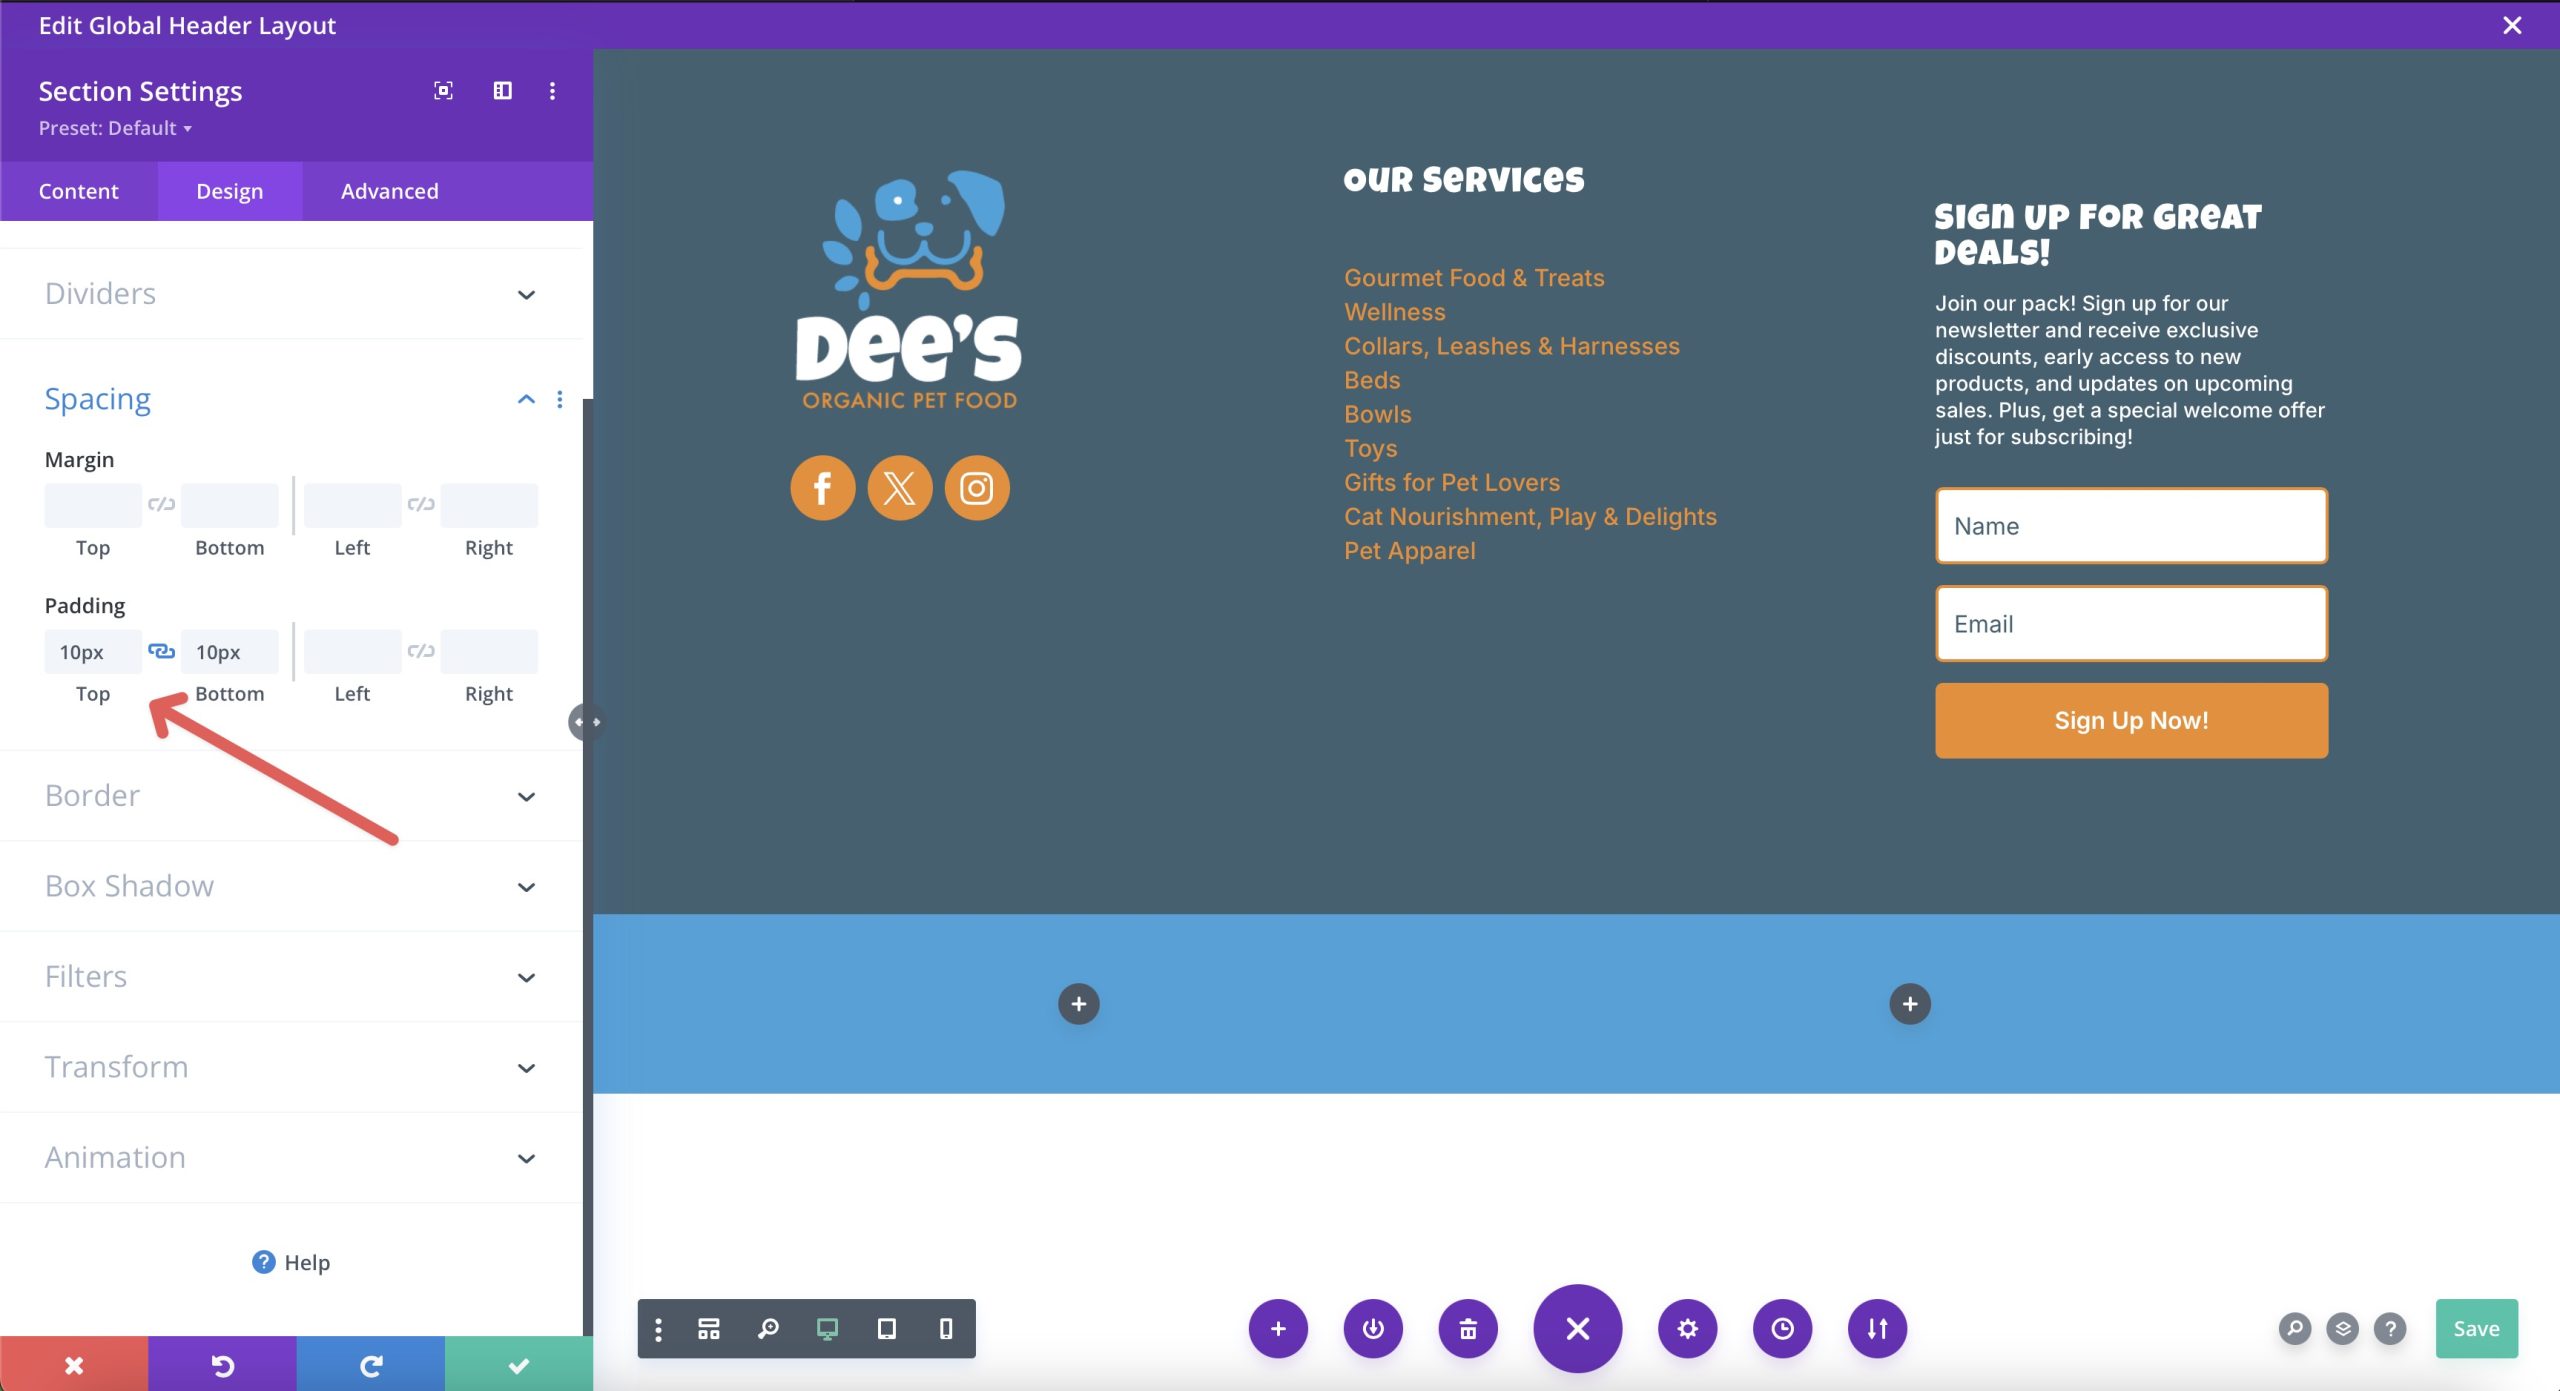
Now that our footer design is whole, there are a few stray fixes we’ll wish to do. As you’ll perceive, the determine of the email opt-in module doesn’t quite align with the supplier menu heading inside the neighboring column. That’s on account of Divi supplies some padding to it by the use of default. To fix this, open the email selection module’s settings and navigate to the design tab. Beneath the spacing dropdown menu, add 0px padding to the perfect & bottom and left & right kind to remove the awkward spacing.
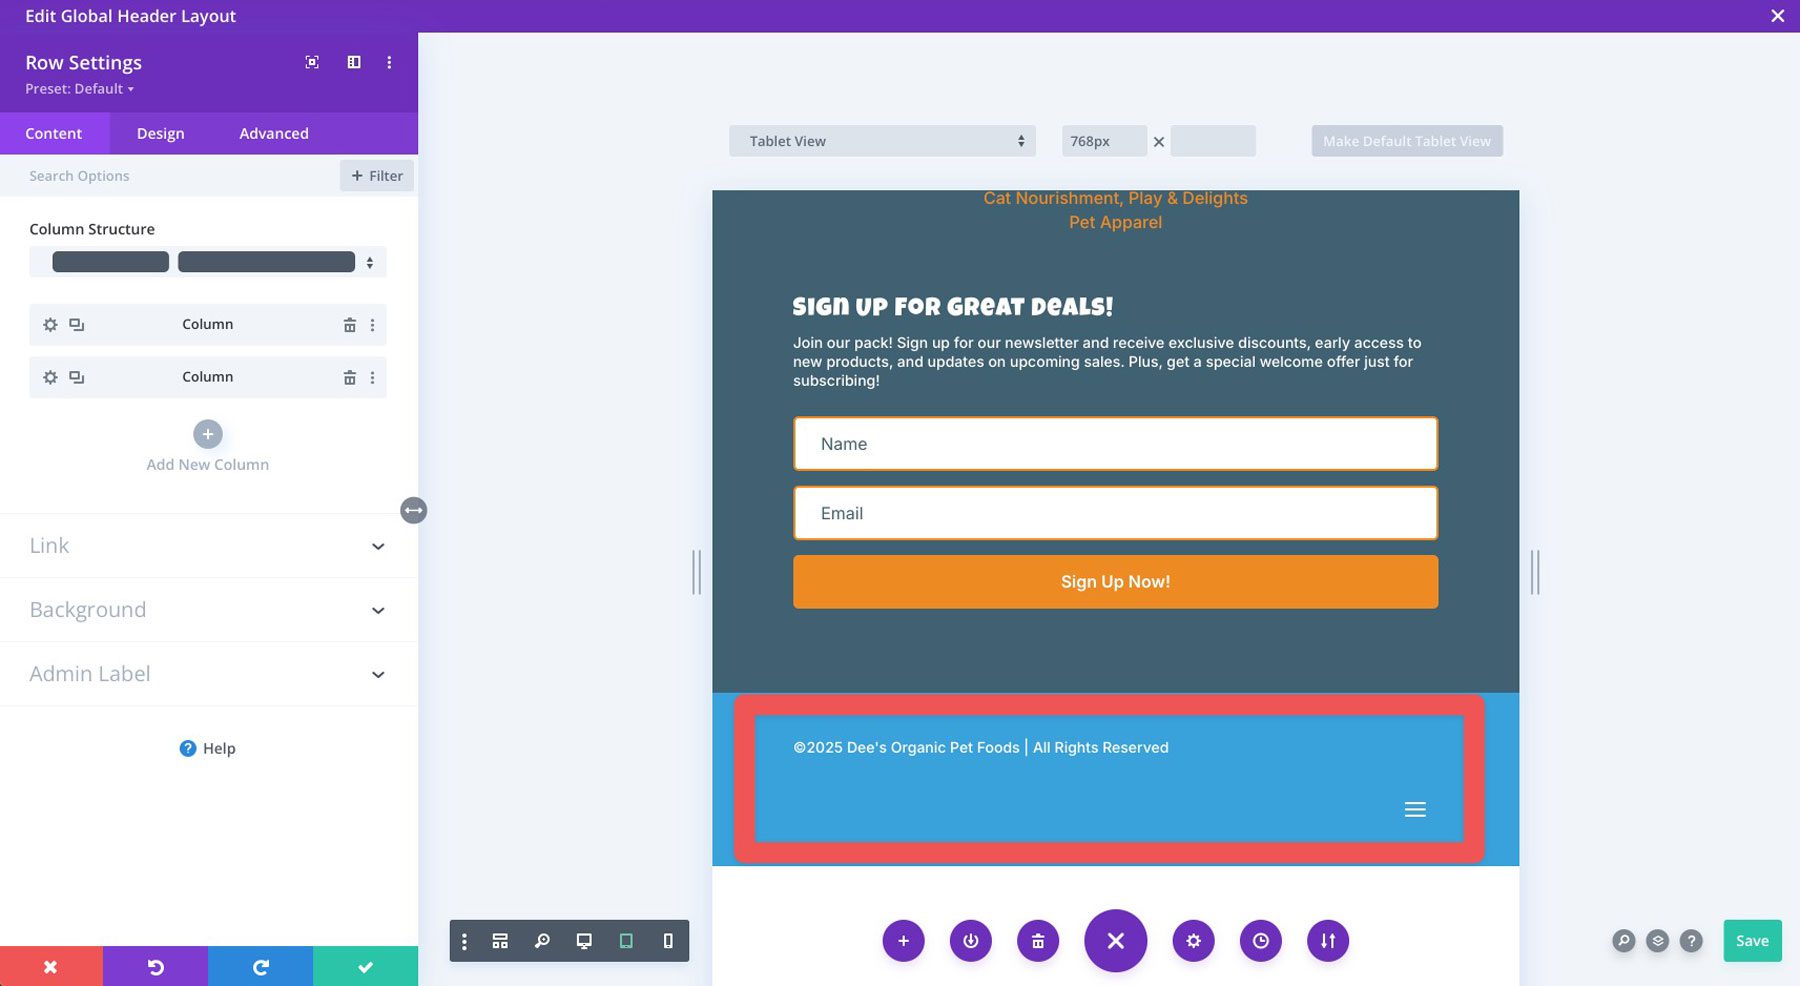
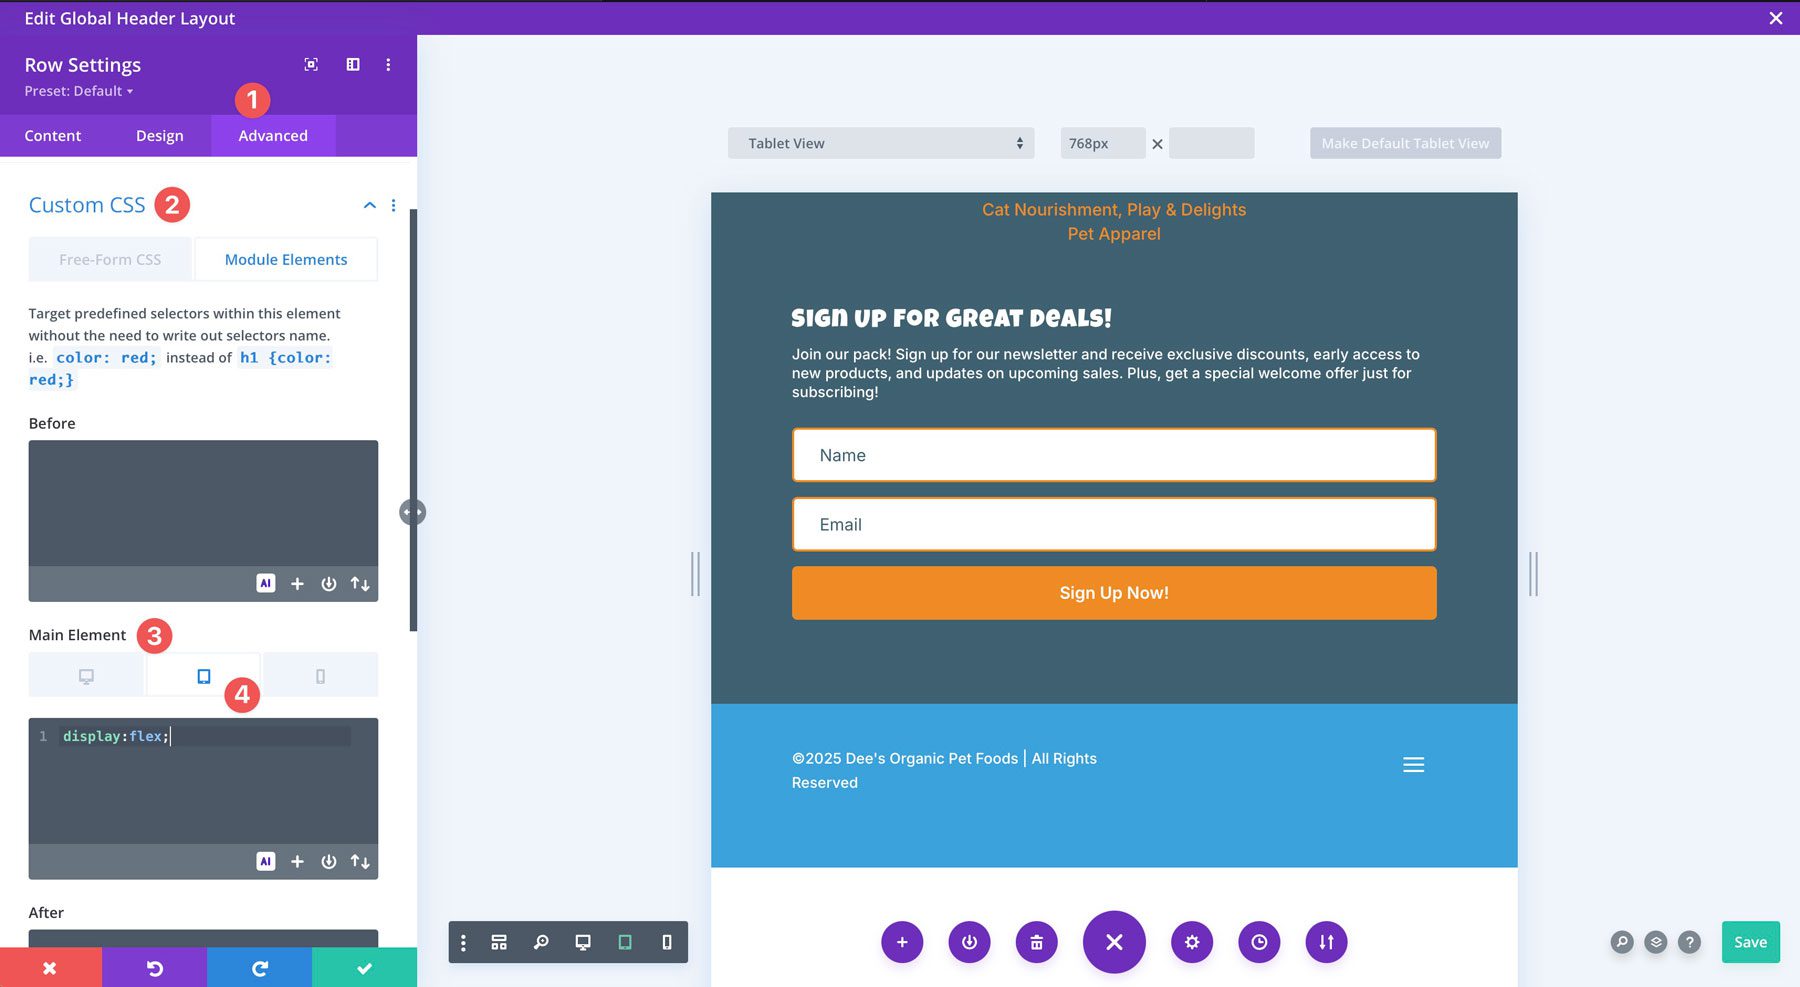
In any case, while our copyright data and prison menu are aligned on the desktop, they don’t quite line up on smaller shows.
To fix this, click on at the complicated tab for the row. Beneath Custom designed CSS, choose the primary section and navigate to the responsive settings. Inside the CSS field, add the following for the tablet:
display:flex;
On every occasion you whole the changes, click on at the green save button to avoid wasting quite a lot of your footer.
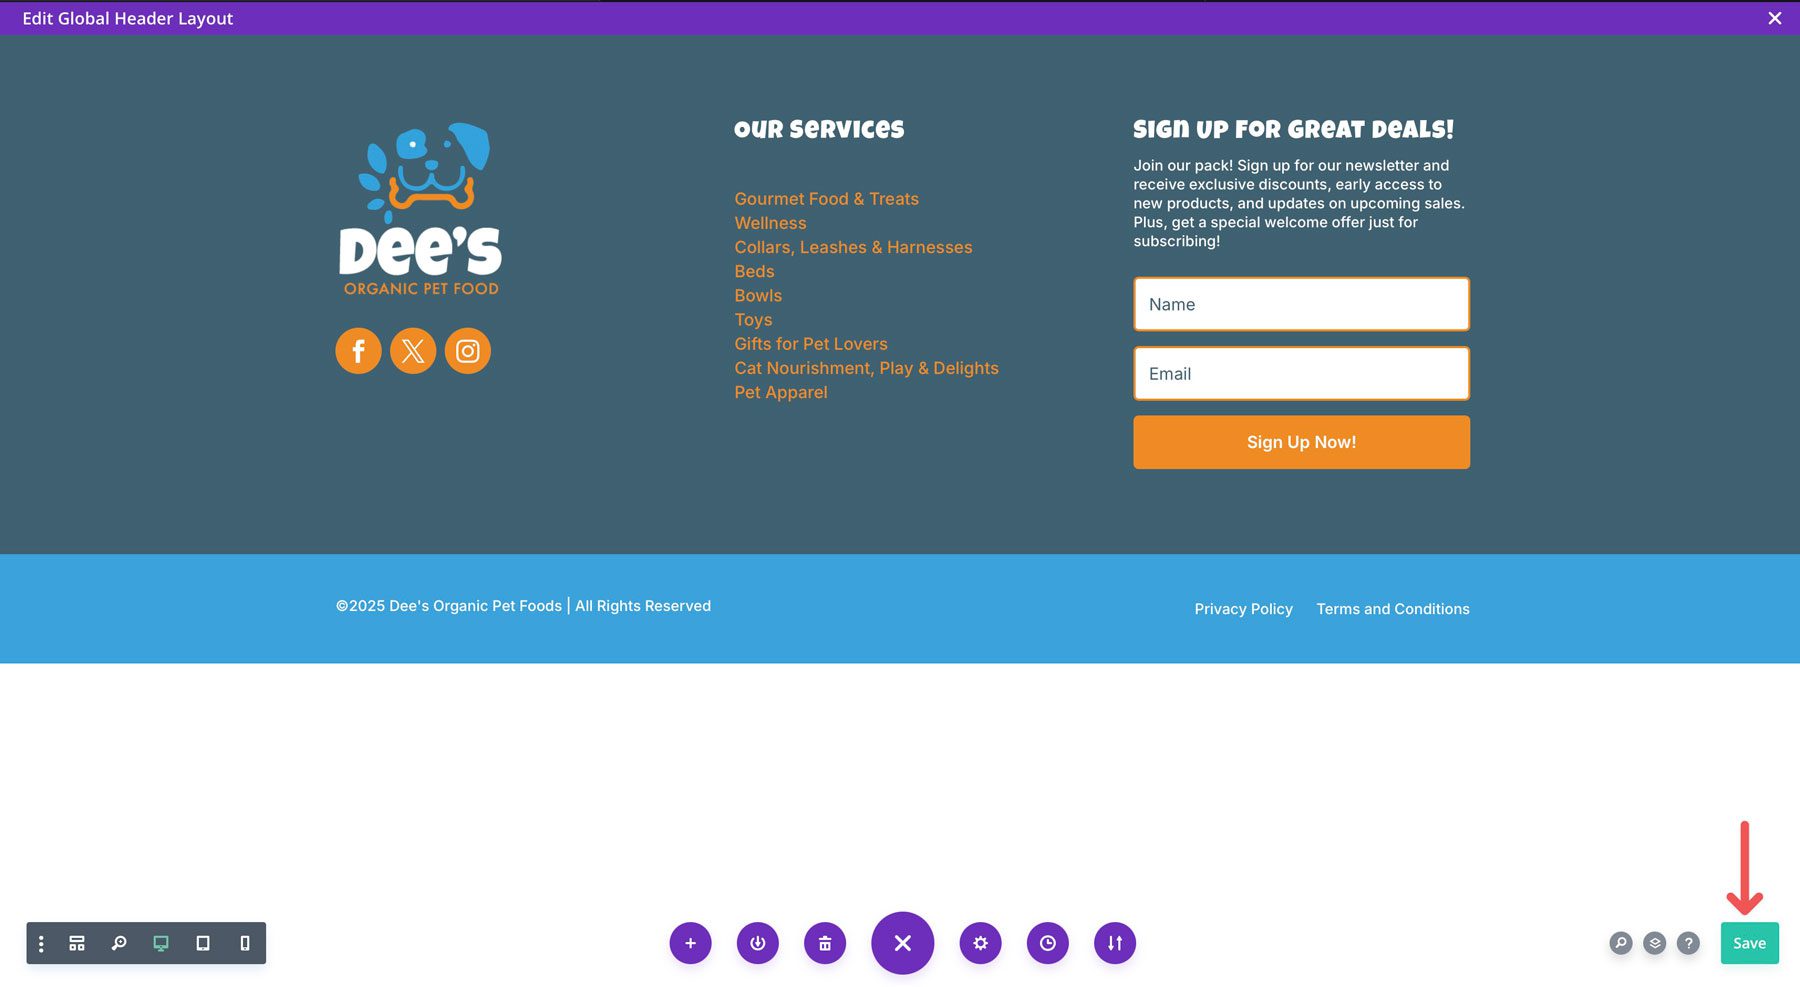
Click on at the X on the most productive right kind of the Theme Builder to head out.
Finally, click on at the save changes button to make your footer live.
As you’ll see, Divi makes it blank to design a web site footer in a few minutes.
A well-designed web site footer is additional than just an afterthought. It’s the most important part of any a success web site, offering valuable authentic belongings for crucial wisdom, emblem reinforcement, and the entire particular person revel in. By the use of incorporating key design laws like readability, emblem consistency, and Search engine optimization-rich content material subject material, you’ll design a footer that effectively serves your visitors and boosts your online presence. Designing a good looking and sensible footer with equipment like Divi is terribly blank. By the use of following the ones steps, you’ll create a footer that meets your needs and leaves a long-lasting have an effect on on your target market.
We’ve created a at hand table that showcases all of the Divi theme’s choices that can assist you understand its true power.
The publish How To Design A Footer (2025 Educational) appeared first on Sublime Topics Weblog.
Summary: Rated-2, a cost-effective and environmentally friendly fertilizer, is gaining popularity in Memphis. This article explores the current state, emerging trends, key players, and step-by-step implementation of rated-2 in the city.
The Current State of Rated-2 in Memphis
Rated-2, a slow-release fertilizer, has been widely used in Memphis for its ability to provide nutrients to plants gradually over time. Its popularity stems from its cost-effectiveness, reduced environmental impact, and ease of application.
Emerging Trends Shaping the Future of Rated-2
Advances in technology have led to the development of innovative rated-2 products, including controlled-release and water-soluble formulations. These new technologies offer increased efficiency and customizability, further enhancing the benefits of rated-2.
Key Players and Influencers in Memphis’s Rated-2 Market
Several leading companies and organizations play a significant role in promoting and distributing rated-2 in Memphis. These include fertilizer manufacturers, agricultural cooperatives, and government agencies.
A Step-by-Step Guide to Implementing Rated-2
Soil Testing: Determine the nutrient needs of your soil through a soil test.
Product Selection: Choose a rated-2 product that aligns with the nutrient requirements of your plants.
Application: Apply rated-2 according to the manufacturer’s instructions. Typically, it is applied at regular intervals throughout the growing season.
Monitor: Observe plant growth and adjust fertilizer application as needed to optimize results.
Common Mistakes to Avoid When Using Rated-2
Over-application: Excessive use can lead to nutrient imbalances and plant damage.
Improper timing: Applying rated-2 during dormant seasons or under unfavorable weather conditions can reduce its effectiveness.
Lack of soil testing: Neglecting soil testing can result in nutrient deficiencies or over-fertilization.
Case Studies: Successful Rated-2 Implementations in Memphis
Case Study A: A local nursery experienced a 25% reduction in fertilizer costs by switching to rated-2.
Case Study B: A landscape company improved turf quality and reduced maintenance time by using a water-soluble rated-2 formulation.
Future Predictions and Opportunities for Rated-2
Increased Adoption: Rated-2 is expected to gain wider acceptance as its benefits become more recognized.
Technological Advancements: Continued innovation will lead to even more efficient and customized rated-2 products.
Expanded Applications: Rated-2 is not only applicable to turf and landscaping but also to agriculture, horticulture, and home gardening.
TL;DR
Rated-2 is a widely used fertilizer in Memphis due to its cost-effectiveness, reduced environmental impact, and ease of application. Key players and emerging trends are shaping the future of rated-2, offering increased efficiency and customizability. A step-by-step implementation guide ensures optimal results, while case studies demonstrate the successful implementation of rated-2 in Memphis. The future holds bright prospects for rated-2, with increased adoption, technological advancements, and expanded applications.
Narrative Summary
The rise of rated-2 in Memphis reflects a growing awareness of sustainable and cost-effective fertilizer solutions. Its ability to provide nutrients gradually over time, reduce environmental impact, and enhance plant growth makes it an ideal choice for a wide range of applications. As technology advances and key players continue to drive innovation, rated-2 is poised to become even more integral to the agricultural and horticultural landscapes of Memphis. Its versatility and adaptability offer exciting opportunities for farmers, landscapers, and homeowners alike, paving the way for a greener and more sustainable future.