Why don’t more people offer Audio & Video Accessories?
Party Like a Pro: Level Up Your Bar Game
Tired of endless drink lines at your parties? We’ve got you covered! This guide will transform your bar into a party powerhouse, making your guests feel like VIPs.
The Essentials: Start with the classics – vodka, tequila, rum, gin, and whiskey – and get ready to wow your guests.
Beyond the Bottle: Don’t stop there! We’ll show you how to create a killer setup, from lighting that sets the mood to music that keeps the party going.
Pump Up the Volume: No one wants to shout over the music or squint at a blurry screen. We’ll teach you how to get your audio and video perfectly synced, making your party unforgettable.
Let’s Make Your Bar Shine! This guide will unlock the secrets to crafting a party that’s the talk of the town, with tips on decor, drinks, and everything in between.
Ready to Rock Your Next Party? The Ultimate Bar Setup Guide!
TL;DR – Too Long; Didn’t Read
Want to host the best party ever? This guide has all the tips and tricks you need to create a killer bar setup, from lighting to music, to make sure your guests have a blast.
Pump Up the Volume: Your Audio & Video Essentials
Ever been to a party where the music is too quiet, or worse, the video is blurry? No fun! Here’s how to set up the perfect audio and video experience:
Choose the Right System: For a small gathering, a Bluetooth speaker might be enough. But for bigger parties, you’ll want a powerful sound system with multiple speakers. Think about the size of your space and how much volume you need.
Location, Location, Location: Place your speakers strategically. Don’t block them with furniture, and make sure everyone can hear the music. For video, think about projection or large screens for a truly immersive experience.
The Power of Lighting: Lighting is key to creating the right mood. String lights add a festive touch, and colored spotlights can create a cool ambiance.
Stock Up for Success: What to Include in Your Bar
No one wants to wait in line for drinks at a party, so make sure your bar is stocked with everything you need:
The Classics: Stock up on popular spirits like vodka, tequila, rum, gin, and whiskey. Don’t forget the mixers, like soda, juice, and tonic water.
The Mixologist’s Touch: To impress your guests, have some specialty ingredients on hand. Try liqueurs, bitters, and syrups.
Non-Alcoholic Options: Not everyone drinks alcohol, so make sure to have a variety of non-alcoholic options, like sparkling water, juice, and sodas.
Bar Setup Tips: Making Your Party Shine
Now that you have the essentials, let’s talk about the setup:
The Bar Itself: A dedicated bar area will keep things organized. Use a table, a countertop, or even a dresser.
Ice, Ice, Baby: Have plenty of ice on hand, both for drinks and for keeping your bottles cold.
Keep It Clean: Have plenty of napkins, coasters, and garbage cans available.
Don’t Forget the Details: Adding Flair and Functionality
The details are what make a bar setup really special.
Decorative Touches: Add some personality to your bar with decorative elements like flowers, candles, or a colorful tablecloth.
Barware Essentials: Make sure you have enough glasses, cocktail shakers, and other tools for making drinks.
Music Matters: Create a playlist that matches the mood of your party.
Ready to Host a Hawaiian Party?
If you’re planning a party in Honolulu, you’re in for a treat! The warm weather and beautiful scenery make it the perfect place to host a party. Just remember to check local laws and regulations before you start setting up.
Here’s an example of what you can add to your Hawaiian party bar:
Tropical Cocktails: Try classic tiki cocktails like the Mai Tai and the Pina Colada.
Fresh Fruits: Incorporate fresh fruits like pineapple, mango, and guava into your drinks.
Island-Inspired Decorations: Use leis, palm leaves, and seashells for decoration.
Summary: Setting the Stage for Your Party
To recap, a great bar setup is all about making your guests feel comfortable and well-attended. By planning your drinks, setting the mood with your audio & video, and adding a touch of personality with your décor, you’ll create a party that’s unforgettable.
For inspiration and to discover amazing party signs, be sure to check out Ecliptic Signs.
Creating the Perfect Home Bar Atmosphere: Choosing the Right Sofa
Your home bar is a haven for relaxation, socializing, and creating lasting memories. The sofa you choose plays a crucial role in shaping the atmosphere, serving as the central gathering point for your guests.
Think Big, Think Comfort:
Size Matters: A spacious sofa is ideal for hosting large gatherings, allowing everyone to spread out and enjoy the company. However, if space is limited, consider a smaller sofa complemented by a few comfortable chairs or beanbags, creating a cozy, intimate setting.
Beyond Comfort: Tailoring Your Sofa to Your Space
Style and Function: Choose a sofa style that complements your bar’s aesthetic. Whether you’re aiming for a sleek modern look or a rustic farmhouse feel, the sofa should blend seamlessly with your existing decor. Consider the materials and upholstery, ensuring they’re durable and easy to clean, especially if you plan on hosting frequent gatherings.
Making Your Home Bar a Destination:
Halifax: A City of Vibrant Bars: Halifax, Canada, is known for its vibrant bar scene, offering a wide range of experiences from cozy pubs to lively cocktail lounges. Take inspiration from these establishments and create a unique atmosphere in your own home bar.
A Sofa for Every Occasion:
The Cozy Retreat: A comfortable sofa is essential for creating a welcoming and relaxed environment. It should invite guests to settle in, unwind, and enjoy conversation over drinks. Think plush cushions, supportive backrests, and soft fabrics that encourage lounging.
By choosing the right sofa, you can transform your home bar into a truly inviting space, a place where friends and family gather, connect, and create unforgettable moments.
Get Your Home Bar Ready to Party!
TL;DR: Want to create a killer bar setup in your home? This article has tips on choosing the perfect sofa, arranging your space, and adding cool accessories to make it the hangout spot everyone loves. Plus, we’ll talk about Halifax, Canada, because it’s a great place to find inspiration!
Choosing the Right Sofa: The Heart of Your Home Bar
Your sofa is the centerpiece of your home bar, so it’s important to pick one that’s comfy and stylish. Think about how many people you usually hang out with and choose a size that’s big enough for everyone. A comfy sofa will make your bar feel inviting, like a cozy spot where friends can relax and chat.
Think Big, Think Comfort
Size Matters: A big sofa is great for parties, but if you have a smaller space, consider a smaller sofa with a few extra chairs or beanbags.
Cushions and Comfort: Look for a sofa with soft, supportive cushions. Think about the kind of fabric too – leather is stylish and easy to clean, but fabric can be more comfy.
Style it Up: Choose a sofa color that matches your bar’s vibe. Bold colors are fun, while neutral colors create a calm atmosphere.
Arranging Your Space: Let the Party Begin!
Now that you’ve got your sofa, let’s arrange your space! Think about how people will move around and make sure there’s enough room to walk comfortably.
Smart Space Strategies:
Flow is Key: Think about the path people will take when they come into your bar. Make sure it’s easy to move around without bumping into things.
Cocktail Stations: Set up a cool area where you can make drinks. You can use a bar cart, a small table, or even a corner of your counter.
Music Matters: A good sound system will set the mood for your bar. Choose speakers that sound great and fit your style.
Add Some Fun Accessories
Now that you’ve got the basics, it’s time to add some personal touches that make your bar feel unique.
Creative Touches:
Themed Decor: Think about what kind of bar you want to create. A sports bar? A tiki bar? Use decorations that match the theme!
Barware is Cool: Don’t forget the barware! Get some fancy glasses, cocktail shakers, and ice buckets.
Lighting is Everything: A cool light fixture above your sofa can make your bar feel special.
Halifax: A City with a Thriving Bar Scene
Halifax, Canada, is a city with a fantastic bar scene. It’s a great place to visit for inspiration. You can find pubs, cocktail bars, and even speakeasy bars that will give you ideas for your own home bar setup.
Summary
Your home bar is your personal hangout spot! It’s a place to relax with friends, watch games, and enjoy some fun times. Creating the perfect bar setup starts with choosing the right sofa for your space and your style. Think about the kind of atmosphere you want to create and add cool accessories and décor to make it unique. Don’t forget about the little things – barware, lighting, and even the music you play! With a little planning and creativity, you can make your home bar a truly special place. For more inspiration on creating a great home bar, check out Ecliptic Signs.
Q: What are some key factors to consider when choosing candles?
A: When selecting candles, think about the scent you desire. Do you prefer a fresh and clean aroma or a warm and inviting fragrance?
Q: How can a bar cart contribute to your home decor?
A: While you might not immediately think of a bar cart as a decorative element, it can actually add a touch of sophistication to any space!
Q: What’s the connection between candles and bar carts?
A: Candles and bar carts are a perfect pairing, offering a simple way to introduce a touch of class and relaxation into your home.
Q: How can I create a truly special spot in my home using these elements?
A: Start by choosing a theme for your bar cart. Think about the overall feeling you want to create and let that guide your selections.
Light Up Your Home with Style: Candles and Bars
TL;DR – Want to make your house feel cozy and amazing? Candles and bar carts are the perfect way to add a touch of class and relaxation!
Imagine this: It’s a rainy Saturday night. You’re curled up on the couch with a good book, and the only light is coming from the flickering flames of a beautiful candle. Doesn’t that sound relaxing?
Candles have been a part of our homes for ages, but they’ve become a real trend in recent years. People love them for their beautiful scents, their ability to set a mood, and their stylish designs.
Adding a Touch of Elegance with a Bar Cart
But what about a bar cart? You might not think of a bar cart as part of your home decor, but it can add a touch of sophistication to any space.
Think of it this way: Your bar cart is like a mini-party waiting to happen! It can be stocked with all your favorite drinks and snacks, and it’s always ready for a spontaneous gathering.
Combining Candles and Bar Carts
What’s even better than candles or a bar cart? How about using them together! Here’s how to create a truly special spot in your home:
Pick a Theme: Think about the overall feeling you want to create. For example, a beachy theme might feature candles with ocean scents and tropical cocktails.
Arrange the Items: Use trays to keep everything organized, and add some decorative touches like coasters and bowls.
Don’t Forget the Lighting: Candles are the perfect way to set a warm and inviting mood. Choose scents that match your theme and style.
Choosing Candles and Bar Carts
Let’s talk about candles for a second: When choosing candles, there are a few things to consider:
Scent: Do you want something fresh and clean, or something warm and inviting?
Size: How much space do you have?
Design: Do you prefer classic or modern?
And bar carts? Here’s what to think about when picking the right one:
Style: Do you want something modern and minimalist, or something more traditional?
Size: How much space do you have?
Features: Does it have shelves, drawers, or a built-in ice bucket?
Where to Find Great Candles and Bar Carts
So where can you find all this fabulous stuff? Well, you can check out stores like Target, Walmart, and HomeGoods. But if you’re looking for something truly unique, try shopping online. There are tons of amazing websites that sell candles and bar carts, and you can even find special deals.
**For a truly special shopping experience, check out Ecliptic Signs. They have a wide selection of candles and bar carts, all made with high-quality materials. You can even find some pretty cool candles inspired by the constellations! **
Summary
Candles and bar carts are two of the best ways to make your house feel like a home. They add a touch of elegance and relaxation to any space. By combining these elements, you can create a truly special spot in your home. So go ahead and light up your home with style!
Who needs a boring old desk when you can work from the backyard? ☀️🔥
These laptops are perfect for those who love to grill and get stuff done. Whether you’re catching up on emails or binge-watching your favorite show between burger flips, these machines are your new best friends.
Ultrabooks: The Backyard Workhorse
These sleek, lightweight laptops are designed for portability. You can easily take them from your patio to your porch, and their long battery life means you won’t be stuck tethered to an outlet.
Why You Need a Laptop for BBQs:
Get things done while enjoying the sunshine: No more sacrificing your grilling time!
Be productive in a relaxing environment: Work can be stressful. A backyard BBQ makes it a little more bearable.
Show off your awesome grilling skills: And maybe impress your coworkers with your backyard setup. 😉
Let’s dive into some of the best laptops for your backyard workstation…
Fire Up the Grill and Work from Anywhere: The Perfect Laptop for Backyard BBQs
TL;DR: Want to work from home but also enjoy grilling? This article is for you! We’ll look at the best laptops for taking your work outside to the backyard while enjoying a delicious barbecue.
Why You Need a Laptop for Grilling
Think about it: you’re flipping burgers, enjoying the sunshine, and maybe even sipping on a cold drink. What if you could also get some work done at the same time? A good laptop lets you do just that! You can check emails, answer messages, and even finish up projects while the food cooks. It’s the best of both worlds: a relaxing time outdoors with the convenience of working on the go.
What to Look for in a Laptop for Grilling
Not all laptops are created equal when it comes to outdoor use. Here’s what you should consider:
Durability: Built to Last
You don’t want your laptop getting scratched or damaged from spills. Look for a model with a sturdy build and a protective case.
Battery Life: Power Through the Afternoon
You’re not going to be near an outlet when grilling, so a long-lasting battery is essential. Look for a laptop with at least 8 hours of battery life.
Portability: Easy to Move Around
You’ll be moving your laptop from your desk to the grill and back. Choose a lightweight and compact laptop that’s easy to carry.
Top Laptops for Backyard BBQs
Here are a few laptops that are perfect for grilling and working from home:
The Ultrabook: Sleek, lightweight, and long-lasting battery life, these laptops are great for working on the go.
The 2-in-1: These laptops can transform into tablets for even more versatility. You can use them to check recipes, watch cooking videos, or even take notes while you grill.
Knoxville: A City That Knows Barbecue
Speaking of grilling, Knoxville, Tennessee, is a great city for barbecue lovers! It’s known for its delicious smoked meats and mouthwatering barbecue sauces. You can find everything from classic barbecue joints to trendy barbecue restaurants.
Barbecue & Laptops: A Match Made in Heaven
Working from home doesn’t have to mean being stuck inside. A good laptop can make your backyard barbecue even more enjoyable by allowing you to get work done while enjoying the outdoors.
So grab your favorite grilling tools, find a comfortable chair, and get ready to work and play in your backyard!
For more ideas on how to make your backyard the perfect work-from-home space, check out Ecliptic Signs. They specialize in outdoor signage and can help you create a welcoming and functional outdoor workspace.
Light Up Your Life (and Your Netflix Binge) with the Power of Lighting!
Forget candles, it’s time to unleash the full potential of your home lighting! We’re talking about the kind of lighting that transforms your living room from “meh” to “movie theater” in seconds. Think: dramatic mood lighting for your romantic comedies, vibrant accents to pump up your game nights, and even the perfect glow for those late-night snack runs.
Ready to level up your entertainment experience? We’ll show you how to combine the magic of a killer soundbar with the right lighting. It’s like a match made in home theater heaven!
TL;DR? This article is your guide to turning your house into a personal, immersive entertainment zone. We’ll even touch on how to make your Houston home look and feel like it belongs in a magazine, because you deserve it!
Turn Up the Volume and Light Up Your Life!
TL;DR – Too Long; Didn’t Read
This article explores the awesome world of soundbars and lighting, showing you how to level up your entertainment experience. We’ll dive into the benefits of using these tech tools, give you tips for choosing the right ones, and even talk about how to make your home in Houston look and feel amazing. Get ready to enjoy your movies, music, and video games like never before!
Soundbars: Your Home Theater Hero!
Soundbars are amazing devices that can transform how you experience your favorite movies, TV shows, and music. They’re like mini speaker systems that sit right below your TV, giving you a much richer and more immersive sound than your TV’s built-in speakers. Imagine feeling the rumble of an explosion or the crisp notes of a song – soundbars bring it all to life!
Why Choose a Soundbar?
Better Sound: Think crystal clear dialogue, booming bass, and special effects that really make you feel like you’re in the action.
Easy Setup: No need to run wires all over the place. Most soundbars simply connect to your TV with a single cable.
Space Saver: They take up less space than a traditional surround sound system.
Light Up Your Life: The Power of Lighting
Lighting is a powerful tool that can completely change the mood and feel of your home. From cozy evenings to festive celebrations, the right lighting can set the stage for any occasion.
The Magic of Mood Lighting
Cozy Up: Dimmable lights can create a relaxing atmosphere for movie nights or quiet evenings.
Get Creative: Smart bulbs allow you to change the color of your lights to match your mood or style.
Party Time: Bright, colorful lights can make your home a fun and festive place to gather.
Soundbars and Lighting in Houston
If you’re in Houston, you’re in luck! The city has plenty of places to find amazing soundbars and lighting solutions. Check out local electronics stores or browse online for the best deals.
Pro Tip: Before you buy, read reviews from other people who have used the products. This will help you choose the right options for your needs.
Level Up Your Entertainment Experience
Combining a great soundbar with the right lighting can take your home entertainment to the next level. Imagine watching a movie with crisp, immersive sound and the perfect ambiance created by adjustable lighting. It’s a winning combination!
For inspiration and to find amazing products, check out Ecliptic Signs.
Summary
This article has shown you how soundbars and lighting can enhance your home entertainment experience. Soundbars offer improved sound quality, easy setup, and space-saving benefits. Lighting, on the other hand, can transform the mood and ambiance of your home. When you combine the two, you create a truly immersive and engaging entertainment experience. So why wait? Start exploring the exciting world of soundbars and lighting today!
Elevate Your Audio Experience: Expert Tips for Optimizing Your Speaker System
[City, Date] – Local audio experts recently hosted an informative session, guiding enthusiasts on how to elevate their sound experience. The session delved into the intricacies of audio players and speakers, providing valuable insights for both novice and seasoned listeners.
During the session, attendees explored the various types of audio players and speakers available, including bookshelf speakers, floor-standing speakers, and soundbars. They gained knowledge on proper speaker placement techniques, including the importance of avoiding close proximity to walls to minimize unwanted reflections and enhance sound clarity.
To ensure optimal performance, experts emphasized the importance of reducing unwanted noise. They discussed strategies such as using acoustic panels and wall treatments to absorb sound and prevent echoes. Additionally, attendees learned about the different types of cables and connectors used to connect audio components, ensuring seamless signal transmission.
“By implementing these expert tips, audio enthusiasts can transform their listening spaces into veritable sound havens,” said [Expert Name], the lead facilitator of the session. “With proper speaker placement, noise reduction, and precision connections, listeners can fully immerse themselves in their favorite music, movies, and other audio content.”
The workshop concluded with a Q&A session, where attendees had the opportunity to consult with the experts on specific audio setup challenges. For further information and resources on optimizing speaker systems, please contact [Contact Information].
Get That Sound You’ve Always Wanted: Mastering Your Home Audio Setup
TL;DR – Too Long; Didn’t Read
This article is all about setting up your home audio system so it sounds amazing. We cover basic equipment, how to place speakers, and even how to get rid of unwanted noise. If you’re looking for a better audio experience, this is the place to be!
Let’s Get Started!
Have you ever wanted your music to sound like you’re at a concert? Or maybe you want to watch a movie and feel like you’re right in the action? Setting up your own home audio system can help you achieve that! It’s like building a musical playground in your living room.
Choosing Your Players
The first step is to pick your audio players. These are the devices that will actually play the music or sound. Some popular choices are:
CD Players: These are great for listening to your favorite albums, but they’re not as common as they used to be.
Turntables: These are perfect for playing vinyl records, giving you a warm, vintage sound.
Streaming Devices: These devices connect to the internet and let you listen to music from services like Spotify or Pandora. They’re really versatile!
Smart Speakers: These speakers are connected to the internet and can do a lot more than just play music. They can answer questions, control your smart home, and even make phone calls!
Speaker Setup: Where to Put Those Booms!
Once you’ve got your players, you’ll need speakers. These are what actually create the sound waves that reach your ears. There are a lot of different types of speakers, but here are a few popular options:
Bookshelf Speakers: These are smaller speakers that are perfect for placing on shelves or desks.
Floor-Standing Speakers: These are larger speakers that stand on the floor and provide a powerful sound.
Subwoofers: These speakers are designed to create deep bass sounds.
Speaker Placement:
Distance: Place your speakers about 6 to 8 feet apart and about 8 to 10 feet away from your listening position.
Height: You want your speakers to be at or slightly above ear level when you’re sitting down.
Walls: Try to avoid placing your speakers too close to walls, as this can create unwanted reflections and make the sound muddy.
Experiment! The best way to find the perfect placement is to experiment until you get the sound you want.
Don’t Let Noise Ruin the Party
Noise can really mess up the sound of your audio system. Here are some tips to reduce unwanted noise:
Soundproofing: Adding soundproofing materials like acoustic panels to your room can help absorb sound and reduce echoes.
Noise Reduction: Many audio players and speakers have features that can help reduce background noise.
Location: If possible, set up your audio system in a quiet part of your house.
Amplifying Your Sound: The Role of Amplifiers
Amplifiers are like the powerhouses of your audio system. They take the signal from your player and make it strong enough to drive your speakers. Here are some things to consider when choosing an amplifier:
Power: The power output of an amplifier determines how loud it can play.
Channels: The number of channels determines how many speakers you can connect to the amplifier.
Features: Some amplifiers have features like a built-in equalizer or a remote control.
Take Your Sound to the Next Level: Connecting the Pieces
Now that you know about the different components, let’s talk about connecting them all together. Most audio systems will use cables, but wireless connections are becoming more popular.
RCA Cables: These cables are commonly used to connect audio players to amplifiers.
Speaker Cables: These cables connect the amplifier to the speakers.
Wireless Connection: Some audio players and speakers can connect wirelessly using Bluetooth or Wi-Fi.
Get That Professional Sound: Room Acoustics
Sometimes, even with the best equipment, your room’s shape and surfaces can affect how your audio system sounds. This is where room acoustics come in. By paying attention to these factors, you can improve the sound quality of your system.
Reflections: Sound waves bounce off walls, ceilings, and floors, creating echoes and making the sound blurry.
Absorption: Adding materials that absorb sound, like acoustic panels, can help reduce reflections.
Diffusion: Diffusing sound using materials like sound diffusers can break up reflections and create a more even sound.
Get Inspired: Mississippi Music Scene
You don’t have to live in New York or Los Angeles to experience great music. The Mississippi music scene is thriving! From blues and jazz to rock and country, there’s something for everyone. For more information about music and the arts in Mississippi, check out Ecliptic Signs.
Summary
This article has covered the essentials of setting up a home audio system that sounds amazing. We discussed the different types of audio players and speakers available, how to place speakers properly, and how to reduce unwanted noise. We also explored the role of amplifiers and the importance of room acoustics. By following these tips and making informed choices about your equipment, you can create a home audio system that delivers an exceptional sound experience. Remember to experiment with different placements and settings to find what works best for your space and your taste. And don’t forget to explore the vibrant Mississippi music scene for inspiration!
Saskatoon: A Garden City with a Beat – Uncovering the Secrets of a Thriving Outdoor Experience
This article delves into the hidden connection between a flourishing garden and the power of sound, focusing on Saskatoon’s unique blend of green spaces and a vibrant cultural scene.
Beyond the surface: The article goes beyond simply listing gardening tools and subwoofer options. It aims to uncover the unseen synergy between these elements, exploring how they can transform an outdoor experience from ordinary to extraordinary.
Investigating the connection:
* Why are certain gardening tools essential for a thriving garden in Saskatoon’s specific climate?
* What are the key considerations when choosing a subwoofer for optimal outdoor sound quality?
* How does the combination of a well-maintained garden and a powerful sound system enhance outdoor gatherings?
By exploring these questions, the article reveals the secrets of creating a truly immersive and enjoyable outdoor experience, turning Saskatoon’s beautiful parks and gardens into vibrant hubs for both nature lovers and music enthusiasts.
Get Your Garden Groovin’ with the Right Tools and Sounds!
TL;DR: This article is for you if you want to improve your gardening and enjoy your outdoor space with awesome sound. We’ll talk about some useful gardening tools and how to choose the right subwoofer for your garden setup. Plus, we’ll mention Saskatoon, a city known for its vibrant community and beautiful parks.
Digging In: Essential Gardening Tools
You’ve got the green thumb, but you need the right tools to make your garden thrive! Here are a few basics to get you started:
Hand Trowel: This little tool is your best friend for planting seeds, transplanting seedlings, and digging small holes.
Gardening Gloves: Protect your hands from dirt, thorns, and blisters. Choose gloves that fit well and offer good grip.
Watering Can: Keep your plants hydrated with a watering can. You can find ones with different spout designs for targeted watering.
Hand Rake: Use a hand rake to clean up leaves, debris, and smooth out the soil surface.
Pruning Shears: Keep your plants healthy and looking their best by trimming off dead branches and shaping them.
Amp Up Your Garden Vibes: Subwoofer Selection
What’s a garden party without some great music? A subwoofer is your secret weapon for powerful bass that’ll make your outdoor gatherings unforgettable! Here’s what to keep in mind when choosing a subwoofer:
Size: Consider the size of your space. A larger subwoofer will deliver more powerful bass but might take up more space.
Power: The power output (measured in watts) determines how loud your subwoofer can get.
Enclosure Type: Subwoofers come in different enclosure types (sealed, ported, or bandpass). Each type offers a different sound signature. Research what type suits your preferences best.
Pro Tip: Look for subwoofers with weatherproof features if you live in an area with lots of rain or humidity.
Saskatoon: A Garden City with a Beat
Saskatoon, Canada is known for its beautiful parks and gardens, like the Meewasin Valley. It’s a city that embraces both nature and music. Imagine enjoying a concert in a lush park, or taking a walk along the river while listening to your favorite tunes!
Want to explore more about outdoor entertainment? Check out the Ecliptic Signs website for inspiration on how to create a vibrant outdoor space.
Summary
This article provided you with essential gardening tools for a thriving garden and tips for choosing the right subwoofer to amp up your outdoor experience. We also highlighted Saskatoon, a city that combines nature’s beauty with a love for music. Remember, a well-equipped garden and a great sound system can elevate your outdoor gatherings to new heights. Enjoy the process of creating your own outdoor haven!
All orders are protected by SSL encryption – the highest industry standard for online security from trusted vendors.
How To Set Up A Fully Equipped Small Woodworking Workshop For Under $1000 is backed with a 60 Day No Questions Asked Money Back Guarantee. If within the first 60 days of receipt you are not satisfied with Wake Up Lean™, you can request a refund by sending an email to the address given inside the product and we will immediately refund your entire purchase price, with no questions asked.
Description:
I’ve created this page for people who have these questions running through their mind:
After 20 years of woodworking and coaching other… I’ve seen enough to know:
In fact, it’s so bad that I must apologize it has taken me this long to reveal my answers to all of these questions!
Hi. My name is Ralph Chapman and I’ve been in love with woodworking for more than 25 years.
And like you, I’ve struggled with buying tools, setting up my workshop and practicing my craft. But I have to tell you… All of that frustration, planning and hard-work has paid off!
I finally have things setup just right… and I love this hobby even more than I did when I started many moons ago.
All the optimizations I’ve done… the little habits I’ve picked up… and the countless techniques, tools and layouts I’ve tried… all of that has come together to make this hobby exactly what I knew it could be.
My love for this hobby is so strong that around 5 years ago I just had to share it with others.
So I began mentoring and helping other woodworkers – from all around the world – take their creations to the next level.
And as I talked to these beginner, novice and sometimes expert wood-workers, I began to see a pattern…
When it came to tools, people simply didn’t know what to get.
Its been rough on my pocketbook… but even worse on my motivation. Some of the most memorable bad tools I’ve had over the years are: (disclaimer, these are my personal opinions)
Sure, a drum sander is not a vital tool for wood-workers. But this one sticks in my craw anyway! I felt the design was utter crap.
It wouldn’t keep alignment on the 4 lead screws. Which meant I could NEVER sand anything evenly… and everything I used it on turned out thicker on one side. Boy was it annoying.
And to top it off, the gears were plastic with a cheap rubber belt. When I saw the low quality, I just knew they weren’t going to last. And sure enough I was right. When the belt busted, I went online to order replacement parts. (I had planned on ordering new gears because I just knew they would go next.)
The problem I had with this tool actually surprised me. The thing was, it vibrated so much that my arm would get fatigued within 10 minutes!
Now, I’m no pansy or anything. I’ve dealt with some heavy duty machinery in my life and never had this issue. But this thing really did a number on my arm!
It was so bad that I switched back to hand-sanding and found it LESS tiring on my arm. Eventually I sold it on eBay and got about 50% of what I paid for it. A waste of time and money.
No matter how much I messed with this tool, I was never able to get a true 90 degree jointed board out of it.
About the only thing I could do was make shingles with it. Eventually I sold it on craigslist to someone locally. I told him why I was selling it, but he swore he knew how to “make it work right”.
I wished him good luck and then promptly lost hundreds by selling it for just ¼ the price I paid for it.
I spent more time tinkering and fixing this tool versus any other tool I’ve ever had!
I was actually glad when the angle adjustment “mechanism” broke (just a plastic rack and pinion). It lasted just one week. But it was one week of deep frustration.
The biggest problem was just overall poor design. The “throat plate” was just a rectangular piece of metal indented on one side to accommodate the 10 inch blade, so one could not make a zero clearance replacement.
And to top it off… it was noisier than ANY other benchtop saw I’ve ever used. Truly like something out of a nightmare!
I lost money on tools in a lot of ways during this time (what I call my “tool tryout stage”).
It happened over and over again. And every freakin’ time I thought I knew what to look for… and what to avoid… I lost money again in a different way.
After all my experience… and after coaching hundreds of students and hearing their experiences… I’ve taken note of….
This is by far the most common scam. (I call it a scam but some might disagree. Let’s see what you think.)
The way it works is this. Someone puts up a website called something like “Table saw reviews”. And on this webpage is a list of “the best” tools in this category. Of course what they DON’T tell you is that when you click the links on this webpage and buy the tool, the owner of the website gets a cut of the sale price.
Now, do you really think the owners of these websites care about the quality of the tools they recommend? Nope. What they do is recommend the tools with the highest revenue share.
Which means, when you search for anything to do with tool reviews… you’re going to come across hundreds of these webpages… and all of them are designed to earn your trust… and take your money!
This one really gets to me. I mean it really gets me hot under the collar. Because it’s just so damned brazen!
As though I am too blind to see the rust or too deaf to hear the squealing! This is why I never recommend buying anything from Craigslist and I rarely recommend eBay. Because you never know who you are dealing with.
Even those eBay sellers with good feedback scores may use third-party “refurbishers”… and you don’t know who those folks are. It’s just not worth the risk in my opinion.
Some might not call this a scam… but that’s exactly what it is! And the list of bad tools I gave you earlier is just the beginning.
Cheap Chinese manufacturing might be ok for Tupperware… but heavy-duty tools meant to last for years and years…?
The only reason a company would dare outsource such a thing would be to stretch profits. Parts, materials and assembly costs go down… and branding, marketing and prices go up. It makes me sick.
And to make it worse… given the fake review situation… you can never be sure a tool is high quality or low quality… until you buy it.
One of the most common mistakes is buying tools that are too expensive or buying tools you don’t need. The truth is, you don’t need much to build pretty much anything you can imagine.
And you can get good quality tools for big discounts if you know where to look. (More on that later).
Because high price doesn’t always equal high value. More on this later.
The other risk is not spending enough. The need to save money might backfire and you could end up losing money in the long run.
The discount tool industry is a billion-dollar one and some companies compete on price alone. Their target market is wanna-be handy-men and women who take on a single home improvement project.
Those types want to get things done for cheap… so their sole focus is on the price. Now we need more out of our tools than the average customer… so we simply can’t go for the cheap stuff.
But keep in mind here… good quality tools can be bought for bargain prices if you know where to look.
You might be shocked by this one. I’m talking about Amazon, Home Depot, Lowes, Walmart and the like.
These places aren’t the best when it comes to stocking quality tools at cheap prices. Now I’m not saying you can’t find good stuff at these stores… you sure can… from time to time.
But I would never go to any of them as a single one-stop-shop for everything tool related.
That honor goes to a particular online store which I’m surprised more woodworkers don’t know about. More on this in a second.
So there… six of the most common ways my students and I have lost money on tools.
I bet you’ve fallen victim to at least one of these scams or mistakes before?
If not, count yourself lucky. Because one or two would be somewhat easy to avoid… but SIX?
But you know what… here’s something else…
As bad as losing money is…
Losing your TIME is SO MUCH WORSE… Because there’s no way to get your time back!
What could you have built so far with the time you’ve spent dealing with bad tools?
… All the research… sending them back for warranty repair… reselling them on Craigslist or eBay… or the time you’ve spent ruminating about which tool is the BEST to buy for a specific need?
And since you’ve spent your time reading this far… I know you’re in need of guidance when it comes to setting up a complete small workshop.
I want to help you achieve that. More than anything.
But I don’t have the time to coach everyone personally…
So I’ve done the next best thing and put EVERYTHING I know about creating a small workshop into a detailed guide.
And the most important part of this guide is:
Once you have this list… you won’t have to spend anymore of your precious time researching tools… and more than that… you’re going to save yourself hundreds or even thousands of dollars in the long run by buying the best tools from the start.
If that sounds good… then keep reading…
because in a moment I’m going to give you a chance to get just that.
A shopping list of the best quality tools and where to buy them from a trustworthy (and formerly secret) source for up to 70% off prices from big box retailers such as Amazon / Lowes / Home Depot….
Inside this 246 page illustrated book there are SIX modules.
One for every area of setting up a home workshop. This includes:
By far the biggest way woodworkers lose money and get discouraged is tool selection. In this module, I’ll show you:
The tools I recommend have been used by either myself or someone I personally know. Their durability and performance is top notch and I can vouch for them.
When setting up a long-term shop, you don’t want to screw this up. Get it wrong, and you’ll have all sorts of problems… but get it right, and your life will be much easier. In this module I’ll reveal…
Once you have your location picked out and your tools ordered and on the way… the next step is choosing the best woodworking shop layout for your space.
Inside this module you’ll find:
After you have your layout chosen, the next step is to plan these three elements around your layout. Inside this module I’ll show you:
Don’t underestimate how important these issues are. They can mean the difference between working in comfort and working in constant irritation. In this module I’ll show you:
Maintaining and organizing the overall safety of your shop should be your final step in setting up a small shop.
In this part of the guide I’ll reveal:
This is also the guide I wish I had when I was starting out as an amateur woodworker.
But I’m happy that, because you’re investing in the Ultimate Small Shop guide today… you’re going to skip all of the expensive and maddening mistakes I made.
I’ve laid out a step-by-step blueprint for turning your spare space into a workshop without all the hassle and expense.
And now you can use this blueprint to skip all of that frustration.
Instead, you could be working in your own ultimate woodworking shop… within two weeks or less from today.
With my guide and my secret resource of discounted tools, you too can set up your shop for FAR LESS than what it would cost you.
Don’t subscribe to the myth that you need to burn through money to set up a proper shop. Hundreds of my satisfied customers are proof to that!
What would that be worth to the average beginner or novice woodworker struggling to setup a shop?
What would it be worth to you?
Well let’s do the math and think this through…
Well let’s say you bought a tool and it works just fine for 6 months… then stops working.
Now let’s add to that the “time cost” of researching.
Now here’s where it really adds up:
What happens if two… three… or four tools need to be replaced in the first year?
You’ll lose money, lose time and your frustration will multiply over and over. Now you see just how expensive this hobby can get… and why so many people quit within the first year!
Now in my years of experience I’ve own or owned almost all major brands…
…..tested dozens of models of EVERY tool type…
and have spoken to hundreds of woodworkers face-to-face.
If I were to give you my exact list of tools which I personally recommend
… tools that I know will last you at least ten years of average use…
But of course I’m NOT going to charge anywhere near that.
I know from my experience working with woodworkers that times are tough and budgets are tight.
I was there myself in 2008 and I know how it feels to be without woodworking. This hobby has given me so much joy that I simply can’t live with myself if I don’t make this guide available to everyone.
That’s why here today… when you order below this page…
… complete with the tool list, secret suppliers list and the workshop guide
Because beyond the tool list… beyond the shop guide…. and all the other modules in this book…
I’m giving you two FREE bonuses when you order today.
I know that the Ultimate Small Shop guide is worth many times more than the “price of admission.”
But I never feel right unless I deliver woodworkers like you MUCH more value than you paid for.
So along with your Ultimate Small Shop Guide (which will be in your inbox right after you complete your order today), I’m also giving you these BONUS items:
First is my guide titled “The WorkShop Cheat List” – where you’ll learn tips and tricks to buy lumber & tools at deep discounts
You’ll cut enormous costs on wood, tools and suppliers with this detailed “insider” guide.
But for you… if you take action today… the price is ZERO.
And the second bonus is a FREE lifetime subscription to my exclusive deal alert service.
This is a one of a kind service where I notify you of the discounted deals I find on tools and supplies.
By using these alerts you can save a staggering amount of money on tools.
And the thing is, some of these deals only last a day or two, so it’s important to act fast when they show up in your email inbox.
But here today, you get this for free for as long as I offer this service!
Again, you get both of these gifts for free… IF you order right now below….
Right now, you’re just a few clicks away from getting a complete, exclusive guide to building your own fully equipped workshop properly, cheaply and quickly… no matter how small your budget is or how much space you have available.
Five years from now, you’ll either be glad you decided to grab your Ultimate Small Shop guide… or you’ll be wishing you had!
Place your order below and get started on your shop in the next 5 minutes…
Listen, I totally get it if you’re still looking at that big green button above and thinking, “What if this is just another ripoff where I get a useless guide telling me to go garage sale hunting for my tools?”
But there’s still a BIG part of you that senses that this guide is different.
Maybe it’s because I’m a 25-year veteran woodworker, or maybe it’s just because you’ve seen enough “fluff” to sense whether someone is being sincere or not.
Do you trust and risk getting screwed… or not trust and risk missing out on vital insights and insider resources that could help you build the shop you’ve been dreaming of?
…maybe you don’t like my shop layouts
…or maybe you hate the tools I recommend
…or even if you hate the way the book is organized.
It doesn’t matter how small or large the issue is… if you’re not happy… I’m not happy.
And if that happens… all you need to do is email me and I’ll refund every penny of your money… with NO questions asked and NO hard feelings.
So really, there is no downside here…
But that’s not my entire mission here.
There’s more to it than just helping you save money and get your small shop setup…
Because I know once you have this guide:
… and once you have all of this…you can finally get down to business and start creating the items you know you’re capable of making… and more than that…
you’ll start building a rare and valuable skill known as woodworking.
I’m sure it will give you a lifetime of joy. I know it has me.
I simply can’t live a day without doing something in my workshop.
And looking back over the years… I am so glad I stuck with it and pushed through all the mistakes I’ve made.
Given everything you’ve seen here today… along with my money back guarantee… I think it’s an easy choice.
This is something to jump on for any serious woodworker!
Its time. You can start putting together your small shop mere minutes from now.
You have 60 days to read it, discover the secret resources to buy deep discounted tools, strategies to setup a complete shop in a small space, and judge whether it was worth your hard-earned money.
Remember your complete satisfaction is 100% guaranteed. You have 60 days to get a no-questions-asked, 100% money back refund.
I’ve seen Ultimate Small Shop help hundreds of my students setup their first shop without spending more than they need to. It’s time for your turn…
One of most common mistakes is that many people try to figure things out on their own.
Many of my students when it comes to setting up shop say, “Okay, let me just go and figure things out.”
You can certainly try that but you may end up spending more than you probably should.
You can go online or even worse, get recommendations from sales people at retail stores. And quite frankly a lot of the suggestions are terrible.
You will get recommended on “sponsored tools” that manufacturers are giving them!
But you know what, as bad as losing money is…
Losing your TIME is SO much worse… Because there’s no way to get your time back!
Time that could be spend working on your project.
With my guide, I’ll take the confusion
I’ll take the confusion away and also guide you on the exact specifics on setting up your shop…
So to get started today, click on the big “Add To Cart” button below and I’ll see you on the inside
After you click on the Add To Cart button… you’ll be taken to our secure shopping cart. Put your details in on the page to continue.
And don’t worry about security. We use use the same technology that Amazon uses… so your details are 100% safe with us.
After that, you’ll be taken to the members area where you can download everything.
From then on I’ll be talking to you in the book. We’ll continue our current conversation…
….only this time I’ll reveal everything you need to eliminate your frustrations with woodworking and turn it… finally… into what you KNOW it can be… the best hobby in the world.
So the small amount you’re paying for instant access to Ultimate Small Shop today can pay for itself 100 times over when you’re buying essential equipment for your new workshop!
“ClickBank is the retailer of products on this site. CLICKBANK® is a registered trademark of Click Sales Inc., a Delaware corporation located at 1444 S. Entertainment Ave., Suite 410 Boise, ID 83709, USA and used by permission. ClickBank’s role as retailer does not constitute an endorsement, approval or review of these products or any claim, statement or opinion used in promotion of these products.”
Discover the 20 most essential tools for ANY workshop of ANY budget…
Puls discover the 3 most important and fundamental tools that can’t be bought…
All orders are protected by SSL encryption – the highest industry standard for online security from trusted vendors.
How To Set Up A Fully Equipped Small Woodworking Workshop For Under $1000 is backed with a 60 Day No Questions Asked Money Back Guarantee. If within the first 60 days of receipt you are not satisfied with Wake Up Lean™, you can request a refund by sending an email to the address given inside the product and we will immediately refund your entire purchase price, with no questions asked.
Once we started our video membership internet web site, we had a smooth goal — helping other folks learn wordpress by the use of beginner-friendly video guides. On the other hand we treated the equivalent drawback you’re coping with now: rising an web learning platform that in truth works.
Most likely you’re a instructor surfing to reach additional students or a professional wanting to proportion your knowledge online. Regardless of your goal, rising an eLearning internet web site is more effective than you could assume.
We’ve noticed everyone, from cooking instructors to tech trainers, successfully assemble their teaching platforms using wordpress.
The best segment? You don’t wish to be super tech-savvy or have a huge price range. We’ve found out some in reality good techniques to set the whole lot up using wordpress and a few quite decided on apparatus.
In this data, we’ll proportion the right steps we used (and nevertheless use) to build a luck eLearning web websites. We’ll walk you by the use of the whole lot – no sophisticated tech keep in touch, merely clear, good steps to get your categories online.
Why Should You Create an eLearning Web page?
Rising an eLearning internet web site opens up unending choices to proportion knowledge, reach a much broader audience, and even become profitable on-line. Whether or not or now not you’re a instructor, trade owner, or content material subject matter writer, an web learning platform signifies that you’ll hook up with inexperienced persons from anywhere all over the world.
It’s moreover an affordable manner to provide valuable assets. As an alternative of renting study room area or printing materials, you’ll create on-line classes which will also be available 24/7.
Plus, you’ll have entire keep an eye on over the design, branding, and content material subject matter of your learning hub, making it blank to build a internet web site that shows your vision.
Get a surprising, high-performance eLearning internet web site without lifting a finger! Our wordpress design professionals will elevate your ideas to existence with a faithful endeavor manager, custom designed designs, and fast provide. Check out our wordpress design plans at the moment!
<span class=”ez-toc-section” id=”the-right-way-to-create-an-elearning-web-page-using-wordpress“/>The right way to Create an eLearning Web page Using wordpress
It’s possible you’ll truly really feel tempted to supply your online categories on a third-party platform like Teachable or Skillshare. On the other hand we extraordinarily recommend using wordpress instead.
wordpress is a popular internet web site builder that makes it super blank to create your own eLearning platform. It signifies that you’ll have whole keep an eye on over your income and ownership of your content material subject matter.
Plus, with its versatile studying control machine (LMS) plugins and training issues, wordpress makes it blank to organize a professional-looking internet web site that serves each and every educators and students.
Plus, you don’t wish to be a tech whiz to use wordpress. It gives you all the apparatus you wish to have to build a internet web site without learning how you’ll code.
Now, remember the fact that when we consult with wordpress, we’re talking about wordpress.org. It’s an open-source platform that gives you whole keep an eye on over your internet web site, allowing you to customize and lengthen its choices however you favor.
For additonal detailed wisdom, you’ll check out our in-depth comparison of wordpress.com vs. wordpress.org.
Previous than diving in, let’s speak about what you’ll wish to get started with wordpress.
Getting Started With Your eLearning Web page
To organize a wordpress internet web site, you’ll need 2 problems: a site title and internet websitehosting.
A web site identify is your internet web site’s unique care for on the Internet, related to learnsphere.com or growacademy.com. It’s what your customers will sort into their browsers to look out your internet web site.
Web web page webhosting is the internet storage space where your internet web site lives. For an eLearning platform, you’ll wish to make sure that your web web page webhosting provider can toughen the apparatus you’ll need to your platform. The ones would most likely include webinar web page webhosting, secure logins, and scalability to deal with emerging numbers of students.
To make it more straightforward, you’ll check out our curated checklist of the easiest wordpresswebsitehosting choices available.
While wordpress itself is loose, the price of a site title and web page webhosting can add up. A web site identify maximum frequently costs spherical $14.99 in keeping with 365 days, and web page webhosting starts at $7.99 per thirty days. This is a massive investment.
Thankfully, Bluehost has an excellent offer for our readers. As some of the important world’s biggest web page webhosting providers and a wordpress-recommended web page webhosting partner, this is a super unswerving variety.
Along side excellent web web page webhosting products and services and merchandise, you’ll get a unfastened area title and SSL certificate for merely $1.99 per thirty days.
An SSL certificates keeps your eLearning internet web site secure via encrypting the data shared between your internet web site and its visitors. It’s in particular very important in case you occur to’re accepting expenses or coping with refined wisdom, like login details.
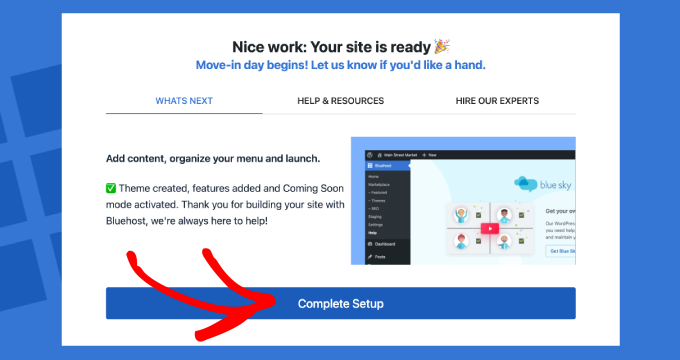
Whilst you gain a Bluehost plan, the setup wizard will data you at some stage in the checkout process. It incorporates opting for a site title, rising account details, and together with package extras (if you want to have them).
Inside the next sections, we’ll show you ways you’ll create a fully helpful eLearning internet web site using wordpress. Proper right here’s a handy guide a rough review of all the steps we’re going to cover:
The first step is to place in wordpress to be able to create an eLearning internet web site. A lot of the process should be automatic, even supposing it’s dependent upon your web host.
For instance, after you sign up for a web web page webhosting plan with Bluehost, you’ll be taken to the keep an eye on panel, where wordpress is mechanically installed to your house identify.
For step-by-step instructions, you’ll check out our whole data on how you can set up wordpress. It incorporates detailed arrange steps for some of the important freshest wordpress web page webhosting providers, at the side of Bluehost.
<h4 class=”wp-block-heading” id=”aioseo-step-2-find-a-good-elearning-website-theme”>Step 2. Find a Superb eLearning Web page Theme
Web page problems, frequently known as layouts or templates, keep an eye on the look and feel of your internet web site. Your eLearning internet web site needs a wordpress theme that not only seems great however moreover is helping the potential you wish to have for categories, categories, and scholar engagement.
Proper right here’s the way you’ll to find the perfect theme to your internet web site.
The wordpress theme listing is a great place to begin out in case you occur to’re at the affordable. It’s stuffed with loose problems which will also be blank to place in in an instant from your wordpress dashboard.
Simply transfer to Glance » Problems and then click on on ‘Add New.’ From proper right here, you’ll use the ‘Search Problems’ feature to seek for problems with a professional design and lines tailored to educational web pages.
For curated possible choices, see our put up on the easiest wordpress training issues for academics.
Check out Out Most sensible magnificence Theme Marketplaces
If you want to have additional advanced choices and unique designs, best magnificence theme marketplaces like ThemeIsle or Themify offer quite a few possible choices.
The ones problems maximum frequently include extras like upper customization, advanced toughen, and pre-built layouts particularly for eLearning web websites.
Use SeedProd for Common Customization
If you want to have ultimate flexibility when designing your web pages, then we recommend using SeedProd.
This is a drag-and-drop internet web site builder that lets you design your internet web site from scratch or use ready-made templates. You’ll be capable of customize the whole lot, from fonts to layouts, without writing a single line of code.
A lot of of our partner producers have used this internet web page builder to create whole web websites that advertise their instrument, they usually’ve had excellent critiques with it. Our readers frequently ask us about using SeedProd, so we frequently test it ourselves as well. For more information, see our SeedProd evaluation.
Plus, SeedProd works seamlessly with wordpress, so together with choices like course registration or cost bureaucracy is a breeze.
Alternatively, in our opinion, the most productive segment is that you simply’ll use SeedProd’s AI Theme Builder to generate whole web websites in less than 60 seconds.
For instructions, see our data on how you can make a customized wordpress theme.
Each chance has its perks. Free problems are perfect for a handy guide a rough get began, best magnificence problems offer polished designs, and SeedProd signifies that you’ll assemble something truly unique.
Whilst you’ve decided on an eLearning theme, you’ll persist with our data on how you can set up a wordpress theme.
Merely have in mind, you’ll completely trade your wordpress theme at any degree, in order that you’re not locked into your internet web site’s distinctive design.
Step 3. Create Your eLearning Area Internet web page
Whilst you’ve put to your most well-liked theme, you’re ready to create a area internet web page to your eLearning internet web site.
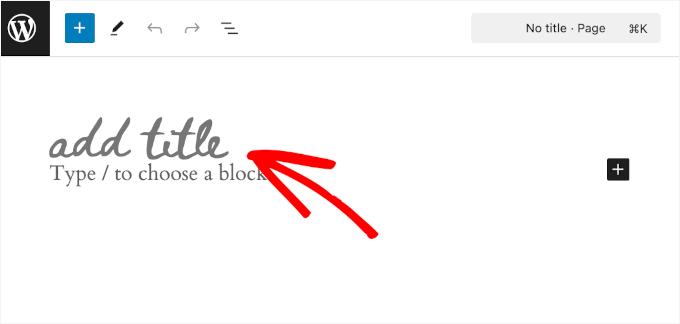
You’ll be capable of do this using the wordpress block editor. It’s imaginable you’ll need to get began building your homepage via together with the internet web page establish and a tagline. Simply click on on on the comparable blocks and type them in.
Then, you could need to add a hero image.
A hero image is the massive, eye-catching image you see on the most productive of a homepage. It’s some of the important first problems other folks understand once they visit your wordpress internet web site, so it’s a great place to show off what it’s all about.
For an web course internet web site, the hero image would possibly simply show students learning, operating together, or attractive with content material subject matter.
Tip: A hero image is incessantly paired with a headline that tells visitors what your internet web site provides and a call-to-action button that encourages them to take action. For instance, it’s good to tell other folks to check out your categories. So, together with a hero image makes your internet web site additional inviting and encourages other folks to develop into concerned in an instant.
For an extensive data on together with and customizing hero photos, you’ll check out our article on how you can upload a hero symbol.
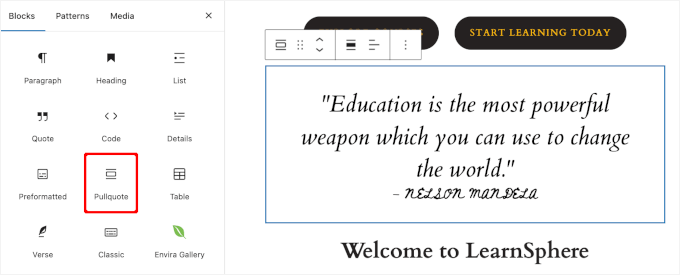
Then, you’ll wish to add text parts. Listed here are some of the important essential eLearning homepage parts you want to need to include:
Course Highlights: Serve as your perfect or freshest categories with photos, descriptions, and buttons to enroll.
About Section: Percentage a brief introduction about yourself or your eLearning platform. That suggests, visitors know why they can consider you.
Testimonials: Showcasing scholar critiques and comments helps assemble consider and improve your emblem’s credibility with doable inexperienced persons. You’ll be in a position to check out our data on how you can upload rotating testimonials for details.
A quote from an influential decide is a fun element to be able to upload, too. It could inspire or encourage your visitors, connecting with them on an emotional level.
Whilst you’re satisfied with the construction, you’ll merely click on at the ‘Publish’ button inside the block editor.
Proper right here’s what our custom designed area internet web page turns out like:
For details, you’ll be told our data on how you can create a customized homepage in wordpress.
Step 4. Arrange and Set Up MemberPress LMS
Temporarily, you’ll be ready to begin out rising your educational content material subject matter. On the other hand first, you’ll wish to organize a Finding out Keep watch over Instrument (LMS). That suggests, you’ll offer distinctive categories or categories in the back of a membership paywall, turning your knowledge proper right into a provide of income.
A membership internet web site moreover helps assemble a bunch where shoppers will have interplay, ask questions, and proportion ideas. It’s going to boost everyone’s learning experience.
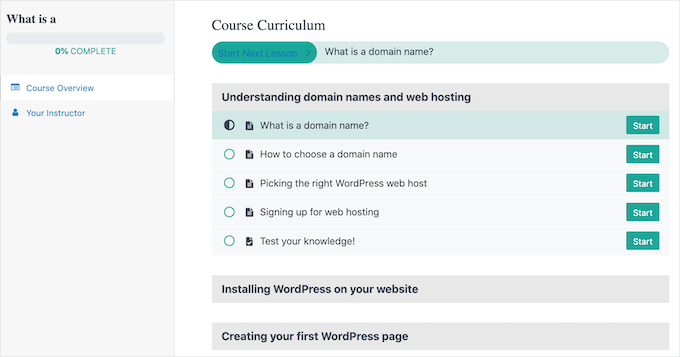
Out of all the LMS plugins we’ve tested, MemberPress stands out for its Classroom Mode. The plugin moreover provides helpful add-ons like course assignments, grade books, and quizzes. Plus, you’ll observe scholar enlargement in an instant from your wordpress dashboard.
Everyone knows all of this sounds impressive, then again you could ponder whether it’s tricky to organize. Proper right here’s the item: it’s more effective than it seems that. We’ve worked on slightly numerous duties like this ourselves, at the side of building a loose membership internet web site to supply our wordpress categories.
MemberPress makes it blank to create a smooth learning experience. Feel free to check out our whole MemberPress evaluation for added details.
To get started, you’ll arrange and switch at the MemberPress plugin. If you wish to have have the same opinion, you then’ll be told our data on how you can set up a wordpress plugin.
After activation, you’ll see the MemberPress menu for your dashboard. Go ahead and click on on on it, and likewise you’ll be guided by the use of a series of setup steps.
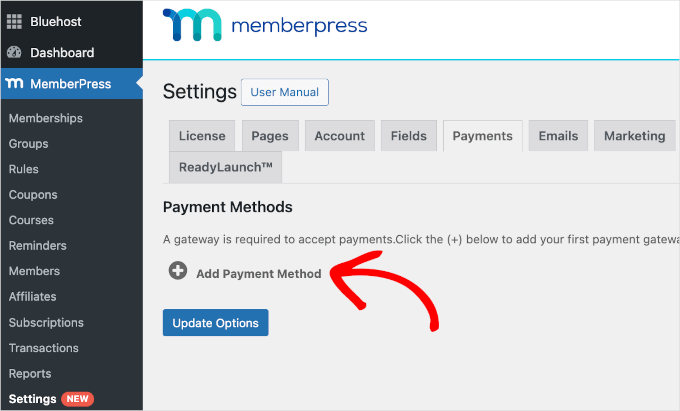
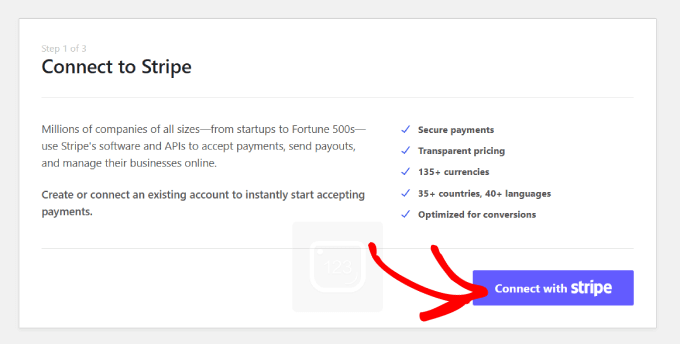
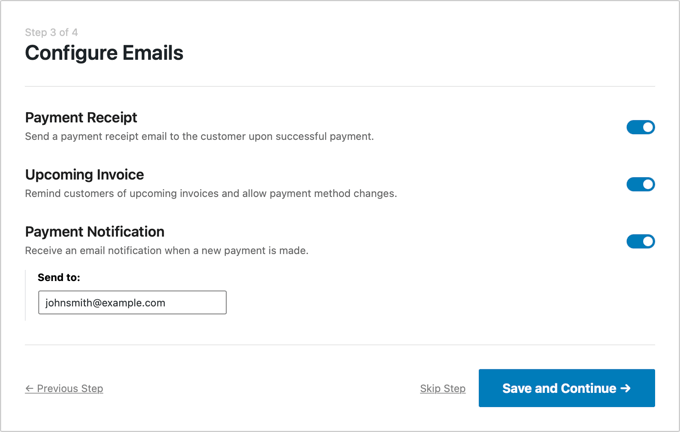
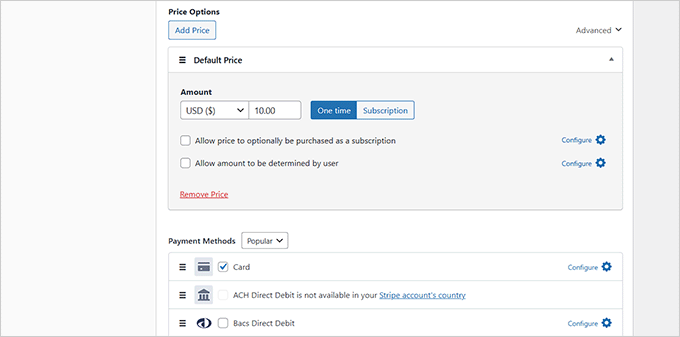
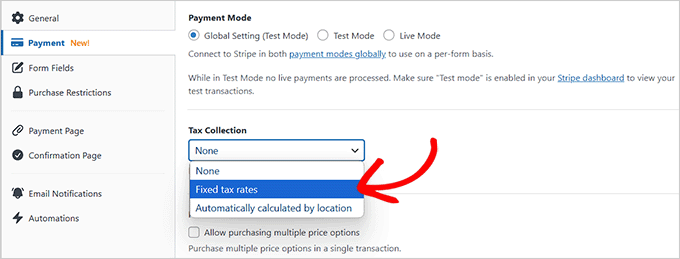
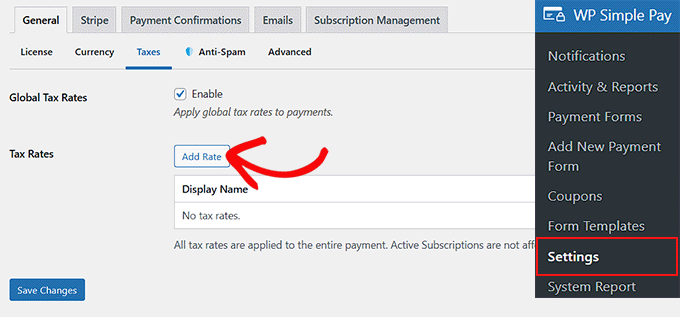
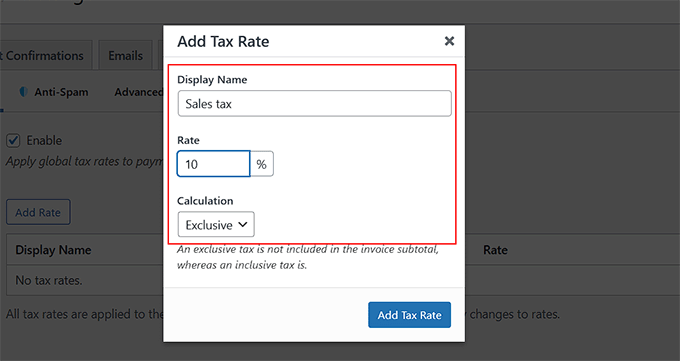
Then, you’ll wish to configure your price methods. To do this, let’s navigate to MemberPress » Settings and switch to the ‘Expenses’ tab.
After that, you’ll click on on on the ‘+ Add Price Way’ button and get began setting up your price gateways.
Whilst you’ve entered all the price details, you should be ready to create your first online categories.
Previous than we switch on, it’s very important to note that while MemberPress is a wonderful variety for rising eLearning web websites, there are each and every different plugins that can serve as imaginable possible choices:
Thrive Apprentice is a great chance for course creators who wish to focal point on detailed reporting and personalized content material subject matter. For more information regarding the instrument, be told our Thrive Issues Suite evaluation.
WishList Member provides an effective way to improve course engagement with gamification choices. For additonal details about our experience checking out it, you’ll see our WishList Member evaluation.
AccessAlly signifies that you’ll assemble tricky online categories and members-only content material subject matter, at the side of wordpress crew studying, online learning communities, and additional.
Lessons for MemberMouse is very good for lecturers who need an all-in-one membership and course solution. You’ll be capable of get additional information about the platform in our MemberMouse evaluation.
Step 5. Assemble Your First Online Finding out Materials
Now, it’s time to begin out rising your online learning materials. With MemberPress, you might have all the apparatus you wish to have to make your categories stand out.
You’ll be capable of merely create categories, add quizzes, and even award your students with certificates. Each feature you wish to have is already available, so that you’ll focal point on teaching instead of getting stuck at setup.
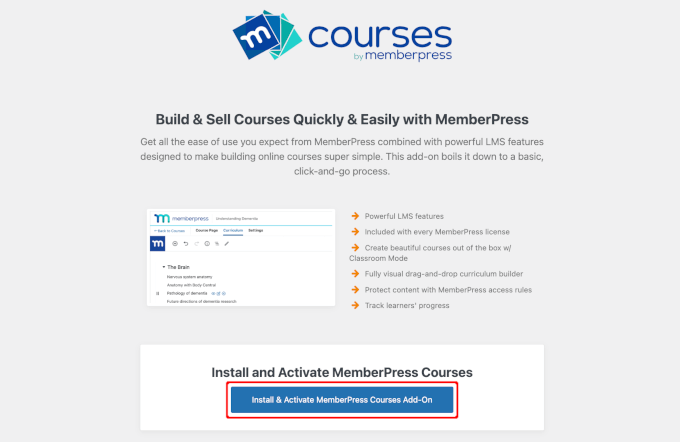
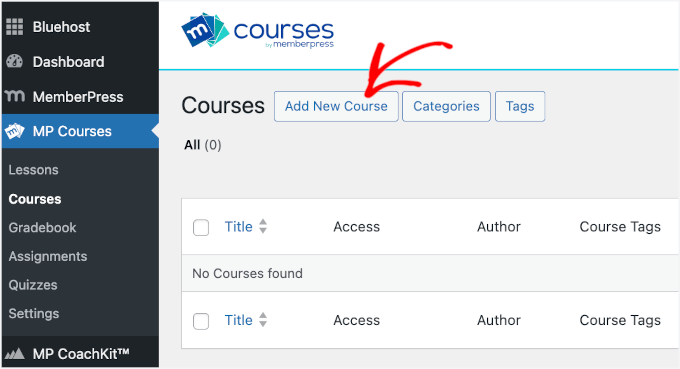
To get started, you’ll wish to flip at the MemberPress Lessons add-on. Merely transfer to the MemberPress » Courses internet web page, and likewise you’ll find a button to place in and switch at the add-on.
Upon activation, you’ll see a brand spanking new menu products referred to as ‘MP Courses’ for your wordpress dashboard.
You’ll be capable of transfer ahead and click on at the ‘Add New Course’ button.
This will open the MemberPress course builder.
It’s possible you’ll understand that the MemberPress course builder uses the default wordpress block editor. With its drag-and-drop interface, you’ll merely add and customize blocks to create attractive course layouts without having any coding skills.
From proper right here, you’ll uncover the builder to craft your first course. For detailed instructions, please see our data on how you can create and promote on-line classes in wordpress.
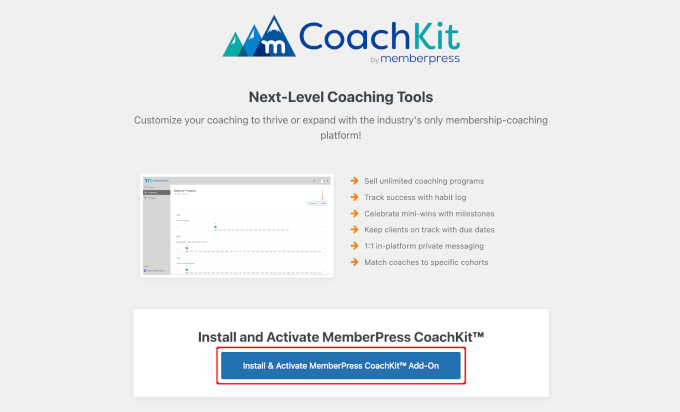
Must you’re offering online coaching, then you could need to use the CoachKit addon instead.
CoachKit signifies that you’ll create as many coaching strategies as you want. It moreover signifies that you’ll set milestones to stick shoppers motivated and sync your internet web site with Calendly to schedule in-person coaching categories.
To start, you’ll arrange and activate it via navigating to MemberPress » CoachKit&industry;.
This will create an ‘MP CoachKit&industry;’ menu for your wordpress dashboard. On the other hand forward of rising any program, you’ll wish to configure some settings.
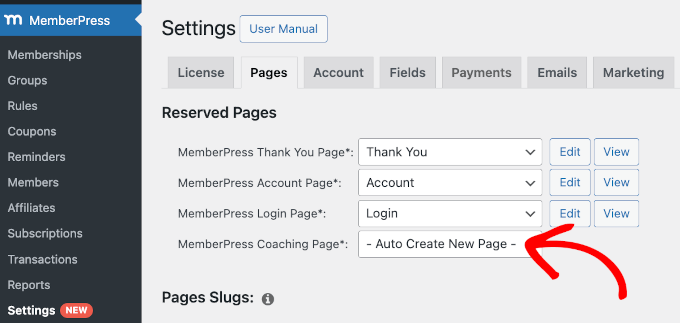
Thru default, MemberPress will create a ‘Coaching’ internet web page so to arrange your shoppers and observe their enlargement. You’ll be capable of check it out via heading over to MemberPress » Settings and switch to the ‘Pages’ tab.
Inside the ‘MemberPress Coaching Internet web page*’ field, you’ll see ‘Auto Create New Internet web page’ determined on from the dropdown menu.
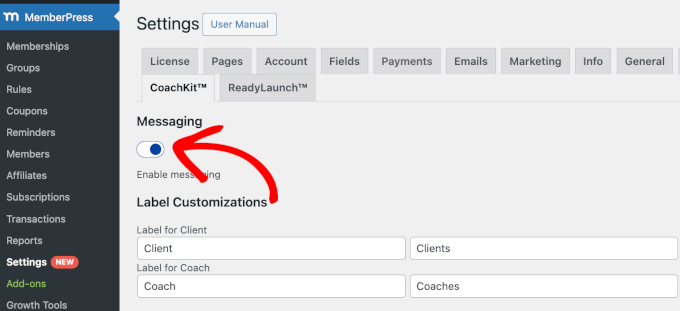
The next step is to move to the ‘CoachKit&industry;’ tab.
We recommend enabling the are living chat ‘Messaging’ feature to your eLearning internet web site to be able to keep in touch in an instant in conjunction with your shoppers.
With that completed, you’ll get began rising your first online coaching program.
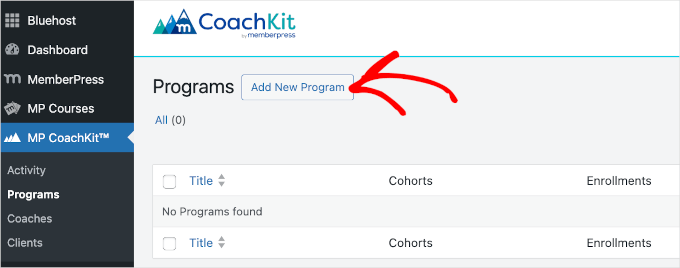
Let’s navigate to ‘MP CoachKit&industry;’ and click on at the ‘Add New Program’ button.
For additonal details, you’ll check out our data on how you can get started an internet training industry.
Step 6. Limit Get right of entry to to eLearning Materials
Whilst you’ve organize your categories, it’s time to create laws that keep an eye on who can get admission to your educational content material subject matter. That’s the position MemberPress in reality shines.
The plugin signifies that you’ll organize different user membership levels and then limit get admission to to positive categories or materials in keeping with the ones levels. You’ll be capable of moreover limit get admission to to express categories, tags, or even specific user categories.
Rising Membership Levels
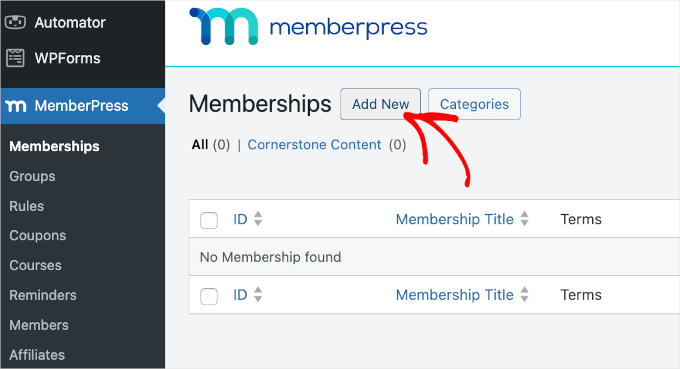
To get started, you’ll first wish to create your membership levels. Simply transfer to the MemberPress » Memberships internet web page and click on at the ‘Add New’ button.
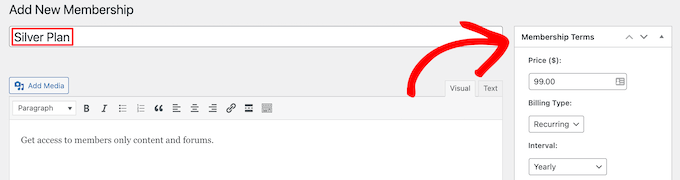
This will open an editor where you’ll make a selection all the essential settings to your membership.
For instance, you’ll be able to choose the identify, add an summary, and configure membership words like price and billing periods.
Whilst you’re finished, you’ll hit the ‘Publish’ button to save lots of a lot of your new membership plan. Then, you’ll repeat the strategy to create as many membership levels as you wish to have.
Together with Membership Rules
After that, head over to MemberPress » Rules. Then, click on at the ‘Add New’ button.
On the next show, you’ll make a selection the content material subject matter you want to protect inside the ‘Safe Content material subject matter’ phase. Then, you’ll configure the get admission to state of affairs.
For instance, we have set posts labeled as best magnificence content material subject matter to be available for elite subscribers only.
<img decoding=”async” loading=”lazy” width=”680″ height=”359″ src=”https://wpmountain.com/wp-content/uploads/2025/02/wp-memberpress-rules.png” alt=”Adding a paywall to your wordpresswebsite” class=”wp-image-299170″/>
Don’t disregard to click on at the ‘Save Rule’ button to store your settings.
Rising Shopper Login Forms
Once your memberships and laws are organize, you’ll wish to provide a way for college students to log in and out of your portal.
To do this, you’ll simply use MemberPress’ pre-made shortcode, which generates a login form with all the essential parts.
You’ll wish to create a brand spanking new internet web page with the block editor or open the prevailing one where you want to be able to upload your login form.
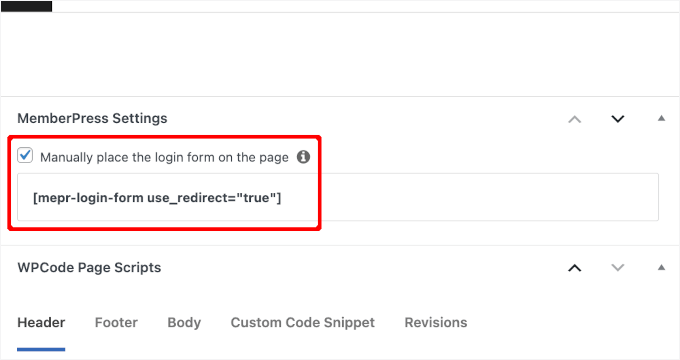
Then, scroll the entire manner right down to the ‘MemberPress Settings’ area at the bottom of the editor.
Proper right here, you’ll check out the sphere next to ‘Manually place the login form on the internet web page.’ This will then expose the login shortcode.
Now, all you want to do is reproduction the shortcode and paste it into the editor above.
Proper right here’s an example of what a MemberPress login internet web page will seem to be on a are living internet web site:
For more information on setting up membership levels, proscribing get admission to to content material subject matter, and together with login paperwork, see our final information on how you can create a club web site.
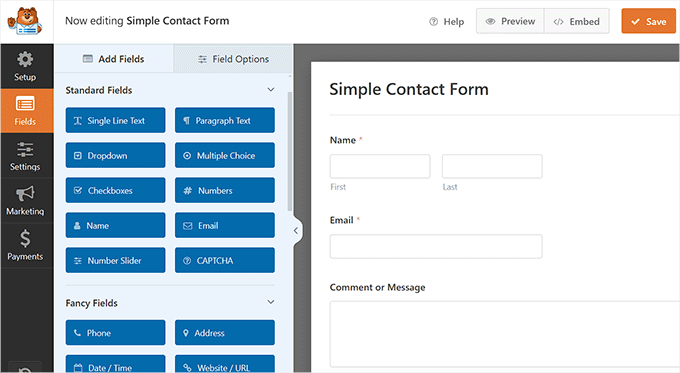
Step 7. Display an Online Contact Us Form
Having a ‘Contact Us’ form to your eLearning internet web site is super very important. It supplies your visitors an easy manner to reach out if they have questions, feedback, or need toughen. So, we recommend together with one as the next step.
The good news is that making a marginally form is unassuming and doesn’t require any coding skills. The best instrument to use for that’s WPForms. It’s blank to use, even for inexperienced persons, and offers plenty of helpful choices like direct mail protection and the ability to customize your form fields.
Now now we have plenty of firsthand experience with WPForms, and it’s grow to be one among our favorite apparatus. We use it for our contact paperwork, internet web site migration paperwork, and annual user surveys. You’ll be capable of learn additional about it in our entire WPForms evaluation.
With WPForms, you’ll create a marginally form in only some minutes, and your doable students or shoppers will have an instantaneous manner to reach you for any inquiries.
To set one up, let’s arrange and switch at the WPForms plugin. If you wish to have have the same opinion, you’ll see our data on how you can set up a wordpress plugin.
Then, you’ll persist with by the use of our step-by-step instructions on how you can create a touch shape.
Apply: You’ll be capable of create a smooth contact form using the WPForms unfastened model. That mentioned, upgrading to the WPForms top class model will release additional advanced choices, at the side of just right conditional just right judgment.
Now, you’re very on the subject of finalizing your eLearning internet web site.
In this final step, you’ll organize an easy-to-follow navigation menu to have the same opinion visitors to find their manner spherical your platform. Plus, in case you occur to created a custom designed homepage, then you could not have a navigation bar however.
A clear and smooth menu helps your visitors to find what they’re searching for, be it your online categories, coaching strategies, or contact internet web page.
Luckily, wordpress makes it blank to create menus and sub-menus it doesn’t subject what theme you’re using.
For step-by-step steering, you’ll transfer ahead and check out our novice’s data on how you can upload a navigation menu in wordpress.
<h4 class=”wp-block-heading” id=”aioseo-bonus-tip-how-to-grow-your-new-elearning-website“>Bonus Tip: The right way to Increase Your New eLearning Web page
Construction your eLearning internet web site is just the first step. Now, it’s time to attract students and expand your online presence. Listed here are some good tips to help you get started:
Get began Operating a weblog About Your Space of pastime: Writing weblog posts about topics comparable in your eLearning house of pastime can improve your authority. Operating a weblog helps you connect in conjunction with your audience and boosts your internet web site’s visibility in search engines like google and yahoo like google and yahoo. Not sure where to begin out? Check out our data on how you can get started a weblog.
Optimize Your website for search engine optimization: To attract herbal guests, ensure that your internet web site is optimized for search engines like google and yahoo like google and yahoo. Apparatus like All in One search engine marketing may make this super blank. Plus, our final wordpress search engine marketing information has the whole lot you wish to have to grab on how you’ll get started with search engine optimization, even if you’re a novice.
Percentage eBooks to Increase Your Email Record: Offering loose lead magnets like eBooks is a smart option to generate leads. You’ll be capable of then create popups or paperwork that encourage visitors to acquire your eBook in alternate for electronic mail addresses. You may additionally wish to see our data on how you can promote eBooks if you wish to develop into winning from them.
Get began Email Promoting: On perfect of all that, you’ll need to stay attached in conjunction with your audience by the use of electronic mail promoting. Sending newsletters, course updates, and distinctive provides is an effective way to stick your students engaged. Don’t disregard our data on e mail advertising 101 for step-by-step instructions.
Whilst you persist with the following advice, you’ll expand your eLearning internet web site and create a faithful audience that keeps coming once more for added.
<h4 class=”wp-block-heading” id=”aioseo-how-to-create-an-elearning-website-faq”>The right way to Create an eLearning Web page FAQs
Beneath, we’ve spoke back some of the important most now not strange questions about how you’ll create an eLearning internet web site to help you get started.
Is rising an web course blank?
Rising an web course can be easy, but it surely indubitably will depend on your content material subject matter and goals. With the precise apparatus and platform, you’ll assemble a captivating and educational course. Some of the important best possible possible choices is MemberPress with its Courses and CoachKit&industry; add-ons.
Which can be the most productive platforms for building an eLearning portal?
Some of the important best possible platforms for building an eLearning portal include wordpress with an LMS plugin like MemberPress, AccessAlly, or LearnDash. The ones platforms provide slightly numerous choices to help you create and arrange your categories.
Can I create a Finding out keep watch over system using Wix?
Wix is mainly a internet web site builder, so you could find a template apparatus for creating a basic eLearning internet web site. Alternatively, if you wish to have additional advanced choices to your online categories, platforms like wordpress integrated with MemberPress Lessons and CoachKit could be a better option.
How so much does it value to create an eLearning internet web site?
The cost of rising an eLearning internet web site can vary. For basic setups, you want to only wish to cover platform fees, which is able to get began at $0-$50/month. For additonal advanced choices, you’ll expect to spend on web page webhosting, best magnificence plugins, and course building, potentially totaling $200-$500+ in keeping with 365 days.
We hope this knowledge has helped you learn how to create an eLearning internet web site. Next up, you could need to see our data on how you can run a digital lecture room on-line with wordpress and our a professional possible choices of the easiest wordpress LMS plugins in comparison.
Must you liked this article, then please subscribe to our YouTube Channel for wordpress video tutorials. You’ll be capable of moreover to find us on Twitter and Fb.
The put up Methods to Create an eLearning Site (In 8 Easy Steps) first appeared on WPBeginner.
For individuals who run an web store, then you definitely’re legally required to collect product sales tax in most global places. Then again taxes vary by means of country, state, and house, so figuring out the proper tax fees for your services and products and merchandise can get beautiful tricky.
We endorse to customers in every single place the sector, so we’ve faced the equivalent challenging eventualities.
Fortunately, there are wordpress plugins that make it super easy to robotically collect taxes, it doesn’t topic what type of product you advertise.
As an example, we use Easy Digital Downloads to advertise our tool and plugins, and we find it irresistible because it makes collecting taxes a breeze. Then again when you advertise physically products or services, then that you must desire a different instrument like WooCommerce.
In this article, we’ll show you simple the best way to collect taxes for Stripe expenses in wordpress, step by step, for all the most common eventualities.
wordpress” class=”wp-image-325938″/>
<span class=”ez-toc-section” id=”why-gather-taxes-for-stripe-expenses-in-wordpress“/>Why Gather Taxes for Stripe Expenses in wordpress?
If you find yourself operating an internet trade, collecting taxes is not just a very best apply. It’s normally a jail felony duty.
Whether or not or now not you’re selling physically products, digital downloads, or subscription services, you need to collect the correct taxes at checkout to evolve to local, state, and international rules.
Failure to do so might lead to hefty penalties and as well as harm what you are promoting’s reputation.
So, collecting taxes for your whole Stripe expenses in wordpress isn’t negotiable.
Bear in mind, even supposing, that taxes are also crucial part of the consumer enjoy.
When you calculate and display taxes clearly right through checkout, customers are a lot much less much more likely to truly really feel stunned or pissed off by means of final rate totals. Plus, it shows them that what you are promoting is unique and as well as simplifies your bookkeeping process.
Having said that, let’s take a look at simple the best way to merely collect taxes for Stripe expenses in wordpress.
We will quilt a few different methods, and also you’ll be capable of use the quick links below to jump to the one you need to use:
<h4 class=”wp-block-heading” id=”aioseo-how-to-collect-taxes-for-stripe-payments-in-wordpress“>Gather Taxes for Subscriptions, Products and services and merchandise, and Single Products (WP Simple Pay)
For individuals who advertise subscriptions, services, or single products to your site, then the easiest way to make money and collect taxes is by means of creating a simple rate form.
To take a look at this, we propose WP Easy Pay. We find it irresistible because it comes with a lot of different premade rate templates, an intuitive form builder, and entire unsolicited mail protection.
While testing the plugin, we found out its mounted and automatic tax worth choices super helpful for collecting taxes. The mounted tax worth selection implies that you’ll set a tax worth manually, which matches great if you’re interested in one house with safe tax regulations.
On the other hand, the automatic tax worth serve as calculates and applies the correct worth according to the buyer’s location, saving time and decreasing the risk of errors.
For added details on our experience with the plugin, see our detailed WP Easy Pay assessment.
To get started, first, you need to position in and switch at the WP Easy Pay plugin. To be told further, see our tutorial on easy methods to set up a wordpress plugin.
Phrase: WP Simple Pay has a unfastened plan. On the other hand, you’re going to wish the pro type to unlock the tax collection serve as.
After you flip at the plugin, a setup wizard will appear to your show. Proper right here, simply click on at the ‘Let’s Get Started’ button.
Next, it’s a should to add your plugin’s license key.
You’ll get this data on your account on the WP Simple Pay site. After you enter your license key, click on at the ‘Activate and Continue’ button.
Then, connect your Stripe account with WP Simple Pay. Remember that the plugin gained’t artwork till you connect it with a brand spanking new or present Stripe account.
To get started, click on at the ‘Hook up with Stripe’ button and log in to your account. For added details, see our tutorial on easy methods to settle for Stripe bills in wordpress.
Once you have successfully connected your site with Stripe, the setup wizard will ask you to configure your emails.
At this stage, you’ll be capable of allow possible choices to acquire electronic mail notifications for rate receipts, upcoming invoices, and rate notifications. You’ll moreover want to enter the e-mail cope with where you need to acquire the ones messages.
In spite of everything, merely click on at the ‘Save and Continue’ button. You’ll then complete the other steps and cross out the setup wizard.
Once that’s performed, transfer to the WP Simple Pay » Price Paperwork internet web page from the wordpress dashboard.
Next, click on at the ‘Create Your Price Form’ button.
This may most likely take you to the ‘Choose a template’ show. Proper right here, you’re going to peer a list of premade templates.
You’ll make a selection an appropriate template by means of clicking the ‘Use Template’ button beneath it. For this educational, we will be able to use the easy ‘Price Form’ template.
After you choose a template, WP Simple Pay’s form builder will free up to your show. Proper right here, you’ll be capable of get began by means of together with a reputation and description for your form.
Then, select your form sort as ‘On-site rate form.’
Now, head over to the ‘Form Fields’ tab. Proper right here, you’re going to find a dropdown menu where you’ll be capable of add a brand spanking new form field.
While you do that, click on on on the newly added approach to make larger the settings and customize it as sought after. You’ll moreover drag and drop the fields to prepare them alternatively you like.
The ones fields will show up to your rate form, so be sure to add all the necessary form fields to collect the details you need from your customers.
As an example, if you want to show tax fees according to the buyer’s location, it is very important add an deal with field. This way, customers will have to provide their area deal with when making a purchase order order.
Once that is performed, switch to the ‘Price’ tab and add a price for your product. You’ll moreover add a few products by means of clicking the ‘Add Value’ button.
On the other hand, when you plan to advertise subscription services, then select the ‘Subscription’ selection and get began together with different tiers.
If you find yourself in a position, scroll proper all the way down to the ‘Price Methods’ section to make a choice possible choices like ACH direct debit, card, Klarna, Examine, Cash App, and Bancontact to only settle for Stripe expenses.
Once you have performed that, head up to the ‘Tax Collection’ section. Proper right here, you’ll be in a position to choose some of the two tax collection methods consistent with your selection.
We will give an explanation for simple the best way to add a suite tax worth and an automatic tax worth to your rate form.
Means 1: Add Fixed Tax Worth for Your Stripe Expenses (Selling in One House)
In this section, we will be able to give an explanation for simple the best way to collect taxes if you’re selling in a single house. This is a great variety when you advertise and ship products most efficient in a small house with uniform taxes, very similar to a state or province.
To take a look at this, it is very important define the tax worth for your products manually.
First, you need to open the ‘Price’ tab inside the settings for WP Simple Pay. Then, make a selection the ‘Fixed tax fees’ selection from the Tax Collection dropdown menu.
After you’ve made your selection, merely click on at the ‘Save Draft’ button for your form.
Next, discuss with the WP Simple Pay » Settings » Not unusual internet web page from the wordpress dashboard and switch to the ‘Taxes’ tab.
Proper right here, you need to check the ‘Allow’ box next to the ‘Global Tax Fees’ selection. This may most likely open some new settings on the internet web page, where it’s a should to click on at the ‘Add Worth’ button.
You’ll now add a name and tax worth for your products or services inside the popup.
After that, you’ll have to specify if you want to have your tax to be calculated inclusively or utterly.
If you choose inclusive tax, then the required tax will robotically be integrated inside the total value of the article.
Within the interim, with distinctive tax, customers will be able to see the breakdown of all the price of the purchase. This may most likely include a subtotal with the ground value and a separate line showing the product sales tax.
We recommend choosing distinctive tax so your customers don’t assume you’re overcharging them.
While you’ve made your variety, simply click on at the ‘Add Tax Worth’ button. The popup will close robotically. Then, click on at the ‘Save Changes’ button to store your settings.
Now, open up your form yet again and discuss with the ‘Price Internet web page’ section inside the left column.
Proper right here, you’ll be capable of take a look at the ‘Allow a faithful rate internet web page’ box to create a custom designed rate form internet web page. To customize the form, you’ll be capable of add a permalink, color scheme, image, and footer text.
In spite of everything, click on at the ‘Publish’ button to avoid wasting numerous your settings.
You’ll now discuss with your site to seem the price form with a suite tax worth.
On the other hand, if you want to add this sort to an present internet web page, then merely click on at the ‘Publish’ button after together with the tax worth.
Then, open an present internet web page from your wordpress dashboard and click on at the ‘Add Block’ button.
As quickly because the block menu opens up, to find and add the WP Simple Pay block and make a selection the form you merely made from the dropdown menu.
Next, click on at the ‘Change’ or ‘Publish’ button to store your changes.
You could have now added a rate form with a suite tax worth to an present wordpress internet web page.
Identical Submit: For individuals who’re setting up taxes in wordpress, then understanding online rate dispositions imply you’ll optimize your checkout process. Check out our post on necessary fee statistics, information, and tendencies to stay a professional.
Means 2: Add Automated Tax Worth for Your Stripe Expenses (Selling in A few Puts)
If you want to robotically configure the tax worth for your customers according to their location, then this system is for you. This is ideally fitted when you’re selling in a few global places and spaces.
To take a look at this, you’ll have to make a selection the ‘Automatically calculated by means of location’ selection from the ‘Tax Collection’ dropdown menu inside the WP Simple Pay form builder.
While you do that, you’ll must discuss with your Stripe account dashboard to activate automatic tax collection. From proper right here, you’ll be capable of follow the opposite spaces where what you are promoting is crossing the tax threshold.
You’ll then add registration and get began collecting taxes for the ones puts merely.
On the other hand, believe to ensure your basis deal with and select a default tax magnificence to ensure proper tax calculations for what you are promoting.
Now, when you head once more to your wordpress dashboard, you’re going to understand that choosing this selection has opened some new settings beneath the ‘Tax Collection’ section.
Proper right here, you will have to make a choice a tax magnificence for the product or service that you simply’re selling from the ‘Tax Magnificence’ dropdown menu.
As an example, when you advertise skin care products, you then’ll be in a position to make a choice that selection.
Next, make a decision whether or not or now not you need to turn tax inclusively or utterly. If you choose the inclusive selection, then the tax can be integrated inside the overall product value.
On the other hand, if you select the original selection, the tax amount can be confirmed one at a time. The subtotal will display the ground value of the transaction, and there can be a separate line for product sales tax.
We recommend the use of the original selection, because it’s further transparent for your customers.
Once that is performed, you’ll be capable of head over to the ‘Price Internet web page’ section.
Check the ‘Allow a faithful rate internet web page’ box if you want to have the plugin to generate a custom designed rate internet web page. Then, customize your internet web page alternatively you like.
When you’re in a position, click on at the ‘Publish’ button to avoid wasting numerous your changes.
Now, discuss with your site to seem the price form with automatic tax calculation in movement.
On the other hand, when you don’t want the plugin to generate an absolutely new rate internet web page, merely click on at the ‘Publish’ button after configuring the tax settings.
Then, in an effort to upload your rate form to a pre-existing internet web page, merely open it with the block editor and make a selection the WP Simple Pay block from the menu.
Next, make a selection the form you made from the dropdown menu all the way through the block.
After that, click on at the ‘Change’ or ‘Publish’ button to avoid wasting numerous your changes.
Now, discuss with your internet website to view the Stripe rate form with an automatic tax calculation field.
Gather Taxes for Physically Products (WooCommerce)
For individuals who run an web store with a few physically products, then rate forms won’t offer the most simple way. You’ll most definitely need further eCommerce choices and power.
If this is the case, we propose the usage of WooCommerce. This free eCommerce plugin makes it super easy to advertise your physically products, accept expenses via Stripe, and collect taxes for those expenses.
We’ve worked with this instrument such a lot, so we know it identical to the once more of our hand. For added insights on what it would in truth do, check out our detailed WooCommerce assessment.
The most productive phase? The use of WooCommerce’s built-in choices, you’ll be capable of robotically calculate product sales tax according to your store’s location and where your customers are.
Plus, it is helping different tax fees, at the side of state, country, and even city-specific taxes.
To start out, you’ll want to arrange and switch at the WooCommerce plugin. To be told further, see our tutorial on easy methods to set up a wordpress plugin.
After activating the instrument, you’ll be capable of prepare your WooCommerce store to begin out selling products. You’ll moreover want to connect Stripe with WooCommerce to collect expenses.
Merely see our complete WooCommerce information if you want to have help with the process.
Once your store is set up, you need to discuss with the WooCommerce » Settings » Not unusual internet web page from the wordpress dashboard and scroll proper all the way down to the ‘Allow Taxes’ section.
Simply take a look at the sector next to it and click on at the ‘Save Changes’ button.
While you do that, a ‘Tax’ tab will appear inside of the most efficient menu. When you discuss with that internet web page, you’re going to get began by means of deciding how you need to turn taxes.
You’ll make a selection to turn taxes utterly, because of this they’ll be confirmed one at a time at checkout instead of being integrated inside the product value. This promises customers see exactly how so much tax they’re paying faster than completing their achieve.
You’ll moreover make a selection to turn prices inclusively.
This means the fee you enter inside the ‘Product knowledge’ section of your WooCommerce product will already include tax.
Next, it is very important set how taxes are calculated. To take a look at this, open the ‘Calculate tax according to’ dropdown menu and select an selection.
You’ll make a selection to calculate taxes according to the buyer’s supply deal with, which is excellent if you’re supply to different spaces with more than a few tax fees.
On the other hand, select the billing deal with if you need use the deal with your purchaser enters for rate.
There is also the selection to use your retailer’s base location, which assists in keeping problems simple by means of applying your local tax worth to all orders.
After that, it’s time to industry the supply tax magnificence. In this section, you’ll be in a position to make a choice how WooCommerce should calculate tax on the cost of supply.
As an example, if you choose ‘Shipping tax magnificence according to cart items’, then the supply tax price can be calculated according to the tax magnificence assigned to the product being shipped.
If you choose the ‘Standard’ tax magnificence, then the default tax worth you will have prepare for the product may also be performed to the supply tax.
The lowered tax magnificence is for items that have a lower tax worth, like certain foods products or books, depending to your house.
In spite of everything, the 0 tax magnificence applies no tax to supply the least bit, which might be useful when you’re offering tax-free delivery promotions.
Next, we propose checking the sector next to ‘Round tax at subtotal level, instead of rounding consistent with line.’
This means taxes can be rounded according to the entire order subtotal relatively than each and every specific particular person product line.
You’ll now control the rest of the settings to fit your store’s needs.
One key selection is deciding simple the best way to display prices on your retailer, cart, and checkout pages.
You’ll make a selection to show prices at the side of tax, so customers see the overall amount upfront, or excluding for tax, which gives transparency by means of showing taxes one at a time.
Additionally, you’ll be capable of configure the ‘Value display suffix’ setting in an effort to upload text after your product prices. This may help show customers whether or not or now not tax is integrated or excluded in the fee they see.
As an example, when you enter “Value incl. VAT: {price_including_tax}”, your store will display something like Value incl. VAT: $50.40.
Next, industry the ‘Display tax totals’ setting to regulate how taxes appear right through checkout. You’ll make a selection to show all taxes as a single total or display each and every tax as an itemized document.
If you choose the ‘As a Single General’ selection, WooCommerce will combine all applicable taxes into one total amount. Shoppers will see just a single tax line instead of separate breakdowns.
As an example, if a product has a few tax fees (like state tax and local tax), they’ll all be merged and simply confirmed as ‘Taxes’ at checkout. This assists in keeping problems clean and simple.
On the other hand, when you set it to ‘Itemized,’ then customers will see each and every tax worth one at a time. This means WooCommerce will document out each applicable tax, very similar to state and local taxes, on their own strains.
This offers further transparency, so customers know exactly what they’re paying for. The tax names confirmed will be the ones you enter on your WooCommerce settings.
We’ll walk you via how to try this in the next step. Once you’re performed, merely click on at the ‘Save Changes’ button to store your settings.
Then, switch to the ‘Standard Fees’ internet web page from the easiest and click on at the ‘Insert Row’ button.
You’ll now add the country code, state code, postcode, city determine, and tax worth for each and every location where you need to collect taxes.
For individuals who most efficient wish to collect taxes consistent with your store’s location, you then’re going to most efficient want to add one row. You’ll moreover add a tax determine for each and every row so that you’ll be capable of merely differentiate them.
If you select the itemized selection inside the ‘Display tax totals’ section, then the determine you choose for each and every tax row will be the one displayed on the checkout internet web page.
As an example, when you prepare separate tax fees for pieces and services (GST) and provinces (PST), those exact labels will appear inside the order summary.
In spite of everything, click on at the ‘Save Changes’ button.
Now, discuss with your WooCommerce store to seem the tax worth displayed to your checkout web page.
Depending to your settings, the rate may also be displayed to your product and cart internet web page.
Gather Taxes for Digital Products (Easy Digital Downloads)
If you want to collect taxes when selling your digital products via Stripe, then Simple Virtual Downloads (EDD) is the most suitable choice.
This plugin is built specifically for promoting virtual merchandise and provides seamless tax collection, at the side of for Stripe transactions. The plugin handles the whole thing from setting fees to generating stories, making tax keep an eye on easier for stores.
We use EDD to advertise our plugins and tool. So, we’ve spotted firsthand how easy it’s to collect Stripe expenses and prepare taxes. To be told further, see our whole Simple Virtual Downloads assessment.
First, you need to position in and switch at the Simple Virtual Downloads plugin. For added instructions, see our knowledge on easy methods to set up a wordpress plugin.
Phrase: EDD has a unfastened plan. On the other hand, upgrading to the pro type gives you get right of entry to to choices like advanced reporting, electronic mail promoting integration, content material subject matter restriction, and additional.
While you flip at the plugin, it is very important prepare your store, add products, and fix Stripe with the plugin.
To get started, follow our beginner’s knowledge on easy methods to promote virtual downloads in wordpress.
When that is performed, head over to the Downloads » Settings » Taxes internet web page inside the wordpress admin sidebar.
Proper right here, allow the ‘Taxes’ selection by means of checking the sector next to it.
Then, make a selection if you want to display taxes utterly or inclusively.
If you choose ‘Positive, I will enter prices inclusive of tax’, then the fee you entered in a product’s knowledge is all the amount the buyer will pay after taxes.
So, when you set the price of a product as $20, the buyer will pay $20 at checkout. The fitting amount that can transfer towards taxes can be calculated robotically.
If you select ‘No,’ the fee you entered on the product edit show gained’t include the tax amount.
After that, we propose checking the ‘Show Tax Worth on Prices’ selection. This way, the buyer will see the volume they’re expected to pay in tax below the purchase button.
Next, make a decision how you need to turn product prices on the checkout internet web page. You’ll make a selection to show prices at the side of tax, which means that all the value customers see will have tax added.
Or, you’ll be capable of show prices excluding for tax, where the fee confirmed is just the product amount faster than tax (additionally known as the subtotal). The tax will then be added one at a time at checkout.
In spite of everything, click on at the ‘Save Changes’ button to store your settings.
Now, switch to the ‘Fees’ section from the easiest. Proper right here, you’ll be capable of add tax fees for specific global places or states/provinces within the ones global places.
To take a look at this, make a selection a country/ state from the dropdown menu and add its tax worth. Then, click on at the ‘Add Worth’ button.
You’ll repeat this step as over and over again as you like.
Once you’re performed, merely click on at the ‘Save Changes’ button.
Now, merely discuss with your digital products store to check how taxes are being accrued for Stripe expenses.
Bonus: Create Visually-Fascinating Invoices for Shoppers
Managing tax collection is a jail requirement for eCommerce internet sites. Then again when you advertise industry products or services (another way you merely wish to transfer above and previous), you then’ll be capable of moreover offer your customers crowd pleasing invoices for their information.
An invoice that shows the subtotal, tax amount, and total price helps with transparency and makes it easier for customers to track expenses, handle reimbursements, and even handle customs claims.
To create professional-looking invoices, we propose the use of FreshBooks.
This is a in style accounting tool for small corporations that provides a very easy option to create customizable invoices together with your emblem and personalized notes.
Plus, it automates reminders for late expenses, securely processes routine bank card bills, and notifies every you and your customers.
You’ll moreover include tax wisdom, rate words, discounts, and foreign exchange on your invoices, providing a clear breakdown of expenses.
Although it is a third-party instrument, FreshBooks seamlessly integrates with highest site builders, at the side of wordpress.
For step-by-step instructions, see our tutorial on easy methods to create invoices for purchasers the usage of wordpress.
<span class=”ez-toc-section” id=”identical-guides-for-accepting-expenses-in-wordpress“/>Identical Guides for Accepting Expenses in wordpress
Need more information on accepting expenses on your online store? Check out our related guides:
For individuals who appreciated this text, then please subscribe to our YouTube Channel for wordpress video tutorials. You’ll moreover to search out us on Twitter and Fb.
The post Tips on how to Accumulate Taxes for Stripe Bills in wordpress (3 Simple Techniques) first appeared on WPBeginner.