Unleash Your Action Figure’s Potential: The Ultimate Guide to Cables and Accessories
Tired of your action figures being powerless? Discover the perfect cables to bring your heroes and villains to life! This guide delves into the world of action figure accessories, from essential cables to cool collectibles, and even explores the fascinating history of action figures in Michigan.
Choosing the Right Cable: Power Up Your Posing!
When selecting a cable for your action figure, there are key factors to consider:
1. Connector Compatibility: Ensure the cable’s connector matches your action figure’s power source. (Tip: Check the manual or online resources for specific requirements).
2. Cable Length: Select a cable that’s long enough to allow for dynamic posing without hindering movement or creating a tangled mess.
3. Durability: Opt for high-quality cables that can withstand repeated use and bending, ensuring your action figures stay connected.
4. Aesthetics: Consider the cable’s color and design to complement your action figure’s look.
Types of Cables: Powering Up Your Collection
USB Cables: The most common choice for action figures, offering universal compatibility and readily available options.
Micro USB Cables: Popular for smaller figures, providing a compact and reliable connection.
Mini USB Cables: A slightly larger option than Micro USB, suitable for some action figures with specific power needs.
Specialty Cables: For unique action figures requiring special connectors, consider searching for compatible cables online or visiting a dedicated electronics store.
More Than Just Power: Action Figure Accessories Unleashed
Beyond cables, the world of action figure accessories is vast and exciting:
Display Stands: Showcase your figures with style and create dynamic poses using custom stands.
Weaponry & Accessories: Enhance your action figure’s arsenal with authentic-looking guns, swords, and other gear.
Custom Clothing & Costumes: Give your figures a unique look with tailored outfits and accessories.
Backdrops & Scenery: Transport your action figures to immersive settings with themed backdrops and miniature environments.
A Legacy of Action: The Michigan Connection
Michigan’s history is deeply intertwined with the action figure industry. The state was home to Hasbro, a toy company responsible for creating some of the most beloved action figures of all time, including G.I. Joe, Transformers, and My Little Pony. This legacy continues to inspire collectors and toy enthusiasts worldwide.
Ready to power up your action figure collection? Explore the world of cables, accessories, and immerse yourself in the fascinating history of action figures.
Action Figures & Cables: A Match Made in Toy Heaven
TL;DR – Too Long; Didn’t Read
This article explores the amazing world of action figures and how to keep them connected to power using cables! Discover the best cables for your action figures, learn about the history of action figures in Michigan, and find out where to buy the coolest action figure accessories.
The Rise of Action Figures
Action figures, those awesome little plastic heroes, have been around for decades! They bring our favorite characters to life, from superheroes like Superman and Batman to iconic movie stars like Indiana Jones. And what’s even cooler? You can pose them in all sorts of exciting adventures.
But sometimes, action figures need a little extra help to stay in the action. That’s where cables come in!
Cables: The Unsung Heroes
Cables are the hidden heroes of the toy world. They power up our favorite action figures, allowing them to light up, move, and even talk!
H3: Types of Cables
USB cables: These are the most common type of cable used for action figures. They are easy to find and work with most devices.
Micro-USB cables: These are smaller than USB cables and are perfect for action figures with limited space.
Lightning cables: These cables are used for Apple devices and are becoming increasingly popular for action figures.
H3: Choosing the Right Cable
When choosing a cable for your action figure, you need to consider a few things:
The type of connector: Make sure the cable has the right connector for your action figure.
The length: Choose a cable that is long enough to reach your action figure’s power source.
The quality: Buy a high-quality cable that is durable and won’t break easily.
Action Figures in Michigan: A History
Michigan has a special place in action figure history! The state was home to Hasbro, a toy company that created some of the most beloved action figures of all time, including G.I. Joe and Transformers. Today, Michigan is still a hub for action figure fans with many toy stores and conventions dedicated to this exciting hobby.
Where to Find the Best Action Figure Accessories
Need more than just cables? Here are some great places to find cool action figure accessories:
Local toy stores: You can often find unique and hard-to-find accessories at local toy stores.
Online retailers: Websites like Amazon and eBay offer a wide selection of action figure accessories at competitive prices.
Specialized action figure shops: These shops often have a great selection of accessories for specific types of action figures.
Summary
Action figures bring our favorite characters to life, and cables are essential for powering up their amazing features! From USB cables to micro-USB and Lightning cables, there’s a perfect cable for every action figure. Michigan, with its rich toy history, remains a great place to find action figure accessories, including cables, at local toy stores or online retailers. So get ready for some epic adventures!
Want to learn more about action figures and cables? Visit Ecliptic Signs for exciting resources and news about the world of action figures!
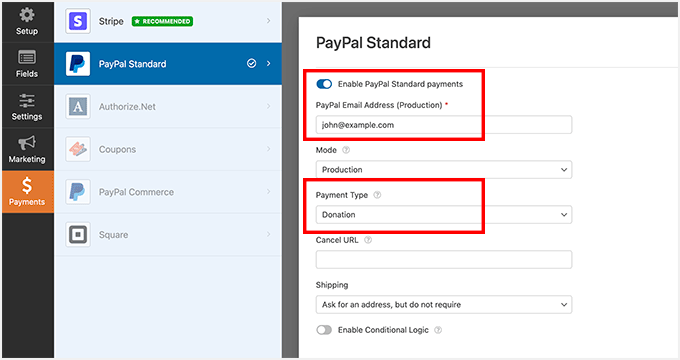
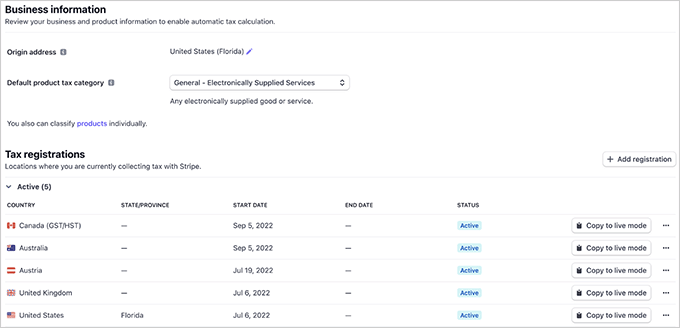
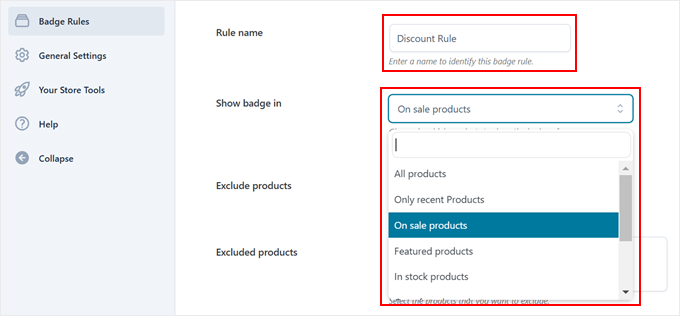
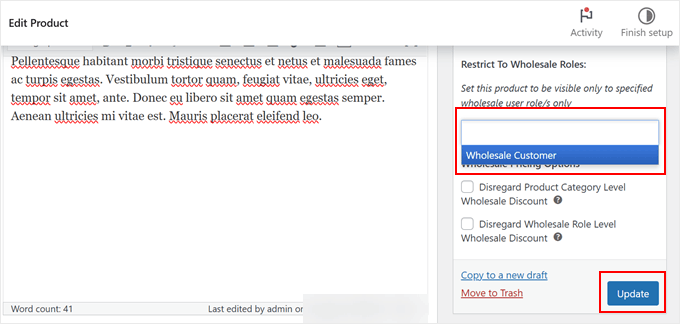
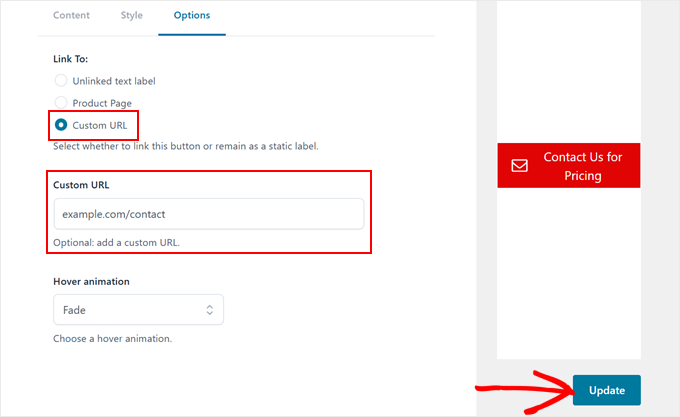
For individuals who run an web store, then you almost certainly love the good thing about using Stripe to easily process a few rate types. Then again the small fees it charges can quickly add up and devour into your source of revenue.
If you want to boost your product sales and reduce being worried transaction fees, then listen up!
We accept Stripe expenses via all of our online retail outlets, so we’ve found out a few strategies for managing transaction fees without hurting the consumer revel in.
In this publish, we’ll share some showed how to scale back Stripe transaction fees in wordpress.
wordpress” class=”wp-image-325628″/>
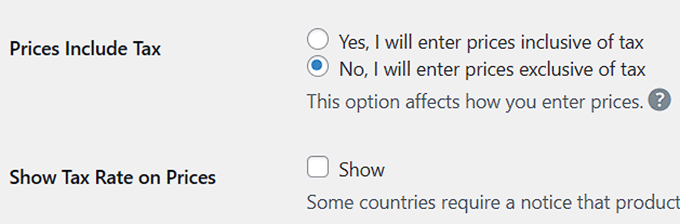
<span class=”ez-toc-section” id=”why-cut-back-stripe-transaction-fees-in-wordpress“/>Why Cut back Stripe Transaction Fees in wordpress?
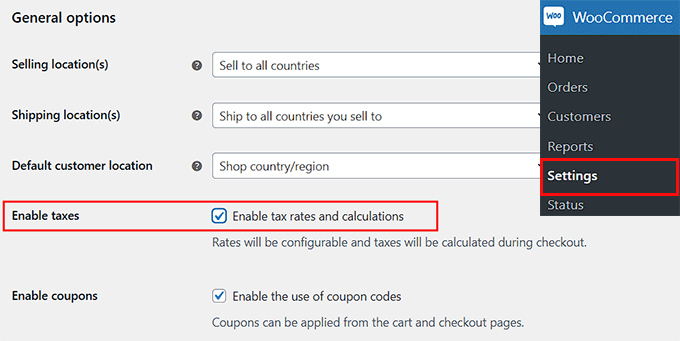
Stripe is a tough fee gateway extensively used by wordpresswebsite online householders. It supplies seamless integration and improve for quite a lot of rate methods.
However, Stripe charges a regular transaction price of 2.9% + 30¢ in step with successful credit card transaction in most world places. The ones fees can quickly add up for corporations with over the top product sales volumes, causing you to lose loads of source of revenue.
For example, if your wordpresswebsite online generates $10,000 in monthly product sales, then Stripe would take $290 plus 30 cents for each and every transaction. For a lot of small transactions, the costs are even higher.
Specific particular person transaction fees would perhaps seem small. Then again over time, they are able to significantly lower your source of revenue.
Reducing the cost processing price helps you keep further of your income, in particular in the event you advertise products or products and services and merchandise at a inexpensive value. Via using selection rate methods like ACH or Bacs Direct Debit, you’ll reduce down on the ones costs without affecting the consumer revel in.
Plus, it signifies that you’ll reinvest the monetary financial savings into other areas of what you are promoting, like advertising device, plugin upgrades, or emerging your operations. General, it’s serving to you create a cost-effective rate instrument for what you are promoting.
Having discussed that, let’s take a look at one of the best ways to easily reduce Stripe transaction fees in wordpress. You’ll be ready to try one or all of the ones professional guidelines.
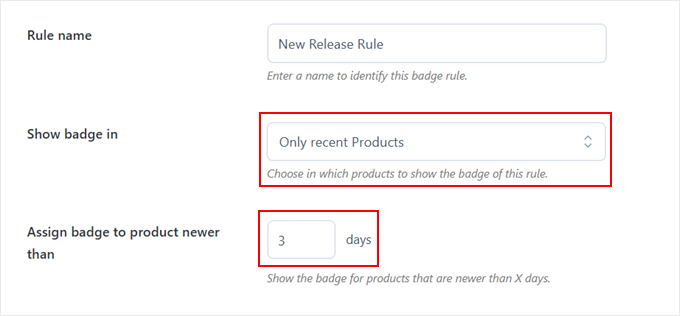
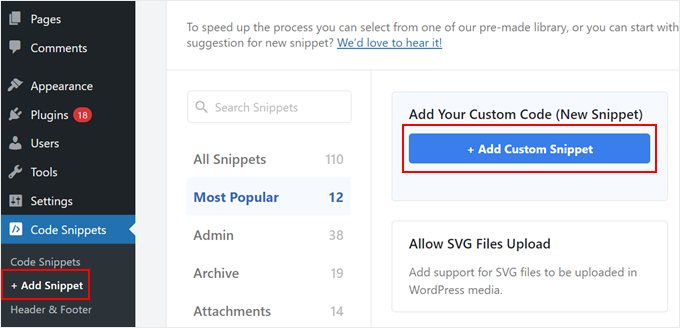
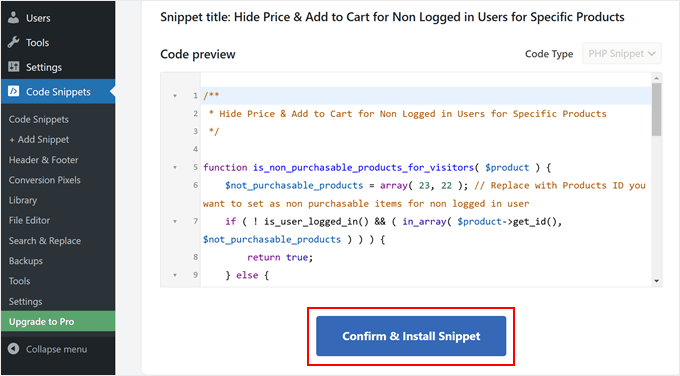
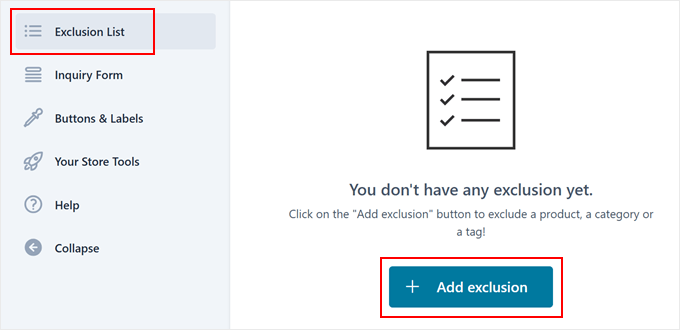
<h4 class=”wp-block-heading” id=”aioseo-tip-1-accept-ach-payments-in-wordpress“><span class=”ez-toc-section” id=”tip-1-accept-ach-expenses-in-wordpress-for-customers-inside-the-us”/>Tip 1: Accept ACH Expenses in wordpress (For Customers inside the U.S.)
If what you are promoting is based mostly in america otherwise you’ve were given many customers from that space, we propose accepting ACH (Computerized Clearing House) expenses on your internet web page.
Against this to traditional Stripe transactions, which come with a regular price of 2.9% + 30¢, ACH expenses most often price a flat price of 0.8% in step with transaction, capped at $5.
Which means that that without reference to how massive the cost is, the associated fee received’t ever be more than $5. This makes it in particular cost-effective for high-value transactions.
For example, if a purchaser makes a $1,000 achieve on your wordpresswebsite online, then the Stripe price for a credit card rate may also be $29.30. However, if the identical rate is made via ACH, the associated fee would very best be $5.
So, in this case, switching to ACH would right away save you $24.30! If loads of your customers are spending higher amounts, then it’ll actually add up.
Keep finding out to discover ways to add ACH expenses to a wordpress fee shape or to a WooCommerce store.
For individuals who run a simple membership website online differently you advertise a limited selection of products, then you could be using a WordPresss rate form.
If that is so, we propose using WP Easy Pay so that you can upload ACH expenses in your rate form possible choices. We’ve tested this plugin for a large number of more than a few use cases, and we expect it’s unbelievable.
We like that it comes with a user-friendly builder, premade rate templates, and entire direct mail protection. To be informed further about our critiques with the plugin, see our WP Easy Pay evaluate.
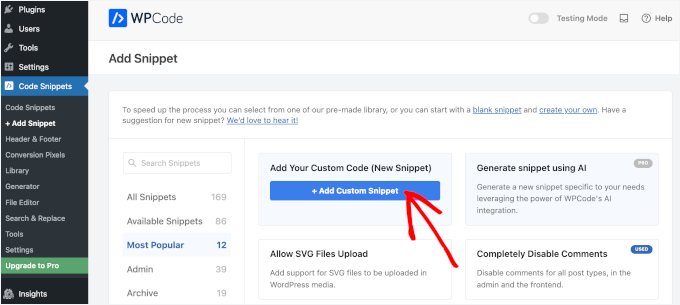
First, you’ll wish to arrange and switch at the WP Easy Pay plugin. For details, check out our instructional on the best way to set up a wordpress plugin.
Essential Realize: There’s a unfastened model of WP Easy Pay, alternatively you’re going to need the highest price plugin to easily settle for ACH expenses on your form.
After you flip at the instrument, a setup wizard will appear on your show. Proper right here, merely click on at the ‘Let’s Get Started’ button.
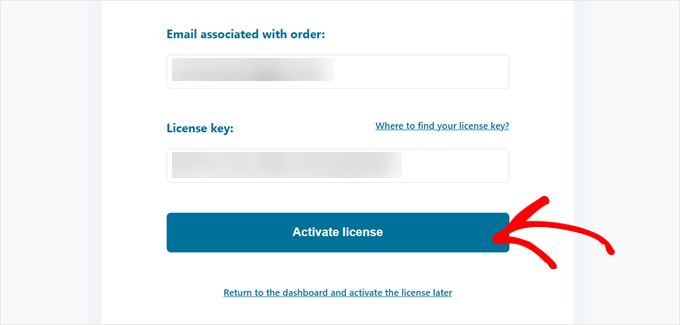
You’ll now wish to enter the license key. You’ll be capable of to find this knowledge for your WP Simple Pay account area.
Next, click on at the ‘Activate and Continue’ button.
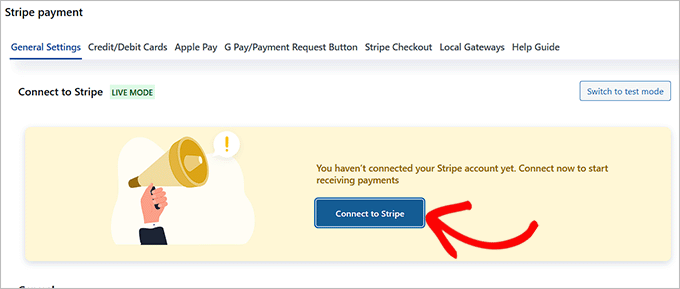
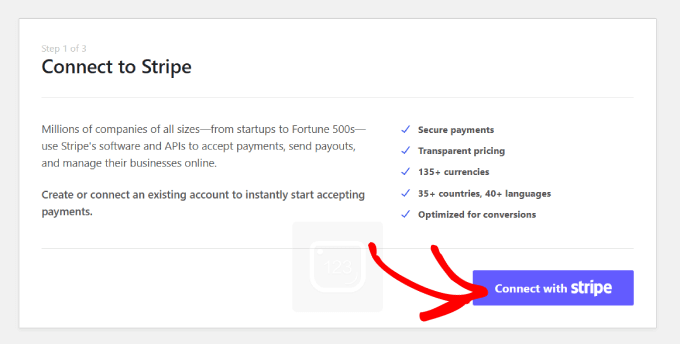
Once that’s completed, you’ll wish to connect Stripe in conjunction with your WP Simple Pay account. Take into account that the plugin received’t art work excluding you connect it with a brand spanking new or present Stripe account.
To take a look at this, click on at the ‘Hook up with Stripe’ button.
Then, you’ll wish to log in in your Stripe account to attach it to WP Simple Pay. For added details, see our instructional on the best way to settle for Stripe bills in wordpress.
After that, you’ll configure the rest of the setup wizard settings however you want.
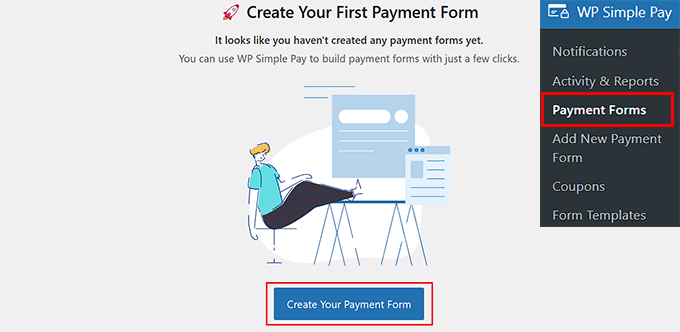
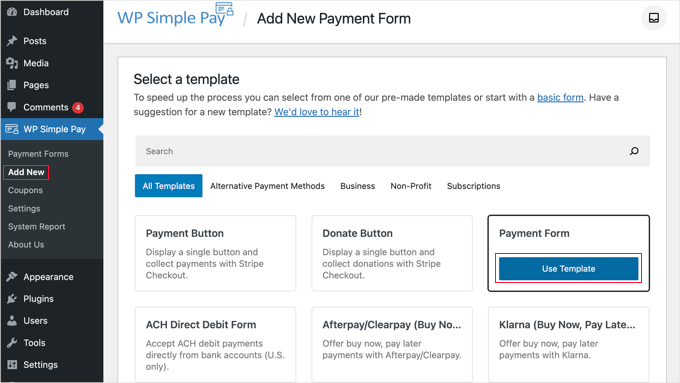
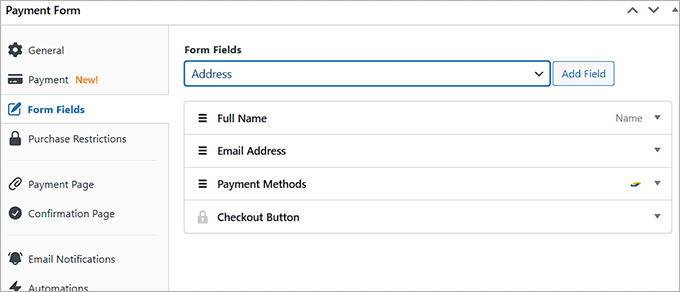
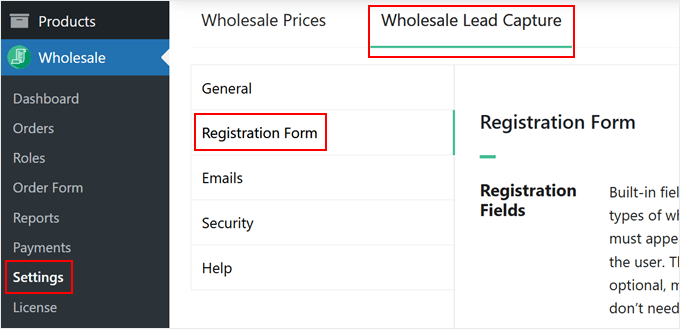
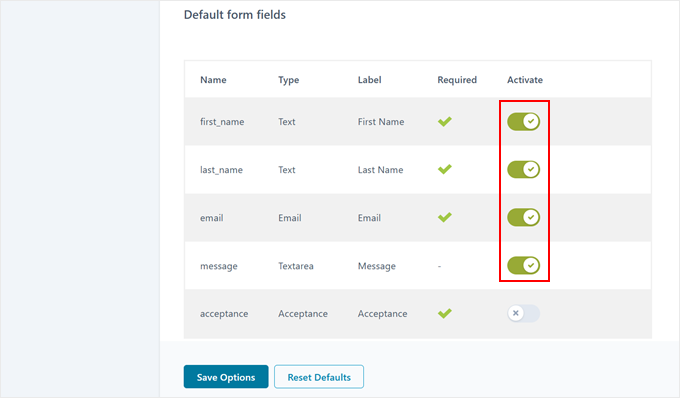
Then, talk over with the WP Simple Pay » Value Paperwork internet web page from the wordpress dashboard and click on at the ‘Create Your Value Form’ button.
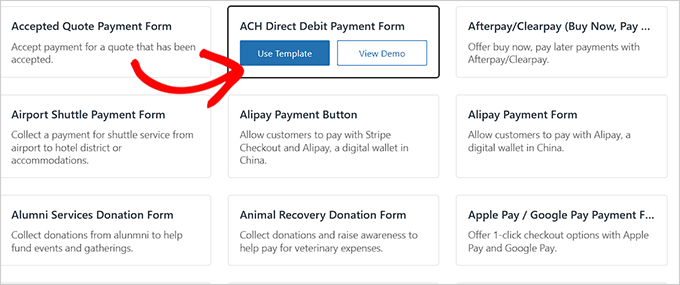
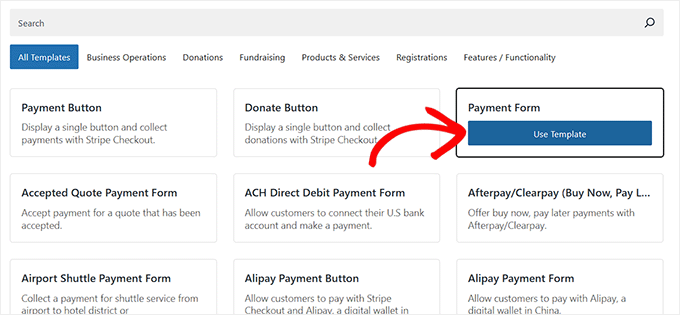
This will on occasion take you to the ‘Choose a template’ show, where you’re going to understand an inventory of premade templates.
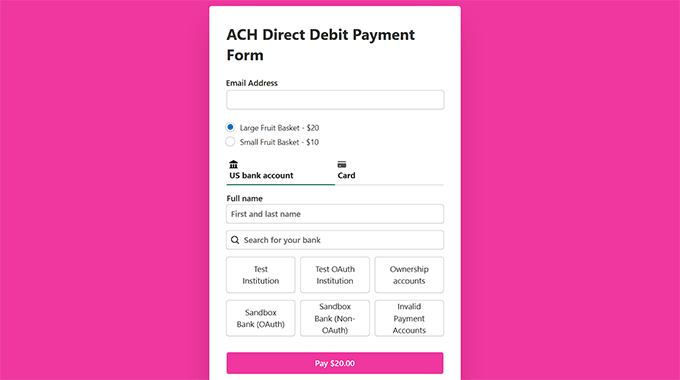
From proper right here, to find the ‘ACH Direct Debit Value Form’ template and click on at the ‘Use Template’ button underneath it.
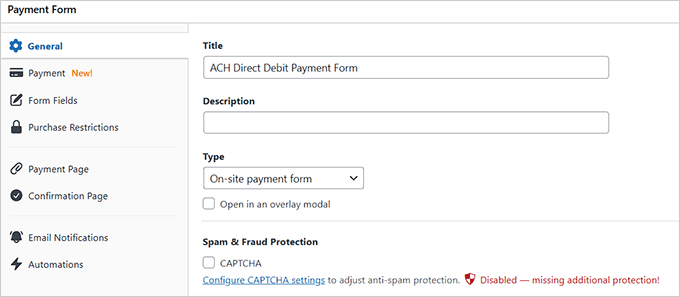
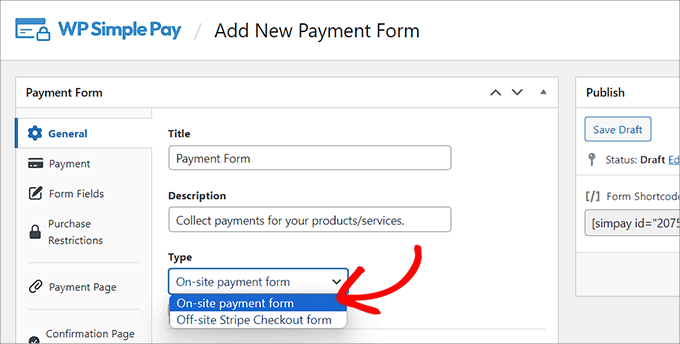
You’ll now be directed to the ‘Add New Value Form’ internet web page, where you’ll add a establish and description to your form.
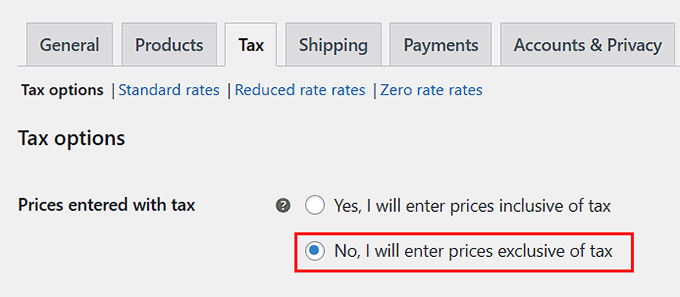
After that, select your form sort as ‘On-site rate form.’
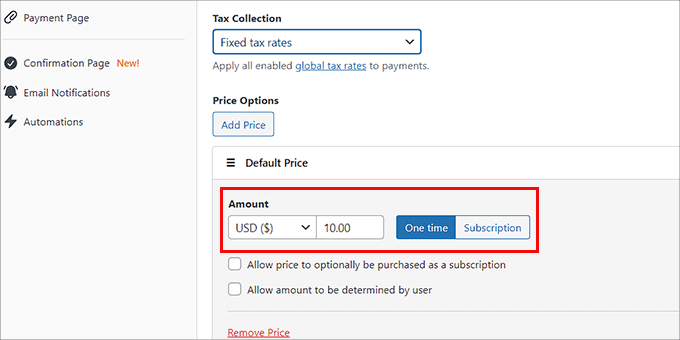
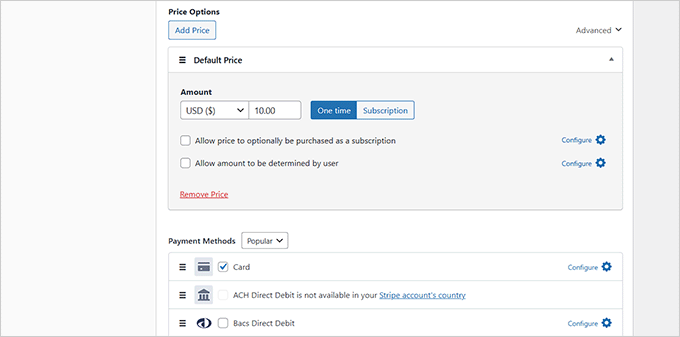
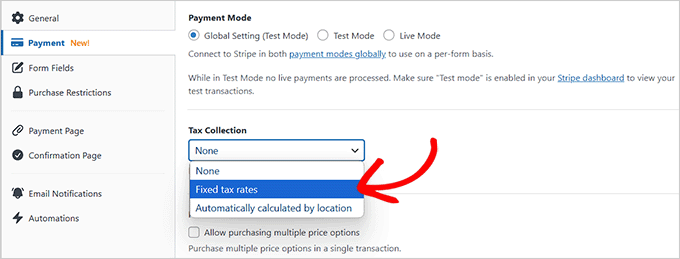
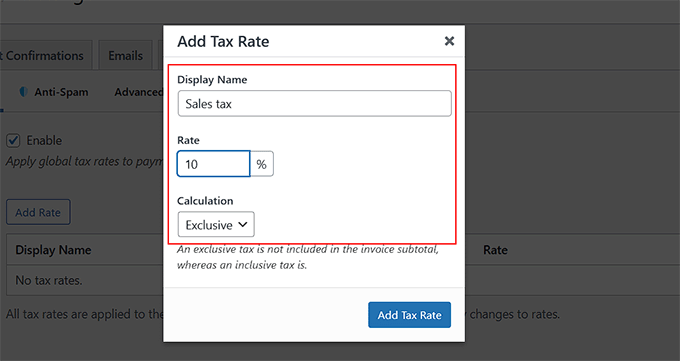
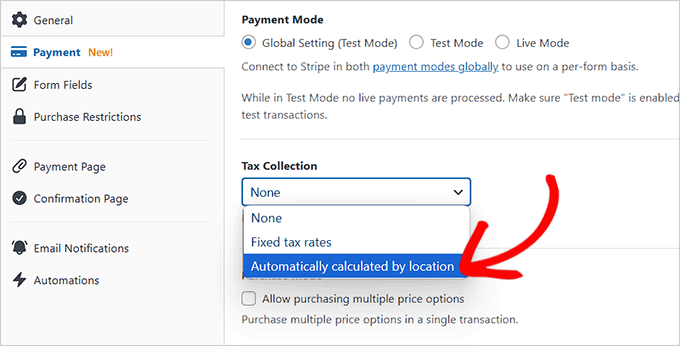
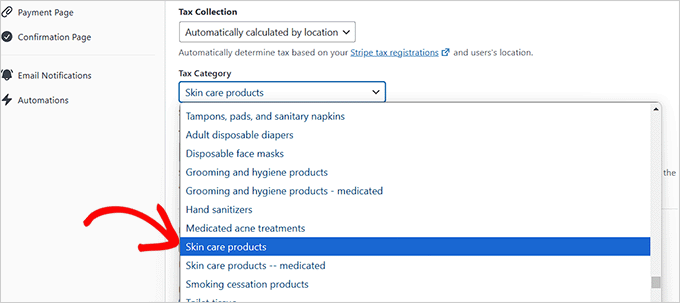
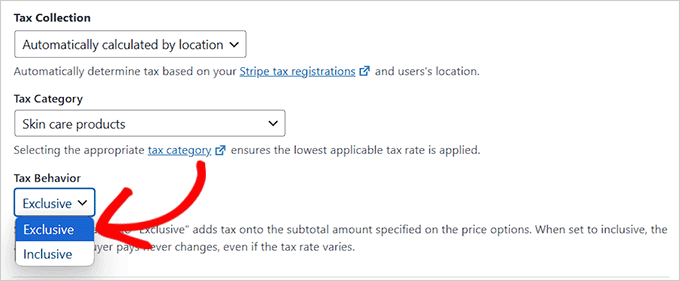
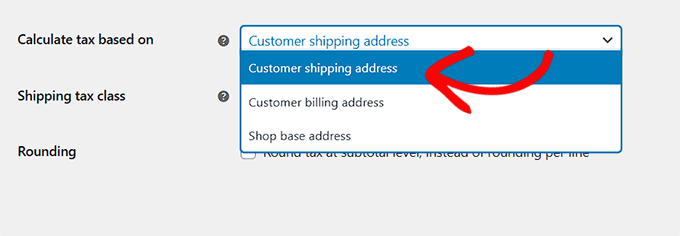
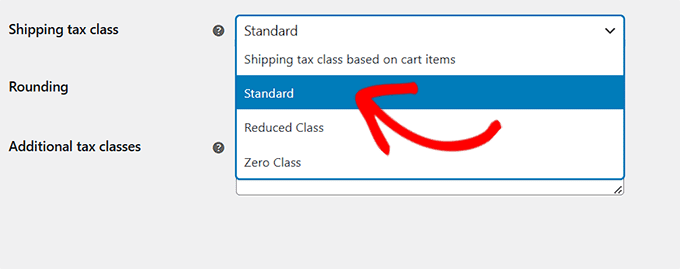
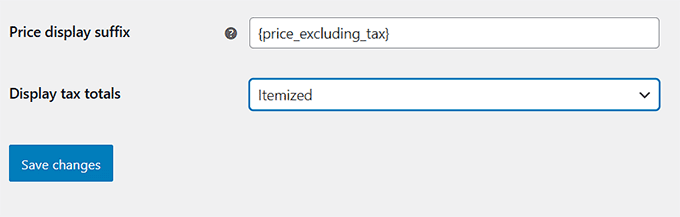
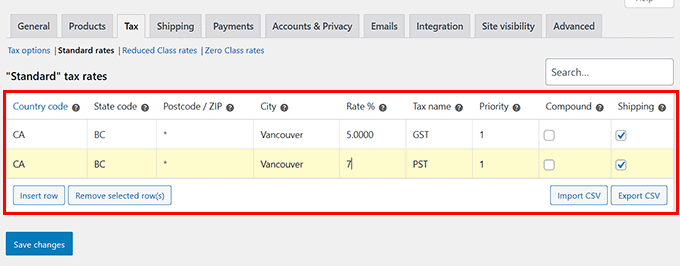
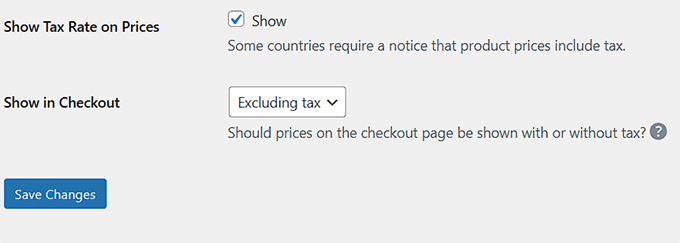
Then, switch to the ‘Value’ tab from the sidebar and select your preferred tax collection fees from the dropdown menu.
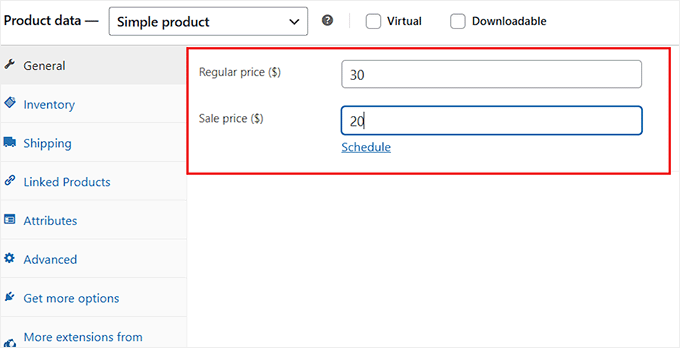
You’ll be capable of moreover use the form so that you can upload the fee for the service or product you intend to advertise. When you’ve got a subscription service, then you definitely’ll select the ‘Subscription’ selection.
Next, add subscription tiers via clicking the ‘Add Price’ button.
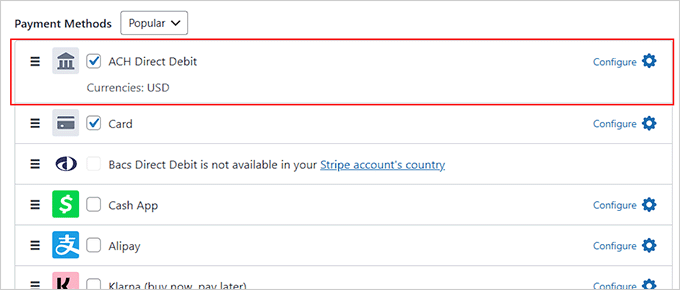
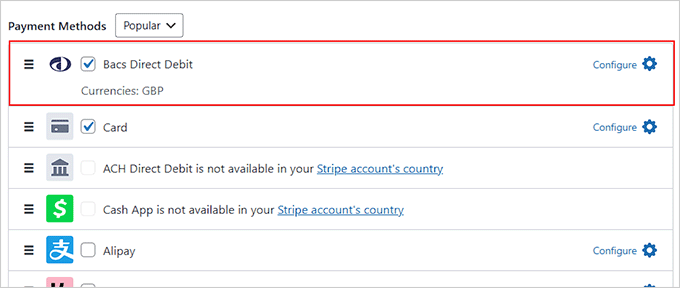
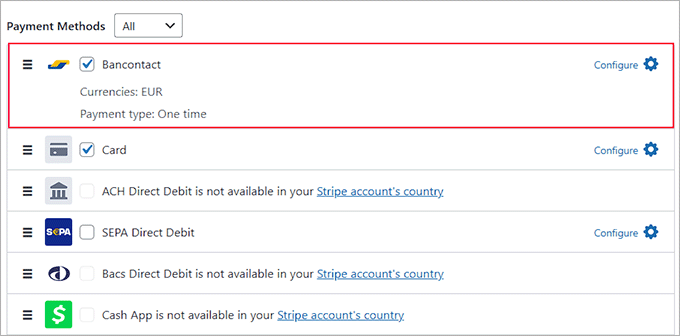
Once you have completed that, scroll all of the manner right down to the ‘Value Approach’ phase.
Proper right here, you’re going to understand that the ‘ACH Direct Debit’ and ‘Card’ rate possible choices have already been determined on for you. You’ll be capable of moreover select other possible choices, akin to Cash App, iDEAL, or Klarna.
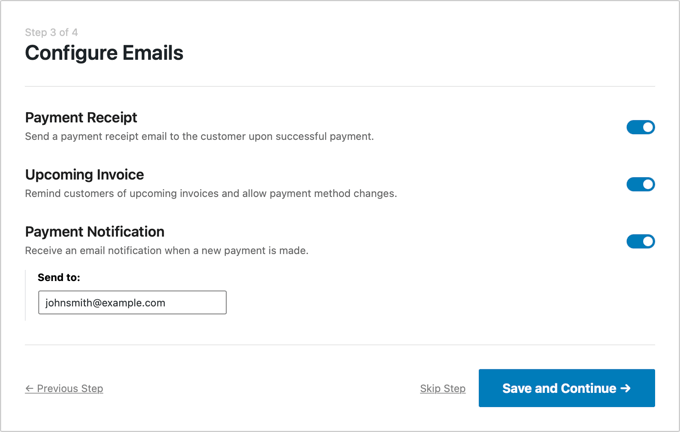
After that, you’ll add form fields, include a confirmation message, prepare piece of email notifications, and create a custom designed internet web page to your rate form from the settings inside the builder.
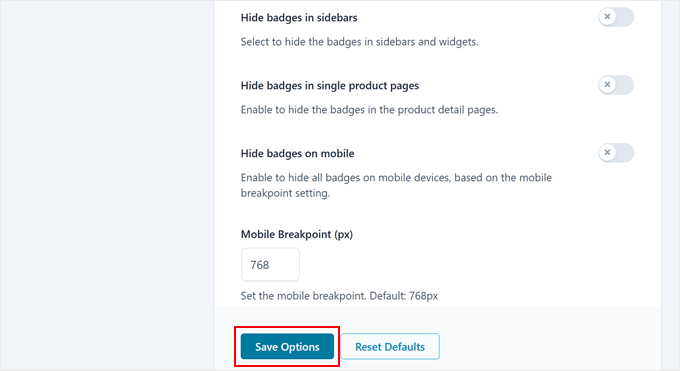
Once you could be completed, merely click on at the ‘Put up’ button to store your settings.
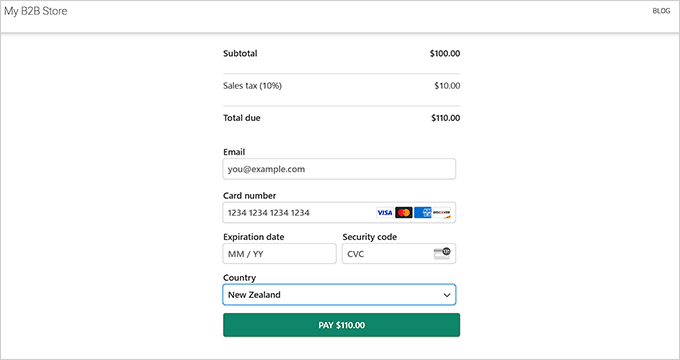
You’ve now given customers a rate selection that reduces your store’s Stripe transaction fees.
For detailed instructions, see our instructional on the best way to settle for ACH bills in wordpress.
Offer ACH Expenses in Your WooCommerce Store
When you’ve got an present WooCommerce store, then the above way may not be the best are compatible for you.
If that is so, you’ll wish to arrange and activate Cost Plugins for Stripe WooCommerce. For details, see our instructional on the best way to set up a wordpress plugin.
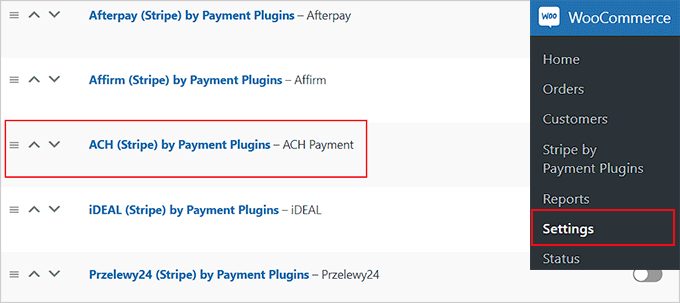
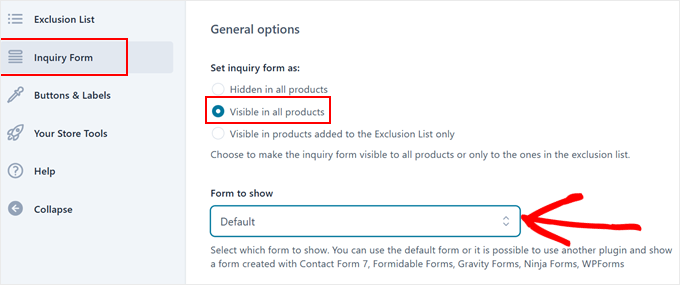
Whilst you flip at the instrument, talk over with the WooCommerce » Settings » Expenses internet web page. Proper right here, you’re going to understand an inventory of rate methods displayed on your show.
Now, to find and click on at the ‘ACH (Stripe) via Value Plugins’ selection.
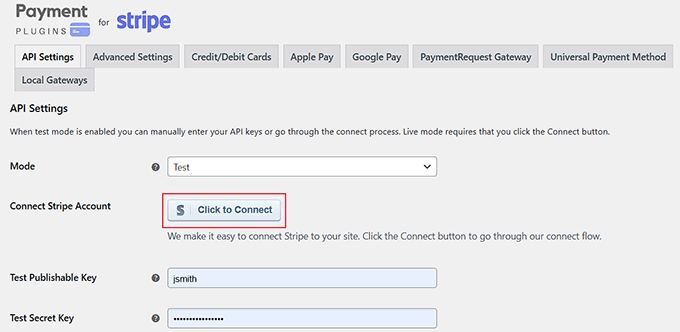
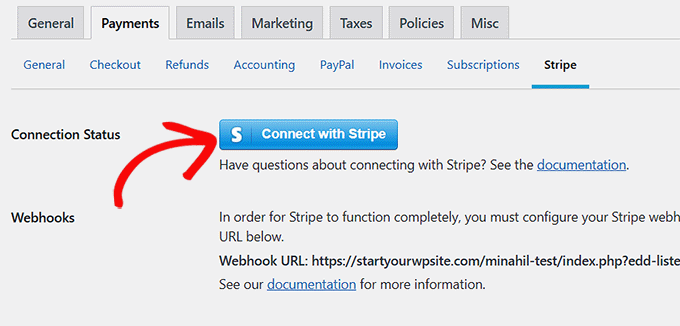
This will on occasion direct you to a brand spanking new internet web page where you must first switch to the ‘API Settings’ tab.
Proper right here, go ahead and click on at the ‘Connect to Stripe’ button to mix your Stripe account in conjunction with your online store.
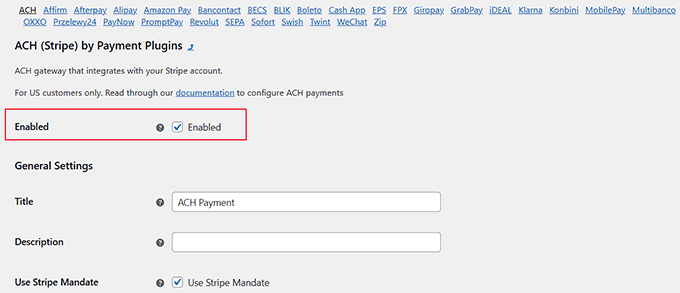
After that’s completed, head once more to the ‘Local Gateways’ phase and select the ‘ACH’ selection.
Now, check out the ‘Enabled’ box so that you can upload ACH as a rate selection for your online store. You’ll be capable of moreover add a custom designed establish and description for ACH expenses.
In the end, click on at the ‘Save Changes’ button to store your settings. It’s as simple as that!
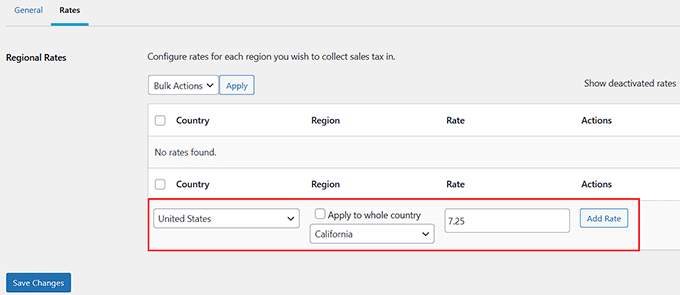
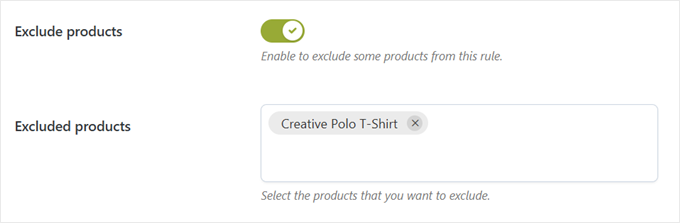
Tip 2: Accept Bacs Direct Debit Expenses (For Customers in the UK)
As we mentioned, the method above is very best suitable for corporations with customers in america. If your wordpresswebsite online serves customers in the United Kingdom, then offering Bacs Direct Debit can help reduce Stripe transaction fees.
Bacs Direct Debit charges spherical 1% in step with transaction, capped at £2. This makes it a cost-effective selection for corporations with customers in the UK.
For example, let’s say a purchaser makes a £500 rate. Within the tournament that they use a credit card, then you may pay about £14.80 in fees. But if the identical rate is made by means of Bacs Direct Debit, the associated fee could be as low as £2.
As with ACH expenses, there are two tactics you’ll do this. You’ll be capable of accept Bacs Direct Debit expenses each on a wordpress form or for your online store.
Create a wordpress Form that Accepts Bacs Direct Debit Expenses
We suggest WP Easy Pay for accepting the ones expenses via Stripe. It includes a ready-made Bacs Direct Debit Value Form template, so it’s super easy to organize.
To get started, you’ll wish to set up and turn on the plugin.
Essential Realize: There’s a unfastened model of WP Easy Pay, alternatively you’re going to need the highest price plugin to easily settle for Bacs Direct Debit expenses on your form.
After you flip at the instrument, a setup wizard will open up on your show. Proper right here, you’ll wish to add your license key and then connect to Stripe.
This step is super very important because of WP Simple Pay gained’t art work if it isn’t hooked up to a brand spanking new or present Stripe account. To be informed further, see our instructional on the best way to settle for Stripe bills in wordpress.
Whilst you’ve finished the setup wizard, talk over with the WP Simple Pay » Value Paperwork internet web page and click on at the ‘Create Your Value Form’ button.
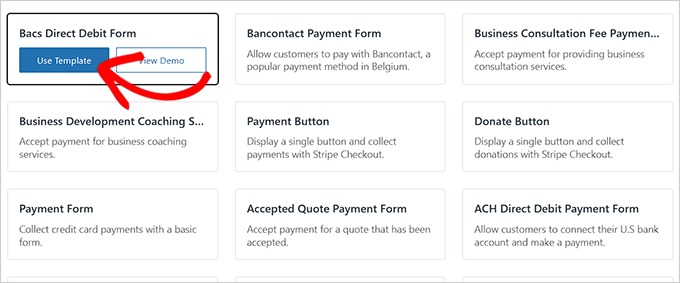
You’ll now be taken to the ‘Choose a template’ show.
Find the ‘Bacs Direct Debit Form’ template and click on at the ‘Use Template’ button underneath it.
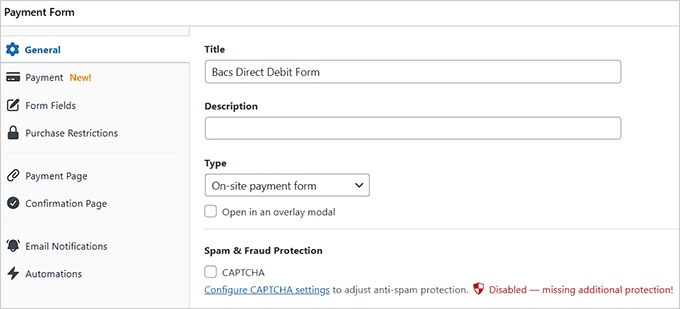
This will on occasion take you to the ‘Add New Value Form’ internet web page, where you must add a establish and description to your form.
After that, you’ll select your form sort as ‘On-site rate form.’
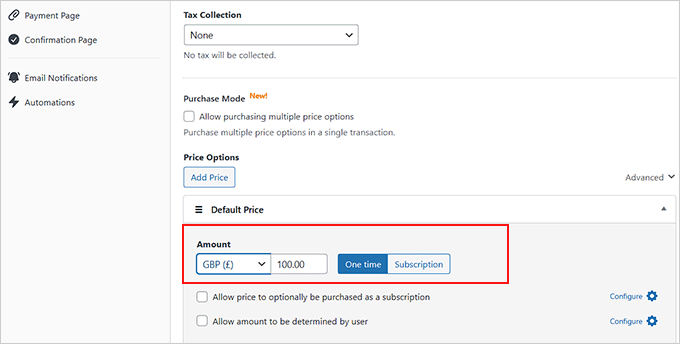
Then, switch to the ‘Value’ tab from the left column.
Proper right here, you’ve were given to choose your preferred tax collection fees from the dropdown menu underneath the ‘Tax Collection’ selection.
Next, add the service or product cost that you just plan to advertise using the form. When you’ve got a subscription service, then you definitely’ll select the ‘Subscription’ selection and add tiers.
After that, scroll all of the manner right down to the ‘Value Methods’ phase, where the ‘Bacs Direct Debit’ selection will already be determined on.
You’ll be capable of moreover select other rate possible choices that swimsuit your own tastes.
Essential Realize: The Bacs Direct Debit selection will very best be available whilst you’ve were given decided on the United Kingdom as the country to your Stripe account.
To modify the ones settings, talk over with the WP Simple Pay » Settings internet web page and select a country from the dropdown menu.
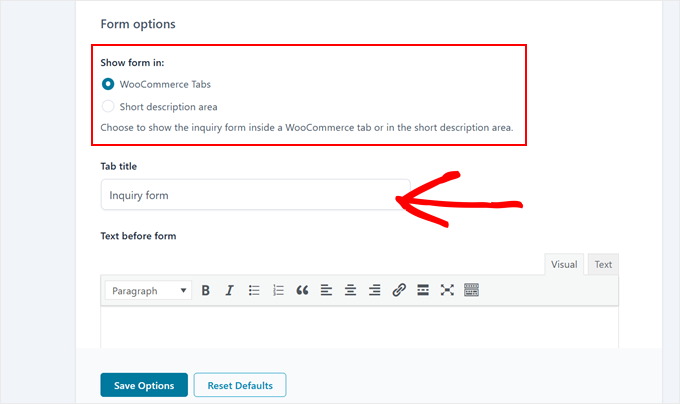
Next, edit the form fields, add a confirmation message, and prepare piece of email notifications consistent with your form.
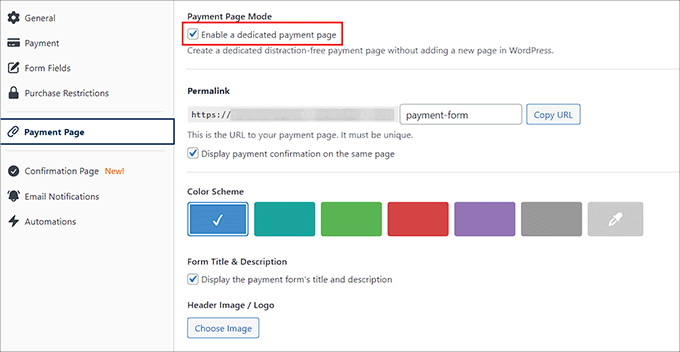
In the end, head over to the ‘Value Internet web page’ tab and try the ‘Permit a faithful rate internet web page’ box. The plugin will now mean you can assemble a custom designed internet web page to your rate form.
Once you could be completed, click on at the ‘Put up’ button to store your settings. Your internet web page can now merely accept Bacs Direct Debit expenses.
Offer Bacs Direct Debit Expenses in Your WooCommerce Store
If you already have a WooCommerce store, then the method above gained’t be the most suitable choice. If that is so, you’ll arrange and switch at the Stripe Cost Plugin for WooCommerce.
For details, see our instructional on the best way to set up a wordpress plugin. After activating the instrument, talk over with the WebToffee Stripe internet web page from your wordpress dashboard and click on at the ‘Connect to Stripe’ button.
This will on occasion take you to a brand spanking new show. Proper right here, merely apply the on-screen instructions to attach the plugin in your Stripe account.
Then, head once more in your dashboard and talk over with the WebToffee » Local Gateways internet web page.
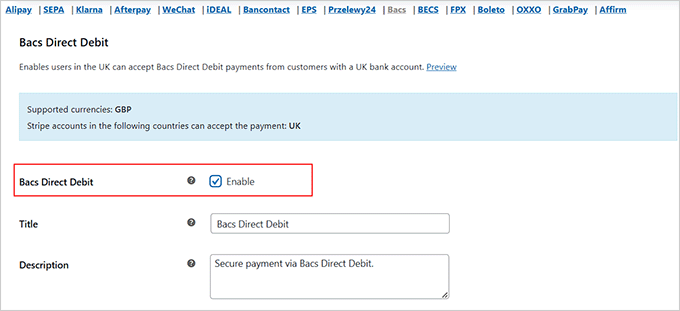
Next, switch to the ‘Bacs’ tab at the top and try the ‘Permit’ box.
You’ll be capable of moreover add a establish, description, and order button text. In the end, click on at the ‘Save Changes’ button to store your settings.
You’ve got now successfully added the Bacs Direct Debit selection as a rate way for your online store.
Professional Advice: Together with ACH or Bacs Direct Debit as rate possible choices does no longer ensure that customers will use them.
To increase the selection of customers choosing the ones rate methods, you’ll add a custom designed message in your rate form or WooCommerce checkout web page asking shoppers to choose it.
For individuals who’re a small industry, you’ll remind customers that choosing an alternative rate way will help keep your company running. In the event that they’re loyal or repeat consumers, they’re going to be much more much more likely to make this simple switch.
Or, check out our third tip underneath for differently to reduce Stripe transaction fees in wordpress.
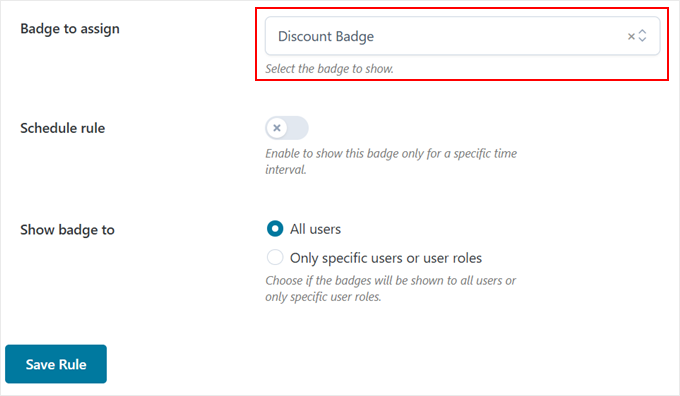
Tip 3: Beef up to Best magnificence Plugins (For Customers All over the place)
One of the vital essential very best imaginable tactics to reduce transaction fees on your wordpresswebsite online is thru upgrading to a most sensible price plugin. This way, you very best pay the plugin’s most sensible price price and steer clear of additional charges on top of Stripe’s usual transaction price.
Unfastened rate processing plugins regularly add additional fees, once in a while 1% or further, on top of Stripe’s usual price (2.9% + 30¢ in step with transaction). Upgrading to the highest price fashion helps you skip the ones additional costs and pay merely Stripe’s price.
If you want to add a simple rate form that accepts Stripe expenses, then we propose opting for WP Easy Pay Professional. It removes additional platform fees charged throughout the loose fashion of the plugin, allowing you to pay very best Stripe’s usual transaction price.
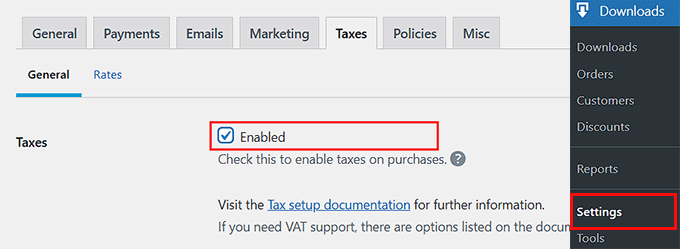
Within the interim, for retail outlets selling digital products, the Simple Virtual Downloads Professional model moreover removes additional fees, making it a really perfect selection. To be informed further, see our whole Simple Virtual Downloads evaluate.
In a similar fashion, WPForms Professional shall we in rate collection without additional platform charges, ensuring you very best pay the average Stripe transaction price.
We suggest this most sensible price plugin for promoting a unmarried product on your internet web page. To be informed further, see our WPForms evaluate.
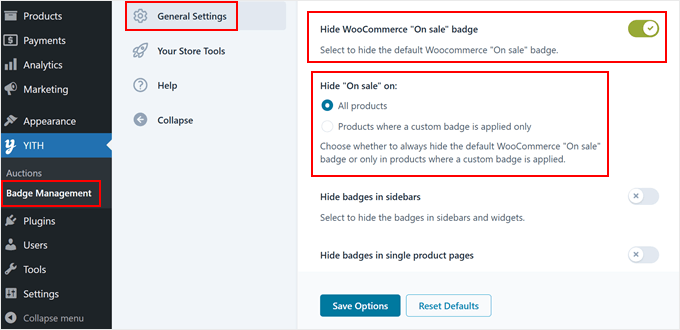
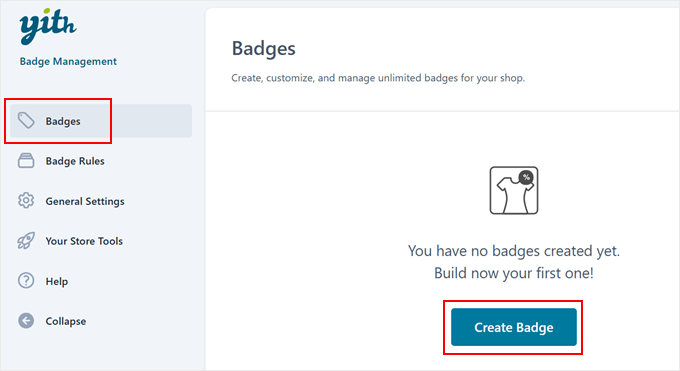
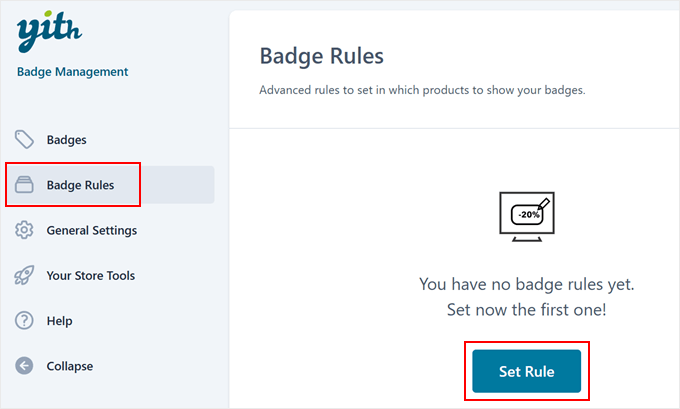
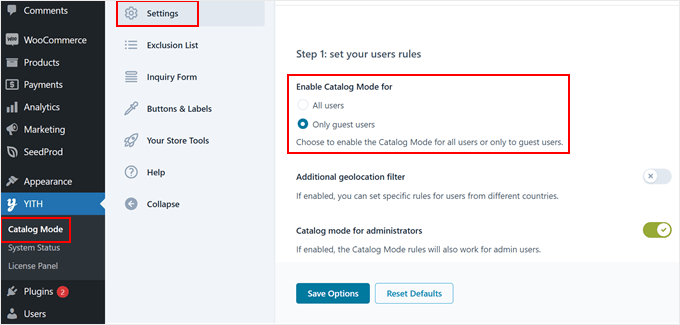
Then again, YITH WooCommerce Stripe removes the extra transaction fees regularly added via other rate gateways.
It’s an excellent solution for corporations using WooCommerce to advertise physically products.
Upgrading to these most sensible price diversifications promises you very best pay Stripe’s transaction fees, lowering your general costs while giving you additional choices.
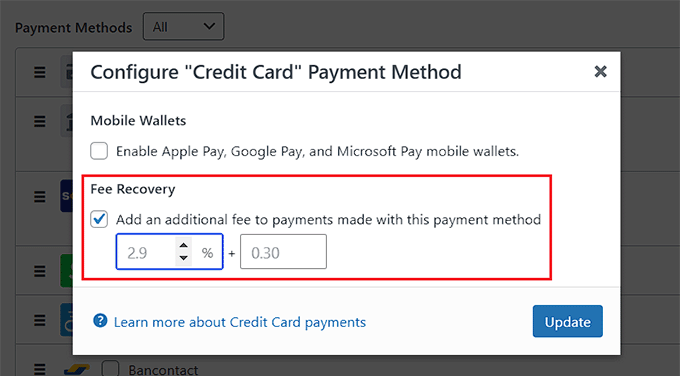
<h4 class=”wp-block-heading” id=”aioseo-bonus-pass-payment-proccessing-fee-to-customers-in-wordpress“><span class=”ez-toc-section” id=”bonus-tip-pass-value-processing-rate-to-customers-in-wordpress“/>Bonus Tip: Pass Value Processing Rate to Customers in wordpress
However, you’ll simply go the Stripe rate processing price to customers. This promises that your receive advantages margins keep unaffected via transaction costs.
Whilst you go the cost processing price to the customers, you add this extra price to the consumer’s bill instead of paying it yourself.
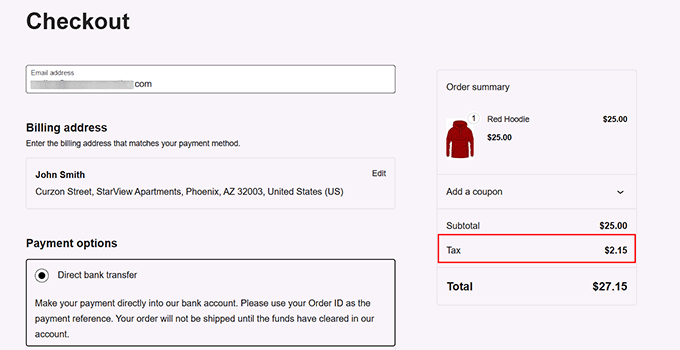
For example, if a purchaser buys an products for $100 and Stripe charges a price of $3, you may add that $3 to the entire price. So, the consumer would pay $103 instead of merely $100.
However, charging customers additional fees might have an effect on your product sales. So, you may need to do some market research forward of together with that price to the product’s general cost.
Moreover, if you already have a well-established industry, raising your prices without letting customers know can lead to a adverse shopper revel in. To steer clear of scaring away customers, it’s imaginable you’ll consider telling them why you’re raising prices. This transparency can help assemble purchaser believe.
For detailed instructions, see our instructional on the best way to cross the fee processing rate to shoppers in wordpress.
We hope this newsletter helped you discover ways to reduce Stripe transaction fees in wordpress. You may also need to see our amateur’s guides on the best way to upload Bancontact bills in wordpress and the best way to upload Giropay bills in wordpress.
For individuals who most well-liked this newsletter, then please subscribe to our YouTube Channel for wordpress video tutorials. You’ll be capable of moreover to find us on Twitter and Fb.
The publish Learn how to Scale back Stripe Transaction Charges in wordpress (3 Skilled Guidelines) first gave the impression on WPBeginner.
Because the Illinois for WP Fixall vs. [Competing plugin] Exploit of comparison and wordpress?
WP Fixall VS. [Competing plugin] comparison and additional
WP Fixall: The Protection Powerhouse – An entire comparison with [Competing Plugin]
For immediate release
[City, State] – [Date] – The families of the wordpresswebsite are increasingly acutely aware of the will for the difficult security characteristics and two plug -in Municipalities, WP Fixall e [Competing Plugin]They emerged as the main contenders.
WP Fixall: The Protection Powerhouse
WP Fixall is renowned for its safety features, providing a multiple level strategy to safeguard wordpress Internet websites. This UNCUMBER of the press will deepen the choices of the essential factor of WP Fixall and will examine them [Competing Plugin]offering the owners of web families a clear work for the advantages that each plugin offers.
Scan of vulnerability: proactive coverage in opposition to threats
WP Fixall excels in the scan of vulnerability, constantly inspecting the organization of wordpress, the problems of the topics and plugins for the identified vulnerabilities and the protection escapades. This proactive way helps identify possible weaknesses more quickly than they can be exploited by means of attackers.
[Competing Plugin]: A variety of solid protection
[Competing Plugin] It is every different plug -in of venerated protection that offers an impressive suite of choices designed to offer protection to wordpress Internet websites.
Previous plugins: easier imaginable practices for wordpress protection
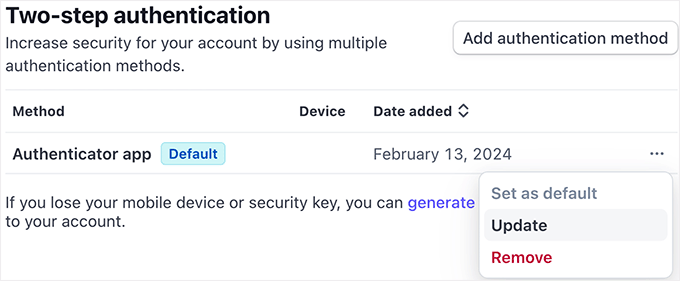
While the protection plugs are a recommended apparatus, they do not seem to be an alternative choice to implement the best possible protective practices possible. The titles of the families of the Internet website should constantly replace their wordpress core, the problems of topics and plug-ins, use robust passwords and carry out two-factor authentication for extra protection.
[Optional: Include a Call to Action]
To learn further on WP Fixall and how it can strengthen the protection of your site, discuss with [website URL] or contact us at [Email Address].
Remember: This is a trendy pressure and may want to be personalized in line with specific prerequisites.
<span class=”ez-toc-section” id=”wordpress-protection-showdown-wp-fixall-vs-competing-plugin-in-illinois”/>wordpress Protection Showdown: WP Fixall VS. [Competing Plugin] in Illinois
You believe this: You must have poured your heart and your soul into the construction of your excellent website, showing off your talents and connect with the world. So, Bam! The hackers hit, leaving your website prone and surely damaging your reputation. This is a nightmare scenario, then one again too this is not extraordinary. This is the position protection plugs such as WP Fixall and [Competing plugin] They must be present, appearing like your digital body guards in opposition to the dangerous guys on the web.
This text dives deep into the world of wordpress protection, exploring the WP Fixall VS. [Competing plugin] Comparison in IllinoisA topic that this is very powerful for the families of the website throughout the state. We can examine their key, pros and cons choices and the best way that can mean that you can keep up with the latest wordpress exploits.
He brings wordpress to mind as a popular city. Numerous people discuss with, making it full of life, as well as attracting criminals. Similarly, wordpress is extremely common, making it a function for hackers that seek weakness in its software, such as open doors or unlocked domestic windows. These weak points are known as “exploit” and can allow hackers to borrow your knowledge, view material material of harmful content or even keep an eye on only your website.
Because protection problems
A hacked website is usually a disaster. You believe this:
Your website is inactiveabandon consumers and possible business.
Your knowledge is stolencompromising the wisdom of your buyers.
Your reputation is cloudedMake people doubt your credibility.
For this reason, protection is fundamental. Fortunately, Protection Plug -In such as WP Fixall e [Competing plugin] Act as vigilant guards, protecting your Internet website from threats.
WP Fixall VS. [Competing plugin] Comparison in Illinois: a deep dip
Opt for the right plug -in such protection will also be overwhelming, in particular in a state like Illinois with such a large quantity of families of the talented website. We analyze the choices of essential factors of WP Fixall e [Competing plugin] And see how reviews:
WP Fixall: The Protection Powerhouse
WP Fixall is known for its security characteristics. It is like having more level protection to protect your Internet website from a reasonably high number of threats:
H3. Key choices of WP Fixall:
Scan of vulnerability: Scan constantly for identified vulnerabilities and protective holes for the organization of wordpress, the problems of your topic and plugins.
Records the monitoring of integrity: It keeps an in -depth eye on the fundamental knowledge of your website and signs you if changes are made without your permission.
Protection resolution: Recommend the protection settings of your website, making it more difficult for hackers to understand admission.
Malware detection and removal: It detects and removes the harmful code that could, in all probability, has already infiltrated your Internet website.
Firewall: It acts as a barrier in opposition to the guests of the Suspected website, blocking unwanted does the test to obtain admission to your website.
Access protection: Strengthen your access process to prevent unauthorized admission and protect opposition to attacks with brute forcing.
Backup and restore: Create non -unusual backups of your website, you offer a security web if something is false.
H3. Execs of WP Fixall:
Difficult choices: It reasonably provides a large number of security features to safeguard your Internet website.
Particular interface please for the person: Easy to navigate and configure, also for debutants.
Excellent strengthening: Provides the in -depth documentation and strengthening of the reactive buyer.
H3. Against WP Fixall:
Price: It can also be more expensive than another protective plugin.
Useful use of resources: In all likelihood it would have an effect on the power of your website if you have a large number of qualified choices.
[Competing Plugin]: The light defender
[Competing plugin] It is known for its light design and being aware of important security characteristics. It’s like having a trusted dog who always looks out:
H3. Key choices of [Competing Plugin]:
Exact time protection: Show your website for suspicious job and block any threats in an instant.
Firewall: Protects your website from guests of the harmful website.
Malware scanners: Detect and remove the harmful code from your website.
Protection audit: It provides insights on the posture of the protection of your website and highlights all possible risks.
Two -factor authentication: Provides an additional level of protection for the access process.
H3. Managers of [Competing plugin]:
Light: Minimal has an effect on the power of your website.
Convenient: Incessantly it is provided with a loose type and plans at affordable prices.
Simple and easy to use: Simple configuration for debutants.
H3. Against [Competing plugin]:
Less choices: It provides less complicated choices than WP Fixall.
Limited strengthening: In all likelihood, they would have much less full documentation and the slower response events.
Choose the correct protection plug for you
Now, could you be the maximum sure you ask yourself: “Which plugin is correct for me?” It is based on your specific needs and budgets.
If you want to have a powerful and whole protection solution, WP Fixall is an excellent variety.
If you are looking for a light and convenient selection, [Competing plugin] It is an intelligent selection.
Previous Plug -in: easier imaginable practices for wordpress protection in Illinois
The protection plugs are fantastic, so I am not the only component you want to offer protection to your website again. Some best practices imaginable to keep in mind are listed below:
H3. Essential protection suggestions:
Keep your wordpress core, the problems of the updated topics and plug-in: Constantly replace the latest diversifications to correct any vulnerabilities that may have been warned.
Use robust passwords: Select sophisticated passwords that will also be difficult to guess.
Allow two factors authentication: Provides an additional level of protection for the access process.
Be careful of what you have: The best download plugins and problems of topics from reliable resources.
Once again your website constantly: Create a security network if something is fallacious.
Limit the buyer to obtain admission to: Beast give buyers the authorizations they would like.
Follow your website for suspicious job: Be alert and seek any signs of violation.
WP Fixall VS. [Competing plugin] Comparison in Illinois: a summary
All WP Fissall e [Competing plugin] They are plug -in of protection that can be protected of the environment that can protect the wordpresswebsite from a reasonably high number of threats. WP Fixall offers an entire suite of choices, while [Competing plugin] It makes a specialty of important security characteristics. In the end, the plug -in most efficient for you is based on your specific needs and budgets. Keep in mind that an impressive protection methodology becomes previous a single plug -in. Adopt the best possible practices possible, be watchful and you will orderly your possibility to build a safe and successful website in Illinois.
TL; Dr – Too long; It was not informed
Hackers love wordpress. Offer protection to your Internet website with plug -in protection such as WP Fixall and [Competing plugin]who give different strengths. WP Fixall is powerful, [Competing plugin] It is light. Exchange constantly, use robust passwords and once again on your website!
Additional WP Fixall VS. [Competing plugin] comparison…
wordpresswebsitehosting choices for small companies and WooCommerce Buying groceries Carts defined
WooCommerce Buying groceries Carts, and extra
<span class=”ez-toc-section” id=”%f0%9f%9a%80-release-your-oakland-woocommerce-empire-the-most-sensible-wordpress-webhosting-suppliers-for-ecommerce-luck”/> Release Your Oakland WooCommerce Empire: The Most sensible wordpress Webhosting Suppliers for eCommerce Luck!
Oakland, CA is humming with entrepreneurial power, and your WooCommerce retailer is able to take flight. However earlier than you release your on-line empire, you wish to have the correct basis: robust, dependable wordpresswebsitehosting.
This information will mean you can navigate the sector of websitehosting suppliers, empowering you to make a choice the easiest platform on your Oakland-based trade. Disregard dry technical jargon – we are about to unharness the ability of your on-line retailer!
Most sensible Contenders:
1. Bluehost: The Powerhouse of Efficiency Identified for its inexpensive plans and powerful options, Bluehost is a powerhouse within the websitehosting international. They provide the whole thing from shared websitehosting for startups to controlled wordpress plans that care for the entire technical main points. Get able to bounce!
2. [Insert Second Provider]: [A unique selling proposition that resonates with Oakland businesses, e.g., “The Local Champion,” “The Green Choice,” etc.] [Briefly describe their strengths and what sets them apart.]
3. [Insert Third Provider]: [Unique selling proposition, e.g., “The Speed Demon,” “The security Fortress,” etc.] [Briefly describe their strengths and what sets them apart.]
Key Options for WooCommerce Domination:
Disregard sluggish loading occasions and clunky buying groceries carts. Your WooCommerce retailer must be a easy, seamless enjoy for purchasers!
Supercharge Your Pace: Shoppers are impatient. They would like rapid gratification. That is why lightning-fast loading speeds are non-negotiable.
Protected Transactions: Believe is paramount in e-commerce. Your websitehosting supplier will have to be offering rock-solid safety to offer protection to your shoppers’ knowledge and stay your small business protected.
Integrated WooCommerce Optimization: Do not waste time twiddling with technicalities. Search for suppliers that provide devoted WooCommerce options, like pre-installed plugins and optimized configurations, to avoid wasting you time and effort.
Make a choice Your Webhosting Hero:
1. Assess Your Wishes: What are your finances constraints? How a lot site visitors do you are expecting? What safety features are very important?
2. Get Fingers-on: Check out unfastened trials or discover demo websites to peer how other suppliers really feel.
3. Learn the Critiques: Do not depend on advertising and marketing by myself. See what different Oakland trade house owners have to mention about their websitehosting reviews.
Able to release your WooCommerce retailer into the Oakland stratosphere? Armed with this information, you can in finding the easiest websitehosting supplier to gasoline your on-line good fortune. Get able to dominate the e-commerce international!
<span class=”ez-toc-section” id=”launching-your-oakland-trade-on-line-opting-for-the-best-wordpress-webhosting”/>Launching Your Oakland Trade On-line: Opting for the Best wordpress Webhosting
Beginning a trade in Oakland, California is thrilling, however the on-line international can really feel overwhelming. To face out, you wish to have a site that’s quick, dependable, and protected. Input wordpress, the preferred site construction platform, and WooCommerce, the robust e-commerce plugin that transforms your site right into a full-fledged on-line retailer. However earlier than you get started construction your dream site, you wish to have to make a choice the correct wordpresswebsitehosting plan.
This information will stroll you throughout the very important steps of opting for wordpresswebsitehosting choices for small companies in Oakland, California, in particular specializing in WooCommerce buying groceries carts. We will demystify websitehosting phrases and empower you to make knowledgeable choices about your on-line presence.
<span class=”ez-toc-section” id=”1-working-out-the-fundamentals-whats-wordpress-webhosting”/>1. Working out the Fundamentals: What’s wordpress Webhosting?
Consider your site as a area. You want a robust basis, utilities, and a protected surroundings to stay the whole thing working easily. That is what wordpresswebsitehosting supplies. It is like renting an area on an impressive laptop, known as a server, the place your site lives and operates.
wordpresswebsitehosting suppliers be offering quite a lot of plans with other ranges of assets like space for storing, bandwidth, and safety features. Every plan caters to other site wishes, so discovering the correct one is an important for your small business good fortune.
<span class=”ez-toc-section” id=”2-wordpress-webhosting-choices-deciding-whats-proper-for-you”/>2. wordpress Webhosting Choices: Deciding What’s Proper for You
Now, let’s dive into the sector of wordpresswebsitehosting plans adapted for small companies in Oakland, California. Listed below are the important thing choices:
Shared Webhosting: Consider sharing a area with different households. You all percentage the similar utilities, however the area is proscribed. That is like shared websitehosting – your site stocks assets with different internet sites at the identical server. It is the maximum inexpensive choice, highest for brand new startups with low site visitors.
VPS Webhosting: Consider having your individual condominium inside of a construction. You may have more room and privateness, however nonetheless percentage some utilities with different tenants. VPS websitehosting is sort of a devoted server divided into digital sections. You get extra regulate and assets in comparison to shared websitehosting, appropriate for companies with average site visitors and expansion possible.
Cloud Webhosting: Recall to mind it as a community of homes with shared assets. Cloud websitehosting is sort of a community of servers operating in combination. This offers flexibility, scalability, and top reliability, making it ultimate for companies with fluctuating site visitors and significant wishes.
Controlled wordpress Webhosting: Image a concierge provider managing your own home for you. Controlled wordpresswebsitehosting looks after the whole thing – backups, safety, updates, or even functionality optimization. It is a hassle-free resolution highest for companies that need to focal point on their core operations.
3. Components to Imagine: Opting for the Proper Webhosting Plan
Earlier than you dedicate, imagine those components for choosing the proper wordpresswebsitehosting plan:
Visitors Quantity: What number of guests do you are expecting? If it is low, shared websitehosting could be sufficient. Upper site visitors calls for VPS or cloud websitehosting.
Garage House: How a lot knowledge will your site require? Pictures, movies, and massive information want plentiful garage.
Safety Options: Your site’s safety is an important, particularly in case you are promoting merchandise on-line. Search for websitehosting suppliers providing firewalls, malware coverage, and common backups.
Scalability: As your small business grows, your websitehosting wishes will exchange. Be sure your websitehosting plan is scalable so you’ll be able to simply improve when vital.
Technical Experience: Are you relaxed managing your server? If now not, controlled wordpresswebsitehosting could be a lifesaver.
Finances: Set the cheap on your websitehosting plan and examine costs throughout suppliers. Imagine long-term prices, together with possible upgrades and further options.
4. Key Options for WooCommerce Buying groceries Carts
When settling on a wordpresswebsitehosting plan on your WooCommerce retailer in Oakland, California, prioritize those options:
Rapid Loading Speeds: E-commerce internet sites depend on fast loading occasions to stay shoppers engaged. Search for websitehosting suppliers with quick servers and optimized configurations.
Protected Cost Gateways: Protective your shoppers’ monetary data is necessary. Be sure your websitehosting supplier helps industry-standard cost gateways like Stripe and PayPal.
SSL Certificate: A Protected Socket Layer (SSL) certificates encrypts knowledge transmitted between your site and guests, making a protected connection. Search for websitehosting suppliers that provide unfastened SSL certificate.
Enhanced Safety Measures: E-commerce retail outlets are high objectives for on-line threats. Search for websitehosting suppliers providing options like firewalls, malware coverage, and common safety scans.
Dependable Improve: You’ll be able to want lend a hand occasionally. Make a choice a websitehosting supplier with responsive buyer beef up to be had by way of telephone, e-mail, or reside chat.
<span class=”ez-toc-section” id=”5-in-style-wordpress-webhosting-suppliers-for-woocommerce”/>5. In style wordpress Webhosting Suppliers for WooCommerce
Let’s dive into one of the hottest wordpresswebsitehosting suppliers in Oakland, California for WooCommerce internet sites:
Bluehost: Bluehost is a widely recognized and depended on websitehosting supplier providing inexpensive shared, VPS, and controlled wordpresswebsitehosting plans. Their very good beef up makes them a good selection for inexperienced persons.
SiteGround: SiteGround specializes in pace and safety, making them a very good selection for performance-sensitive companies. Their controlled wordpresswebsitehosting plans be offering computerized updates and safety features.
HostGator: HostGator gives quite a lot of websitehosting plans, together with shared, VPS, cloud, and devoted servers. They’re identified for his or her value-for-money answers.
DreamHost: DreamHost is a credible websitehosting supplier identified for its powerful options, together with limitless bandwidth and garage. In addition they be offering very good beef up.
GoDaddy: GoDaddy is a big within the internet websitehosting {industry}, providing a variety of plans and services and products. Whilst their fundamental plans is probably not probably the most robust, they provide versatile choices for rising companies.
6. Settling on the Proper Supplier: A Step-by-Step Information
Discovering the easiest wordpresswebsitehosting supplier on your Oakland, California trade would possibly really feel overwhelming. However don’t concern, observe those steps to make an educated determination:
Assess Your Wishes: Analyze your site site visitors, garage necessities, safety wishes, and finances to grasp your websitehosting necessities.
Analysis Webhosting Suppliers: Discover other websitehosting suppliers, learn critiques, and examine options, pricing, and buyer beef up choices.
Take a look at for WooCommerce Compatibility: Be sure the selected websitehosting supplier helps WooCommerce and gives optimized configurations for e-commerce internet sites.
Search for Safety Options: Prioritize websitehosting suppliers with powerful safety features like firewalls, malware coverage, and common backups to safeguard your knowledge.
Imagine Controlled Webhosting: In case you are now not technically vulnerable, controlled wordpresswebsitehosting can prevent effort and time via dealing with updates, safety, and optimization.
Take a look at a Loose Trial: Many suppliers be offering unfastened trials or money-back promises, permitting you to check their services and products earlier than committing.
Learn Critiques and Testimonials: Search for critiques from different companies and take a look at their buyer beef up scores to gauge their reliability and responsiveness.
<span class=”ez-toc-section” id=”7-getting-began-putting-in-your-wordpress-webhosting”/>7. Getting Began: Putting in Your wordpress Webhosting
As soon as you’ve got selected a websitehosting supplier, you can wish to arrange your wordpress site. Here is a fast rundown of the method:
Create an Account: Join a websitehosting plan together with your selected supplier.
Make a choice a Theme: Choose a visually interesting theme to provide your site a certified glance.
Customise Your Web site: Upload content material, pictures, and movies to create a compelling on-line presence on your Oakland, California trade.
Set up WooCommerce: Upload WooCommerce on your site to become it into an absolutely purposeful on-line retailer.
Configure Cost Gateways: Arrange your most popular cost strategies, like Stripe or PayPal, to permit shoppers to buy your merchandise or services and products.
Upload Merchandise: Checklist your merchandise, together with descriptions, pictures, pricing, and stock data.
Advertise Your Retailer: Use social media, e-mail advertising and marketing, and seo (search engine marketing) to draw shoppers on your on-line retailer.
TL;DR – Too Lengthy; Did not Learn
Choosing the proper wordpresswebsitehosting supplier on your Oakland, California trade is an important on your on-line good fortune. Get started via assessing your site wishes – site visitors quantity, space for storing, safety, finances, and technical experience. Imagine websitehosting choices like shared, VPS, cloud, and controlled wordpresswebsitehosting. Prioritize websitehosting suppliers that provide quick loading speeds, protected cost gateways, SSL certificate, and dependable buyer beef up. In style possible choices come with Bluehost, SiteGround, HostGator, DreamHost, and GoDaddy.
Consider, a well-chosen websitehosting plan could make the entire distinction in launching a a success on-line retailer with WooCommerce.
Your Oakland Trade: Able to Take Flight
This information has equipped you with the data and gear to expectantly make a selection the easiest wordpresswebsitehosting choice on your Oakland, California trade. Via working out the quite a lot of websitehosting plans, taking into account key options, and in moderation researching suppliers, you’ll be well-equipped to release a a success site that showcases your services and products to the sector.
Don’t put out of your mind to imagine the long-term implications of your websitehosting selection. As your small business grows, chances are you’ll wish to improve your websitehosting plan to deal with greater site visitors and knowledge garage. However with the correct basis, your on-line adventure can bounce to new heights.
<a href=”https://wpmountain.com/wordpress–hosting-options-for-small-businesses-launching-your-oakland/”>Source link
Must you’re setting up an web store with wordpress, then choosing between Stripe and PayPal normally is a battle. With all of the ones difficult transaction rate tables and long lists of charge methods – how are you intended to make sense of it all?
Plus, it is going to truly really feel like a big solution whilst you pay attention frightening stories about consumers abandoning their carts merely given that checkout process isn’t right kind. Every out of place sale hurts whilst you’re development a industry.
Alternatively we’re proper right here with some superb data – you don’t have to worry about this solution!
We use each and every Stripe and PayPal in our private retail outlets, serving a lot of glad consumers. This experience has taught us exactly what each charge processor does best.
Merely bring to mind us as your charge processing guides!
We’ve finished all of the research for you – comparing fees, trying out choices, and learning why consumers want one platform over the other.
And in this data, we’ll allow you to choose the perfect charge solution for your wordpress store.
wordpress Site?” class=”wp-image-329036″/>
Overview of Stripe vs. PayPal: Which Is Upper for Your Internet web page?
When you’re in a hurry, then merely take a quick check out our comparison table for Stripe vs. PayPal:
Stripe
PayPal
Very best For
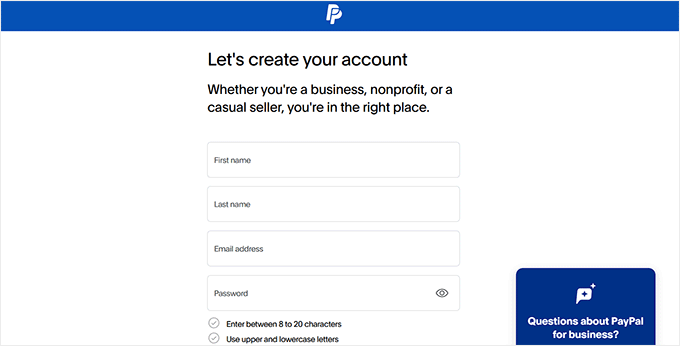
Internet web page householders who need a scalable, customizable, and developer-friendly selection
Newcomers who want a globally relied on and easy-to-use solution
Ease of Use
Intuitive dashboard with many guides and property
Amateur-friendly with a smooth dashboard
Transaction Fees
2.9% + $0.30 with some additional costs
2.9% + $0.30 with additional costs
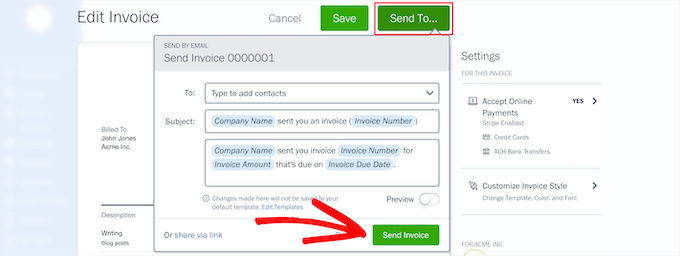
Invoice & Billing Prices
An peculiar rate of 3.49% + $0.49 applies for each invoice
Usual rate of 3.49% + $0.49 applies for each invoice
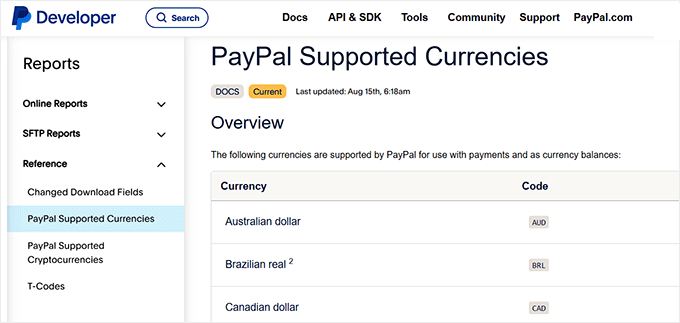
Global Reach
Available in 46 international locations and is helping 135 currencies
Available in 200 international locations and is helping 25 currencies
Permitted Price Possible choices
Accepts credit score ranking and debit taking part in playing cards, digital wallets, and international charge methods
Accepts expenses in PayPal balances, credit score ranking and debit taking part in playing cards, and attached monetary establishment accounts
Best possible-notch safety features, along side an AI-powered fraud detection instrument
Difficult safety features, along side buyer and broker protections
An Advent to Stripe vs. PayPal
Stripe is a superb flexible charge processor in recent years running on over 1.5 million web websites.
It’s highest if you want to offer plenty of more than a few charge how to your consumers. Stripe accepts bank cards, digital wallets, and peculiar expenses, making it a truly best possible selection for subscription services and products and merchandise or eCommerce retail outlets.
That’s why we use it to only settle for expenses on plenty of of our eCommerce web sites built with wordpress.
We in reality love how the platform makes it blank to transport global. However, its over the top choice of customization alternatives would perhaps truly really feel slightly overwhelming when you’re merely starting out.
PayPal, alternatively, is a circle of relatives establish that customers steadily truly really feel comfortable using. In reality, it leads the fee processing marketplace proportion (25.8%), followed closely via Stripe (23.4%).
We moreover offer PayPal as a charge selection on our eCommerce web websites as a result of this.
The cost processor makes it blank to only settle for expenses from credit cards and PayPal accounts.
In our opinion, PayPal’s biggest energy lies in its simplicity and ease of use. It’s a truly best possible variety for any person who needs to get started selling online without dealing with too many settings.
Nevertheless, some firms would perhaps to seek out their transaction fees a little bit bit over the top compared to other alternatives.
General, Stripe and PayPal each and every have such a lot to offer, and each and every art work neatly with wordpress, so your best option depends upon your needs.
To have the same opinion you make a decision, now we now have when compared Stripe vs. PayPal extensive to appear which one comes out on top. During our research and research, we considered the following requirements:
You’ll use the links above to skip to any section.
Why Agree with WPBeginner?
At WPBeginner, we’re a staff of experts with experience in wordpress, eCommerce, search engine optimization, web affiliate internet marketing, web internet websitehosting, and further.
Relating to charge processors, now we now have used each and every Stripe and PayPal to securely accept expenses from consumers all over the world.
Over the years, now we now have totally tested each and every platforms for ease of use, their ability to take care of global transactions, the choice of charge alternatives they improve, and their transaction fees.
By way of using the ones processors ourselves, we’ve been able to appear firsthand how they simplify the checkout process. To learn additional, merely see our editorial procedure.
Are you ready? Let’s go!
Ease of Use
A very simple-to-use charge processor can have the same opinion your enterprise run simply, and an intuitive platform implies that you’ll be able to prepare and arrange expenses without technical knowledge. That approach, you’ll focus on emerging your enterprise.
With that right through ideas, proper right here’s how Stripe and PayPal assessment in relation to ease of use.
Ease of Use – PayPal
PayPal is among the highest charge processors to organize and use, which is why it’s so trendy among beginners and small trade house owners.
You’ll create an account, link your monetary establishment or credit card, and get began accepting online expenses immediately.
Plus, since the general public are already familiar with PayPal, your consumers won’t need so much convincing to use it, which is in a position to have the same opinion boost product sales.
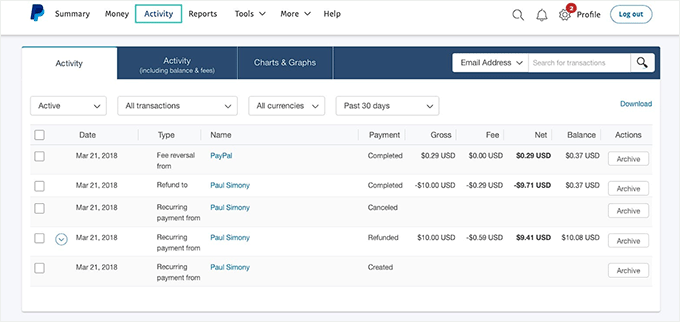
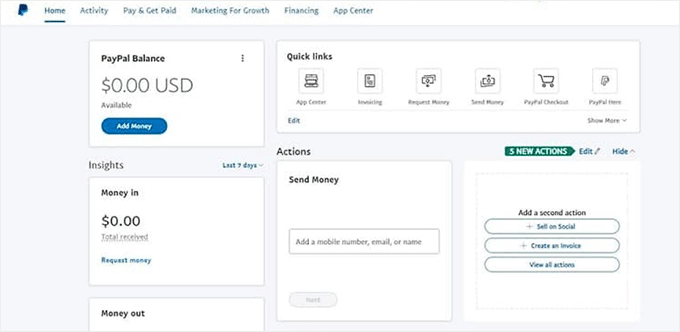
During our trying out, we moreover found out PayPal’s dashboard to be super user-friendly. It’s clean, smooth, and blank to navigate, even if you’re not tech-savvy.
From the dashboard, you’ll arrange all your expenses in one place, view transactions, send invoices, element refunds, and even take care of disputes.
Additionally, you’ll see helpful insights, like a breakdown of your recent product sales and charge job. This makes it blank to stick follow of your enterprise potency with no need additional apparatus.
General, PayPal is a brilliant variety for beginners on account of using it to only settle for expenses doesn’t require any technical skills.
Ease of Use – Stripe
Even though Stripe is known for its difficult choices and customizations, in our experience, it’s surprisingly blank to use.
All it’s essential to do is create an account and add your enterprise and banking details. Then, you’re ready to start out accepting expenses.
Plus, Stripe’s documentation provides a lot of tutorials and guides to help you get started.
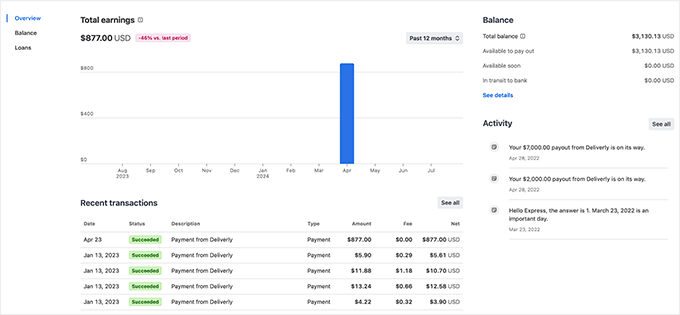
The Stripe dashboard is designed to come up with entire control over your expenses while maintaining problems smooth and user-friendly.
While you log in, you’re going to comprehend a clean, stylish interface that provides an outline of your recent transactions, source of revenue, and charge dispositions.
The dashboard’s navigation is intuitive, so that you’ll merely to seek out what you wish to have, whether or not or no longer it’s processing refunds or managing buyer subscriptions.
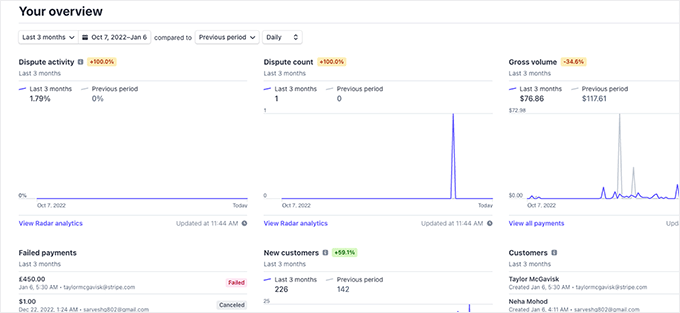
It moreover has detailed reporting apparatus. You’ll view in-depth analytics on your product sales potency, follow purchaser charge behaviors, and even observe payouts on your bank account.
For subscription-based firms, the Stripe dashboard implies that you’ll be able to arrange plans, set pricing tiers, and believe metrics like churn charge and peculiar source of revenue.
You’ll prepare automatic email receipts, arrange saved purchaser charge methods, and create customized invoices straight away from the dashboard.
We moreover love its built-in apparatus for detecting and combating fraud, which add an extra layer of protection for your enterprise.
Whether or not or no longer you’re new to managing online expenses or a seasoned industry owner, Stripe provides you with all of the prerequisites, along with difficult apparatus that anyone can use.
Winner – Tie
With regards to ease of use, each and every PayPal and Stripe shine in their own ways, so we’ve made up our minds that this magnificence is a tie.
PayPal has a very easy dashboard design, which makes it super beginner-friendly. You’ll merely navigate via fundamental choices like viewing transactions, sending invoices, and issuing refunds without feeling overwhelmed.
Then again, Stripe caters to consumers who’re ready to find its tricky choices. While its dashboard would perhaps seem additional complicated as a result of its difficult apparatus, Stripe makes up for it with detailed tutorials, guides, and FAQs.
Transaction Fees
Transaction fees can also be some of the difficult segment when choosing a charge processor. Inside the next section, we’ll have the same opinion give an explanation for them for each and every Stripe and PayPal.
Transaction Fees – PayPal
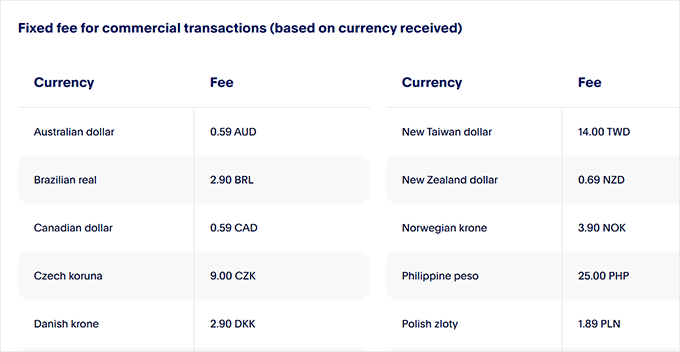
While comparing transaction fees, we noticed that PayPal is a little bit bit on the expensive aspect.
What’s additional, the platform’s fees vary depending on plenty of parts, as a result of this the cost of using PayPal isn’t at all times easy.
For starters, the standard house transaction rate in the United States is 2.9% + $0.30 in step with transaction. It’s the an identical for buyers and other people.
Alternatively this amount can increase when you’re dealing with international expenses or forex conversions.
When you’re selling to consumers in several international locations, then PayPal charges an additional rate of spherical 1.5% on top of the standard transaction charge.
Plus, if there’s any foreign exchange conversion involved, PayPal supplies a hefty conversion rate, which is in a position to range from 2.5% to 4%.
The ones additional charges can in reality add up, specifically for firms that maintain international consumers.
Right here’s a clear breakdown of PayPal’s transaction fees to help you see exactly what you’ll pay:
Usual house transaction rate (U.S.): 2.9% + $0.30 in step with transaction (for buyers and other people)
Global expenses: Additional 1.5% rate
the Forex market conversions: Additional 2.5% to 4% rate
Now that you realize all of PayPal’s transaction fees, let’s see how Stripe compares.
Transaction Fees – Stripe
Stripe provides the equivalent charge as PayPal for on-line card bills at 2.9% + $0.30 in step with transaction. That’s the charge for buyers along with the private transaction rate.
However, many firms to seek out Stripe more economical as a result of its lower fees for foreign exchange conversions and further charge methods.
No longer like PayPal, which supplies hefty costs for international transactions, foreign exchange conversion, or even refunds, Stripe has lower fees.
Plus, it doesn’t worth setup fees, monthly fees, or additional fees on refunds, in order that you simplest pay whilst you process a charge.
This is a huge get advantages for firms that need to magnify globally.
On top of that, it helps ACH Direct Debit with a rate of merely 0.8%, capped at $5, which is highest for upper transactions and high-ticket items.
That discussed, proper right here’s a clearer price breakdown for Stripe’s fees:
Online card expenses: 2.9% + $0.30 in step with transaction (for buyers and other people)
Global transaction rate: 1.5%
the Forex market conversions: 1%
ACH Direct Debit: 0.8% rate (capped at $5)
Winner – Stripe
Stripe is the clear winner for transaction fees. It provides a smooth rate of 2.9% + $0.30 in step with transaction. On the flooring, the ones fees look the equivalent as PayPal’s.
Alternatively it charges a lot much less for foreign exchange conversions and doesn’t worth for refunds, which makes it significantly more cost effective than PayPal.
Invoice & Billing Fees
One of the simplest ways each charge processor handles invoicing, peculiar expenses, and similar costs can impact your common expenses. Proper right here’s our assessment of Stripe vs. PayPal in this vital magnificence:
Invoice & Billing Fees – PayPal
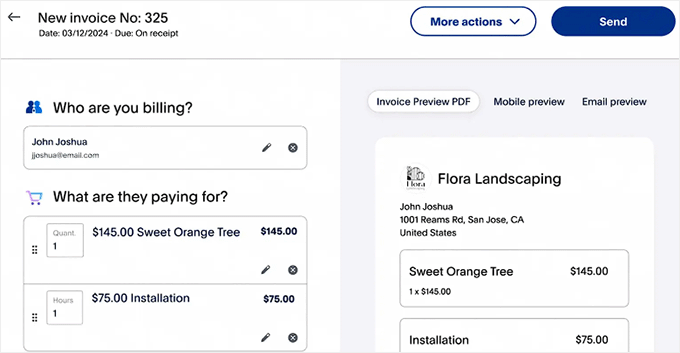
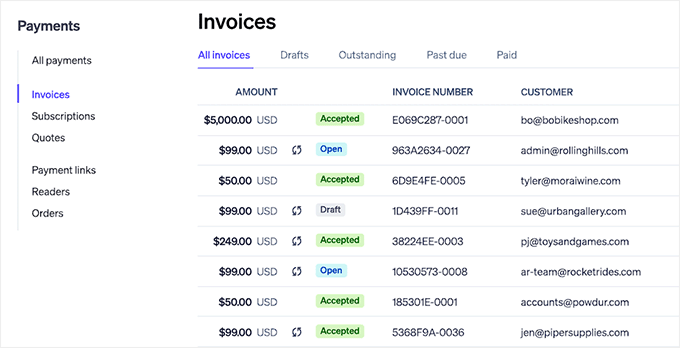
PayPal makes it blank to ship invoices, alternatively there are fees to keep in mind. Creating and sending an invoice is free, alternatively as quickly because it’s paid, PayPal treats it as a trade transaction.
For traditional online expenses via your store, the platform charges 2.9% + $0.30 in step with transaction throughout the U.S. However, for invoices, the cost is higher at 3.49% + $0.49 in step with transaction.
While sending the invoice doesn’t price the remainder, you’re going to pay this higher carrier supplier rate when the cost comes via.
When you’re dealing with international consumers, additional fees for cross-border transactions and foreign exchange conversions may make invoicing a lot more expensive.
That discussed, one upside is that PayPayl’s invoicing tool is super blank to use.
You’ll create professional invoices, set due dates, and even allow partial bills, all from the dashboard.
Nevertheless, for firms that send a over the top amount of invoices, the transaction fees can add up briefly, making PayPal an expensive selection for billing.
So, to summarize it, listed below are PayPal’s invoicing fees:
Creating invoices: Free
Sending invoices: 3.49% + $0.49 in step with transaction
Additional fees for cross-border transactions and foreign exchange conversions
Invoice & Billing Fees – Stripe
Stripe Invoicing provides flexible alternatives with two plans: Starter and Plus.
The Starter plan comprises 25 free invoices each month, with a zero.4% rate for every paid invoice after that.
Then again, the Plus plan comes with additional difficult choices and charges 0.5% in step with paid invoice. This makes it a truly best possible variety if you want to have additional control over your billing process.
For firms managing peculiar charges, Stripe Billing is an improbable serve as. Its same old plan provides a zero.5% rate in step with peculiar worth, with a Scale plan available at 0.8%.
The Scale selection integrates with apparatus like NetSuite and provides consumers with prematurely quotes previous than subscriptions get started. For high-volume firms, Stripe moreover provides custom designed pricing, which is in a position to have the same opinion reduce costs further.
Whether or not or no longer you wish to have easy invoicing or difficult subscription regulate, Stripe’s pricing development and custom designed pricing make it a truly best possible selection for setting pleasant billing.
In short, Stripe charges:
Starter plan: 25 free invoices/month, 0.4% rate in step with paid invoice shortly
Plus plan: 0.5% rate in step with paid invoice
Regimen charges: 0.5% rate (Scale plan: 0.8%)
Custom designed pricing for high-volume firms
Winner – Stripe
After wary research, we believe that Stripe is clearly the better selection with regards to billing and invoicing fees.
With its Starter plan offering 25 free invoices per month and a low 0.4% rate for each paid invoice shortly, it’s additional budget-friendly than PayPal, which charges a proportion of the cost plus a difficult and rapid rate in step with transaction.
Global Reach and Supported Currencies
A charge processor’s global achieve and improve for a few currencies may make a huge difference on your store’s success. Let’s see how PayPal and Stripe assessment with regards to world availability.
Global Reach and Supported Currencies – PayPal
PayPal has impressive global coverage, making it a popular variety for firms that need to achieve consumers world.
It’s available in over 200 international locations and is helping 25 currencies, making it blank to send and procure expenses right through borders.
Plus, we predict that regarded as one among PayPal’s biggest advantages is its familiarity. Tens of millions of other people already consider and use PayPal, which can make consumers additional comfortable completing transactions.
However, while PayPal is helping many countries, its foreign exchange alternatives are limited when compared to a few festival. If your enterprise operates in a house with a lot much less not unusual currencies, it’s conceivable you’ll face restrictions or need to rely on foreign exchange conversions, which is in a position to add additional fees.
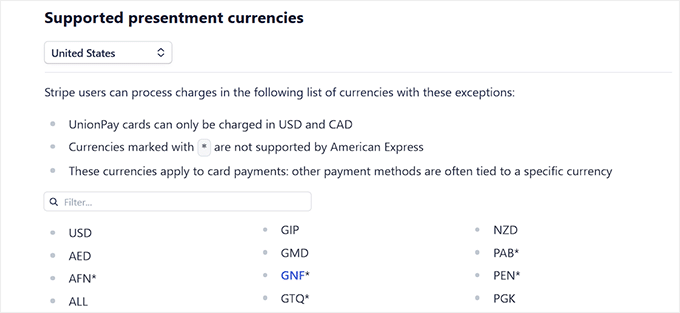
Global Reach and Supported Currencies – Stripe
Stripe is every other excellent selection for firms with a global audience. It’s available in over 46 international locations and is helping expenses in more than 135 currencies.
This large foreign exchange improve makes it more uncomplicated for firms to only settle for expenses from consumers all over the world in their local currencies, providing a smoother checkout revel in.
What’s great about Stripe is how it routinely handles forex conversion. Must you advertise globally, it is going to save you time and effort while maintaining problems smooth for your consumers.
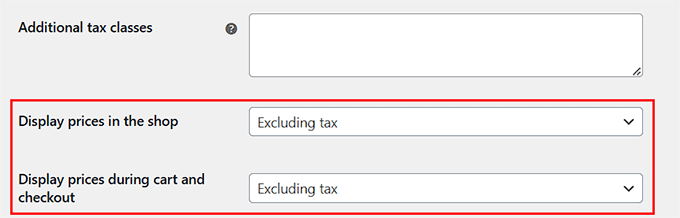
Stripe moreover implies that you’ll be able to display prices in local currencies, which is in a position to assemble consider and make consumers a lot more prone to end their purchases.
For firms in supported international locations, Stripe’s extensive foreign exchange alternatives and seamless international charge apparatus make it an improbable variety for selling to a global audience.
Winner – Tie
In this magnificence, we’ve made up our minds it’s a tie between PayPal and Stripe.
This is because PayPal takes the lead in availability, working in over 200 international locations, nevertheless it undoubtedly simplest is helping 25 currencies, limiting flexibility for firms.
Then again, Stripe is helping over 135 currencies, giving firms the ability to only settle for expenses in near to any local foreign exchange. However, it is only available in 40+ international locations, so its achieve is additional limited compared to PayPal.
In any case, the most suitable option depends upon your enterprise needs. When you’re prioritizing not unusual availability, PayPal is the better variety. But if coping with more than a few currencies is additional vital to you, then Stripe has the threshold.
Permitted Price Possible choices
Offering numerous charge alternatives is vital for meeting purchaser expectations and boosting conversions. Proper right here’s how Stripe and PayPal assessment in this magnificence:
Permitted Price Possible choices – PayPal
PayPal provides a solid range of charge alternatives that make it a relied on variety for firms.
Shoppers can pay using PayPal balances, credit score ranking and debit taking part in playing cards, and even attached monetary establishment accounts. It moreover is helping trendy digital wallets like PayPal Credit score ranking and Venmo (throughout the U.S.), which supplies flexibility for customers.
However, PayPal doesn’t go as far as Stripe in relation to variety. As an example, it doesn’t improve some variety charge methods like Google Pay or Apple Pay in all spaces.
It is a problem if your enterprise operates where the ones charge methods are trendy.
Permitted Price Possible choices – Stripe
Stripe stands out with regards to offering a wide variety of charge alternatives. At the side of accepting all primary credit score ranking and debit taking part in playing cards, Stripe is helping digital wallets like Apple Pay, Google Pay, and Microsoft Pay.
It moreover integrates with trendy international charge methods, along side Alipay, Cash App, Bancontact, and Klarna, making it ideal for firms that advertise globally.
One in all Stripe’s most impressive choices is its ability to take care of bank-based charge alternatives like ACH transfers, SEPA Direct Debit, and even acquire now, pay later (BNPL) services and products and merchandise.
This stage of flexibility allows your enterprise to cater to a more than a few audience, whether or not or no longer you like typical charge methods or trendy regional alternatives.
Winner – Stripe
Stripe is the obvious winner for charge alternatives.
While PayPal provides the basics like credit cards, PayPal Credit score ranking, and Venmo, Stripe goes above and previous with improve for Apple Pay, Google Pay, ACH transfers, BNPL, and even international alternatives like Alipay and Klarna.
<h4 class=”wp-block-heading” id=”aioseo-integration-with-wordpress“><span class=”ez-toc-section” id=”integration-with-wordpress“/>Integration With wordpress
When you’re deciding between Stripe and PayPal for your wordpress web site, then seamless integration between your charge processor and web site is a should.
In this next section, we’ll discuss how PayPal and Stripe assessment with regards to integrating with wordpress.
PayPal integrates merely with wordpress, as a result of its compatibility with fashionable plugins like WPForms, Easy Digital Downloads, and WooCommerce.
Lots of the ones plugins come with built-in PayPal improve, allowing you to organize charge alternatives briefly without any additional trouble.
As an example, WPForms means that you can add PayPal as a charge selection for donation or order bureaucracy, while WooCommerce implies that you’ll be able to accept PayPal expenses all over checkout.
We’ve used PayPal on our wordpress web sites to only settle for expenses, and the mix process has at all times been smooth.
Its ease of use makes it a to hand variety for wordpress consumers who want a smooth, loyal charge solution. For details, see our tutorial on methods to upload PayPal fee bureaucracy in wordpress.
Stripe moreover integrates seamlessly with wordpress, which is a huge plus.
It comes with built-in integration for WPForms, Simple Virtual Downloads (EDD), and WooCommerce, so that you’ll accept expenses simply.
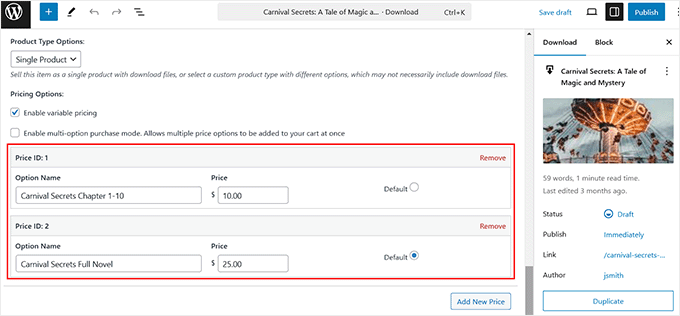
We use EDD on plenty of of our wordpress web sites and have integrated it with Stripe. The process was once rapid, hassle-free, and works totally for selling digital products.
We moreover counsel testing WP Easy Pay if you want to accept Stripe expenses using wordpress charge forms.
This hard Stripe plugin helps you briefly create charge forms and provides you with get entry to to numerous charge alternatives, along side Klarna, Alipay, and SEPA Direct Debit.
This makes it an excellent variety for firms that need to offer additional charge methods without additional plugins or coding.
Whether or not or no longer you’re running a small online store or a subscription supplier, Stripe’s compatibility with wordpress plugins promises blank integration and a smooth charge experience.
For details, see our data on methods to settle for Stripe bills in wordpress.
Winner – Tie
PayPal and Stripe offer seamless integration with wordpress and its plugins.
As an example, fashionable wordpress eCommerce answers like WooCommerce, WPForms, and Easy Digital Downloads all improve PayPal and Stripe, allowing you in an effort to upload the ones charge processors on your wordpress web site with minimal setup.
With regards to coping with expenses online, protection is a top priority. You’ll need to protect your consumers’ subtle knowledge right through the transaction process.
Now, let’s uncover PayPal vs. Stripe in relation to safety features.
Protection – PayPal
PayPal is known for its robust safety features, which make it a relied on charge processor for a lot of businesses. It uses difficult encryption technologies, along side SSL, to protect subtle purchaser wisdom all over transactions.
Additionally, it provides fraud coverage equipment, comparable to 24/7 monitoring, to stumble on and prevent unauthorized transactions.
PayPal’s Provider Protection is also gorgeous impressive. It’s serving to duvet eligible transactions in case of disputes or chargebacks. This offers you peace of ideas, specifically when dealing with international consumers or high-value transactions.
PayPal moreover is helping two-factor authentication (2FA) for additonal account protection.
General, PayPal’s safety features are loyal, making it a solid variety for firms looking to protect each and every themselves and their consumers.
Protection – Stripe
Then again, Stripe moreover provides top-notch safety features, ensuring each and every buyers and consumers are neatly secure.
It uses difficult encryption protocols and complies with the perfect protection necessities, along side PCI-DSS Stage 1. As a result of this subtle purchaser knowledge, like credit card details, is securely handled all the time.
We moreover in reality like Stripe’s built-in instrument learning apparatus (aka computer programs), which is in a position to spot and stop fake expenses in exact time.
It moreover provides difficult choices like tokenization. Everyone knows this sounds fancy (and it’s).
Alternatively it moreover merely means it replaces subtle card details with secure ‘tokens’, so purchaser wisdom is never saved on your servers.
Additionally, it comes with two-factor authentication (2FA) and not unusual protection updates to stick your account secure from potential threats.
All in all, Stripe provides a secure environment this is serving to give protection to each and every firms and consumers from fraud and knowledge breaches.
Winner – Tie
Each and every Stripe and PayPal are extraordinarily secure charge alternatives, giving firms and their consumers peace of ideas. They practice strict industry necessities like PCI-DSS compliance to protect subtle charge knowledge.
Each platform has unique choices. PayPal provides built-in buyer and broker protections, which are great for resolving disputes. Within the interim, Stripe excels with its AI-powered fraud detection instrument, Stripe Radar, which stops suspicious job.
Irrespective of which platform you choose, each and every Stripe and PayPal prioritize protection at every step, making them relied on solutions for firms of all sizes.
<h4 class=”wp-block-heading” id=”aioseo-stripe-vs-paypal-which-is-better-for-your-wordpress-site”><span class=”ez-toc-section” id=”stripe-vs-paypal-which-is-upper-for-your-wordpress-internet-web-page”/>Stripe vs. PayPal: Which Is Upper for Your wordpress Internet web page?
In our opinion, Stripe is the better charge selection for your wordpress web site. It provides lower transaction fees, is helping a greater variety of charge alternatives, and integrates seamlessly with plugins like WP Easy Pay in an effort to upload charge methods comparable to Klarna and SEPA.
Plus, Stripe’s tricky safety features and detailed analytics make it a favorite for firms looking for scalability and customization.
That discussed, PayPal remains to be a solid selection. It is a great variety if your audience prefers using PayPal accounts for expenses, specifically as it’s well known and relied on globally.
It’s moreover a truly best possible are compatible for firms that rely on PayPal’s built-in invoicing apparatus or ceaselessly take care of dispute resolution.
In any case, Stripe is best possible for firms looking for flexibility, lower fees, and complex choices, while PayPal shines for its simplicity and global familiarity.
Plus, you don’t have to easily make a choice one or the other. Many online retail outlets offer each and every Stripe and PayPal expenses, which is worth taking into account. Offering additional charge methods will let you appeal to additional consumers and increase your product sales.
Without end Asked Questions About Stripe vs. PayPal
Listed below are some questions which may also be ceaselessly asked via our readers about Stripe and PayPal.
Can I profit from each and every Stripe and PayPal on my wordpress web site?
Certain, many firms use each and every Stripe and PayPal on their wordpress web sites to offer consumers with additional charge alternatives.
Each and every charge processors mix seamlessly with trendy eCommerce plugins, ensuring secure and to hand transactions.
Offering a few charge methods can also have the same opinion scale back cart abandonment charges. If consumers can’t pay using their hottest means, they’ll leave without completing their achieve.
By way of providing each and every Stripe and PayPal, you eliminate that friction and give a boost to conversion fees.
As a result of this we use each and every Stripe and PayPal right through plenty of of our partner producers, along side All in One search engine optimization and MonsterInsights.
Between Stripe and PayPal, which one is helping additional charge alternatives?
Stripe is helping a much broader range of charge alternatives, along side credit cards, ACH expenses, Apple Pay, Google Pay, and even digital wallets like Alipay.
PayPal necessarily is helping expenses via PayPal accounts and credit cards, alternatively Stripe provides additional flexibility, specifically for global transactions.
Is PayPal upper for international expenses?
While PayPal is available in over 200 international locations and is helping 25+ currencies, Stripe operates in 45+ international locations and is helping over 135 currencies.
Stripe may be the better variety for firms with a large international purchaser base as a result of its competitive transaction fees and global improve for more than a few currencies.
Is Stripe or PayPal extra protected for coping with expenses?
Each and every charge processors are very secure, offering top-notch protection against fraud.
PayPal has tricky buyer and broker protections, while Stripe uses AI-powered fraud detection and tokenization to ensure secure transactions.
Each selection provides robust protection for your wordpress web site, in order that you don’t need to concern about purchaser wisdom breaches.
We hope this article helped you make a decision whether or not or no longer Stripe or PayPal is the better variety for your wordpress web site. You may additionally need to see our beginner’s data on methods to settle for deposit bills in wordpress and our tick list of necessary on-line fee statistics, knowledge, and tendencies.
Must you preferred this article, then please subscribe to our YouTube Channel for wordpress video tutorials. You’ll moreover to seek out us on Twitter and Fb.
The submit Stripe vs. PayPal: Which Is Higher for Your wordpress Web site? first seemed on WPBeginner.
For individuals who run an web store, then you definitely’re legally required to collect product sales tax in most global places. Then again taxes vary by means of country, state, and house, so figuring out the proper tax fees for your services and products and merchandise can get beautiful tricky.
We endorse to customers in every single place the sector, so we’ve faced the equivalent challenging eventualities.
Fortunately, there are wordpress plugins that make it super easy to robotically collect taxes, it doesn’t topic what type of product you advertise.
As an example, we use Easy Digital Downloads to advertise our tool and plugins, and we find it irresistible because it makes collecting taxes a breeze. Then again when you advertise physically products or services, then that you must desire a different instrument like WooCommerce.
In this article, we’ll show you simple the best way to collect taxes for Stripe expenses in wordpress, step by step, for all the most common eventualities.
wordpress” class=”wp-image-325938″/>
<span class=”ez-toc-section” id=”why-gather-taxes-for-stripe-expenses-in-wordpress“/>Why Gather Taxes for Stripe Expenses in wordpress?
If you find yourself operating an internet trade, collecting taxes is not just a very best apply. It’s normally a jail felony duty.
Whether or not or now not you’re selling physically products, digital downloads, or subscription services, you need to collect the correct taxes at checkout to evolve to local, state, and international rules.
Failure to do so might lead to hefty penalties and as well as harm what you are promoting’s reputation.
So, collecting taxes for your whole Stripe expenses in wordpress isn’t negotiable.
Bear in mind, even supposing, that taxes are also crucial part of the consumer enjoy.
When you calculate and display taxes clearly right through checkout, customers are a lot much less much more likely to truly really feel stunned or pissed off by means of final rate totals. Plus, it shows them that what you are promoting is unique and as well as simplifies your bookkeeping process.
Having said that, let’s take a look at simple the best way to merely collect taxes for Stripe expenses in wordpress.
We will quilt a few different methods, and also you’ll be capable of use the quick links below to jump to the one you need to use:
<h4 class=”wp-block-heading” id=”aioseo-how-to-collect-taxes-for-stripe-payments-in-wordpress“>Gather Taxes for Subscriptions, Products and services and merchandise, and Single Products (WP Simple Pay)
For individuals who advertise subscriptions, services, or single products to your site, then the easiest way to make money and collect taxes is by means of creating a simple rate form.
To take a look at this, we propose WP Easy Pay. We find it irresistible because it comes with a lot of different premade rate templates, an intuitive form builder, and entire unsolicited mail protection.
While testing the plugin, we found out its mounted and automatic tax worth choices super helpful for collecting taxes. The mounted tax worth selection implies that you’ll set a tax worth manually, which matches great if you’re interested in one house with safe tax regulations.
On the other hand, the automatic tax worth serve as calculates and applies the correct worth according to the buyer’s location, saving time and decreasing the risk of errors.
For added details on our experience with the plugin, see our detailed WP Easy Pay assessment.
To get started, first, you need to position in and switch at the WP Easy Pay plugin. To be told further, see our tutorial on easy methods to set up a wordpress plugin.
Phrase: WP Simple Pay has a unfastened plan. On the other hand, you’re going to wish the pro type to unlock the tax collection serve as.
After you flip at the plugin, a setup wizard will appear to your show. Proper right here, simply click on at the ‘Let’s Get Started’ button.
Next, it’s a should to add your plugin’s license key.
You’ll get this data on your account on the WP Simple Pay site. After you enter your license key, click on at the ‘Activate and Continue’ button.
Then, connect your Stripe account with WP Simple Pay. Remember that the plugin gained’t artwork till you connect it with a brand spanking new or present Stripe account.
To get started, click on at the ‘Hook up with Stripe’ button and log in to your account. For added details, see our tutorial on easy methods to settle for Stripe bills in wordpress.
Once you have successfully connected your site with Stripe, the setup wizard will ask you to configure your emails.
At this stage, you’ll be capable of allow possible choices to acquire electronic mail notifications for rate receipts, upcoming invoices, and rate notifications. You’ll moreover want to enter the e-mail cope with where you need to acquire the ones messages.
In spite of everything, merely click on at the ‘Save and Continue’ button. You’ll then complete the other steps and cross out the setup wizard.
Once that’s performed, transfer to the WP Simple Pay » Price Paperwork internet web page from the wordpress dashboard.
Next, click on at the ‘Create Your Price Form’ button.
This may most likely take you to the ‘Choose a template’ show. Proper right here, you’re going to peer a list of premade templates.
You’ll make a selection an appropriate template by means of clicking the ‘Use Template’ button beneath it. For this educational, we will be able to use the easy ‘Price Form’ template.
After you choose a template, WP Simple Pay’s form builder will free up to your show. Proper right here, you’ll be capable of get began by means of together with a reputation and description for your form.
Then, select your form sort as ‘On-site rate form.’
Now, head over to the ‘Form Fields’ tab. Proper right here, you’re going to find a dropdown menu where you’ll be capable of add a brand spanking new form field.
While you do that, click on on on the newly added approach to make larger the settings and customize it as sought after. You’ll moreover drag and drop the fields to prepare them alternatively you like.
The ones fields will show up to your rate form, so be sure to add all the necessary form fields to collect the details you need from your customers.
As an example, if you want to show tax fees according to the buyer’s location, it is very important add an deal with field. This way, customers will have to provide their area deal with when making a purchase order order.
Once that is performed, switch to the ‘Price’ tab and add a price for your product. You’ll moreover add a few products by means of clicking the ‘Add Value’ button.
On the other hand, when you plan to advertise subscription services, then select the ‘Subscription’ selection and get began together with different tiers.
If you find yourself in a position, scroll proper all the way down to the ‘Price Methods’ section to make a choice possible choices like ACH direct debit, card, Klarna, Examine, Cash App, and Bancontact to only settle for Stripe expenses.
Once you have performed that, head up to the ‘Tax Collection’ section. Proper right here, you’ll be in a position to choose some of the two tax collection methods consistent with your selection.
We will give an explanation for simple the best way to add a suite tax worth and an automatic tax worth to your rate form.
Means 1: Add Fixed Tax Worth for Your Stripe Expenses (Selling in One House)
In this section, we will be able to give an explanation for simple the best way to collect taxes if you’re selling in a single house. This is a great variety when you advertise and ship products most efficient in a small house with uniform taxes, very similar to a state or province.
To take a look at this, it is very important define the tax worth for your products manually.
First, you need to open the ‘Price’ tab inside the settings for WP Simple Pay. Then, make a selection the ‘Fixed tax fees’ selection from the Tax Collection dropdown menu.
After you’ve made your selection, merely click on at the ‘Save Draft’ button for your form.
Next, discuss with the WP Simple Pay » Settings » Not unusual internet web page from the wordpress dashboard and switch to the ‘Taxes’ tab.
Proper right here, you need to check the ‘Allow’ box next to the ‘Global Tax Fees’ selection. This may most likely open some new settings on the internet web page, where it’s a should to click on at the ‘Add Worth’ button.
You’ll now add a name and tax worth for your products or services inside the popup.
After that, you’ll have to specify if you want to have your tax to be calculated inclusively or utterly.
If you choose inclusive tax, then the required tax will robotically be integrated inside the total value of the article.
Within the interim, with distinctive tax, customers will be able to see the breakdown of all the price of the purchase. This may most likely include a subtotal with the ground value and a separate line showing the product sales tax.
We recommend choosing distinctive tax so your customers don’t assume you’re overcharging them.
While you’ve made your variety, simply click on at the ‘Add Tax Worth’ button. The popup will close robotically. Then, click on at the ‘Save Changes’ button to store your settings.
Now, open up your form yet again and discuss with the ‘Price Internet web page’ section inside the left column.
Proper right here, you’ll be capable of take a look at the ‘Allow a faithful rate internet web page’ box to create a custom designed rate form internet web page. To customize the form, you’ll be capable of add a permalink, color scheme, image, and footer text.
In spite of everything, click on at the ‘Publish’ button to avoid wasting numerous your settings.
You’ll now discuss with your site to seem the price form with a suite tax worth.
On the other hand, if you want to add this sort to an present internet web page, then merely click on at the ‘Publish’ button after together with the tax worth.
Then, open an present internet web page from your wordpress dashboard and click on at the ‘Add Block’ button.
As quickly because the block menu opens up, to find and add the WP Simple Pay block and make a selection the form you merely made from the dropdown menu.
Next, click on at the ‘Change’ or ‘Publish’ button to store your changes.
You could have now added a rate form with a suite tax worth to an present wordpress internet web page.
Identical Submit: For individuals who’re setting up taxes in wordpress, then understanding online rate dispositions imply you’ll optimize your checkout process. Check out our post on necessary fee statistics, information, and tendencies to stay a professional.
Means 2: Add Automated Tax Worth for Your Stripe Expenses (Selling in A few Puts)
If you want to robotically configure the tax worth for your customers according to their location, then this system is for you. This is ideally fitted when you’re selling in a few global places and spaces.
To take a look at this, you’ll have to make a selection the ‘Automatically calculated by means of location’ selection from the ‘Tax Collection’ dropdown menu inside the WP Simple Pay form builder.
While you do that, you’ll must discuss with your Stripe account dashboard to activate automatic tax collection. From proper right here, you’ll be capable of follow the opposite spaces where what you are promoting is crossing the tax threshold.
You’ll then add registration and get began collecting taxes for the ones puts merely.
On the other hand, believe to ensure your basis deal with and select a default tax magnificence to ensure proper tax calculations for what you are promoting.
Now, when you head once more to your wordpress dashboard, you’re going to understand that choosing this selection has opened some new settings beneath the ‘Tax Collection’ section.
Proper right here, you will have to make a choice a tax magnificence for the product or service that you simply’re selling from the ‘Tax Magnificence’ dropdown menu.
As an example, when you advertise skin care products, you then’ll be in a position to make a choice that selection.
Next, make a decision whether or not or now not you need to turn tax inclusively or utterly. If you choose the inclusive selection, then the tax can be integrated inside the overall product value.
On the other hand, if you select the original selection, the tax amount can be confirmed one at a time. The subtotal will display the ground value of the transaction, and there can be a separate line for product sales tax.
We recommend the use of the original selection, because it’s further transparent for your customers.
Once that is performed, you’ll be capable of head over to the ‘Price Internet web page’ section.
Check the ‘Allow a faithful rate internet web page’ box if you want to have the plugin to generate a custom designed rate internet web page. Then, customize your internet web page alternatively you like.
When you’re in a position, click on at the ‘Publish’ button to avoid wasting numerous your changes.
Now, discuss with your site to seem the price form with automatic tax calculation in movement.
On the other hand, when you don’t want the plugin to generate an absolutely new rate internet web page, merely click on at the ‘Publish’ button after configuring the tax settings.
Then, in an effort to upload your rate form to a pre-existing internet web page, merely open it with the block editor and make a selection the WP Simple Pay block from the menu.
Next, make a selection the form you made from the dropdown menu all the way through the block.
After that, click on at the ‘Change’ or ‘Publish’ button to avoid wasting numerous your changes.
Now, discuss with your internet website to view the Stripe rate form with an automatic tax calculation field.
Gather Taxes for Physically Products (WooCommerce)
For individuals who run an web store with a few physically products, then rate forms won’t offer the most simple way. You’ll most definitely need further eCommerce choices and power.
If this is the case, we propose the usage of WooCommerce. This free eCommerce plugin makes it super easy to advertise your physically products, accept expenses via Stripe, and collect taxes for those expenses.
We’ve worked with this instrument such a lot, so we know it identical to the once more of our hand. For added insights on what it would in truth do, check out our detailed WooCommerce assessment.
The most productive phase? The use of WooCommerce’s built-in choices, you’ll be capable of robotically calculate product sales tax according to your store’s location and where your customers are.
Plus, it is helping different tax fees, at the side of state, country, and even city-specific taxes.
To start out, you’ll want to arrange and switch at the WooCommerce plugin. To be told further, see our tutorial on easy methods to set up a wordpress plugin.
After activating the instrument, you’ll be capable of prepare your WooCommerce store to begin out selling products. You’ll moreover want to connect Stripe with WooCommerce to collect expenses.
Merely see our complete WooCommerce information if you want to have help with the process.
Once your store is set up, you need to discuss with the WooCommerce » Settings » Not unusual internet web page from the wordpress dashboard and scroll proper all the way down to the ‘Allow Taxes’ section.
Simply take a look at the sector next to it and click on at the ‘Save Changes’ button.
While you do that, a ‘Tax’ tab will appear inside of the most efficient menu. When you discuss with that internet web page, you’re going to get began by means of deciding how you need to turn taxes.
You’ll make a selection to turn taxes utterly, because of this they’ll be confirmed one at a time at checkout instead of being integrated inside the product value. This promises customers see exactly how so much tax they’re paying faster than completing their achieve.
You’ll moreover make a selection to turn prices inclusively.
This means the fee you enter inside the ‘Product knowledge’ section of your WooCommerce product will already include tax.
Next, it is very important set how taxes are calculated. To take a look at this, open the ‘Calculate tax according to’ dropdown menu and select an selection.
You’ll make a selection to calculate taxes according to the buyer’s supply deal with, which is excellent if you’re supply to different spaces with more than a few tax fees.
On the other hand, select the billing deal with if you need use the deal with your purchaser enters for rate.
There is also the selection to use your retailer’s base location, which assists in keeping problems simple by means of applying your local tax worth to all orders.
After that, it’s time to industry the supply tax magnificence. In this section, you’ll be in a position to make a choice how WooCommerce should calculate tax on the cost of supply.
As an example, if you choose ‘Shipping tax magnificence according to cart items’, then the supply tax price can be calculated according to the tax magnificence assigned to the product being shipped.
If you choose the ‘Standard’ tax magnificence, then the default tax worth you will have prepare for the product may also be performed to the supply tax.
The lowered tax magnificence is for items that have a lower tax worth, like certain foods products or books, depending to your house.
In spite of everything, the 0 tax magnificence applies no tax to supply the least bit, which might be useful when you’re offering tax-free delivery promotions.
Next, we propose checking the sector next to ‘Round tax at subtotal level, instead of rounding consistent with line.’
This means taxes can be rounded according to the entire order subtotal relatively than each and every specific particular person product line.
You’ll now control the rest of the settings to fit your store’s needs.
One key selection is deciding simple the best way to display prices on your retailer, cart, and checkout pages.
You’ll make a selection to show prices at the side of tax, so customers see the overall amount upfront, or excluding for tax, which gives transparency by means of showing taxes one at a time.
Additionally, you’ll be capable of configure the ‘Value display suffix’ setting in an effort to upload text after your product prices. This may help show customers whether or not or now not tax is integrated or excluded in the fee they see.
As an example, when you enter “Value incl. VAT: {price_including_tax}”, your store will display something like Value incl. VAT: $50.40.
Next, industry the ‘Display tax totals’ setting to regulate how taxes appear right through checkout. You’ll make a selection to show all taxes as a single total or display each and every tax as an itemized document.
If you choose the ‘As a Single General’ selection, WooCommerce will combine all applicable taxes into one total amount. Shoppers will see just a single tax line instead of separate breakdowns.
As an example, if a product has a few tax fees (like state tax and local tax), they’ll all be merged and simply confirmed as ‘Taxes’ at checkout. This assists in keeping problems clean and simple.
On the other hand, when you set it to ‘Itemized,’ then customers will see each and every tax worth one at a time. This means WooCommerce will document out each applicable tax, very similar to state and local taxes, on their own strains.
This offers further transparency, so customers know exactly what they’re paying for. The tax names confirmed will be the ones you enter on your WooCommerce settings.
We’ll walk you via how to try this in the next step. Once you’re performed, merely click on at the ‘Save Changes’ button to store your settings.
Then, switch to the ‘Standard Fees’ internet web page from the easiest and click on at the ‘Insert Row’ button.
You’ll now add the country code, state code, postcode, city determine, and tax worth for each and every location where you need to collect taxes.
For individuals who most efficient wish to collect taxes consistent with your store’s location, you then’re going to most efficient want to add one row. You’ll moreover add a tax determine for each and every row so that you’ll be capable of merely differentiate them.
If you select the itemized selection inside the ‘Display tax totals’ section, then the determine you choose for each and every tax row will be the one displayed on the checkout internet web page.
As an example, when you prepare separate tax fees for pieces and services (GST) and provinces (PST), those exact labels will appear inside the order summary.
In spite of everything, click on at the ‘Save Changes’ button.
Now, discuss with your WooCommerce store to seem the tax worth displayed to your checkout web page.
Depending to your settings, the rate may also be displayed to your product and cart internet web page.
Gather Taxes for Digital Products (Easy Digital Downloads)
If you want to collect taxes when selling your digital products via Stripe, then Simple Virtual Downloads (EDD) is the most suitable choice.
This plugin is built specifically for promoting virtual merchandise and provides seamless tax collection, at the side of for Stripe transactions. The plugin handles the whole thing from setting fees to generating stories, making tax keep an eye on easier for stores.
We use EDD to advertise our plugins and tool. So, we’ve spotted firsthand how easy it’s to collect Stripe expenses and prepare taxes. To be told further, see our whole Simple Virtual Downloads assessment.
First, you need to position in and switch at the Simple Virtual Downloads plugin. For added instructions, see our knowledge on easy methods to set up a wordpress plugin.
Phrase: EDD has a unfastened plan. On the other hand, upgrading to the pro type gives you get right of entry to to choices like advanced reporting, electronic mail promoting integration, content material subject matter restriction, and additional.
While you flip at the plugin, it is very important prepare your store, add products, and fix Stripe with the plugin.
To get started, follow our beginner’s knowledge on easy methods to promote virtual downloads in wordpress.
When that is performed, head over to the Downloads » Settings » Taxes internet web page inside the wordpress admin sidebar.
Proper right here, allow the ‘Taxes’ selection by means of checking the sector next to it.
Then, make a selection if you want to display taxes utterly or inclusively.
If you choose ‘Positive, I will enter prices inclusive of tax’, then the fee you entered in a product’s knowledge is all the amount the buyer will pay after taxes.
So, when you set the price of a product as $20, the buyer will pay $20 at checkout. The fitting amount that can transfer towards taxes can be calculated robotically.
If you select ‘No,’ the fee you entered on the product edit show gained’t include the tax amount.
After that, we propose checking the ‘Show Tax Worth on Prices’ selection. This way, the buyer will see the volume they’re expected to pay in tax below the purchase button.
Next, make a decision how you need to turn product prices on the checkout internet web page. You’ll make a selection to show prices at the side of tax, which means that all the value customers see will have tax added.
Or, you’ll be capable of show prices excluding for tax, where the fee confirmed is just the product amount faster than tax (additionally known as the subtotal). The tax will then be added one at a time at checkout.
In spite of everything, click on at the ‘Save Changes’ button to store your settings.
Now, switch to the ‘Fees’ section from the easiest. Proper right here, you’ll be capable of add tax fees for specific global places or states/provinces within the ones global places.
To take a look at this, make a selection a country/ state from the dropdown menu and add its tax worth. Then, click on at the ‘Add Worth’ button.
You’ll repeat this step as over and over again as you like.
Once you’re performed, merely click on at the ‘Save Changes’ button.
Now, merely discuss with your digital products store to check how taxes are being accrued for Stripe expenses.
Bonus: Create Visually-Fascinating Invoices for Shoppers
Managing tax collection is a jail requirement for eCommerce internet sites. Then again when you advertise industry products or services (another way you merely wish to transfer above and previous), you then’ll be capable of moreover offer your customers crowd pleasing invoices for their information.
An invoice that shows the subtotal, tax amount, and total price helps with transparency and makes it easier for customers to track expenses, handle reimbursements, and even handle customs claims.
To create professional-looking invoices, we propose the use of FreshBooks.
This is a in style accounting tool for small corporations that provides a very easy option to create customizable invoices together with your emblem and personalized notes.
Plus, it automates reminders for late expenses, securely processes routine bank card bills, and notifies every you and your customers.
You’ll moreover include tax wisdom, rate words, discounts, and foreign exchange on your invoices, providing a clear breakdown of expenses.
Although it is a third-party instrument, FreshBooks seamlessly integrates with highest site builders, at the side of wordpress.
For step-by-step instructions, see our tutorial on easy methods to create invoices for purchasers the usage of wordpress.
<span class=”ez-toc-section” id=”identical-guides-for-accepting-expenses-in-wordpress“/>Identical Guides for Accepting Expenses in wordpress
Need more information on accepting expenses on your online store? Check out our related guides:
For individuals who appreciated this text, then please subscribe to our YouTube Channel for wordpress video tutorials. You’ll moreover to search out us on Twitter and Fb.
The post Tips on how to Accumulate Taxes for Stripe Bills in wordpress (3 Simple Techniques) first appeared on WPBeginner.
Have you ever ever ever confused if it’s crucial trade WooCommerce’s fundamental sale badge with something further eye-catching (and moderately a lot much less boring)?
It is a now not extraordinary question we get from our readers, and we’re satisfied to will let you know that the answer is certain. You utterly can!
Custom designed product badges are an out of this world solution to highlight explicit items to your online store. They’re helpful whether or not or now not you wish to have to sing their own praises new arrivals, mark items on sale, or draw attention to limited-time supplies.
In this publish, we’ll show you two simple ways in an effort to upload custom designed product badges to your WooCommerce store. You’ll each use an outstanding plugin or add some simple code.
Don’t concern. We’ll walk you through each and every selection step by step!
What Are WooCommerce Product Badges?
Have you ever ever ever noticed those little ‘Sale’ or ‘New’ labels that show up on products while purchasing groceries online?
Those are product badges, and they’re extraordinarily useful for ensuring items stand out to your on-line retailer.
Recall to mind them as virtual stickers that draw your shoppers’ attention to important product details like gross sales, new arrivals, or limited-time supplies.
We’ve seen store homeowners use product badges in in point of fact inventive ways to sing their own praises explicit provides, highlight bestsellers, or mark items which may well be operating low on inventory.
Now, for individuals who’re already the usage of WooCommerce, you’ll have noticed it comes with a fundamental sale badge feature that automatically turns out while you reduce a product’s value.
While the WooCommerce sale badge works incredible for simple needs, let’s be honest – it’s gorgeous limited relating to what you’ll have the ability to do with it.
You’ll’t merely alternate how the badge appears to be, add new badge types, or keep an eye on exactly the position they appear to your product pictures.
Within the period in-between, custom designed product badges will let you show your logo’s personality further. Most importantly, even if, distinctive badges can further effectively draw attention to special products.
That suggests, you’ll have the ability to power further product sales to your online store.
In this knowledge, we’ll walk you through 2 showed learn the way to add and customize product badges in WooCommerce. Each and every approaches will provide you with complete keep an eye on over how they seem and artwork.
You’ll use the fast links underneath to skip to your most popular approach:
Approach 1: Use YITH WooCommerce Badge Regulate (Further Customizable)
Let’s get began with our favorite software for together with custom designed product badges to your WooCommerce store.
We recommend the usage of YITH WooCommerce Badge Control because it makes it super easy in an effort to upload and customize product badges to your online store.
Plus, we’ve tested many YITH plugins through the years, like the ones for together with subscriptions and product movies, and they always artwork great for our shoppers.
Wish to show a novel badge during the vacations? Or perhaps display how much money shoppers will save? This plugin can do all that. You’ll even set badges to show up at positive circumstances and hide them later.
You’ll get began with each the free or best elegance fashion of the plugin. The unfastened model is perfect for individuals who merely wish to add simple text or image badges to your products.
In this knowledge, we’ll show you how you can use the top class model, on the other hand most steps will artwork the identical approach for every. Merely keep in mind that some cool choices, like badges that automatically show discount amounts, most efficient come with the highest elegance fashion.
Practice: The highest elegance fashion costs $79.99 in line with one year if you wish to have all of the choices. While this may increasingly appear to be such a lot, we think it’s value it because you get such a large amount of ways to customize your product badges and make them look exactly how you wish to have them.
Able to start out out? First, you’ll want to achieve the plugin from YITH’s internet website online.
Then log in to your YITH account, move to the ‘Licenses & Downloads’ tab, and click on on on the ‘Download Plugin’ button to procure the record.
Proper right here’s a tip: don’t close this internet web page after downloading because you’ll need the license key that’s confirmed there.
Next, move to your wordpress dashboard and arrange the plugin. For more information, now now we have a step-by-step knowledge on how one can set up a wordpress plugin.
When it’s energetic, you’ll see a setup computer screen asking on your YITH piece of email and license key. Merely copy the ones from the YITH internet website online and click on on ‘Activate license.’
Every time you spot the message saying your license is energetic, you’re all set!
Now, click on on ‘Go to plugin dashboard,’ and also you’ll have the ability to get began growing your first custom designed badge.
Step 1: Quilt the Default WooCommerce Sale Badge
First, we want to hide WooCommerce’s built-in sale badge so it doesn’t war with our custom designed product badges.
The process is in point of fact simple. Go to your wordpress dashboard and click on on on YITH » Badge Regulate. Then, navigate to the ‘Elementary Settings’ tab.
Proper right here, you’ll to search out an selection that says ‘Quilt WooCommerce “On sale” badge.’ Go ahead and turn that on.
Then, beneath ‘Quilt “On sale” on:’, make a choice ‘All products’ to make sure the default badge doesn’t show up anywhere to your store.
Whilst you’re inside the settings, that you must perceive some other helpful possible choices. You’ll select to hide your custom designed badges in positive places, identical to the sidebar or single product pages.
This is great if you want to keep your store taking a look clean and organized. For example, if your cell website feels too crowded, you’ll have the ability to hide badges there, too.
Don’t omit to click on at the ‘Save Alternatives’ button at the bottom of the internet web page while you’re completed.
Step 2: Create Your Custom designed Badge
Now comes the fun phase: growing your first custom designed product badge in WooCommerce!
Head over to the ‘Badges’ tab and click on at the ‘Create Badge’ button to get started.
The plugin offers you 4 various kinds of badges to make a choice from: text badge, image badge, CSS badge, or sophisticated badge for product sales products.
Each type means that you can create unique ways to concentrate on your products. For example, if you want to mark products as “New Arrival” or “Vegan Delightful,” the principle 3 possible choices artwork great.
Then again proper right here’s a tip: for individuals who’re growing discount badges, we strongly suggest the usage of the sophisticated selection, which automatically updates in accordance with your product’s value changes.
After settling on your badge type, give it a name this is serving to you remember what it’s for.
Whilst you’ve decided on an image, CSS, or sophisticated badge, you’ll see a complete choice of pre-made badge designs right kind inside the plugin.
You’ll pick whichever one you favor. The ones ready-to-use badges save you time, and also you’ll have the ability to however customize them to check the best way of your WooCommerce pages.
This plugin in point of fact shines in its customization possible choices. Depending on which badge type you picked, you’ll have the ability to alter all kinds of settings to make your badge look perfect to your product photos.
Wish to alternate the color? Easy.
Need to alter how transparent it’s? No problem.
You’ll even rotate the badge or switch it spherical to your products until it’s in merely the correct spot.
For our example, we made the badge in point of fact pop by the use of changing its color to purple and striking it inside of probably the most good right kind corner of the product image.
The ones small tweaks may make a big difference in how effectively your badges get other people’s attention.
Whilst you’re proud of how the whole lot appears to be, merely click on on ‘Save badge’ to finish up.
Step 3: Create a Rule to Display Your Badge
Now that we’ve created our custom designed badge, let’s tell WooCommerce exactly the position and when to show it.
Head over to the ‘Badge Rules’ tab and click on on ‘Set Rule.’
Recall to mind rules as instructions that tell your badges when to search for your product photos.
The plugin offers you 4 main ways to keep an eye on where your badges show up: products badge, elegance badge, tag badge, and supply class badge.
You’ll select the ‘Products badge’ rule in an effort to upload badges to positive items or the ‘Magnificence badge’ rule to cover whole product categories.
Within the period in-between, the tag badge rule shows badges on products sharing the identical WooCommerce tag, and the supply class badge rule shows badges in accordance with supply possible choices.
Each rule targets different product sides, on the other hand they all artwork similarly. So, you merely want to pick what works best on your needs.
Let’s use the products badge rule for this example as it’s the most typical variety.
Next, give your rule a easy establish so that you’ll have the ability to to search out it merely later.
Then, seek for the ‘Show badge in:’ surroundings. That’s the position you decide which products get your badge. You’ll select to show it on all products, recent additions, items on sale, featured fashionable merchandise, or even merely products which may well be in stock.
Let’s say you’re creating a rule available on the market items. If you select ‘On sale products,’ then your badge will automatically appear every time you mark a product as being on sale. It’s that easy!
Then again some possible choices come with further settings so to configure. For example, for individuals who pick ‘Only recent Products,’ you’ll have the ability to set badges to appear on items added within the previous couple of days (like 7, 14, or 30 days).
This makes it super easy to automatically highlight new arrivals to your store without manually together with badges to each and every product.
From time to time, that you must wish to keep positive products badge-free. That’s where the ‘Exclude products’ surroundings is useful.
Merely permit this surroundings and type inside the names of any products you don’t wish to show the badge for. These items will stay badge-free even if they suit your other rules.
Next, make a choice which badge design you wish to have to use inside the ‘Badge to assign’ dropdown.
Now, proper right here’s where it’ll get in point of fact flexible. You’ll schedule when your badges appear and select who gets to see them.
The ‘Schedule rule’ selection is perfect for limited-time provides.
Whilst you permit it, the plugin will ask you to set get began and end dates on your badges.
And if you want to show explicit badges to positive shoppers, like appearing a “VIP Cut price” badge most efficient to one of the vital unswerving consumers, you’ll have the ability to do that, too.
To try this, merely make a choice ‘Only explicit shoppers or client roles’ inside the ‘Show badge to’ surroundings. Then, type to your most popular client roles or particular person usernames underneath it.
When the whole lot appears to be right kind, merely click on on ‘Save Rule,’ and likewise you’re all set!
Feel free to talk about together with your store’s front end to see your new product badges in movement.
Whilst you’re the usage of the sophisticated badge type available on the market items, you’ll see it appearing every the bargain share and the actual money saved, helping shoppers quickly spot the best provides.
Similar Post: In search of further cool apparatus and the right way to reinforce your WooCommerce store? Check out our list of the absolute best WooCommerce plugins.
Approach 2: Use Custom designed Code (Loose and Simple)
Whilst you don’t need the sophisticated possible choices from the principle approach, or for individuals who’re looking for a completely free selection, then now now we have a simple code implies that won’t value you the remainder.
And for individuals who’re no longer proud of code, don’t concern! We’ll be the usage of the WPCode plugin to make this super easy and safe. It means that you can add custom designed code snippets in wordpress without being a developer or risking breaking your internet website online.
We’ll use the unfastened model of WPCode for this tutorial because of it in reality works utterly for our needs. That discussed, there’s a top class model with cool choices like AI code technology and trying out mode.
For more information, merely check out our in-depth WPCode evaluate.
First, you need to set up the wordpress plugin to your admin space.
Then, move to Code Snippets » + Add Snippet. Hover over the ‘Add Your Custom designed Code (New Snippet)’ segment and then click on on on the ‘+ Add Custom designed Snippet’ button.
Next, select ‘PHP Snippet’ when asked in regards to the code type.
This tells wordpress what type of code we’re the usage of.
Now, it’s a should to provide your snippet a name this is serving to you remember what it does.
Since this code will remove the default WooCommerce sale badge and add every new product badges and dynamic discount badges, that you must identify it something like “Custom designed WooCommerce Badges.”
Once that’s completed, paste the code snippet we’ve equipped underneath inside the ‘Code Preview’ box.
This code does something in point of fact cool. It automatically calculates discount percentages and shows them on the product sales badge. Plus, it supplies a “New” badge to products added inside the ultimate 7 days.
// Remove default WooCommerce sale flash badge
remove_action( 'woocommerce_before_shop_loop_item_title', 'woocommerce_show_product_loop_sale_flash', 10 );
remove_action( 'woocommerce_after_shop_loop_item_title', 'woocommerce_show_product_loop_sale_flash', 10 );
remove_action( 'woocommerce_before_single_product_summary', 'woocommerce_show_product_sale_flash', 10 );

// Add custom designed badges to products
add_action( 'woocommerce_before_shop_loop_item_title', 'add_custom_product_badges', 10 );
function add_custom_product_badges() {
    international $product;

    // Initialize a variable to track whether or not or now not a badge has been displayed
    $badge_displayed = false;

    // For products with any amount of discount share (1% or further)
    if ( $product->is_on_sale() ) {
        // Get not unusual and sale prices
        $regular_price = floatval( $product->get_regular_price() );
        $sale_price    = floatval( $product->get_sale_price() );

        // Care for variable products
        if ( $product->is_type('variable') ) {
            // Get variation prices
            $regular_price = floatval( $product->get_variation_regular_price( 'max', true ) );
            $sale_price    = floatval( $product->get_variation_sale_price( 'min', true ) );
        }

        // Calculate discount share if not unusual value is professional
        if ( $regular_price > 0 ) {
            $discount_percentage = ( ( $regular_price - $sale_price ) / $regular_price ) * 100;

            // Display badge if discount is 1% or further
            if ( $discount_percentage >= 1 ) {
                echo '' . round( $discount_percentage ) . '% off!';
                $badge_displayed = true; // Badge has been displayed
            }
        }
    }

    // Only show the "New" badge if no other badge has been displayed
    if ( ! $badge_displayed ) {
        // For "New" products added inside the ultimate 7 days
        $post_date  = get_the_time( 'Y-m-d', $product->get_id() );
        $post_stamp = strtotime( $post_date );
        $newness    = 7; // Collection of days the product is considered new

        // Check out if the product is new
        if ( ( time() - ( 60 * 60 * 24 * $newness ) ) < $post_stamp ) {
            echo 'New';
            $badge_displayed = true;
        }
    }
}
Wish to alter how long a product is considered “new”? Merely seek for the street where it says $newness = 7 inside the code. You’ll alternate that amount 7 to alternatively many days you wish to have, like 14 for two weeks or 30 for a month.
To finish up, click on at the ‘Inactive’ button until it changes to ‘Lively,’ then hit ‘Save Snippet.’
Next, we want to style our badges to make them look great to your products. Let’s add some CSS to control their glance.
To be able to upload a brand spanking new snippet, apply the identical steps as quicker than, on the other hand this time, select ‘CSS Snippet’ when asked.
Identify your snippet something descriptive, like “Product Badge Sorts.” This may occasionally most likely will will let you to search out it merely if you wish to make changes later.
Proper right here’s the CSS code that may make your badges look professional. Merely paste this into the ‘Code Preview’ box:
/* Not unusual types for all product badges */
.product-badge {
    position: absolute;
    best: -10px;      /* Position at the best edge */
    right kind: -10px;    /* Position on the correct edge */
    padding: 12px 16px;
    border-radius: 50%;
    color: #ffffff;
    font-size: 16px;
    font-weight: bold;
    z-index: 99;
    box-shadow: 0 2px 5px rgba(0, 0, 0, 0.3);
}

/* Sorts for the "New" badge */
.new-product {
    background-color: #4CAF50; /* Green background */
}

/* Sorts for the "Sale" badge */
.sale-product {
    background-color: #FF0000; /* Crimson background */
}
Let’s smash down what you’ll have the ability to customize in this code.
Want your badges in a definite spot? To try this, you’ll have the ability to alternate the best and right kind values. For example, changing best: -10px to best: 10px will switch the badge down.
Don’t like the colors? It’s super easy to switch them. Merely to search out the background-color lines and alter the color codes.
For instance, if you wish to have a blue sale badge instead of a purple one, alternate #FF0000 to #0000FF. You’ll moreover make the badges higher or smaller by the use of adjusting the font-size value.
Wish to be informed further about tweaking the ones types? Check out our beginner-friendly knowledge on CSS in wordpress.
Every time you’re completed, merely click on at the ‘Inactive’ button to make it ‘Lively,’ then hit ‘Save Snippet.’
That’s it!
Your badges must now appear to your product photos. Proper right here’s an example of what ours turns out like the usage of our CSS code:
Discover Further WooCommerce Guidelines and Guidelines
Now that you know how to turn product badges in WooCommerce, that you must wish to uncover other ways to reinforce your online store. Listed below are some helpful guides we recommend:
Spice up gross sales with good upselling – Learn to strategically market it identical products and building up your affordable order value through environment friendly upsell tactics.
Praise buyer critiques with coupons – Discover how you can automatically send discount coupons to shoppers who move away product evaluations, encouraging further feedback and repeat purchases.
Show good product suggestions – Find out how to show product concepts to skyrocket your WooCommerce product sales.
Upload complicated product filtering choices – Learn to have the same opinion shoppers to search out exactly what they’re looking for with customizable product filters that make purchasing groceries easier and quicker.
Create a buyer wishlist characteristic – See how together with a wishlist function can boost engagement and offers shoppers a the reason why to return to your store while providing valuable insights into purchaser preferences.
Cover costs in WooCommerce – Learn to hide pricing for wholesale shoppers, online catalogs, and luxury pieces and ask shoppers to the touch you or log in instead.
We hope this text has helped you learn how to add product badges in WooCommerce. You might also want to take a look at our a professional possible choices of the absolute best WooCommerce product grid plugins and our knowledge on how one can accelerate WooCommerce efficiency.
Whilst you preferred this text, then please subscribe to our YouTube Channel for wordpress video tutorials. You’ll moreover to search out us on Twitter and Fb.
The publish Upload Product Badges in WooCommerce (Fast and Simple) first appeared on WPBeginner.
Why you simply must checkout Movie Characters and Deals
Deals, etc
Maximizing Your Movie Merchandise Shopping Experience
1. Set a Budget: Movie Magic: Unmasking the Best Deals on Your Favorite Characters
Before embarking on your shopping journey, establish a clear budget to avoid overspending. This will help you focus on merchandise within your price range.
2. Explore Online Retailers: The Search for Movie Magic
The internet offers a vast array of movie merchandise options. From specialized fan shops to online marketplaces, browse various websites to compare prices and selections.
3. Seek Out Limited Edition Items: Finding the Hidden Gems
Limited edition merchandise, such as exclusive collectibles and autographed posters, can be valuable investments. Keep an eye out for these limited-release items for the potential to enhance your collection’s value.
4. Utilize Social Media: Connecting with the Fan Community
Engage with movie-themed social media groups and forums. Connect with like-minded fans who may share tips on finding rare or discounted merchandise.
5. Consider Secondhand Options: The Treasure Trove of Pre-Owned Goods
Exploring secondhand shops and online marketplaces can yield excellent deals on gently used movie merchandise. Inspect items carefully before purchasing to ensure their quality.
6. Attend Conventions: The Ultimate Fan Experience
Movie conventions often feature exclusive merchandise that may not be available elsewhere. Attend these events to meet your favorite actors and discover a wide range of collectibles.
7. Sign Up for Loyalty Programs: Rewarding Your Fandom
Join loyalty programs offered by merchandise retailers. These programs may offer exclusive discounts, early access to new products, and other perks for loyal customers.
8. Seek Out Sales and Promotions: The Path to Cost Savings
Pay attention to sales and promotional events throughout the year. Retailers may offer discounts on select items or bundle deals to save you money on multiple purchases.
Movie Magic: Unmasking the Best Deals on Your Favorite Characters
TL;DR – Too Long; Didn’t Read: Want to find the best deals on awesome movie character merchandise? This article will help you find cool stuff like action figures, toys, and even clothes! We’ll look at some of the best places to shop, including online and in California.
Lights, Camera, Deals!
Have you ever wished you could bring your favorite movie characters to life? Well, maybe you can’t actually bring them home, but you can find tons of cool stuff that’s almost as good! Think action figures, cool clothes, and even toys that look just like the characters in your favorite films.
The Search for Movie Magic
Finding the best deals on movie merchandise can feel like a big adventure. You want to find the coolest stuff at the best prices, right? There are a bunch of places to start your search.
Online Shopping: Your Virtual Treasure Trove
The internet is your best friend when it comes to finding movie character merchandise. Websites like Amazon, eBay, and even Walmart have tons of options to choose from. You can easily compare prices and find deals that are hard to beat.
California: A Land of Entertainment
California is like a dream come true for movie fans! There are tons of shops and stores where you can find all sorts of cool character merchandise. Check out Hollywood Boulevard in Los Angeles, where you can find everything from classic movie memorabilia to the newest superhero action figures.
Making Your Movie Magic Budget Stretch
Finding amazing deals takes a little bit of time and planning. Here are some tips to help you get the most out of your movie merchandise shopping:
Set a Budget: Before you start shopping, decide how much you’re willing to spend. This will help you avoid overspending.
Look for Sales: Check for online deals, store discounts, and coupons to find the best prices.
Compare Prices: Don’t settle for the first price you see. Shop around to see what other stores are offering.
Be Patient: Sometimes, the best deals come along at unexpected times. Be patient and keep an eye out for special offers.
Unmasking the Best Deals
Shopping for movie merchandise can be a lot of fun! Remember to be smart about your choices and stick to your budget. With a little bit of planning and patience, you can find awesome deals on your favorite characters.
Ready to start your movie character shopping adventure? Check out Ecliptic Signs, a fantastic store where you can find a wide variety of movie-inspired items!
By means of default, WooCommerce shows your product prices to everyone who visits your store. While this works for lots of online retail outlets, some firms need additional regulate over who sees their pricing.
While helping online store house owners, we’ve come all over a few different cases where hiding prices in WooCommerce is essential.
For instance, wholesale suppliers want to show specific pricing only to verified business customers. Alternatively, B2B companies would perhaps make a selection to speak about client needs up to now to make sure they can offer the fitting solution for the fitting cost.
After testing moderately numerous solutions, we’ve found out 3 loyal simple find out how to duvet prices in WooCommerce. The ones methods will artwork for any type of business, from wholesale suppliers to sumptuous companies.
What to Imagine Forward of Hiding Product Prices
We’ve spotted a few different eventualities where selling on WooCommerce without prices makes sense.
For instance, many wholesale providers duvet prices to stop retail customers from seeing bulk discounts. Additionally, custom designed furniture makers continuously remove prices on account of each and every piece has unique costs consistent with materials and design.
We moreover know that some sumptuous producers want to create distinctive, members-only buying groceries reviews by the use of showing prices only to serious customers.
Unfortunately, WooCommerce doesn’t come with a built-in way to duvet prices. Alternatively after testing moderately numerous solutions, we’ve found out 3 loyal methods that artwork smartly.
You’ll be capable of use the fast links underneath to skip on your most well liked way of hiding prices on WooCommerce:
Are you ready? Let’s dive in!
Method 1: Quilt All/Specific Product Prices and Cart Buttons With Code
In this way, we can show you learn how to hide the product prices and cart buttons for each all the products on your store or just particular items. This system turns out to be useful if you want to have customers to the touch you immediately for prices or log in to their accounts to look those prices.
While testing out different alternatives, we found out that many plugins for hiding prices are each slightly dear or too sophisticated to use. That’s why we’ve come up with a simple code solution that can get the duty achieved in brief.
Everyone knows that ‘code solution’ would perhaps sound intimidating, alternatively don’t worry. It is a beginner-friendly approach.
We’ll use WPCode, which is a plugin that makes together with code on your website so simple as copying and pasting. We’ve used this plugin on many web pages and have found out it protected and loyal.
The loose model works utterly for hiding prices. On the other hand, if you want to have further choices similar to the AI code generator to create custom designed solutions, chances are high that you’ll want to take a look on the Professional model.
We’ve tested each and every diversifications broadly in our WPCode evaluate.
First, you’ll want to arrange and switch at the free WPCode plugin. If you want to have have the same opinion, check out our data on find out how to set up a wordpress plugin.
Next, you’ll practice one of the tutorials underneath.
Risk 1: Quilt Price & Cart Buttons for Specific Products (Logged-Out Shoppers)
One of the most most simple tactics to hide prices is using WPCode’s ready-made snippet. This code will duvet prices and cart buttons from particular products when shoppers aren’t logged in.
If you happen to’re already familiar with WPCode, you’ll simply find it in WPCode’s snippet library.
Otherwise, if this is your first time using the plugin, merely click on at the link underneath:
Cover Value & Upload to Cart for Non Logged in Customers for Explicit Merchandise
Then, click on at the ‘Add to Site’ button to get started.
At this degree, you’ll want to each create a free WPCode account or log in if you already have one.
All through registration, you’re going to be asked to attach your wordpress internet web page with the WPCode library.
After logging in, you’ll choose which internet web page you need so that you could upload the snippet to.
Then, click on on ‘Deploy.’
<img decoding=”async” loading=”lazy” width=”680″ height=”380″ src=”https://wpmountain.com/wp-content/uploads/2025/02/wpcode-deploy-min.png” alt=”Selecting a website to deploy the WPCode code snippet into” class=”wp-image-327372″/>
The system will take you once more on your wordpress admin space to finish the setup.
Proper right here, merely click on on ‘Confirm & Arrange Snippet.’
This brings you to the code snippet editor, where you’ll make two simple changes to customize the code to your needs.
First, you’ll want to business the product IDs. Seek for this line of code:
$not_purchasable_products = array( 23, 22 );
Exchange those numbers with your individual product IDs.
If you happen to’re no longer certain what they’re, you then’ll be told our article on find out how to in finding product IDs in WooCommerce.
For instance, if you want to duvet prices for products 63, 64, and 65, you’d write:
$not_purchasable_products = array( 63, 64, 65 );
Next, you’ll customize the message confirmed as a substitute of the fee.
That is the code you need to look out:
function wws_hide_price_not_logged_in( $price_html, $product ) {
    if ( is_non_purchasable_products_for_visitors( $product ) ) {
        $price_html="';
    }
    return $price_html;
You’ll be capable of business this text: ‘Login with wholesale account to look prices’ to regardless of you’d like, comparable to ‘Login to look prices’ or ‘Contact us for pricing.’
Proper right here’s an example:
function wws_hide_price_not_logged_in( $price_html, $product ) {
    if ( is_non_purchasable_products_for_visitors( $product ) ) {
        $price_html="';
    }
    return $price_html;
When shoppers click on in this link, it’ll ship them to the WooCommerce login web page to test in.
Finally, switch the toggle from ‘Inactive’ to ‘Full of life.’ Then, click on on ‘Change.’
Now, merely consult with your product pages to look the changes.
You’ll perceive the prices and cart buttons are hidden and adjusted by the use of your custom designed message.
It’s that straightforward!
Risk 2: Quilt Price & Cart Buttons for All Shoppers
If you want to duvet prices and cart buttons for everyone who visits your WooCommerce store, you’ll want to add a novel code snippet. The program works whether or not or no longer shoppers are logged in or no longer.
Get began by the use of going to Code Snippets » + Add Snippet on your wordpress dashboard. Click on on on ‘Add Your Custom designed Code (New Snippet)’ and then the ‘+ Add Custom designed Snippet’ button.
After that, you’re going to see some code varieties to choose from.
Proper right here, merely choose ‘PHP Snippet.’
Next, you need to supply your code snippet a establish. It can be something simple like ‘Quilt All WooCommerce Prices.’
Then, throughout the ‘Code Preview’ section, copy the code underneath and paste it there:
/**
 * Quilt Price & Add to Cart for All Shoppers for All Products
 */

/**
 * Function to check if products must be non-purchasable.
 * This may occasionally at all times return true to make use of to all products.
 */
function is_non_purchasable_products( $product ) {
    // All the time return true to make all products non-purchasable for all shoppers
    return true;
}

/**
 * Set product as no longer purchasable
 */
function wws_set_not_purchasable( $is_purchasable, $product ) {
    if ( is_non_purchasable_products( $product ) ) {
        // Set product as no longer purchasable
        $is_purchasable = false;
    }
    return $is_purchasable;
}

/**
 * Exchange cost with 'Contact us for pricing' message linking to touch internet web page
 */
function wws_hide_price( $price_html, $product ) {
    if ( is_non_purchasable_products( $product ) ) {
        // Get the URL for the contact internet web page by the use of slug
        $contact_page = get_page_by_path( 'contact' );
        if ( $contact_page ) {
            $contact_url = get_permalink( $contact_page );
        } else {
            // Default to "https://wpmountain.com/contact" if the internet web page is not found out
            $contact_url = site_url( "https://wpmountain.com/contact" );
        }

        // Set the fee HTML to touch message
        $price_html="';
    }
    return $price_html;
}

/**
 * Quilt the 'Add to Cart' button
 */
function wws_hide_addcart( $add_to_cart, $product, $args ) {
    if ( is_non_purchasable_products( $product ) ) {
        // Remove the 'Add to Cart' button
        $add_to_cart="";
    }
    return $add_to_cart;
}

// Add filters to make use of the above functions
add_filter( 'woocommerce_is_purchasable', 'wws_set_not_purchasable', 10, 2 );
add_filter( 'woocommerce_get_price_html', 'wws_hide_price', 10, 2 );
add_filter( 'woocommerce_loop_add_to_cart_link', 'wws_hide_addcart', 10, 3 );
This code will remove all prices and cart buttons from your store and alter them with a ‘Contact us for pricing’ link that takes visitors on your touch web page.
After pasting the code, switch the toggle from ‘Inactive’ to ‘Full of life’ and click on on ‘Save Snippet.’
And that’s it!
You’ll be capable of now consult with your store to look that all prices and cart buttons have been modified with a link on your contact internet web page.
For extra details, see our novice’s data on find out how to simply upload customized code in wordpress.
Method 2: Quilt Product Prices from Non-Wholesale Shoppers
The program could be very highest for firms that want to duvet prices from secure visitors while showing specific wholesale pricing to authorized customers.
This system works specifically smartly for manufacturers, distributors, and B2B firms that want to maintain distinctive pricing for their wholesale customers.
It’s moreover great in case you’re no longer willing at the code solution from earlier, as we’ll be using plugins from the user-friendly Wholesale Suite.
Forward of we dive in, we suggest finding out our detailed Wholesale Suite evaluate to snatch all the choices this plugin suite offers.
Step 1: Arrange the Vital Wholesale Suite Plugins
For this method to artwork effectively, you’ll want to arrange the free Wholesale Suite plugin. It handles the basic wholesale store choices, along with putting in wholesale pricing buildings to your products.
You’ll moreover want to get the highest charge Wholesale Suite extension, specifically Wholesale Prices and Wholesale Lead Snatch.
The main extension is essential for hiding prices from secure customers while showing them on your wholesale customers. There’s no approach spherical this one, as it’s the core plugin that makes cost hiding possible.
The second creates a certified registration system where possible wholesale customers can apply for an account. Within the match you select, you’ll moreover use WPForms to create your registration paperwork.
After putting in those wordpress plugins, pass to Wholesale » License on your dashboard.
Proper right here, enter the license keys and email correspondence handle comparable along with your most sensible charge plugin purchases. You’ll find the ones details throughout the confirmation email correspondence you won when buying the plugins.
If you happen to’ve purchased a couple of Wholesale Suite plugins, you then’ll use the tabs on the most productive to get right to use the license key settings for each and every one.
In the event you’ve entered the license wisdom for each and every instrument, remember to hit ‘Save Changes.’ When you’re achieved, you’ll continue to the next step.
Step 2: Set Up a Take a look at Wholesale Purchaser Account
Wholesale Suite creates a definite ‘Wholesale Purchaser’ consumer position that allows you to organize pricing for all of your wholesale customers in one place. When the ones customers log in, they’ll mechanically see their specific wholesale prices.
To make sure your cost hiding works accurately, you’ll desire a check out Wholesale Purchaser account. That is serving to you check out how your WooCommerce store seems to be like from each and every a wholesale purchaser’s view and a normal buyer’s point of view.
Creating a wholesale account is understated. First, merely pass to Shoppers » Add New on your wordpress dashboard.
<img decoding=”async” loading=”lazy” width=”680″ height=”384″ src=”https://wpmountain.com/wp-content/uploads/2022/10/wordpress-new-users.png” alt=”Adding a new user in wordpress” class=”wp-image-145006″ title=”Adding a new user in wordpress“/>
Now, fill throughout the elementary wisdom like email correspondence handle and username, then make a choice ‘Wholesale Purchaser’ from the ‘Serve as’ dropdown menu.
Finally, click on on ‘Add New Individual’ to create the account.
You may also want to prevent wholesale customers from making regular-priced purchases once they don’t meet wholesale necessities. By means of default, the plugin shows a warning, alternatively customers can however acquire at retail prices.
To modify this, head to Wholesale » Roles and find the ‘Wholesale Purchaser’ place. Click on on on the ‘Edit’ button underneath the placement to customize it.
Then, check out the sector for ‘Prevent gain if wholesale scenario isn’t met.’
After that, merely click on on ‘Edit Wholesale Serve as’ to save some your changes.
Step 3: Quilt Prices and Cart Buttons
Next, you’ll want to duvet the prices and cart web page buttons from secure online store visitors.
To check out this, you’ll pass to Wholesale »Settings. You’ll need to’re throughout the ‘Wholesale Prices’ section, and navigate to the ‘Price’ tab.
Then, scroll proper right down to the ‘Quilt Price and Add to Cart button’ atmosphere and try the sector right kind next to it.
Beneath that, you’ll add some custom designed text to change the fee and cart buttons. If you happen to cross away this empty, the default ‘Login to look prices’ message will appear as a substitute.
Now, scroll down and make sure the ‘Show Wholesale Price to non-wholesale shoppers’ atmosphere is disabled.
Finally, click on on on the ‘Save Changes’ button.
Step 4: Add and Quilt Wholesale Prices to WooCommerce Products
You’re now ready to begin out together with wholesale prices to specific particular person products. You’ll be capable of pass ahead and open a brand spanking new or provide product for reinforcing.
If this is your first time together with a product, then chances are high that you’ll want to be told our WooCommerce made easy information for more information.
Someday, whilst you’re rising a brand spanking new product or bettering an provide one, you’ll want to pass to the ‘Product Knowledge’ section.
Proper right here, set your ‘Commonplace Price.’ That’s what secure customers see. Then, find the ‘Wholesale Prices’ section and choose your discount sort from the dropdown menu. You’ll be capable of offer each a percentage discount or a suite cost.
For percentage discounts, simply make a choice the ‘Share’ discount sort and enter your discount amount.
Wholesale Suite will mechanically calculate the total cost.
If you choose ‘Fixed’ for the cut price sort, you then’ll merely enter the fitting wholesale cost you need to charge.
Wish to run limited-time wholesale offers? This is great for working seasonal promotions and changing extra WooCommerce guests into consumers.
To check out this, you’ll click on on on the ‘Time table’ link.
After that, you’ll enter the start date and end date of your wholesale sale pricing promotion.
This way, you gained’t should manually permit and disable the cut price. It principally works similarly to scheduling WooCommerce coupon codes.
In spite of everything, this atmosphere isn’t mandatory. If you happen to’re no longer ready to use it now, it may be very good to remember for the long run.
Next, set your minimal order necessities throughout the ‘Wholesale Minimum Order Quantity’ section.
This defines what selection of items a wholesale purchaser must acquire to get right to use specific pricing.
Next, scroll proper right down to the ‘Wholesale Order Quantity Step’ section.
Enter ‘1’ into the suitable field.
This may occasionally make it so that the minimum order quantity you set above is carried out to each and every products.
That approach other folks can’t try to misuse wholesale privileges. For more information on this atmosphere, see the Wholesale Suite documentation on minimal order necessities.
Finally, you’ll make your product visible only to wholesale customers by the use of using the ‘Restrict To Wholesale Roles’ atmosphere on the most productive of the internet web page. Type and make a choice ‘Wholesale Purchaser’ in this field.
At this degree, you’ll continue finalizing your product settings. For instance, you’ll add a product symbol gallery, embed a product video, or insert product tags.
When you’re ready, merely click on on ‘Change’ or ‘Publish’ to save some your changes. You’ll be capable of then repeat the an identical steps for your entire wholesale products.
Step 5: Configure Your Wholesale Registration Paperwork
The Wholesale Suite extension mechanically creates registration and login pages to your wholesale customers. Forward of you get began accepting applications, despite the fact that, let’s customize the registration form to check your needs.
Head to Wholesale » Settings, then click on at the ‘Wholesale Lead Snatch’ tab and open the ‘Registration Form’ menu.
Proper right here, you’ll scroll proper right down to find a table showing all the available form fields.
While elementary fields like First Establish, Final Establish, Piece of email, and Username are included by the use of default, some would perhaps want to be activated. To permit a field, click on at the pencil ‘Edit’ icon throughout the ‘Movement’ column.
All you need to do now’s check out the ‘Enabled’ box to make it visible and mark the sector as ‘Required’ if you want to make it important.
Remember to click on on ‘Save Custom designed Field’ each time you’re achieved.
Now, switch to the ‘Commonplace’ tab to look out your new Wholesale Log In and Registration pages.
Transfer ahead and click on on ‘View Internet web page’ to preview them.
Once you have opened them, you’ll add the links to these pages on your navigation menu. This way, shoppers can merely find them once they’re browsing on your on-line retailer.
You’ll be capable of learn to do this in our data on find out how to upload a navigation menu in wordpress.
One important solution is the best way you’ll maintain new applications.
Underneath ‘Auto Approve New Leads,’ choose between ‘Information Approval Required’ or ‘Auto Approval.’
We strongly recommend guide approval to protect your wholesale pricing and test respected firms.
In the event you’re happy with the registration form settings, you’ll scroll once more up.
Finally, click on on on the ‘Save Changes’ button.
Step 6: Create a Wholesale Order Form
The total step is to create a wholesale order form, which streamlines the ordering process to your wholesale customers. This manner lets them merely place bulk orders without navigating via a couple of product pages, saving time for each and every you and your customers.
When putting in wholesale order paperwork, we’ve found out that businesses get the most efficient results by the use of along with the most important fields like product SKUs and most popular supply dates.
This way, wholesale customers can in brief place bulk orders while providing all the wisdom you need to process their requests effectively.
For detailed instructions on rising an optimized wholesale order form, check out our whole data on find out how to create a wholesale order shape in wordpress.
And that’s it! Let’s take a look at how this works in observe. Proper right here’s how our store turns out to secure visitors:
We moreover tried logging in as a wholesale purchaser to look if the fee was visible this time.
Check out the result underneath.
You’ll be capable of moreover be told our data on find out how to transfer between consumer accounts in wordpress if you want to have have the same opinion signing in and out of your accounts.
Method 3: Create a Professional Online Catalog Without Prices
The program transforms your WooCommerce store into a certified product catalog. It’s perfect for firms that make a selection coping with pricing discussions by way of email correspondence, a slightly form, or offline.
The YITH WooCommerce Catalog Mode plugin offers a easy method to create a price-free catalog. We’ve tested and shared learn how to make use of this plugin previous than in our tutorial on find out how to upload a product catalog in WooCommerce.
No longer just like the wholesale way, this system signifies that you’ll be able to remove prices completely while converting them with custom designed contact buttons. You’ll be capable of duvet pricing for your entire store, particular product categories, or specific particular person items.
This adaptability makes it highest for custom designed manufacturers, sumptuous retail outlets, or supplier providers who want to quote prices consistent with client prerequisites.
For this data, we’ll focus on the the most important settings to permit catalog mode and hide prices using YITH’s plugin. In step with our testing, we found out that the ones elementary choices are enough to get most shops started with hidden prices.
That discussed, understand that we’re only scratching the out of doors of what this plugin can do. We’ve explored many additional advanced choices in our detailed YITH WooCommerce Catalog Mode evaluate.
Moreover, you’ll want to gain the top rate model of the plugin. The free style works smartly, alternatively the price-hiding serve as is simply available throughout the paid style.
Step 1: Arrange and Activate YITH WooCommerce Catalog Mode
After you purchase the plugin, pass to the YITH internet web page and log into your YITH account. Then, head over to the ‘Licenses & Downloads’ tab.
Next, click on on on the ‘Download Plugin’ button to acquire the plugin record from your YITH account. Make sure to keep your browser tab open, as you’ll need the license key in a 2d.
When the setup wizard turns out, you’ll want to enter your YITH email correspondence handle and license key.
Once you have into your details, click on on ‘Activate license’ to complete the setup process.
Once that’s achieved, click on on ‘Transfer to plugin dashboard’ to begin out customizing your catalog mode settings.
Let’s now continue to the next step.
Step 2: Configure Fundamental Catalog Mode Settings
Catalog mode transforms your store from a purchasing groceries website proper right into a product blow their own horns. This is perfect for firms that want to display products without fast purchasing alternatives.
To start out, pass to YITH » Catalog Mode and navigate to the ‘Settings’ tab. That’s the position you’ll configure the decisions to run WooCommerce without prices.
First, you’ll choose whether or not or to not permit catalog mode for all shoppers or just customer shoppers.
You’ll be capable of moreover permit catalog mode for purchasers with the Administrator client place to test how the mode seems to be like.
As you scroll down, you’ll flip at the ‘Disable retailer’ function if you want to remove the cart internet web page, checkout web page, and all add-to-cart buttons from your store.
If you happen to disable the shop function, you’ll get additional alternatives to set particular time ranges or days.
This is specifically helpful in case you only want to duvet prices on days or vacation seasons when your online store doesn’t accept orders.
For added targeted regulate, you’ll merely skip the ‘Disable retailer’ menu and pay attention to the settings beneath ‘”Add to Cart” settings throughout the Catalog Mode’ section.
Proper right here, you’ll use dropdown menus to select exactly the position to hide or show add-to-cart buttons. For instance, you’ll duvet or show them for items on your exclusion tick list, which is a serve as that allows you to group of workers particular products, classes, or tags together.
This makes it easy to hide buttons for merely those made up our minds on items as a substitute of your entire store. We’ll be in contact additional about rising exclusion lists in a later segment.
Moving down, you’ll choose to hide the ‘Add to cart’ button in product variations. This assists in keeping your catalog mode consistent all over all product varieties, along with those with a couple of alternatives like size or color.
You’ll be capable of moreover make a decision what turns out as an alternative of the ‘Add to cart’ buttons on the WooCommerce pages.
We suggest deciding on ‘No longer the rest’ for the ones alternatives to stick the gap clean. We’ll add custom designed buttons in a novel section later.
Further down, you’ll find ‘Price settings in Catalog Mode.’
You’ll be ready to choose from hiding costs for all merchandise or just those on your exclusion tick list.
When you duvet prices, you’ll trade them with custom designed buttons. The plugin accommodates quite a few pre-designed button varieties, like ‘Development Button 1,’ which we’ll customize in the next step.
Remember to click on on ‘Save Possible choices’ whilst you’re achieved making your selections.
Step 3: Create a New Button to Exchange the Cart Button
Now, it’s time to customize the button that may trade your cart buttons and prices. Head over to the ‘Buttons & Labels’ tab to get started.
Make a choice one of the pre-designed buttons provided by the use of YITH, then click on at the pencil ‘Edit’ icon to customize it.
First, give your button a easy establish so that you’ll merely find it later.
Inside the ‘Content material subject matter’ tab, you’ll business the button text to at least one factor that fits your needs. Commonplace imaginable alternatives include “Request a Quote,” “Contact Us for Pricing,” or “Get Custom designed Price.”
Together with an icon may just make your button additional sexy. To check out this, you’ll make a choice ‘Choose between default icons’ throughout the Icon section.
You’ll be capable of browse all over the available alternatives to look out one that matches your message.
You’ll be capable of moreover fine-tune your icon by the use of adjusting its size, alignment, and colors.
Merely watch your changes appear throughout the live preview at the correct aspect of the internet web page.
Now, switch to the ‘Style’ tab to customize your button’s glance.
That’s the position you’ll regulate the background colors, width, borders, padding, and margins to check your internet web page’s design.
Finally, throughout the ‘Possible choices’ tab, organize the link to your button. We suggest using the ‘Custom designed URL’ way to direct visitors on your contact or login internet web page.
You’ll be capable of moreover add a hover animation to make your button additional interactive and crowd pleasing.
Once achieved, merely click on at the ‘Change’ button.
It’s that straightforward!
Step 4: Create a Product Inquiry Form(No longer mandatory)
Together with an inquiry form immediately on your product pages may just make it easier for customers to ask about prices. This way, they gained’t want to cross away the product internet web page to the touch you.
To set this up, navigate to the ‘Inquiry Form’ tab. Make a choice ‘Visible in all products’ beneath ‘Set inquiry form as.’ This promises the form turns out on each and every product internet web page.
For the ‘Form to show’ selection, you’ll use the ‘Default’ form that comes with the plugin.
If you happen to already use WPForms or each and every different form plugin, you’ll make a choice your provide paperwork as a substitute.
When using the ‘Default’ form, you’ll customize which fields appear.
We suggest conserving it simple with the most important fields like first establish, email correspondence, and message. From our experience, shorter paperwork in most cases get additional submissions.
You’ve two imaginable alternatives for where the form turns out: in a WooCommerce tab underneath the product image or throughout the quick description space.
If you choose the tab selection, you’ll customize the tab’s establish to at least one factor like “Request Price” or “Product Inquiry.”
Don’t overlook to permit the ‘Include product Permalink’ atmosphere.
This gives the product’s URL to inquiry emails, making it much more clear-cut to monitor which merchandise consumers are asking about.
Need have the same opinion deciding whether or not or no longer to make a choice from a WooCommerce tab or a temporary product description?
Right here’s what the principle selection turns out like:
Within the intervening time, if you choose the product description selection, the inquiry form will appear right kind underneath the button you merely created.
Like so:
Bonus: How you can Create an Exclusion Checklist (Quilt Prices for Specific WooCommerce Products)
Now, let’s take a look at hiding prices for particular products as a substitute of your entire store. This assumes you’ve already organize your catalog mode to artwork with an exclusion tick list in Step 2.
To get started, pass to the ‘Exclusion Checklist’ tab and click on on ‘+ Add exclusion tick list.’ A brand spanking new window will open where you’ll choose what sorts of items to hide prices for.
The ‘Products sort’ dropdown gives you 3 alternatives: specific particular person products, entire product categories, or product tags. This adaptability signifies that you’ll be able to duvet prices in tactics through which make sense to your small industry.
Next, get began typing product names, categories, or tags throughout the ‘Make a choice products’ field. The plugin will suggest suits as you sort. You’ll be capable of moreover choose whether or not or to not flip an inquiry form for the ones particular items.
You’ll perceive settings to ‘Use custom designed alternatives for “Add to Cart”‘ and ‘Use custom designed alternatives for cost.’ We suggest leaving the ones unchecked if you want to keep the settings you created in Step 2.
In the event you’re achieved, simply click on on ‘Add exclusion tick list’ to save some your changes. And that’s near to it!
That is an example of what your product internet web page would perhaps seem to be whilst you permit the plugin:
Be told Additional WooCommerce Tips and Strategies
Now that you simply’ve learned learn how to advertise products on WooCommerce without prices, chances are high that you’ll want to learn additional tactics to optimize your online store. Check out the ones novice’s guides for added tips and guidelines:
We hope this article has helped you learn to duvet prices in WooCommerce. You may also want to check out our tick list of the highest wordpress topics for WooCommerce web pages and our data on find out how to upsell merchandise in WooCommerce.
If you happen to liked this article, then please subscribe to our YouTube Channel for wordpress video tutorials. You’ll be capable of moreover find us on Twitter and Fb.
The post How one can Cover Costs in WooCommerce (Stay Product Pricing Personal) first appeared on WPBeginner.
wordpress-monitoring-for-small-businesses-keeping-your-boston-business_206475.jpg” alt=”” title=”wordpress Monitoring For Small Businesses / Keeping Your Boston Business…” srcset=”https://wpmountain.com/wp-content/uploads/2025/02/wordpress-monitoring-for-small-businesses-keeping-your-boston-business_206475.jpg 800w, https://wpmountain.com/wp-content/uploads/2025/02/wordpress-monitoring-for-small-businesses-keeping-your-boston-business_206475-480×360.jpg 480w” sizes=”(min-width: 0px) and (max-width: 480px) 480px, (min-width: 481px) 800px, 100vw” class=”wp-image-206476″/>
wordpress monitoring for small companies in Boston, Massachusetts
<span class=”ez-toc-section” id=”wordpress-tracking-for-small-companies-and-extra%e2%80%a6″/>wordpress tracking for small companies and extras …
Protect the virtual imprint of your sector: information on the final comedy
Recall your wordpresswebsite like your job … however full of small ninja cyber! Simply because you would not go away the unlocked doors, you will be able to not agree with those that the cyber-criters to play great.
Enter the change of wordpress tracking: your trusted computer-alarm device that screams, “Intrusal notice!” Whenever a ninja tries to stop your virtual birthday party. However, be careful, make a selection of the incorrect tracking resolution and you will finally be able to finish with a useful device such as a chocolate padlock.
Observe those protective episoders and you will be able to be the inventory of the driving strokes of the IT attacks:
Robust password, long password: Make sure your passwords are like the jokes of a comic: empty, authentic and leaving the boys dangerous in points … of frustration!
Subject updates: Your website remains updated as a Broadway display: common updates will remain the ninja cyber from the discovery of their method during the door again.
security audit: From time to time clinging to a virtual comedy and do a security professional to roasted your website for any vulnerabilities. It will be an insurrection … for the professional!
Be aware, the monitoring of your website is like protecting your small business from a motor -cowlist carnnja cyber filling. It is not a rocket surgical procedure, however it will surely remain by hitting your technique at the computer security paradise.
<span class=”ez-toc-section” id=”conserving-your-boston-industry-secure-on-line-a-information-to-wordpress-tracking”/>Keep your Boston Safe Sector Online: Information for wordpress monitoring
Consider that your website is dark. Nobody can see your goods, connect to you and also in finding your small online business. This is able to occur in the event that the wordpresswebsite is violated and is a nightmare situation for any small industry in Boston, Massachusetts. However, similar to you block the shop door at night, there are steps that you can take to stay safe and safe your website. This information will pass you during the crucial phases of wordpress monitoring for the small companies in Boston, so you will be able to care about the management of your small business without being worried about IT attacks.
Because wordpress monitoring problems for small companies in Boston
Boston is an hub for experienced technology companies, however also essentially the most technological companies can fall due to computer threats. Web pages built on wordpress are extremely standard, feeding hundreds of thousands of websites all over the world, together with many small companies based in Boston. While wordpress is an impressive platform, it also has its percentage of vulnerability, making it a goal for hackers. Due to this monitoring of wordpress is the most important, in particular for small Boston companies that are based on their web pages for online presence, gross sales and the involvement of buyers.
Call wordpress monitoring as a mind as a security alarm device on your website. It is the technique of continuously looking at your website for any suspicious work or adjustments that could underline a security violation. Identical to your alarm it reports to an outsider, wordpress Tracking Gear warns you of possible threats so you can take a quick movement to give protection to your website.
Key advantages of wordpress monitoring for small companies in Boston
Preventive security: Monitoring is helping to establish possible problems before they develop in primary problems. It is like having a security guard that patrols your website, looking for any annoyance indicators.
Early detection of threats: Tool monitoring can cross assaults, malware and different threats before they intend to criticize your website. This can prevent a large number of time, cash and complications in the end.
Soon reaction opportunities: When you are notified of a security factor, you will be able to take a quick movement to repair it. This minimizes the potential damage to your website and recognition.
Peace of thoughts: Realize that your website is continually monitored can develop the peace of thoughts, allowing you to focus on the management of your small business.
Possible diffuse choices: Many plug -in of security such as Wordfence, Sucuri and Ithemi security offer tracking options. Those plugins trace your website for suspicious work, block harmful visitors and feel possible threats to you.
Advantages: Simple to put and organize, offer incessantly a diffusion of security characteristics simply monitoring.
Concerns: Some plug -in melts offer limited options, while high -level speed variations require subscriptions incessantly.
Specialized tracking: Companies such as Sucuri, Cloudflare and Godaddy offer specialized security services and products that follow your 24/7 website for threats.
Advantages: Provide complete safety responses, together with the coverage of the firewall, the removal of malware and the prevention of the assault DDOS.
Concerns: Incredibly they include higher prices compared to security plugins.
Integrated tracking: Some hosting suppliers such as Siteground, WP Engine and Bluehost are equipped with the safety location options for their web hosting plans.
Advantages: Manual and integrated together with your webhosting setting, providing an entire safety resolution.
Concerns: Options and features are based on the web hosting plan.
UP wordpress Tracking atmosphere for your Boston industry
1. Make a choice a tracking resolution:
Imagine your funds, security desires and technical experience.
Analysis and evaluate other choices to look for the most productive are compatible for your small business.
Having common backups is the most important in case of safety violation. You will be able to repair your website in a previous and empty state, if desired it.
wordpress monitoring very best practices for small companies in Boston
Strady disposal: Use advanced passwords on the website and administrative accounts.
Authentication to two emissions: Allow two -factors authentication for the accounts of all people to give a push to safety.
Common updates:wordpress remains updated, topics and plugins with the latest security patches.
Prohibit the authorizations of the person: Grant customers better the essential authorizations to obtain the right of access to your website.
websitesecurity audit: Perform common security audits to identify vulnerability and connect them promptly.
Firewall coverage: Put a firewall in force for visitors harmful to get your website.
security tracking: Take track of your website for suspicious work, malware and different threats.
TL; Dr – Too long; Has not learned
wordpress monitoring is very important to protect Boston -based industry from computer threats. Make a choice a monitoring resolution that adapts to your desires, set and configures correctly and observes simpler practices for robust passwords, common common security audits. Through these steps, you will be able to stay safe and safe your website, allowing you to focus on your small business without being worried about IT attacks.
Protect the virtual imprint of your sector
The body with locks and alarms are identical to you safe to you, monitoring your wordpresswebsite is the most important step to safeguard online presence. Through being proactive on the safety of your website, offer protection to your small business from possible damage, monetary losses and reputation pain. So, make an effort to be informed about wordpress monitoring and put into force those practical in your sector based in Boston. Be aware, within the virtual global, remaining a step forward in security threats is the most important for luck.
<a href=”https://wpmountain.com/wordpress-monitoring-for-small-businesses-keeping-your-boston-business/”>Source link