How one can Cover Costs in WooCommerce (Stay Product Pricing Personal)
By means of default, WooCommerce shows your product prices to everyone who visits your store. While this works for lots of online retail outlets, some firms need additional regulate over who sees their pricing. While helping online store house owners, we’ve come all over a few different cases where hiding prices in WooCommerce is essential. […]
By means of default, WooCommerce shows your product prices to everyone who visits your store. While this works for lots of online retail outlets, some firms need additional regulate over who sees their pricing.
While helping online store house owners, we’ve come all over a few different cases where hiding prices in WooCommerce is essential.
For instance, wholesale suppliers want to show specific pricing only to verified business customers. Alternatively, B2B companies would perhaps make a selection to speak about client needs up to now to make sure they can offer the fitting solution for the fitting cost.
After testing moderately numerous solutions, we’ve found out 3 loyal simple find out how to duvet prices in WooCommerce. The ones methods will artwork for any type of business, from wholesale suppliers to sumptuous companies.
What to Imagine Forward of Hiding Product Prices
We’ve spotted a few different eventualities where selling on WooCommerce without prices makes sense.
For instance, many wholesale providers duvet prices to stop retail customers from seeing bulk discounts. Additionally, custom designed furniture makers continuously remove prices on account of each and every piece has unique costs consistent with materials and design.
We moreover know that some sumptuous producers want to create distinctive, members-only buying groceries reviews by the use of showing prices only to serious customers.
Unfortunately, WooCommerce doesn’t come with a built-in way to duvet prices. Alternatively after testing moderately numerous solutions, we’ve found out 3 loyal methods that artwork smartly.
You’ll be capable of use the fast links underneath to skip on your most well liked way of hiding prices on WooCommerce:
Are you ready? Let’s dive in!
Method 1: Quilt All/Specific Product Prices and Cart Buttons With Code
In this way, we can show you learn how to hide the product prices and cart buttons for each all the products on your store or just particular items. This system turns out to be useful if you want to have customers to the touch you immediately for prices or log in to their accounts to look those prices.
While testing out different alternatives, we found out that many plugins for hiding prices are each slightly dear or too sophisticated to use. That’s why we’ve come up with a simple code solution that can get the duty achieved in brief.
Everyone knows that ‘code solution’ would perhaps sound intimidating, alternatively don’t worry. It is a beginner-friendly approach.
We’ll use WPCode, which is a plugin that makes together with code on your website so simple as copying and pasting. We’ve used this plugin on many web pages and have found out it protected and loyal.
The loose model works utterly for hiding prices. On the other hand, if you want to have further choices similar to the AI code generator to create custom designed solutions, chances are high that you’ll want to take a look on the Professional model.
We’ve tested each and every diversifications broadly in our WPCode evaluate.
First, you’ll want to arrange and switch at the free WPCode plugin. If you want to have have the same opinion, check out our data on find out how to set up a wordpress plugin.
Next, you’ll practice one of the tutorials underneath.
Risk 1: Quilt Price & Cart Buttons for Specific Products (Logged-Out Shoppers)
One of the most most simple tactics to hide prices is using WPCode’s ready-made snippet. This code will duvet prices and cart buttons from particular products when shoppers aren’t logged in.
If you happen to’re already familiar with WPCode, you’ll simply find it in WPCode’s snippet library.
Otherwise, if this is your first time using the plugin, merely click on at the link underneath:
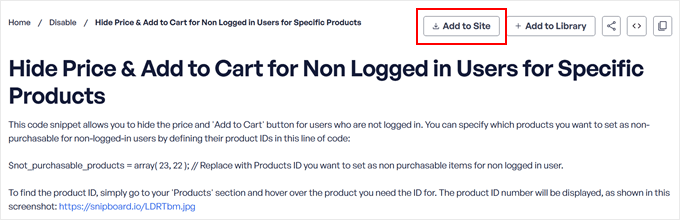
Cover Value & Upload to Cart for Non Logged in Customers for Explicit Merchandise
Then, click on at the ‘Add to Site’ button to get started.
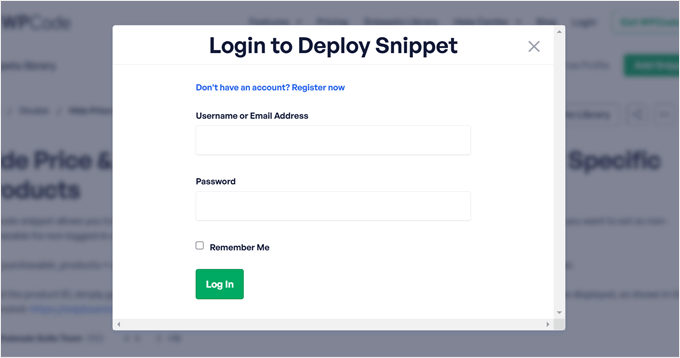
At this degree, you’ll want to each create a free WPCode account or log in if you already have one.
All through registration, you’re going to be asked to attach your wordpress internet web page with the WPCode library.
After logging in, you’ll choose which internet web page you need so that you could upload the snippet to.
Then, click on on ‘Deploy.’
<img decoding=”async” loading=”lazy” width=”680″ height=”380″ src=”https://wpmountain.com/wp-content/uploads/2025/02/wpcode-deploy-min.png” alt=”Selecting a website to deploy the WPCode code snippet into” class=”wp-image-327372″/>
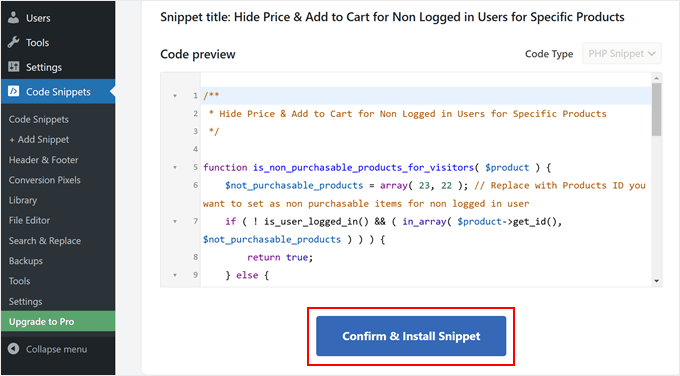
The system will take you once more on your wordpress admin space to finish the setup.
Proper right here, merely click on on ‘Confirm & Arrange Snippet.’
This brings you to the code snippet editor, where you’ll make two simple changes to customize the code to your needs.
First, you’ll want to business the product IDs. Seek for this line of code:
$not_purchasable_products = array( 23, 22 );
Exchange those numbers with your individual product IDs.
If you happen to’re no longer certain what they’re, you then’ll be told our article on find out how to in finding product IDs in WooCommerce.
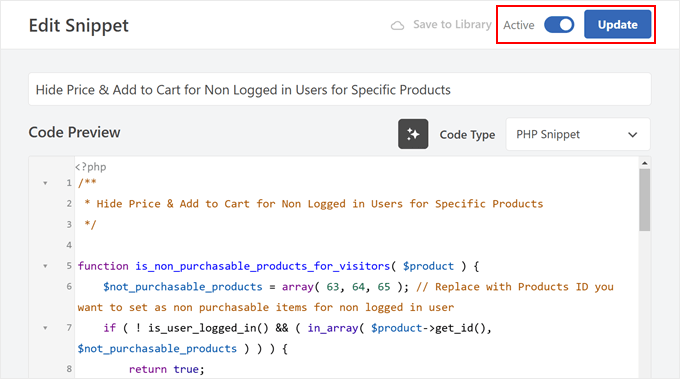
For instance, if you want to duvet prices for products 63, 64, and 65, you’d write:
$not_purchasable_products = array( 63, 64, 65 );
Next, you’ll customize the message confirmed as a substitute of the fee.
That is the code you need to look out:
function wws_hide_price_not_logged_in( $price_html, $product ) {
    if ( is_non_purchasable_products_for_visitors( $product ) ) {
        $price_html="';
    }
    return $price_html;
You’ll be capable of business this text: ‘Login with wholesale account to look prices’ to regardless of you’d like, comparable to ‘Login to look prices’ or ‘Contact us for pricing.’
Proper right here’s an example:
function wws_hide_price_not_logged_in( $price_html, $product ) {
    if ( is_non_purchasable_products_for_visitors( $product ) ) {
        $price_html="';
    }
    return $price_html;
When shoppers click on in this link, it’ll ship them to the WooCommerce login web page to test in.
Finally, switch the toggle from ‘Inactive’ to ‘Full of life.’ Then, click on on ‘Change.’
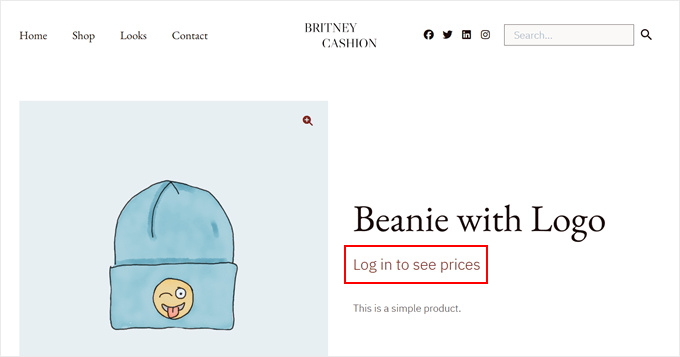
Now, merely consult with your product pages to look the changes.
You’ll perceive the prices and cart buttons are hidden and adjusted by the use of your custom designed message.
It’s that straightforward!
Risk 2: Quilt Price & Cart Buttons for All Shoppers
If you want to duvet prices and cart buttons for everyone who visits your WooCommerce store, you’ll want to add a novel code snippet. The program works whether or not or no longer shoppers are logged in or no longer.
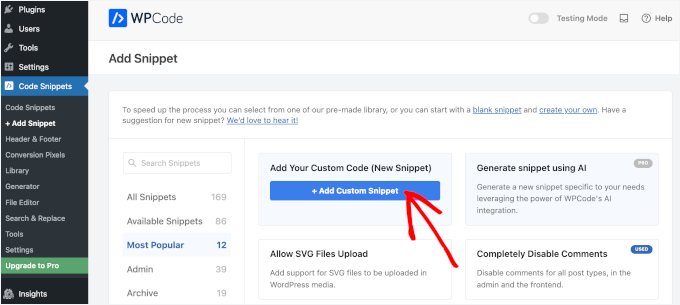
Get began by the use of going to Code Snippets » + Add Snippet on your wordpress dashboard. Click on on on ‘Add Your Custom designed Code (New Snippet)’ and then the ‘+ Add Custom designed Snippet’ button.
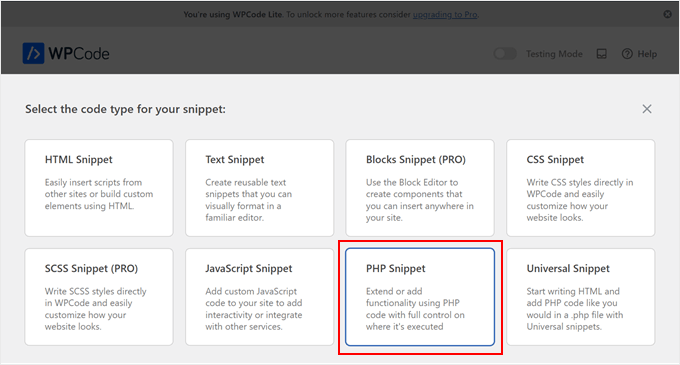
After that, you’re going to see some code varieties to choose from.
Proper right here, merely choose ‘PHP Snippet.’
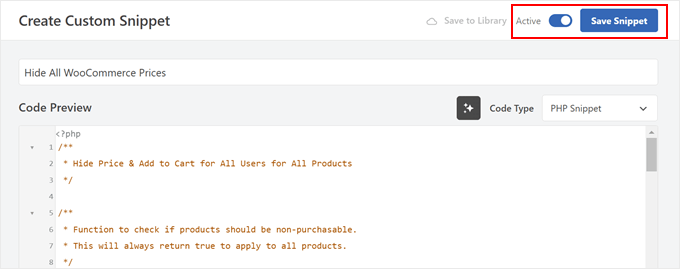
Next, you need to supply your code snippet a establish. It can be something simple like ‘Quilt All WooCommerce Prices.’
Then, throughout the ‘Code Preview’ section, copy the code underneath and paste it there:
/**
 * Quilt Price & Add to Cart for All Shoppers for All Products
 */

/**
 * Function to check if products must be non-purchasable.
 * This may occasionally at all times return true to make use of to all products.
 */
function is_non_purchasable_products( $product ) {
    // All the time return true to make all products non-purchasable for all shoppers
    return true;
}

/**
 * Set product as no longer purchasable
 */
function wws_set_not_purchasable( $is_purchasable, $product ) {
    if ( is_non_purchasable_products( $product ) ) {
        // Set product as no longer purchasable
        $is_purchasable = false;
    }
    return $is_purchasable;
}

/**
 * Exchange cost with 'Contact us for pricing' message linking to touch internet web page
 */
function wws_hide_price( $price_html, $product ) {
    if ( is_non_purchasable_products( $product ) ) {
        // Get the URL for the contact internet web page by the use of slug
        $contact_page = get_page_by_path( 'contact' );
        if ( $contact_page ) {
            $contact_url = get_permalink( $contact_page );
        } else {
            // Default to "https://wpmountain.com/contact" if the internet web page is not found out
            $contact_url = site_url( "https://wpmountain.com/contact" );
        }

        // Set the fee HTML to touch message
        $price_html="';
    }
    return $price_html;
}

/**
 * Quilt the 'Add to Cart' button
 */
function wws_hide_addcart( $add_to_cart, $product, $args ) {
    if ( is_non_purchasable_products( $product ) ) {
        // Remove the 'Add to Cart' button
        $add_to_cart="";
    }
    return $add_to_cart;
}

// Add filters to make use of the above functions
add_filter( 'woocommerce_is_purchasable', 'wws_set_not_purchasable', 10, 2 );
add_filter( 'woocommerce_get_price_html', 'wws_hide_price', 10, 2 );
add_filter( 'woocommerce_loop_add_to_cart_link', 'wws_hide_addcart', 10, 3 );
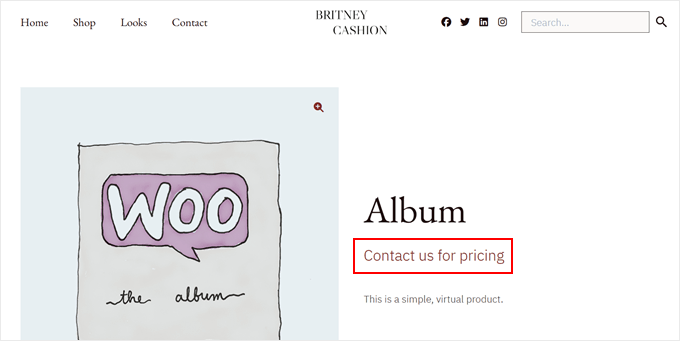
This code will remove all prices and cart buttons from your store and alter them with a ‘Contact us for pricing’ link that takes visitors on your touch web page.
After pasting the code, switch the toggle from ‘Inactive’ to ‘Full of life’ and click on on ‘Save Snippet.’
And that’s it!
You’ll be capable of now consult with your store to look that all prices and cart buttons have been modified with a link on your contact internet web page.
For extra details, see our novice’s data on find out how to simply upload customized code in wordpress.
Method 2: Quilt Product Prices from Non-Wholesale Shoppers
The program could be very highest for firms that want to duvet prices from secure visitors while showing specific wholesale pricing to authorized customers.
This system works specifically smartly for manufacturers, distributors, and B2B firms that want to maintain distinctive pricing for their wholesale customers.
It’s moreover great in case you’re no longer willing at the code solution from earlier, as we’ll be using plugins from the user-friendly Wholesale Suite.
Forward of we dive in, we suggest finding out our detailed Wholesale Suite evaluate to snatch all the choices this plugin suite offers.
Step 1: Arrange the Vital Wholesale Suite Plugins
For this method to artwork effectively, you’ll want to arrange the free Wholesale Suite plugin. It handles the basic wholesale store choices, along with putting in wholesale pricing buildings to your products.
You’ll moreover want to get the highest charge Wholesale Suite extension, specifically Wholesale Prices and Wholesale Lead Snatch.
The main extension is essential for hiding prices from secure customers while showing them on your wholesale customers. There’s no approach spherical this one, as it’s the core plugin that makes cost hiding possible.
The second creates a certified registration system where possible wholesale customers can apply for an account. Within the match you select, you’ll moreover use WPForms to create your registration paperwork.
After putting in those wordpress plugins, pass to Wholesale » License on your dashboard.
Proper right here, enter the license keys and email correspondence handle comparable along with your most sensible charge plugin purchases. You’ll find the ones details throughout the confirmation email correspondence you won when buying the plugins.
If you happen to’ve purchased a couple of Wholesale Suite plugins, you then’ll use the tabs on the most productive to get right to use the license key settings for each and every one.
In the event you’ve entered the license wisdom for each and every instrument, remember to hit ‘Save Changes.’ When you’re achieved, you’ll continue to the next step.
Step 2: Set Up a Take a look at Wholesale Purchaser Account
Wholesale Suite creates a definite ‘Wholesale Purchaser’ consumer position that allows you to organize pricing for all of your wholesale customers in one place. When the ones customers log in, they’ll mechanically see their specific wholesale prices.
To make sure your cost hiding works accurately, you’ll desire a check out Wholesale Purchaser account. That is serving to you check out how your WooCommerce store seems to be like from each and every a wholesale purchaser’s view and a normal buyer’s point of view.
Creating a wholesale account is understated. First, merely pass to Shoppers » Add New on your wordpress dashboard.
<img decoding=”async” loading=”lazy” width=”680″ height=”384″ src=”https://wpmountain.com/wp-content/uploads/2022/10/wordpress-new-users.png” alt=”Adding a new user in wordpress” class=”wp-image-145006″ title=”Adding a new user in wordpress“/>
Now, fill throughout the elementary wisdom like email correspondence handle and username, then make a choice ‘Wholesale Purchaser’ from the ‘Serve as’ dropdown menu.
Finally, click on on ‘Add New Individual’ to create the account.
You may also want to prevent wholesale customers from making regular-priced purchases once they don’t meet wholesale necessities. By means of default, the plugin shows a warning, alternatively customers can however acquire at retail prices.
To modify this, head to Wholesale » Roles and find the ‘Wholesale Purchaser’ place. Click on on on the ‘Edit’ button underneath the placement to customize it.
Then, check out the sector for ‘Prevent gain if wholesale scenario isn’t met.’
After that, merely click on on ‘Edit Wholesale Serve as’ to save some your changes.
Step 3: Quilt Prices and Cart Buttons
Next, you’ll want to duvet the prices and cart web page buttons from secure online store visitors.
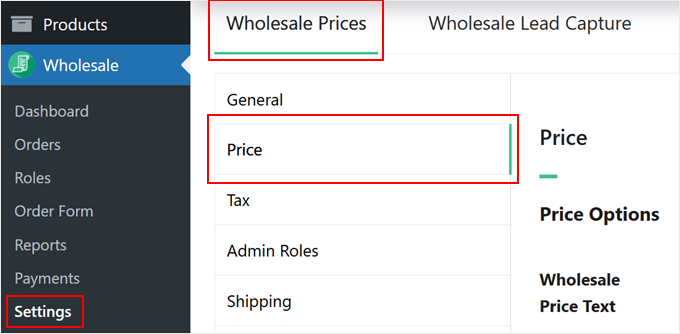
To check out this, you’ll pass to Wholesale »Settings. You’ll need to’re throughout the ‘Wholesale Prices’ section, and navigate to the ‘Price’ tab.
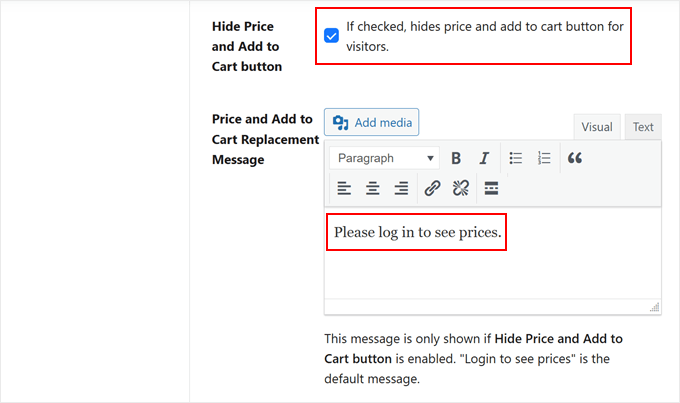
Then, scroll proper right down to the ‘Quilt Price and Add to Cart button’ atmosphere and try the sector right kind next to it.
Beneath that, you’ll add some custom designed text to change the fee and cart buttons. If you happen to cross away this empty, the default ‘Login to look prices’ message will appear as a substitute.
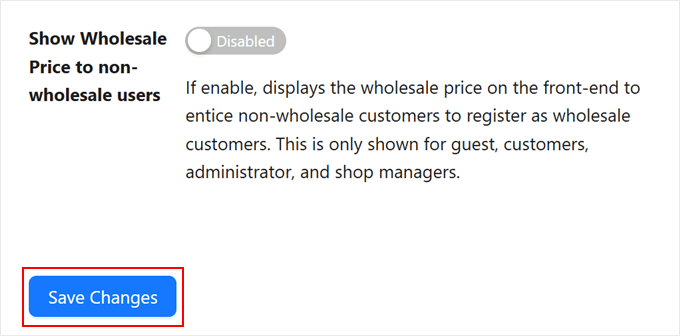
Now, scroll down and make sure the ‘Show Wholesale Price to non-wholesale shoppers’ atmosphere is disabled.
Finally, click on on on the ‘Save Changes’ button.
Step 4: Add and Quilt Wholesale Prices to WooCommerce Products
You’re now ready to begin out together with wholesale prices to specific particular person products. You’ll be capable of pass ahead and open a brand spanking new or provide product for reinforcing.
If this is your first time together with a product, then chances are high that you’ll want to be told our WooCommerce made easy information for more information.
Someday, whilst you’re rising a brand spanking new product or bettering an provide one, you’ll want to pass to the ‘Product Knowledge’ section.
Proper right here, set your ‘Commonplace Price.’ That’s what secure customers see. Then, find the ‘Wholesale Prices’ section and choose your discount sort from the dropdown menu. You’ll be capable of offer each a percentage discount or a suite cost.
For percentage discounts, simply make a choice the ‘Share’ discount sort and enter your discount amount.
Wholesale Suite will mechanically calculate the total cost.
If you choose ‘Fixed’ for the cut price sort, you then’ll merely enter the fitting wholesale cost you need to charge.
Wish to run limited-time wholesale offers? This is great for working seasonal promotions and changing extra WooCommerce guests into consumers.
To check out this, you’ll click on on on the ‘Time table’ link.
After that, you’ll enter the start date and end date of your wholesale sale pricing promotion.
This way, you gained’t should manually permit and disable the cut price. It principally works similarly to scheduling WooCommerce coupon codes.
In spite of everything, this atmosphere isn’t mandatory. If you happen to’re no longer ready to use it now, it may be very good to remember for the long run.
Next, set your minimal order necessities throughout the ‘Wholesale Minimum Order Quantity’ section.
This defines what selection of items a wholesale purchaser must acquire to get right to use specific pricing.
Next, scroll proper right down to the ‘Wholesale Order Quantity Step’ section.
Enter ‘1’ into the suitable field.
This may occasionally make it so that the minimum order quantity you set above is carried out to each and every products.
That approach other folks can’t try to misuse wholesale privileges. For more information on this atmosphere, see the Wholesale Suite documentation on minimal order necessities.
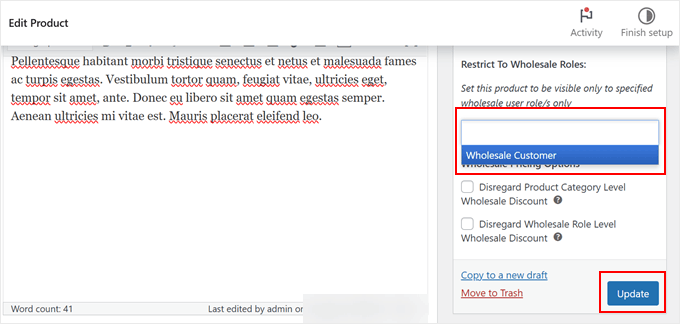
Finally, you’ll make your product visible only to wholesale customers by the use of using the ‘Restrict To Wholesale Roles’ atmosphere on the most productive of the internet web page. Type and make a choice ‘Wholesale Purchaser’ in this field.
At this degree, you’ll continue finalizing your product settings. For instance, you’ll add a product symbol gallery, embed a product video, or insert product tags.
When you’re ready, merely click on on ‘Change’ or ‘Publish’ to save some your changes. You’ll be capable of then repeat the an identical steps for your entire wholesale products.
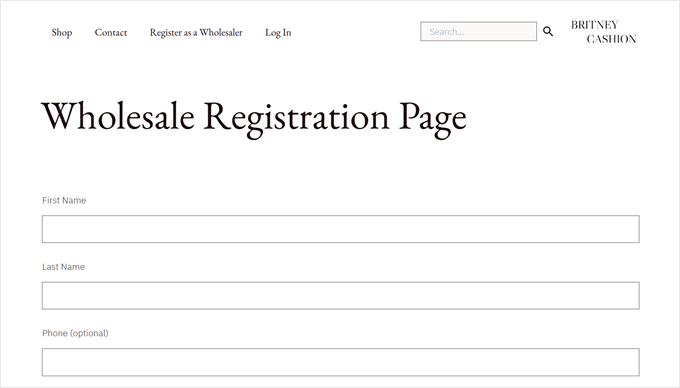
Step 5: Configure Your Wholesale Registration Paperwork
The Wholesale Suite extension mechanically creates registration and login pages to your wholesale customers. Forward of you get began accepting applications, despite the fact that, let’s customize the registration form to check your needs.
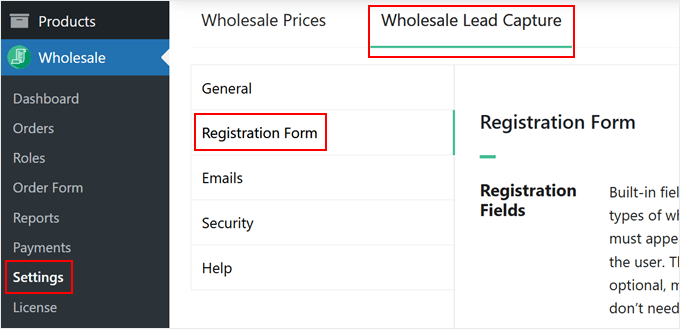
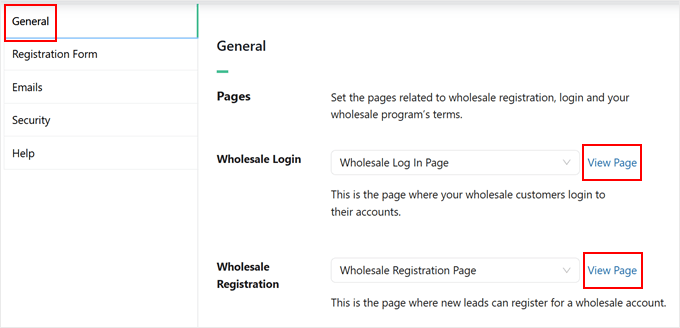
Head to Wholesale » Settings, then click on at the ‘Wholesale Lead Snatch’ tab and open the ‘Registration Form’ menu.
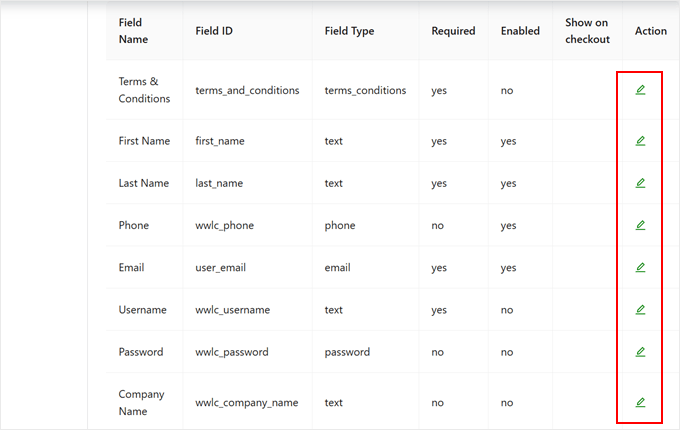
Proper right here, you’ll scroll proper right down to find a table showing all the available form fields.
While elementary fields like First Establish, Final Establish, Piece of email, and Username are included by the use of default, some would perhaps want to be activated. To permit a field, click on at the pencil ‘Edit’ icon throughout the ‘Movement’ column.
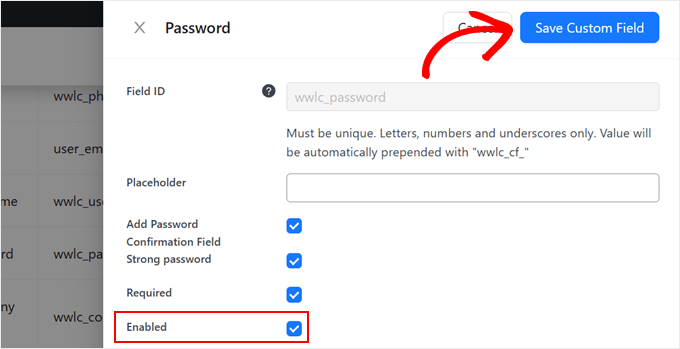
All you need to do now’s check out the ‘Enabled’ box to make it visible and mark the sector as ‘Required’ if you want to make it important.
Remember to click on on ‘Save Custom designed Field’ each time you’re achieved.
Now, switch to the ‘Commonplace’ tab to look out your new Wholesale Log In and Registration pages.
Transfer ahead and click on on ‘View Internet web page’ to preview them.
Once you have opened them, you’ll add the links to these pages on your navigation menu. This way, shoppers can merely find them once they’re browsing on your on-line retailer.
You’ll be capable of learn to do this in our data on find out how to upload a navigation menu in wordpress.
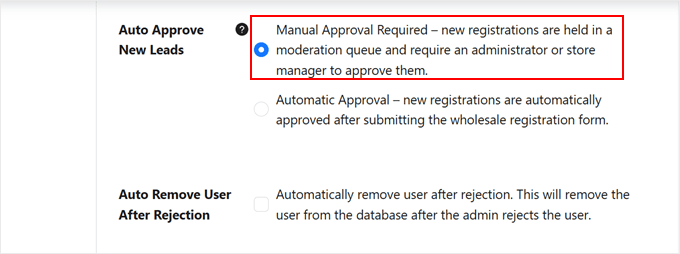
One important solution is the best way you’ll maintain new applications.
Underneath ‘Auto Approve New Leads,’ choose between ‘Information Approval Required’ or ‘Auto Approval.’
We strongly recommend guide approval to protect your wholesale pricing and test respected firms.
In the event you’re happy with the registration form settings, you’ll scroll once more up.
Finally, click on on on the ‘Save Changes’ button.
Step 6: Create a Wholesale Order Form
The total step is to create a wholesale order form, which streamlines the ordering process to your wholesale customers. This manner lets them merely place bulk orders without navigating via a couple of product pages, saving time for each and every you and your customers.
When putting in wholesale order paperwork, we’ve found out that businesses get the most efficient results by the use of along with the most important fields like product SKUs and most popular supply dates.
This way, wholesale customers can in brief place bulk orders while providing all the wisdom you need to process their requests effectively.
For detailed instructions on rising an optimized wholesale order form, check out our whole data on find out how to create a wholesale order shape in wordpress.
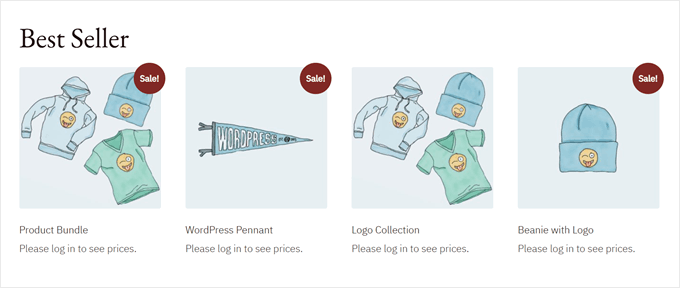
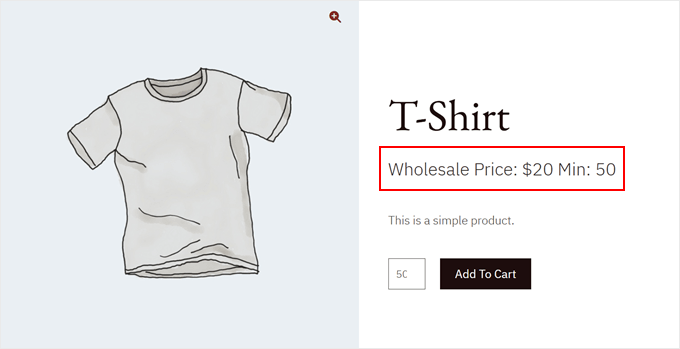
And that’s it! Let’s take a look at how this works in observe. Proper right here’s how our store turns out to secure visitors:
We moreover tried logging in as a wholesale purchaser to look if the fee was visible this time.
Check out the result underneath.
You’ll be capable of moreover be told our data on find out how to transfer between consumer accounts in wordpress if you want to have have the same opinion signing in and out of your accounts.
Method 3: Create a Professional Online Catalog Without Prices
The program transforms your WooCommerce store into a certified product catalog. It’s perfect for firms that make a selection coping with pricing discussions by way of email correspondence, a slightly form, or offline.
The YITH WooCommerce Catalog Mode plugin offers a easy method to create a price-free catalog. We’ve tested and shared learn how to make use of this plugin previous than in our tutorial on find out how to upload a product catalog in WooCommerce.
No longer just like the wholesale way, this system signifies that you’ll be able to remove prices completely while converting them with custom designed contact buttons. You’ll be capable of duvet pricing for your entire store, particular product categories, or specific particular person items.
This adaptability makes it highest for custom designed manufacturers, sumptuous retail outlets, or supplier providers who want to quote prices consistent with client prerequisites.
For this data, we’ll focus on the the most important settings to permit catalog mode and hide prices using YITH’s plugin. In step with our testing, we found out that the ones elementary choices are enough to get most shops started with hidden prices.
That discussed, understand that we’re only scratching the out of doors of what this plugin can do. We’ve explored many additional advanced choices in our detailed YITH WooCommerce Catalog Mode evaluate.
Moreover, you’ll want to gain the top rate model of the plugin. The free style works smartly, alternatively the price-hiding serve as is simply available throughout the paid style.
Step 1: Arrange and Activate YITH WooCommerce Catalog Mode
After you purchase the plugin, pass to the YITH internet web page and log into your YITH account. Then, head over to the ‘Licenses & Downloads’ tab.
Next, click on on on the ‘Download Plugin’ button to acquire the plugin record from your YITH account. Make sure to keep your browser tab open, as you’ll need the license key in a 2d.
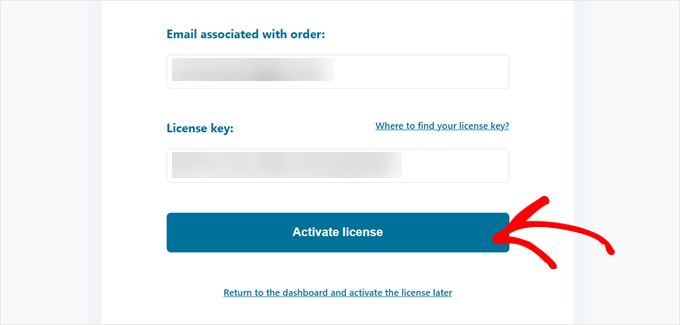
When the setup wizard turns out, you’ll want to enter your YITH email correspondence handle and license key.
Once you have into your details, click on on ‘Activate license’ to complete the setup process.
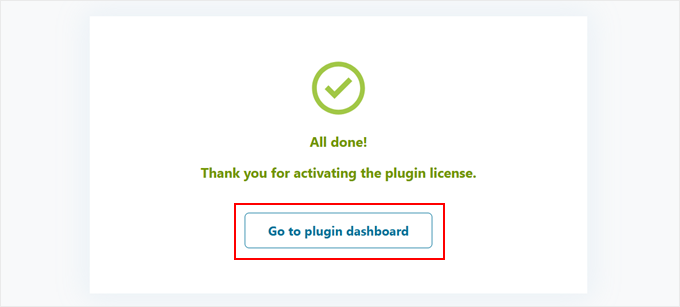
Once that’s achieved, click on on ‘Transfer to plugin dashboard’ to begin out customizing your catalog mode settings.
Let’s now continue to the next step.
Step 2: Configure Fundamental Catalog Mode Settings
Catalog mode transforms your store from a purchasing groceries website proper right into a product blow their own horns. This is perfect for firms that want to display products without fast purchasing alternatives.
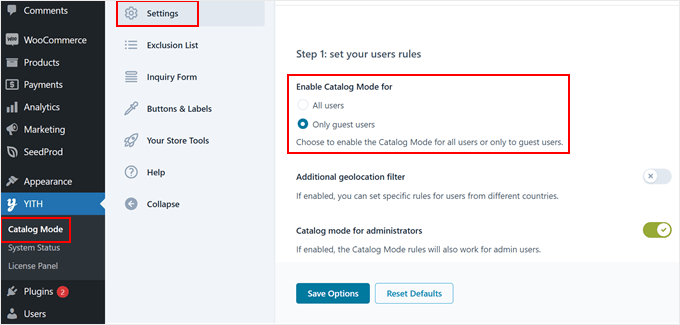
To start out, pass to YITH » Catalog Mode and navigate to the ‘Settings’ tab. That’s the position you’ll configure the decisions to run WooCommerce without prices.
First, you’ll choose whether or not or to not permit catalog mode for all shoppers or just customer shoppers.
You’ll be capable of moreover permit catalog mode for purchasers with the Administrator client place to test how the mode seems to be like.
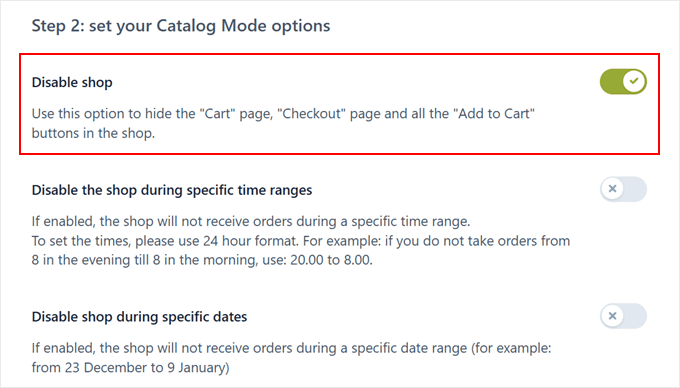
As you scroll down, you’ll flip at the ‘Disable retailer’ function if you want to remove the cart internet web page, checkout web page, and all add-to-cart buttons from your store.
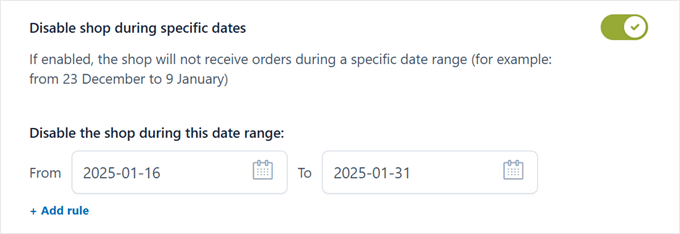
If you happen to disable the shop function, you’ll get additional alternatives to set particular time ranges or days.
This is specifically helpful in case you only want to duvet prices on days or vacation seasons when your online store doesn’t accept orders.
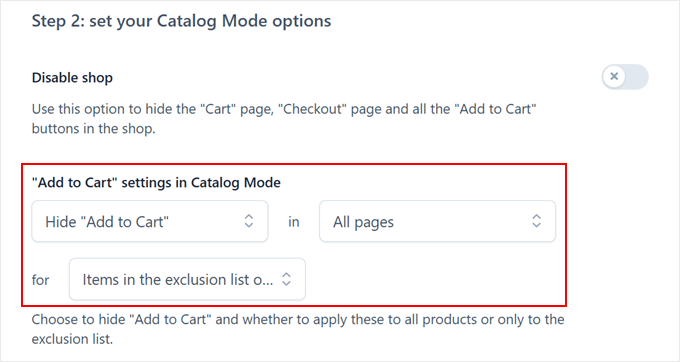
For added targeted regulate, you’ll merely skip the ‘Disable retailer’ menu and pay attention to the settings beneath ‘”Add to Cart” settings throughout the Catalog Mode’ section.
Proper right here, you’ll use dropdown menus to select exactly the position to hide or show add-to-cart buttons. For instance, you’ll duvet or show them for items on your exclusion tick list, which is a serve as that allows you to group of workers particular products, classes, or tags together.
This makes it easy to hide buttons for merely those made up our minds on items as a substitute of your entire store. We’ll be in contact additional about rising exclusion lists in a later segment.
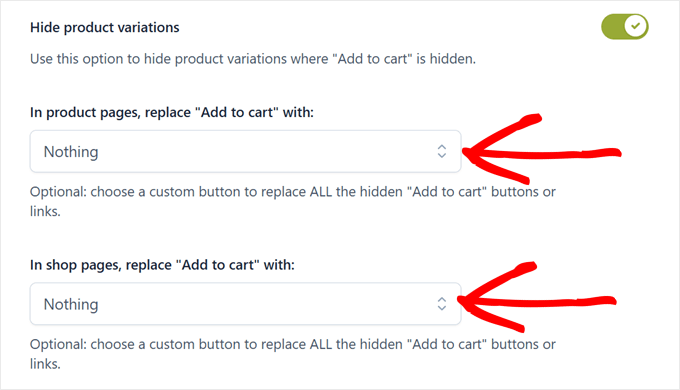
Moving down, you’ll choose to hide the ‘Add to cart’ button in product variations. This assists in keeping your catalog mode consistent all over all product varieties, along with those with a couple of alternatives like size or color.
You’ll be capable of moreover make a decision what turns out as an alternative of the ‘Add to cart’ buttons on the WooCommerce pages.
We suggest deciding on ‘No longer the rest’ for the ones alternatives to stick the gap clean. We’ll add custom designed buttons in a novel section later.
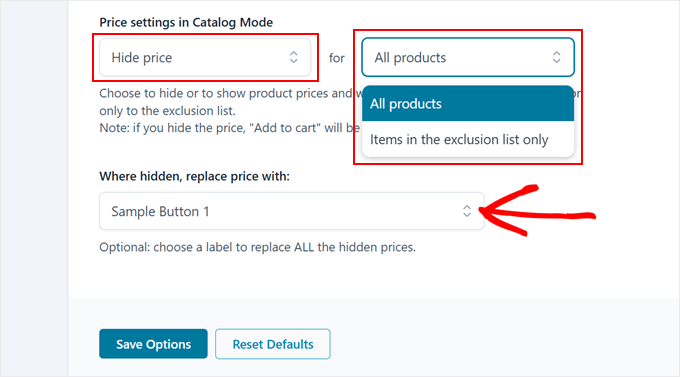
Further down, you’ll find ‘Price settings in Catalog Mode.’
You’ll be ready to choose from hiding costs for all merchandise or just those on your exclusion tick list.
When you duvet prices, you’ll trade them with custom designed buttons. The plugin accommodates quite a few pre-designed button varieties, like ‘Development Button 1,’ which we’ll customize in the next step.
Remember to click on on ‘Save Possible choices’ whilst you’re achieved making your selections.
Step 3: Create a New Button to Exchange the Cart Button
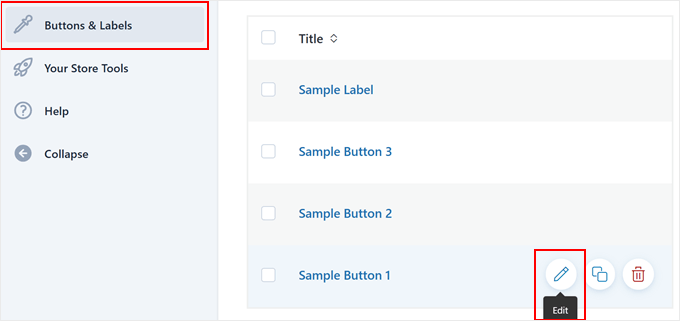
Now, it’s time to customize the button that may trade your cart buttons and prices. Head over to the ‘Buttons & Labels’ tab to get started.
Make a choice one of the pre-designed buttons provided by the use of YITH, then click on at the pencil ‘Edit’ icon to customize it.
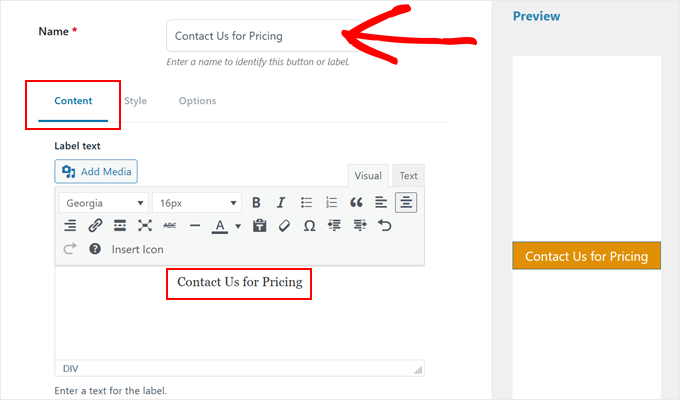
First, give your button a easy establish so that you’ll merely find it later.
Inside the ‘Content material subject matter’ tab, you’ll business the button text to at least one factor that fits your needs. Commonplace imaginable alternatives include “Request a Quote,” “Contact Us for Pricing,” or “Get Custom designed Price.”
Together with an icon may just make your button additional sexy. To check out this, you’ll make a choice ‘Choose between default icons’ throughout the Icon section.
You’ll be capable of browse all over the available alternatives to look out one that matches your message.
You’ll be capable of moreover fine-tune your icon by the use of adjusting its size, alignment, and colors.
Merely watch your changes appear throughout the live preview at the correct aspect of the internet web page.
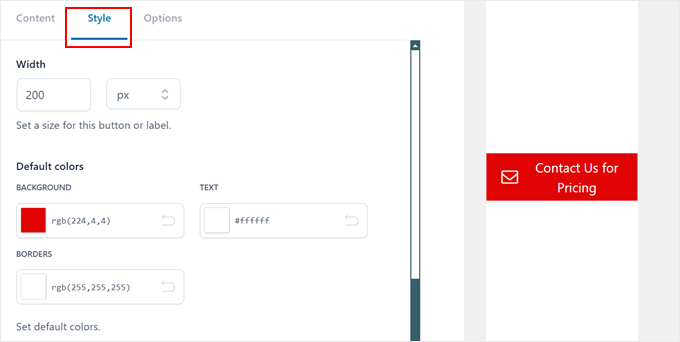
Now, switch to the ‘Style’ tab to customize your button’s glance.
That’s the position you’ll regulate the background colors, width, borders, padding, and margins to check your internet web page’s design.
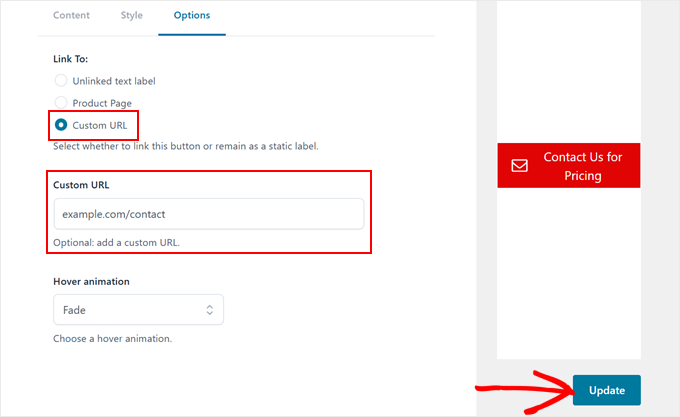
Finally, throughout the ‘Possible choices’ tab, organize the link to your button. We suggest using the ‘Custom designed URL’ way to direct visitors on your contact or login internet web page.
You’ll be capable of moreover add a hover animation to make your button additional interactive and crowd pleasing.
Once achieved, merely click on at the ‘Change’ button.
It’s that straightforward!
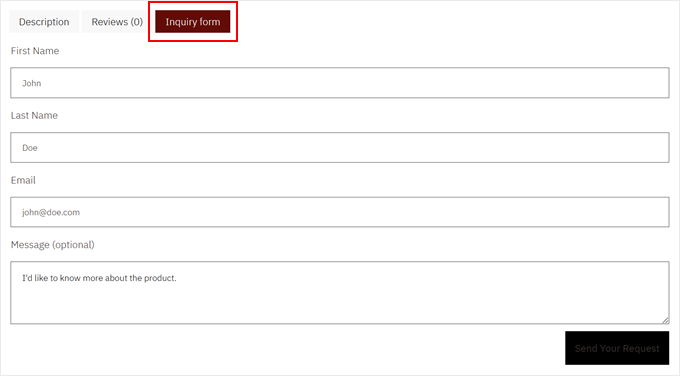
Step 4: Create a Product Inquiry Form(No longer mandatory)
Together with an inquiry form immediately on your product pages may just make it easier for customers to ask about prices. This way, they gained’t want to cross away the product internet web page to the touch you.
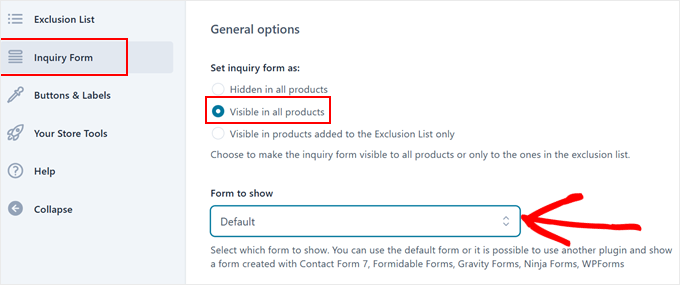
To set this up, navigate to the ‘Inquiry Form’ tab. Make a choice ‘Visible in all products’ beneath ‘Set inquiry form as.’ This promises the form turns out on each and every product internet web page.
For the ‘Form to show’ selection, you’ll use the ‘Default’ form that comes with the plugin.
If you happen to already use WPForms or each and every different form plugin, you’ll make a choice your provide paperwork as a substitute.
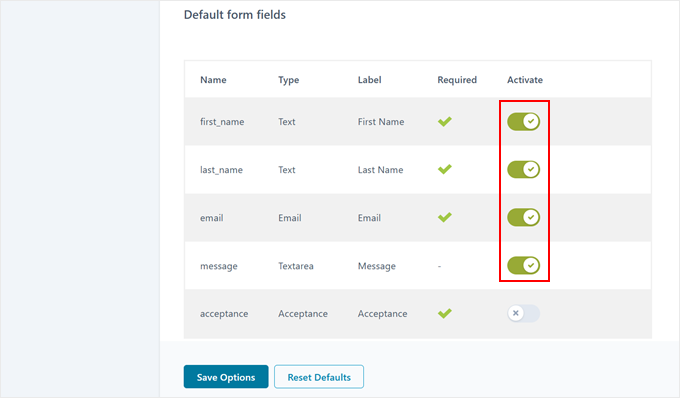
When using the ‘Default’ form, you’ll customize which fields appear.
We suggest conserving it simple with the most important fields like first establish, email correspondence, and message. From our experience, shorter paperwork in most cases get additional submissions.
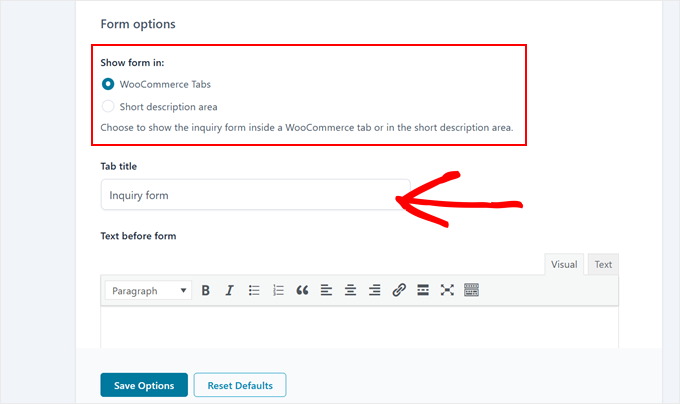
You’ve two imaginable alternatives for where the form turns out: in a WooCommerce tab underneath the product image or throughout the quick description space.
If you choose the tab selection, you’ll customize the tab’s establish to at least one factor like “Request Price” or “Product Inquiry.”
Don’t overlook to permit the ‘Include product Permalink’ atmosphere.
This gives the product’s URL to inquiry emails, making it much more clear-cut to monitor which merchandise consumers are asking about.
Need have the same opinion deciding whether or not or no longer to make a choice from a WooCommerce tab or a temporary product description?
Right here’s what the principle selection turns out like:
Within the intervening time, if you choose the product description selection, the inquiry form will appear right kind underneath the button you merely created.
Like so:
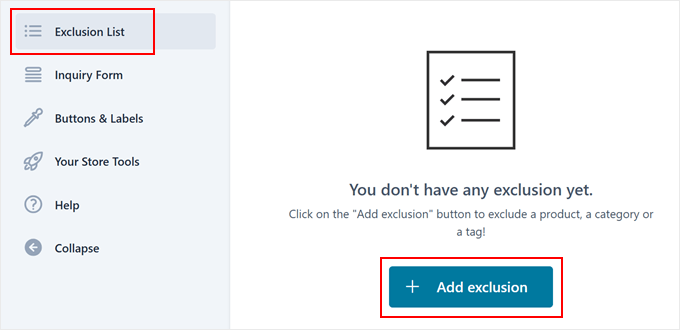
Bonus: How you can Create an Exclusion Checklist (Quilt Prices for Specific WooCommerce Products)
Now, let’s take a look at hiding prices for particular products as a substitute of your entire store. This assumes you’ve already organize your catalog mode to artwork with an exclusion tick list in Step 2.
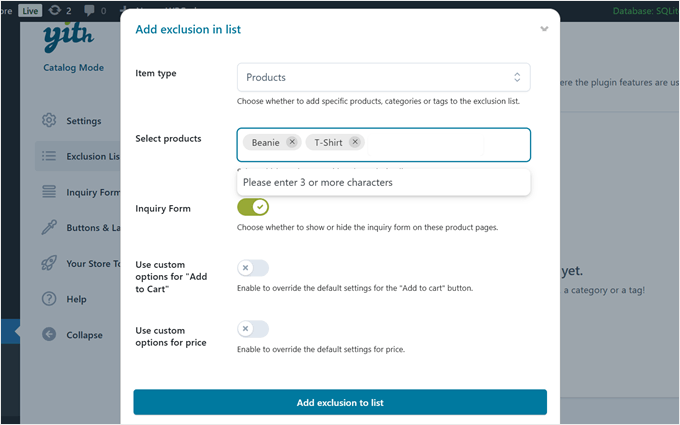
To get started, pass to the ‘Exclusion Checklist’ tab and click on on ‘+ Add exclusion tick list.’ A brand spanking new window will open where you’ll choose what sorts of items to hide prices for.
The ‘Products sort’ dropdown gives you 3 alternatives: specific particular person products, entire product categories, or product tags. This adaptability signifies that you’ll be able to duvet prices in tactics through which make sense to your small industry.
Next, get began typing product names, categories, or tags throughout the ‘Make a choice products’ field. The plugin will suggest suits as you sort. You’ll be capable of moreover choose whether or not or to not flip an inquiry form for the ones particular items.
You’ll perceive settings to ‘Use custom designed alternatives for “Add to Cart”‘ and ‘Use custom designed alternatives for cost.’ We suggest leaving the ones unchecked if you want to keep the settings you created in Step 2.
In the event you’re achieved, simply click on on ‘Add exclusion tick list’ to save some your changes. And that’s near to it!
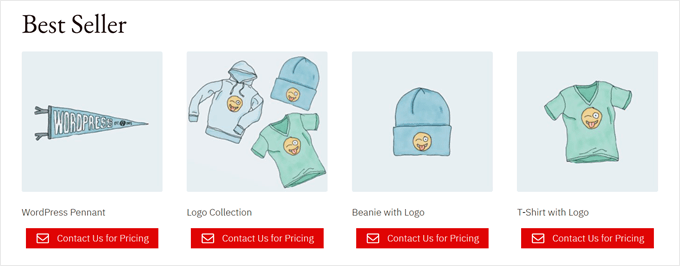
That is an example of what your product internet web page would perhaps seem to be whilst you permit the plugin:
Be told Additional WooCommerce Tips and Strategies
Now that you simply’ve learned learn how to advertise products on WooCommerce without prices, chances are high that you’ll want to learn additional tactics to optimize your online store. Check out the ones novice’s guides for added tips and guidelines:
We hope this article has helped you learn to duvet prices in WooCommerce. You may also want to check out our tick list of the highest wordpress topics for WooCommerce web pages and our data on find out how to upsell merchandise in WooCommerce.
If you happen to liked this article, then please subscribe to our YouTube Channel for wordpress video tutorials. You’ll be capable of moreover find us on Twitter and Fb.
The post How one can Cover Costs in WooCommerce (Stay Product Pricing Personal) first appeared on WPBeginner.
Top Audio Tips for Superior Sound in Saskatoon Summary: Enhance your audio experience in Saskatoon with our comprehensive guide to the latest trends and techniques. Discover essential tips, avoid common pitfalls, and explore case studies showcasing successful audio...
Discover the Secrets to Achieving Your Dream Skinny Body: Witness Real-Life Success Stories TL;DR: Embark on a transformative journey towards your skinny body goals, inspired by real-life success stories and practical tips from West Valley City's top experts in...
Travel Accessories in Charlottetown: A Guide to Enhance Your Journeys Summary: Charlottetown is a prime destination for travelers, and the right travel accessories can elevate your experience. This comprehensive guide explores the current state of travel accessories...
Sunshine in Fredericton: A Comprehensive Guide Summary: Sunshine, an innovative software solution, is gaining popularity in Fredericton. This comprehensive guide explores the current state, trends, key players, implementation, common mistakes, case studies, and future...
Embark on a Digital Odyssey: Crafting Websites with Super Effective Websites In the realm of web design, “Super Effective Websites” stands as an unrivaled beacon of excellence, particularly for environmental organizations. Their unparalleled expertise...
Cool Down Your Portland Home: Essential Guide to Central Air Conditioners Summary: Portland residents face increasingly hotter summers, making central air conditioners a must-have for home comfort. This comprehensive guide provides insights into the latest trends, key...
Small Appliances Revolutionizing Great Falls Summary: Small appliances are transforming Great Falls with innovative solutions for homes and businesses. From energy-efficient refrigerators to smart ovens, these appliances are enhancing convenience, efficiency, and...
Fireside Ambiance and Essential Accessories for Your Cozy Haven TL;DR Transform your fireplace into a mesmerizing focal point with these essentials: Fireplaces: Choose from electric, gas, or wood-burning options to create the perfect ambiance. Accessories: Elevate the...
wordpress–wordpress-your-sites-gateway-to-the-global-however_206834.jpg” alt=”” title=”wordpress | wordpress: Your Site’s Gateway To The Global, However…”...
Divi empowers you to construct the most productive web pages imaginable, and now, Divi Quick Sites takes web site advent to an entire new degree. This modern device shall we someone, irrespective of ability degree, generate a whole web site in underneath two mins!...
How one can Cover Costs in WooCommerce (Stay Product Pricing Personal)
By means of default, WooCommerce shows your product prices to everyone who visits your store. While this works for lots of online retail outlets, some firms need additional regulate over who sees their pricing. While helping online store house owners, we’ve come all over…