Tips on how to Accumulate Taxes for Stripe Bills in WordPress (3 Simple Techniques)
For individuals who run an web store, then you definitely’re legally required to collect product sales tax in most global places. Then again taxes vary by means of country, state, and house, so figuring out the proper tax fees for your services and products and merchandise can get beautiful tricky. We endorse to customers in […]
For individuals who run an web store, then you definitely’re legally required to collect product sales tax in most global places. Then again taxes vary by means of country, state, and house, so figuring out the proper tax fees for your services and products and merchandise can get beautiful tricky.
We endorse to customers in every single place the sector, so we’ve faced the equivalent challenging eventualities.
Fortunately, there are wordpress plugins that make it super easy to robotically collect taxes, it doesn’t topic what type of product you advertise.
As an example, we use Easy Digital Downloads to advertise our tool and plugins, and we find it irresistible because it makes collecting taxes a breeze. Then again when you advertise physically products or services, then that you must desire a different instrument like WooCommerce.
In this article, we’ll show you simple the best way to collect taxes for Stripe expenses in wordpress, step by step, for all the most common eventualities.
wordpress” class=”wp-image-325938″/>
<span class=”ez-toc-section” id=”why-gather-taxes-for-stripe-expenses-in-wordpress“/>Why Gather Taxes for Stripe Expenses in wordpress?
If you find yourself operating an internet trade, collecting taxes is not just a very best apply. It’s normally a jail felony duty.
Whether or not or now not you’re selling physically products, digital downloads, or subscription services, you need to collect the correct taxes at checkout to evolve to local, state, and international rules.
Failure to do so might lead to hefty penalties and as well as harm what you are promoting’s reputation.
So, collecting taxes for your whole Stripe expenses in wordpress isn’t negotiable.
Bear in mind, even supposing, that taxes are also crucial part of the consumer enjoy.
When you calculate and display taxes clearly right through checkout, customers are a lot much less much more likely to truly really feel stunned or pissed off by means of final rate totals. Plus, it shows them that what you are promoting is unique and as well as simplifies your bookkeeping process.
Having said that, let’s take a look at simple the best way to merely collect taxes for Stripe expenses in wordpress.
We will quilt a few different methods, and also you’ll be capable of use the quick links below to jump to the one you need to use:
<h4 class=”wp-block-heading” id=”aioseo-how-to-collect-taxes-for-stripe-payments-in-wordpress“>Gather Taxes for Subscriptions, Products and services and merchandise, and Single Products (WP Simple Pay)
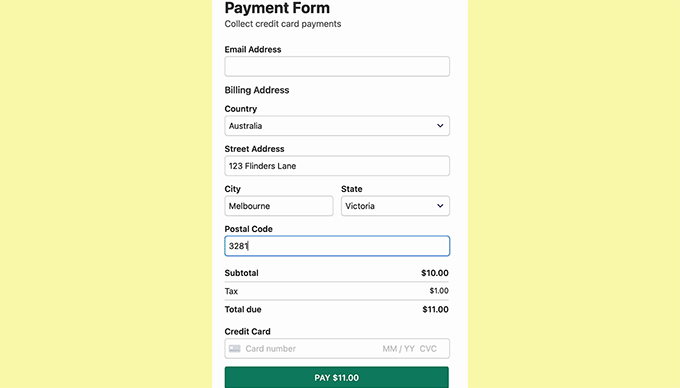
For individuals who advertise subscriptions, services, or single products to your site, then the easiest way to make money and collect taxes is by means of creating a simple rate form.
To take a look at this, we propose WP Easy Pay. We find it irresistible because it comes with a lot of different premade rate templates, an intuitive form builder, and entire unsolicited mail protection.
While testing the plugin, we found out its mounted and automatic tax worth choices super helpful for collecting taxes. The mounted tax worth selection implies that you’ll set a tax worth manually, which matches great if you’re interested in one house with safe tax regulations.
On the other hand, the automatic tax worth serve as calculates and applies the correct worth according to the buyer’s location, saving time and decreasing the risk of errors.
For added details on our experience with the plugin, see our detailed WP Easy Pay assessment.
To get started, first, you need to position in and switch at the WP Easy Pay plugin. To be told further, see our tutorial on easy methods to set up a wordpress plugin.
Phrase: WP Simple Pay has a unfastened plan. On the other hand, you’re going to wish the pro type to unlock the tax collection serve as.
After you flip at the plugin, a setup wizard will appear to your show. Proper right here, simply click on at the ‘Let’s Get Started’ button.
Next, it’s a should to add your plugin’s license key.
You’ll get this data on your account on the WP Simple Pay site. After you enter your license key, click on at the ‘Activate and Continue’ button.
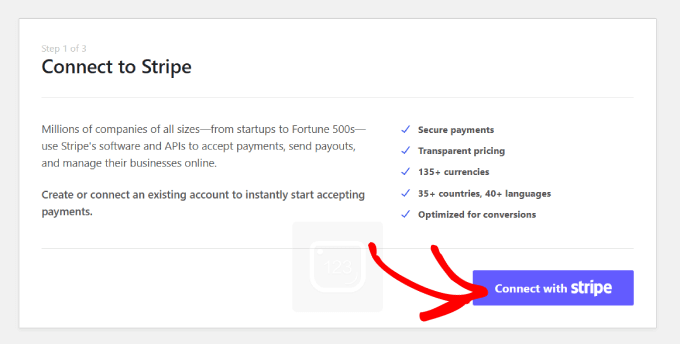
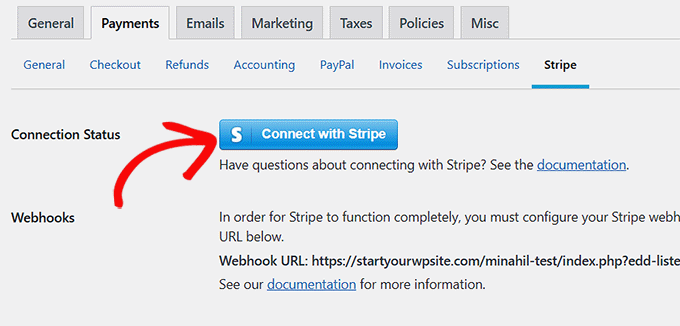
Then, connect your Stripe account with WP Simple Pay. Remember that the plugin gained’t artwork till you connect it with a brand spanking new or present Stripe account.
To get started, click on at the ‘Hook up with Stripe’ button and log in to your account. For added details, see our tutorial on easy methods to settle for Stripe bills in wordpress.
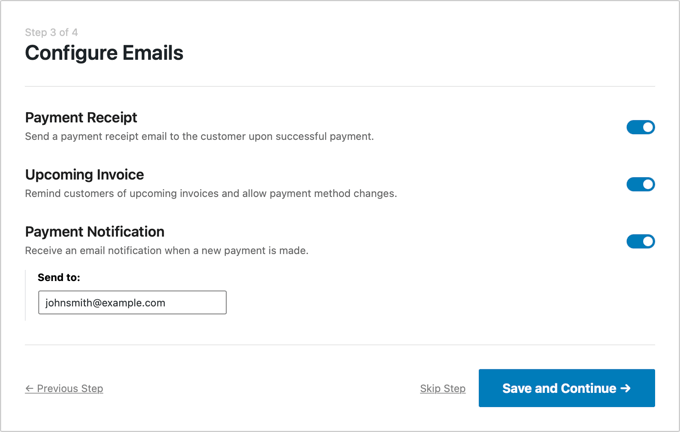
Once you have successfully connected your site with Stripe, the setup wizard will ask you to configure your emails.
At this stage, you’ll be capable of allow possible choices to acquire electronic mail notifications for rate receipts, upcoming invoices, and rate notifications. You’ll moreover want to enter the e-mail cope with where you need to acquire the ones messages.
In spite of everything, merely click on at the ‘Save and Continue’ button. You’ll then complete the other steps and cross out the setup wizard.
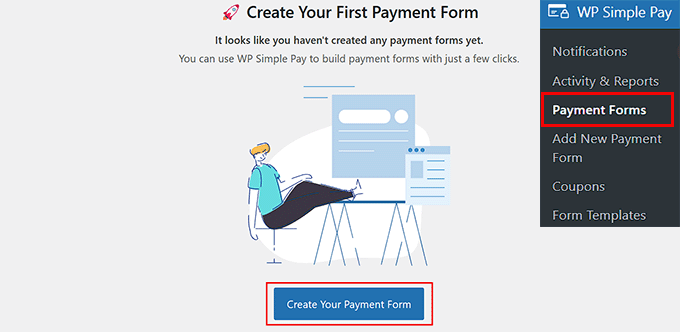
Once that’s performed, transfer to the WP Simple Pay » Price Paperwork internet web page from the wordpress dashboard.
Next, click on at the ‘Create Your Price Form’ button.
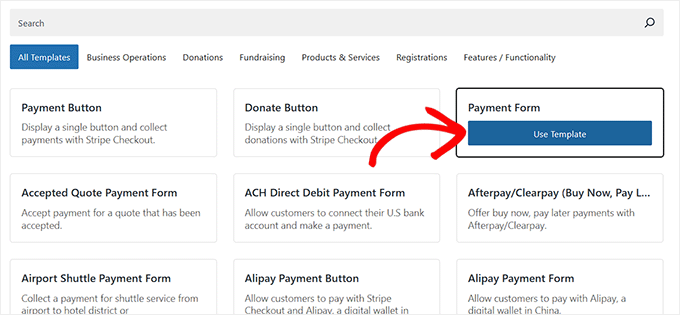
This may most likely take you to the ‘Choose a template’ show. Proper right here, you’re going to peer a list of premade templates.
You’ll make a selection an appropriate template by means of clicking the ‘Use Template’ button beneath it. For this educational, we will be able to use the easy ‘Price Form’ template.
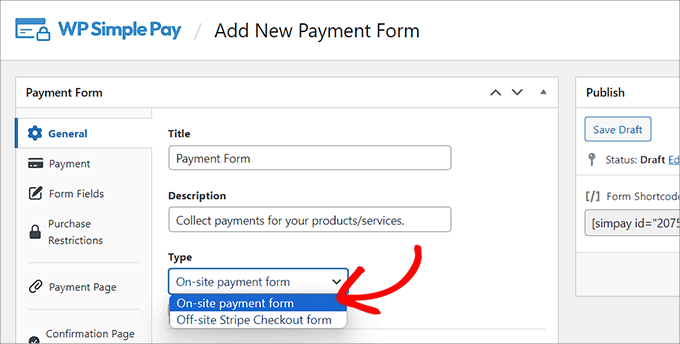
After you choose a template, WP Simple Pay’s form builder will free up to your show. Proper right here, you’ll be capable of get began by means of together with a reputation and description for your form.
Then, select your form sort as ‘On-site rate form.’
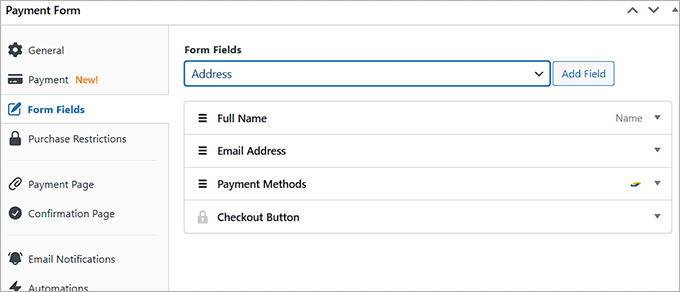
Now, head over to the ‘Form Fields’ tab. Proper right here, you’re going to find a dropdown menu where you’ll be capable of add a brand spanking new form field.
While you do that, click on on on the newly added approach to make larger the settings and customize it as sought after. You’ll moreover drag and drop the fields to prepare them alternatively you like.
The ones fields will show up to your rate form, so be sure to add all the necessary form fields to collect the details you need from your customers.
As an example, if you want to show tax fees according to the buyer’s location, it is very important add an deal with field. This way, customers will have to provide their area deal with when making a purchase order order.
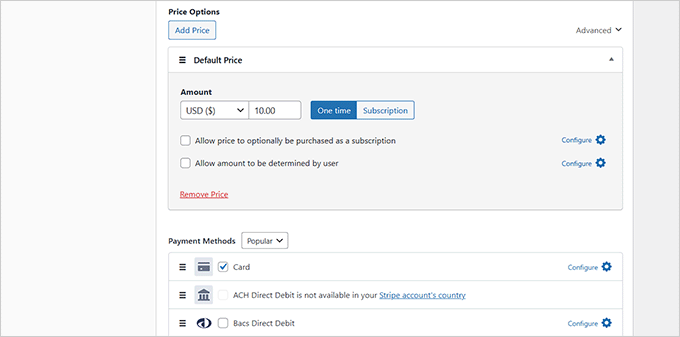
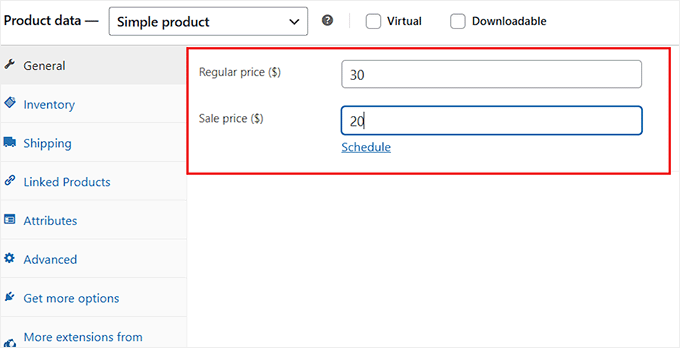
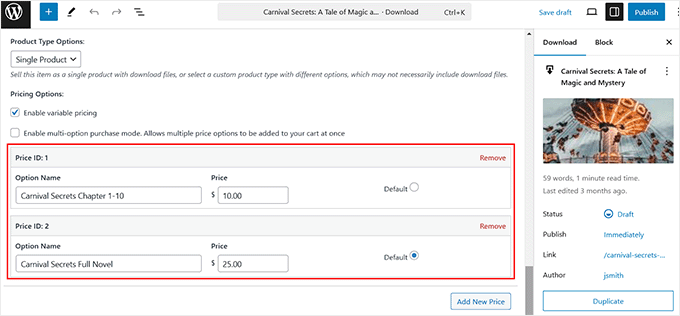
Once that is performed, switch to the ‘Price’ tab and add a price for your product. You’ll moreover add a few products by means of clicking the ‘Add Value’ button.
On the other hand, when you plan to advertise subscription services, then select the ‘Subscription’ selection and get began together with different tiers.
If you find yourself in a position, scroll proper all the way down to the ‘Price Methods’ section to make a choice possible choices like ACH direct debit, card, Klarna, Examine, Cash App, and Bancontact to only settle for Stripe expenses.
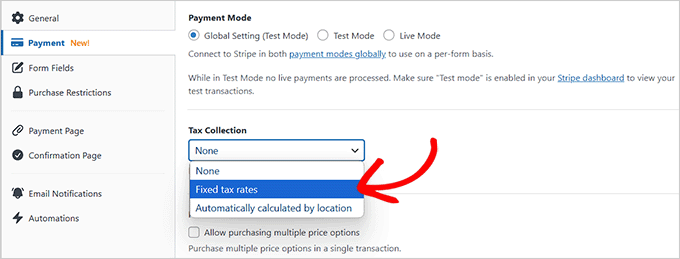
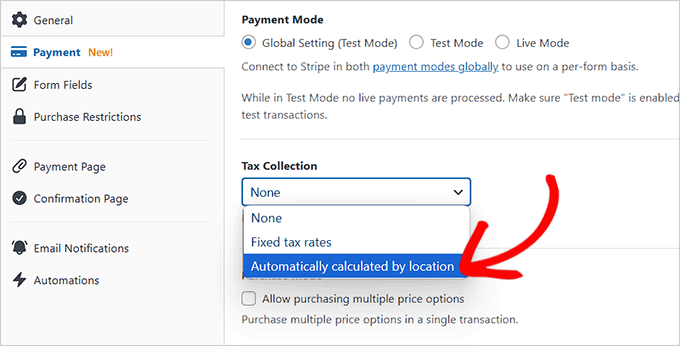
Once you have performed that, head up to the ‘Tax Collection’ section. Proper right here, you’ll be in a position to choose some of the two tax collection methods consistent with your selection.
We will give an explanation for simple the best way to add a suite tax worth and an automatic tax worth to your rate form.
Means 1: Add Fixed Tax Worth for Your Stripe Expenses (Selling in One House)
In this section, we will be able to give an explanation for simple the best way to collect taxes if you’re selling in a single house. This is a great variety when you advertise and ship products most efficient in a small house with uniform taxes, very similar to a state or province.
To take a look at this, it is very important define the tax worth for your products manually.
First, you need to open the ‘Price’ tab inside the settings for WP Simple Pay. Then, make a selection the ‘Fixed tax fees’ selection from the Tax Collection dropdown menu.
After you’ve made your selection, merely click on at the ‘Save Draft’ button for your form.
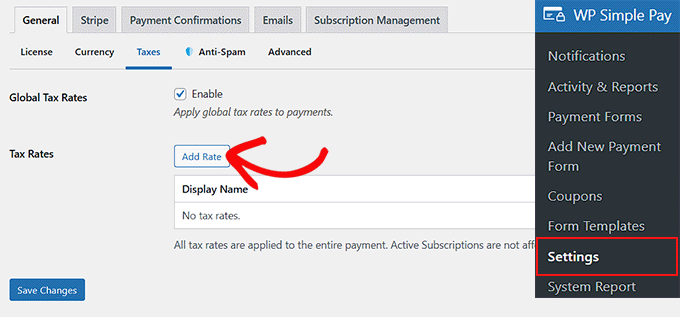
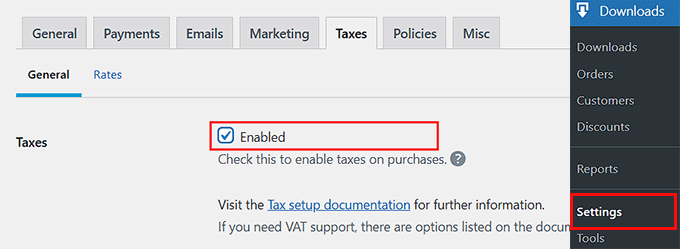
Next, discuss with the WP Simple Pay » Settings » Not unusual internet web page from the wordpress dashboard and switch to the ‘Taxes’ tab.
Proper right here, you need to check the ‘Allow’ box next to the ‘Global Tax Fees’ selection. This may most likely open some new settings on the internet web page, where it’s a should to click on at the ‘Add Worth’ button.
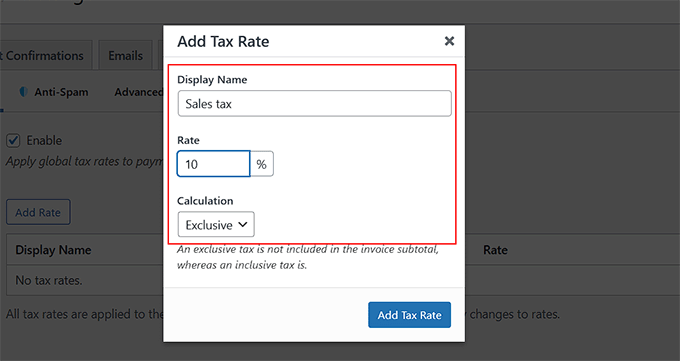
You’ll now add a name and tax worth for your products or services inside the popup.
After that, you’ll have to specify if you want to have your tax to be calculated inclusively or utterly.
If you choose inclusive tax, then the required tax will robotically be integrated inside the total value of the article.
Within the interim, with distinctive tax, customers will be able to see the breakdown of all the price of the purchase. This may most likely include a subtotal with the ground value and a separate line showing the product sales tax.
We recommend choosing distinctive tax so your customers don’t assume you’re overcharging them.
While you’ve made your variety, simply click on at the ‘Add Tax Worth’ button. The popup will close robotically. Then, click on at the ‘Save Changes’ button to store your settings.
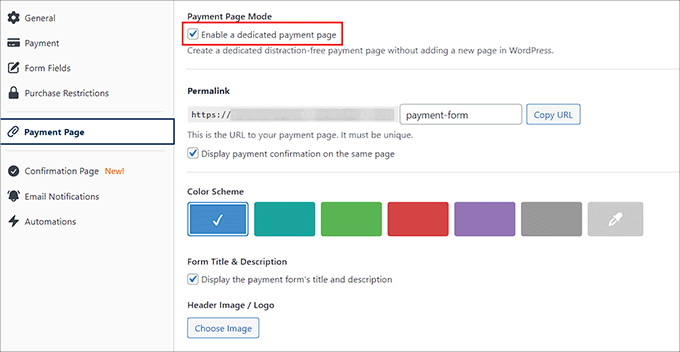
Now, open up your form yet again and discuss with the ‘Price Internet web page’ section inside the left column.
Proper right here, you’ll be capable of take a look at the ‘Allow a faithful rate internet web page’ box to create a custom designed rate form internet web page. To customize the form, you’ll be capable of add a permalink, color scheme, image, and footer text.
In spite of everything, click on at the ‘Publish’ button to avoid wasting numerous your settings.
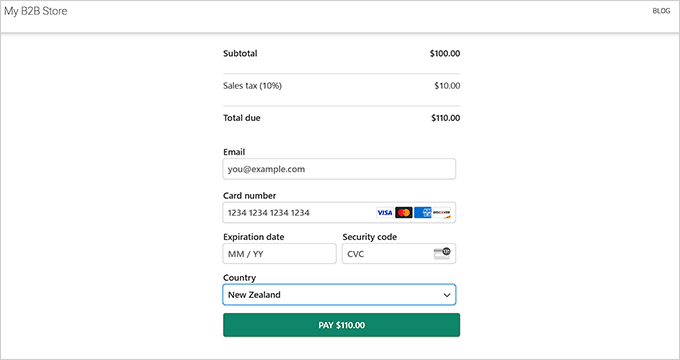
You’ll now discuss with your site to seem the price form with a suite tax worth.
On the other hand, if you want to add this sort to an present internet web page, then merely click on at the ‘Publish’ button after together with the tax worth.
Then, open an present internet web page from your wordpress dashboard and click on at the ‘Add Block’ button.
As quickly because the block menu opens up, to find and add the WP Simple Pay block and make a selection the form you merely made from the dropdown menu.
Next, click on at the ‘Change’ or ‘Publish’ button to store your changes.
You could have now added a rate form with a suite tax worth to an present wordpress internet web page.
Identical Submit: For individuals who’re setting up taxes in wordpress, then understanding online rate dispositions imply you’ll optimize your checkout process. Check out our post on necessary fee statistics, information, and tendencies to stay a professional.
Means 2: Add Automated Tax Worth for Your Stripe Expenses (Selling in A few Puts)
If you want to robotically configure the tax worth for your customers according to their location, then this system is for you. This is ideally fitted when you’re selling in a few global places and spaces.
To take a look at this, you’ll have to make a selection the ‘Automatically calculated by means of location’ selection from the ‘Tax Collection’ dropdown menu inside the WP Simple Pay form builder.
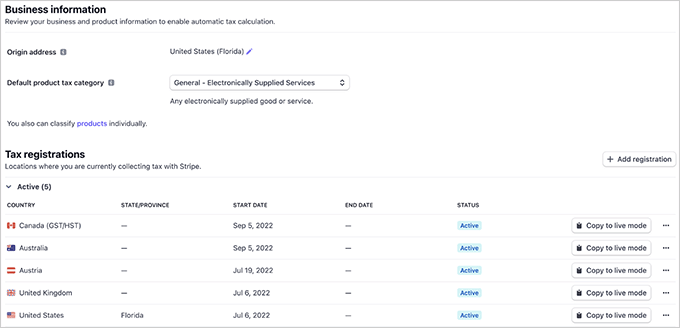
While you do that, you’ll must discuss with your Stripe account dashboard to activate automatic tax collection. From proper right here, you’ll be capable of follow the opposite spaces where what you are promoting is crossing the tax threshold.
You’ll then add registration and get began collecting taxes for the ones puts merely.
On the other hand, believe to ensure your basis deal with and select a default tax magnificence to ensure proper tax calculations for what you are promoting.
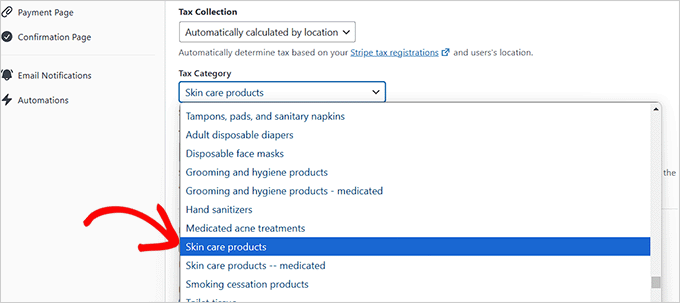
Now, when you head once more to your wordpress dashboard, you’re going to understand that choosing this selection has opened some new settings beneath the ‘Tax Collection’ section.
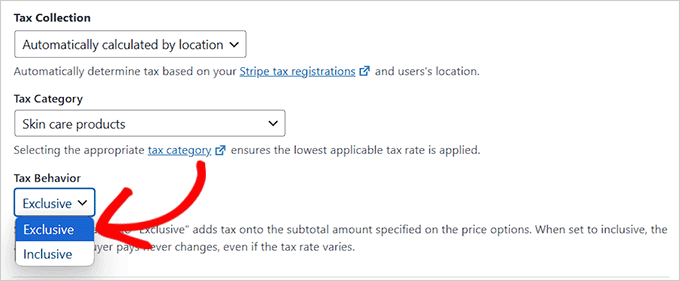
Proper right here, you will have to make a choice a tax magnificence for the product or service that you simply’re selling from the ‘Tax Magnificence’ dropdown menu.
As an example, when you advertise skin care products, you then’ll be in a position to make a choice that selection.
Next, make a decision whether or not or now not you need to turn tax inclusively or utterly. If you choose the inclusive selection, then the tax can be integrated inside the overall product value.
On the other hand, if you select the original selection, the tax amount can be confirmed one at a time. The subtotal will display the ground value of the transaction, and there can be a separate line for product sales tax.
We recommend the use of the original selection, because it’s further transparent for your customers.
Once that is performed, you’ll be capable of head over to the ‘Price Internet web page’ section.
Check the ‘Allow a faithful rate internet web page’ box if you want to have the plugin to generate a custom designed rate internet web page. Then, customize your internet web page alternatively you like.
When you’re in a position, click on at the ‘Publish’ button to avoid wasting numerous your changes.
Now, discuss with your site to seem the price form with automatic tax calculation in movement.
On the other hand, when you don’t want the plugin to generate an absolutely new rate internet web page, merely click on at the ‘Publish’ button after configuring the tax settings.
Then, in an effort to upload your rate form to a pre-existing internet web page, merely open it with the block editor and make a selection the WP Simple Pay block from the menu.
Next, make a selection the form you made from the dropdown menu all the way through the block.
After that, click on at the ‘Change’ or ‘Publish’ button to avoid wasting numerous your changes.
Now, discuss with your internet website to view the Stripe rate form with an automatic tax calculation field.
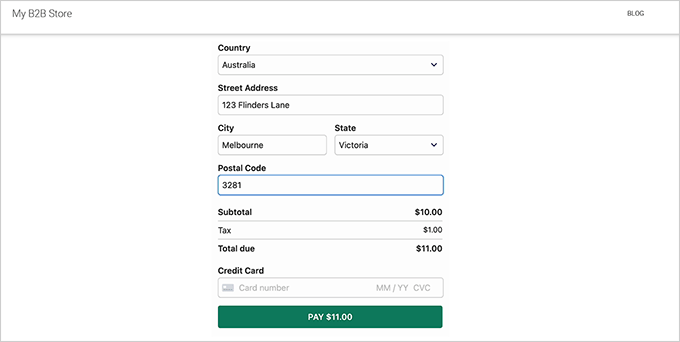
Gather Taxes for Physically Products (WooCommerce)
For individuals who run an web store with a few physically products, then rate forms won’t offer the most simple way. You’ll most definitely need further eCommerce choices and power.
If this is the case, we propose the usage of WooCommerce. This free eCommerce plugin makes it super easy to advertise your physically products, accept expenses via Stripe, and collect taxes for those expenses.
We’ve worked with this instrument such a lot, so we know it identical to the once more of our hand. For added insights on what it would in truth do, check out our detailed WooCommerce assessment.
The most productive phase? The use of WooCommerce’s built-in choices, you’ll be capable of robotically calculate product sales tax according to your store’s location and where your customers are.
Plus, it is helping different tax fees, at the side of state, country, and even city-specific taxes.
To start out, you’ll want to arrange and switch at the WooCommerce plugin. To be told further, see our tutorial on easy methods to set up a wordpress plugin.
After activating the instrument, you’ll be capable of prepare your WooCommerce store to begin out selling products. You’ll moreover want to connect Stripe with WooCommerce to collect expenses.
Merely see our complete WooCommerce information if you want to have help with the process.
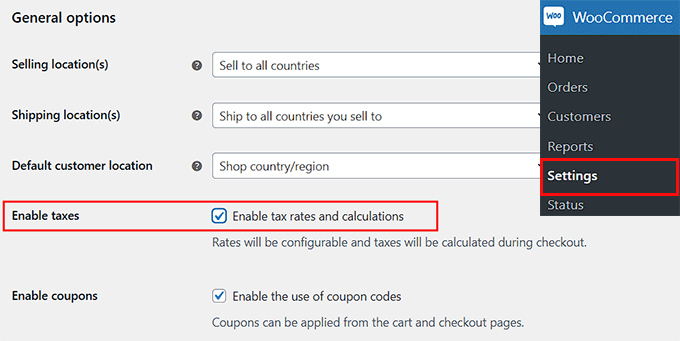
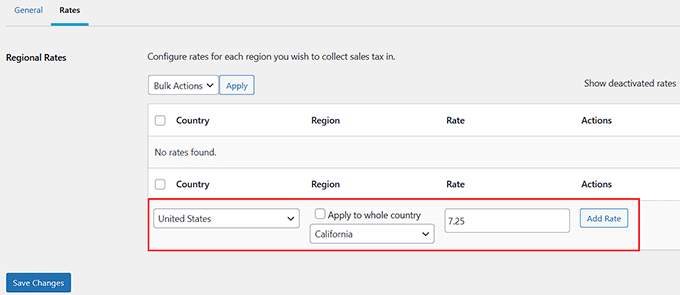
Once your store is set up, you need to discuss with the WooCommerce » Settings » Not unusual internet web page from the wordpress dashboard and scroll proper all the way down to the ‘Allow Taxes’ section.
Simply take a look at the sector next to it and click on at the ‘Save Changes’ button.
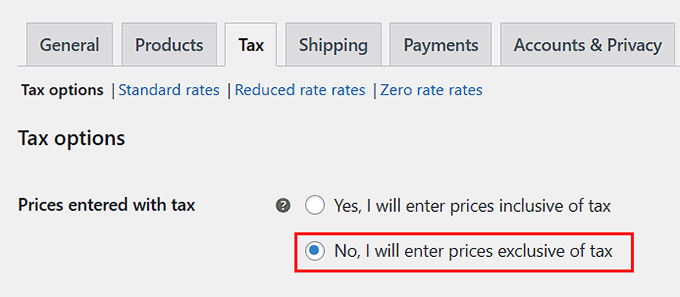
While you do that, a ‘Tax’ tab will appear inside of the most efficient menu. When you discuss with that internet web page, you’re going to get began by means of deciding how you need to turn taxes.
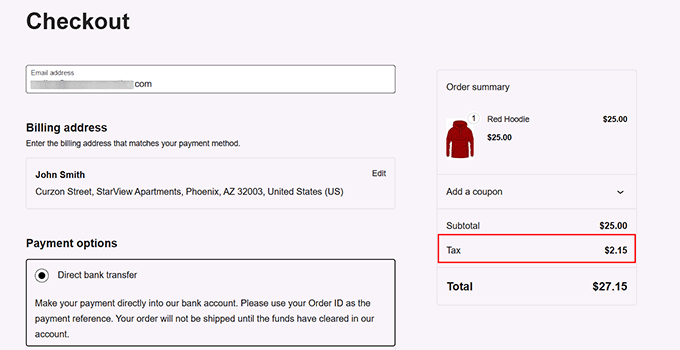
You’ll make a selection to turn taxes utterly, because of this they’ll be confirmed one at a time at checkout instead of being integrated inside the product value. This promises customers see exactly how so much tax they’re paying faster than completing their achieve.
You’ll moreover make a selection to turn prices inclusively.
This means the fee you enter inside the ‘Product knowledge’ section of your WooCommerce product will already include tax.
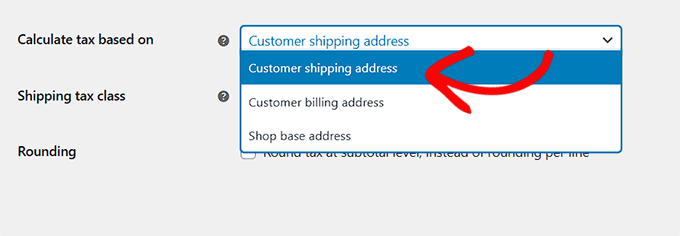
Next, it is very important set how taxes are calculated. To take a look at this, open the ‘Calculate tax according to’ dropdown menu and select an selection.
You’ll make a selection to calculate taxes according to the buyer’s supply deal with, which is excellent if you’re supply to different spaces with more than a few tax fees.
On the other hand, select the billing deal with if you need use the deal with your purchaser enters for rate.
There is also the selection to use your retailer’s base location, which assists in keeping problems simple by means of applying your local tax worth to all orders.
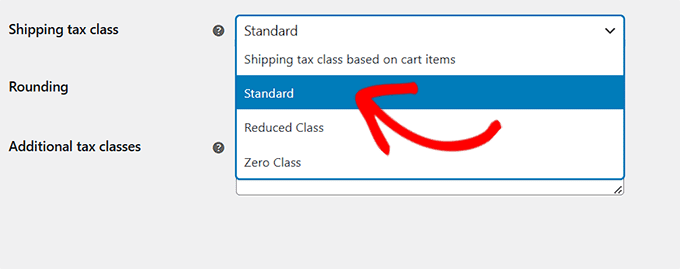
After that, it’s time to industry the supply tax magnificence. In this section, you’ll be in a position to make a choice how WooCommerce should calculate tax on the cost of supply.
As an example, if you choose ‘Shipping tax magnificence according to cart items’, then the supply tax price can be calculated according to the tax magnificence assigned to the product being shipped.
If you choose the ‘Standard’ tax magnificence, then the default tax worth you will have prepare for the product may also be performed to the supply tax.
The lowered tax magnificence is for items that have a lower tax worth, like certain foods products or books, depending to your house.
In spite of everything, the 0 tax magnificence applies no tax to supply the least bit, which might be useful when you’re offering tax-free delivery promotions.
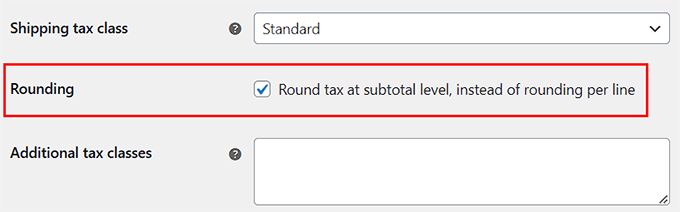
Next, we propose checking the sector next to ‘Round tax at subtotal level, instead of rounding consistent with line.’
This means taxes can be rounded according to the entire order subtotal relatively than each and every specific particular person product line.
You’ll now control the rest of the settings to fit your store’s needs.
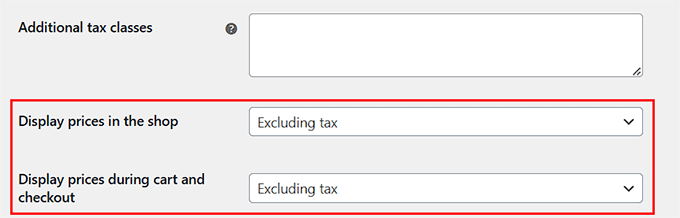
One key selection is deciding simple the best way to display prices on your retailer, cart, and checkout pages.
You’ll make a selection to show prices at the side of tax, so customers see the overall amount upfront, or excluding for tax, which gives transparency by means of showing taxes one at a time.
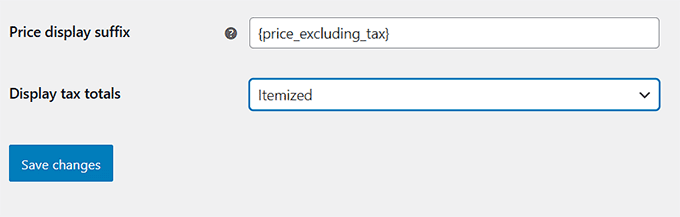
Additionally, you’ll be capable of configure the ‘Value display suffix’ setting in an effort to upload text after your product prices. This may help show customers whether or not or now not tax is integrated or excluded in the fee they see.
As an example, when you enter “Value incl. VAT: {price_including_tax}”, your store will display something like Value incl. VAT: $50.40.
Next, industry the ‘Display tax totals’ setting to regulate how taxes appear right through checkout. You’ll make a selection to show all taxes as a single total or display each and every tax as an itemized document.
If you choose the ‘As a Single General’ selection, WooCommerce will combine all applicable taxes into one total amount. Shoppers will see just a single tax line instead of separate breakdowns.
As an example, if a product has a few tax fees (like state tax and local tax), they’ll all be merged and simply confirmed as ‘Taxes’ at checkout. This assists in keeping problems clean and simple.
On the other hand, when you set it to ‘Itemized,’ then customers will see each and every tax worth one at a time. This means WooCommerce will document out each applicable tax, very similar to state and local taxes, on their own strains.
This offers further transparency, so customers know exactly what they’re paying for. The tax names confirmed will be the ones you enter on your WooCommerce settings.
We’ll walk you via how to try this in the next step. Once you’re performed, merely click on at the ‘Save Changes’ button to store your settings.
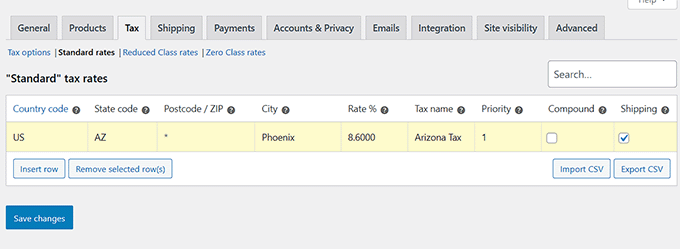
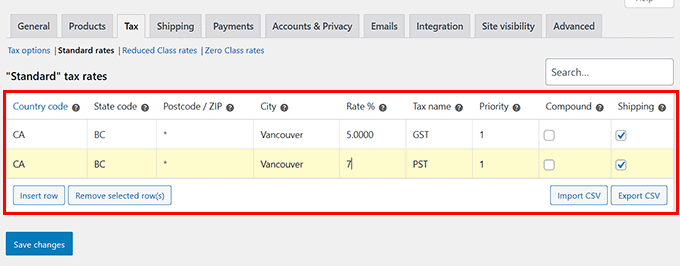
Then, switch to the ‘Standard Fees’ internet web page from the easiest and click on at the ‘Insert Row’ button.
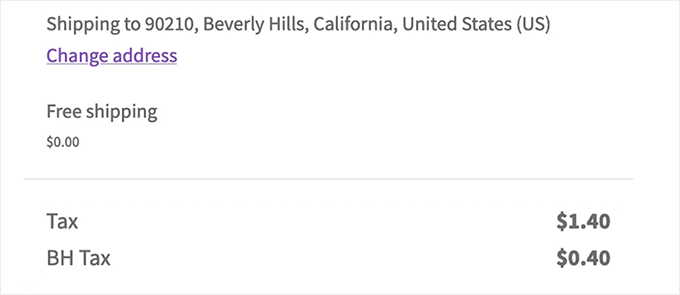
You’ll now add the country code, state code, postcode, city determine, and tax worth for each and every location where you need to collect taxes.
For individuals who most efficient wish to collect taxes consistent with your store’s location, you then’re going to most efficient want to add one row. You’ll moreover add a tax determine for each and every row so that you’ll be capable of merely differentiate them.
If you select the itemized selection inside the ‘Display tax totals’ section, then the determine you choose for each and every tax row will be the one displayed on the checkout internet web page.
As an example, when you prepare separate tax fees for pieces and services (GST) and provinces (PST), those exact labels will appear inside the order summary.
In spite of everything, click on at the ‘Save Changes’ button.
Now, discuss with your WooCommerce store to seem the tax worth displayed to your checkout web page.
Depending to your settings, the rate may also be displayed to your product and cart internet web page.
Gather Taxes for Digital Products (Easy Digital Downloads)
If you want to collect taxes when selling your digital products via Stripe, then Simple Virtual Downloads (EDD) is the most suitable choice.
This plugin is built specifically for promoting virtual merchandise and provides seamless tax collection, at the side of for Stripe transactions. The plugin handles the whole thing from setting fees to generating stories, making tax keep an eye on easier for stores.
We use EDD to advertise our plugins and tool. So, we’ve spotted firsthand how easy it’s to collect Stripe expenses and prepare taxes. To be told further, see our whole Simple Virtual Downloads assessment.
First, you need to position in and switch at the Simple Virtual Downloads plugin. For added instructions, see our knowledge on easy methods to set up a wordpress plugin.
Phrase: EDD has a unfastened plan. On the other hand, upgrading to the pro type gives you get right of entry to to choices like advanced reporting, electronic mail promoting integration, content material subject matter restriction, and additional.
While you flip at the plugin, it is very important prepare your store, add products, and fix Stripe with the plugin.
To get started, follow our beginner’s knowledge on easy methods to promote virtual downloads in wordpress.
When that is performed, head over to the Downloads » Settings » Taxes internet web page inside the wordpress admin sidebar.
Proper right here, allow the ‘Taxes’ selection by means of checking the sector next to it.
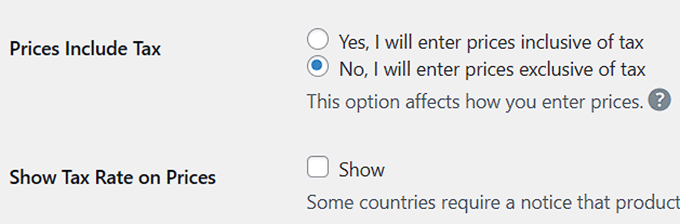
Then, make a selection if you want to display taxes utterly or inclusively.
If you choose ‘Positive, I will enter prices inclusive of tax’, then the fee you entered in a product’s knowledge is all the amount the buyer will pay after taxes.
So, when you set the price of a product as $20, the buyer will pay $20 at checkout. The fitting amount that can transfer towards taxes can be calculated robotically.
If you select ‘No,’ the fee you entered on the product edit show gained’t include the tax amount.
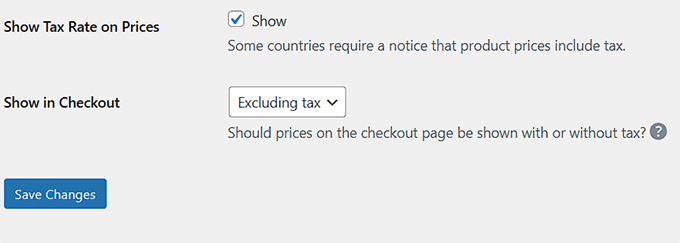
After that, we propose checking the ‘Show Tax Worth on Prices’ selection. This way, the buyer will see the volume they’re expected to pay in tax below the purchase button.
Next, make a decision how you need to turn product prices on the checkout internet web page. You’ll make a selection to show prices at the side of tax, which means that all the value customers see will have tax added.
Or, you’ll be capable of show prices excluding for tax, where the fee confirmed is just the product amount faster than tax (additionally known as the subtotal). The tax will then be added one at a time at checkout.
In spite of everything, click on at the ‘Save Changes’ button to store your settings.
Now, switch to the ‘Fees’ section from the easiest. Proper right here, you’ll be capable of add tax fees for specific global places or states/provinces within the ones global places.
To take a look at this, make a selection a country/ state from the dropdown menu and add its tax worth. Then, click on at the ‘Add Worth’ button.
You’ll repeat this step as over and over again as you like.
Once you’re performed, merely click on at the ‘Save Changes’ button.
Now, merely discuss with your digital products store to check how taxes are being accrued for Stripe expenses.
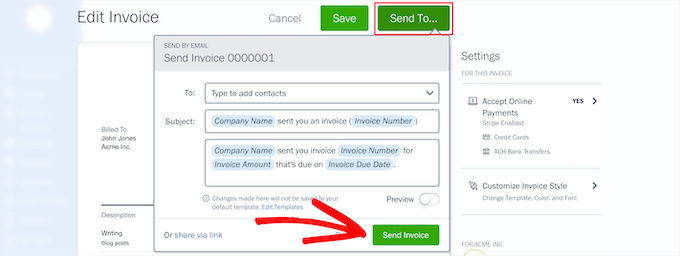
Bonus: Create Visually-Fascinating Invoices for Shoppers
Managing tax collection is a jail requirement for eCommerce internet sites. Then again when you advertise industry products or services (another way you merely wish to transfer above and previous), you then’ll be capable of moreover offer your customers crowd pleasing invoices for their information.
An invoice that shows the subtotal, tax amount, and total price helps with transparency and makes it easier for customers to track expenses, handle reimbursements, and even handle customs claims.
To create professional-looking invoices, we propose the use of FreshBooks.
This is a in style accounting tool for small corporations that provides a very easy option to create customizable invoices together with your emblem and personalized notes.
Plus, it automates reminders for late expenses, securely processes routine bank card bills, and notifies every you and your customers.
You’ll moreover include tax wisdom, rate words, discounts, and foreign exchange on your invoices, providing a clear breakdown of expenses.
Although it is a third-party instrument, FreshBooks seamlessly integrates with highest site builders, at the side of wordpress.
For step-by-step instructions, see our tutorial on easy methods to create invoices for purchasers the usage of wordpress.
<span class=”ez-toc-section” id=”identical-guides-for-accepting-expenses-in-wordpress“/>Identical Guides for Accepting Expenses in wordpress
Need more information on accepting expenses on your online store? Check out our related guides:
For individuals who appreciated this text, then please subscribe to our YouTube Channel for wordpress video tutorials. You’ll moreover to search out us on Twitter and Fb.
The post Tips on how to Accumulate Taxes for Stripe Bills in wordpress (3 Simple Techniques) first appeared on WPBeginner.
Why East South Central for how to get skinny?How to get skinny, Grills, and more…In a realm where the aroma of grilled delights fills the air, there unfolds a tapestry of culinary artistry and social camaraderie. Amidst the radiant sunshine and the gentle...
The World's Most Aromatic Brew: Revel in the Art of Coffee and its Utensils The Elixir of Life: Coffee Coffee, the aromatic nectar that fuels our mornings, is a beloved beverage around the globe. Its origins trace back centuries, when the people of Ethiopia discovered...
Why you simply must checkout web design for interior designers and SERP Content Generation SERP Content Generation, etc Website Hosting: Finding the Perfect Palace for Your Digital Abode Like a luxurious mansion for your website, website hosting provides the...
Hike's Soaring Popularity Transforms Miami's Sewing Scene Summary: The renowned sewing and craft supplies retailer Hike has experienced a meteoric rise in Miami, captivating crafters and hobbyists alike. This article delves into the current state of Hike, explores...
Unlock the Power of the Web: A Comprehensive Guide to Website Creation In today’s digital age, a well-designed website is crucial for businesses and individuals alike. Whether you’re a seasoned entrepreneur or a budding online presence, this article will...
WPMUDEV, a primary provider of wordpress services and products, has earned a reputation for exceptional buyer empowerment and improvement. The entire evaluation delves into the essential aspects of WPMUDEV’s enhancement tool, providing insights to wordpress...
Dive into the World of Air Fryer Delights and Keyboard Magic with This Ultimate Guide TL;DR If you're looking for delectable air fryer meal plans and a keyboard that transforms your typing experience, brace yourself for a comprehensive journey filled with...
Unlocking the Wonders of iPhones and the Digital Realm: An Immersive Adventure TL;DR: For those who want to know the gist: This article explores the captivating world of iPhones and the limitless possibilities of internet and streaming, revealing hidden gems and...
Layout in Rankin Inlet: Enhancing Community Spaces and Social Interactions Summary: This comprehensive article explores the current state of layout in Rankin Inlet, examining emerging trends, key players, step-by-step implementation guides, and case studies. It...
A disaster recovery plan on your internet web page seems like a wonderfully inexpensive coverage internet — until that internet tears under power. Merely ask GitLab. In 2017, the most popular code repository platform professional a devastating knowledge loss...
Tips on how to Accumulate Taxes for Stripe Bills in WordPress (3 Simple Techniques)
For individuals who run an web store, then you definitely’re legally required to collect product sales tax in most global places. Then again taxes vary by means of country, state, and house, so figuring out the proper tax fees for your services and products…